#3d lace fabrics
Explore tagged Tumblr posts
Photo


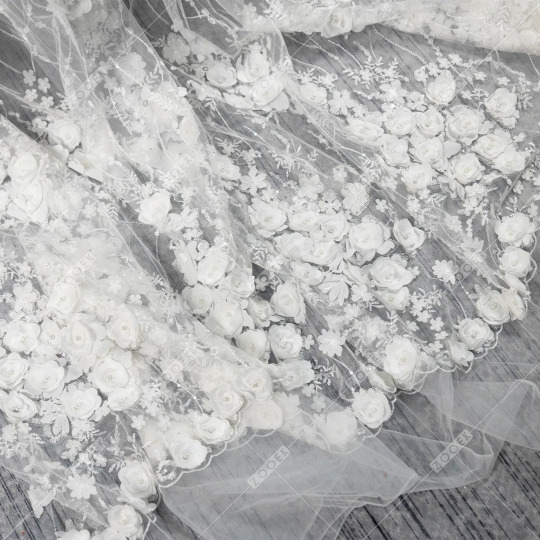
Luxury pearls beaded 3D flowers ivory/black embroidery lace fabric. Beaded bridal 3d lace material for making wedding dresses, special occasion gowns, and decorations.
4 notes
·
View notes
Text
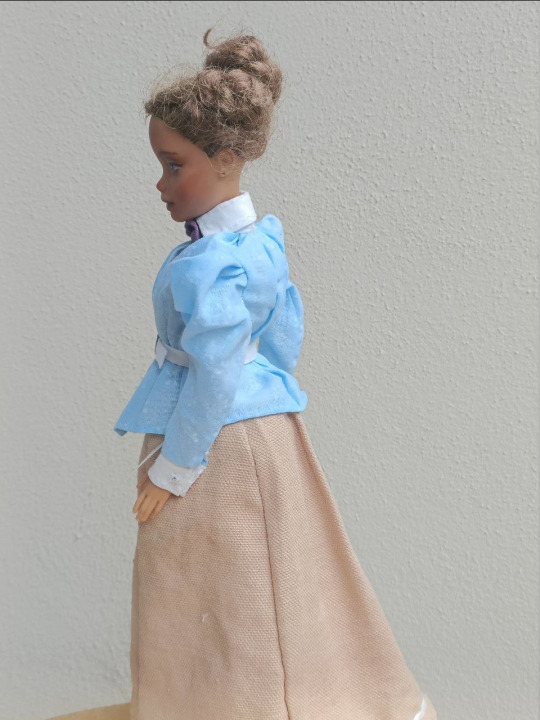
Sewing 1890s Day Dress in Doll Scale
I went slightly overboard with this second historical doll project. Here's my first one. The style is from around 1897 and more of a middle class style. As with my first doll outfit, I tried to stick to historical methods as much as possible, but the scale forced me to do some deviations. I hand-sew everything though sewing machine was already widely used, because in this scale it's easier to control the stitch, there's not that much to sew anyway and also I just really like hand-sewing. Here's all the items I made. As said, I went a little overboard. One thing that's missing is the corset cover, but the layers of fabric were creating enough bulk on the waist as is so I decided to not make one.

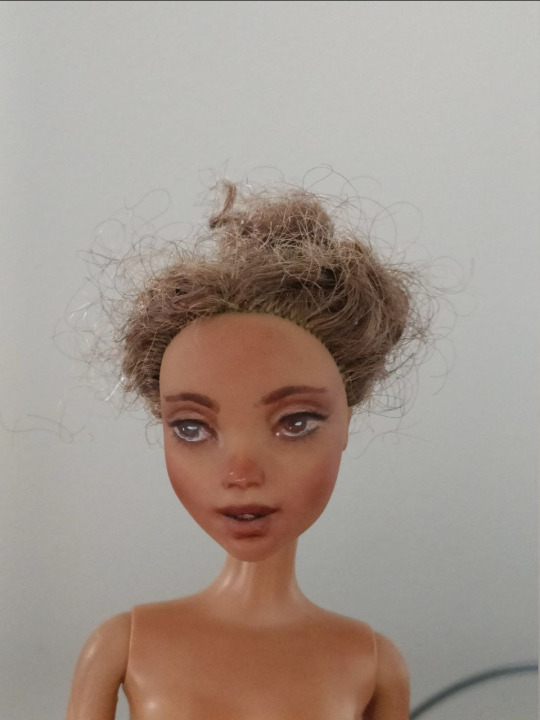
This time I decided to try repainting the face. I don't have any doll customization materials, so I used acrylics. After couple of attempts I got decent results. Acrylics can't make as smooth and delicate finish as pastels, pencils and gouache, which can be used on vinyl with basing sprays, and I'm not experienced with painting small details on 3D objects, so it's a bit smudged at points, especially with the other eye. I aimed for 1890s very neutral make up and the type of expression that was popular in fashion plates and other illustrations.
Undergarments
Combinations and stockings
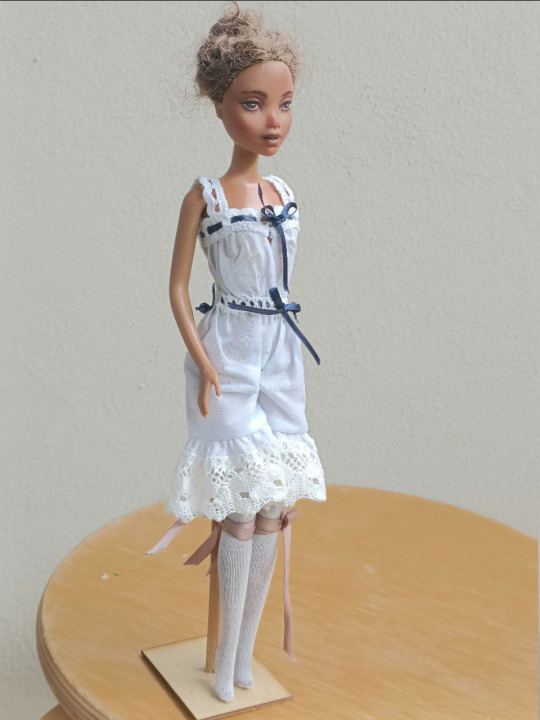
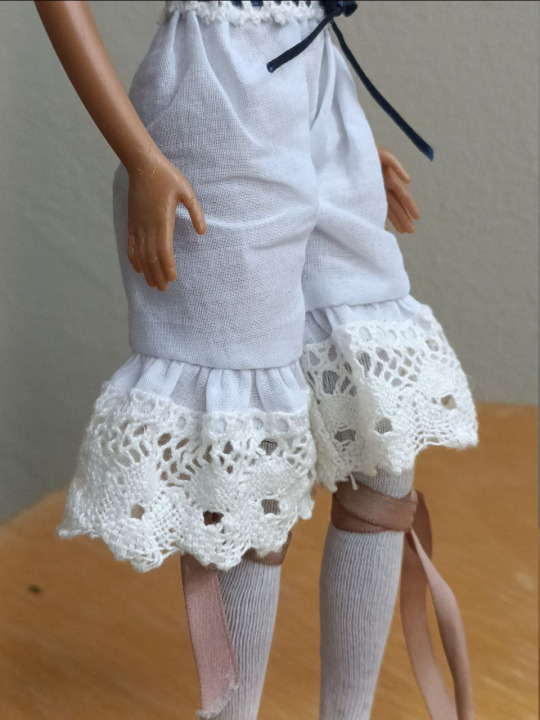
The combinations are split crotch as they were in the period. They are from thin cotton voile I have a lot of and is very appropriate. I didn't have really tiny enough lace for this, so it's kinda bulky, but I think it's okay enough. The stockings are cotton knit, which fits well. The garters are not actually necessary for this doll since her legs are rubbery.
Corset
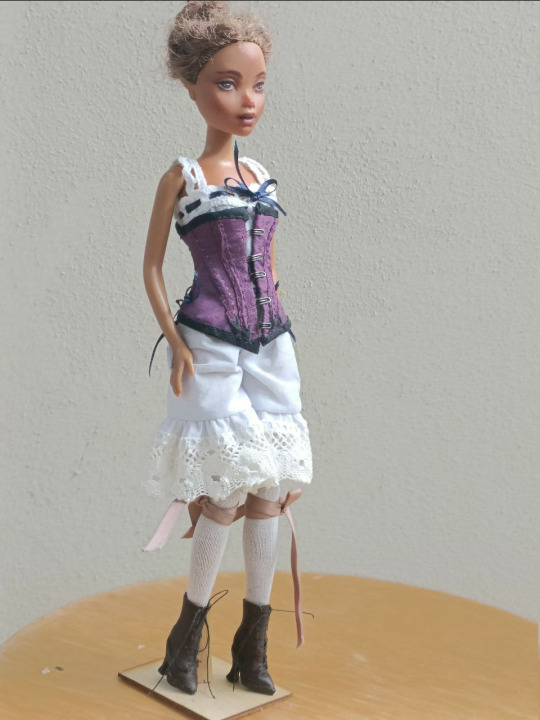
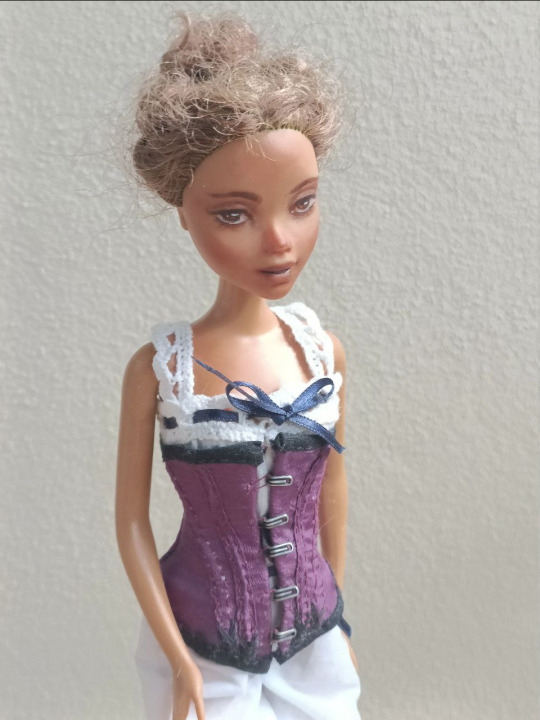
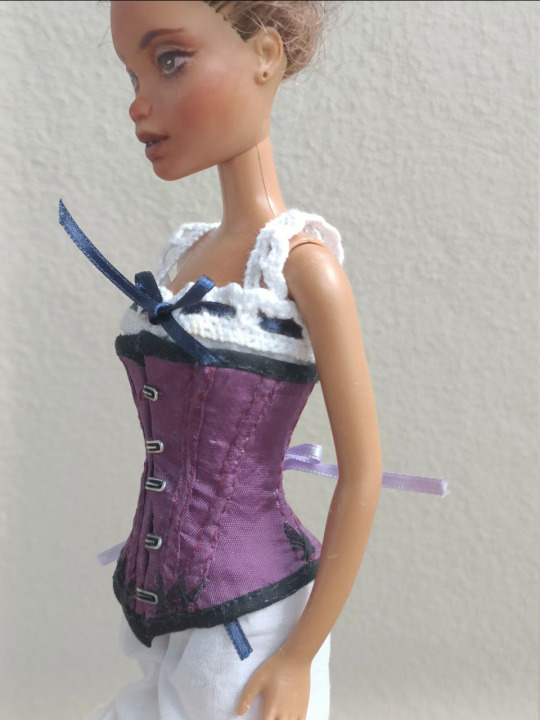
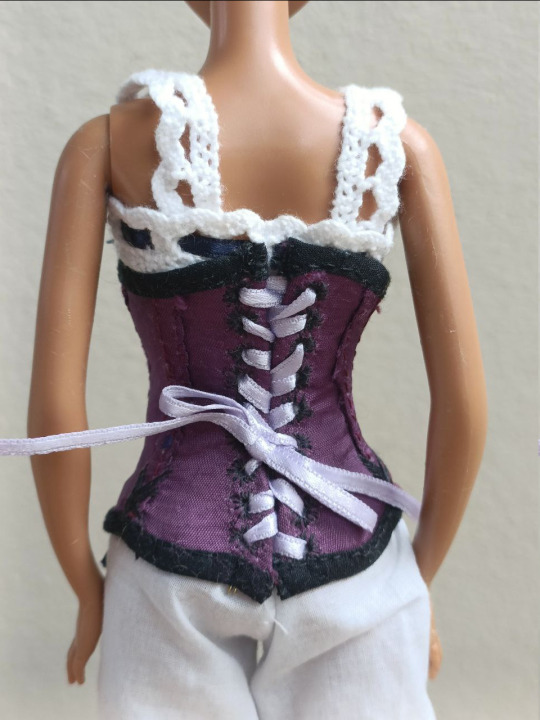
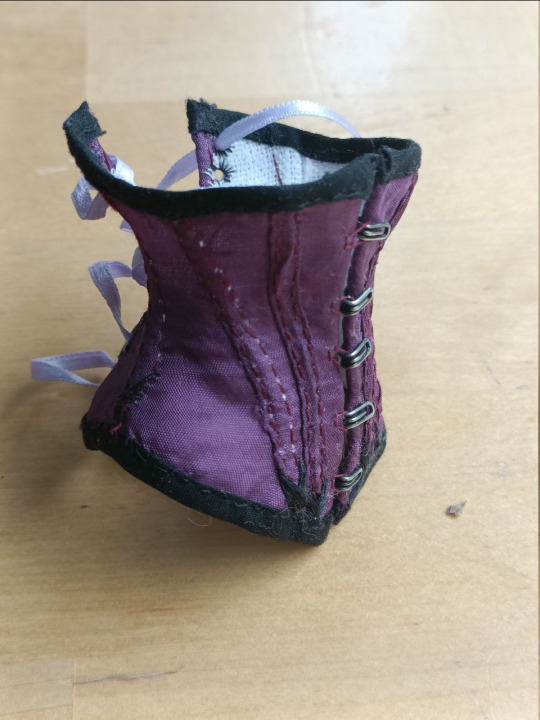
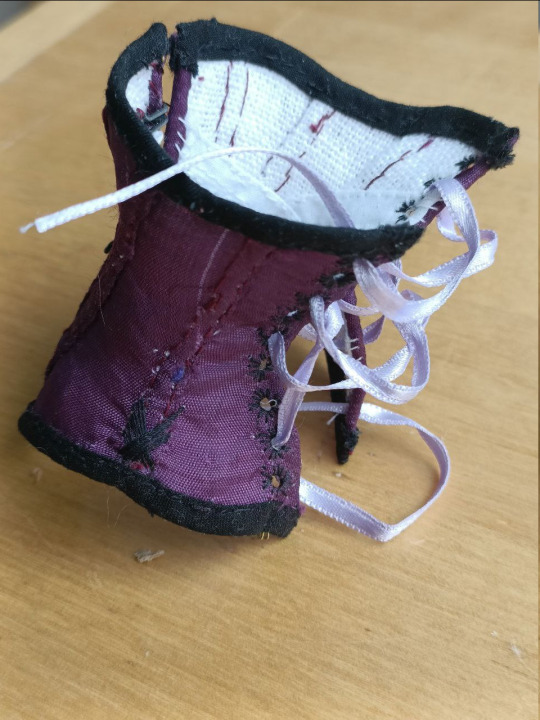
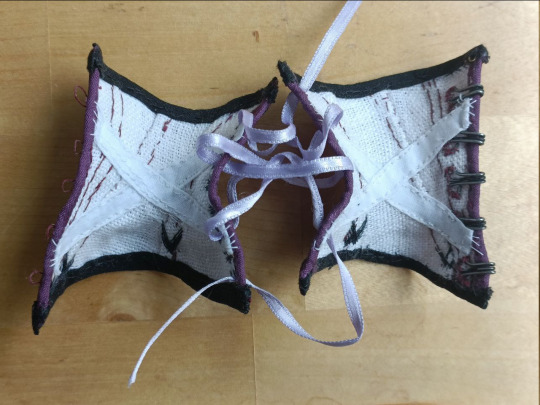
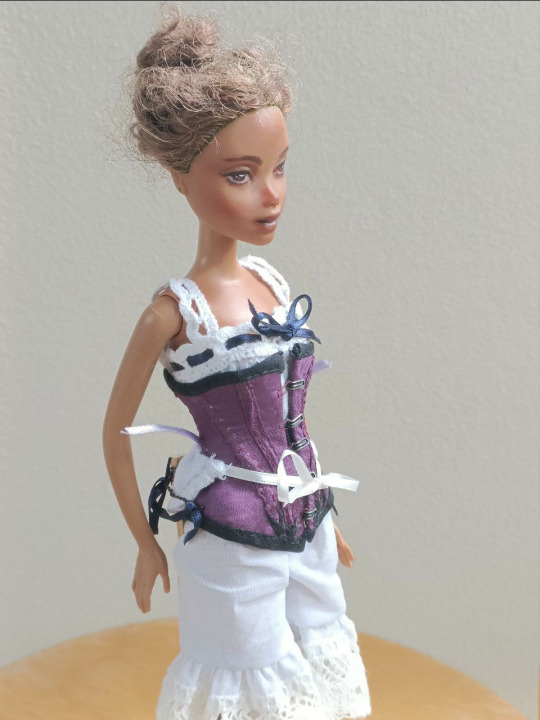
I made the corset from a firm-ish linen and satin rayon pretending to be silk as the fashion fabric. The stitching of the boning channels is not super neat, this fabric is very unforgiving, I didn't have exactly matching thread and the scale made it very difficult. I of course didn't have tiny busk, so I used small hooks, sewed thread loops for them and used narrow metal wire for the edges. I think it looks surprisingly right on the outside. I used the same wire as the boning to reinforce the lacing on the back. I didn't actually use boning elsewhere but the tightly packed linen edges in the boning channels kinda work like lighter boning. I think it keeps the shape pretty ways even with just that. I stitched cotton tape inside to shape the corset further. I also didn't have tiny metal eyelets so I hand-sewed the lacing holes.
Bustle pad
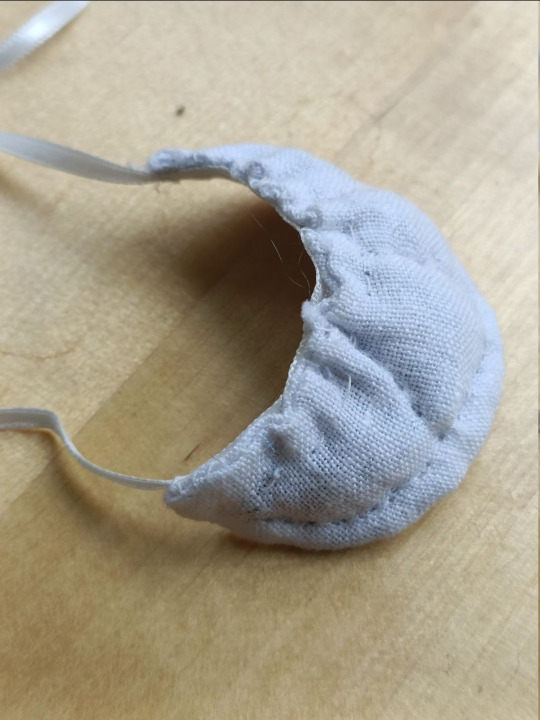
The bustle pad is from linen and stuffed with tiny cabbage.
Petticoat
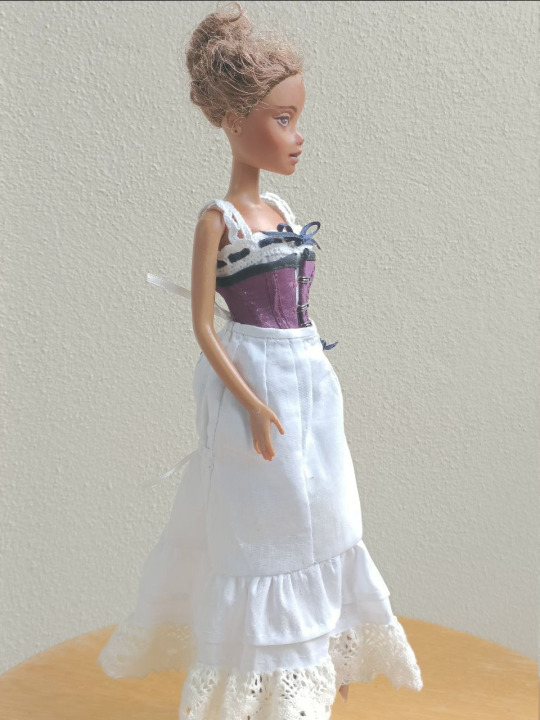
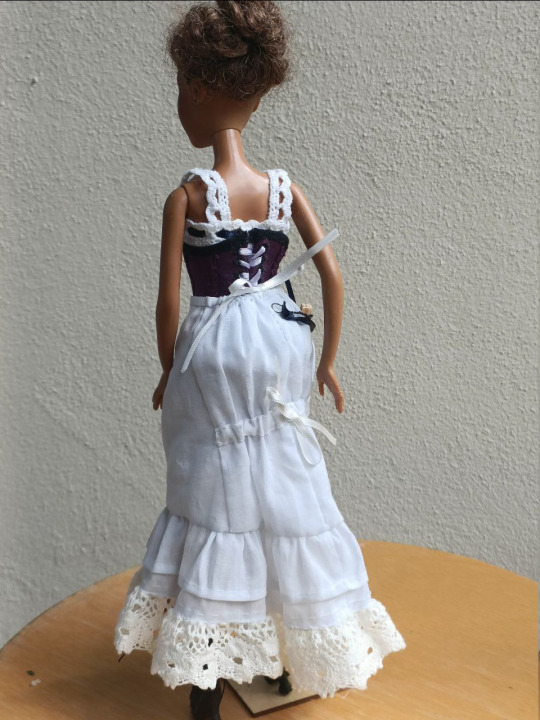
The petticoat is from the same cotton as the combinations.
Outer wear
Skirt
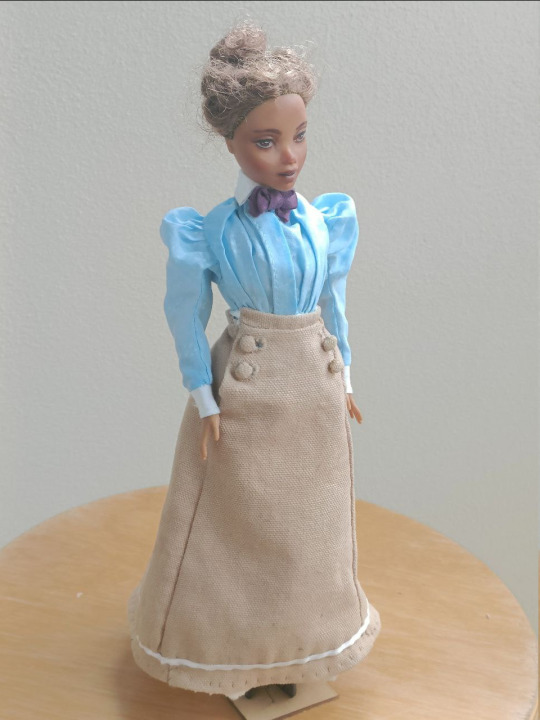
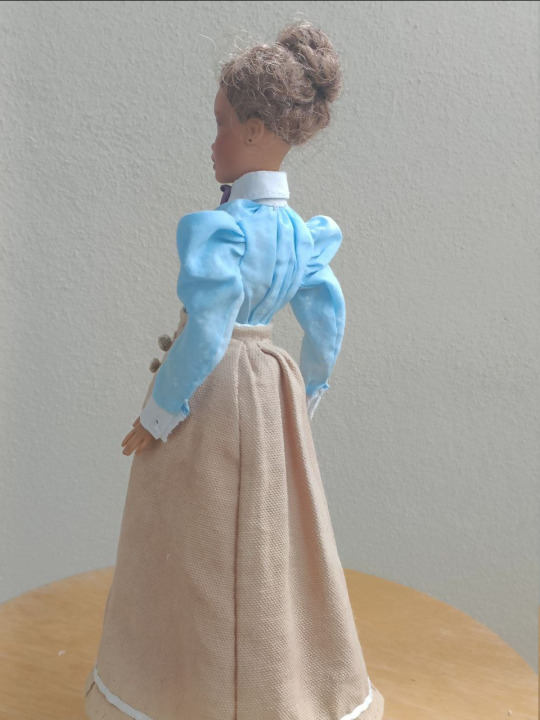
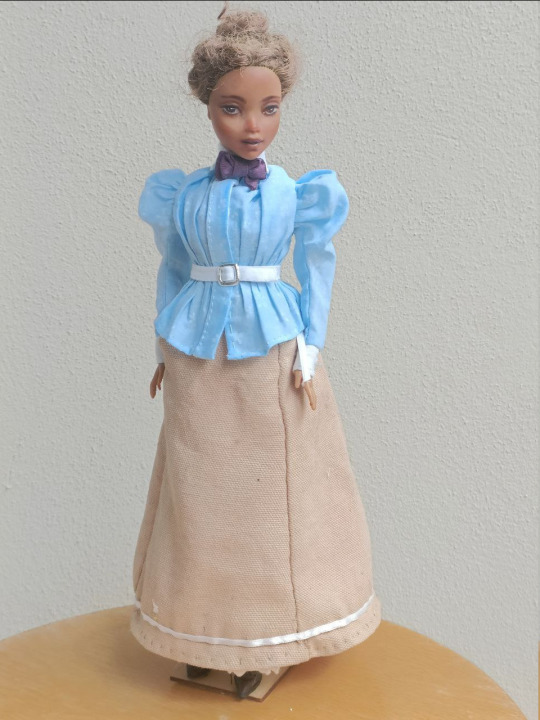
The fabric is cotton half-panama. It's pretty thin, but firm. I would have liked to use a woven wool, but I didn't have any that's thin enough to work in this scale. I think this cotton looks close enough in this scale to a wool with a tight weave, so I'm imagining it's that. My problem was that the cotton was white, but I wanted light brown. I wasn't going to buy any fabric for this, so I did the reasonable thing and dyed it with red onion peals (I've been doing natural dye experiments so this worked well for me).
Shirtwaist
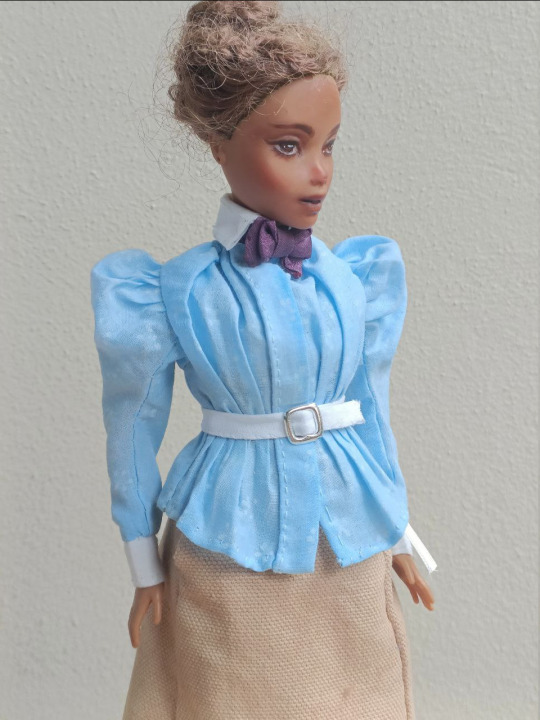
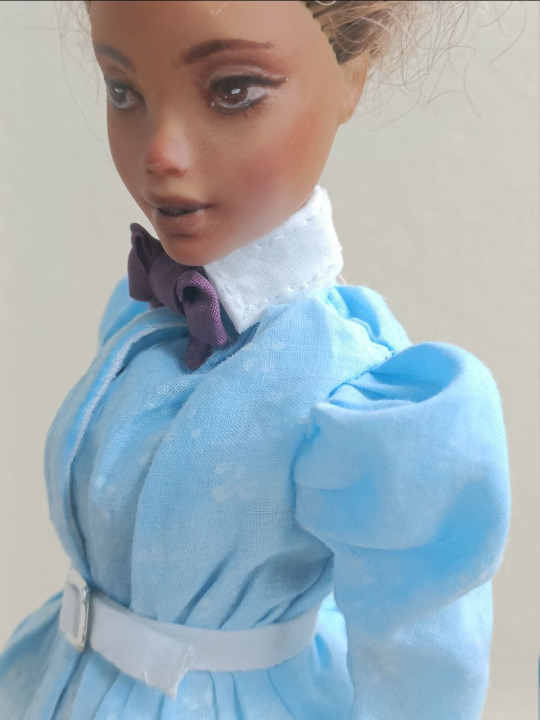
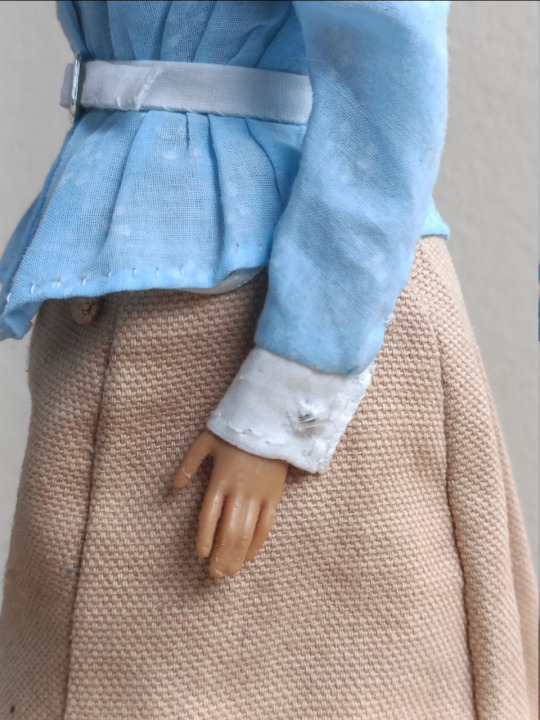
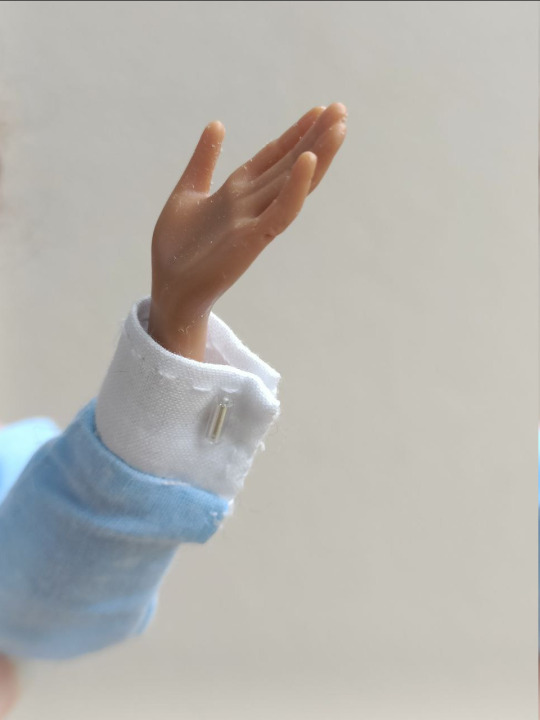
The shirtwaist is from the same cotton as the undergarments. Yes, I dyed it too. I didn't have thin enough cotton in a color that would fit with the skirt and the purple bow, so I dyed it light blue with fabric color. Since I already went the trouble of dyeing I decided I might as well make a small flower print to it since that was popular in the era. I didn't want it to jump out too much but the lighting makes it even less visible. I made it with a white fabric pen. The collar and cuffs are reinforced with linen. I also sewed small stick-like beads to the cuffs on both sides, so one acts as a button (I sewed a buttonhole too) and the other makes it look like they are cufflinks. The bow is from the same fabric as the corset and the belt is sewn from the same cotton as the shirtwaist. The buckle is from a barbie belt.
Waistcoat
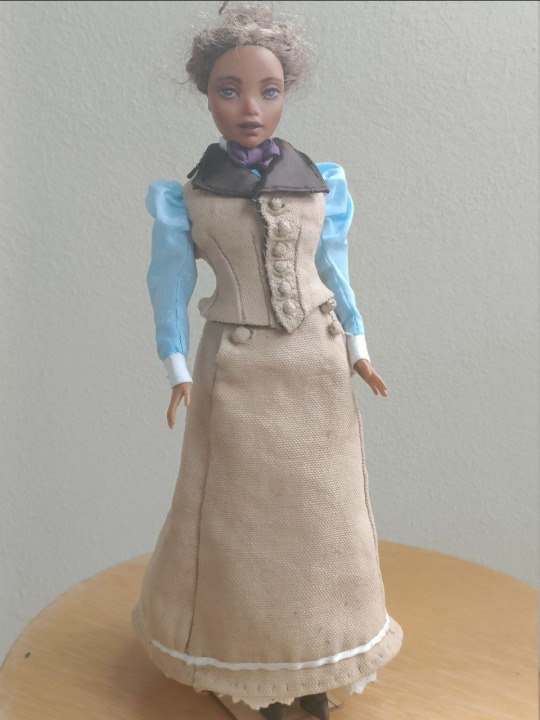
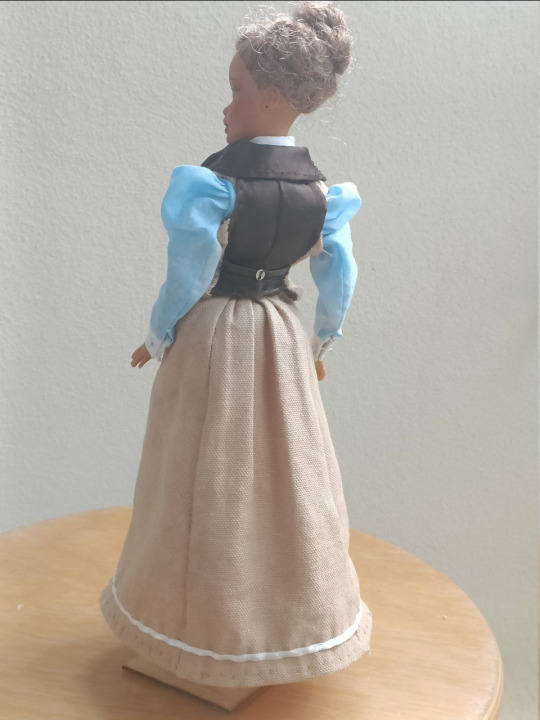
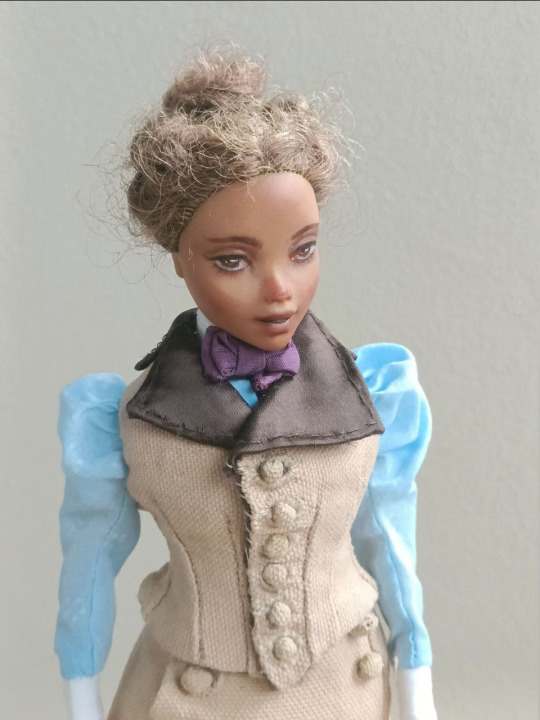
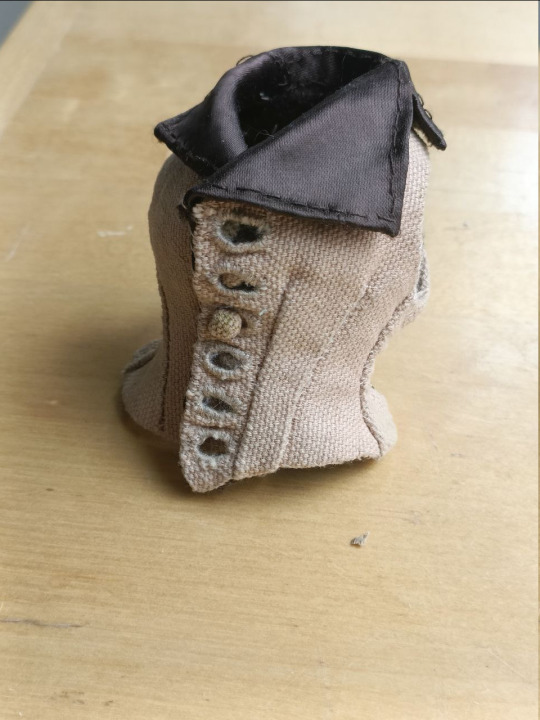
The waistcoat is from the same fabric as the skirt, thought the lapels and the back are from another satin rayon. I tailored the front panels and the lapels by stitching the linen interlining with tailor's stitches (I don't remember if that's the correct word in English) into shape. There is some wonkiness on one side of the hemline for some reason.
Boots
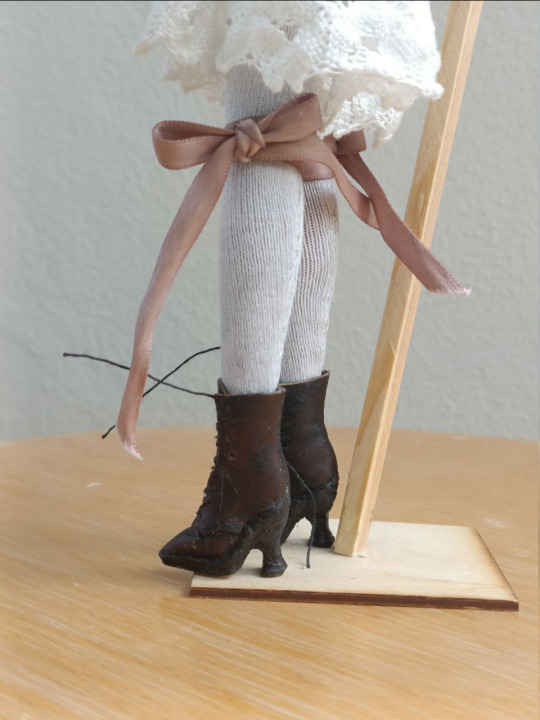
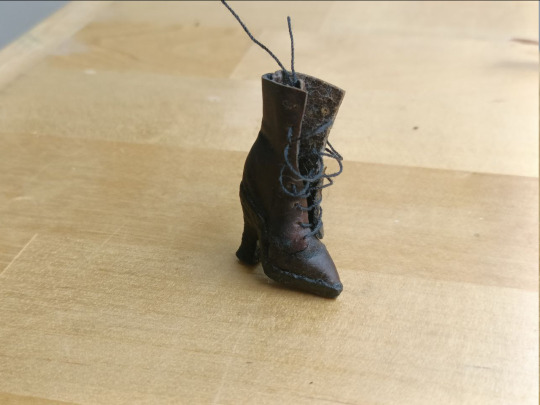
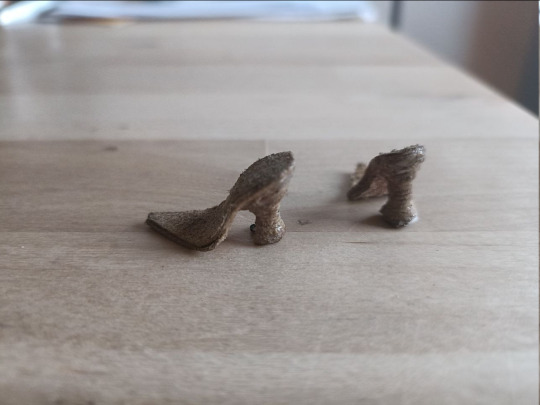
I made the slightly insane decision to make the shoes fully from leather, like they would have been in the period. I had an old broken leather wallet I had saved in case I needed some leather scarps. It has fairly thin leather, so it was workable here. It's light brown though, so I used black shoe polish to darken it. I wanted black or very dark brown shoes. I stacked the heels from glue and leather pieces and carved them into the right shape and sewed the shoe itself to leather shaped as the sole and glued it to the heeled and shaped sole. After I had shaped the shoes and the heels as much as I could I painted the heels black.
#historical fashion#fashion history#sewing#custom doll#ooak doll#victorian fashion#dress history#costuming#historical costuming#doll clothes#doll customization#historical sewing#my scene#my art#dolls
905 notes
·
View notes
Text
Pst! You know what time it is? New cosplay time! I decided to remake one of if not my favorite cosplays in my collection, Naven Nuknuk from Epithet Erased


This has been by far my most time consuming build (as well as expensive). this cosplay took a total of 279 hours over the span of roughly 8 months to make. That time doesn't include redoing sections or details that didn't make it into the final look.
And now for a detailed look at this whole outfit because dang, I put so many tiny details in.
Starting off with the earring and beads, I used a tequnic called lampwork to make them. The best way I can explain lampworking is like miniature glassblowing
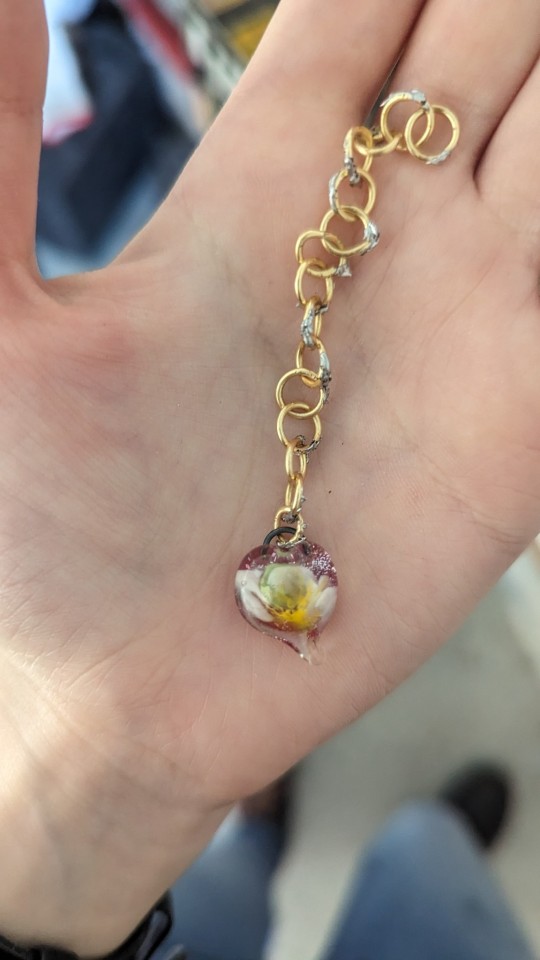
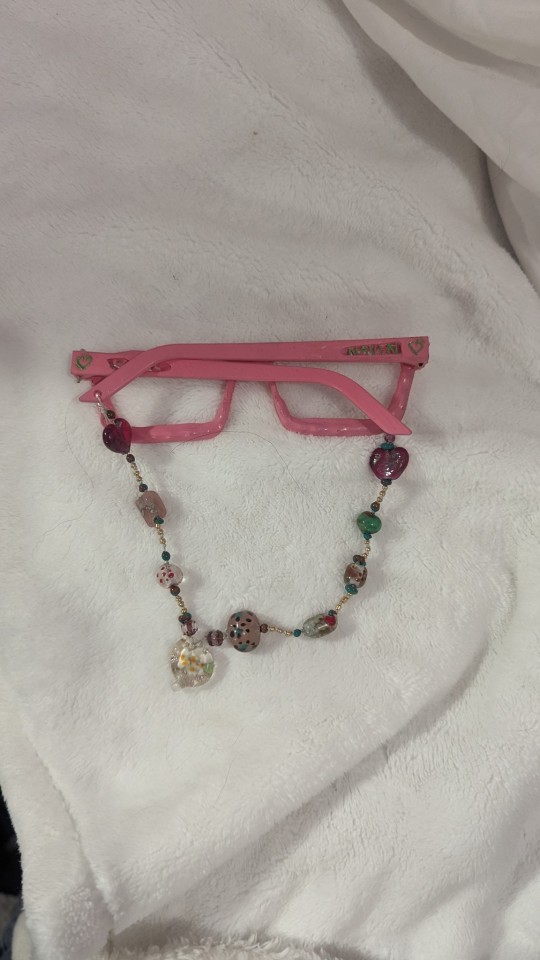
Lampwork uses glass rods heated in a flame to create generally small pieces like beads or buttons. Lampworking can be incredibly detailed. While I'm still fairly beginner at all of this I was able to learn a tequnic called implosion to make the flowers look more 3 dimensional. I also used lampworking to make the buttons on the undershirt!
I did all the 3d modeling for parts like the glasses and the belt buckle. (Stealing pictures from my Instagram because the progress tracker i use corrupted my images)
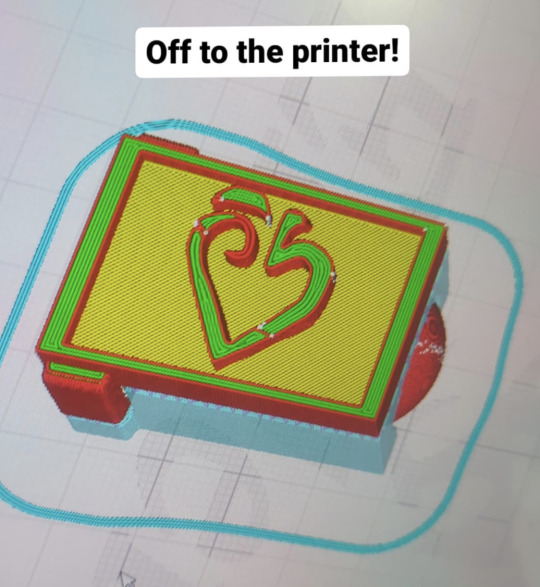
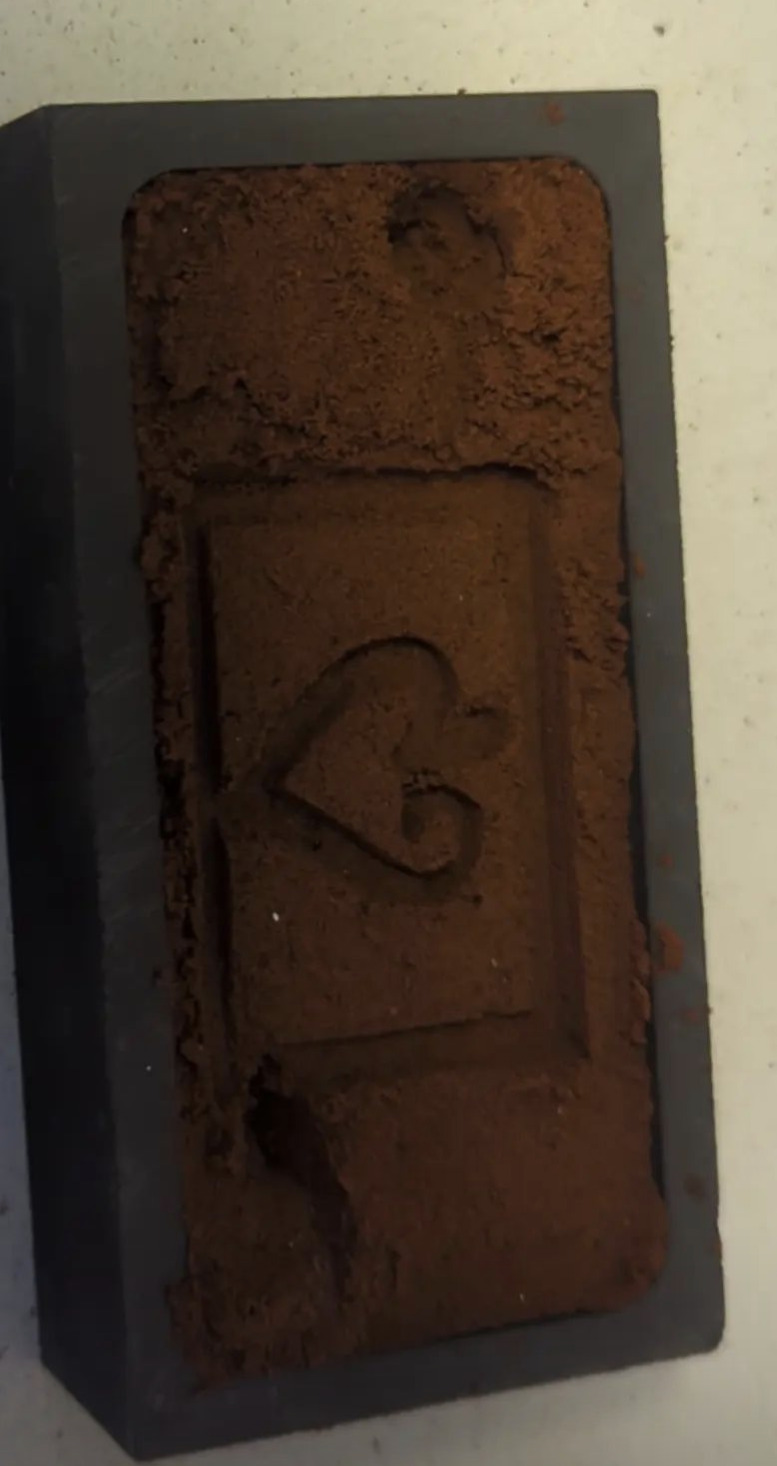
While I don't usually focus on the 3d modeling in my builds it's a huge passion of mine. After making a model of the belt buckle I put my 3d print into casting clay. After carefully removing it I poured tin in to make the final belt buckle.

I also taught myself basic leather working and tooling to add some apple blossom inspired designs onto the belt and painted it.
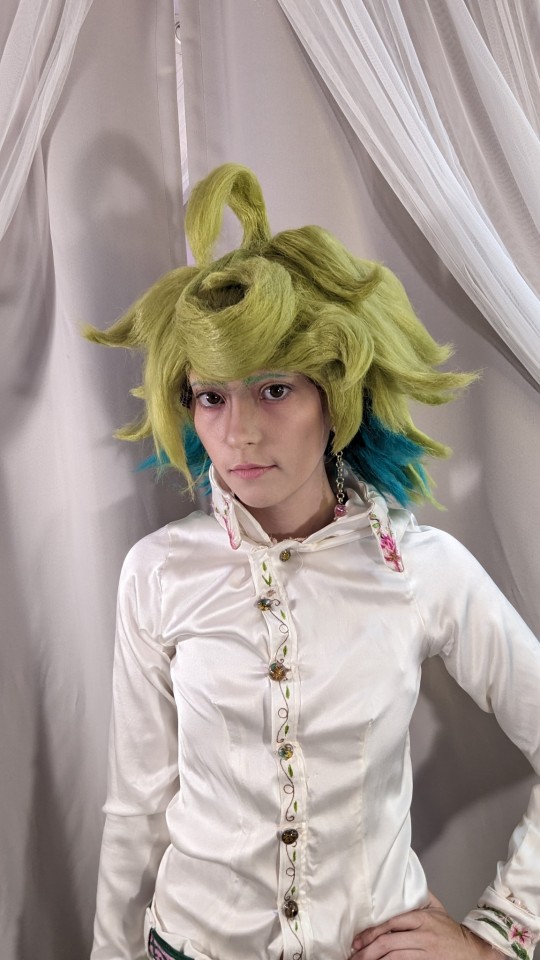
Next thing I think I should talk about is the embroidery. I wanted to incorporate more details about naven into his outfit. After asking jello some questions we came to the conclusion that the embroidery should be lillies and carnations. Because of my constant insanity I hand embroidered everything. I also did some embroidery on the pants and used an embroidery floss that changes colors in the sun for fun.
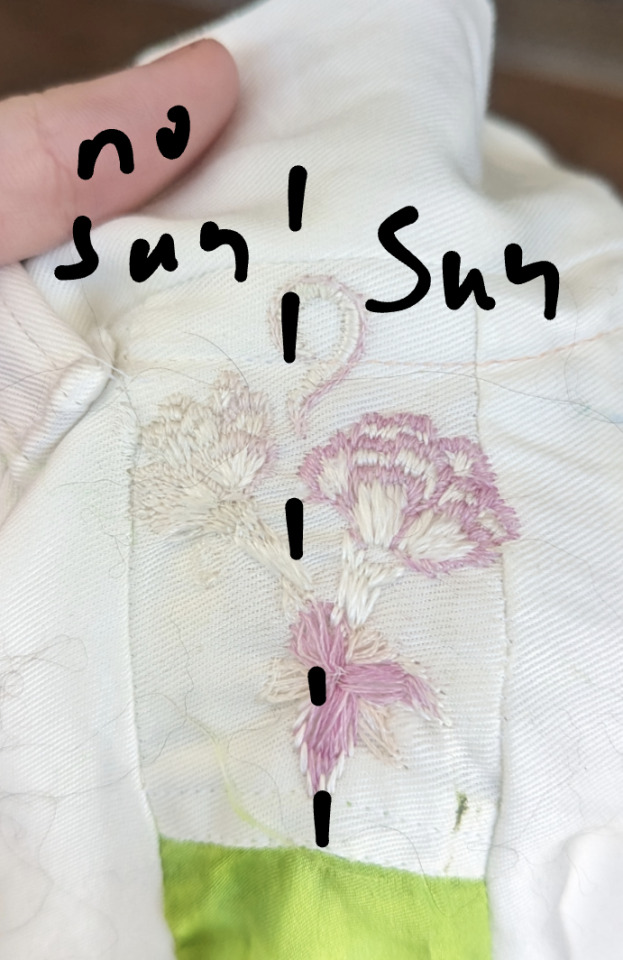
Before I get any questions about materials I'll add in, the white shirt and embroidery are both silk. I struggle to embroider with cotton dye to the sound and feeling it makes, and I felt like being fancy so silk shirt too. The pants are a cotton twill (pretty much jean fabric without the indigo) and the green strips are silk. A perfect Segway into the tatting and knitting!
For those who don't know tatting is a traditional form of lace making found in many different places around the world. There are 2 main forms of tatting, needle tatting and shuttle tatting, I tend to use shuttle tatting due to how nice and portable it is. I thought tatting would be fitting to add to navens outfit due to it's other name, farmers lace.
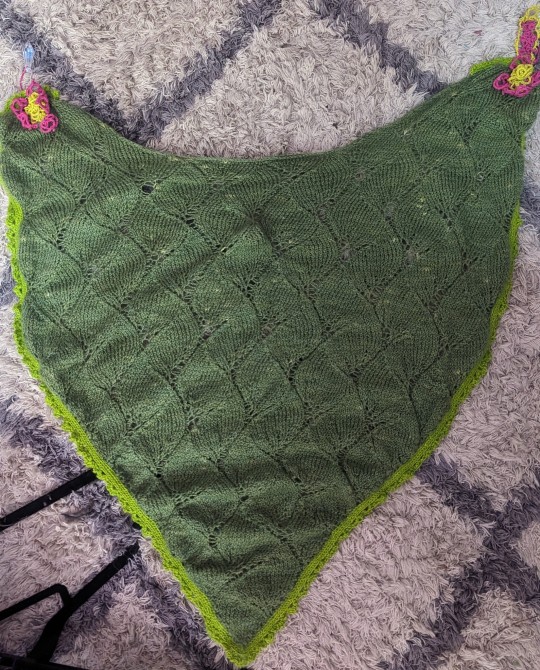
And now for the big beast of this outfit, the knitting. Like with everything else in this outfit I dyed the yarn myself. It's 80 percent wool to 20 percent silk blend.
Huge thanks to jello for suggesting so many ideas, this outfit wouldn't be nearly as cool as it is otherwise.
Anyways I hope all y'all like the outfit! I had so much fun making this insanity
#naven nuknuk#naven nuknuk cosplay#ee naven#epithet erased#epithet erased cosplay#prison of plastic#prison of plastic cosplay#anime campaign#anime campaign cosplay#cosplay
502 notes
·
View notes
Text
𝑤𝑎𝑦𝑠 𝑡𝑜 𝑠𝑡𝑎𝑦 𝑜𝑐𝑐𝑢𝑝𝑖𝑒𝑑
⌗ bake for other people, like family, friends, colleagues
⌗ watch mukbang videos, informative documentaries about internet phenomenons, history (political, fashion) crime or strange occurrences
⌗ listen to new music and learn more about the artist or the band itself, make new playlists
⌗ watch a gameplay on youtube or play childhood nostalgic video games
⌗ learn new makeup styles, hairstyles and build outfits based off of different fashion styles
⌗ get a homemade manicure
⌗ create your own website (ex. carrd)
⌗ deep cleaning: making your bed, doing laundry, going through a pile of clothing, throwing away old/expired makeup products, de-cluttering, cleaning the bathroom, deep cleaning the kitchen and the pantry by throwing away expired products, cleaning bags, boxes, wallets and pencil cases, changing the aesthetic of your bedroom
⌗ gardening or taking care of house plants
⌗ learn more about certain species of flowers, animals, subjects (like astronomy, philosophy, sociology, biology) and take notes
⌗ make a shopping list for necessities (food, cleaning supplies, hygiene necessities) and wishes (makeup, clothing, collectibles) on paper and by making pinterest boards and sections
⌗ re-watch old nostalgic movies or series (comedy anime like azumanga daioh, lucky star, nichijou, gakuen handsome and saiki k, horror/thriller and comedy movies, novelas)
⌗ read a book, whether it’s classic literature or a comic book
⌗ studying: watching videos, taking notes, reciting out loud
⌗ take an everything shower with music playing. from skincare, to hair care, brushing teeth and body care
⌗ skincare: do a face mask and a gua sha massage, learn more about your skin type and how to take care of it
⌗ make handmade gifts:
paper crafts: stickers, bookmarks, collages, keychains with shrink paper, decorated envelopes (drawings, glitter, paint, gluing things like buttons and lace, 3d open envelope drawings), scenery stands, fake food and objects, strings, drawing posters, paper stars, paper crowns, flower bouquets, realistic camera;
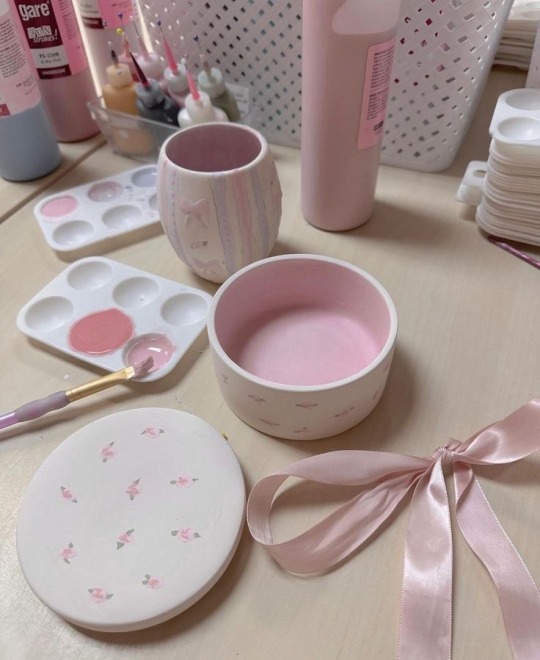
clay crafts: vases, boxes, plates, bowls, spoons, jewelry holders, cups and mugs, charms, rings, playhouses, paint palettes, animal sculptures, candle and incense stands, lighter cases;
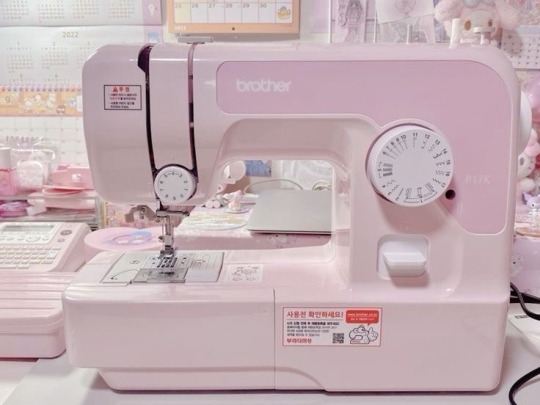
crocheting and sewing: hats, gloves, scarves, plushies, keychains, pillow covers/pillows, bags, cup stands, book cases, water bottle bags, pencil cases, creating new clothes out of old ones, mixed/leftover fabric rugs or blankets.
bracelets: patterned, beaded, with a string and buttons;
other: door handle hangers, painted wooden spoons, painted tiles, painted tea bags, pins, painted rocks, decorated journal cases, soap making, altoid wallets, decorate your phone case, hair wraps, decorate a photo frame, recycle an old candle (seashell and can candles), flags, window beads, hair accessories (decorated headbands, hairpins), decorated sunglasses, soda tab friend, bleached t-shirts, surfboard necklace, washi tape, gift baskets.
tiktok: diy ideas when you’re bored
⌗ try out a new sport: ex. badminton, volleyball, dance, swimming, tennis, basketball, martial arts, athletics.
⌗ do pilates or a 1980s workout, play just dance or do a karaoke session
⌗ play a board/card game (monopoly, trivial pursuit, uno, cluedo, guess who)
⌗ take a walk and explore your surroundings
⌗ write down new recipes you haven’t tried yet including the necessary steps to make them and make a grocery shopping list of everything you need

#coquette aesthetic#coquette#this is a girlblog#girlblogging#girlblog aesthetic#this is a boyblog#boy blogger#diy projects#diy craft#2014 tumblr#2014 aesthetic#2014 nostalgia#girl interupted syndrome#this is what makes us girls#hell is a teenage girl#tumblr girls#lana del rey aesthetic#lana is god#lana unreleased#lana del ray aka lizzy grant#buffalo 66#y2k aesthetic#hyper feminine#faunlet subculture#faunlet
35 notes
·
View notes
Text
I've finally finished making all the adjustments to my Jaskier costume!
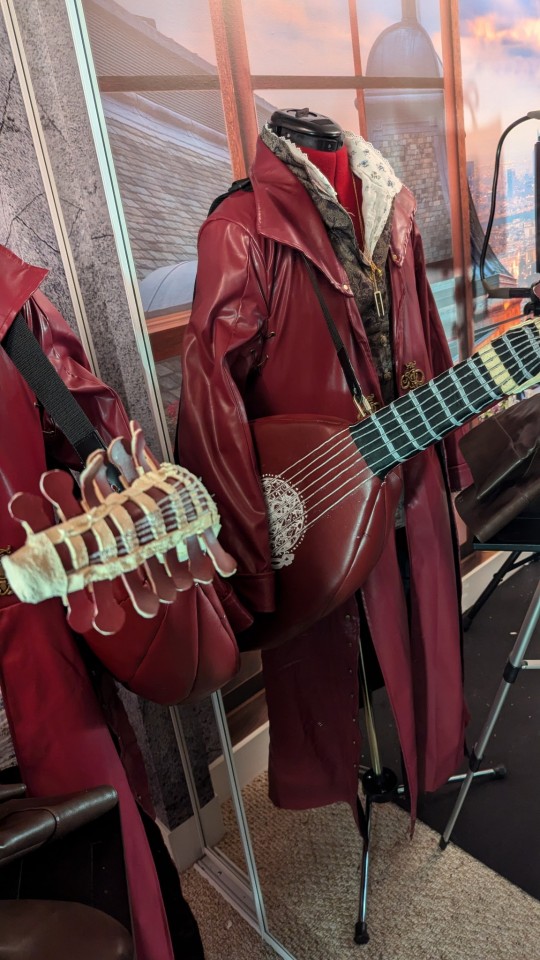
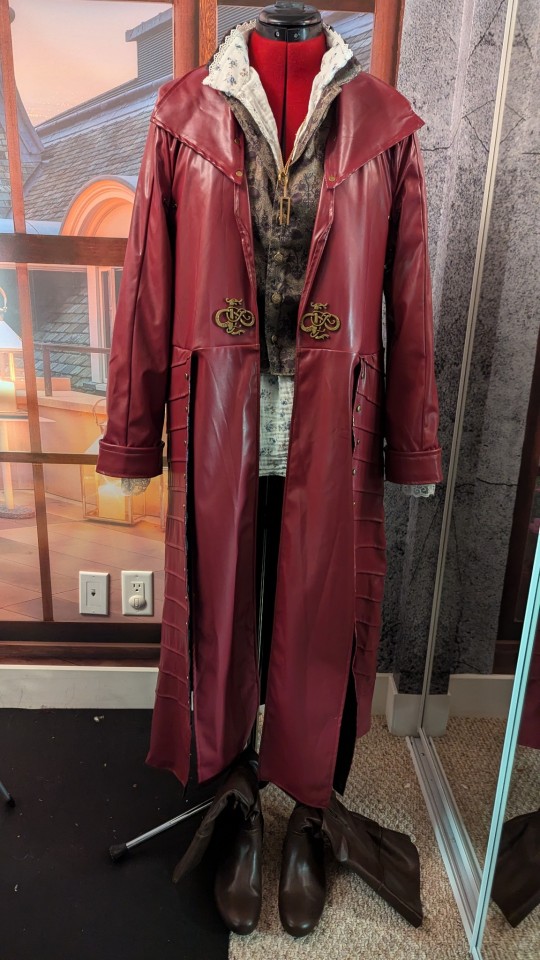
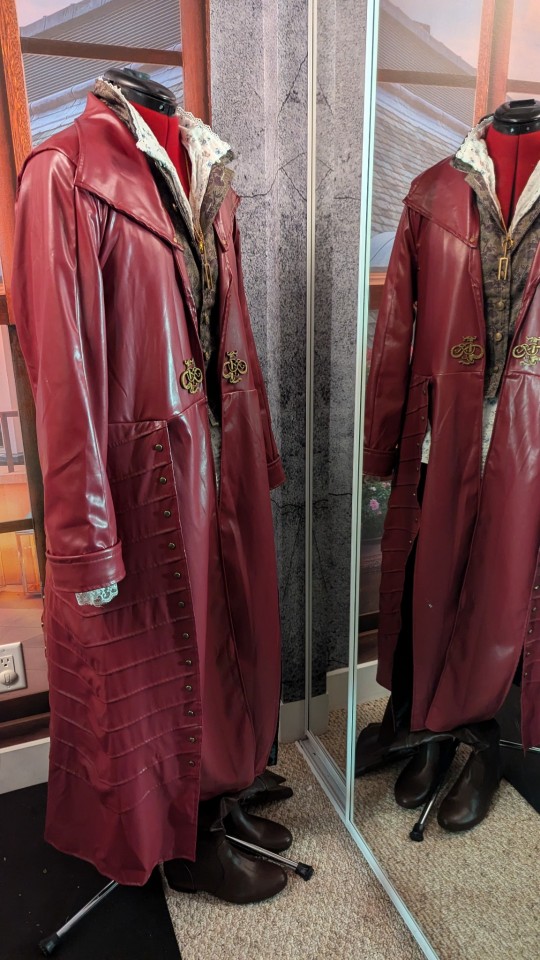
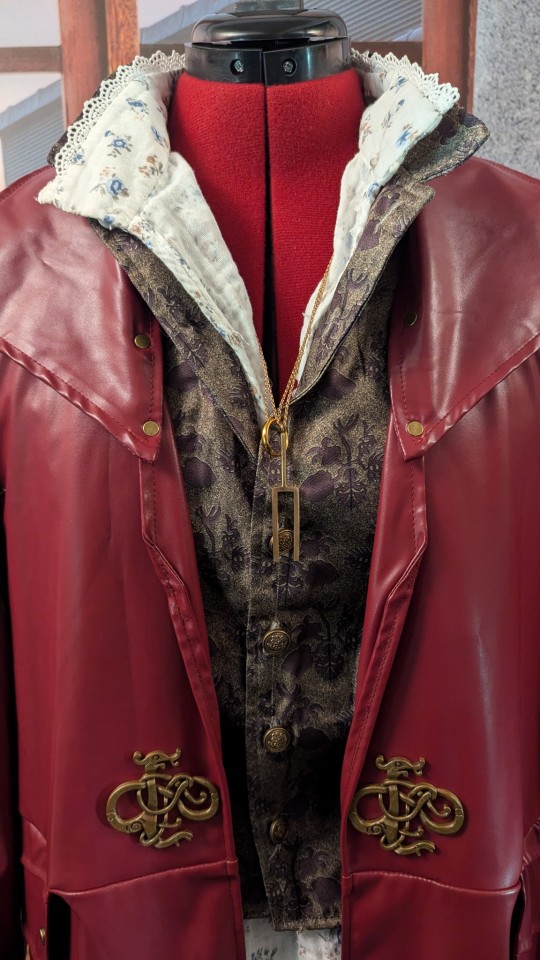
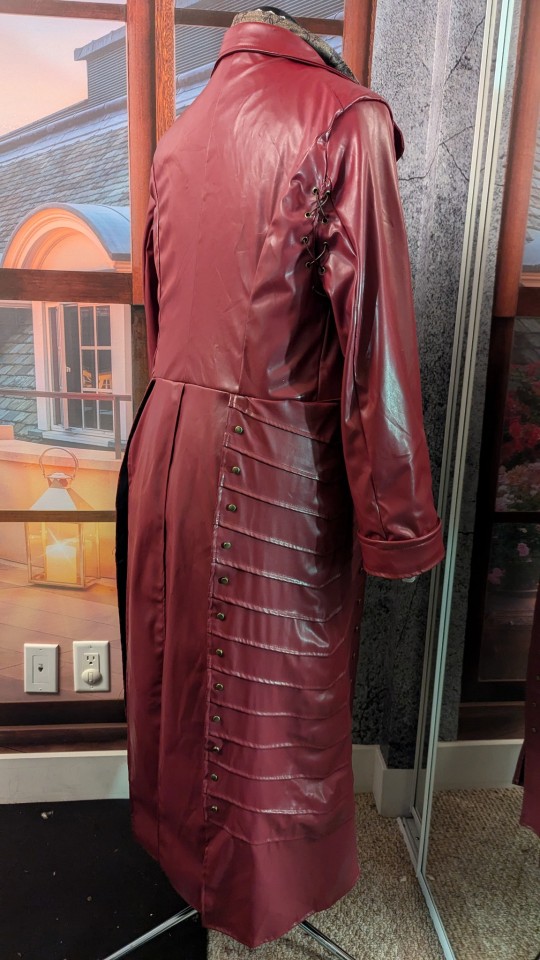
Full disclosure, I started with a pre-made Jaskier costume, i.e. this one:
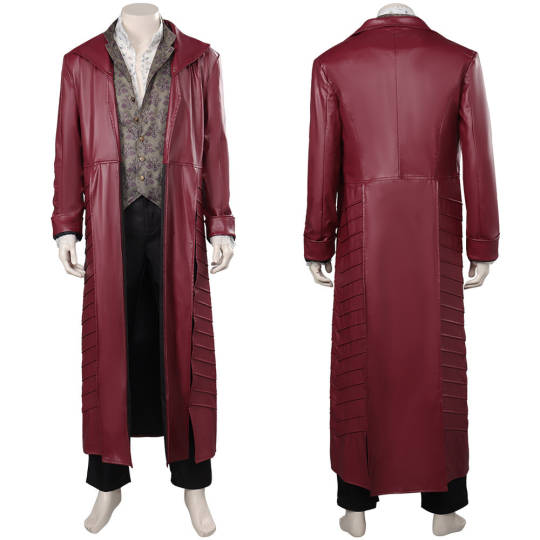
I bought a man's XL size (because I figured it would be easier to "shrink it" than discover the costume I'd ordered was too small).
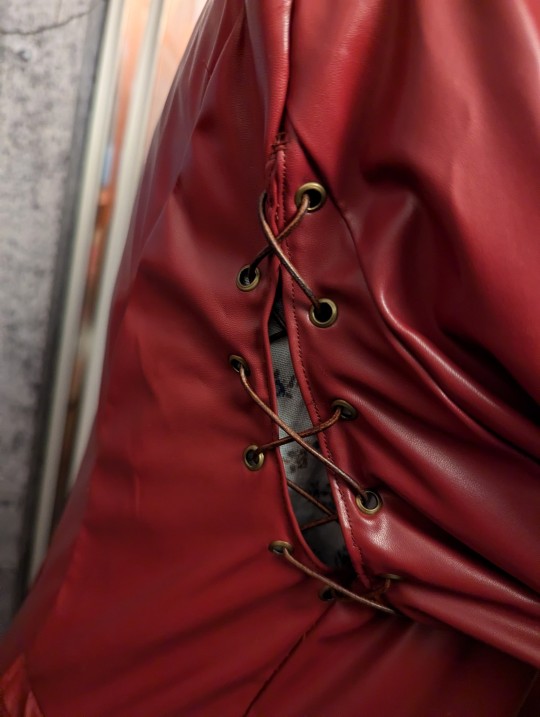
Then, completely unstitched the jacket and the vest apart, cut each piece to fit my own size, put it all back together, split the back panel into two panels instead, added rivets on the side panels and made sure they went all around the collar, the jacket ornaments/clasps (I'm lucky enough to have a friend with a 3D printer, and to have bought the pattern before the store on Etsy moved... I wanted to link it here, but it's no longer available!), and, of course, the underarms slits with the laces!
a.k.a. The one detail that had my partner looking at me in utter disbelief asking "Are you serious?! Who is going to be paying attention to your underarms?!
Ah, me. I'll know! If I've kept hyperfocusing on that specific detail of the jacket ever since Yennefer hugged him, you bet I'd notice if my jacket was missing the laced slits!
(Plus, let's face it, given how that shirt's fabric is very synthetic and not at all breathable, I've a feeling I'll be grateful for the underarms openings!)
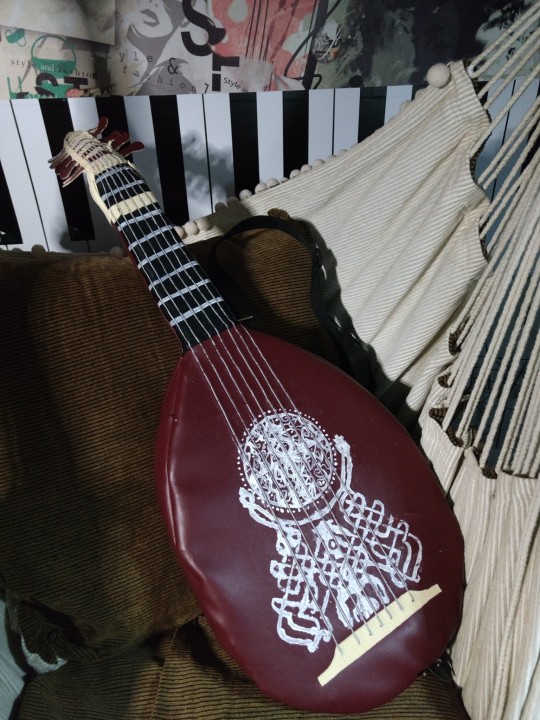
Oh, yeah, and I made the lute with a bunch of scraps I had lying around (including half dried out fabric paint) for a dance number back in 2021.
And for little impulsive shits like me that enjoy cutting corners...
If you want to quickly color PLA 3D models in the laziest fashion, a permanent Sharpie marker will give good results in terms of covering / color intensity, and then you can fix that color using "Mod Podge" (I used one with the matte finish).
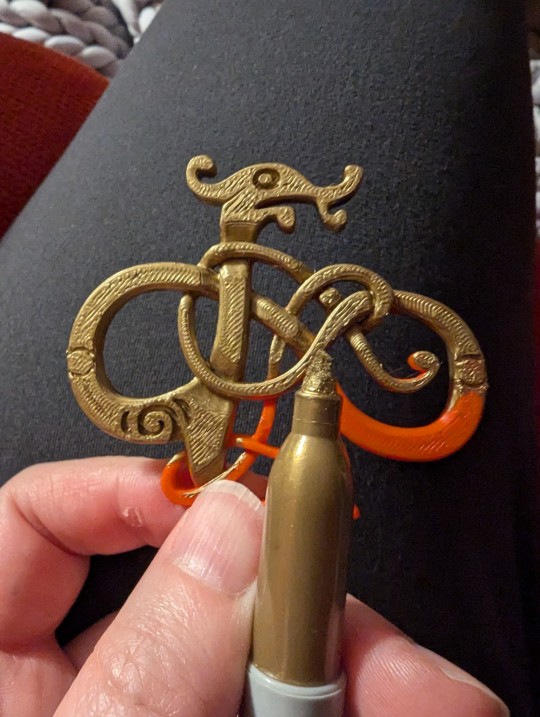
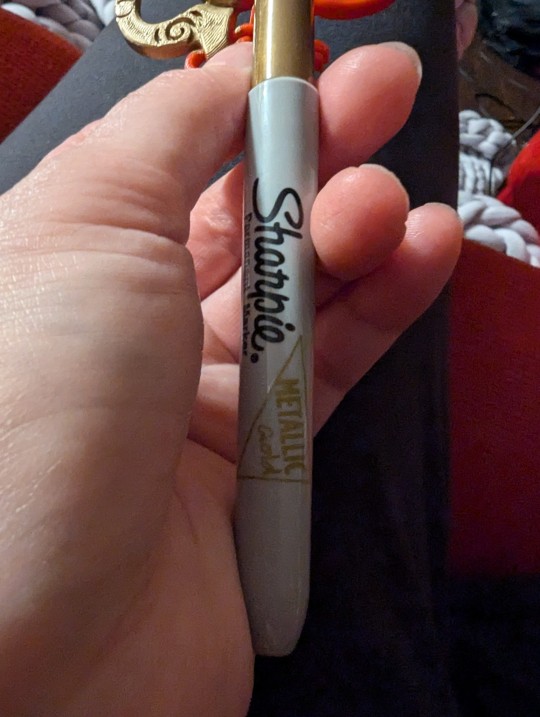
And yes, I'm 100% aware you're supposed to sand your 3D models, but I loved the look of those "tiny stripes" on it, so I've kept them (also, lazy impulsive little shit... That'll take the time to add laced underarms slits to her coat, but can't be bothered to properly sand and paint those clasps! Don't question me!).
Now, back to Radovid...
#Jaskier#Radskier#Cosplay#Only thing missing for Radovid is that long red kaftan / robe of his...#Yeah I've a very weird crafting room...#My Posts
46 notes
·
View notes
Text
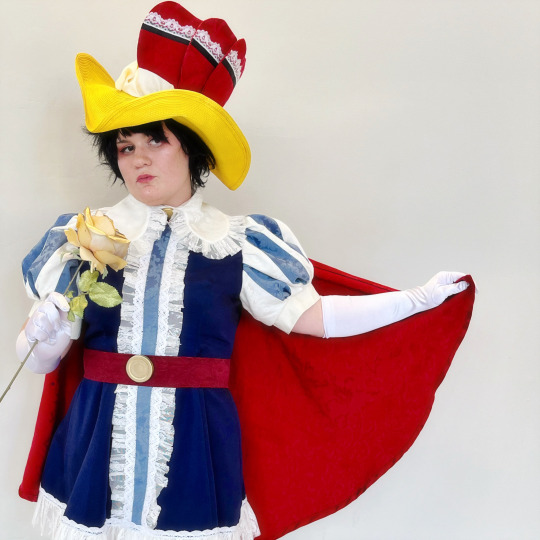
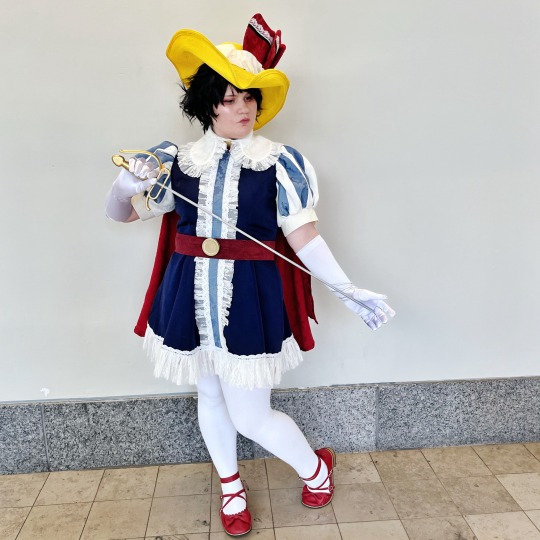
Heyyyy. I’m realizing I never posted my Sapphire cosplay photos here.
This was a take based on the manga with some knowledge of Takarazuka costuming. Basically I wanted the vibe to be if a Takarazuka troupe did a Princess Knight show or Revue piece. I also wanted to use as much from my fabrics and trim from my stash as possible.
The pattern is altered from a JSK in Otome no Sewing Book and the rest is drafted by me. The red, jacquard white, and light blue are all thrifted and up cycled materials, with the navy being a long term stash fabric. A good amount of the lace was also thrifted but I don’t remember exactly what. The hat was thrifted and re-styled as well. The sword is my first 3D printed prop.
If you have any other questions about the make, feel free to ask.
#cosplay#princess knight#osamu tezuka#ribon no kishi#shoujo#shoujo manga#classic shoujo#retro anime#retro shojo#retro shoujo
98 notes
·
View notes
Text
Pastry Artist Creates Cakes Shaped Like Historical Dresses

Nguyen Vu Hoang Anh is one of the most talented and creative cake artists in Vietnam. Among his most notable creations are the cakes shaped like historical dresses: confectionery masterpieces that take the form of lavish Baroque gowns, complete with drapes, ruffles, lace, and embroidery made from edible materials.


Born and raised in Vietnam, Nguyen developed a passion for art and cooking from a young age. After completing his studies in pastry, he honed his skills by combining tradition and innovation, transforming his creations into a viral phenomenon on social media.
The cakes are made with a sponge cake base, topped with buttercream, chocolate, fondant, and colored glazes. Reproducing the dress involves hours of studying patterns to ensure the accuracy of every detail. "Before making a cake shaped like a dress, I study every little thing: the fabric folds, the shape of the buttons, and the type of material to use," the artist said in an interview with Oddity Central. Nguyen also loves to experiment, incorporating innovative technologies such as food 3D printers and new edible materials to expand creative possibilities.


21 notes
·
View notes
Text


Aemond: ElvenDen Helaena & ph by me
...and since some people seem to be so concerned about Helaemonds, I also remembered I haven't posted this photo here. which is criminal, because it's possibly my favorite photo. I actually did both variations of photo correction for it, the one I started editing the costest with, and the one I settled on later on, so both versions deserve to be seen somewhere. xD
My cosplay tags:
Photos, gifs, videos from costests/cos shoots/cons
Inprogresses (costumes, 3d printing etc)
Kinda sorta maybe an update on the state of full cosplay if anyone's interested
I still unfortunately have some health problems occasionally striking out of the blue, but overall I do hope I'll be ready for convention season to take Helaemond out. I've got a jacket and a new wig for Aemond. It needs bleaching to match the color of mine, the one in the costest photos is my friend's, so I can't do anything to it, plus it's too dense and we all know the wigs in the show are shit and have the density of zero.
Still need to paint the crowns since I could't do it with sinusitis, and now that it's winter it's too cold to do it until spring. :( Probably gonna do two versions of Hel's crown, show's and my variation with some green&gold beads and possibly the inner side of sword-y pieces green as well, since at first my model printed without the strips inside and I've got enough parts for 2, if not 3, crowns. But basically everything is sanded and waiting for painting and assembling...


FINALLY found and ordered a bunch of lace for Hel's dress PRETTY
like sure, I kinda went overboard with it, but since I suck at sewing, better safe than sorry. I actually found an even better fabric, but it was sold out in green, soooooo... Still think below are pretty decent options with beads and sewing & not sequins which imho usually look bad


Our Alicent from the costest is also gonna do a full Alicent, so I'm really hoping to have everything in order at worst mid-summer since it's when the outdoors con I really want to take all of this to is taking place. But like, hopefully even before that, because if anything, this fandom and some vocal people in it make me wanna do things lol. I'm a spiteful btch, what can I say. We can't all be perfect-do-no-wrong ladies like the HOTD women for some reason are. 🌚
Oh also I've ordered the Dark Sister. Because if Rhae can have a sword, so can Hel. And if Condal & Hess can shit all over canon and characters, so can I. Gimme the Dark Sister. Literally no one can stop me well unless my taobao agent doesn't receive it, 'cause it's been almost two weeks since the order was placed and they still haven't, buuuut it's a Chinese NY so hopefully it works out I NEED HELAENA WITH A SWORD
#helaemond#aemond targaryen#helaena targaryen#aemond one eye#hotd aemond#prince aemond#helaena the dreamer#queen helaena#hotd#house of the dragon#hotd cosplay#got cosplay#game of thrones cosplay#cosplay photos and videos#cosplay inprogress
24 notes
·
View notes
Text
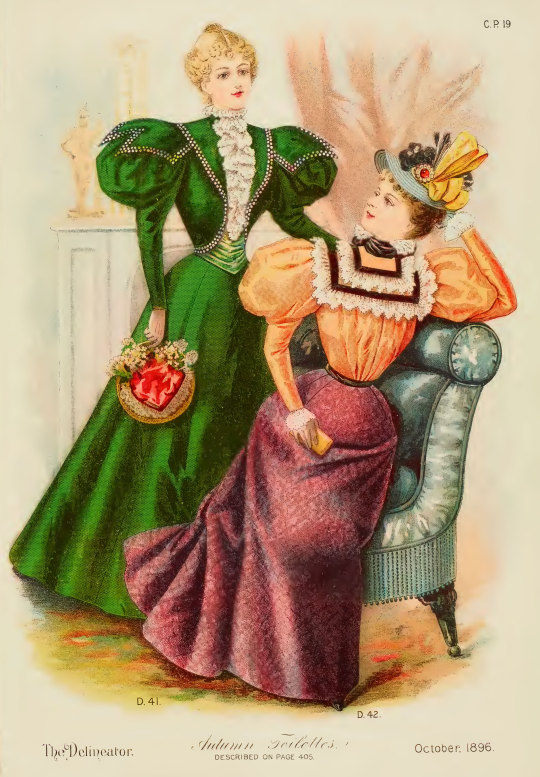
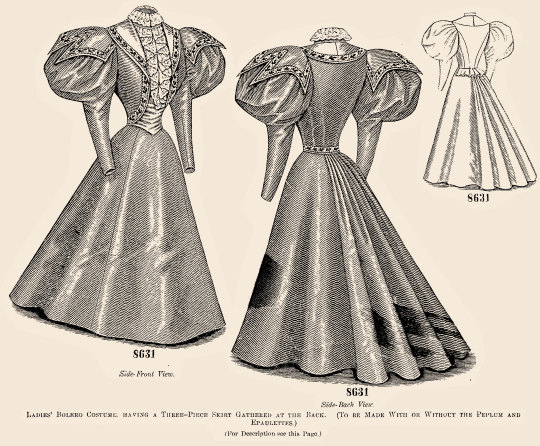
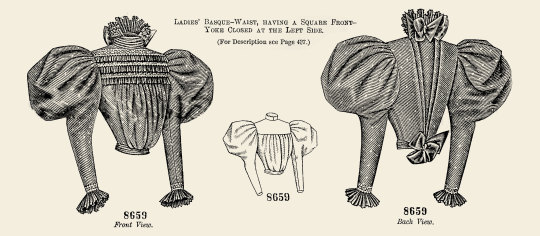
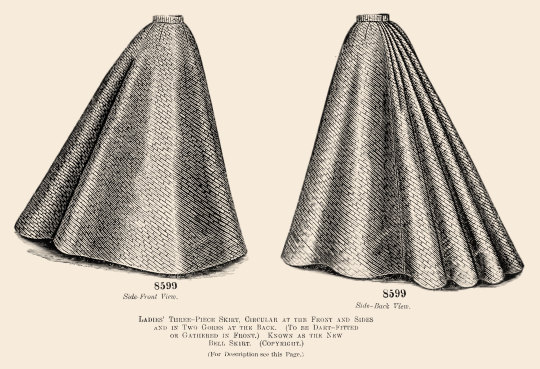
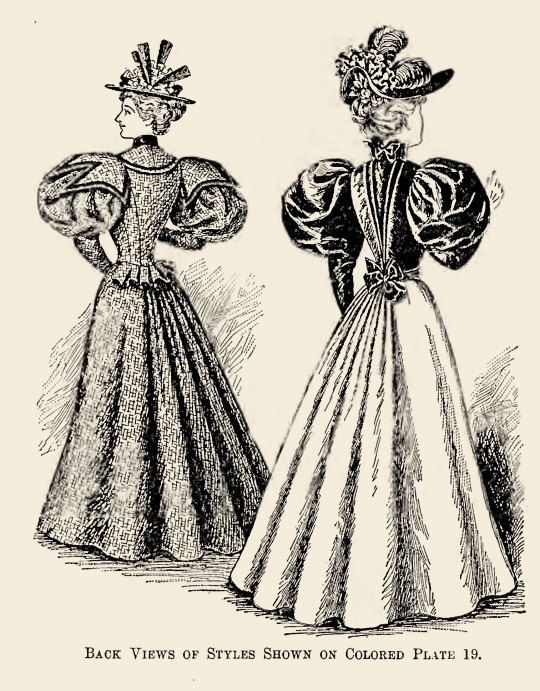
The Delineator, no. 4, Vol. XLVIII. Autumn Number. October 1896. Published by the Butterick Publishing Co. London & New York. Colored Plate 19. Figures D41 and D42. Autumn Toilettes. Internet Archive, uploaded by Albert R. Mann Library
Figure D 41. — LADIES’ PROMENADE COSTUME.
Figure D 41. — This illustrates a Ladies’ costume. The pattern, which is No. 8631 and costs 1s. 8d. or 40 cents, is in thirteen sizes for ladies from twenty-eight to forty-six inches, bust measure, and may be seen in three views on page 418.
Rich myrtle-green broadcloth and silk are combined in this elegant costume, with lace edging for the jabot and iridescent spangled trimming and narrow lace edging for decoration. The basque adjustment is made by single bust darts and the usual seams and the closing is concealed by a double jabot of lace edging. A frill of narrow lace edging falls over the stand¬ ing collar, giving a soft and dainty touch. Bolero jacket-fronts are a pleasing feature of the costume ; they present a rounding outline and are reversed above the bust and extended to form a deep round collar at the back. Between them the jabot of lace appears fluffily, the edges of the lace falling softly on the boleros. The end of the jabot droops over a pretty crush belt of silk that is gathered at the ends and crosses the front under the jacket-fronts. Pointed epaulettes bordered with spangled trimming stand out stylishly over the one-seam leg-o’-mutton sleeves, which flare in puff effect at the top and fit the arm closely below. The back of the waist is lengthened by a peplum that ripples gracefully.
The three-piece skirt consists of a front-gore and two circular portions that meet in a seam at the center of the back, where the skirt is gathered at the top. At the sides and back the skirt falls in stylish rippling folds and at the front it flares in the approved fashion.
The revival of broadcloth invites refined and artistic dress for the street and marked individuality may assert itself in the selection of colors and decoration. Warm, rich tints of broadcloth in such shades as garnet, dahlia, mulberry, chestnut and wood-brown are liked, as well as green, blue and black. For decoration, bands of passementerie, spangled trimming, fur, etc., are commended and a soft jabot of yellow lace is becoming and rich with any shade of cloth. Aside from broadcloth, there is an infinite variety of materials suitable for Autumn and Winter wear, serge, Scotch cheviot, camel’s-hair and novelty wool goods being all available. With any of these materials velvet or satin may be associated in a costume like this, the decorative fabric being employed for the boleros, girdle and epaulettes; or a third fabric may be used for the girdle. The effect is always enhanced by trimming, which, however, should not be tawdry.
The hat has a soft velvet crown and is trimmed with lace and flowers.
Figure D 42. — LADIES’ VISITING TOILETTE.
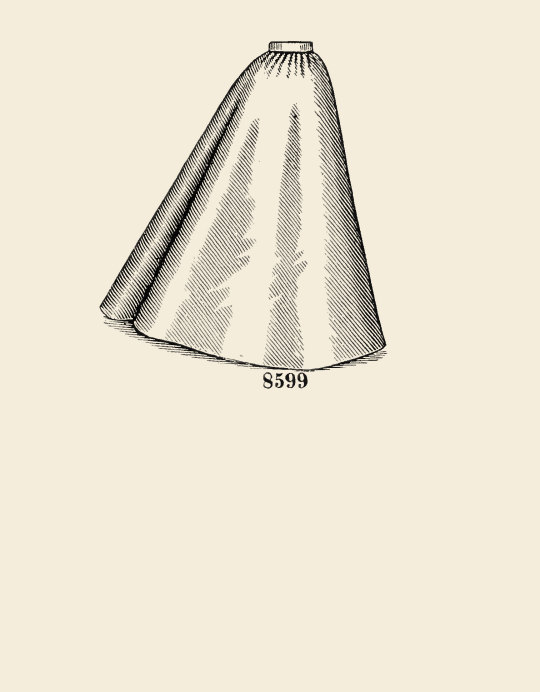
Figure D 42. — This consists of a Ladies’ basque-waist and skirt. The basque-waist pattern, which is No. 8659 and costs 1s. 3d. or 30 cents, is in thirteen sizes for ladies from twenty-eight to forty-six inches, bust measure, and may be seen in three views on page 440. The skirt pattern, which is No. 8599 and costs 1s. 3d. or 30 cents, is in nine sizes for ladies from twenty to thirty-six inches, waist measure, and is shown on its accompanying label.
The basque-waist is pictured made of salmon silk and decorated with velvet ribbon and lace edging. The lining over which the waist is arranged is adjusted by double bust darts and the usual seams and is closed in front. The square front-yoke is closed on the left shoulder and the full front fastens at the center. The front has its fulness drawn well to the center by gathers at the top and bottom and puffs out stylishly; the seamless back has two backward-turning plaits at each side of the center flaring toward the shoulders. The one-seam sleeves flare in leg-o’-mutton puffs at the top and fit closely below, and a frill of lace edging droops from the wrist edge over the hand. The yoke is trimmed with two frills of lace edging arranged to follow the square outline, each frill being headed by a row of inch-wide velvet ribbon, and the standing collar is encircled by a softly twisted stock of Avide velvet ribbon, a pretty fan of lace edging drooping over the stock at each side. A soft twist of the wide velvet ribbon surrounds the waist.
The skirt of dahlia crépon, known as the new bell skirt, is circular at the front and sides and in two gores at the back; it may be dart-fitted or gathered in front and presents the rippling folds at the sides and back now fashionable.
A very artistic toilette may be composed with this basque-waist and skirt, if becoming colors and stylish materials are selected. Silk will be most appropriate for the basque-waist and broadcloth, serge, crépon, wool canvas or novelty wool goods are commended for the skirt. Lace edging, spangled trimming, passementerie, velvet ribbon, etc., are popular garnitures.
The hat is stylishly trimmed with fancy plumage, ribbon and a jewelled ornament.
#Delineator#19th century#1890s#1896#periodical#fashion#fashion plate#color#description#internet archive#Albert R. Mann Library#dress#autumn#gigot#collar#october color plates#one color plates#devant et dos
39 notes
·
View notes
Text
Kim Kassas Spring 2023 Wedding Dresses — “Oh Romeo” Bridal Collection
[Inspired by the love story of Romeo and Juliet]

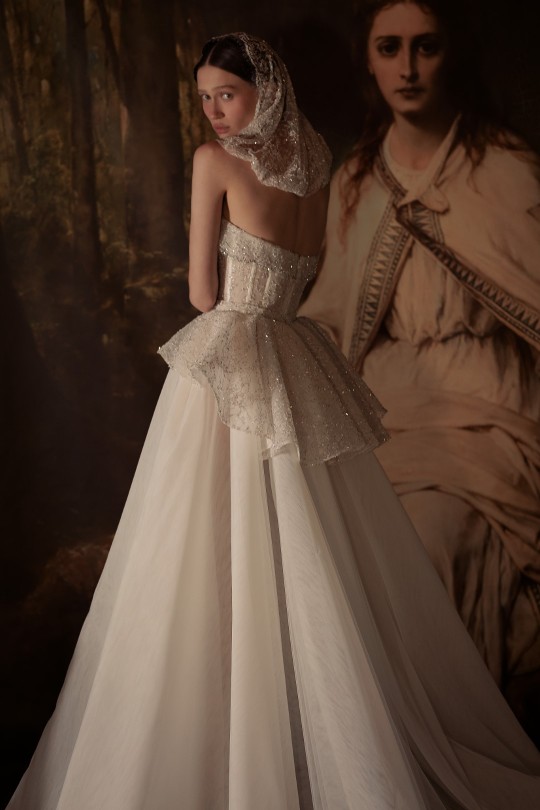

FLORENCE - A corset based ball gown accentuated by a beaded lace peplum layer with a matching belt and a detachable hood
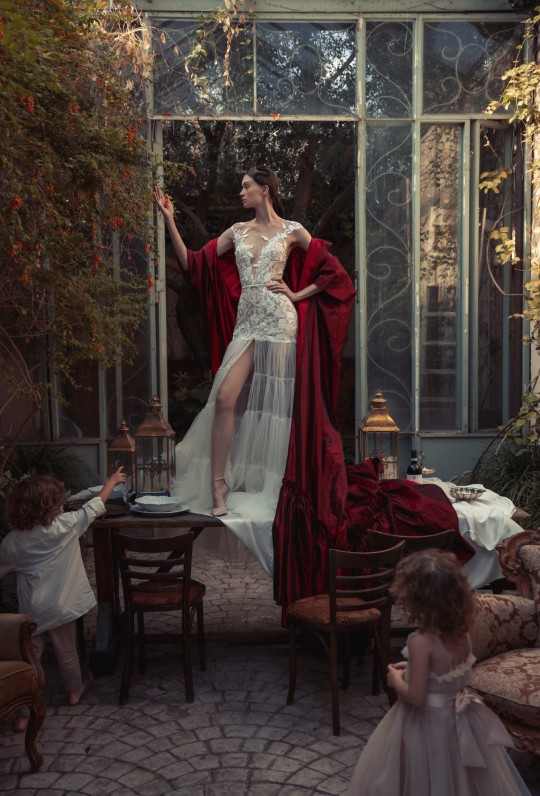
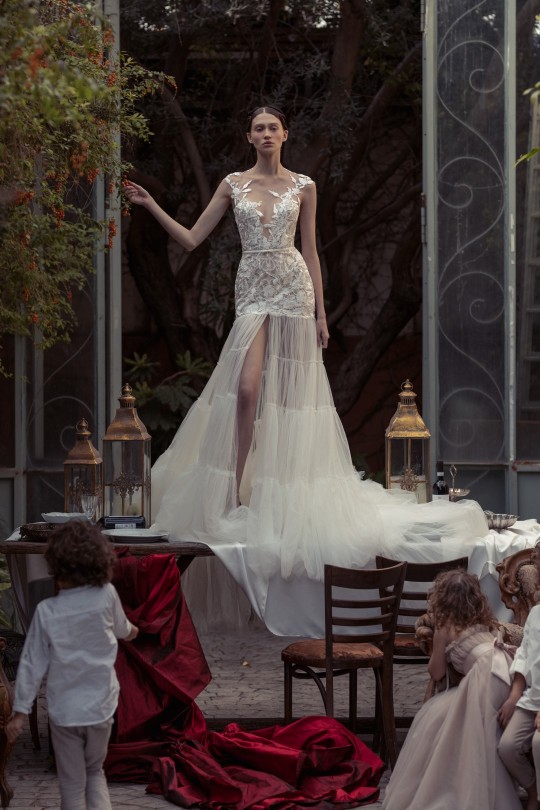
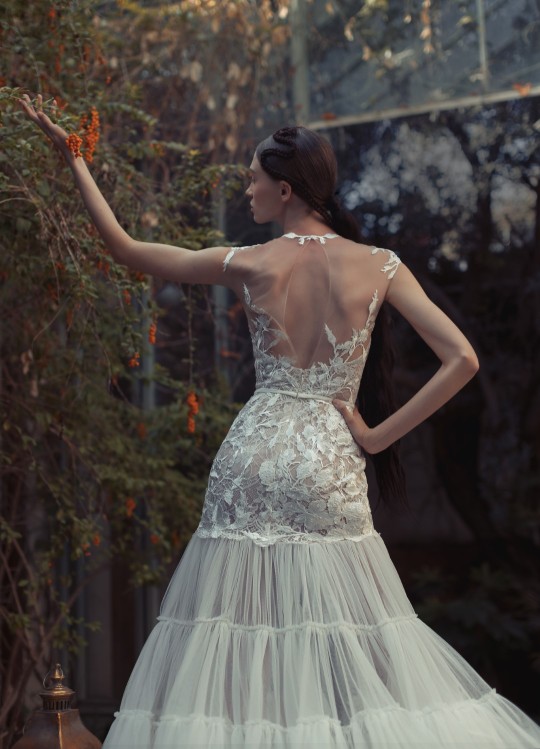
VERONA - A mini corset dress made of embroidered Italian lace with crystal embellishments featuring a voluminous sheer skirt extension with a front slit

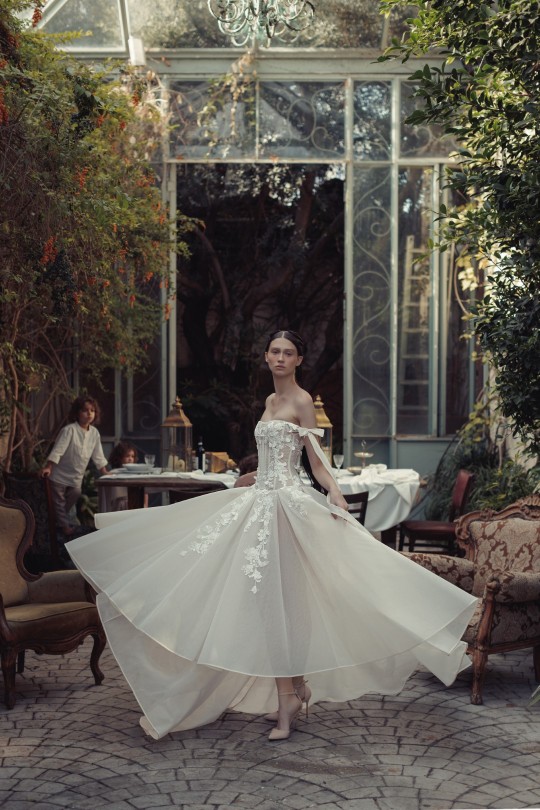

SHAKESPEARE - A modified a-line dress featuring a corset bodice, lower waistline and a pleated asymmetrical ankle length skirt design with 3D embroidered detailing

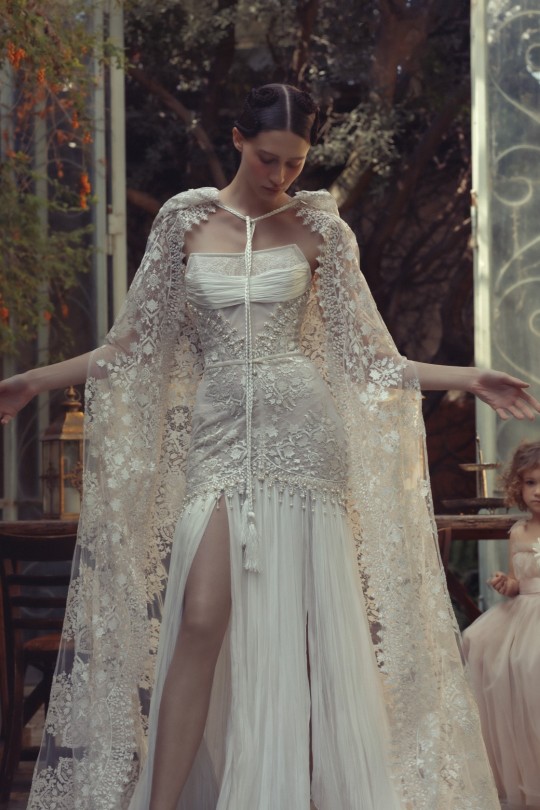
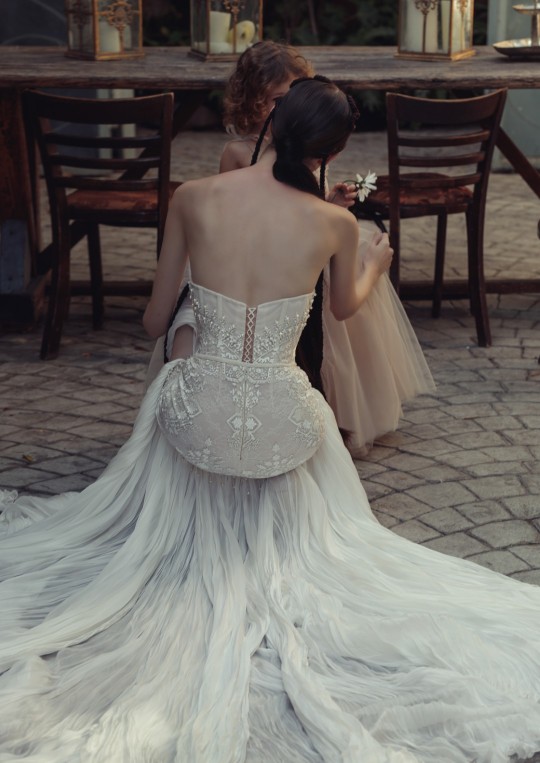
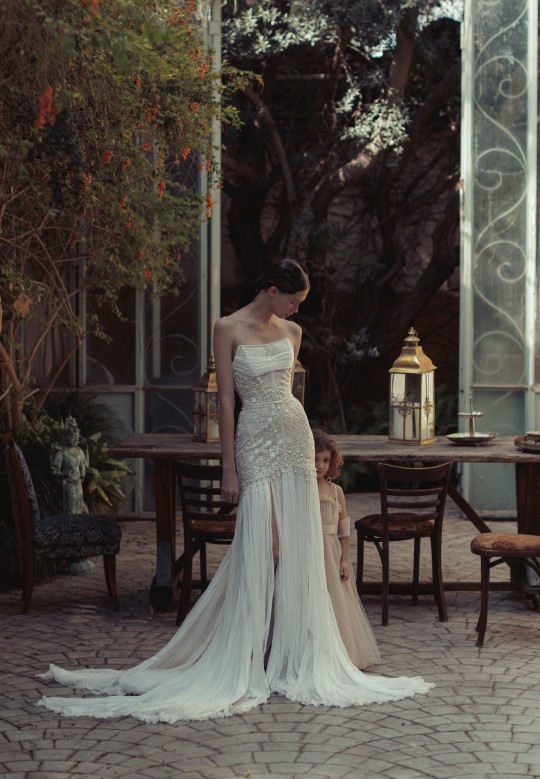
GINOVANA - An Indian lace corset dress featuring pearl beaded accents and a voluminously panel silk chiffon skirt. The dress is paired with a matching statement cape made of Indian lace

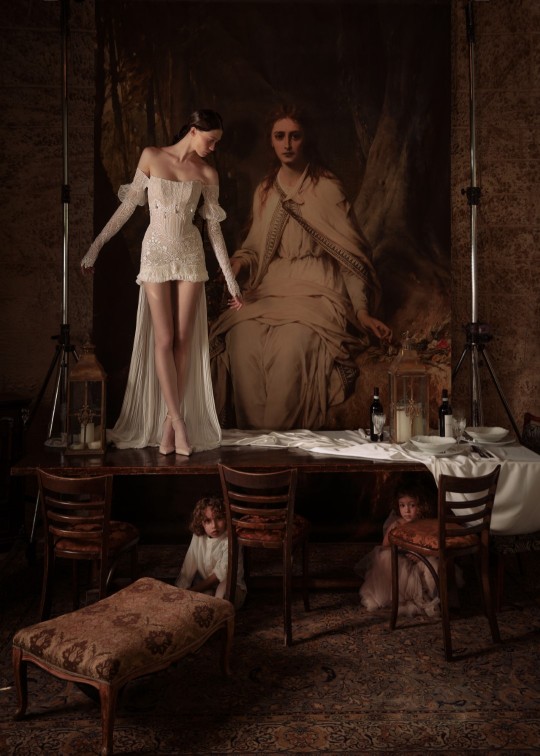
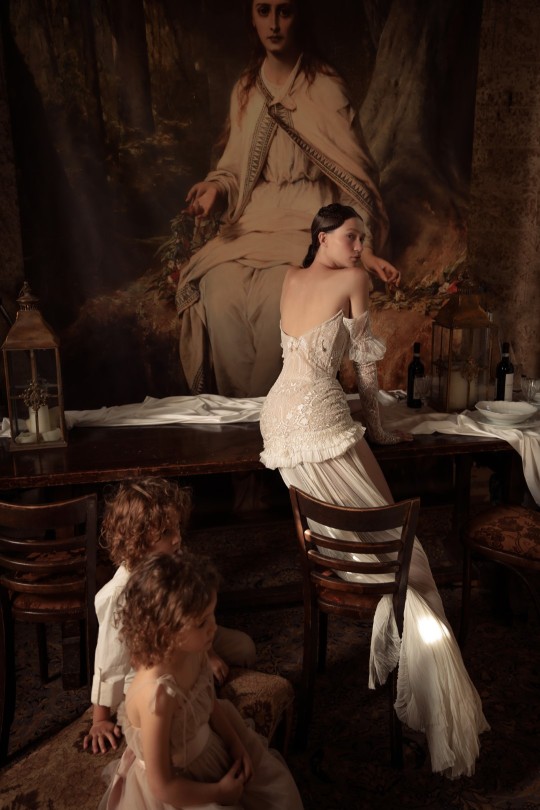
WILLIAM - A mini corset dress made of various lace fabrications with accentuated sleeve puffs and an attached pleated silk chiffon skirt train at the back
#fashion#high fashion#couture#fashion photography#haute couture#bridal looks#bridal dress#bridal fashion#bridal#kim kassas#oh romeo#gowns#wedding dress#wedding gowns#kim kassas couture#spring 2023#romeo and juliet#aesthetic#dreamy#beautiful
222 notes
·
View notes
Text
Cosplay Build Breakdown - Stede Bonnet
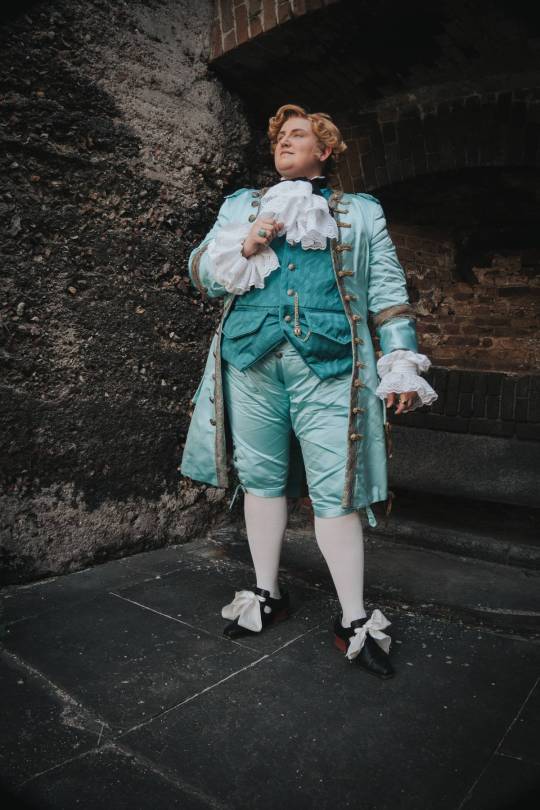
When I completed this costume a few months ago, I promised I would write up a build breakdown on how it was made, and what it was made of, and provide information in case anyone wanted to build it for themselves. I can't promise that this will be exhaustive, but it will be informative, and you can always reach out to me if you have any questions!
Details under the cut!
The Coat
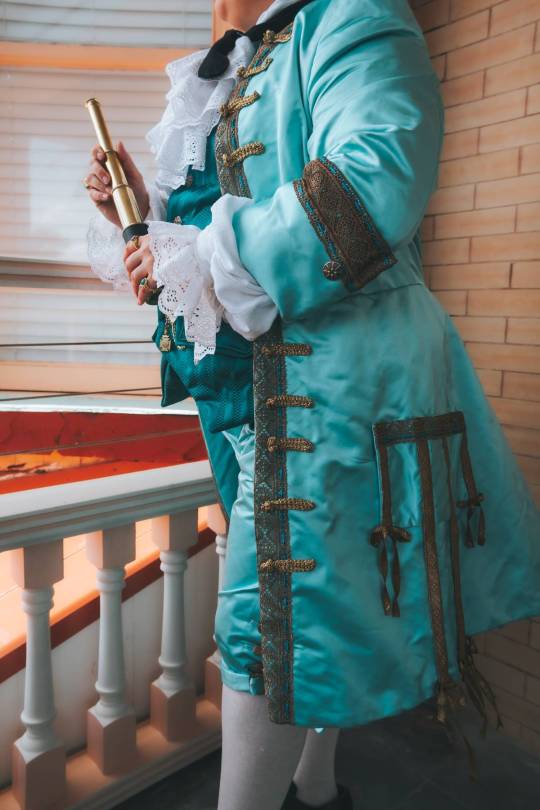
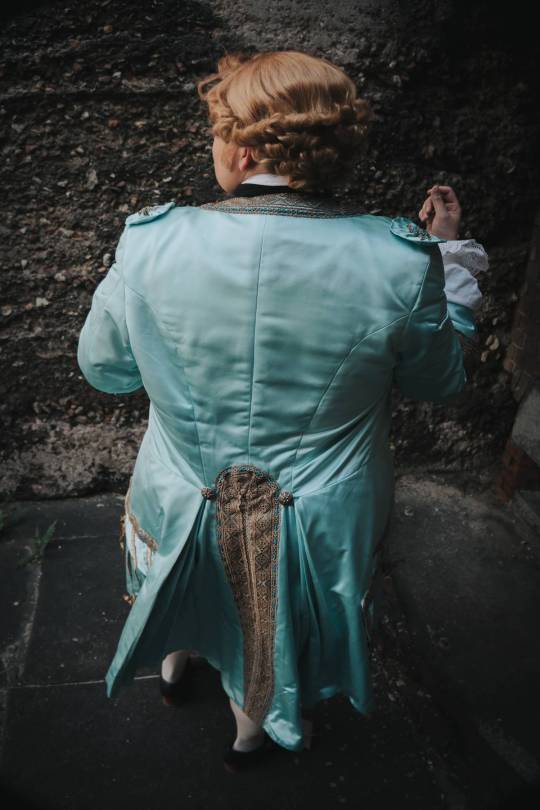
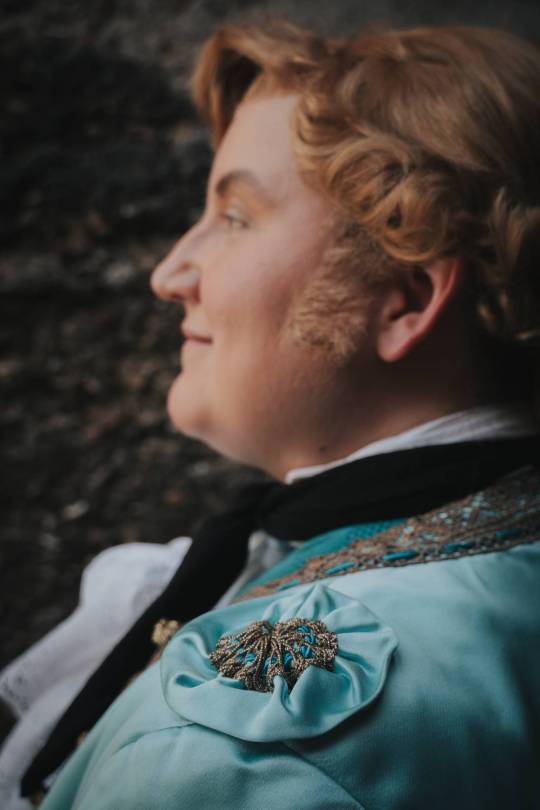
The coat was made of silk duchess satin and lined in silk dupioni, and because this was a uniquely tailored coat, I had to draft the entire pattern for it myself. The buttons are screen accurate and airbrushed gold, antiqued with a black acrylic wash. The trim along the front edge was hand dyed twice to achieve the dark gold color seen here, and hand stitched on to preserve the curve of the garment. I hand wove soutache braid into the trim as well. The trim toggles along the left side of the coat were crocheted by me out of a gold baker's twine.
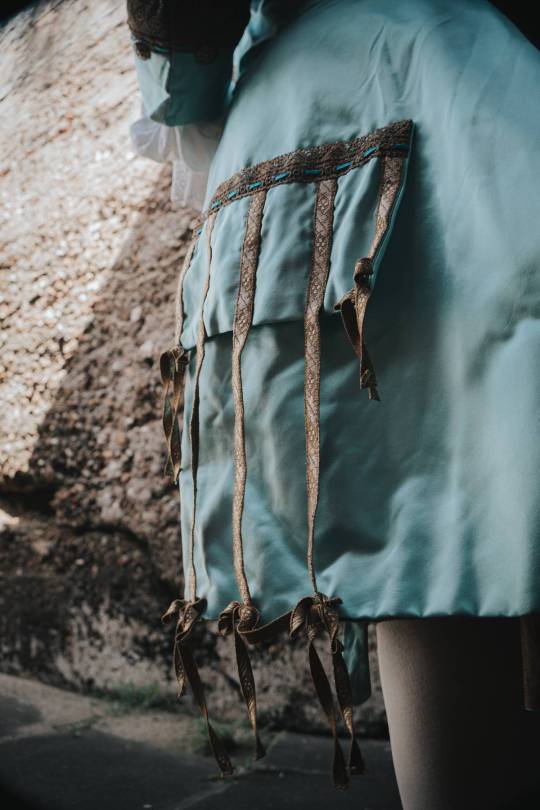
The pockets are functional, but that's not what makes them special.
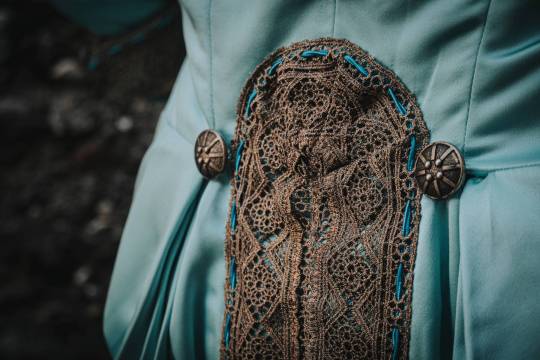
This vertical trim is extant from the 18th century - three hundred years old, sourced from a seller in the UK who specialized in antique trim. Since I couldn't know what was used on screen, I went for something that existed in the historical Stede Bonnet's time.
The shoulder devices are called cockades, and I hand made both of these! They're hand-gathered little beauties!
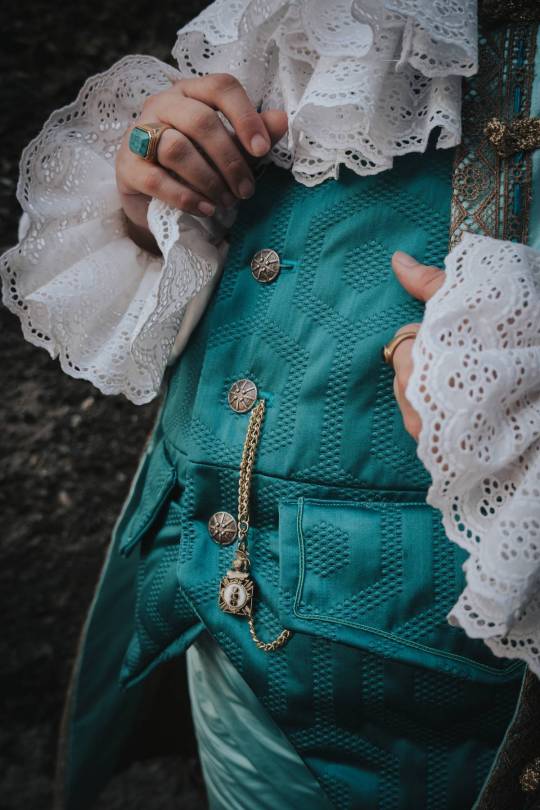
The Waistcoat
The waistcoat was a modified 18th century waistcoat pattern - I had to draft in the waist seam and alter the pocket placement. The fabric used was the screen accurate fabric from Rodeo Home Fabrics - it's called Metro, and the shade is "Jade". Because this pattern was meant for cis men, I had to add in a (period accurate) lacing mechanism to accommodate the hips I was born with, as w ell as any weight fluctuation. The pockets are functional, of course, and the fob medal is a 3D print by Kitty Krell, modeled after the screen accurate Oddfellows fob medal that we see him wear on screen. Not seen as well is the linen shirt underneath, which was made in the 18th century style. The lace used on the sleeves and linen cravat is not screen accurate - but it is close, and it is vintage! The cuffs are attached with velcro so that I can change them out depending on which outfit of Stede's I am wearing, so I only had to make one shirt!
Other Things
The black sailor's neckerchief was made from black raw silk, and the breeches were made from an 18th century pattern - they have a functional drop front and functional knee buttons and buckles!
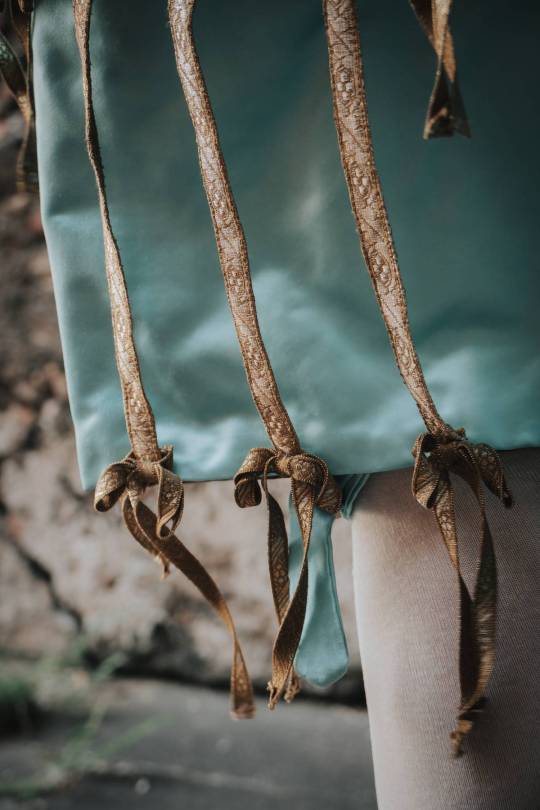
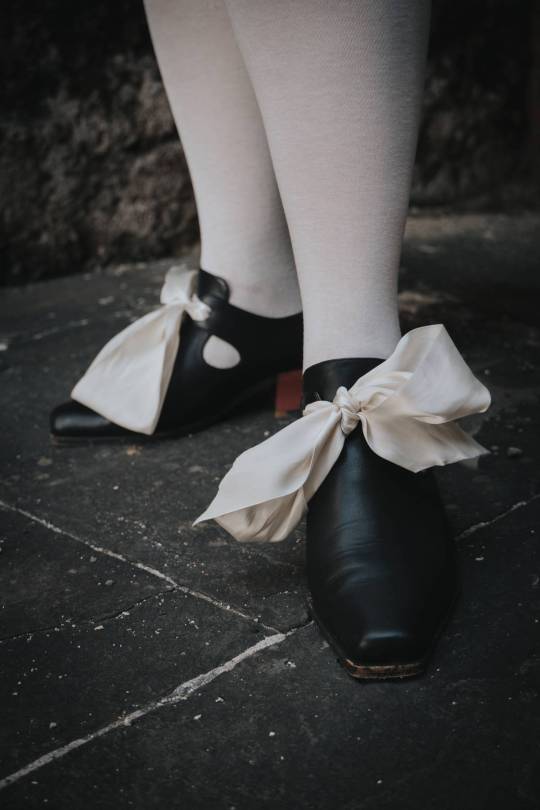
The stockings are silk stockings, and come from American Duchess. The shoes also come from American Duchess, but I had to paint the heels red myself and add the silk ribbon. They are open lachet style, just as we see him wear on screen.
The Wig
I styled this wig myself - it was a lengthy blond lacefront from WigIsFashion, which I stitched additional wefts into the back, and put into a whole pincurl set. I steamed the set with a hand steamer, and plucked the recedes while ventilating some hair into the widows peak to better emulate Rhys Darby's hairline. From there, it was just a matter of styling and trimming the wig into the right shape.
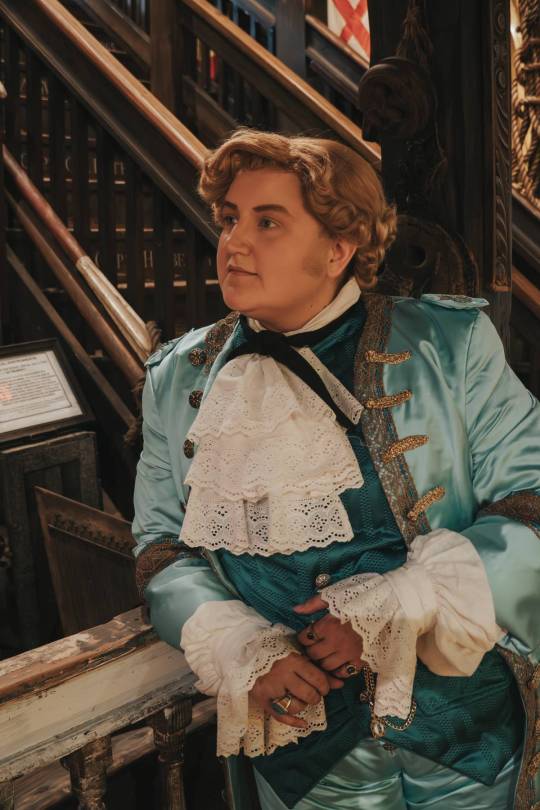
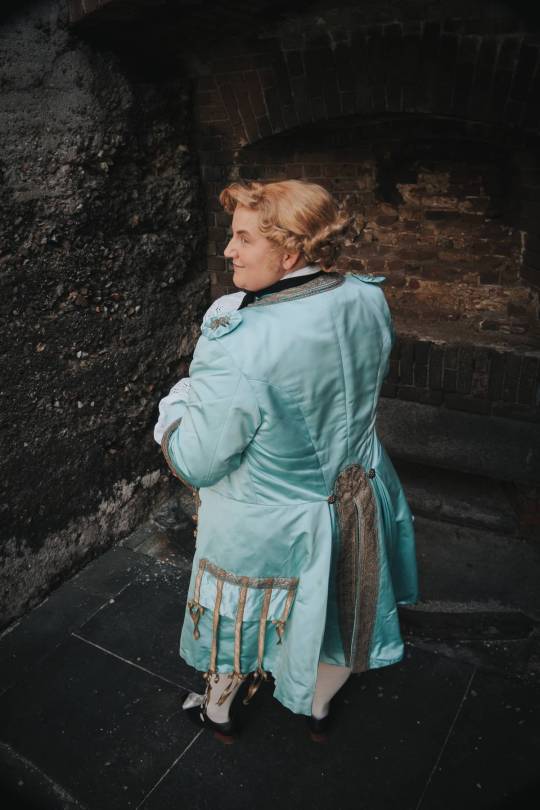
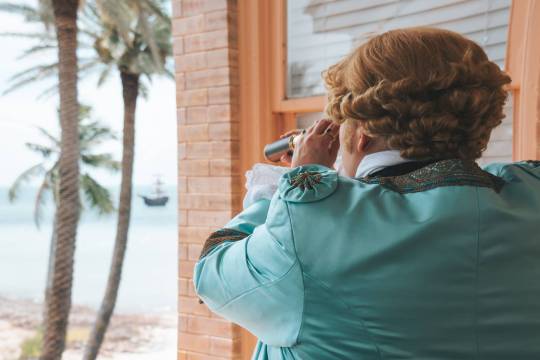
And that is about that! My rings were sourced on Etsy and are turqouise, garnet, and aventurine.
Thank you to R.L. Photography for the photos, and an immense, endless thank you to my partner, my Edward, @sonotthekraken for all your endless cheerleading and support. Because of you, I was able to take home the Best in Masters Award at Fan Expo Dallas, and take wonderful, beautiful photos with you. <3

#stede bonnet#our flag means death#stede bonnet cosplay#our flag means death cosplay#cosplay#cosplay build#ofmd#gentlebeard#rhys darby
28 notes
·
View notes
Text
Punk Skunk Girl and Punk Cat Boy doll set finished Sat. Nov. 16 2024 with pictures—took forever, finally done
I was really pleased with how these anthropomorphic cat boy and skunk girl dolls turned out. The heads (with original hairstyles) came from the 2020s MGA LOL OMG Hair Hair Hair pets line, which were all music-themed. The bodies came from Tomy(?) posable artist figures from AliExpress. I made most of their clothes (with contributions from toy companies MGA, Zuru, and Mattel), and I made all of their rock and rock accessories.
The tiny, male and female, black vinyl hinged and ball socket artist figure bodies caused many delays in finishing these this year, as the joints would break when they were moved. I had to use a combination of superglue with water putty powder, and sometimes black felt and super glue to stabilize and repair breaks. (Then I’d seal, paint black, seal, and repeat the steps when the joints inevitably broke again.) But there was nothing else available for doll bodies in black in this scale.
I made his black jeans, his black mesh top, her red sweater, her stretchy black tights, and her skirt from scratch from old jeans, an unused Forever 21 clearance cocktail dress, black scraps, and a new holiday-themed sock. His gold tone belt buckle is a tiny piece broken off of some bit of doll accessory or doll jewelry (likely Mattel Barbie). The printed top layer of her skirt was made by gathering the long printed satin care instructions in multiple languages from the dress tag.
His clear neon green “studded” vest came in a handful of MGA LOL OMG doll clothes and accessories bought at this spring’s Port Costa town-wide yard sale (studs had to be reglued, as they shed off the vinyl). His black cotton jacket and her black, red, and silver sleeveless top came from a new set of MGA Little Bratz clothes bought years ago. (The top came with “punk” printed in red on the fabric and the faux silver zipper trim.) Her boots were bought this year with a Barbie Extra Mini doll (which I bought primarily for parts) and painted black and sealed with Testor’s sealant.
His black Doc Marten-style boots (with real laces and tongue) and her black polka dotted bow came from this year’s Zuru Mini Fashion series 3 surprise ball pack. (A high quality detailed series of miniatures—I bought only the 2023-2024 series that came with fashion doll shoes.)
I made his neon green “studded” wrist bands from cheap plastic tube beads from Michael’s and painted the studs on with textured silver fabric paint (sealed with Testor’s Dullcote before and after), which is how I made the “studded” red band in her hair.
The parts of the outfits I was most pleased with are their 1980s rock band buttons and emblems. I printed out images from the original band merchandise online on our injet printer, then affixed them to either white thumb tacks, white card paper, or off-white felt with Mod Podge, then I sealed them with Mod Podge 3D “dimensional” clear coating.
His Oingo Boingo square green album button (with cat and Christmas graphic) is from “Nothing to Fear.” (I bent a wire into a square to be a “pin back” attachment glued to the card backing in this button.) His jacket patch (attached to his jacket with a rougher punk DIY style of stitching) is from the first EP “Oingo Boingo,” featuring the Louis Wain cat. Her yellow, pink, and orange Oingo Boingo Louis Wain cat button is supposedly the first button from the first EP.
I used the same method to create her Dead Milkman cow logo button, but I used a rubbery earring packaging plug (which comes on the ends of new earring wires) to affix it to the lapel, instead bending the thumb tack stem back with needle nose pliers, as I did with the other buttons. On her blouse collar’s lapel is a Siouxie and the Banshees band button with a portrait of the lead singer. Some of the ink came off in the glueing, so I carefully filled in the missing bits with a black felt tip pen before sealing.
Saturday morning, I photographed the pair posing together and dancing (including tgeir doing the Pogo) on our white brick mantel in the living room, with the natural light supplemented by a clip-on halo light (attached to my iPhone 13) and my flexible bedroom lamp twisted up from under my arm.
I enjoyed putting these together. It was a similar creative process as when, a few years ago, I repaired and made over some damaged old Sunshine Family dolls into 1980s teens and 1990s Seattle grunge skater kids. I think the pink and black mohawk on the MGA cat head gave me the impetus for this pair.


13 notes
·
View notes
Note
This is probably a weird question, but what are some tips you could give on character design? I've been trying to feel confident with my own designs, but they feel kind of bland... what kinds of things would you suggest to help make designs stand out more?
Hoo boy. Hm. I feel like I am not the right person to ask about this because objectively I do almost nothing you're "supposed" to, but if it's working I guess that means I might be onto something?
A lot of my design considerations are practical. I don't want to give anybody a design that's going to be a nightmare to draw over and over again. I've done enough commissions in my time to know when somebody is overdesigned and therefore hugely annoying to draw, and that's a no-no. So I tend to stick with simple patterns at most, not too many layers, no need for five million belts, no need for incredibly intricate hairstyles, etc. This is a practical consideration for the medium of comic art, but other mediums have different considerations - 3D-modeled art, for instance, can overdesign the characters as much as they want because they only need to model them once, and a lot of visual novel characters are limited to a very small handful of poses and some interchangeable expressions, meaning it isn't prohibitively complicated to make them a little Extra. The most time-consuming and frustrating commissions I've ever done were for characters who were frankly never designed to be drawn more than once. A quick sampling of highlights for the design features I swore to myself I would never deal with again-


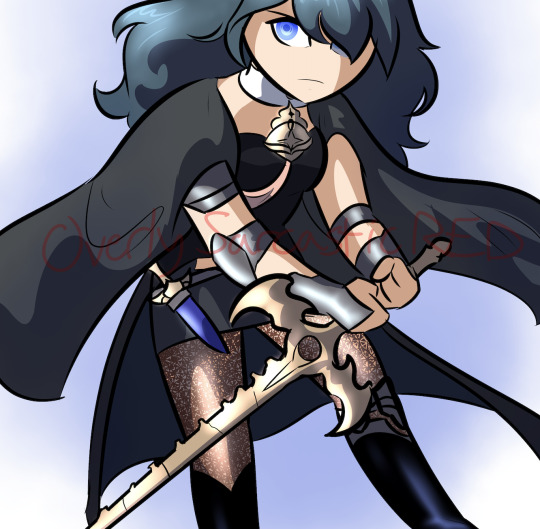
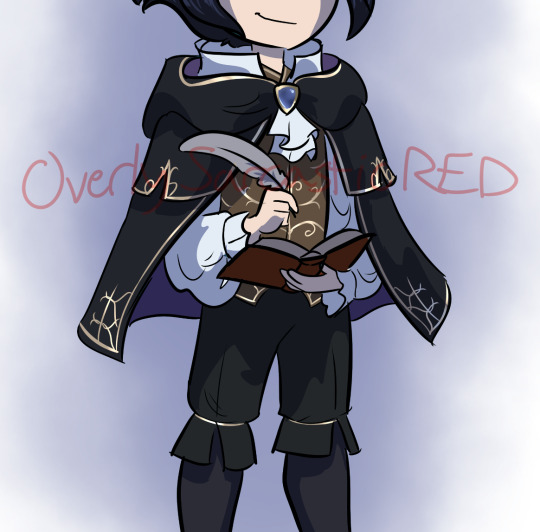
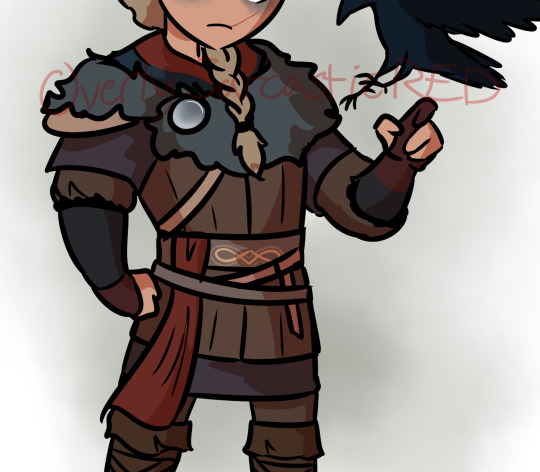
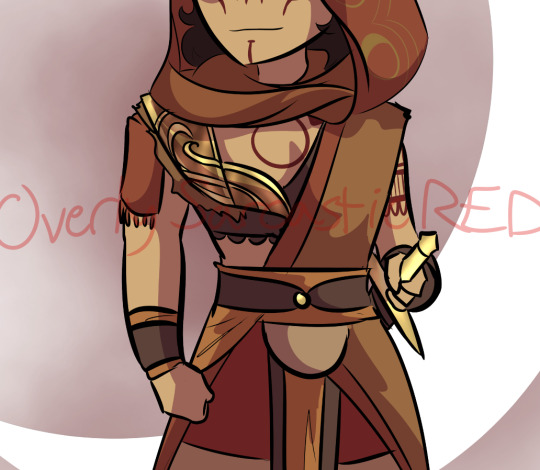


So on a basic level, if you're designing a character to draw over and over again, it needs to be something you're willing and able to draw over again. Intricate patterns, a lot of interlocking plates, anything with lace - those are all things I try to avoid.
I've often seen the advice that character silhouettes should be super visually distinct, that characters should be very strongly shaped like different things. I think that's great if your style is that flexible, but if you kind of want everybody to be shaped like a human being with a skeleton, this advice is not very useful.

I think a diversity of body shapes is great, but the style I favor requires the anatomy to at least sort of makes sense, which means while there can still be a lot of variation in the distribution of muscle and fat, everyone's bones are gonna be in roughly the same place. I can't just draw a square and fill it with a dude. So instead I try and distinguish my character silhouettes in other ways.
Everyone's hair is different, and because most characters have big hair, this plays a large part in their silhouette. Falst and Erin both have short hair, but Falst's is a bristling mane while Erin's is usually more swept and soft-looking. Dainix and Kendal both have long hair, but even when Dainix's hair is loose it doesn't hang or flow the same way Kendal's does - it gets in the way, drapes in front of his face and overall doesn't move the same. Alinua's hair is bouncy curls. On top of that, everyone's outfits are fairly simple, but no two of them are exactly the same - Erin has a monopoly on poofy sleeves, Kendal has cuffed boots and the back-slung sword, Dainix has the poncho and the poofier pants, Alinua has the v-neck top with slightly pauldron-y shoulders and the slippers, Falst's clothing is ragged at the edges, etc. Even without getting into their distinct color palettes, everyone's at least a little bit distinct.
And this is another place where I purposefully try to avoid overdesigning. If everyone has too much going on it can circle around to being hard to tell the characters apart, because too much is happening. Who can pay attention to the fact that one character is sleeveless and one has asymmetrical boots and one has a mullet when everybody is wearing eight layers of embroidered fabric with four belts and half a breastplate on top?
Avoiding same-face is hard, and I'm not very good at it. But I do try to make sure everyone's face shape, nose and eyes are at least slightly different from everyone else's. It might not show from a distance and it might not be as extreme as a pixar design sheet, but it's something.
Ultimately the main consideration I keep in mind when designing characters is - perhaps a bit redundantly - their character. Who they are as people, and how that will impact the way they look. Everybody stands differently, and shifts their weight differently when a situation is changing.
Despite both being short, lightweight guys with short hair, Falst and Erin are wildly different people and are not going to dress the same, make the same facial expressions or hold themselves the same way. Despite both being tall, long-haired, generally friendly warrior badasses, Kendal and Dainix carry themselves very differently and react to things in very distinct ways. Tess and Erin have the exact same haircut and nobody noticed for ages because of everything else.


The designs aren't complicated, and compared to some, they aren't even that distinct. But I try to make sure that their personality is visible in every aspect of their design. Every "why?" in their design has an in-character answer, and since they're all quite different on the inside, keeping things simple means that starts showing through on the outside.
This is also how I can visually distinguish between Vash and Kendal, who have the exact same body and clothes.


we can never underestimate the importance of ✨body language✨
392 notes
·
View notes
Text
i need to make art.
i need to write a story. i need to worldbuild. i need to draw. i need to paint. i need to sew. i need to sculpt. i need to carve. i need to make music. i need to take photos. i need to make movies. i need to animate. i need to 3d model. i need to make a game. i need to improve my neocities website. i need to learn to code better. i need to learn every single language. I need to learn to play every instrument. i need to learn to read sheet music. i need to fill my room with plants. i need to play every single game. i need to make silly dubs. I need to dye my hair weirdly. i need to start using annoyingly colorful eyeshadow. i need to dance. i need to learn to skateboard. i need to learn archery. i need to learn a martial art. i need to go to concerts. i need to visit museums and art shows. i need to read books and comics and zines. i need to make silly and ugly sculptures from all the scrap i hoard. i need to knit. i need to learn to crochet. i need to learn macramé. i need to learn to make lace. i need to learn to spin yarn. i need to learn to make fabrics. i need to learn to work with leather.
i need to scream into the sky but its as if there is an invisible force restraining me.
I need to make and experience art.
13 notes
·
View notes
Text
Techniques and craftmanship methods require for Jewelry making
Jewelry making involves a wide range of techniques and craftsmanship methods, each requiring specific skills, tools, and materials. Here are some of the most common techniques used in jewelry making, whether for handmade artisanal pieces or mass-produced collections:
Hand Fabrication
Sawing: Using a jeweler’s saw to cut metal sheets into desired shapes.
Filing & Sanding: Smoothing and refining metal surfaces or edges after cutting.
Soldering: Using heat to melt solder (a metal alloy) to join pieces of metal, such as attaching clasps, links, or settings.
Forging: Shaping metal by hammering it to create texture, thin it out, or curve it.
Polishing: Using buffing machines, wheels, or cloth to achieve a high-shine finish on the metal.
Casting
Lost Wax Casting: A mold is created from a wax model, which is then melted and replaced with molten metal. This is one of the oldest techniques used for making detailed metal jewelry pieces.
Centrifugal & Vacuum Casting: Used to ensure the molten metal flows evenly into the mold, minimizing air bubbles and imperfections.
Stone Setting
Prong Setting: Small metal prongs are used to hold a gemstone in place. Common for engagement rings.
Bezel Setting: A metal rim encircles the gemstone to hold it securely.
Pavé Setting: Multiple small gemstones are set closely together, often giving the illusion of a continuous surface of stones.
Channel Setting: Gemstones are set between two strips of metal, allowing for a seamless, smooth look.
Flush Setting: The gemstone is set flush with the metal surface, offering a sleek and modern aesthetic.
Gypsy Setting: Similar to flush setting but usually involves a hammered finish around the gemstone, used for bold, simple designs.
Engraving & Embellishment
Hand Engraving: Using sharp tools to carve intricate patterns or designs into metal surfaces.
Laser Engraving: A modern technique that uses lasers to create detailed engravings or inscriptions, often used for personalization.
Etching: Using acid or other chemicals to corrode the surface of the metal in specific patterns, creating a textured or detailed design.
Filigree
Wire Work: Fine wires of gold or silver are twisted and shaped into intricate designs, often with lace-like appearances. This technique requires high precision and is often used in traditional jewelry.
Enameling
Cloisonné: Small cells or compartments are created with metal wire, which are then filled with enamel (colored glass powder) and fired to create vibrant patterns.
Champlevé: Enamel is applied into recessed areas of metal, then fired to create a colored design.
Plique-à-Jour: A transparent enamel technique that allows light to shine through, giving a stained-glass effect.
Hammering & Texturing
Chasing: A technique where the surface of the metal is hammered from the front to create patterns or designs.
Repoussé: The reverse of chasing, where the metal is hammered from the back to create a raised design.
Texturing: Using different hammers, stamps, or other tools to create a variety of surface textures, such as hammered, brushed, or matte finishes.
Wirework
Wire Wrapping: Jewelry made from twisting and wrapping wire into shapes and loops, often around gemstones, beads, or crystals.
Weaving & Knotting: Using wire or string to weave intricate patterns, often incorporating beads or small stones.
Beadwork
Stringing: Threading beads, pearls, or gemstones onto a string or wire to create necklaces or bracelets.
Knotting: Tying knots between beads (commonly pearls) to ensure they don’t rub against each other and for added strength.
Loom Beading: Using a loom to weave tiny seed beads into patterns for bracelets, necklaces, or other accessories.
Electroforming
Metal Coating: This is a process where a base material (such as a wax or organic object) is coated with a metal layer through electroplating. It’s commonly used for creating lightweight, hollow jewelry pieces.
CNC & 3D Printing
CNC Machining: This computerized technique is used to carve precise patterns and designs into metal or wax, enabling intricate designs that are difficult to achieve by hand.
3D Printing: Used for prototyping or creating complex designs, 3D printing involves creating a wax or resin model layer by layer, which can then be cast in metal using traditional techniques.
Inlay & Marquetry
Stone Inlay: Stones, such as turquoise or lapis lazuli, are cut into thin pieces and inserted into metal grooves to create decorative designs.
Wood or Shell Inlay: Wood, shell, or other non-metal materials are inlaid into metal surfaces to create intricate designs or mosaics.
Embossing & Stamping
Stamping: Using metal stamps or dies to create patterns or letters on the surface of a piece.
Embossing: Using pressure to raise designs on metal surfaces, creating a three-dimensional effect.
Granulation
Beading Technique: Small metal beads or granules are applied to the surface of a piece and soldered to create intricate designs, often used in ancient and traditional jewelry styles.
Soldering & Welding
Soldering: Used to join metal pieces together with the help of solder and heat.
Laser Welding: A modern technique using laser technology to weld small or delicate pieces of metal together, often for intricate repairs.
Pearl & Bead Setting
Knotting: Hand-knotting is used in pearl necklaces to separate each pearl and add durability.
Glue Setting: Some beads and pearls are set using adhesives, especially in designs where drilling holes isn't practical.
By mastering these techniques and methods, jewelry makers can produce pieces ranging from simple, minimalist designs to complex, ornate creations. The choice of technique depends on the desired aesthetic, materials used, and the skill level of the jeweler.
5 notes
·
View notes
Note
this is really fucking late and you have probably received questions about it before but what brand binder did you end up buying? or how should someone go about shopping for one that has the correct materials?
I personally bought several binders from gc2b. I've heard the quality has gone down, but I got two new ones semi-recently (within six months) and the only problem I've had is the stitching came out of the hem on one of them--but I also throw them in the washer and they're hand-wash only
(going through the dryer won't ruin them but it will loosen them up really fast after a few times. washing mine on cold and a low spin cycle has worked fine for me, but hand washing is better)
some basic bullet points:
--look for brands selling specifically to transgender people. if all they mention is binding or for tomboys or sports, it's probably not going to do what you want, safely
--there shouldn't be any compression! none of the materials should be meant to squeeze or constrict any part of your back or chest
--the fabric on the back, shoulders, and stomach can be a silky, clingy fabric like what you would expect from form-fitting leggings
--the torso section directly on your chest will likely be a stiffer material meant to hold a flat shape. think like a cone-shaped corset, where the front doesn't lace up, it's just a really stiff panel that's straight up and down so there's no boob shape at all
--this shouldn't push down on your chest too much, only as much as a sports bra. the main goal is to distribute the fat evenly across the whole front of your chest (like if you push in gently with your palms on your nipples), to conceal individual boob shape
--unless you already have a very small size, you probably won't get a "flat" chest from binding. cis men have pecs AND FAT there too! the goal is a uniform shape that looks flat going across, not literally up and down flat. your torso is already a 3D cone shape anyway
--layering: tighter clothes underneath loose clothes. you want looser, heavier fabrics on top. black REALLY helps disguise any shadows or bumps
4 notes
·
View notes