#30 fps video capture
Explore tagged Tumblr posts
Visit Tumblr Blog
Explore Tumblr blogs with no restrictions, modern design and the best experience.
Last Seen Tumblr Blogs


Fun Fact
The KCSC sent more than 20K requests to delete posts related to prostitution and porn to Tumblr from January to June 2017.
Text
Making Gifs Part 1 - Capturing Video
I am making this for @errruvande but I thought maybe others could use this guide to. This is my own personal workflow on how I make my gifs. Everyone has their own way of doing it, and there is no right or wrong way, but I have found this works best for me, with my limited tools and since I do not have photoshop.
Please note I am not an expert lol! There are people out there making far better gifs than me, and many other gifmaking resouces on Tumblr that are probably better than mine.
Keep reading below >>>
So there are two ways that I have found that work for capturing video. If you have the discs like I do, using a program like Videobyte BD-DVD Ripper works really well to grab video clips from Blu-Rays and DVD's. I recommend only using Blu-Rays if you have them. since DVD's are much lower quality.
However I have noticed the videos I captured with this program tend to be dark and have some compression artifacts, even when rip to an MKV with high quality settings. So I use a different method which I feel produces higher quality video captures.
I use Windows Screen Recorder (I have Win11 but this will work for all versions of Windows) with the quality settings set to High. In order to do this, go to Settings > Gaming > Captures and set the following:
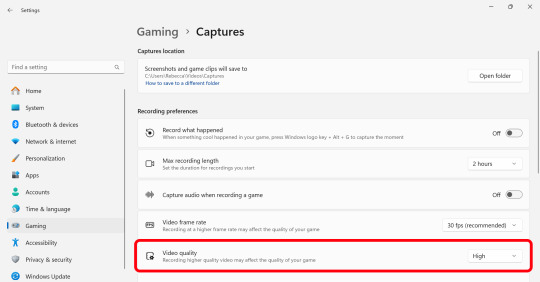
Make sure the Video Quality is set to High, set your Screenshots folder, turn off Audio (you don't need it), and keep the frame rate to 30 fps.
For Windows 11 press WIN + ALT + R to activate the screen recorder. There is usually a bit of a delay so make sure you start a few seconds before the scene you want to capture. And try to keep the length of the capture below about 90 seconds; the shorter the better.
______________________________________________________________
Capturing Sequential Caps
So, for those of you with Photoshop, you can import your video directly into the program and make your gif from there. But I found that Photopea really does not like videos, and will stall and crash if I load a video directly. So I have to capture sequential screencaps to make my gifs.
I use VLC Media Player. There are a few others out there that take sequential caps, but I have not been able to get them to work myself.
Download and install the latest version. Then go to your settings to set up the Sequential Caps function. They have a great guide on their website here but I will reiterate it in this post.
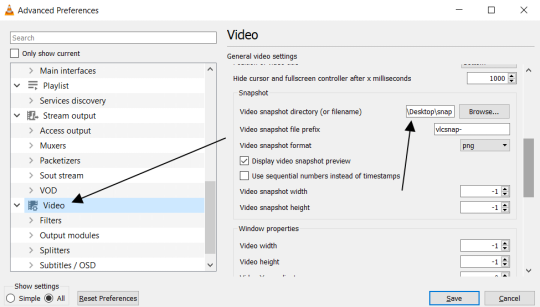
Go To Tools > Preferences and then at the bottom of the screen select the All radio button to show all settings.
Select Video from the left menu. Scroll down about halfway until you see the Snapshot section. Choose the folder where you want the caps to go.
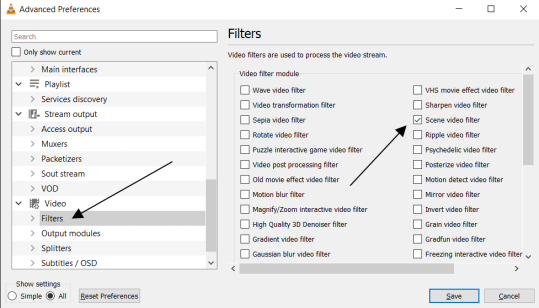
3. Then, under Video on the left, expand the Filters list.
4. Check the "Scene Video Filter" from the list.
5. Then scroll down on the left menu under Filters and click on Scene Filter. This will open up the settings for that particular filter.
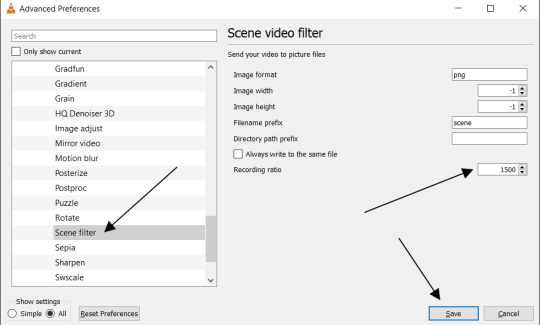
6. Set the Image Format to PNG.
7. Then for the Recording Ratio, change to "1". The Recording Ratio is the frame interval. So for example, if it was set to "300" (with a 30fps video), then it would take one cap every 10 seconds. Setting it to "1" will make it take a cap once per frame.
8. None of the other settings need to be changed.
9. One more important setting, otherwise this will not work! Close the menu, and go back to Tools > Settings and leave it on Simple. Go to the Video section and MAKE SURE the output is set to "Automatic". This is important because if it is not on Automatic the Scene Filter won't work!
Then just open your video with VLC. VLC will automatically take the screencaps while the video is playing. If you pause the video, it will stop taking caps.
NOTE: For smoother gifs, change your playback speed to be slower. Go to the top menu > Playback > Speed > Slower (fine). The more you click this the slower the video will playback, and that means more caps will be taken over that time frame. I usually set it to 0.75x, but if you want even smoother gifs for really short clips, you can set it even slower than that.
Your screenshot folder will look like this:

Then we are done with this part and onto Photopea! Which I will go into detail in another post: PART 2
#gifmakers#gifmaking#gif making#gifmaking resources#gif making resources#my guides#giffing tutorial#screencapping#sequential caps#gif making tutorial
45 notes
·
View notes
Text
Now that I've finally finished it, I figured I'd share my thoughts on Sonic X Shadow Generations. It's good and you should buy it. O.K. Spoilers, below.
In terms of the Sonic Generations section, it's the same great game as it was 13 years ago. Ironically enough, I bought the original release back on December 23. Lucky me. The only real notable differences are in performance and story, so I'll focus on those. I'm not really an expert on performance. I can barely tell the difference between 30 fps vs. 60 fps. I'll just say that Sonic Generations ran better on my Switch than the original release did on my gaming PC. Take of that what you will. In terms of the rewrite, I thought it was lackluster. Ian Flynn is a writer that I like a lot, so it's a bit of a shame but not too much. The story remains virtually identical, with the changes adding nothing of note at best, and feeling slightly awkward at worst. I could have gone without the random Time Stone reference (it feels a bit off considering Sonic has time traveled in numerous other ways before), and Amy's crush on Sonic being toned town. I feel like making her less clingy was good, but they went a bit too far, in my opinion. I know she still mentions her attraction to Sonic in the dialogue, but I would have preferred it was mentioned in the cutscenes. Also, the removal off "I thought I was dead! Floating without a body in a black limbo... Ughhh, I'm gonna have nightmares for weeks!" is criminal.
Now, onto the main attraction, Shadow Generations. Now, this might be controversial, but... I think Sonic Frontiers is better. Don't get me wrong. Shadow Generations is still a great game, but it didn't quite capture the magic Frontiers had. In terms of the boost levels, Shadow Generations definitely beats out Sonic Frontiers. The level design was frankly more interesting, and I had a lot of fun using Doom Powers to take/come up with shortcuts. In terms of the Open Zone, Frontiers wins. While Shadow Generations White Space fits together more neatly, running around and exploring just isn't as fun as it was on the Starfall Islands. Part of that might be unlocking the map as you go, while in Shadow, it's just handed to you. Doing the open zone challenges in Shadow Generations feels like a chore, whereas it felt fun in Frontiers. Boss fights, I mean, come on, obviously Frontiers was going to win. The battling mechanics were so interesting, and it felt really fun to string them together. Shadow Generations also has really fun bosses, but I found them really easy. Honestly, the bosses characters are really what made the boss fights fun in Shadow Generations, I was geeking out like a kid in a candy shop. In terms of the story, I find them both great. I would heavily recommend Pariah695's video on Shadow Generations story as he goes into more detail than I will (even if I don't agree with his opinions on Ian Flynn). Ultimately, it might just be that the characters and their journeys in Frontiers mean more to me. They're both very enjoyable, and I'll probably watch the cutscenes of Shadow Generations for fun like I do with Frontiers.
Ultimately, even though I think Frontiers is the better game, Sonic X Shadow Generations are still great games that I would highly recommend.
#sonic the hedgehog#shadow the hedgehog#amy rose#miles tails prower#sonic x shadow generations#sonic frontiers#review
11 notes
·
View notes
Text
so you want to use OBS
hello! i’ve decided to compile information on my OBS setup and some resources that have helped me along the way. this is mostly for personal reference, but maybe others can make use of this information!
some notes before i get into it:
i use OBS for both offline recording and (twitch) streaming. any footage i record is edited using DaVinci Resolve 18, which is free.
most of my OBS captures are of video games (through a USB capture card, specifically elgato), and the occasional screen/application capture (like clip studio paint, and sometimes PC games).
as such, the information here is reflective of these experiences. this post is not comprehensive to all of OBS’s features- this is just an overview of the settings and configurations that are most relevant to me.
with that out of the way, all the information will be under the cut!
Basic Setup
file format:
how to change: settings -> output -> recording -> recording format -> press “apply” once finished!
I save most of my recordings as .mkv files- it supports multi-track audio! i prefer .mkv over .mp4 because if your power goes out, you still have a recording to work with.
.mkv files can be read by DaVinci Resolve without an issue- but for Adobe software, they'll need to be remuxed to .mp4 within OBS! (file -> remux recordings -> press the … to select a file -> press the “remux” button)
video resolution and framerate:
how to change: settings -> video -> output (scaled) resolution
my obs canvas is @ 1920 x 1080p (16:9)
i switch between 720p and 1080p as needed! if you're concerned about space, you can probably just go for 720p. i also record at 30 fps, simply because that’s what my capture card supports.
video bitrate:
how to change: settings -> output -> encoder settings (located in both the streaming and recording tab) -> press “apply” once finished!
bitrate is a bit of a doozy to explain, but the most important thing to know is that bitrate affects your video’s quality. lower numbers = lower quality, while higher numbers = higher quality.
generally speaking, you'll want higher bitrate when you're recording things with high depth of information (e.g. you’d want a higher bitrate for something fast-paced like splatoon, compared to a slower-paced game like animal crossing).
my video bitrate is either set to 3000 or 4000 kbps! and here's some of my other (related) settings while i'm at it:
you can put your bitrate at much higher values than me if you're a stickler for quality- but keep in mind that a higher bitrate means:
bigger file size
more information to upload (when streaming)
your computer will need to encode more
i’d recommend reading twitch’s guidelines on encoding, bitrate, resolution, and framerate to get an idea of what values to pick. for people who are doing offline recording or streaming on a different platform, i suggest googling the appropriate resources!
multi-track audio:
this is mostly applicable to anyone looking to do video editing!
multi-track audio basically allows you to separate your audio sources (e.g. discord, game audio, and your own microphone) into different tracks.
this is an immensely helpful tool because it lets you adjust audio levels in post-production (editing). some examples of how this can be used:
increasing someones microphone volume if they speak too softly
increasing/decreasing game audio
muting swear words/sensitive information
completely muting voice call + microphone if you want to upload a no commentary video
and more!
to set this up, take a look at your audio mixer panel, and press the ⚙ icon. this will bring up advanced audio properties.
by checkmarking a track box, it puts the audio on that track. to make the above screenshot easier to digest:
track 1 consists of ALL three audio sources- desktop, elgato, and microphone.
track 2 only has the microphone audio.
track 3 only has desktop audio (i use this for voice calls)
track 4 only has the elgato capture card audio (game audio). the volume has also been lowered so that any speaking voices can be heard clearly.
tracks 5 and 6 are unused.
you might be wondering, “why do all three of these have 1 checked off?” this is what i call the universal audio track. i recommend having a universal audio track for a few reasons:
when you stream from OBS onto twitch/youtube- you have to select ONE audio track.
it’s also a nice backup in case you didn’t separate your audio correctly.
if for whatever reason you need to move around your individual audio tracks in editing, the universal track acts as a nice reference point.
mark off your audio tracks for each audio source as you see fit! once you’re finished with the advanced audio properties, go to settings > output.
for the streaming tab, you’ll want to have the number of your universal audio track selected. in my case, that will be audio track 1.
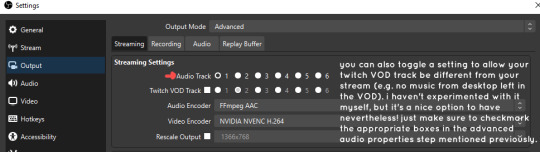
for the recording tab, checkmark all the audio tracks that are applicable to you (in my case, audio tracks 1, 2, 3, and 4). by default, only audio track 1 is selected.
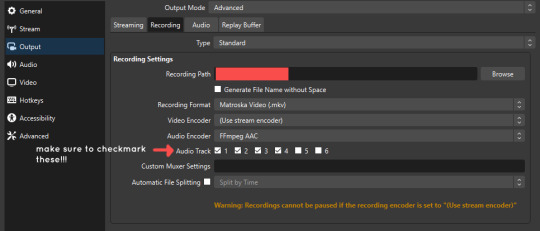
if you don’t check off the additional audio tracks in the output > recordings section, you will not have access to those audio tracks in editing, and you won’t be able to edit your audio tracks independently of each other. so don’t forget to do this! 👍
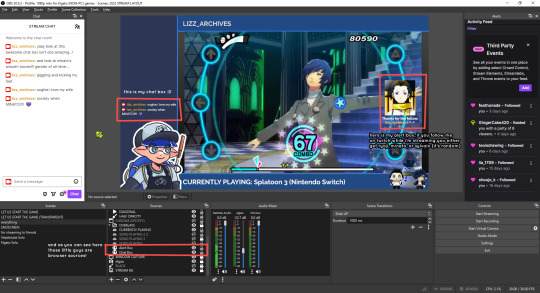
custom browser docks
custom browser docks are a great tool for when you’re streaming and want to have access to your twitch chat and/or activity feed! (or if you wanted to have some other web browser on OBS).
to create one, go to docks -> custom browser docks.
you’ll be given a table interface that asks you to put the dock name and URL. for streamers who want to have chat and alerts available, do the following:
on twitch’s homepage, go to the upper right and click your icon
then, click creator dashboard
once you’re on your dashboard, go to stream manager
click the vertical “...” on my chat OR activity feed.
press “pop-out chat” OR “pop-out activity feed”
copy and paste the link into the table back into OBS
press apply once you’re done
click and drag the docks around at your leisure to put them where you like!
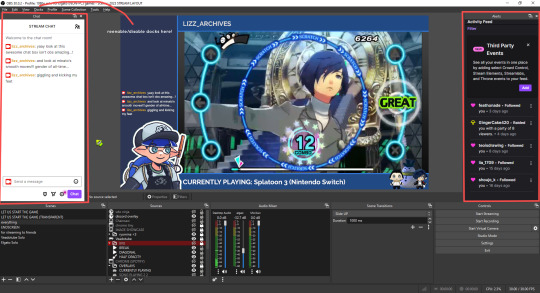
if you ever decide you don’t want to have something on your OBS dock (or want to bring something back), go to the toolbar, click “docks,” and click the appropriate dock!
third party things
a section of optional things that you may enjoy having.
streamlabs alerts
this is basically for anyone who streams and wants to have their chat and/or follower notifications visualized on screen!
streamlab alerts can be added to OBS by adding a browser source into your scene, and the specifics can be customized on streamlabs itself. it’s pretty self-explanatory, so i’ll just leave a link to streamlabs website, where you can log in using the streaming platform of your choice: https://streamlabs.com/
discord overlay
this is a browser source that can be set up to show people who are in a server's voice chat and who speaks. i recommend this to people who make multiplayer content- it can help viewers distinguish who is who but also it can be helpful in editing.
to set this up, go to https://streamkit.discord.com/overlay, click “install for OBS,” and after logging in with discord, go to “voice widget” and click the server and voice channel you want.
you are able to apply CSS if you'd like more control over the visuals, but the standard layout tends to work fine for me! a search of “discord overlay css” on youtube can help you get more information.
veadotube mini
this is a pngtuber software that a friend recommended to me! no webcam is required- mouth opening and closing is based on your microphone input!
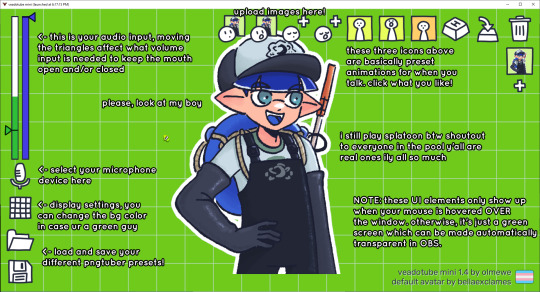
you can download it here (it’s pay what you want!): https://olmewe.itch.io/veadotube-mini
for a proper tutorial on how to use it, i recommend checking out the app's documentation, which you can read here: https://veado.tube/help/
source record
have you ever wanted to stream something with a chat overlay/layout, but wanted your recording to ONLY be the gameplay? or maybe you wanted to record BOTH your gameplay AND your webcam so that you can have a crisp zoom-in on your webcam!
source record is a third party plugin that can help you with that!
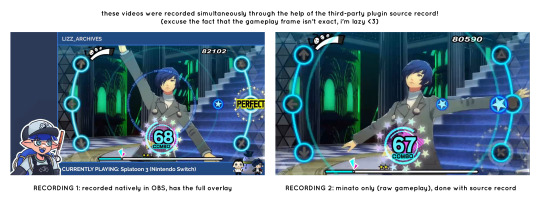
the general gist of source record involves applying the “source record” filter on either a scene or source, and customizing the encoding settings accordingly. the exact details of how to set it up is beyond the scope of this post, so I'll just direct people to this video instead (it was very helpful to me):
youtube
⚠ a quick note about source record: this plugin can be intense for your computer. be sure to do test recordings and the like to see what your computer can handle (and see if the recordings come out the way you like). it took me a few tests before i settled onto something i liked!
you can download and install source record here: https://obsproject.com/forum/resources/source-record.1285/
vdo.ninja
have you ever wanted to do a collaborative video or stream where you feature someone else’s video on your stream? or maybe you’re doing a multi-person streaming event! vdo.ninja is the perfect tool for you!
vdo.ninja turns your OBS virtual camera into a browser source link- which your collaborator can add on their stream! this is a new tool that i’ve added to my arsenal recently- since my friend and i are planning to stream a side order challenge together! i’ve still got to iron it out a bit more, but i like what i’ve used of it so far.
try it out for yourself at their website here (with documentation and demos available on the homepage!): https://vdo.ninja/ (no downloads required!)
ok! i’m set up! what now?
and with that, that’s all of the settings and tools that i thought would be worth mentioning! while most of my setup was written with video games in mind, some of these plugins and setups may be applicable to other types of videos (e.g. tabletop gaming with a physical camera)!
now that i’ve outlined all these settings, i have one more thing i have to say: regardless of what you're using OBS for, do a test recording before doing anything “official” with it. this recording can be as short as 30 seconds. it’s a good habit to develop that can make sure your streams/recordings turn out the way you want them to!
here are the kinds of things i like to check! it’s not an exhaustive list, but this can be a starting point:
video:
does my video look the way i want it to (and can my computer handle that)?
can my computer handle the load of encoding? - OBS will note in the bottom if the encoding is overloaded. if it can’t handle it, turn down your bitrate or adjust other encoding settings (e.g. i had to toggle psycho visual tuning OFF because it was causing lag)
this is especially the case if you're recording PC games- you don’t want to have slowdown on either your game or the recording!
audio:
are my audio sources (e.g. desktop audio and microphone) correct? - if you plug/unplug devices a lot, be sure to check this (settings -> audio).
are any of my audio sources muted? - make sure you don’t have anything on 🔇 if you don’t want it to be muted! otherwise the audio will be lost forever… (i lost my friend’s VC audio once… it was sad)
are my audio tracks separated properly? - requires you to boot up your editing software, but it's worth doing! for the test recording, just have something from all your sources playing at once, and see if your editor has things separated into tracks.
can i hear the voices clearly? or does the music and/or game overpower them?
if for whatever reason your OBS crashes, or you want more information on anything “critical” or “warning” worthy in your set-up, you can go to help > log files > upload current log file > analyze. crash logs currently can’t be analyzed by the log analyzer- but they’re a valuable tool when asking for help on the OBS forums!
and that’s all! for real, this time. i hope that some of these tools and settings can help anyone wanting to get more out of OBS. there’s definitely other things i didn’t touch upon (e.g. audio filters for noise compression, suppression, etc.), so i suggest doing your own research and trying things out!
happy recording/streaming, and thanks for reading! ✨
#lizzy speaks#this was a fun little write up!! i've been slowly getting some of my friends into video making teehee and its SO FUN!!!#(digital) video is like one of my other passions next to art. everyone say thank you splatoon for getting me back into it again <3#i've been using obs since like 2018 so i wanted to share some of the things i learned for funsies... i really love video...#but also i like having reference posts like this in the case people have questions they want to ask me...#because i don't always remember what video tutorials i watched and it's nice to document that somewhere...#warning to anyone who reads it this is like 2.1k words. i do want to stress that this isn't comprehensive but there's still a lot of info#that i wanted to put for this post...! that said topics like designing your own stream layout + assets for it are NOT in the scope of this#post and nor is this a beginner's guide to obs (i wrote this with the assumption that you know how to record and/or stream and that-#people already have an idea of how to use scenes and the different types of sources obs can use).#i hope everyone's had a lovely march 5th! i would love to look at the fanart but im still not done with reload...#but im hoping to finish it by the end of the month!!! yipee!!!#Youtube
50 notes
·
View notes
Text
Master Recs: The "N64" Trilogy (2023)

Pseudoregalia
Let us muse over a very small, three-dimensional Metroidvania game stylistically fashioned after the Nintendo 64 era of graphical fidelity. It stars a deliciously polygonal rabbit-y, goat-y, cat-like girl.
Now, I am playing this on the fabled Steam Deck. It runs and controls smoothly on the platform but you might require to fiddle with the video settings as the default configuration is slightly blurry due to a very specific and fascinating reason. It turns out Pseudoregalia vaunts a certain level of depth in its technical customization, one that's surprisingly fun to manipulate. There's an option to toggle on or off a retro graphical scale and character movement rate, which graciously emulate the old school console experience. You can also manually reduce or augment the maximum framerate for the whole game. You could theoretically play something that looks like a 30 fps 3D Platformer from 1997 or the most HD upscaled version thereof at 144 fps, or everything in between! The default, blurry configuration comes as a result of the aforementioned retro scaling clashing with the 4K resolution in full screen mode. This is the first and last time in recorded human history that I will ever be this enamoured with "specs talk."
The point is, we have a darling gem with a cultivated aesthetic, a good level of polish: it will look "right" regardless of your favoured settings. I'm impressed by the extra layer of work placed in the subtle use of limited framerates for the character's movement.
Pseudoregalia captures the idea, the abstract concept and low-poly charm of a N64 title with a gameplay that recalls your memory of it, rather than the unwieldy reality. I say this as someone who doesn't have nostalgia for early 3D graphics: the game makes them look spiffy.
I shall be honest, this is normally not the sort of title I would enjoy playing, as precise platforming and traversal puzzles are my nemesis. I mentioned afore the level of polish, which is generally consistent, but some of the movement upgrades you get (such as the jump/wall kick) can be rather finicky to master. In that sense, be wary that the game does not openly provide you with tutorials for the moves that require more finesse, choosing instead to hide an additional set of instructions in the inventory descriptions. It's "old school", you see. Older versions were bereft of maps thus making exploration a burden for those like me who are directionally challenged - both in games and in real life. Regardless, I kept getting drawn by its world, its somber atmosphere, its tight gameplay and especially its protagonist, Sybil.

An appealing design for your avatars goes a long way in ensuring an emotional connection to them and Sybil just so happens to have one of the most striking and instantly recognizable appearances I can fathom. It's a pleasure to look at her go! Furthermore, I would posit that she has a lot in common with my precious videogame fluffy boy, Klonoa - and I do I mean, a lot. I will not elaborate. If you get it, you get it. In conclusion, Pseudoregalia is an impressively put together jam. It's easy to pick up yet punishing to handle, it's fun and fascinating in spite of its more irritating aspects. The best overall critique I can give it is that it made me want to keep trying, and trying, and trying, until I eventually became good enough to complete it several times and even beat the insanely hard Time Attacks. In short: game is good. Play it.
---
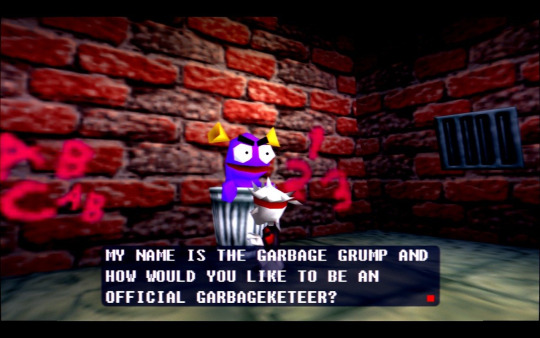
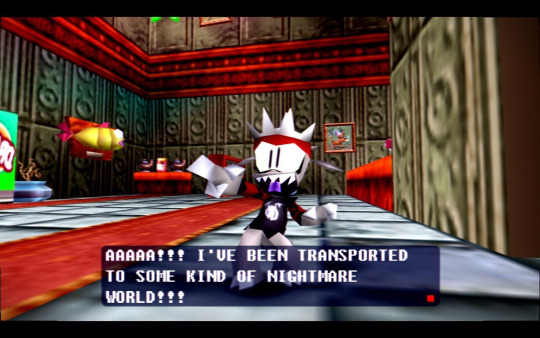
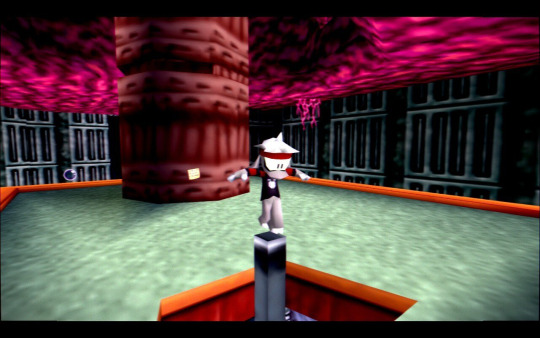
Corn Kidz 64
If I had a nickel for every time a throwback 3D Platform game starring a cute goat-like creature managed to grab my attention, I would have a whopping three nickels! Anyway, here is Corn Kidz 64, an artistically verosimile homage to the Rareware games you probably remember.
Deliciously stylized polygons welcome both you and I into a quirky mindscape. You play as a rude little prick named Seve who's having a vivid nachos related dream but has to contend with various bollocks - as it's often the case.

If you are even marginally familiar with all the Kanjo-Bazooies and Konkey Dongs out there then you will recognize its sphere of influences right away. It's a proper tribute to that era of gaming up to the inclusion of the "correct" low video resolution settings and insane completion requirements. There is much puzzling and platforming to be had, tactical traversal and secrets-within-secrets to bamboozle and titillate your gamer's lizard brain. Genre freaks will feel very welcome here.
I will say that I find the character design especially pleasing. Aesthetically, I would place it somewhere in between Rayman. Belgian comic book artist André Franquin and web strips from twenty years ago or more. It's expressive, to say the least.


As a sign of good will from the game's part, this is the track that greets you as you plunge into the realm of your dreams of childhood:
Corn Kidz 64 is a short, fun experience, bedazzled by tight controls, surreal atmosphere and "Early Internet" humour. It does not overstate its welcome and only occasionally gets immensely frustrating. Its dedication to the N64 ethos is both a boon and a detriment, in that sense. Let me put it this way: I shall not be doing a 110% completion run any time soon.
---
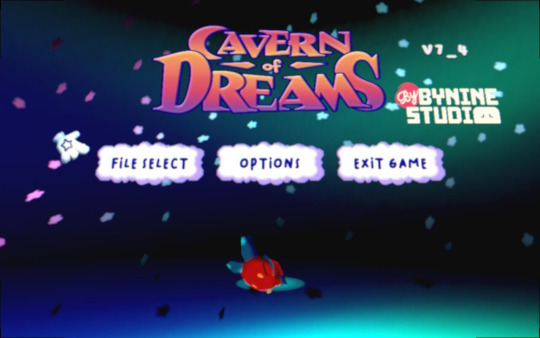
Cavern of Dreams
As a direct result of me wanting more, here is Cavern of Dreams. Yet another N64 aesthetically driven title that came out last year but was promptly overshadowed by Funny Goat Game and Sexy Goat Game - as far as my own pop cultural myopia is concerned, that is.
It is a small yet multilayered Collect-A-Thon with an emphasis on exploration rather than combat or complex platforming. There is no health bar and there are no traditional enemies. There is a handful of puzzles here and there, some of which might be legitimate head scratchers. The dragon baby is cute. I do have a couple of gripes with this one.
Playing this game is, in a word, annoying. It is bothersome how weighted and limited the movement is, it is fastidious how the character collision is in relation to the environment, it is aggravating how it all affects the gameplay in small yet noticeable ways. Here's an example: you can use the traditional ground pound to gain extra height. However, in order to do so, you have to keep pressing the attack button while in midair. The problem with that is the game still registers it as an attack when you do so. As such, if you happen to be hugging a wall, atop a small ledge, this action will inevitably cause your character to hit said wall and propel you backwards, resulting in you falling to your doom. This happened constantly. Generally speaking, the control scheme doesn't feel ideally tailored to an experience that requires precise platforming. A repeated offender would be grabbing onto climbable ropes. Which is to say, sometimes it just doesn't happen. You'll float towards a rope and, if the collision isn't pixel-perfect, you will miss it entirely. Also, Baby is unable to jump above once he climbs all the way to the top, half the time. The later levels are worse in that regard as they need some amount of skill.

Speaking of which, something that will always make me consider quitting a game in a fit of rage is being sucked down a drain that expels me into a different area, forcing me to walk all the way back to where I was before. Once again, annoying is the word.
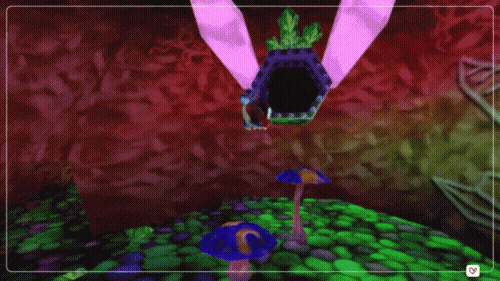
All that said, the saving grace of Cavern of Dreams lies in the exquisitely crafted, imaginative stages that compose the dreamlike tapestry of the game's aesthetics: living airborne vessels, desolate ice kingdoms, nightmarish art galleries that twist and distort your senses.

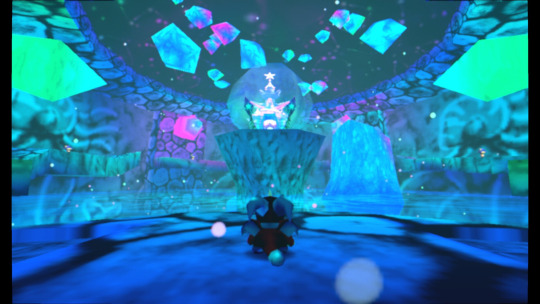
The use of colour hues, sounds and deliberately non-contiguous spaces create this palpable atmosphere of both wonder and anxiety. A welcoming world may turn weird and alienating. A dream may turn into a nightmare. There is a depth beneath the surface presentation that is absolutely worth experiencing. I really wanted to like this game but, alas, I'm left with mostly mixed feelings. Regardless, it's an adorable title with some tinges of darkness and it might just be for you!

---
As a conclusive note, I find myself enthralled by the subtle similarities these games share as well as their abundant differences. All of them are stylistically reminiscent of a specific bygone era whilst being perfectly distinct in presentation, and they all are about Dreams...


They are about exploring dreamscapes, lands where subconscious thoughts and memories materialize in daunting vistas of a forlorn past, comically bizarre hyper-realities from an active imagination or an infant's idea of the world around itself. Pondering about the familiarity of it all fills me both with comfort and melancholy: the parallelism of Dream, Childhood and Gaming. The distant memories of youth in correlation to the experience of videogame escapism are akin to a dream from which we are expected to wake... Well, now I just want to gush about Klonoa again!
In fact, I would go as far as to say that Corn Kidz 64's "plot resolution" feels like a direct parody of Door to Phantomile's ending, and it gets funnier the more I think about it.

---
A/N:
Thank you for reading.
Follow Madhog on:
YouTube Twitter Bluesky Blogger
#twitter#corn kidz 64#pseudoregalia#cavern of dreams#dreasm#klonoa#platforming#3d#n64#steam#review#master recs
23 notes
·
View notes
Text
Best DSLR Cameras for Professional & Beginner Photographers
If you're serious approximately images, investing in a incredible DSLR camera can extensively enhance your competencies and image great. DSLR cameras provide versatility, higher picture sensors, interchangeable lenses, and manual manipulate over settings. Whether you're a newbie or a professional, there may be a DSLR camera that suits your needs. In this guide, we will discover some of the great DSLR cameras to be had today, thinking about elements like performance, functions, and rate.
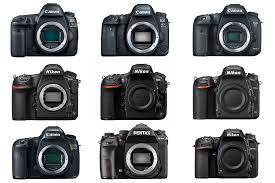
Best budget DSLR cameras for photography enthusiasts
1. Canon EOS 5D Mark IV
Why Choose It?
The Canon EOS 5D Mark IV is an tremendous choice for expert photographers who call for high resolution, surprising low-light performance, and rapid autofocus.
Key Features:
Sensor: 30.4MP Full-Frame CMOS Sensor
Autofocus: Dual Pixel CMOS AF with sixty one-point AF system
ISO Range: 100-32,000 (expandable to 50-102,400)
Burst Shooting: 7 fps
Video: 4K video recording
Connectivity: Built-in Wi-Fi, GPS, NFC
Pros:
✔ High picture resolution and element
✔ Excellent autofocus and occasional-mild overall performance
✔ Great dynamic variety
✔ 4K video functionality
Cons:
✖ Expensive
✖ Heavy body
✖ Crop element in 4K video mode
2. Nikon D850
Why Choose It?
The Nikon D850 is an extremely good all-rounder, offering a excessive-decision sensor, speedy capturing velocity, and brilliant dynamic range, making it best for both landscapes and action photography.
Key Features:
Sensor: forty five.7MP Full-Frame BSI CMOS Sensor
Autofocus: 153-factor AF system
ISO Range: 64-25,six hundred (expandable to 32-102,four hundred)
Burst Shooting: 9 fps
Video: 4K UHD recording at 30 fps
Connectivity: Bluetooth and Wi-Fi
Pros:
✔ Exceptional picture satisfactory and sharpness
✔ Long battery life
✔ Fast and accurate autofocus
✔ High ISO overall performance
Cons:
✖ No built-in flash
✖ Large and heavy
✖ High price tag
3. Canon EOS 90D
Why Choose It?
For those who want a flexible APS-C DSLR with high-pace overall performance, the Canon EOS 90D is a first rate choice, mainly for flora and fauna and sports activities images.
For those who want a flexible APS-C DSLR with high-pace overall performance, the Canon EOS 90D is a first rate choice, mainly for flora and fauna and sports activities images.
Key Features:
Sensor: 32.5MP APS-C CMOS Sensor
Autofocus: 45-factor all-go-type AF machine
ISO Range: one hundred-25,600
Burst Shooting: 10 fps
Video: 4K UHD without crop
Connectivity: Wi-Fi and Bluetooth
Pros:
✔ Excellent decision for an APS-C sensor
✔ Fast and reliable autofocus
✔ Great battery life
✔ Uncropped 4K video recording
Cons:
✖ No in-frame stabilization
✖ Limited dynamic range in comparison to full-frame cameras
four. Nikon D7500
Why Choose It?
The Nikon D7500 is a first-rate mid-range DSLR with superb photo pleasant, proper autofocus, and sturdy battery life, making it ideal for lovers.
Key Features:
Sensor: 20.9MP APS-C CMOS Sensor
Autofocus: fifty one-factor AF system
ISO Range: one hundred-51,2 hundred (expandable to 50-1,640,000)
Burst Shooting: eight fps
Video: 4K UHD at 30 fps
Connectivity: Wi-Fi and Bluetooth
Pros:
✔ Great low-light overall performance
✔ Fast and accurate autofocus
✔ Lightweight for a DSLR
✔ Good battery life
Cons:
✖ Only one SD card slot
✖ No vertical grip choice
five. Canon EOS Rebel T8i (850D)
Why Choose It?
For beginners looking for an affordable but characteristic-packed DSLR, the Canon EOS Rebel T8i is an extremely good entry-stage choice.
Key Features:
Sensor: 24.1MP APS-C CMOS Sensor
Autofocus: 45-factor all-cross-kind AF machine
ISO Range: one hundred-25,600
Burst Shooting: 7 fps
Video: 4K at 24 fps
Connectivity: Wi-Fi and Bluetooth
Pros:
✔ Affordable fee
✔ Easy-to-use controls
✔ Good autofocus for an access-degree DSLR
✔ Vari-attitude touchscreen
Cons:
✖ Limited dynamic range
✖ No in-frame stabilization
✖ Slow burst price in comparison to higher-quit models
6. Pentax K-1 Mark II
Why Choose It?
The Pentax K-1 Mark II is a unique full-frame DSLR that gives climate-sealed construction and built-in stabilization, making it ideal for out of doors photographers.
Key Features:
Sensor: 36.4MP Full-Frame CMOS Sensor
Autofocus: 33-point SAFOX 12 AF system
ISO Range: a hundred-819,2 hundred
Burst Shooting: four.Four fps
Video: Full HD 1080p at 30 fps
Connectivity: Wi-Fi and GPS
Pros:
✔ Excellent build nice with climate sealing
✔ In-body stabilization (uncommon for DSLRs)
✔ High ISO variety for low-mild images
✔ Unique AstroTracer function for night time sky pictures
Cons:
✖ Slower autofocus as compared to competitors
✖ Limited lens selection
✖ Lower video satisfactory than competitors
Choosing the Right DSLR for Your Needs
For Professionals: Canon EOS 5D Mark IV or Nikon D850 are first-rate picks.
For Enthusiasts: Nikon D7500 or Canon EOS 90D gives first rate balance in charge and capabilities.
For Beginners: Canon EOS Rebel T8i is a splendid entry-level digital camera.
For Outdoor and Adventure Photography: Pentax K-1 Mark II with its rugged frame and stabilization is good.
3 notes
·
View notes
Note
Dear Nicefieldsfm,
I hope you are doing well. My name is [Your Name], and I am an aspiring animator and a huge fan of your work. Your "Life is Strange" animations have deeply inspired me, and I would love to create my own.
Could you please share some advice on the following:
Software and Tools: What do you use for your animations?
Workflow: How do you go from concept to final render?
Character Design: Tips for designing and rigging expressive characters?
Scene Composition and Lighting: Key techniques for capturing the series' emotional tone?
Thank you for your time and inspiring work. I look forward to your response.
Hello Jim-Chen!
Thank you, glad you like my stuff! I haven't made videos in a while, but I used to make them in Source Filmmaker. For my last few videos I moved over to Blender which is way more advanced, which I'd definitely recommend. Both are free to download.
As for workflow for my animations, I'd just start animating at the beginning and see where it goes from there. I'm a very visual thinker so I always know what I want it to look like in my head. When I'm done I export my animations as an image sequence and import them into Adobe Premiere Pro where I edit them, add sound and export the final video.
In case you're not aware, all models are extracted from those Life is Strange video games. I didn't design them. 😬 I don't even have to rig them, other people in the community have already done that, I just download them ready to go. I always use the same models and locations so I'm always good to go.
I've always liked studying cinematography in movies and TV, I'd suggest studying your favorite movies and art. One common trick is to keep the background dark and to light up your actors to make them stand out in the scene. I usually have some backlight too, to make the edges of characters pop. A lot of my pics and videos can have up to 4 light sources per character. I would also recommend having some volumetric lighting. Lighting is key.
To give them a "film look" I make my videos 24 fps which I think is pretty rare in the online 3D community, a lot of animators make them 30 or 60 fps for the smoothness.
I will usually have a shallow field of view with some depth of field. I also sometimes add a little bit of film grain. This is all personal preference to go for that "film look".
Thanks for the question, I hopes this helps somewhat!
11 notes
·
View notes
Text
Dimensity 7300 : Unbelievable Speed and Power Unleashed
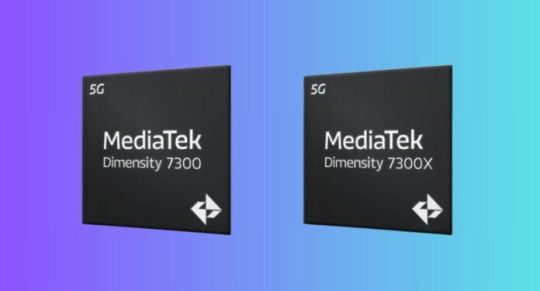
MediaTek launched the 4nm Dimensity 7300 and Dimensity 7300X high-end mobile device processors today. Best-in-class power economy and performance make Dimensity 7300 chipsets ideal for AI-enhanced computing, faster gaming, better photography, and effortless multitasking. Dimensity 7300X supports twin displays for flip-style foldable devices.
Both MediaTek Dimensity 7300 chipsets have 2.5GHz octa-core CPUs with 4X Arm Cortex-A78 and A55 cores. 4nm reduces A78 core power consumption by 25% over Dimensity 7050. To speed up gaming, the CPU combines the most recent Arm Mali-G615 GPU with a number of MediaTek HyperEngine optimisations. The Dimensity 7300 series provides 20% quicker FPS and 20% more energy efficiency than competing options. The new chips optimise 5G and Wi-Fi game connections, use clever resource optimisation, support Dual-Link True Wireless Stereo Audio and Bluetooth LE Audio technology to significantly improve gaming experiences.
According to MediaTek’s Wireless Communications Business Deputy General Manager Dr. According to Yenchi Lee, “The MediaTek Dimensity 7300 chips will help integrate the newest AI and connectivity technologies consumers can stream and game seamlessly. “Furthermore, the dual display capability of the Dimensity 7300X allows OEMs to create creative new form factors.”
With compatibility for a 200MP primary camera and a premium-grade 12-bit HDR-ISP, the MediaTek Imagiq 950 is another enhanced photographic feature available with the Dimensity 7300 chipsets. New hardware engines provide accurate noise reduction (MCNR), face detection (HWFD), and video HDR in the Dimensity 7300. This allows users to take beautiful pictures and videos in any kind of lighting. Compared to the Dimensity 7050, live focus and photo remastering are 1.3X and 1.5X faster, respectively. In addition, 4K HDR video may be recorded with a dynamic range that is more than 50% broader than competing solutions, allowing users to capture more detail in their recordings.
The MediaTek APU 655 doubles the performance of the Dimensity 7050 while also greatly increasing the efficiency of AI tasks. Also, in order to reduce memory requirements for larger AI models and more effectively use memory bandwidth, the Dimensity 7300 chips support new mixed precision data types.
The Dimensity 7300 SoCs enable global HDR standards and remarkably detailed WFHD+ displays with 10-bit true colour thanks to MediaTek’s built-in MiraVision 955. This improves media streaming and playing. Additionally, OEMs find it simpler to satisfy the expanding market demand for cutting-edge form factors thanks to the Dimensity 7300X’s specialised support for dual display flip phones.
Dimensity 7300 and Dimensity 7300X important features
With MediaTek’s own optimisations and a full suite of R16 power-saving advancements, MediaTek 5G UltraSave 3.0+ technology offers 13–30% more power efficiency than competing options in typical 5G sub-6GHz connectivity settings.
Supporting 3CC carrier aggregation up to 3.27Gb/s 5G downstream speed, which enables better downlink rates in suburban and urban settings.
Support for multi-band Wi-Fi 6E allows for dependable and quick multi-gigabit wireless access.
Users will have more options with dual 5G SIM capability and dual VoNR.
This was addressed by MediaTek’s Dimensity 7300 series in May 2024. The Dimensity 7300 and 7300X chipset series boosts high-end to smartphone and foldable device performance, energy efficiency, and AI.
Constructed for Rapidity and Effectiveness
A powerful octa-core CPU powers the Dimensity 7300. This combo is ideal for gaming and multitasking with four 2.5 GHz Arm Cortex-A78 cores. Four Arm Cortex-A55 cores, which are energy-efficient, complement these and guarantee dependable performance for daily use. In comparison to the Dimensity 7050, this combination represents a major advancement.
The advanced 4nm manufacturing process is a feature of the 7300 series. This corresponds to a 25% decrease in power usage over the 6nm technique utilised in earlier generations. Users will benefit from longer battery life as a result, while manufacturers can create sleeker devices without compromising functionality.
Superpower in Graphics
Immersive mobile experiences require strong visuals. The Dimensity 7300 has an Arm Mali-G615 GPU to fix this. This graphics processor runs even the most demanding games smoothly, and MediaTek’s HyperEngine technology stabilises the network and efficiently manages resources. MediaTek says the 7300 series is appealing to mobile gamers due to its 20% higher frame rates (FPS) and energy economy.
AI Gains Strength
AI is increasingly changing the smartphone experience, enabling intelligent assistants, better photography, and facial recognition. The Dimensity 7300 uses the MediaTek APU 655, following this trend. This AI processing unit doubles the efficiency of the Dimensity 7050, resulting in a notable performance boost. New mixed precision data types, which enable more effective memory bandwidth utilisation and lower memory requirements for larger AI models, are also supported by the 7300 series. Future smartphones will be able to incorporate even more advanced AI features thanks to this.
Gorgeous Images
For a fascinating mobile experience, a stunning display is essential; a strong processor is only half the story. This demand is met by the Dimensity 7300 series, which supports powerful screens. With the ability to support WFHD+ resolutions at frame rates of up to 120 Hz, these chipsets guarantee fluid and visually spectacular images. For an even smoother user experience, the 7300 series also supports Full HD+ screens at an even higher refresh rate of 144Hz.
Concentrate on Take Pictures
Users now place a greater value on mobile photography, and the Dimensity 7300 series delivers. The chip has MediaTek’s Imagiq 950 image signal processor (ISP), which provides sophisticated photographic features. With the 12-bit HDR pipeline supported by this ISP, detailed information and brilliant colours may be captured. Furthermore, the Imagiq 950 enables features like video HDR, face detection, and precise noise reduction, guaranteeing beautiful images and movies in a range of lighting scenarios. The 7300 series stands out for its ability to enable dual simultaneous video capture, which allows for the development of more imaginative content.
A Set of Chips for Foldables
A 7300 variation called the Dimensity 7300X goes one step farther by being designed with foldable cellphones in mind. One essential component of these cutting-edge gadgets is dual display compatibility, which this chipset provides. Manufacturers may design foldable phones with seamless experiences on both the cover and main displays thanks to the 7300X.
Mobile’s Future
Mobile processing power has advanced significantly with the release of the Dimensity 7300 series. This chipset family, with its emphasis on efficiency, performance, AI capabilities, and support for cutting-edge technologies like foldable devices and high refresh rate screens, is positioned to have a significant impact on the direction of mobile technology. The Dimensity 7300 series offers makers a strong and adaptable foundation to develop next-generation smartphones that offer outstanding user experiences as smartphones continue to advance.
Read more on govindhtech.com
#dimensity7300x#MediaTekDimensity#AI#artificialintelligence#AITechnology#mobiletechnology#smartphone#aimodel#CPU#cpupower#news#technews#technology#technologynews#technologytrends#govindhtech
7 notes
·
View notes
Text

What is Interlacing? Standard-definition NTSC SD video does not run at 30fps. Technically the frames, as captured digitally, are 29.97 fps but the effective frame rate on older TVs was 59.94, because playback would only show every other line of the picture (as we would see it now digitally), and cycle back and forth at about 60fps (59.94), or 50fps in PAL territories (25fps). This is what interlacing is: you can see how this digital capture actually alternates between two frames on every other line. You can deinterlace this in various ways, such as outputting as 59.94 frames per second in VirtualDub using Yadif.

Here's interlacing in a Muppet Show episode. The 25fps picture is actually 50fps, with two distinct frames being shown on alternating lines, so you get a 50fps (or 60fps in US) video presentation on an SD CRTV. A correctly deinterlaced version would show both frames, rather than delete one of them ….


NTSC video never actually ran at 30 fps, except in rare cases, and that frame rate looks strange to us. We were always seeing 59.94 fps (as fields per second) or 24 frames per second film presented in a 59.94 playback with a 3:2 pulldown. (That is, a pattern of three "clean" frames then two "interlaced" ones where an extra half-frame is added to the playback for timing reasons.)

There is new motion and frames happening, in NTSC SD video, at 59.94 frames per second, although these fields do not get the full vertical resolution of the picture when in motion.

Your deinterlaced version of an old VHS should be running at 59.94 fps (or IVTCed to 23.98 fps if it's a film). It should not have these lines in it, except in your raw capture, which should have these lines in it. In most cases it should not run at 30fps in the final web export.

You can deinterlace this during playback in VLC in several ways, and in editing. A "bob" deinterlace is playback at 59.94 fps at a halved vertical resolution.
Others try to retain more quality by judging whether the image is currently in motion or not, and incorporating the full picture if it's not in motion.
And IVTC (Inverse Telecine) removes the additional fields which turned a 24fps film into a 29.97/59.94 interlaced presentation.


5 notes
·
View notes
Text
youtube
Dark Souls 2: Worse than Soul Loss・ダークソウル2(初見プレイ):ソウル奪われるより苦難
I promise I'll find new background music for the next episode. IF MY FOOTAGE DOESN'T GET CORRUPTED.
ahem.
Welcome to my Dark Souls 2 let's play, featuring the original Xbox 360 1.00 version of the game. I've often heard that Dark Souls 2 is the black sheep of the FromSoft catalogue, but I've never played a FromSoft title before, so let's see how painful this game really is! Mostly, this is a fun exercise for me to practice my Japanese and maybe learn a few video editing tips, so I hope you'll enjoy this journey with me.
I hope the video quality's better this time around. I tweaked my capture card to 1920 x 1080 and 60 FPS, but honestly I can't get a straight answer on what DS2 actually runs at. The best I've come up with is 720p 30 FPS, but the 360 upscales it and also can run up to 40+ FPS? I don't know...
次回は新しいBGMを見つける、きっと。録画が破損されなければ!
ごほん
ミューズのダークソウル2の初見実況プレイだ!今回はXbox360の1.00バージョンをやりたいと思う。フロムソフトウェアのゲームの中でダークソウル2が一番やばいそうだけど、フロムソフトウェアのゲームを挑戦したことないから、どのぐらい苦しいかなぁ。この実行プレイは主で日本語の練習するためなので、日本語の字幕に間違いがあればぜひ教えてください!そして、英語の字幕も付けておいたから、一緒に英語を勉強しよう!
今回のクオリティがちょっと上がるといいね。キャップチャーの設定が1920x1080と60FPSにしたけど、ダークソウル2の元クオリティの詳しい情報が見つかれない。おそらく1080x720と30FPSだが、Xbox360がクオリティとFPSをアップするそうです。わけわかんない…
#Dark Souls#Dark Souls 2#First Playthrough#Let's Play#Subtitles#English#Japanese#Video Corrupted#Xbox360#Usada Pekora#DOVA SYNDROME#Earthbound#Sanctuary Guardians#Fist of the North Star#You are already dead#Bill Waterson#Calvin and Hobbes#Metal Gear Solid#Ugandan Knuckles#The Punisher#ダークソウル#ダークソウル2#初見#レッツプレイ#字幕#英語#日本語#録画が破損された#兔田ぺこら#ホロライブ
2 notes
·
View notes
Text
Looking for the Best Camera for Video? These Are the Top Choices for 2025!
In 2025, the world of videography continues to evolve, with cameras becoming more powerful, portable, and capable of capturing breathtaking footage. Whether you're a professional filmmaker, a content creator, or an amateur enthusiast, choosing the right camera for video is essential. With so many options on the market, it can be overwhelming to determine which one is best suited to your needs.
This guide will walk you through the best cameras for video in 2025, from cutting-edge mirrorless models to professional-grade cinema cameras. We’ll explore the standout features, performance, and price points of each, so you can make an informed decision and start shooting high-quality videos.
1. Why Choosing the Right Camera Matters
When it comes to videography, not all cameras are created equal. The best camera for video needs to offer crisp image quality, smooth frame rates, and advanced video-centric features like high dynamic range, autofocus, and stability. It’s important to know what to look for, whether it’s 4K/8K resolution, fast autofocus, or professional-grade audio options.
Key factors to consider:
Resolution: The higher the resolution, the sharper the footage.
Frame Rate: Higher frame rates ensure smoother motion, especially for action shots.
Low-Light Performance: Cameras with great ISO performance will excel in darker environments.
Stabilization: In-body or lens stabilization can make or break handheld shots.
Lens Compatibility: Choosing a system with versatile lenses is crucial for different shooting needs.
2. Sony Alpha 1 – The All-in-One Powerhouse
Sony continues to dominate the camera market, and in 2025, the Sony Alpha 1 is still one of the best cameras for video enthusiasts and professionals alike. With 8K recording capabilities at 30 fps, this mirrorless camera is a beast in terms of video performance. Its Real-time Eye AF for video ensures that subjects stay sharp even in fast-moving environments.
Key features:
8K 30fps and 4K 120fps video recording.
15-stop dynamic range for rich details in highlights and shadows.
Full-frame sensor for superior low-light performance.
Dual CFexpress card slots for extended recording times.
3. Canon EOS R5C – The Hybrid Marvel
For those who want a camera that excels in both photography and video, the Canon EOS R5C is a top choice in 2025. It offers cinema-grade video performance with 8K RAW recording and comes with advanced cooling for extended video shoots. The R5C bridges the gap between Canon's cinema line and its mirrorless systems, making it perfect for hybrid shooters.
Key features:
8K RAW at 30fps and 4K 120fps.
Dual Pixel CMOS AF for incredibly fast autofocus.
C-Log 3 for extended dynamic range in post-production.
Compact and lightweight design ideal for on-the-go shoots.
4. Panasonic Lumix GH7 – The Best for Content Creators
For content creators who need a more budget-friendly option that doesn’t compromise on quality, the Panasonic Lumix GH7 is a go-to camera. Known for its Micro Four Thirds sensor, the GH7 offers excellent video performance in a compact form factor. It’s perfect for vloggers, YouTubers, and those who need a camera that can shoot high-quality video without the bulk of larger systems.
Key features:
6K video recording at 30fps.
5-axis in-body stabilization for smooth handheld shots.
10-bit 4:2:2 internal recording for professional-grade video quality.
Versatile, lightweight design ideal for travel and vlogging.
5. Blackmagic URSA Mini Pro 12K – The Cinema King
When it comes to professional cinema cameras, the Blackmagic URSA Mini Pro 12K is a game-changer in 2025. Offering 12K resolution, this camera provides an unmatched level of detail for film and high-end production work. With RAW recording and color science, it’s the ideal choice for filmmakers who need the best in image quality and post-production flexibility.
Key features:
12K Super 35 sensor with 14 stops of dynamic range.
Built-in ND filters for shooting in various lighting conditions.
Dual CFast and SD card slots for extended recording.
Blackmagic RAW format for ultimate flexibility in post.
6. Fujifilm X-H2 – The Stylish Performer
For videographers who love Fujifilm’s color science, the Fujifilm X-H2 is a standout model in 2025. It offers 8K video recording in a stylish and retro-inspired design, making it a great choice for videographers and photographers alike. With its APS-C sensor, the X-H2 delivers excellent detail while remaining compact.
Key features:
8K video recording at 30fps and 4K at 120fps.
F-Log2 for a higher dynamic range.
Film Simulation modes for unique color profiles straight out of the camera.
In-body stabilization for steady handheld footage.
3 notes
·
View notes
Text
BAS - Genre & Log lines [26.2.24]
Hello folks, as you know I'm starting my Bachelor of Screen Arts this week, and I thought because I love to learn and share that knowledge, it would be fun to share some of what I'm learning :)
Today, we learned about genre & log lines, which, might not sound interesting or pretty basic at first. But there's surprisingly a lot of cool stuff here & EXAMPLES! :D
Genre is a style or category of film, art, music & literature with a defined set of characteristics that allows examples to be grouped by others.
For video games, the same goes, except genre also includes how the player interacts with the game. E.g. RPG or FPS.
What's interesting, is that genre changes over time. An action movie today, won't be the same as an action movie from 30 years ago. It's how they evolve, change and develop which keeps them new and interesting. What elements are repeated is what keeps audiences feeling safe with something they'll like, and what elements are different (whether it's abiding by or subverting standard conventions), is what keeps in interesting, so the audience doesn't get bored by the same carbon-copy films.
Log line are a summary of a story's essential ingredients in a way which isn't bogged down with details, but is able to capture the listener's interest.
E.g. 'A plucky hen struggles to escape a cruel farmer. When a rooster from the circus arrives, a crack team assemble - Can they get out before the chicken pies get cooked?'
-> Chicken Run
I thought this was really cool. I've tried to do this in the past, and mine always sound washy and long.
So for fun (& practice), I wrote the log line for Lost Children of the CCC:
'A reformed criminal with the power to reverse time is unable to save his friends from a notorious clan of criminals. Desperate to change their fates, he rewrites reality, unknowingly unearthing a dark secret of the past. Can him and his friends survive? Or will they be the next victims of Project Harmonious?'
That sounds SO COOL! Like, this is what I currently have on A03 for the same story:
'It was meant to be the perfect ending, It was meant to be a happy ending with his closest friends Charles & Ellie, It was meant to be HIS happy ending... ... and then the Toppat's happened. But not this time. Henry Stickmin is getting his happy ending, no matter the consequences.'
My current version, it sounds cool like an awesome blurb, but it's very cryptic and unclear. It gives us character names and tells us that someone or thing, called the 'Toppats' ruined this guys happy ending, and he's out for revenge. But that's it. It just tells us a revenge story.
The log line on the other hand is very clearly and easily presents the main character, the stakes, and enough of the plot that you know what happened, and a little bit of how.
The log line clearly has elements of an action/thriller (Ex- criminal vs criminal clan & hints of survival or death), sci-fi (time travel) and mystery ('dark secrets of the past').
All things which are exactly what this story is: An action mystery thriller, with aspects of sci-fi & fantasy. (I know, fantasy isn't technically in there, but the time travel is a part of a magic system in my world, not the sci-fi part (the sci-fi refers to Project Harmonious), so, fantasy.)
#helpfulstuff#Bachelor of Screen Arts#writing help#genre#log lines#story writing#lost children of the ccc
3 notes
·
View notes
Note
I love the background you made I started using them right away!! How are you able to get these crisp visuais? Do you just take them from an emulator?
Thank you so much! It honestly shocks me that people actually use them its an honor ;~; <3
Pretty much all my PSO gifs are from Ephinea now, though there are a few floating around on here that are from Dolphin. Ephinea allows you to adjust your graphis similarly to an emulator, but more importantly, I can easily move the camera around on their server, which allows me to get my character out of frame and whatever angle I want :)
Long with the graphics the main reason would probably be my capture program Camtasia, followed by being put through Photoshop. I can record around 60 fps, and with PSO being 30 fps, recording isn't a problem when it comes to missing frames. The video files are also exported in 1080, and Photoshop allows me to up the resolution further :3
#also big thanks to the person who originally requested I try making a background out of a gif and I went completely ham over it#but yeah camtasia and photoshop are all I've ever used when making gifs on this site#i feel arrogant saying over 10 years of familiarity but its a bit of that too
3 notes
·
View notes
Text
TOOL TUTORIAL 4
Screencapping Frames with FFmpeg
FRAME BY FRAME SCREENCAPPING METHODS
Tool type: Command Line tool
Operating systems: Mac, Windows, and Linux
Difficulty: Even if it's your first ever time opening your command line and trying to type anything, I think you can do this! I believe in you! :D
Input: Video files (any video file format).
This tutorial is largely based on instructions provided by u/ChemicalOle as part of their GIMP GIFS 101 tutorial for r/HighQualityGifs.
____________________________________
WINDOWS USERS: CHANGE ALL FORWARD SLASHES IN THIS SCRIPT TO BACK SLASHES!!!
____________________________________
Tutorials I've made so far have covered gif-making methods where video footage is transformed straight to .gif and there is no need to screencap frames. When making gifs in Photoshop (and if you want to make gifs using GIMP) rather than input video straight into the program, you often load a stack of screencaps into the program—one screencap representing every frame. After all, gifs are nothing more than a series of images all stacked together playing one by one in a loop. So lets learn a super faster automated way of screencapping every frame in a video clip automatically. Even if you've never opened your OS's command line interface in your life, I think you can do this!
1. Install FFmpeg
I recommend you install FFmpeg via Homebrew if you're on Mac or Linux by pasting this into your terminal (if/once Homebrew is installed):
brew install ffmpeg
Windows users or other users who don't want Homebrew can follow install instructions on the FFmpeg website.
2. Make a Folder
Make a folder on your desktop called FRAMES and place your video source file in that folder.
I’m going to rename my source video video.mp4 for this tutorial, but you can also just change “video.mp4” to the name of the file in the script below—this includes changing the video file extension in the script below as needed. I don’t think there’s a video file type FFmpeg cannot work with.
3. Determine when the moment you want to gif begins and ends
I’m going to gif a short moment from Season 1 Episode 7 of Supernatural as an example.
According to my video player (I'm using IINA) the exchange I want to gif starts at 8:02.565 and ends at 08:10.156. While you can trim precisely by the millisecond, I’m going to assume your video player doesn’t show milliseconds since many don't.
I'm going to keep the start of my clip at 08:02 but round up the end timestamp 1 second to make sure I get all the milliseconds in that second I want to include. In my case: I need to start capturing at precisely 8.02 and end capturing at 08.11, which is 9 seconds later.
4. Use this script template
You want to use the following template script u/ChemicalOle provided (replacing each # with a number you need):
cd YourFilePathGoesHere ffmpeg -i video.mp4 -r ## -t # -ss ##:## -f image2 frame_%4d.png
video.mp4 is where your video file name goes (including changing the video extension if you need to to .mkv, .mpg, .mov, etc).
-ss ##:## specifies when to start capturing. (I need to put 08:02 here)
-t # specifies how many seconds to spend capturing. (I need to put 9 here)
-r ## tells FFmpeg how many times to capture a .png every second (i.e. the frames per second or FPS). u/ChemicalOle recommends you set this at 30 for a 30 FPS capture.
-f image2 frame_%4d.png tells FFmpeg to output .png images with the name frame_0001.png, frame_0002.png, frame_0003.png, etc.
In my case, my script will look like this:
cd ~/Desktop/FRAMES ffmpeg -i video.mp4 -r 30 -t 9 -ss 08:02 -f image2 frame_%4d.png
The top line starting with cd just tells my terminal to change directories to where my video file is located, and where to dump the frames to be generated (in the FRAMES folder with my video file). (Windows users: change forward slashes to back slashes and that cd command will move you to your FRAMES folder too).
When you input this command into your system shell (Terminal on Mac, Powershell on Windows) and press enter, you you might feel like it’s stalling at first or not working because
"Press [q] to stop, [?] for help"
Will be printed on the screen. It is working though! Just leave it alone for minute and it'll start working. When the cursor prompt reappears, there will be a bunch of PNGs in your FRAMES folder, organized in sequence by number.
6 notes
·
View notes
Text
Price: [price_with_discount] (as of [price_update_date] - Details) [ad_1] From the manufacturer Sony Alpha ILCE 6100L 24.2 MP Mirrorless Digital SLR Camera with 16-50 mm Power Zoom Lens (APS-C Sensor,Fast Auto Focus,Real-time Eye AF,Real-time Tracking,4K Vlogging Camera & Tiltable Screen), Black ILCE-6100 comes with Exmor CMOS image Sensor, implemented with the latest BIONZ X image processor, It offers a lightning fast autofocus time of 0.02 seconds with Real-time Eye AF offers AI based object recognition, resulting in improved accuracy, speed and tracking performance for both human and animals. Brand Sony Model Name Apsc Image Stabilization Optical Max Shutter Speed 767011 Seconds Min Shutter Speed 30 Seconds SanDisk Extreme SD UHS I 128GB Card for 4K Video for DSLR and Mirrorless Cameras 180MB/s Read & 90MB/s Write With the SanDisk Extreme SD UHS-I memory card save time transferring media with read speeds upto 180mb/s (128GB-256GB) powered by SanDisk QuickFlow Technology. Pair with the SanDisk Professional PRO-READER SD and microSD to achieve maximum speeds (sold separately). With shot speeds up to 130MB/s* and UHS speed Class 3 (U3) recording you're ready to capture high-resolution, stutter free 4K UHD video Brand Sandisk Model Name Extreme Memory Storage Capacity 128.0 Gb Compatible Devices Mirrorless Camera Special Feature Ultra High Speed Real time eye AF for still + Animal Eye AF;Real time tracking World fastest 0.02 Sec AF speed with 425 phase detection and contrast points;24.2MP, EXMOR CMOS sensor with outstanding light sensitivity 11 FPS continuous shooting with AF/AE;180 degree tilt able touch LCD screen ISO sensitivity up to 102400;High resolution, sensitivity and colour reproduction capability;Smooth and stable AF;Country of Origin: China Save time with card offload speeds upto 180mb/s powered by SanDisk quickflow technology Perfect for shooting 4K UHD video and sequential burst mode photography Capture uninterrupted video with UHS Class 3 (U3) and video speed class 30 (V30) Built for and tested in harsh conditions [ad_2]
0 notes
Text
VIOFO A229 Pro 3-Channel
Why Choose the VIOFO A229 Pro 3-Channel?
✅ High-Resolution Recording: The front camera captures video in 4K resolution at 30 frames per second (fps), ensuring clear and detailed footage. The rear camera records in 2K at 30 fps, and the interior camera offers 1080p recording, all contributing to comprehensive coverage. ✅ Wide Viewing Angles: The front camera provides a 140° field of view, the rear camera offers a 160° field of view, and the interior camera has a 150° field of view, effectively covering critical areas around the vehicle. ✅ Night Vision: The interior camera is equipped with four infrared LEDs, enhancing its ability to capture clear footage in low-light conditions, which is particularly useful for monitoring the vehicle's interior at night. ✅ Advanced Parking Modes: The A229 Pro offers multiple parking modes, including buffered parking mode, time-lapse recording, and low-bitrate recording, providing surveillance when the vehicle is parked. ✅ Voice Control: The dash cam supports voice commands, allowing hands-free operation for functions like locking footage, taking snapshots, and starting or stopping recordings. ✅ Dual-Band Wi-Fi and GPS: Built-in dual-band Wi-Fi (2.4GHz and 5GHz) facilitates faster data transfer, while the GPS feature logs speed and location data for each recording.
VIOFO A229 Pro 3-Channel Pros & Cons
👍 Pros (What We Love) ✔ Clear and detailed video from all perspectives. ✔ Effectively covering critical areas around the vehicle. ✔ Aiding in the clear capture of details such as license plates during nighttime or in challenging lighting conditions. ✔ Reliable Power Source: Utilizing a capacitor instead of a battery. ✔ User-Friendly Installation and Operation 👎 Cons (Things to Consider) ❌ Higher Price Point ❌ Complex Wiring for Multiple Cameras ❌ App Functionality Limitations
Should You Buy the VIOFO A229 Pro 3-Channel?
**📢 Overall Score: ** 8.7/10 ⭐⭐⭐⭐⭐ 📌 Best For: ✅ Drivers who want high-quality video in all lighting conditions ✅ Rideshare drivers (Uber, Lyft, Grab) needing a cabin camera for passenger safety ✅ Car owners who need reliable 24/7 parking surveillance ✅ Tech-savvy users who value GPS tracking, WiFi connectivity, and app control ⚠️ Not Ideal For: ❌ Users who want built-in cloud storage ❌ Beginners who prefer simpler single or dual-channel setups ❌ Those who need true 4K front recording 🎯 Conclusion: Get the Best Car Accessories for 2024! 📢 Looking for More Car Accessories? Check These Reviews: - Best Dash Cams in 2024 - Top Smart Car Gadgets for Safer Driving - Best GPS Trackers for Vehicles Read the full article
0 notes
Link
0 notes