#2x4 from the local hardware store
Text
I was busy for a while and my tools were collecting dust. Tried to build a toolbox but I got a snag. Die to lack of foresight of the build procedure at this point, there came a moment where I had to make a cut down the legnth of a board; which is difficult to do with a jig saw. The lack of confidence and the not really wanting to spend what little free time I had on practicing redundancy, I just let it stand half complete for couple weeks
Until one saterdag I took it apart and used the wood to rather just make a planter box since by now I can whip those up quickly. What was grindimg my nuts tho was the fact that working with pallet Wood, nothing you make is ever going to be straight unless you put alot of work into wood process. I dnt want to spend time learn processing yet. I want to build. But everything I've built so far, using pallets, is not coming out the way I envisioned in my head.
When I mentioned my frustration to my mentor carpenter he said that I should not expect a straight or flush product when working with wood of this quality. This is after all a recycle project.
I made a nice planter box but I wasn't happy. It wasn't straight. I coils get all the nookies and crannies when varnishing....it's just....uuurg...
So I asked my mentor if we could go to the hardware store to purchase some wood. I wanted to build something, anything, using wood that was atleast straight.
I dnt know sizes of woods. I can appreciate a good grain and for now.that's about it. Strength and application is beyond me at this point.
So I show him a picture I saved on Pinterest. Simple coffee table. Make legs. Add top. Simple. I could see myself assembling this piece of furniture. At the shop we chose out some lengths, and ask the guys there to chop up into sizes that'll fit in the car...
And then I simply went to work. Assembling my little coffee table. ..gave it a sand and a single coat of varnish and some stain....
And then 5 hours later this happened:

I've been in utter disbelief since I first stepped back to look at the first coat of varnish. It's not even done. I just had to stop and come show you what I had created.
There's is still lots to learn....but wow have I learn a metric fuck ton already.
Excited for the road ahead.
PS. I got a grinder and a sanding attachment.
Off on holiday from work and back home. I'll be busy.
#carpenter thoughts#beginner woodworking#beginner carpentry#amature woodwork#coffee table#omg i made that with my hands#and some tools#clear varnish#burhundy wood stain#2x4 from the local hardware store
0 notes
Text
Diy tea box

#Diy tea box how to#
With the price of wood these days, it’s important to be thrifty when you can, and garden projects are a great way to do that. Pro Tip: If there is a sawmill near you that deals with cedar, such as Grant’s Cedar Mill here in TN, you buy a bunk (approximately 2 pickup truck loads) of cedar “2nds” for about $200. To continue to nurture them, I recommend using homemade compost tea as a fertilizer. Organic Container Soil - Plants will have their best start when given nutrient-rich soil. Saw, Drill, Drill Bits, Staple Gun, and Scissors - If you are curious about which tools I use, you can check out my tool reviews here. So if you’re using ¾” thick wood for this project, make sure it’s actually ¾” thick or your 1 ½” screws will pop out the other side.Ģ4”x24” Landscaping Fabric - Even an old towel or t-shirt would work for this, and if there’s no fabric or staple gun available, just line the bottom with wood instead and you’ll do just fine. An example is that 2x4’s are not actually 2”x4”, they are 1 1/2 x 3 1/2 inches.
#Diy tea box how to#
Also, check this post out if you're interested in learning where your lumber comes from, how to turn trees into useable lumber, how the milling process works, how lumber is dried, etc.Ģ0 1 1/4” Exterior Grade Screws - If you’re using lumber from the hardware store, it’s always a good idea to check to make sure the thicknesses of your wood is “as advertised” so you can buy the correct length screws for the job at hand. To make your planter more affordable, you can purchase discount lumber directly from a local sawmill (see Pro Tip at the end of the post). Easy, DIY, Planter Box Plans - Grab my FREE plans at the end of this post!ġ2’ x 6”x ¾” Cedar or Pine Lumber - Raw (untreated) cedar is an ideal wood to use because it is extremely water and rot-resistant.
0 notes
Text
I wasn’t here much over the summer, partly because my parents had a lot of houseguests who are disturbed by my nocturnal wanderings so I just stayed home at the apartment a lot, and partly because I had so darned much to do: two catering gigs, writing an article, editing my own book chapter, editing other people’s articles, developing a themed reading list for the magazine, and putting together a mammoth job application. (As in, once I got the requested materials together it was 600 pages. I didn’t apply to grow my teeth out and wander around the ice caps naked on all fours, because I don’t have the accreditation for that.)
Also, that pandemic thing that makes you bake your own bread hit me too, so my normal aversion to food waste kicked into high gear. I made dandelion jelly and chokecherry syrup. My parents have a freezer full of strawberries, blueberries, apples, pears, and Saskatoon berries; and more pears and apples are sitting dehydrated in bags. One of my best friends came back to town after the death of one of her grandmothers, and we spent some time over at her parents’ house, and her parents said, “Oh hey, by the way, when you pass the house, pick some pears. Off the ground, off the tree, doesn’t matter. The place is empty, and you’ll save us cleaning them up.” So yeah, lots of tiny juicy pears. And seeds for next year, in case the job application doesn’t go through.
And the garlic scapes my father bought ended up going brown and gross down in the basement. I’d promised to pickle them, but by the time the houseguests left there was no doing anything with them. Well, except harvesting the heads to plant our own garlic for next year. I was supposed to build raised beds for them this week, as per instructions from the local alliomancer, but the hardware store is out of 2x4s, because remodelling is apparently sourdough for homeowners.
I’ve also taken up smoking. Started with a cheese, and when that seemed not to kill anyone immediately, tried salmon. I like it just fine, but Will said I should slice it more thinly. I wasn’t able to make the homemade smoker I cobbled together out of two lasagna pans, tinfoil, and a couple of binder clips work the way it did in the YouTube tutorial--perhaps because I was using a barbecue lighter, and the YouTube guy had a blowtorch--but in the end I just put the chips and the food into my dad’s barbecue, turned the burner on low, and closed the lid for like three hours.
Still no cases in town. A new case pops up every couple of days in Sudbury, but so far there have been no deaths in our district since May. But Toronto is going wild.
The original plan was for my mom to go down to spend Thanksgiving with my brother’s family, and then, on the way back, scoop up another of my best friends and her mom, who would spend a week at my parents’ house and then take the bus back. But a couple of weeks beforehand, as case numbers kept rising and rising, the friend and I decided that it was too risky--even if she and her mom made it up okay, being on a bus for hours seems kind of iffy right now--and then my brother found out that one of his sisters-in-law who’d been visiting had attended a wedding where someone tested positive, so everyone stayed put for Thanksgiving. And there was lamb and toasted pecans with garlic and roasted vegetables and cheesy bread and chai pumpkin pie and apple-cranberry kuchen.
Oooh! And the dive bar at the end of my parents’ street has been replaced by an Indian restaurant, the first one in town. The food is AMAZING, and every time I pass they are as full as they can be while observing proper distancing between tables.
I finished La Baronne Trépassée, but it was kind of disappointing. Like, a genre fail. Imagine LOTR if when Frodo and Sam and Gollum made it to Mount Doom, Frodo offered Sam the ring and confessed that this was all an elaborate proposal, and all the orcs and ringwraiths took off their costumes and they were just students, and Sam said yes and they lived happily ever after.
Best books so far this year have been Happiness by Aminatta Forna and Raybearer by Jordan Ifueko.
153 000 words on the new fic. Probably gonna need cutting.
19 notes
·
View notes
Note
hello!! do you have an resources for building sliding doors for a tank? i want to turn my 55 gallon on it’s side and use it for my leopard gecko and thats really my only obstacle before actually tackling this project. tysm in advance!
Hey there! Sliding doors are surprisingly easy to install and require very few tools. You need a track (upper and lower) that spans the length of your enclosure. You can get these pretty cheap on amazon though they’re hard to find in stores (at least around here). You’ll need silicone to mount your tracks. Silicone comes in many forms, colors and intended applications. Just make sure you get a kind that does NOT have mold resistance, as I’ve heard from several people that it contains a chemical that can be bad for your reptiles. Silicone can be bought pretty much anywhere; online, hardware store, even your local general store that has a home improvement/outdoor section will likely carry it. And of course you’ll need your doors, which can be glass, tempered glass, polycarbonate, plexiglass, etc. Each has their own benefits and downfalls you’ll have to look into to decide what works best for you. It turns out that not all hardware stores will cut glass/glass alternatives, so you may want to factor that into your choice. (I’ve personally worked with polycarbonate and plexi and neither are too hard to cut on your own- I scored the sheets with a box knife using a 2x4 as a guide and then used the snapping method- tutorials for this are really easy to find online). Assembly is pretty straightforward, but you’ll have to do some pretty precise measuring, so double and triple check the sizes you need, especially for your glass.
All that being said, you should consider getting a tank designed to be a front loader or PVC/wooden enclosure if you want a front opening enclosure. Glass aquariums that are laid on their side become surprisingly brittle. They’re not designed to hold weight that way, so they’re easily cracked. They’re also not designed to be heated the way we heat reptile enclosures. A heat lamp/CHE on the side of a glass aquarium can heat the glass to dangerous temperatures, making it brittle. If your gecko accidentally knocks over the water dish or some other splash of cool liquid hits the heated glass, it can shatter.
Not to say it absolutely can’t be done, it just has to be done carefully and correctly.
20 notes
·
View notes
Text
21 Do It Yourself House Style And Furniture Projects You Can Make From 2X4s
If you have ever before intended to develop your very own furniture or home decoration, I have a wonderful reward for you. I have located 50 home style as well as furniture suggestions that you can make from 2X4s. The terrific thing regarding this project checklist is you don't need to have a lot of woodworking experience or expensive materials to develop beautiful pieces for your home. 2X4s are truly cheap.

They're amongst the least expensive pieces of lumber that you can find. Head off to Lowe's or your preferred home enhancement store as well as you'll find that these boards are just around $3 for an eight-foot board. You can make many wonderful things with those cost-effective boards, and also I'm most likely to reveal you how.
Many of these Do It Yourself are so easy that you can do them in your extra time. Have a weekend break free? You can develop an exterior couch, bench, or any number of consoles and also coffee tables to include rustic farmhouse design to your home. In less than an hour, you can create fantastic vacation decoration or some gorgeous gifts for teachers and also friends.
I'm informing you, these tasks are all super simple as well as they're all so very low-cost. I enjoy easy and also inexpensive jobs, as well as particularly when those tasks end in rustic or farmhouse furnishings. Have a look at these 55 farmhouse furniture projects that you can make on your own.
If you contain a few 2X4s on hand, you can construct numerous fantastic things. Also if you do not have any type of, they're so cheap that you can validate driving to your local hardware shop to grab a few. I have even obtained a terrific workbench in below that you can make from those 2X4s to help you with your various other woodworking tasks.
Several of these can also be made from reclaimed wood. I love reclaimed wood projects. As opposed to throwing out those boards when you're redesigning closets or other improvements, you can turn them right into brand-new as well as exciting pieces for your residence! If you're into reclaimed wood jobs, you must likewise check out these 40 environmentally friendly reclaimed wood tasks for the house.
So, if you have ever before wanted to make your furnishings or house décor, this is the perfect post for you to browse. There is whatever in below from stocking wall mounts and woodblock snowmen to gorgeous exterior sofas as well as also a splendidly simple to develop deck swing.
From coffee tables to bathroom mirrors, there are always amazing that you can do with those 2X4s to make your residence better, and we're going to have a look at 50 impressive methods for you to do simply that. I wish you find as much inspiration in these Do It Yourself woodworking projects as I have!
1. DIY Wood Stocking Hangers
You can make these charming stocking wall mounts from leftover 2X4 pieces from other jobs. You need to toenail the two assemble, add a hook for hanging the stocking, and then decorate they nonetheless you want. The wood pieces are relatively hefty, so they'll keep from topping overfill those stockings as full as you desire. And, this is a much cheaper means to get excellent stocking owners than paying $10 each for them.
2. Easy Duplicate Charging Station
This charging station looks similar to those expensive ones you see at department stores. However, it will cost you a lot less. If you have a 2X4 accessible, it won't cost you anything. You require cutting a piece of your board, gauging the opening that you require to fit your phone and afterward stain the board. You can construct it to fit your phone whatever type it is, so there are no worries about the phone not being protected while its billing.
3. Do It Yourself Wooden Family Members Design
This wood décor is beautiful as well as an excellent method to reveal your love of household. You can do whatever message you want on this, but I like the Journey To Permanently motif. The blocks are all made from remaining 2X4 pieces, and afterward you paint and also add your wording. Or, you can make use of scrapbook paper as well as stick it to your blocks with Mod Podge. What a lovely screen for the mantel or coffee table!
4. Fast And Also Easy DIY Sawhorse
If you require a sawhorse for all of persons wood working tasks, this is an easy one to construct. You nail your 2X4s with each other to develop it and also considering that those boards are a bit heavy, this little sawhorse is rock solid. You won't have to stress over your boards slipping when you have them on right here for sawing. If you do not have a sawhorse, and also you don't intend to invest upwards of $50 to get a set, I strongly recommend this Do It Yourself project.
5. Easy DIY Bike Rack
Take that old 2X4s and placed them to fantastic use building this very easy Do It Yourself bike rack. If you have youngsters, as well as those youngsters, have bikes, you understand exactly how those bikes can neglect or fall over, getting in the way of every little thing. You can develop this excellent fundamental bike rack in the garage, on the deck, or wherever you normally store your bikes. It keeps everyone's bike separate as well as keeps them from falling over when they're not being used. Plus, it's a truly easy build.
6. DIY Wood Bench And Side Table
You can make this terrific outside bench and also side table in a weekend. It's the perfect piece of exterior furniture for the deck or porch, and it just takes a couple of 2X4s to finish. You do not also require to know that much about woodworking to construct it. It's rather straightforward and also basic and is a terrific bench for the yard.
7. Super Easy 2X4 Nightstand
If you have ever before desired for having a farmhouse style bedroom, this 2X4 night table is a must. It's such an easy little stand to construct and also it does give off that great rustic country ambiance. You require three 2X4s to make it, as well-- and at less than $10 each, that means less than you would certainly spend for a designer farmhouse night table. You can pay for to put one on each side of the bed!
8. $20 DIY Workbench
If you often tend to like woodworking projects, this workbench is something that you ought to build. You can get all of the materials you need to make it for around $20, which is much cheaper than getting an already made workbench. It's inexpensive and also nothing that you would expect to see in a high-end workshop, yet it's additionally sturdy as well as most definitely gets the job done.
9. DIY Wooden Candle Light Owners
If you have ever done a woodworking project, you understand that there are most likely to be scrap pieces of wood left over. You can turn those scrap 2X4 pieces right into these lovely candlelight holders that fit a tealight candle flawlessly. Simply reduce your candle owners all to the very same size, make use of a drill little bit to create the opening for the tealight candlelight and afterward sand as well as tarnish. Or, you can go away them plain if you prefer that great rustic appearance.
10. Drifting Wooden Shelf Or Mantel
This fantastic floating shelf has a good rustic high quality to it. This little shelf is very easy to construct as well as will only take you some hours at one of the majority. You be able to use it for a mantel if you do not have one-- picture hanging your stockings from it! Once it's completed, tarnish nonetheless you want and also perhaps sand it down a little bit to offer it an excellently used appearance.
11. Rustic Dog Crate Style Cabinet
A few 2X4s and some other products will certainly net you this gorgeous rustic styled dresser. I like the dog crate style look. It releases such a wonderful farmhouse ambiance. If you're preparing to purchase a new dresser, take a look at this one first. You can build it for a lot less than a new one would certainly cost, specifically when you develop it in this beautiful rustic style.
12. Do It Yourself Farmhouse Style Entry Table
You only require some 2X4s to build this beautiful farmhouse style access table. You might additionally utilize this as a console-- nevertheless, you use it, you're going to enjoy the farmhouse high quality. It's such an easy rustic design as well as you can construct the entire table, even if you do not have any various other products, for $20 or less. Visualize having this impressive table for less than $20!
13. DIY 2X4 Farmhouse Kitchen Table
Right here's a wonderful task for consuming those 2X4s-- build yourself a farmhouse kitchen area table! I like this whole project. It's a reasonably easy develop, and also I love the idea of a big kitchen area table where friends and family can collect. If you have ever before wished to bring some severe farmhouse style into your house decoration, this is your possibility. And also, you'll conserve hundreds by developing it on your own rather than purchasing it.
14. Do It Yourself Wooden Planter Box Centerpiece
Include some elegance and beauty to your dining room table and also consume those scrap 2X4 items at the same time. This showpiece is so easy to make, and it is lovely when it's completed. It's simply a little box that you develop from your scrap 2X4 pieces. Once you tarnish it, and also perhaps distress it a bit, as well as include your flower holders, it transforms into a gorgeous centerpiece that has a really good rustic look to it.
15. Fourth Of July Wooden Flag Blocks
You can display these great flag blocks at any time of the year, but they would certainly be fantastic for the 4th of July. It is one more project that only needs your scrap wood so if you have done other Dos it yourself with your 2X4s as well as you want something to make use of those scraps for, below's a terrific job. Simply remove completions, sand them down, and repaint them to resemble a flag. It's easy as well as a stunning job.
16. Wooden Floral Centerpiece
Here's an additional terrific Do It Yourself centerpiece suggestion that you can develop with those remaining 2X4 pieces. This one has small openings all over the base that you can put bud flower holders in. Just fill those little vases with what flowers you want to display. You just placed all the pieces together, drill the holes and afterward tarnish or repaint. You can use test tubes for your flower holders and then add your favorite blossoms.
17. DIY Funky Modern Light
This lamp has a unique look, and it's best for any space in your house. You build the base, which is quite high incidentally, out of your 2X4s and then includes the illumination kit and a great lamp shade. You can make the light as brief or as tall as you desire or require, just cut those boards; however long you need them before constructing everything together.
18. Easy Homemade Life Size Jenga Video Game
Think of having your loved ones over to play this life dimension Jenga video game! It is most likely one of the most fun jobs on this checklist, and it truly does look basic to make. Jenga after all is simply a game of wooden boards that you tactically place and replace till somebody success. You be able to do that with your 2X4s and trigger some excitement at your next celebration. It is a great idea for those summertime nights when you desire something fun as well as interesting to do in the yard.

19. DIY 2X4 Fifty Percent Lap Barstool
I have always wanted to make my very own barstools. I can never seem to discover the ones that I want, which is why I love this 2X4 task idea. You can make your very own set of barstools with just a couple of boards and afterward paint or tarnish them nonetheless you need to make sure that they match your home decoration. I enjoy this concept for its uniqueness as well as for how straightforward it is to do.
20. Handmade Hanging Wine Rack
I have a wine cellar, but it's nowhere near as beautiful as this. Plus, mine does not hang. This set hangs on the wall surface to keep it out of the way, and it's the simplest wine cellar you will ever before considering structure. You treat your wood nevertheless you desire-- discolor, paint, etc.-- and after that pierce openings, tactically put naturally, to hold your wine bottles. It is best if you require a wine cellar but do not truly have an area for something large and cumbersome.
21. Do It Yourself Hexagon Wall Planters
If you want something truly distinct from those 2X4s, construct these hexagon wall surface planters. You cut strips of the 2X4 (you need some feet for every planter) and after that assemble them to hold a mason jar. Inside the mason container, you can place all type of fresh flowers or plants. These are so ground-breaking and also will surely look beautiful dangling inside your home
3 notes
·
View notes
Text
I promised to tell you about my date with MISS FORTUNE.
It started yesterday, just as I was sitting down to the computer. A neighbor and old friend called and asked for a water delivery. No problem. Hitched up the water trailer with even less fuss and feathers than usual.
Part way to town, I have to go through a gate that I have to open and close. I use that time to check the trailer over. The “roads” out here are a joke, but not a really funny one. Two of the half inch bolts holding the tank to the trailer were working loose. Took the time to tighten everything up.
Got down to the water meters and waited. And waited. After a bit, an unfamiliar truck pulled up and asked for me. Seems that my friend, who was needed to unlock his meter, got pulled over by the police for speeding on the freeway. For their own reasons, they took his license and he had to go back home being driven by his daughter.
$50.00 dollars flew away, just like that.
Got home for a bit and was just settling down when I got another call. Friends that owe me money wanted to meet me in a nearby town called Horizon. No problem. Just unhitch the trailer.
Riiiight. Pulled the pin on the hitch and the trailer started o roll, ever so slowly! I grabbed it and was able to stop it. I looked about and spotted a good rock to block the wheels. I made a dash for it and somehow twisted my knee! As if to spite me, the trailer rolled about six inches and stopped. I got it blocked securely and left for Horizon.
By the time that I got there, my knee was much better. My friends met me, paid me, and even bought me a couple of fish sandwiches from Mc D’s.
Got home without further issues.
First friend called first thing this morning. He was in town and wanted me to come and get that load of water. I hitched up the “trusty water wagon” and headed into town.
Got to the meters and he was nowhere to be found. While waiting, I texted him and strolled across the street to our local Mc D’s for some takeout for breakfast. Friend finally showed up. He went to church to pass the time, instead of going to Mc D’s as arranged.
We loaded up the water and headed out. We came to that gate that I mentioned earlier. That was when we noticed that water was cascading out the back of the trailer tank. A fast check showed that the valve had managed to break off of the tank! That was a thousand gallons of water wasted!
Turned about and dashed back down the road. Found the valve several miles back. It looked like it could be salvaged. Headed back to town and my favorite hardware store. They did indeed have parts. Had to get broken pieces out of the valve and the tank. I got the part out of the tank OK.
We started to work on the valve. Cut a slit in a sleeve that had to come off. My friend started getting bossy and tried to take a chisel to the piece. I go, “Not crossways! Put the chisel at the end of the slit and pry it open.”
Did he? Not on your tintype! Set it across and whammed it with a hammer. Pow! The part that I was trying to save suddnly became TWO parts! Gee, who could have guessed?
With the valve now past salvage, I had to buy a new one, along with fittings. We only saved one piece from the old set up. Got it all fixed only Twenty two dollars and change later.
Got the replacement water and went to his place without further ado. He wanted to fill several 250 gallon tanks around his place.
Set up the pump and hoses for the first one. I reminded him to hold the hose in the tank because it WILL come out and flail about, spraying a two inch stream of water all over! Part way through the first tank, he says, “I have to pee.”
He let go and turned his back on it! It did exactly as predicted, drenching the side of his place, him and me! Finally got it under control and back in the tank!
He was more careful of the hoses after that!
One of his tanks had a valve that was stuck open. He thought that he closed it by beating on it with a 2x4! We started to put in water and guess what? The valve had not closed! The handle had stripped and moved to closed position with the valve about half open!
We shut off the pump and went to the next tank. It filled without problems except that we ran out of water before it quite filled.
He paid, adding part of the cost of the new valve, and I dragged my soggy ass home.
I hope that your New Year has a better start than mine!
~~ ~~ ~~ ~~
7 notes
·
View notes
Text
Build a Weight Sled at Home: Workout Fitness Sleds

Build Homemade Weight Sleds
Picking up and setting down large objects is something we do a lot. External strength training is based on this principle. The practical accessory work that comes with moving or pulling a weight across a plane is lacking here.
A weight sled is useful in this situation. You can now have a nice time by putting a stack of 45s on a rogue gravity training sled.
Unfortunately, many gyms do not have this equipment. You'll probably have to spend $250 or more to get a good one. As a result, we devised a method for building a sled that can be used without breaking the bank. The next build cost $92, with all materials purchased fresh. Cutting a few things out, which will be highlighted in the instructions, will possibly bring the cost down to about $50.

What You'll Need to Make Weight Speed Sled
You'll need to gather your supplies first. The following materials were used in this project:
• One 4x4 with an 8-foot length
• One 2x10 (shown as a ten-foot board, but you only need four feet total)
• One 2x4 (shown) can make an 8-foot board, but you'll only need about 5 feet.
• Two 1" iron tubing, 36" long with threading*
• One iron pipe, 1 inch in diameter, 18-24 inches long with threading*
• Three flanges for 1 inch iron pipe*
• One ring hook for attaching a tow strap or a pulling cord
• 2-1/2-inch deck screws in a box
• 1-1/4-inch deck screws in a box
*Note on iron pipes: You can save money by purchasing an 8-10 foot iron pipe and having it cut to length and threaded at your local hardware store. Since the employee who was certified on the pipe cutting machine wasn't present, this build relied on pre-cut and threaded pipes. You can also save money on flanges by purchasing only one for the center pipe and drilling 1-1/4 inch holes into which to slip the push handles.
Cut your 2x10 into two parts of 24 inches each. This will be the foundation for your weights.

Make one 2x4 length of 24 inches. We still have two more cuts to make on the 2x4, but we need to calculate them precisely first, so let's get started.
One of your skis' centerline should be measured (45 degree angle cuts down). This will aid in the alignment of your first baseboard. Make sure the board is square by placing a 2x10 with its edge on this side. To secure the piece, use 2-1/2 inch screws.
Attach the second board to the opposite side of the center line using 2-1/2 inch screws. Clamp the other end of the base together to ensure that this stage goes smoothly. Secure the 2x10 with a single screw, and tie the other end together with a clamp, rubber band, string, or other means. When you put the second ski on, you'll have an easier time.
On the second ski, mark your center line, square up your foundation, and attach the second ski with 2-1/2 inch screws.
Now it's time to make the final 2x4 cuts. Measure the length of one ski's end. I had 14-7/8 inches of room to work with in this build. To fill this void, cut two lengths of 2x4 to suit. The foundation for your push handles will be this. Attach with 2-1/2 inch screws to both skis. You'll also know if you didn't square your base properly if you get two different measurements on each ski at this stage.
Place the 2-foot segment of 2x4 across the front of the sled's skis. This is where you'll secure your pull strap. Mine was 6 inches away from the edge. Two-and-a-half-inch screws are used to secure the piece.
2x4 Determine the exact center of the front end. It would be about 1-3/4 inch from the top and bottom edges and 12 inches from each side edge. Use 1-1/4 inch screws to lock your anchoring system to this mark. In this design, I used a four-screw ring hook, but there are a number of other options.
Putting Together Your gravity rogue training Sled
Place a 1 inch pipe flange in the middle of the base to install the center pipe. Each individual board should have two of the four screw holes. 1-1/4 inch screws are used to secure the flange.

The push handle flanges must now be mounted. Place the flanges on top of the 2x4s in the back. Ensure that the four screw holes are parallel to the board's edges. Make sure you take a calculation of the distance between the flange's edge and the back. I chose to position them 5 inches from the back in this build. 2-1/2-inch screws are used to secure the flanges. You can drill a 1-1/4 inch hole through the top of the 2x4 to slip the pipe through if you don't want to use these two flanges.
Putting the Finishing Touches on Your Weight Rogue Sled
You now have a fully functional sled. Screw the threaded pipe through the flanges with a screwdriver. Start piling weight on top of each other and pushing this thing around. It's worth noting that the pipes are interchangeable, so if you wanted 36 inches of stacking capacity, simply put the 36 inch pull in the center. The handles are also spaced far enough apart that you could fit three gravity stacks on this sled.
Pro sled system equipment with a Body-Solid gravity
GWS100 - Push or pull this commercial-grade steel gravity rogue sled to build explosive speed and power.
Sled with a Body-Solid gravity
Body-commercial-rated Solid's GWS100 Weight training Sled can help you gain power, agility, and explosive speed and strength. Gravity sleds have a diverse range of activities to meet the diverse needs of today's athletes and fitness enthusiasts. To target muscle development, stamina, or aerobic exercise, they can be pushed, pulled, or dragged.
Weight sleds allow you to perform a variety of functional exercises that target your quadriceps, hamstrings, anterior and posterior chain, and more. The mainframe of Body Solid's GWS100 Weight fitness Sled is made of heavy-gauge solid steel. The removable posts, including the middle gravity post, often serve as weight plate posts. With multiple attachment anchors, you can tie almost any vest or belt to this sled, giving it unrivaled flexibility. Vertical and horizontal hand posts have a variety of positions for pushing and pulling exercises on both sides.
Tags: covid, racks, agility, weightlifting, series, trainers, speed, quick view, reviews, products, fitness, fitness equipment, fitness products review, equipment, storage, rogue, shop, training, covid weightlifting, racks agility, trainers series, training shop rogue storage equipment fitness, agility racks trainers, reviews products quick view, racks weightlifting,racks trainers series, shop products trainers, balance products equipment, resistance, agility, conditioning, series quick view speed gym, reviews resistance, shop training equipment sleds storage rogue, sleds, shop rogue storage equipment, resistance speed gym series, balance conditioning, shop equipment storage rogue, resistance speed gym shop, resistance series, balance conditioning equipment, shop rogue, series training storage,
The GWS100 gravity Sled will meet your needs whether you're trying to beat the competition in sports or just want to have the healthiest body possible. The GWS100 is small enough to fit in a home or garage gym, but it's tough enough to handle heavy use in a commercial gym or fitness studio, storage rogue shop, training balance conditioning, conditioning racks balance,
• Posts that can be removed
• Steel Frame (Heavy Gauge)
• Horn with a center weight
• Many push and pull handles
• Anchors for attachment
• In-Home Body-Solid Warranty
• Commercial Body-Solid Warranty
• 68 lbs., 50" L x 31" W x 40" H
the amount of weight
68 pound weight
Shipping Conditions

FedEx Home Delivery is provided by FedEx.
Important: Due to recent events, shipping times have increased; please see the following list for our latest shipping times:
• 10-14 working days for small parcel shipments
• Cancellation: 24HRS Orders that are canceled after they have been processed and delivered will be responsible for all delivery costs from and back to the manufacturer's warehouse.
Orders under 150 pounds are normally shipped by FedEx Home Delivery from the Chicagoland area; we are unable to ship FedEx to APO, FPO, or PO Boxes; for these shipments, please call us at 800-383-9300. If you have an item(s) that qualify for 'Free Shipping,' you will still see a shipping charge if you have additional products that do not qualify for free shipping.
Signature Delivery: Certain goods or delivery locations can require signature upon delivery, which you can request by contacting us prior to delivery. Signature is often the best way to ensure delivery.
Harm: Please contact us as soon as possible if the product or packaging appears to be damaged upon delivery; please have the order number and digital images of the damage ready to submit.
Returns: Please contact customer service within 31 days of receipt to receive a Return Authorization Number.
Within the continental United States, shipping to islands can incur an additional charge.
Details to Know Follow:
https://sportsperformanceadvantage.com/best-push-pull-weight-training-sled-2020/
Additional Resources:
https://en.wikipedia.org/wiki/Sled
https://www.nytimes.com/2020/07/26/sports/olympics/olympics-bobsled-suicide-brain-injuries.html
0 notes
Text
RAISED GARDEN BED BASICS

The Benefits of Raised Bed Gardening
Raised garden beds, also called garden boxes, are great for growing small plots of veggies and flowers. They keep pathway weeds from your garden soil, prevent soil compaction, provide good drainage and serve as a barrier to pests such as slugs and snails. The sides of the beds keep your valuable garden soil from being eroded or washed away during heavy rains. In many regions, gardeners are able to plant earlier in the season because the soil is warmer and better drained when it is above ground level.
By raising the soil level, raised garden beds also reduce back strain when bending over to tend the bed. This is especially helpful to older gardeners or people with bad backs. And if the beds are built well, the gardener can sit on the edge of the bed while weeding, and for some gardeners this is the biggest benefit of all.
Raised beds are not the same as garden planters. Planters are elevated containers which have bottoms to prevent the soil from falling out. Planter bottoms usually are slatted, with some type of semi-permeable cloth barrier which permits drainage. Raised beds, however, do not have bottoms; they are open to the ground, which offers the benefit of permitting plant roots to go further into the ground for available nutrients.
Raised garden beds are available in a variety of different materials, or they can be made with relative ease.
How to Build a Raised Garden Bed

Gardeners can build their own elevated garden beds with relative ease. You will need to decide what kind of wood to use, how tall you want the bed to be, and whether you want to build the entire bed yourself or use pre-made corner braces which simplify the construction process and provide a secure corner that won't work loose over time.
What kind of wood to use?
In most cases, cedar is the best wood to use for garden beds because cedar is naturally rot resistant. Western red cedar is commonly used, but Vermont white cedar, Port Orford (yellow) cedar and Juniper are also great choices for outdoor construction projects. Redwood is another excellent rot-resistant wood, but redwood is a more limited resource. How long the wood will last depends on the type of cedar and your local weather conditions. In our garden, we use red cedar for building the beds, and some of these beds have lasted 15 years. In general, you should expect about 10 years from a cedar bed before it begins to deteriorate.
How tall should the bed be?
You can build the bed to any desired height up to 36". The most common height is 11", which is the height of two stacked 2" x 6" boards. If you have good soil beneath the bed, the roots will go down deeper as needed to access more soil and nutrients, so you can even have beds that are only 6" high. If you want a taller bed, remember that as you go taller, the weight of the added soil will add pressure to the sides, and will bow them outward. This is easily prevented by including cross-supports. We recommend using cross-supports in any beds which are taller than 18", or longer than 6'.
It is also important to consider the soil depth requirements for the roots of the vegetables you want to plant. Depending on the soil conditions beneath your bed, you may want to build the sides of your bed higher for certail crops. For more information, read our article Soil Depth Requirements for Popular Vegetables.
How wide and long should the bed be?
We recommend bed width to be no wider that 4' across. This is because it is easy to reach the center of the bed from either side, and for people with long arms, to reach across the bed. It's important to keep the width this narrow to avoid having to step on the bed since this would compress the soil. The bed can be any length as long as cross supports are installed every 4' - 6' along the length of the bed to prevent bowing. We think longer beds are best, if you have the garden space.
We have built many raised beds over the years, and our construction process has evolved. The method described here is, in our opinion, the simplest method of building a raised garden bed, and it requires no special tools or expertise. Using this method, you can build your bed to any desired length, width and height.
Tools & Materials:
LUMBER
Use cedar "2 x" boards for the sides. These are commonly 2" x 6", but you can use 2" x 4" or 2" x 8" boards if this is what you have available. (2" boards bought at a lumber yard are actually 1.5" thick..) For the corner posts, use 4" x 4"s, cut to 10" longer than the desired height of the bed. If your bed is going to be longer than 8', you'll need extra posts to put in mid-span to prevent bowing and to provide a place to secure the cross-supports.
In the photos below, we used 2" x 4" boards for the posts instead of 4" x 4"s. This is because the wood we had was full dimension, i.e., the 2" thickness was a full 2". If you get your wood from a mill, they can cut it full dimension for you.
FASTENINGS
Use 3.5" #10 coated deck screws for the project. You'll need six screws for each corner and two for each mid-span post. If you are using cross-supports, get a few 1" stainless screws.
CROSS SUPPORTS
Buy several lengths of 1/2" aluminum flat stock. This is available at most hardware stores, usually in 8' lengths. It is very easy to cut with a hacksaw and to drill for the screws.
TOOLS
Hand saw, square, carpenter's level, mallet (or sledge), screwdriver, hacksaw, drill.
Is treated lumber safe?
In 2003, the EPA banned the sale of lumber treated with chromated copper arsenate (CCA) for residential use. Two compounds, alkaline copper quat (ACQ) and copper azole (CA-B), have now replaced CCA wood in the residential market. Both contain copper and a fungicide but no arsenic. The copper keeps insects at bay, and the fungicide prevents soil fungus from attacking the wood. In ACQ, the fungicide is quat, which is also used in swimming-pool chemicals and as a disinfectant. The other compound, CA-B, uses copper and tebuconazole, a fungicide used on food crops. According to Miles McEvoy, who works in organic certification with the Washington State Department of Agriculture, no pressure-treated wood is allowed in soils used to grow organic food. If you want to meet this high standard, choose a different material.
Until the safety of treated wood is proven conclusively, we recommend you use a naturally rot-resistant wood like red cedar, black locust or redwood. Under most circumstances, these woods will last 10 - 20 years when used for raised beds. Recycled composite plastic lumber is another alternative, and is now available in a variety of sizes and colors.
Raised Bed Installation / Tips / Layout Suggestions

Lay out the beds so they are horizontally facing south
It's best if the long side of the bed faces south. This assures equal light exposure to all the plants growing in the bed. If your bed is aligned the other way (the ends facing south), you may have planting limitations because taller plants in front can block the sunlight to small plants in back.
Double-dig the bed area
If the ground has never been used for gardening, it should be 'turned over' (dug) to a depth of 16". This gives you a chance to pull rocks, and to see the composition of your soil. Leave soil piled up in the center, away from the sides, so you can set the bed in place without obstructions.
Check for roots
As you dig the soil, keep an eye out for any roots which may be growing beneath your beds. If left to grow, these roots will steal the organic amendments you add to the soil. Pull any roots back towards their source, and pull the main root clump. If the source is a living tree, you may need to install a root barrier by digging a narrow trench outside the perimeter of the bed, and deeper than the roots, and then insert a barrier such as heavy plastic sheeting.
Level the bed
Use a level for this task. This may seem overly meticulous, but after several waterings the soil will settle to level, and you'll want the bed to be the same. Set a stiff board (2x4) on top of the bed sides, across the span, and set your level on this board. Tap down the sides as needed till you get a level reading. Be sure to check for level both along the length and across the width of your bed.
Burrowing pests?
If your garden has burrowing pests such as moles, a layer of 1/2" or 1/4" hardware cloth (galvanized mesh) can be laid across the bottom, before soil is added. The mesh should continue at least 3" up along the insides of the bed and be stapled in place. If you plan to grow root crops, such as potatoes or carrots, you may want to set the mesh lower in the ground by digging deeper when you are setting up the bed. There are also raised garden planters available for above-ground gardening. These planters are designed to be easy on the back, but they also keep burrowing pests, rabbits, cats and other critters out of your garden.
Spread soil out evenly
Add any planned soil amendments, such as peat, compost or lime, and spread the soil evenly across the bed. Water the bed with an even, fine spray. This will settle the soil; add more soil to "top off". (Over time the soil will settle an inch or two more.) Rake the bed once more to even out the soil and you're ready to plant. To learn more about developing the ideal soil for your raised beds, read our articles:
6 Tips for Building Soil in your Raised Beds and Planters
3 Useful Soil Mixes for Planters and Raised Beds
Avoid stepping on the bed
Once the soil is added and the bed is planted, make it a policy to never step on the bed. Stepping on the bed will compact the soil, reduce aeration and impact root growth. Pets should also be trained to stay off the raised beds.
It's very helpful to have a 'spanner board', a short sturdy board, like a 2 x 6, that's just longer than the width of your beds. This board can be laid across the bed, setting on top of the bed sides, and can be used to set buckets on when weeding or adding amendments, and it can be used to step on if you must step on the bed. It also makes a handy seat when weeding or tending the bed.
Leave a generous width between beds for the pathways
It helps when pathways between raised beds are wide enough for a small wheelbarrow. For grass pathways, make sure they are at least wide enough for a weedeater or a small mower. (In our raised bed gardens the pathways are 22" wide.)
Mulch the pathways between beds
Weeding pathways is a nuisance which you can avoid by putting a double layer of perforated landscape cloth over the pathway, and cover this with a 2- 3" layer of bark mulch or coarse sawdust. When laying down the landscape cloth, allow it to come up 1" against the bottom board of the bed, and staple this to the bed. This will not be visible because the mulch will cover it.
When buying mulch, ask the seller if they have had any complaints about weed seeds in the mulch. It is very common for bark mulch to have weed seeds which sprout in your pathways. Some weeds will still appear on your pathways regardless of the mulch. Wait until it rains before pulling them out, or you may rip the landscape cloth. The weeds will come out easily if the ground is wet.
Can a raised bed be installed on a concrete surface, such as a patio? Yes!
Many beautiful raised bed installations are set on concrete surfaces, but there are a few things that need to be taken into consideration. Typically, patio and driveway surfaces are not level; this enables water to drain away from the main house structure. Raised beds should be built to level, the same as if being constructed on soil, but the bottoms of the beds will need to be blocked up on the low end just enough to facilitate and direct drainage. To learn more about this, read our article:
16 notes
·
View notes
Text
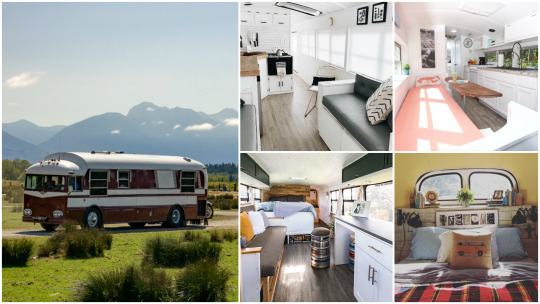
Skoolie & How To Cut The Cost Of Living Up to 80%

What's A Skoolie?

More and more people try to escape the rat race by exploring alternative housing solutions. Resulting in the tiny-house movement and a not so tiny Skoolie. A Skoolie is a small portable home that once was a classic, all-American yellow school bus.
DIY School Bus Conversion Into A Not So Tiny
Home
If you're thinking about saving a bunch of cash on your RV
purchase you might consider to trick out an old yellow school bus. If you have
the at least some basic building skills you should not have a problem to
convert and old bus into a mobile home with all the conveniences you can want.
Yes you did read this right, currently there are people across the
country converting retired school busses like the ones you maybe rode to
school, into custom motor-homes. And they call those RV’s “SKOOLIES”.

What are the start up Costs?
Granted that prices vary by location and condition of the bus, retired
school buses are relatively inexpensive to buy. And if you have access to car
auctions you should be able to buy a standard 34-foot bus for about $2,500 – 3,000. And once you cleared the 70-seater
out you should have about 200 square feet to trick out into living space.
A partially tricked out
Camper Bus will start at about $10,000 and comes without a
kitchen or bath or neither.
You might not be interested in a DIY option. Therefore, you could
by a fully transitioned Skoolie for an
approximately $60,000 Dollar price
tag. However you would be ready to roll.
Don’t worry too much about high mileage, they likely auction of at
1500 000 miles or better. However, they are solid build and with a proper upkeep
will easily take you past the million mile marker. You need to remember that
they are made for schools (Government) so their Diesel Engine and Bus body as
well as the frame are better build than any commercial line.
You should however make yourself familiar with size diesel engines
and various transmission types

What does the transition into a home cost?
It goes without saying that the cost to DIY a Skoolie, greatly depends on the amount of luxury and conveniences
you install. Based on the requirements for a home with a functional kitchen and
bath, the cost start probably around $7,000 and can easily go up to $40,000 or
more.
However, with enough elbow-grease and some frugal configurations
you should be able to keep your conversion cost in a very manageable range. As
for the materials, I suggest to stick to regular standard building materials as
much as you can. And for the plumbing and electrical supplies turn to Camping /
Camper Supplier or Booting Equipment since they are more compact and are made
for your use.

How
long should it take to convert a Bus into a Skoolie?
First you need to find one close to home for a full inspection and
a low cost transport. After that it will depend on what size bus you go for,
and what you all want to do to it.
I have seen statements where the full transition of a large 40-foot bus took 2 years. Now
remember, that is also 2 years of time to store the 40-foot monster somewhere.
And if you don’t have the space you need to rent a suitable storage. Plus you
will need tools, water, and electricity to make the transition happening.
You might think that 2 years seem too long and you do it faster,
but what if you also work a full time job? And let’s be honest, this is not like
working in your home. Everything will be custom made. Each countertop, seat,
bed, and sofa will have to be custom fit and anchored.
Why not just decorate a Skoolie
You could cut the time short by buying a partial converted bus. Sometimes
you can find those sold as camper-bus. They
are labeled as Camper because they either lack the kitchen, bathroom or both.
However, all the seat benches are gone and that cuts down on much hard demo
labor. So you only need to update the kitchen / bath situation and start
decorating.

However, you still need to carefully inspect all aspects of it.
Body, Engine, und Transmission type. Is all the electrical good and why is it
not fully transitioned? Because that would come with a price tag of around
$60,000 Plus such partial converted 30-foot bus will cost you around $10,000 without
even batting an eye.
To me that is not by far the best solution. I think I could use of
the extra $7000 plus the scrap metal from the seat-benches to complete my whole
transition. And I could splurge a little for something nice instead.
Where
can I get Conversion Ideas or Plans?

Skoolie Floor Plan
There are plenty of online sources to search for bus conversion building
plans, tutorials, and tips. Here are a few to get you started:
Skoolie Forum:Forum for skoolie enthusiasts and
DIY builders DoItYourselfRV.com: Great basic bus conversion
tutorials Skoolie decorating @ accessorize
GoodNewsBus: details
one family's bus conversion in daily posts that include video tutorials and
thoughtful lessons learned. The Bus Abides site
Here is a short Kitchen Counter Top Sample Tutorial:
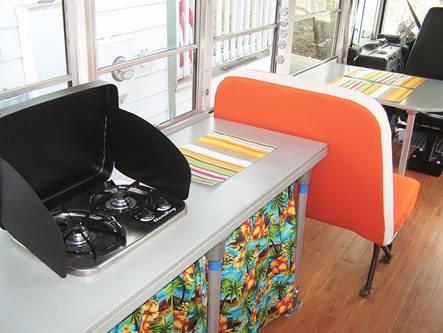
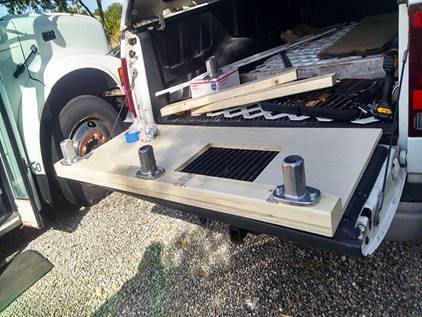
To build the countertops in the school bus, Dana used Kee Clamp fittings and pipe to support the countertops.
It took Dana a few nights of coming up with different design possibilities
before settling on the current design.
To create the counter tops, Dana used plywood for the tops. The plywood tops
were then attached to the "wall" using metal Dana bought at a local
home improvement store.
Pipe legs were then attached to the floor using the Railing Flange.

Flange
You can get these supplies at either a local hardware store or at your plumbing supplier
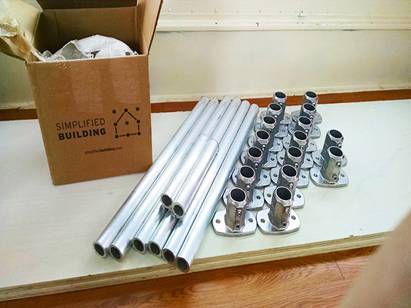
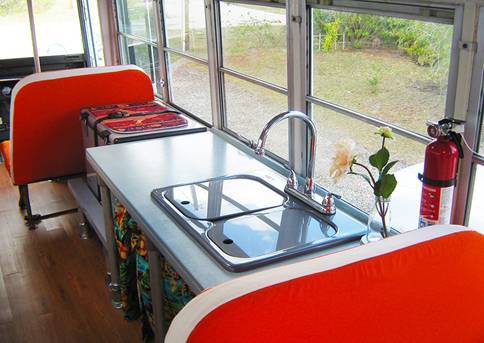
"Ordering online was simple and fast. Then, we went down to a local
metal supply shop and got the aluminum pipe we needed (cut to length)."
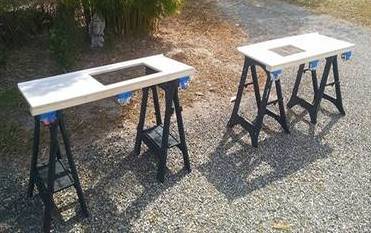
After you mount
the flanges to the bottom of your Countertop, take this countertop into your bus
lay it up-site-down (like now) on the floor where you plan to install it. And take
a measurement to determine the length of your legs. Stay about a 1-1/2 Inch
below the window seal.
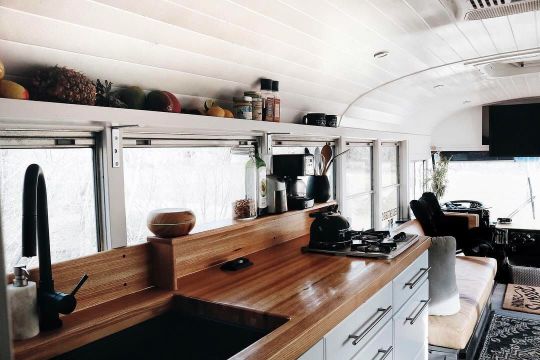
You can also take 3 measurements in that area
and subtract 5 Inches from below the seal to the floor. If you use a ¾ inch plywood
and a 2x4 like illustrated. The brackets should have 1/2” thick plates.
I recommend you
cut only 2 legs and test the install. Because if the length is not good you don’t
waste all pipe. Plus now you can mark the holes to anchor your Bottom plates. If
the legs work well cut the reminder of the legs.

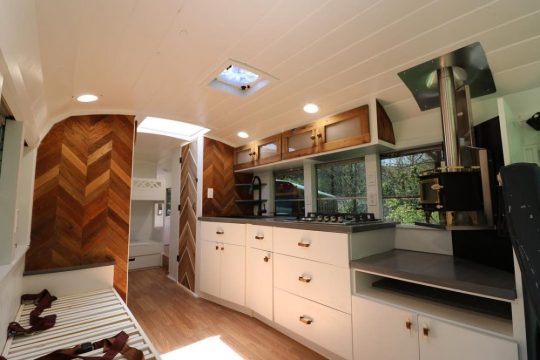
Overall, Dana has been pleased with the design and look of the countertops.
"We like the industrial look of the Kee Clamps and their ease of
assembly. We also like that, unlike using wood legs, we can easily modify and
add onto this build in the future. During assembly and painting we had to
remove the counters more than once. Kee Klamp fittings made this super
easy."
.
Another bonus to using Kee Clamp fittings for the design is that the
fittings themselves are adjustable. This made leveling the structures easier when
putting every together:
"They (Kee Clamp fittings) are also adjustable, which is useful when
converting a school bus. Not everything in there is square and level."
However, don't take my word for it, In
Dana's Skoolie site. Dana's challenges and adventures are documented.
Enjoy the 5 Skoolie Builds Video For Your Inspiration
https://youtu.be/biAUHjdYwtA
How
High are the operating Costs?
Even though the Skoolie lifestyle can save up to 80% of the big
city life expenses (if parked)
The total expected cost of ownership plus fuel and campsite fees
still average between $800 and $1800 compared to about $60/day and person if
renting a home.
Diesel Fuel average $300/ monthInsurance; $64/monthRenter insurance $10/ monthLaundry $15 / monthMonthly Road Costs are about $800 if you include $400 for food.I would also suggest you enroll in an AAA w/RV towing plan for peace
of mind.And save up for maintenance (oil-change $200, tires $250 each,
break-service $300)
Get more details
Can
I park in RV-Parks?
To be clear in some you can in others you cannot. So if you plan
your route you better check a head to have a place to rest. There are also different fees for RV
campgrounds then for Skoolie Camp Sites.
Learn 15 Things You Should Know Before Building A Skoolie School Bus Conversion from the Video
https://youtu.be/V9tZ0zzHYrs
How to Shop For A Bus or Skoolie?
Keep in mind that there is a reason to why schools replace their buses. Many of them are at the end of their useful life. There is most likely something wrong with them in one way or another. Know your transportation cost & conversion budget. Tires are very expensive. A bus with good rubber could cost $500 more than the same bus with bad tires and be still a steal. Traveling Speed. You are not going anywhere fast in Skoolies. Front or rear engine don’t really matter. However, a front engine bus is noisier and hotter for the driver. That will wear you out faster. A front engine bus is easier to repair and rear engine busses perform better in the mountains.Gas or Diesel? Short or long? You need to know that short buses have extra costs to repairing them. Especially if they are van front. Plus many mechanics will tell you: "No thank you," or charge an arm or a leg for repairs. Just read this story! Long Buses are harder to maneuver and have a huge turn radius.Corrosion -- Every bus has rust. From snowy states, to the ocean fronts, your bus will rust. Try to keep it at a minimum when buying one GET UNDER THE BUS with a bright light & check the underbody! Flooring and framing can have rust as long as it is sound and you can’t just jam a screwdriver through it.

What you should do before you buy a non/partial converted bus
You better find out beforehand how fussy your state/provincial Motor Vehicle Agency is going to be to flip the title and registration. If you converse yourself.Check to see if your state has a one-way-trip or temporary tag.You also need to keep in mind that on Auctions, once a vehicle is sold you have only limited time to pick the thing up.Also you need to get the cash and the VIN Number ready for the insurance company to pre-plan insurance.
“You
might be better off to find a carrier before you buy your bus. Especially if
you want to DIY and the bus is road ready but not fully or partially converted.
Once done just call it an RV as long as
it has the requirements like a bath, kitchen, water and bed. Otherwise try to
insure for a Commercial Tag”
SEAT BELT LAWS: You need to know the seatbelt laws for your and any state you visit. Here are the Sources.
Where Can I Buy A Bus Or Skoolie?
There are a few places to look for buying a used school bus:
Bus dealerships: One of the largest Online in the U.S. is Midwest Transit Equipment.
Auctions: Public Surplus and eBay have listings. Local Classifieds: Craigslist online might be a good place to start. Trader – Magazine available at any Gas-Station Google Tiny House Listings Motor-Home Finds
Conclusion
Here I want to turn it
over to you -- Why a Skoolie? How would you justify your lifestyle?
Okay, let
me first say that you do not really NEED to justify our lifestyle and choices
to anyone on here. However, I feel like this could be a good conversation starter
with critics and skeptics. And I look really forward to read some of your
comments below.
So,
what are your reasons to live in a Skoolie? Do you have reasonable arguments
against a truck and trailer?
And as always thank you for reading and sharing JK :)
Read the full article
0 notes
Text
Agilenano - News: Luxurious Pegs For Pegboard

Buy WallPeg 2x4 White Plastic Pegboard with Flex-Lock Peg Hooks AM 24242W: . said I should contact them directly before I left neutral or negative feedback. Shop through a wide selection of Pegboard Hooks at Amazon.com. Free shipping and free returns on Prime eligible items. 8 Black Peg Hooks with Neutral Finish. These 8 black metal peg hooks can be added as hardware to pegboard and store fixtures. Each of the accessories is. This peg board wall treatment is perfect for any house! Because the wooden pegs are interchangeable you can mix, match, and customize to your hearts content. Online shopping for Pegboard Hooks from a great selection at DIY & Tools Store. IKEA SKDIS, Pegboard, You can store things on both sides of the pegboard if you use it as a divider on a desk or in a freestanding ALGOT storage. Organize your entire home from the garage to the kitchen to the office with these clever pegboard storage ideas from HGTV.com. Shop for storage hooks pegboard online at Target. Free shipping & returns and save 5% every day with your Target REDcard. Geo Pegs and Pegboard 36pcs stackable . 36 stackable pegs. . EDX is committed to becoming carbon neutral through re-using, recycling and improving.

Shop pegboard & accessories in the garage organization section of Lowes.com. Find quality . Wall Control 2-Piece Steel Pegboards (Actual: 16-in x 32-in). Shop Pegboard hook pegboard & accessories in the garage organization section of . Blue Hawk 1-Piece Steel Pegboard Hook (Actual: 6-in x 1.38-in). Angled peg hooks are ideal for storage of tools, paint brushes, extension cords and athletic equipment. They are for use in garages, sheds, workshops and. DPI Brown Hardboard Pegboard (Common: x Actual: x lowes accessories that are not easily hung from hooks, such as gardening gloves and hose nozzles. Shop Wall Control Steel Pegboard Standard Tool Kit at Lowes Canada. . Pegboard Tool Organizer Utility Kit and Garage Wall Peg Board Tool Pegboard. Buy any frame then go to Lowes and they will cut pegboard to fit frame. I didnt paint frame or peg board but you can. Lowes Kobalt System Work Surface, Garage Organization, Lowes, Garage Ideas, Peg Board by Wall Control Galvanized Steel Pegboard Panel x Horizontal. 20/02/2018 Spray painted a peg board from Lowes, painted 2 strips of wood same colors . for a kids room/playroom, but it looks pretty neutral and I like it. See more ideas about Blue prints, Do crafts and Pegboard organization. . Heres a pretty cool diy / craft idea for a peg board box so you can keep all your Must go to Lowes and buy a pegboard first. . My colors for the nursery are kid of bright, so the wall color was going to have to be more of a neutral and currently I am.

Zinc-Plated Steel Single Straight Peg Hooks for 1/8 in. and 1/4 in. . Metal Pegboard Standard Tool Storage Kit with White Pegboard and Black Peg Accessories. Use the pieces from this 32-Piece Pegboard Hook Assortment for 1/8 in. and 1/4 in. Pegboards to hang hand tools for easy access and storage. These hooks are. Shop our selection of Pegboard Hook Kit, Fasteners in the Hardware Department at The Home Depot. . Presa 2 in. Zinc-Plated Steel Pegboard Hooks for 1/4 in. This 16 in. x 16 in. Black Plastic Pegboard features an interlocking design and male and female prongs that provide a secure fit for adding peg board for more. Tempered hardwood 1/4 in. commercial grade pegboards is a cost effective . hook 70000 series locking pegboard hooks and accessories provides years of. Peg Board Friendly Baskets The Bulldog Hardware 131595 Mesh Basket-Value Pack $15 # . Everbilt, Peggable Wire Baskets (3-Pack), 17960 at The Home Depot pegboard! Furniture Layout, Diy Headboards, Spray Painting, Sewing. Steel Pegboards 49 Brilliant Garage Organization Tips, Ideas and DIY Projects Black Steel Mesh Peg Board Basket (2-Pack) 24265 at The Home Depot. Installing a pegboard wall in your garage or home is. . A frame will allow you space between the wall and board to connect hangers. It will also . Install from the table to the pegboard to ensure the proper layout. If you want the pegboard to fit the area exactly, buy a larger size and ask the hardware store to cut it to your. The peg board can be painted to match the colors in your room. Love how this fits into an older homes layout; bench banquette with chairs in . Office Depot Brand Magnetic Wall Pocket Letter Size Clear by Office Depot & OfficeMax sticks.

100pcs Pegboard Hooks Slat Wall Peg Board Hooks Shop Display Prong Hanger for sale on Trade Me, New Zealands #1 auction and classifieds website. Peg boards, button boards and button pegs for teaching counting, patterns and coordination. Ideal teachers resource sequencing. A practical and highly adaptable perforated hardboard panel, peg board creates tidy spaces from empty spaces in conventional and unconventional places. A pegboard looks great and the pegs and shelves can be moved around to suit your needs. Learn how to make a pegboard shelf with this guide from Bunnings. We have storage hooks, bicycle hooks, pegboard hooks, tool hooks and tool . in the finish which would be best suited for the type of material you plan to hang. 30/11/2016 FREE NZ SHIPPING $8 FLAT RATE AUS . Peg Board Grid Markings. 3. . One peg board ready for use. . Last month I decided to capitalise on our brisk wintry days and made plans to head for the snow with friends. For me. Wooden peg board shelf . Homewares, home decor, kitchenware and gifts available online from the Perch Home online store NZ. Pegboard Hooks 8 Multipack. $5.50 $9.99. 50mm Pegboard Hooks 3 pack Quick shop. 50mm Pegboard Hooks 3 pack. $5.00. 75mm Pegboard Hooks 3. Organization Have students sort the pegs by color or shape. Then have them stack or place the pegs in rows on the pegboard, again by color or shape.

Check out our range of Pegboard Hooks products at your local Bunnings Warehouse. Visit us today for the widest range of Hooks products. Find Zenith Zinc Plated Assorted Pegboard Hooks Kit 47 Pack at Bunnings Warehouse. Visit your local store for the widest range of building & hardware. If youre looking for a versatile way to decorate a bedroom, a peg board headboard is a simple solution. It will look great and you can easily change it to suit your. Find Zenith Zinc Plated Assorted Pegboard Hooks 32 Pack at Bunnings . Saved by. Bunnings Warehouse I have the standard hanger, but this is fantastic. Masonite 1830 x 915 x White Pegboard Bunnings Warehouse. Home WorkshopClassroom Not sure whether to try a peg board or a wire grid in the office. karina querejeta A list of fantastic DIY Projects for your home. Ruchell Avetisyan. A pegboard looks great and the pegs and shelves can be moved around to suit your needs. Learn how to make a pegboard shelf with this guide from Bunnings. All Sets handy thumb press clothes peg packs are fantastic for securing your laundry and apparel on your clothesline, keeping them off the ground in strong. 20/05/2015 The pegboard hooks are from Bunnings- they come in two length so I got a . Megan, this looks fantastic, organized and colourful and very you!
Harbor Freight buys their top quality major brand tools from the same factories that supply our competitors. We cut out the . 32 Pc 1/4 In Pegboard Hooks. Item #. Harbor Freight buys their top quality major brand tools from the same factories that supply our competitors. We cut out the . 32 Pc 1/4 In Pegboard Hooks. Item #. Harbor Freight buys their top quality major brand tools from the same factories that supply our competitors. We cut out the . 32 Pc 1/4 In Pegboard Hooks. Item #. This pegboard hook kit features 50 assorted pegboard hooks to keep your kitchen, basement, garage or workbench organized. The pegboard hook kit fits. Harbor Freight buys their top quality major brand tools from the same factories that supply our competitors. We cut out the . 32 Pc 1/4 In Pegboard Hooks. Item #. Harbor Freight buys their top quality major brand tools from the same factories that supply our . Pegboard Accessories. 0 Results for pegboard accessories. Amazing deals on this Pegboard Multiple Tool Holder at Harbor Freight. . 2 Pc 3 in. Double Straight Pegboard Hooks. Only: $1.49. Add Pegboard Multiple Tool. Anti-Theft Magnetic Display Security Hook Locks For Pegboards And Slatwall Retail Displays 6Mm 50 Pack. Sold & Shipped by GreaterGood. Add To Cart. WallPeg Hook Kit 100 Pegboard Hooks Tool Storage Garage Organizer. Excellent quick order processing & shipping from the Seller, too. 13 people I bought these pegs for a peg board that came with a work bench from Harbor Freight.

Shop for Pegboard & Accessories in Wall Organization. . Pickup discount eligible . Product Title16 PACK 1/4 HOLE Peg Board Workbench Bins (6) Red b . Loc Hook 1 Single Rod 30-Degree Bend 3/16D Zinc Plated Steel Pegboard Hook for LocBoard, 5pk. Free store pickup. Add To Cart. There is a problem adding. 07/08/2017 Buy Black Pegboard L-Hooks Pegboard L Hooks Storage Garage Organizer Tool (50) Craft Peg board Hooks at . Pickup not available. Pickup. Free store pickup. Add To Cart. There is a . Product Image. Peg Board Hook Kit Garage Tool Storage Pegboard 100 pieces J Hook StyleBLACK. Price. $11.29. Free Shipping. Buy White Peg Board Hook Kit Garage Tool Storage Pegboard 50 pieces J Hook Style at Walmart.com. . Pickup not available. Pickup not. Free store pickup. Add To Cart. There is a . Product Image. Peg Board Hook Kit Garage Tool Storage Pegboard 100 pieces J Hook StyleBLACK. Price. $11.29. Black Peg Board Hook Kit Pegboard 50 pieces J Hook StyleBLACKPlastic J Hook Pegboard Locking Garage Crafts. Average . Pickup not available. Pickup. Buy WallPeg 75 pc peg hook kit for 1/4 pegboard at Walmart.com. . WallPeg 75 peg hook kit for 1/4 pegboard Mix of 3 styles of locking peg Store Pickup. . Organization. Buy products such as Alligator Board 5 Wire Peg Hook (Set of 8) at Walmart and save. . Pegboard & Accessories Pickup discount eligible. Buy products such as Peg Board Hook Kit Garage Tool Storage Pegboard 50 pieces L Hook Style White at Walmart and save. . Pickup discount eligible.

Online shopping for Pegboard Hooks from a great selection at DIY & Tools Store. Peg Board with 1000 Pegs 3.9 out of 5 stars 20 16.49 Britten & James Deluxe Peg Board Set. . holes, 1,000 assorted coloured mushroom Pegs and a leaflet containing creative ideas. Just like the pegs and boards we had at school Children Puzzle Peg Board With 296 Pegs For Kids Educational Toys Creative Gifts. SPONSORED United Kingdom and many other countries See details 1,000 assorted coloured mushroom Pegs and a leaflet containing creative ideas. Free Shipping on many items from the worlds largest Peg Board in Creative . Perler Hama Beads Peg Board Pegboard Template Funny DIY Kids Toy UK I have no idea how many beads are in the big tub as it doesnt say but its full up! 5 Peg boards and 1000 Pegboard Set classroom home school educational Invicta. Schools Direct Supplies 5 Pegboards & Pegs [147759] 5 square pegboards each . and 1000 assorted coloured pegs. also a leaflet containing creative ideas. Buy Block Pegboard with Wooden Pegs, Small, White: Pegboard Hooks Amazon.com FREE DELIVERY possible . Everboards Wooden Magnetic Organizer Inspiring Living Room Decorating Ideas New . Made in the UK, supplied with colorful wooden pegs in 2 sizes. for Kids & Schools Amazon Warehouse You searched for: peg board! Etsy is the home to thousands of handmade, vintage, and one-of-a-kind products and gifts related to your search. No matter what. A unique peg board with two sliding axes lines allowing pupils to practically carry out algebraic workings. We have great value packs of colourful peg boards available in several quantitites. Ideal for fun & creative maths, pattern & symmetry work in the classroom!

Buy Wooden Pegboard Pegs: Storage & Organization Amazon.com FREE DELIVERY possible on eligible purchases. Shop through a wide selection of Pegboard Hooks at Amazon.com. . Other types are also available, such as locking pegboard hooks that include a built-in strap. Buy Block Pegboard Wall Organizer with Wooden Pegs, White: Pegboard Panels & Units Amazon.com FREE DELIVERY possible on eligible purchases. Shop wall organization with pegboards, hooks, shelves and accessories to make a solution thats uniquely yours. . SKDIS pegboard combination, wood. Wood Peg Board System 6.6 H x 24.25 W x 21.25 D Drawer Organizer . 4 D; Product Type: Wine Bottle Rack; Design: Wall Mounted; Material: Solid Wood. Shop Wayfair for the best wooden peg board. Enjoy Free . Product Type: Wall light; Overall: 8.5 H x 1.75 W x 13 D; Base Included: No; Bulb Type: LED. Zinc-Plated Steel Single Straight Peg Hooks for 1/8 in. and 1/4 in. Discover the types of stationary brackets and learn how to install them using The Home. 15/10/2018 Even the pegboard hooks hang on pegboard hooks. . This is the type you need for workshops, garages and other heavy-use areas. . Hooks and 1/2-in. wood dowels organize wrapping paperno more digging through a. The pegs, when positioned accordingly, create numerous and custom-fitting racks from which to hang all kinds of tools. Metal pegboards require the purchase of.

Peg Board Hook Kit Garage Tool Storage Pegboard Plastic; Made of Durable ABS Plastic; Pegboard NOT INCLUDED; Pegboard L-Hooks 100-Pack; FREE. National Hardware S819-841 CD8377 51 Piece Peg Board Hook Kit in Zinc Steel/Plastic Pegboard Mounting & Spacer Kit for DuraBoard or 1/8 In. and 1/4 In. Made in USA; Reinforced ribs properly space peg board from wall or tool bench . PLASTIC J Hook Style Peg Board Hook Kit Garage Tool Storage Fits 1/4. Buy PLASTIC J Hook Style Peg Board Hook Kit Garage Tool Storage Fits 1/4 Pegboard 50 pieces (PEGBOARD NOT INCLUDED): Pegboard Hooks. Shop through a wide selection of Pegboard Hooks at Amazon.com. . Both plastic and metal pegboard hooks are offered, although most styles come in steel that.

Explore Katrina De Laats board Large format tile on Pinterest. See more . Keep it clean and simple with large-format gray tiles and a gorgeous big white. Large format tile offers continuity in design. They are beautiful on walls and floors, and for indoor or outdoor applications. See more ideas about Large format. Sep 29, 2018- Keep it clean and simple with large-format gray tiles and a gorgeous big white bathtub. This cool and contemporary bathroom has a minimalist. 11/07/2014 Why Medium Format Is So Gorgeous (Its About More Than . The effect is even more apparent with large format 45, 58, or 810 film. You can. We specialize in large format canvas printing for photos that need a little extra space. . Our panoramic photo prints are a perfect way to show off that gorgeous. The aesthetic impact of this affiliation is conveyed in the large-folio . Exotic, gorgeous, or bizarre, the Indian plants presented in this large format were meant to. Results 1 30 of 523 Discover gorgeous Large format photography on fine art prints. Fast and reliable shipping. 100% satisfaction guarantee. Unfortunately, many art directors seem to be only able to judge an image with a gorgeous large format tranny on a light box. Alas this is not what the final image. The line and color of these intricate drawings is consistently superb, and they are bordered by heavy, multi-colored stock bound into a gorgeous, large-format.
Agilenano - News
from Agilenano from shopsnetwork (4 sites) https://agilenano.com/blogs/news/luxurious-pegs-for-pegboard
0 notes
Text
Sanity breach part 5
For almost an hour we waited in near total silence. They had us line up and march out of the debate room and into the testing area. Here we would learn how to use the tools we were given for the final portion of this messed up game. And we would also learn just what tools we were given.
Just an hour earlier we had the opportunity to speak our case, a simple question which would determine whether or not the audience thought we were sane or not. Simple right? The only problem is, someone always cheats.
There was no opportunity to speak with the girl since the round ended. As soon as the camera shut off and guards swarmed the room, we became separated. Probably to keep whatever the man wanted to do to her from happening before the final round.
"Welcome back! The votes are in and our contestants are more than eager to hear just what you thought about their answers!" The overly excited announcer's voice comes out from an overhead speaker. He could only pray now that the audience would have mercy.
The camera in front of me cuts on and the man manages his best smile despite the horror of it all.
"Are you ready?" No, no! He silently shouts to himself. A small sign above the camera tells him the answer. I'm certain that just behind the unassuming man is a similar screen for the audience to see.
INSANE
"Welp, no surprise there! Our little Sunshine really is a fan favorite, isn't she? For her efforts, she has been awarded a bronze age spear personally crafted by the good folks down at Astro Tec! Astro Tec; When your needs are astronomical, look to the stars."
"And for our runner up, a 2X4 board from a local hardware store! Locally made and sturdy composition. In fact, we may have used the same type of wood for the pole of the spear earlier! Well not really, but it's a nice thought." A splintered hunk of wood is dropped at his feet unceremoniously.
"And now for your challenge, take up your weapons and move your way through this obstacle course! You'll be given incentives to help you play the right way so don't slack off!" The camera shuts off and a guard from off screen leads me to another room.
They fit the man for some kind of large collar. It feels large and unnecessarily heavy on the neck. The metal underneath prods at the skin under the bands that can't scratched. Just wearing this thing fills one with dread and panic.
None the less, he take up his rough looking wood, making sure not to get any splinters in his hands. As he does so, targets of people appear and the cameras cut on. Looks like there's no introduction needed for this challenge.
The business man spies the nearest one, a burly man with a spear and a colar around his neck just like mine. With a single swing it's head is brutally ripped from it's body and the dummy goes limp.
Another one popps up nearby, a frightened looking woman. Surely they don't mean for him to attack that one? No, in a few moments the target returns to it's previous position out of range. Guess that one was a test?
As the man moves on clutching his wood, he is certain to check and see if the person is not carrying a weapon before swinging.
Another man appears, this time extremely close to where the man is standing and holding a knife up. With a swing it's arm comes off of the dummy and a powerful electric current runs through the man. He lets out a yowl of pain and falls to the ground in a heap.
"No no no! Don't attack the civilians!" Civ-civilians? What is that crazy announcer thinking? He had a knife!
A camera moves in closer around the dummy's neck. There is no collar.
"Attacking civilians will not be tolerated! But out there in The Real World stage, you won't get just a shock for trying it!"
The stunning effect eventually wears off and he gets to his feet shakily. As he keeps moving through that maze of people and obsticals he eventually comes accross a barrier of boxes. The only way through was to jump over them. He hooks the wood over one side of them and uses it to pull himself up and over the crate. He leaps down and keeps running without looking back.
"Gyaaaaaaaaa!" The man shouts, clutching his shoulder. A dummy hiding behind the crates stands silently, spear extended and slightly bloody. The dummies, they can attack to.
[Chapter is getting kinda long so I'll end it off here. Next time may or may not be the final one depending on if I decide to elaborate on this chapter more. Also, there are just a few subtle hints I included in this chapter for the suprise ending. No spoilers!]
2 notes
·
View notes
Text
Hoppa
When I first walked into my friend's bar, Tony had a few milk crates and a closet door. I just about laughed my butt off, but he was happy. To be honest with you, it was down to earth and just what the doctor ordered.
I straddled up to the bar and sat on a wooden ten dollar discount store special. He reached in his cooler and threw me a beer. I do believe we were in heaven. But, that was back in college. We've come a long way since then.
But if I wanted to do a makeover, I know exactly how I would do it now. My friend Tony feels the same way. In fact, I just recently visited his home and he showed me his bar. It was beautiful. But, the funny thing is that he started it with the old milk crate and closet door setup he had back in college.
When you have a few milk crates holding up a closet door, the first change you are going to want to make is on the stability of the bar. With enough foresight, you'll give yourself some room behind the bar for other additions later. Then, build yourself a frame.
Use 2x4s to build yourself a rectangle on the floor, the length and width of the bar that you eventually imagine when it's finished. Extend your structure upward with 2x4s spaced about every 18 inches. Cut them the height of the bar you want. Finish off the frame with another rectangle on top for support.
Some people would actually build the structure sideways and then put it in place. But remember, you're having fun. 호빠 You're not a professional bar builder. And when it's done, it's going to look great anyway because all of the blemishes are going to be covered.
Once your structure is in place, keep the milk carts in the structure of the bar for nostalgia purposes. But, turn them sideways. They are going to work out great as shelves in your home bar when it's all said and down.
You can keep the closet door in place. Tony did. He kept it as a part of his bar by using extra support under and additional support to the sides. I can still see the old scratches that were on the door years ago. He actually finished the door so that any old blemishes remained visible. But, the bar still looks great.
Then, Tony went to the local hardware store where he found cabinet doors. He purchased seven of them. Three actually became cabinet doors on the backside of the bar. The other four were used for decorating the front and one side facing outward from the wall. I thought that was the simplest idea in the world.
Think about it, and this could only come from a guy like Tony who will take the easy road every time. The 2x4s fill the gaps between the cabinet doors. When you open the cabinet doors on the inside, milk crates hold party favors. A refrigerator in the middle of the bar holds some pretty cold beer. The only thing Tony splurged on were the bar stools that he sits around the bar.
A bar doesn't have to be the most extravagant room in the house. You can start small and eventually build yourself to extravagance as you go. There are people in this world who want it all now. But, there are those among us who can take their time and achieve perfection.
0 notes
Text
55-Gallon Water Storage Tanks – Tips, Tricks and How-to!
55-Gallon Water Storage Tanks
55-gallon water storage tanks are probably the most common way to store large quantities of water. They’re not overly expensive, take up a lot less space than larger storage tanks and are relatively easy for people to store in their homes.
What are 55-gallon water storage tanks? 55-gallon water storage tanks are commonly made of some type of food-grade plastic and are also commonly referred to as 55-gallon drums or water barrels. For preppers and other preparedness-minded individuals, they are one of the best ways to store enough water for your family during a disaster.
Storing enough water for your entire family is tough, but using 55-gallon drums for water storage can make it possible for the average family to store enough water for weeks, months or even longer.
[wc_toggle title=“Table of Contents” padding=“” border_width=“” class=“” layout=“box”]
55-Gallon Water Storage Tanks
Using 55-Gallon Drums for Water Storage
What to Look for in a 55-Gallon Water Barrel
Don’t use 55-gallon drums used to store chemicals
Selecting food-grade containers
Good Places to Look for Used 55-Gallon Water Barrels
Suggestions for 55-gallon water barrels
How to Clean Water Barrels Before You Use Them
Where to Store your Water Tanks
Will storing plastic water containers on concrete cause contamination?
Make sure you have a drain nearby!
Stacking 55-gallon water barrels
How to Fill Your 55-Gallon Water Tank
Rainwater collection
Disinfecting Water for Long Term Storage
Water additives
How to Get Water Out of Your Tank
Conclusion
[/wc_toggle]
Using 55-Gallon Drums for Water Storage
For the most part, storing water in a 55-gallon drum is pretty straight forward. There just isn’t a whole lot to putting water into a container and using it later down the road, but there are some tips and tricks that can make water storage a lot easier and less involved than you think.
Start by choosing the right type of water barrel.
What to Look for in a 55-Gallon Water Barrel
When you’re choosing a 55-gallon drum for water storage, there are a few things that you should take into consideration. You’re going to want to make sure they haven’t been used to store any kind of chemicals, are made of food-grade plastics if possible, and clean the barrels before you use them.
Don’t use 55-gallon drums used to store chemicals
It probably goes without saying, but you want to make sure that you’re not using any 55-gallon drums that have been used to store chemicals in the past.
All kinds of chemicals are stored in 55-gallon drums, from pesticides to cleansers, acids to poisons. They’re all transported and distributed in 55-gallon drums. This means that we need to be careful that we know where any used 55-gallon drums come from.
If you can’t trace the origin of a 55-gallon drum, I’d suggest not using it for water storage. Even when you clean out the barrel it can still contain a residual amount of chemicals that you don’t want to drink.
Selecting food-grade containers
Any time that you start looking for plastic containers to store water in, you’re bound to hear about food-grade plastic. Most plastic containers have what looks like a recycling symbol on them with a number inside. This is what’s known as the resin identification code (RIC).
Plastic containers with RIC #2, 4 and 5 are safe for use with food and water and shouldn’t leach chemicals into your water even after long term storage. RIC plastics #1 and 7 can be used but should be avoided if you can.
Plastics #3 and 6 should not be used as they can leach toxic chemicals into your food and water.
As long as you have a container that isn’t #3 or #6 you’ll be okay.
Good Places to Look for Used 55-Gallon Water Barrels
One of the best ways to get 55-gallon water barrels is by reaching out to companies in your local area. Wineries, soda bottling plants, candy factories, dialysis centers, bakeries, and classified ads are all great places to get cheap used 55-gallon water barrels. If you’re lucky, you’ll be able to find them for as low as $10 or $20.
Just make sure that you’re getting 55-gallon drums that haven’t been used to hold any kind of non-food item.
Suggestions for 55-gallon water barrels
If you want to buy new water barrels, you’re better off picking them up in person at a hardware store or country store.
If you want to order one online, you’re going to pay a lot more. You can try something like this if you’re interested in getting one sent to your front door.
How to Clean Water Barrels Before You Use Them
All water barrels should be cleaned out before you use them. This includes brand new water barrels that have never been used before! You’d be surprised at how many plastic shavings (and worse) will come out when you clean them.
There are a lot of ways to make sure that a water barrel is clean before you fill it, but I like to just use regular household chlorine bleach and water. It’s the most convenient way that I’ve found to get a water barrel clean.
Start by filling the barrel up about ¼ of the way with clean water. Then, add a cup of chlorine bleach.
Once you have the diluted bleach mixture in your water barrel, roll it around on its side and slosh the water around to make sure that the entire inside of the barrel is getting exposed to the bleach mix. I like to leave it overnight and then do the same thing again in the morning just to be safe and make sure that the bleach has time to kill anything on the inside of the water barrel.
When you’re happy that the inside is clean, rinse the barrel out with fresh, clean water.
Where to Store your Water Tanks
Before you start filling your water tanks, you need to figure out where you’re going to put them.
You can store your water tanks inside or outside, but you should try to keep them out of direct sunlight and try to keep them from freezing. Direct sunlight will increase algae growth inside your water barrels and freezing can lead to leaks when the water expands as it freezes.
If you’re storing them outside, you should cover them with a tarp to keep the tops as clean as you can.
It’s always good to place the tanks on 2x4s or pallets. This helps keep dirt and water from pooling around the base of the barrels and it helps keep insects off of them.
Will storing plastic water containers on concrete cause contamination?
A lot of people say that storing sealed plastic containers will somehow absorb chemicals from concrete if they’re stored in direct contact with it. Some go so far as to say that the lime from the concrete will absorb into the water… Don’t worry about it!
I’ve searched all over and the only place that you can find anyone saying this is on prepping websites that cite each other as the source of the information.
Putting water barrels on pallets or 2x4s keeps water and dirt from collecting around the bottom of them, you can also argue that it would separate the barrel from the changing temperature of the concrete (even though the air temperature will be changing as well) but doing it to prevent chemicals from leaching into the water doesn’t make sense.
Make sure you have a drain nearby!
If you’re going to store your water in the basement, make sure that you have a drain in the room in case the barrel breaks! 55 gallons of water may not seem like a lot of water but it’s still plenty to damage drywall, carpets, electronics and other preps that you may have stored in your basement!
Stacking 55-gallon water barrels
A lot of us would like to be able to stack our 55-gallon water barrels, but most barrels aren’t designed to support the weight of another barrel on top of it. You can buy stackable water containers if you’re really limited on space and need to stack them. You can also put one or two 5-gallon water containers on top of the 55-gallon drum and you should be fine.
Don’t try to stack normal 55-gallon water drums on top of each other when they’re full!
How to Fill Your 55-Gallon Water Tank
Filling your 55-gallon water tank actually takes more planning than you’d think. The first thing to consider is the hose that you’re going to use.
Traditional garden hoses have brass fittings and can contain up to 8% lead. Time Magazine did a study and found that water from certain garden hoses left the water with lead levels up to 18 times the level that’s acceptable for drinking.
Garden hoses also allow an increased level of BPAs (the chemical used in plastics that are linked to certain health conditions) to be introduced into the water. If you’ve gone out of your way to find a 55-gallon water tank that’s made of food-grade plastic and then taken the time to clean it, you’re undoing all that work by using a using an old garden hose. Ideally, you want to use a drinking water hose to fill the tank.
Before you start filling the tank, make sure that it’s sitting where you plan to keep it! One gallon of water weighs 8.34 lbs. That means that 55 gallons of water weigh 458.7 lbs! Most 55-gallon plastic drums weigh about 20 lbs empty which means that you’re going to have close to 500 lbs once you fill your drum and you’re probably not going to be able to move that much weight.
Rainwater collection
Rainwater collection is an option to fill your water barrels and makes a great way to keep collecting water after a disaster, but you have to understand that the water is dirty and not suitable for drinking until you filter it. The Platypus GravityWorks Water Filter is a good option to filter large amounts of water relatively quickly.
Disinfecting Water for Long Term Storage
There are a lot of questions about how to prepare water for long term storage. Some people say you need to add chlorine or some kind of water additive. Some say you don’t need to add anything. Some people say water is good forever and some say it’s only good for 6 months. What’s the truth?
Let’s talk about the easiest thing first. Water doesn’t expire. It can grow algae or get contaminated from an outside source, but it’s still drinkable water. You just need to get the other stuff out of it before you drink it.
If you’re filling your water tanks with water that’s already been treated with chlorine then you don’t need to do anything to the water before you store it. You can still add chlorine if you want to but it’s not necessary. I still usually add bleach even if it’s treated water.
For water that isn’t treated, you should add 1/8 teaspoon of regular household bleach per gallon of water. For 55-gallons of water just add 7 teaspoons of bleach.
If you’re filling your 55-gallon water tanks with cloudy water for some reason, then you should use ¼ teaspoon of bleach per gallon of water.
Water additives
You can buy special water treatment additives for your 55-gallon water storage tanks that claim to keep your water good for 5 years or more. Some people swear by them, but I think it’s really just a waste of money. You’re just as good going with household bleach for a fraction of the cost.
How to Get Water Out of Your Tank
Once you finally have your water stored and waiting for a disaster, you have to be able to get the water out of the barrel.
Most water storage tanks have the lids that can’t be removed so you’ll need a pump that can get your water out of the barrel. Something like this hand water pump will let you siphon water from the bottom of the barrel.
The other option is to have a spigot installed in the barrel.
Conclusion
55-gallon water storage tanks are one of the best ways to store water for you and your family long term. They aren’t for everyone since they take up a lot of space but if you have the room they’re probably the best way to get into water storage.
The previous article 55-Gallon Water Storage Tanks – Tips, Tricks and How-to! is courtesy of: Ready Lifestyle Prepping Blog
55-Gallon Water Storage Tanks – Tips, Tricks and How-to! published first on https://readylifesytle.tumblr.com
0 notes
Photo

What are some good deficit platforms? https://ift.tt/2Gcc1Rb
I workout from home so am looking to use something that is a mix of sturdy and comfy for hex bar deficit deadlifts. What have you guys used? Is this a place for DIY or should I buy equipment if there is such a thing? I was thinking of buying some 2x4s but my local hardware store only has flat wooden fence posts saran wrapped in groups of 4 (about 6" tall)
submitted by /u/seands
[link] [comments] December 12, 2018 at 10:24PM
0 notes
Text
DIY Floating Deck, Part 2: Frame & Waterproofing
I’m building a floating deck in my back yard! Catch the whole thing, start to finish, right here.
Hey guys! It’s time for the next post in this long-awaited (at least, for me!) update. I’ve finally gotten enough coffee in my system and quieted the dogs long enough to finish this post and give you another written + video combo.
Brace yourselves, we’ve got a lot to cover!
If you recall from the first post where I talked about the deck plan, I shared the overall design, explained some of the decision making that went in, and where my challenges/research led.
Once I’d come up with my overall plan… it was time to get to work!
Recommended tools and materials
May contain affiliate links or links to related posts
miter saw
drill
drill bits
impact driver
GRK 2 1/2-inch screws
GRK 3 1/8-inch screws
GRK 4-inch structural screws
4-ft level
Ground Contact lumber – 2x6s, 2x4s, and 1x4s (more on why below)
composite shims
3 3/4″ concrete screws
hammer drill (if you don’t have one of these, you can get a kit like this that will adapt your impact driver)
deck blocks
landscape fabric
gravel
shovel or mattock
stainless steel brackets/joist hangers
Ground Contact lumber
One of the biggest new pieces of info I picked up as I made my deck plan was discovering that I would likely need to use Ground Contact lumber for the entire project. I was excited to bring Wood Its Real onboard as a sponsor, and I’m so glad I did when I did, because it was through them that I learned about these new recommendations.
As common sense would tell you, outdoor wood projects need more protection than the stuff you’d use on the interior. And most of you probably also know about using “pressure treated” or PT wood for common outdoor projects to make them last longer. But as of 2016, there are new guidelines designating what kind of pressure-treated lumber should be used, and when. As you might guess, part of it is in the name. Since termites and fungi and all sorts of nasty critters live in the ground, that type of contact is especially important to protect against. There are a few other scenarios where Ground Contact is recommended:
Wood will come in contact with soil, vegetation, leaf litter, and debris that can hold moisture for extended periods of time.
You don’t expect good air circulation, especially on the underside and between decking boards.
Wood components are installed less than six inches above the ground and are supported by treated wood or concrete without a moisture-transferring barrier/break.
Wood is in direct contact with material that already shows signs of decay.
Wood gets wet on a very frequent, recurring basis and doesn’t have time to dry adequately.
You are building in a tropical climate.
Well, whaddya know… my new deck is going to meet a LOT of that criteria!
I noticed that my local Lowe’s was kind of half-and-half about having Above Ground and Ground Contact lumber, but the nearby Home Depot seems to have switched out almost all of theirs for Ground Contact. Honestly, it makes sense with a store’s limited shelf space.
Building a floating deck frame
Build outer frame
I began by cutting and building the outer frame. I could have started with the deck blocks and supports and laid it all out, but for whatever reason, this way just seemed to make more sense to me.
For the outer frame, I pre-drilled each hole and used exterior screws. Don’t waste your time like I did! Use exterior screws that don’t need pre-drilling. Like the Ground Contact lumber, you spend a little more for better quality materials. It’s worth it.
Elevate and level out
The frame, at this point, was screwed together, but it was still a rickety mess. To keep the corners square, I reinforced them with a piece of scrap lumber. I would later discard these once the rest of the frame and other supports went in.
I also lifted up the frame using some scrap lumber and my 4-foot level (one of my favorite hand-me-downs from my grandfather). It’s normal for things like this to still have a s l i g h t slope for water runoff (it only looks level, but isn’t), so I noted the way the level looked when laying it on the patio and tried to match the same slope with the deck frame.
Space out supports
I marked every 16 inches and placed another 2×6 in the frame. The longest boards I brought home were 12 feet, but the deck is longer at one end. So, I added another board a couple of feet from the end to give the 12-foot boards something to screw into. Kinda easy, but it helps to have someone assist by holding up all the other ends.
At all corners and in the one spot where I used a 4×4 to help elevate the deck, I added self-tapping structural screws (at this point, I finally bought better ones that didn’t require pre-drilling). For the rest of the structure, I went back through and secured with self-tapping 3 1/8″ fasteners (you can just do this the first time and avoid the double effort!). I also added some stainless steel brackets on some of those joists that I thought were high enough off the ground to add it.
Note: hardware not pictured — I did a lot of second-guessing myself at one point and chose to add more hardware/brackets on the joists of the highest side as the deck boards went on. But since some of my research argued against using it in areas with direct ground exposure, I used them only where I thought applicable. I can really only say “use your best judgment and consult a structural engineer” if you have questions, since this is still my first time building something like this — and, of course, I’m a homeowner messing with her own house, not a professional contractor. This thing mostly sits on the ground, so I’m not super worried about falling down and/or not lasting for as long as I want it. But as with any large build, one tutorial is never enough! It’s always best to read multiple tutorials and make the most informed decision possible. <3
Waterproofing a deck
Somehow, a deck, the Wicked Witch, and cotton candy have the same greatest foe: water.
To combat this (at least, in the deck’s case), there are a number of different options. While we may call this “waterproofing”, what we’re really talking about is adding moisture barriers to help the wood dry out as quickly as possible. Rot is still a natural inevitability with just about everything; we’re just trying to prevent that as best we can. They’re all good suggestions, but doing a combination of more than one seemed like the right option for me:
Using ground contact lumber (6 inches or less above ground, in contact with concrete, etc.) –

Laying down landscaping fabric and gravel under the deck –
Brushing a sealant on cut joist ends
Using flashing tape on the frame (prevents water from sitting in between the deck boards and the joists) –
After spacing out the deck blocks and digging them down, I surrounded everything with landscaping fabric and gravel. K did most of the hauling, so he gets full credit on that (we wound up thinning out the gravel a little from these pictures to use under the shed too, but you get the idea).
I spent some time adding more braces to reinforce the structure as well. Then, I began adding flashing tape.
In order for the flashing tape to stick, the surface needs to be clean and dry. However, this whole deck was built as the spring rain storms swept through, so that was much easier said than done. In Georgia, spring can often be a full day of threatening rain (but not actually raining), or intermittent storms, or blazing sun. It’s always a toss-up. Hard to plan for outdoor projects when the rain is exactly what needs NOT to happen in order to get to the next step!
Whenever the rain splashed dirt on the wood, we’d wait for things to dry out and then apply the tape. A cheap dish brush (that I’ve used for outdoor projects in the past) made quick work of getting things clean.
Since the weather wasn’t always the best assistant, there was a lot of skipping around. We basically spread out the gravel, applied flashing tape, and put in a bunch of braces between the joists all at once… whichever was the easiest to accomplish in the moment.
Building a deck over a concrete patio
I put off what I thought was going to be the hardest part until the end. I’d been reading and researching a lot on this part, and I found my answer on Family Handyman. In order to create a small section over the concrete patio, I would have to screw wood “sleepers” into the concrete. Then, after lining it up with the rest of the frame, I could add the decking on top.
But, once again, one of the more important things to keep in mind is wood touching (or rather, not touching) concrete. I had already built the new frame to have a gap between the outer frame and and the sides of the patio, to which I also added gravel. Then, we drilled a drainage hole in the corner and fit a plastic pipe through (this is potentially where we might try to run power in the future out into the yard, but we didn’t actually do any of that yet… it’s more of a “let’s plan to maybe do this just in case we want it later” type deal).
In my research, I found that if I put some type of composite/plastic product in between the wood and the patio, the deck would last longer. But the thinnest composite trim I was able to find at the store was still too thick to fit the 2×4 on top and still have it line up with the rest of the frame. Enter: plastic shims.
As a solution, I stacked the 2x4s on top of 1x4s (yes, Ground Contact!) and cut them to length at 45-degree angles. I then used the plastic shims to elevate them and get to the correct height.
Using a hammer drill and specialty drill bit (it comes with the concrete screws), I slowly found a way to screw through and line it up. Basically, I put the 1×4 in place and marked for screws every wo feet. Then, I pre-drilled through the wood with a normal drill bit. Next, I drilled through the hole with the concrete drill bit into the patio. This marked the hole in the right place so I could continue with just the hammer drill.
Tip: drill a little bit at a time and deeper than you’ll need. Pull the drill bit back out of the hole periodically to help remove dust and drilling the hole a little deeper will prevent the remaining dust in the hole from clogging things up when you fasten the screw down.
Once the 1×4 and shims were fastened to the patio, I stacked the 2×4 on top and screwed them into the 1×4.
In some cases, shims were needed multiple times, but the main objective was to get it all to line up with the rest of the frame.
You can see in the pic below that I had cut composite trim to attempt to use them as spacers… oh well! Guess now I have to find a use for a long piece of plastic trim that I can’t return (I already have an idea for use in the kitchen).
Once things were all in place, more flashing tape went on top (though I cut the roll in half this time instead of thirds, since the boards were wider here).
I also wrapped corners where I thought screw holes or joints would allow moisture.
And just like that, we were ready to start adding the deck boards! In the next post in this series, I’ll cover the decking process in detail, along with a nifty tool that worked extremely well and kept things evenly spaced. It was a little extra work to get an angled deck instead of laying the deck boards straight, but in the end, I think it’s totally worth it!
Thanks so much for following along, friends! I hope you found this helpful so far. If it’s beneficial to you, I’d love it if you subscribed for more updates so you don’t miss the next deck post. There will be a few DIYs in between that I’ve been meaning to cross off my to-do list for summer (plus, it’s nice to break things up, because it feels like my whole LIFE has been about this deck for the last month!

), so you’ll see those next!
The post DIY Floating Deck, Part 2: Frame & Waterproofing appeared first on Ugly Duckling House.
More Where That Came From
Quick Patio Patch
4 Easy Tips for Growing Hydrangeas
How to Make Your Patio Look New Again for Less Tha...
Game of Stones
.yuzo_related_post img{width:170px !important; height:170px !important;} .yuzo_related_post .relatedthumb{line-height:14px;background:#ffffff !important;color:#454747!important;} .yuzo_related_post .relatedthumb:hover{background:#ffffff !important; -webkit-transition: background 0.2s linear; -moz-transition: background 0.2s linear; -o-transition: background 0.2s linear; transition: background 0.2s linear;;color:#454747!important;} .yuzo_related_post .relatedthumb a{color:#102a3b!important;} .yuzo_related_post .relatedthumb a:hover{ color:#113f5e}!important;} .yuzo_related_post .relatedthumb:hover a{ color:#113f5e!important;} .yuzo_related_post .relatedthumb:hover .yuzo__text--title{ color:#113f5e!important;} .yuzo_related_post .yuzo_text, .yuzo_related_post .yuzo_views_post {color:#454747!important;} .yuzo_related_post .relatedthumb:hover .yuzo_text, .yuzo_related_post:hover .yuzo_views_post {color:#454747!important;} .yuzo_related_post .relatedthumb{ margin: 0px 6px 0px 6px; padding: 0px 0px 0px 0px; } jQuery(document).ready(function( $ ){ jQuery('.yuzo_related_post .yuzo_wraps').equalizer({ columns : '> div' }); });
from Home https://www.uglyducklinghouse.com/diy-floating-deck-part-2-frame-waterproofing/
via http://www.rssmix.com/
0 notes
Last Seen Blogs

blacklatexcat
Без названия

zetaskully
rattle

namdosan
for the hope of it all

qazse-candids
Candid Videos @Qazse

poorti-wholesale
Poorti