#{im not sure why i cropped it to individual panels i think both look good... mhhhhh. lets see...}
Explore tagged Tumblr posts
Text


Want you.
(The full piece):

#homicipher#my art#homicipher fanart#homicipher mc#adami adashino#adami homicipher#mr scarletella#mr scarletella homicipher#mr scarletella x mc#mr scarletella x you#{ <- i guess???????? question mark?@????!?!???!??!?!!!#anyway my brain jas been taken over by him. hate this evil creature#but i enjoyed making this...#im evolving. i can feel it#my art is evolving...}#{im not sure why i cropped it to individual panels i think both look good... mhhhhh. lets see...}
185 notes
·
View notes
Text
kmplayer gif tutorial
hello all! i’m gonna show you how i make my gifs! I use kmplayer and avisynth to make gifs, but I’m going to focus on kmplayer for this one. This tutorial is long and quite in depth so if you’re a beginner, this should be good for you!
also! this is purely just a gif tutorial and not a coloring tutorial lol
what you will need:
photoshop (im using cs5)
kmplayer
any video downloader (I use 4k download or savieo)
Screencapping
Okay first find a video and/or a scene that you want to gif. You’ll want to get the highest quality video possible. Don’t download anything under 720p or else your gif will look grainy. Try to get 1080p as much as possible.
Once you get that downloaded, open your video in kmplayer and go to the scene you want. I like to go a few seconds beforehand to make sure i don’t miss any frames. Now on your keyboard press Ctrl + G to open up the screen cap menu.

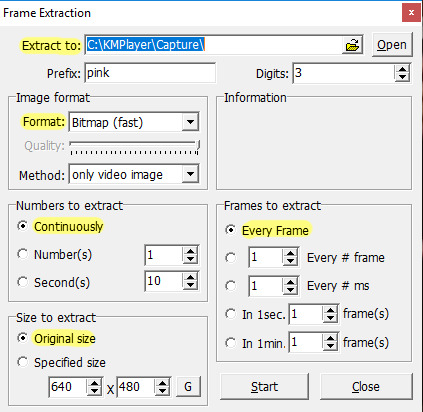
I don’t remember the default settings but here are the settings you’ll want:
Extract to: you’ll want to create a folder to hold your screen caps and then direct that folder here
Format: JPEG and Bitmap are both good options. Bitmap (i believe) is going to be a higher quality image
Numbers to extract: continuously
Size to extract: original size. You want the full size image
Frames to extract: every frame. This ensures that you’re getting every frame and helps your gif look smoother
also the “prefix” is just going to be the first part of the image name, so put whatever you want for this! :)
Once this is done, press Start in the menu and play the video. When the scene is done, press pause on the video. Open the menu again (Ctrl + G) and stop that as well. Now all you want to do is go into the folder with your screen caps and delete the ones you don’t want.
Frame timing and converting to smart objects
Open photoshop: we are now going to start the giffing process! Before you start, make sure you have the animation window and the layers window open. To do this, go to Window > Animation and Layers, if it’s not already showing.
Now, click on File > Scripts > Load multiple DICOM files. Find your screen caps folder and load them in. You’ll see in your animation bar that it only has one image showing.

In order to pull your screen caps from this, go to the top right hand corner of the animation bar and click this button. Click “Make frames from layers”.

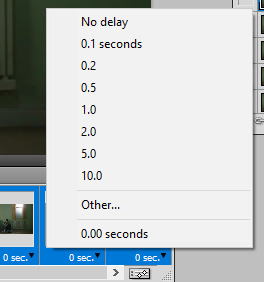
This is so your gif actually plays all the frames and not just the one showing. Next, change the timing of the gif. Personal preference is a big thing in giffing so you’ll want to play around with what works for you. The average timing used by a lot of people is either 0.04 or 0.05 (for screencaps i should say). I find that 0.04 can be a little fast for my liking, so 0.05 is good. To do this, click the “0 sec” and then “Other...” and type in your timing. Make sure you select all the frames before doing this, unless you want to change each frame individually ^.^
P.S. if you ever want to delete a frame in your gif, you can delete the layer in the layer window but in the animation bar, you’ll have to click on the frame and click the tiny trash can next to the bottom scroll bar.

The next step is to click the button in the bottom right hand corner of the animation bar. It looks like it has two sliders on it. It will change your animation from frames to timeline.
Next, right click on a frame in your layers window and select “similar layers”. Then right click again and select “convert to smart object”. This may take a moment btw.

If you see that your animation timeline shortened into one line instead of multiple lines, you’re on the right track! Next thing to do is to crop the part of the scene you want.
Image size, sharpening and canvas size.

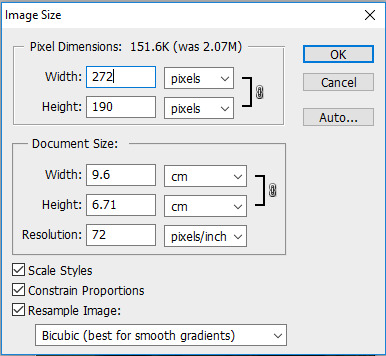
Image size will change the photo size without cropping anything out. Canvas size will change the size without transforming the image. What I like to do is to change the image size to about 5 or so pixels larger than what I actually want for either the width or height. In this case, I want my gif to be 268 x 150. So my cropped photo is going to make my height much larger than I’m going to want it, if that makes sense.
P.S. For sizing, make sure your width is either 177px for 3 panel gifs, 268px for 2 panels, or 540px for a single panel. If you want a 3 panel gifset, make the middle gifs 178 px (i know, it’s a little dumb but if you don’t, it’ll make the middle gif slightly blurry)

(This is what I’m going to resize my cropped image to)
You can just make the width or height automatically what you want (268 in the width for my case), but I find that after sharpening, a line can form around your image. I prevent this by making the image slightly larger than what I want and then cutting that part out later.
Now I want to sharpen my gif! Again, this is about personal preference, but I think this is what a lot of people use as well. Right click on your smart object in the layers window and select “New Smart Object via Copy”. I’ve seen people select “Duplicate layer” instead but I honestly don’t know what the difference is lkasndfllanslk.
Set the top layer’s opacity to 50% and leave the bottom layer at 100%. To actually sharpen the gif, go to Filter > Sharpen > Smart Sharpen.
For the top layer:
1. Smart sharpen: Amount 500%, Radius 0.4
2. Gaussian blur: 0.3 (its also under filter)
For the bottom layer:
1. Smart sharpen: Amount 500%, Radius 0.4, no gaussian blur

After this, go to canvas size and change it to your actual gif size. For my gif, it will take my 272 x 190 to my desired 268 x 150. Then combine your two smart objects by selecting both of them and clicking “Convert to Smart Object”.
Gif without sharpening vs gif with sharpening

Now you’ll want to edit it to your liking, just make it sure it’s under 3mb for tumblr’s image limits.
I’m not going to get too much into coloring bc it can be a real pain sometimes but! I will say that selective coloring is your best friend, just don’t saturate/over color or the gif will look more grainy.
After coloring and such, this is what I get:

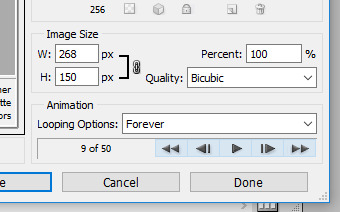
We’re almost there! Save your new gif under “Save for web & devices” and not for “Save as”. When it opens, it’ll look really confusing, but all you need to worry about is that the “Looping options” says forever and not once, or else your gif will stop after it plays the first time.

The last step that I didn’t even learn until recently is that you’ll have to open up your gif again in photoshop. When you do this, you’ll find that the timing has changed from 0.05 to 0.07. Idk why it does this, but your gif will look smoother if you change it back. (It might only be for screencap gifs but idk)
Here’s a comparison of the gif as is vs the gif when i changed the timing again:


And then you go through the process again if you’re making other gifs! I wrote a lot but it really isn’t that hard once you practice a couple times. I’m still learning too! (as you can see since my gifs are still grainy and such) but i hope this was helpful for people who don’t know where to start! Happy giffing!
#text#im not the end all be all but i will say that I know i've improved ever since learning some of these things#if anyone wants to share their knowledge i would lvoe that
13 notes
·
View notes