a blog-shaped guide on everything I know about Discord Bots
Don't wanna be here? Send us removal request.
Note
does the bot tutorial work with adding stuff like tempo bot?
Yep, you can add other functions (like welcoming or role-adding etc)!! I can make a tutorial on any function you're trying to add if you want (except a music bot bc i've never managed one of those lol)
0 notes
Text
HOW TO MAKE A SIMPLE DISCORD BOT THAT RESPONDS TO MESSAGES!!!
(updated tutorial! trust me, it's super easy!!)
Pretty much every Discord bot tutorial I’ve seen is either outdated, way too complicated, or a video... so I’ve decided to take matters into my own hands and make my own tutorial!!!
So here’s how to make a response bot with Python and Repl.it, step by step, with pictures. NO CODING EXPERIENCE NEEDED
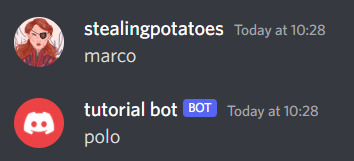
Step 1: HAVE A DISCORD ACCOUNT AND A SERVER!
Seeing as you’re here, I’ll assume you know what discord is and have an account. I won’t explain this bit to you (:
Step 2: MAKE A REPL.IT ACCOUNT
Repl.it is where your bot’s code is gonna live, so you need to make an account for it!!
https://repl.it/signup?goto=%2F~
Step 3: STARTING THE BOT!
Now you’re gonna go to https://discord.com/developers/applications and make an application!
Once you’re there, click that blue “New Application” button and make a new application!

Once you've done that, you should be here
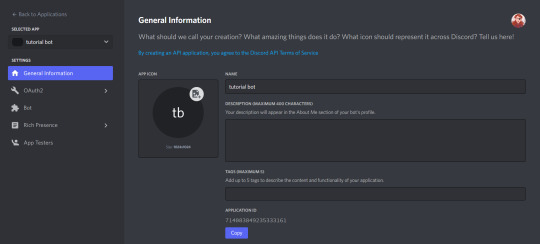
Now go to the bot section and click add bot

Congrats! You've got the beginnings of a robot! Do not close this tab, we'll need it later!
Step 4: ADDING THE BOT!
Now, you need to add the bot to a server so you can use it!
Go to the “General Information” page of your bot/ app, and copy the application ID by clicking the handy little copy button
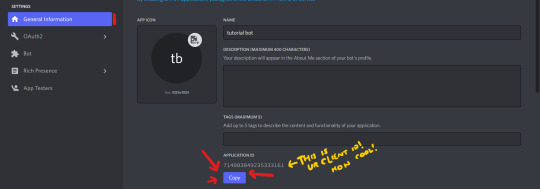
now, replace where this link says [YOUR CLIENT ID HERE] with your client ID and go to said link:
https://discordapp.com/api/oauth2/authorize?scope=bot&client_id=[YOUR CLIENT ID HERE]
(example: https://discord.com/oauth2/authorize?scope=bot&client_id=714083849235333161)
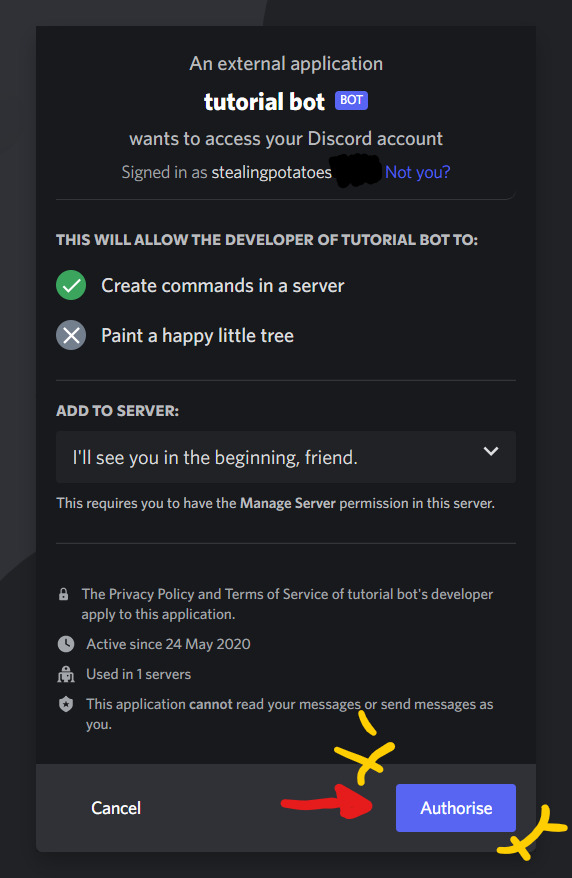
Authorise it and bam! It's in your server!
Step 5: ACTUALLY CODING THE BOT!!
FINALLY!
This bit is REALLY easy, because I’ve made you some base code, so you don’t have to do much!!
Go to: https://repl.it/@stealingpotatos/tutorialbotbase1
Now click the "Fork" button and you've got your own copy of the code!!! Well done!!

Here comes the actual coding! Replace "trigger word" with whatever you want to trigger the bot, and "response" with the-- well I'm sure you can work it out!
THE TRIGGER NEEDS TO BE IN ALL LOWER CASE

But your bot won't work just yet!
step 6: JOINING YOUR BOT AND CODE
Back in the Discord Dev Portal, go to the Bot tab and click "RESET TOKEN" and then copy it!


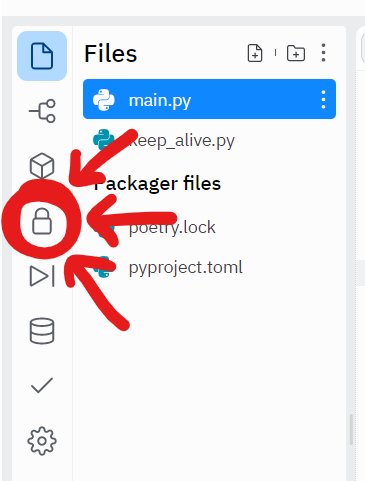
Back on repl.it, click the lock icon to enter the Secrets tab
Once you're there, add a new secret called "SUPER_SECRET_BOT_TOKEN" and make the value your copied bot token!
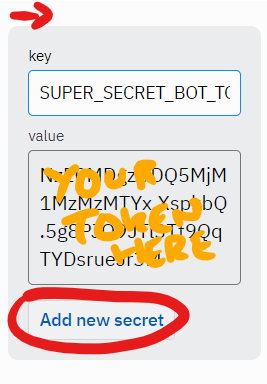
AND THATS IT!!! You have a working bot!!
I'm so proud of you!!!! :D
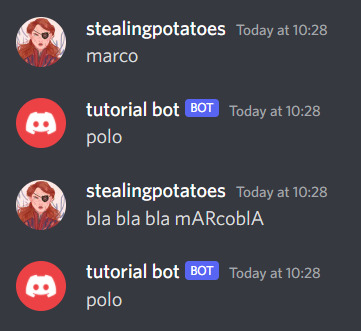
Have fun botting!!
extras: KEEPING YOUR BOT ONLINE
Because of the “keep_alive” function, your bot will continue to be online for about an hour after you close the tab.
But if you want it online all the time, here's a tutorial I made a while back on keeping your bot online 24/7!
extras: ADDING MORE RESPONSES
Super simple!!
If you want multiple triggers for the same response, copy & paste the “(””) in message.content.lower()” part of the statement, + add an or

Like that!
And for adding another trigger/response entirely, just copy & paste the statement entirely, and change the “if” to an “elif” if you don’t want both things to trigger at once.

Like this!!
If you don’t already know python, I’d very much recommend learning it if you’re going to be doing more bot coding!!
Thank you for reading, and if you have ANY QUESTIONS AT ALL, my askbox is open (and has anon if you think the question is kinda dumb and don’t want your name on it. It’s not a dumb question, ask me!)
Also if you have any questions about adding new functions, I’ll try to help you too! This blog is gonna be all abt that!!
81 notes
·
View notes