Text
Xbox Adaptive Joystick Review

The latest in Microsoft’s accessibility focused controllers, the Adaptive Joystick builds on the form factor the Wii Nunchuk, with a similar setup of an analog stick with triggers, and the addition of four face buttons. Like the controller it’s imitating, the Adaptive Joystick is intended to be paired with another controller, either a standard Xbox controller, a selection of licensed third party options, or preferrably, the Xbox Adaptive Controller.
Even with the added face buttons, the Adaptive Joystick only has enough buttons for half a controller, without any of the menu buttons. It can still function as a standard Xbox controller when wired, and with some tweaking you can take one of its seven buttons and turn it into six more, expanding its possible use cases.

By using the Xbox Accessories app to assign a button as the Shift button--in my case the stick click-- you can assign secondary functions to the other buttons. For example, you can have the default binds act as the left analog stick, face buttons and right side trigger and shoulder buttons, then click or hold the stick to swap the functions to the right analog stick, shoulder and trigger buttons, dpad, or menu functions. This can enable you to play many simpler games with a single hand, with the additional face buttons only accessible when needed. For my personal use case, I used it to play several shoot-em-ups, with the trigger buttons allowing me to place the main buttons at my fingertips, with my thumb handling the movement and bombs.
Any simpler game is a good use case for the Adaptive Joystick, making retro systems like the NES, PC Engine, and Megadrive very playable, with turn based RPGs or visual novels good options to relax with. A dpad might be preferable in this situation, but for casual play the analog stick is good enough, with similar tension and response to a standard Xbox analog stick, and the ability to change how rapidly the stick responds through the Xbox Accessories app.

If that’s still not enough controls for you, you can pair it with another Adaptive Joystick to get the second half of the controller, or pair it with any of the previously mentioned full size controllers. This is where you can remap the buttons, save and load controller profiles, and turn on Xbox Assist to combine it with other controllers. Previously named, Xbox Copilot, it was renamed after Microsoft’s push to add its “AI” machine learning tech into all its devices, so you may find older resources still calling it Copilot. The option to enable Xbox Assist is nested under the more options icon, shown as three dots. When enabled, it will take your connected controllers and make them all read as a single unit.
This can allow you to control movement with one controller, while performing actions with the other. This is also how you’ll pair two Adaptive Joysticks together, if you’ve directly connected both of them through USB. A pair will still be missing enough buttons for the menu functions, so you’ll need to set Shift modifiers, or use a keyboard or additional controller to access everything. If you’re someone who enjoys using Nintendo’s Joycons in a split configuration, you might enjoy this setup.
By decoupling the two halves of a controller, it also allows you to set the buttons wherever you find most comfortable, not limited by the form factor of a standard controller. Like the Xbox Adaptive Controller, the Adaptive Joysticks have a standard mounting thread for camera accessories. This allows you to mount it on a tripod, table stand, webcam or microphone arm, or attach wrist straps and other accessories.

With this you could say, mount an Xbox Adaptive Joystick on a camera arm, then swing it in and out to access the controller as needed, or mount two of them to set up as your mech cockpit controls. The Adaptive Joystick’s thumbsticks have a similar tension and size as standard Xbox controllers, which allows you to use different thumbstick caps and toppers.
Options like the Kontrol Freeks can raise the height and add grip for better precision, or you can decorate it with various themed caps. Microsoft also offers a free design service that allows you to choose from a variety of shapes and heights, then download the files for 3D printing. There’s also an existing industry of independent creators who design similar products.


I’ve been personally testing the Adaptive Joysticks with the Thumb Soldiers, which provide various shapes to cater to different abilities and experiences. The mushroom cap is my current favorite, which dramatically expands the surface area, allowing both quick and precise movements, or changing the grip style to control the stick while having better reach for a claw style grip on the triggers. There’s also shapes designed for racing games, or flight stick style experiences.
Paired with the 8bitdo Lite SE Xbox controller, each can cover the other’s weaknesses. The Adaptive Joystick allows you to more easily hold the trigger buttons while operating the joystick, while the Lite SE can lay flat for fightstick style access to the rest of the controls, as well as providing two remappable TRS ports for adding external switches.

The Adaptive Joystick is ultimately a niche accessory that’s intended to supplement, rather than replace a controller, but with a little ingenuity, a wide number of games can be made playable with a single unit. It’s initial appearance seems limiting, but it’s got much more potential to explore.
6 notes
·
View notes
Text


fightstick illustration works
0 notes
Text


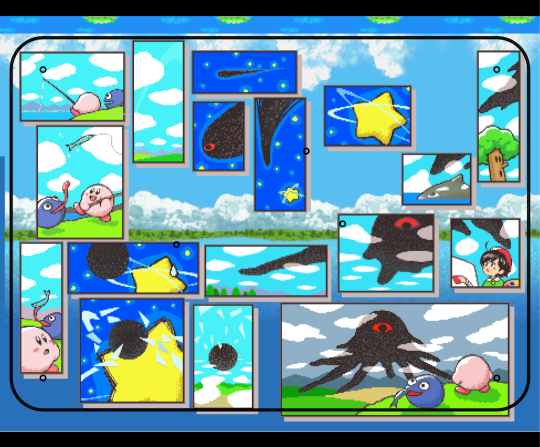
fightstick graphic design works
1 note
·
View note
Text
The S2 Engine: building a better Hitbox


The S2 Engine is a leverless controller layout intended to allow you to play a wider variety of games with arcade style controls. A revision of the S2 Drive, which was designed with retro style games in mind, it combines WASD style directional controls with the spacebar style jump button popularized by the Hitbox.
The goal here was to keep a “home row” position for your hands, with the consideration that it's much faster and more comfortable to close your fingers than to extend them.
Two thumb buttons allow easy access to the trigger buttons, with oversized pinky buttons for auxiliary functions. This has the advantage of allowing both thumbs to access the jump button, with the thumb buttons replacing the hard to reach pinky column, making it easier to hit or hold with other buttons.
youtube
The layout gives you the advantages of a regular leverless layout for fighting games, with the benefit of more intuitive navigation in menus, 2D action games and even 3D space. Combined with a remappable controller firmware, it allows a wider range of applications than both traditional leverless and arcade stick layouts.
I have two recommended button mappings, one more in line with the traditional fightstick layout, and a more universal one suited to all kinds of games.

The first remaps the third column from R1 and R2 to both shoulder buttons, with L1 on the top and R1 on the bottom. This allows easier navigation through menu tabs, instead of the reversed left and right positions of the shoulder buttons on a traditional layout.
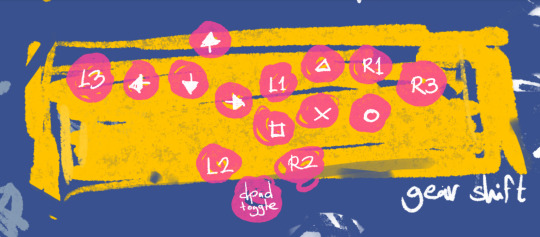
The second puts most of the face buttons on the same row, aligning them in a mirrored WASD position on the other side of the buttons, with the shoulder buttons flanking them. Square, cross, and circle are on the bottom row, with triangle above the cross button, and L1 and R1 to the side of the triangle button. Games commonly focus their main actions on the square, cross and circle buttons, so this allows you to access most of them at the same time without finger movement. The positioning of the L1 and R1 buttons allow more intuitive menu navigation, and directional actions.
Both trigger buttons are positioned on the thumb buttons to the side of the large jump button, with the up button duplicated in the WASD cluster, and the L3 and R3 flank the direction and action buttons.
LAYOUT DEMONSTRATIONS
Here's some example layouts as a demonstration.

For Street Fighter 6 this allows you to play with both classic and modern controls. On classic you get the usual 6 button layout on top, with the shortcuts for Drive Parry, Drive Impact or throw on the thumb or pinky buttons. You can even forego one of the up buttons to turn either into another macro. Personally, I use the right pinky for Drive Impact and the right thumb for parry, with throw and character specific functions on the remaining two.

On Modern this layout makes it easier to use the assist feature by mapping it to a thumb button, allowing the rest of your fingers to rest on top with the light, medium and heavy buttons, with some flexibility on where you'd like the special and shortcut buttons to be.

For Guilty Gear Strive I like to map the thumb buttons to dash and roman cancel, to get easy drift RC. I always found it hard to integrate the dash button in the main six button cluster, and this mimics the natural action of left trigger right trigger that I'm used to on controller.

For games with a block button the thumb buttons are a lifesaver. In Mortal Kombat, the top buttons handle the four attacks, throw and stance flip, while the thumb buttons allow me to hold block and call assists. MK always felt like it didn't have a good solution on a standard arcade layout. Either the attack buttons get stuck in the middle, or shoved to one side with the others requiring you to stretch to use all of them.

In Soulcalibur I keep the block button in the main cluster since I default to using the button combos instead of shortcuts, but I do like keeping the thumb buttons ready for stance macros and easy supers.

In Tekken 8 I use the the top 6 buttons for the standard 4 attacks and multibuttons shortcuts, with Rage on the thumb button, Heat on the right pinky and the left pinky for awkward button combinations.

How about something less conventional? Here's Gundam Versus. Typically you play this on an arcade stick since it only uses 8 directionals and a behind the back camera. The WASD cluster here makes it more natural and even lets you do moves like dashes and blocking (down to up) faster. Again, you can give up the larger UP button and use it for communication commands, or burst.
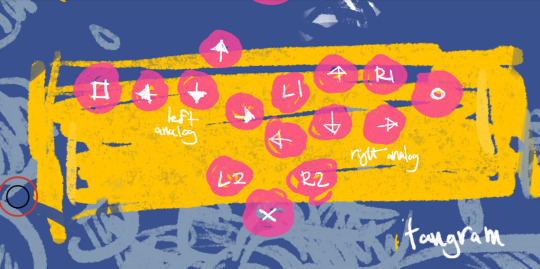
And here's Virtual-On. This makes it easier to hit the turbo modifiers and attack buttons together and perform fast jump cancels. You can even emulate the twin stick setup of the arcades with it. Which is also useful if you want to play some 8 way twin stick shooters.
If you're running GP2040CE you can even use it for 3D action games. A lot of action games don't rely on analog inputs, only differentiating between 8 directions and rarely needing to walk, and often allow you to get away with centering the camera behind the back with a button instead of messing with the right stick. Simply set the directions to the left analog stick, and set the bottom jump button to a dpad modifier so you can access those functions.
This works great in PS2 era action games like Nightshade, which requires you to quickly chain movement and attacks, or older Devil May Cry games, where it's much easier to perform precise inputs like enemy step attacks.

On my personal controllers, I've even added aux ports that allow me to plug in pedals, to go full pianist style, getting quicker reactions for shortcuts like Drive Impact, or adding modifiers to control the camera.
And of course, since it was designed with retro games in mind it works great for that, easily adapting to the six button layouts of the Genesis, Saturn and arcade games, and allowing you to play SNES games that rely on the shoulder buttons much easier.
HOW DO I BUILD ONE?
So how do you get this layout? For my part, I've mostly been creating prototypes for this layout by hand, with a power drill and step bit. But for my final build I went to Eternal Rival with my custom layout, and other case builders such as Jonyfraze, and AllFightSticks can also do custom layouts.
I originally finished this layout over a year ago, before Street Fighter 6, and those were kind of your only options for thumb buttons. Since then the leverless controller scene has blown up with different takes, and you've got quite a few options for something similar.

I personally like Mavercade's KeebBrawler-04MX, with its pill shaped buttons and split layout, but they also have a Keebfighter line with some similar layouts.

The Zenpad Duel has a split dual thumb button layout, and Attachon and Rush box have layouts with pinky and thumb buttons. Jonyfraze offers the 6GAWD for both leverless and fightstick builds. Hell, you could even go for something like a box style controller for Smash.

I'm less impressed with the offerings from companies like Haute42, which seem to just staple buttons onto the existing layout with no consideration for access or aesthetics, but they are an option for those looking for a cheap way to test a thumb button layout.
Whatever way you choose to go, it's undeniable that we're in an era of rapid controller innovation, with tons of different philosophies on how to build better controllers, and fresh ideas coming out all the time. The S2 Engine is what works best for me, but with so many options out there now, it'd be a waste to not experiment and find your personal favorite.
0 notes
Text
Haute42 B16 with Astrolokeys keycaps


-slightly modified layout using larger keycaps to make it easier to hit auxillary buttons
3 notes
·
View notes
Text


UNBREAKABLE BOND: Sonic and Tails themed linking fighsticks
-features the S2 DRIVE, an Allfightsticks 9.5" SEGA 2P mini arcade stick, alongside the mi2con (aka miNIcon), an even smaller arcade stick built inside a project box
-S2 Drive features a Seimitsu lever and buttons, and the mi2con has a rotary encoder for playing arcade games with rotary joysticks or spinners
-ethernet ports on the sides allow the mi2con to connect to the S2 Drive, allowing it to be used to add extra controls for training mode, or right stick and camera controls
1 note
·
View note
Text


S2-WAVECRUSH v.00
-analog arcade stick for playing 3D action games
-SASI JLF analog mod for true analog movement
-generic thumbstick for camera control
-10mm buttons for dpad, as well as toggle and momentary switches to enable dpad directions on the stick
-custom layout with 24mm Qanba KS buttons and 30mm thumb and pinky buttons for triggers
-built inside an Ikea artist easel enclosure
demo videos:
youtube
youtube
3 notes
·
View notes
Text


GRAPEFRUIT FIGHTER ABBADON MK 2
-handmade leverless controller with vinyl wrap and "S2 ENGINE" custom layout
-GP2040ce Advanced Breakout Board
-Qanba Gravity KS Silent buttons
-4 aux jacks on the side for external buttons
1 note
·
View note
Text
Haute42/Cosmox Hautepad P12 Review

The latest in Haute42’s (Cosmox?) line of budget leverless controllers, the confusingly branded Cosmox Hautepad P12 takes a back to basics approach, bucking the wild layouts and constant iteration of their main controller lines. Instead it offers the traditional 8 button leverless layout, housed in an injection molded plastic case--a first for the brand.
The case itself takes more than a few design cues from Razer’s Kitsune, with a stark black color scheme, pill shaped start and select buttons, with round auxiliary function buttons. Where it does differ is in the size and variety of functions. The P12 is definitely a miniature controller, reminding me of Hori’s Fighting Stick Mini line, though thankfully more functional.
It’s lightweight and shows its budget construction, but the smooth edges of the molded case, anti slip pads and good buttons give it a pleasant finish compared to other Haute42 offerings, which often have an almost DIY feel to them. The low profile switches and lack of a top plexi panel make customization limited, but that’s to be expected.
Like other Haute offerings, the P12 runs the open source GP2040ce firmware, giving it an edge over licensed controllers with multi system compatibility, including PC, Switch, PS3, PS4 and even limited Xbox and PS5 support with the purchase of a passthrough device. It takes some work to get it running, but all the software for configuration is right on the controller itself, allowing you remap your controls, set multiple profiles, and set up shortcuts from a web browser. I set mine up with profiles for fighting, action and rhythm games, with the turbo button remapped as a function key for easily swapping between them.

The size and lack of a WASD style up button makes the P12’s utility outside of fighting games limited, and feels quaint compared to the variety of experimental layouts found elsewhere, but as an entry level leverless, often found retailing at the 50USD range, it’s hard to argue with the value presented.
1 note
·
View note
Text
Xbox Adaptive Controller Hub
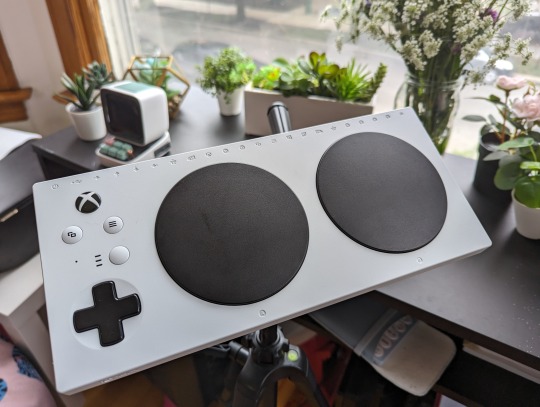
A dedicated page for information on the Xbox Adaptive Controller. Continuously updated. A more detailed breakdown is available past the jump.
Useful links:
Video guides to using the XAC by the MS Gaming Accessibility Team: Detailed visual breakdown on how to use the various XAC features, easier to parse and find info than the dedicated support pages.
Xbox Adaptive Controller Input Device Specifications: Specs on how exactly the ports on the XAC are wired, what inputs are supported, and how they connect to TRS and TRRS connectors. Useful for making custom switches/potentiometer based devices for the XAC.
OVERVIEW The Xbox Adaptive Controller is essentially a hub for pairing multiple input devices into a which output as a regular Xbox controller. The advantage of this is more flexibility in what devices and games you can connect to, without a reliance on separate software.

For example, you could use the USB inputs on the side to attach joysticks to emulate each analog stick, with other individual buttons controller by various other styles and sizes of switch.
Because this is a hardware solution, it can also be used on various other platforms by using converters. For example, you could use a Mayflash Magic S adapter to play on Switch or PS4.
The various 3.5mm jacks on the back also correspond to various inputs, so they can be switched on the fly by simply plugging them into a different port. Each of these ports can also be reassigned using the Xbox Accessories app on Windows or Xbox, and up to three profiles saved to the controller itself--not including the default, unchanged profile.
USB Port Mappings
There are two USB ports, one on either side, and which one you plug a controller into will decide which analog stick it is mapped to, and what the corresponding buttons do. Controllers must be D-Input/HID joystick protocol, meaning no Xbox controllers or controllers reading as x-input are supported. PS4 devices are also generally not supported, though if it has a PS3 compatibility option that may work.
The first 8 assigned buttons will be mapped automatically. These buttons can be remapped, but there will be some overlap on each USB port, and the available buttons CANNOT be reassigned. You'll want to know which buttons are available beforehand. Directional hatswitches/dpads will also not be assigned, unless they read as individual buttons.
The default mappings are show below.
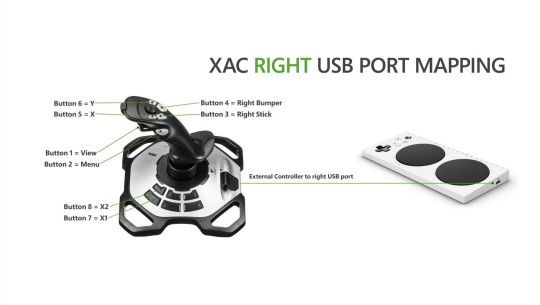
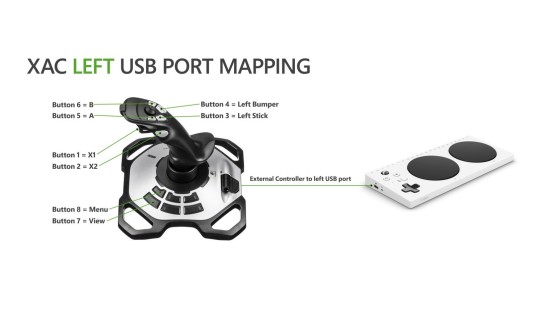
You can see that each side shares the X1, X2, Menu, and View buttons, though with each flipping the 1,2 and 7,8 assignments.
NOTE: Reassigning the Menu and View buttons will NOT reassign the corresponding buttons on the XAC unit itself. So if you're ok accessing those buttons through the hub you can essentially treat those as two extra wild card buttons (X1 and X2 are the other wild cards).
Supported USB Controllers:
A list of controllers I've personally found to work with the XAC.
-8bitdo Lite 2: left analog, face buttons and shoulder buttons available. Triggers unmapped. (8Bitdo Lite does not work).
-Brook Fightboard PCBs: XB Fighting Board not compatible. PS4 compatible PCBs can be used by assigning the directions to Left Stick and making sure it boots up in PS3 mode.
-GP2040ce Advanced Breakout Board. Can be used by assigning the directions to Left Stick and making sure it boots up in Dinput mode.
-Logitech X52 HOTAS: analog axis, trigger, pinky and top buttons, as well as T1/T2 buttons detected. No twist axis or hat switches. Must be plugged into throttle to function, but no buttons or axes on the throttle are detected.
-Saitek AV8R-01 HOTAS PS3 Edition: analog axis, trigger, top buttons as well as T1-4 detected. No twist axis or hat switches.
-Thrustmaster T16000 HOTAS: analog axis, trigger, top buttons as well as the top button row on the left side, and rightmost button on the row below are detected. Function buttons can be switched by toggling the left/right handed switch on the bottom of the stick.
2 notes
·
View notes
Text
S2:V07-PETIT PARADISI
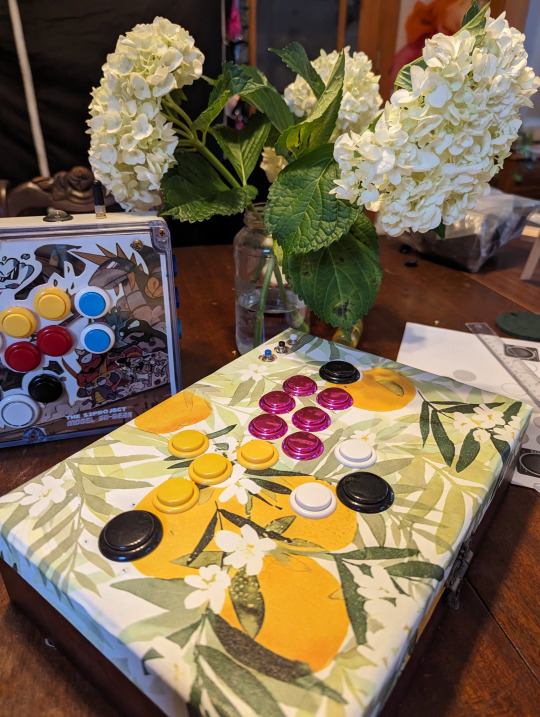
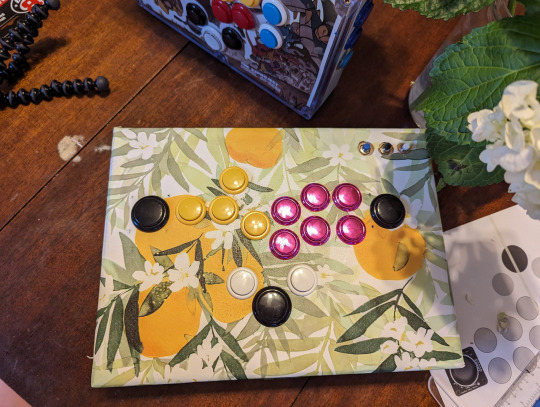


A leverless fighting game controller using the S2 ENGINE custom layout I've been refining. Combination of a WASD and Hitbox style layout, with the final column moved to thumb buttons, and two 30mm buttons at the pinky positions.
The front has a peg for guitar straps, and the strap lock can be used to hold cables. A latch lets you easily access the internals and extra storage. The left and right 30mm buttons can be swapped out for an analog stick using an Adafruit breakout board. Two headphone jacks on the side can be used to attached extra inputs, such as a foot pedal.
4 notes
·
View notes
Text
S2:V06- TWIN TANGRAM

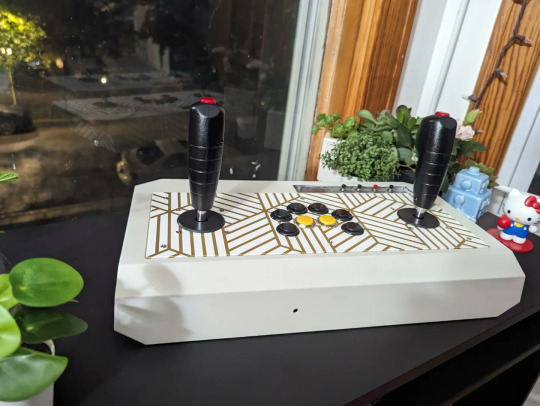
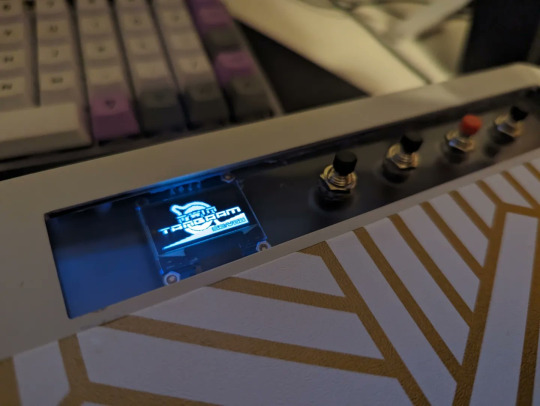

A digital twin stick controller for Virtual On, 8-way twin stick shooters, and more. Housed in the case of a Hori RAP VX-SA, the first arcade stick I bought.
A custom metal plate supports the joystick and buttons, and the cable door has been repurposed to pass through the usb signal and store the cable. The function button panel has been removed and replace with a transparent plexi panel that has function buttons and a status OLED mounted to it.
Uses the GP2040ce open source firmware and an Advanced Breakout Board by TheTrain.
3 notes
·
View notes
Text
Welcome to the S2 PROJECT!

The S2 Project is my personal archive of custom controller builds, teardowns and obscure controllers.
My goal is not only show off the things I build, but provide a resource for others attempting to build their own controllers, figure out niche uses, or simply learn how a piece of hardware works.
1 note
·
View note