Don't wanna be here? Send us removal request.
Text
Injection Disabled on Status Flags Caterpillar ET Software
“Injection Disabled” on Status Flags
Caterpillar ET Software
Read More:
Cold Mode and No Engine Speed on Status Flags Caterpillar ET Software Create Product Status Report (Download List) on Caterpillar ET Software Diagnostic Codes on Caterpillar ET Software
-If a SHUTDOWN is active, Injection Disabled will appear on Status Flags CAT Caterpillar ET. -An engine shutdown event will appear on a CAN J1939 device if the device is capable of displaying Diagnostic Codes.
#Possible Causes:
1). Engine Overspeed Shutdown
-The operator may be operating the engine incorrectly. -The “Engine Overspeed” parameter may be incorrectly programmed for the application, use Caterpillar ET to view the parameter setting for Engine Overspeed. Read More: How to Setting or Testing the Engine Overspeed using Heavy Duty Diagnostic Caterpillar ET?
2). 75% Overspeed Verify Switch
-Faulty on wiring, switches, or connectors. -Check the 75% Overspeed Verify Switch (If installed), it will sending “Ground Signal” to the ECM while activated. -ECM pin 54 (C-15 Engine)
3). Low Engine Coolant Level Shutdown
-The engine has been running for one minute and the coolant level is not being detected by the Coolant Level Sensor. -Check the Engine Coolant Level (If installed). -Check on Caterpillar ET, “Status – Configuration Tool” for “Coolant Level Sensor” (Installed or Not Installed), and Settings on Monitoring System – “Low Coolant Level”. -ECM pin 49 (C-15 Engine)
4). Remote Shutdown Switch
-Check for additional “Remote Shutdown Switch” on the Engine Sensor Shutdown System (If installed). -ECM pin 44 (C-15 Engine)
0 notes
Text
John Deere Service Advisor 5.3 Offline 2022 Construction and Forestry Equipment
John Deere Service Advisor 5.3.166 (replaces 5.2) Offline 2022 Construction and Forestry Equipment
Important Notice. Installation and activation are possible only with remote assistance using Teamviewer.
The laptops with ARM CPUs(Snapdragon 8cx, Microsft SQ1, etc) type are not supported!
The installation of AG and CF on the same Laptop is possible. Please let us know if you need to install the Agriculture and Construction versions of the Service Advisor on the same PC before we process the order.
You are buying John Deere Service Advisor v5.3 for Construction and Forestry equipment online on a USB HDD with international delivery or easy digital download! If you want to download the program. The download link along with the PDF instruction file is emailed to your email address within 2 hours (up to 12 hours on a weekend) of your purchase. If you would like the same software shipped to you on a USB HDD please select the appropriate delivery method during checkout.
The John Deere Service Advisor combines several versions of the program. As well as a number of related programs and diagnostic equipment
For the Agriculture division please check the John Deere Service Advisor 5.3 2022 Agriculture Equipment Division product link
Before you proceed, please check the product requirements below.
Unlike the previous version (John Deere Service Advisor 4.2) to work with the application you need:
Internet Explorer 11, Google Chrome, MS Edge (The shell) Last version of Adobe PDF reader (you will be asked to download the last version before the installation process begin) Last version of Java runtime environment (you will be asked to download the last version before the installation process begin) The John Deere SA v 5.3.166 has a more stable driver version. Sa works with any Windows 10 edition. The latest version of the Database dataset 2020/11 + updates to 2022/03 has all the new models’ coverage and faster performance.
John Deere Service Advisor 5.2 (5.3) System requirements:
– O.S.: Windows 8.1 Pro, Windows 10 Pro, Windows 11 – CPU: Any CPU for the Windows platform – RAM: 8 GB of system memory (Recommended), 4 GB is the minimum required amount. – Hard Drive: 180 GB of available space + ~130 Gb for the setup files if you want to download the software.
JD Service Advisor v5.3 support only Genuine JD EDL V3/V2 DLA Adapter kit (The previous version V2 USB and BT is also supported). If you’re using any other diagnostics tool we do not make any warranties
The new version of Service Advisor comes as a complete solution for those who do the repair, diagnostics, and maintenance of all John Deere construction and forestry equipment. It’s completely different from its previous version 4.2. JD Service Advisor functions are available from the Internet Explorer Web browser. At this moment this is only one officially supported browser version. To start work with any model, you need to enter the model name or its PIN.
Available program futures are divided into a few main sections: – Manuals – Reprogramming – Diagnostics
Manuals Section. First of all, most of the manuals now have a more convenient web interface and you can read/print all you want using Internet Explorer. A part of the manual is still available as pdf files only. So you need Adobe Reader installed.
The reprogramming section requires dealer credentials to access the payload database. At this moment this future is not available.
Diagnostics section. The available menus are
– Codes – Readings – Controllers – Observed Symptoms – Tests – Calibrations
John Deere Service Advisor 5.3 covers:
Hint: Click show all
4WD Loader:
ADT:
AG:
Alternate:
Attachment:
Apollo Series:
Axles:
Backhoe:
Boom Harvester:
Bundler:
CF Management Solutions:
Communication:
Compact Excavator:
Compact Loader:
Compactor:
Crawler:
Delimber:
Excavators:
John Deere 84
John Deere 444
John Deere 544
John Deere 644
John Deere 844
John Deere 344E
John Deere 344G
John Deere 344H
John Deere 344J
John Deere 344K
John Deere 444C
John Deere 444CH
John Deere 444D
John Deere 444E
John Deere 444G
John Deere 444H
John Deere 444J
John Deere 444JR
John Deere 444K
John Deere 524K
John Deere 524K-II
John Deere 524L
John Deere 544A
John Deere 544B
John Deere 544C
John Deere 544CFB
John Deere 544D
John Deere 544DFB
John Deere 544DH
John Deere 544E
John Deere 544EH
John Deere 544ELL
John Deere 544ETC
John Deere 544G
John Deere 544GH
John Deere 544GL
John Deere 544GT
John Deere 544H
John Deere 544J
John Deere 544K
John Deere 544K-II
John Deere 544L
John Deere 624E
John Deere 624EH
John Deere 624G
John Deere 624H
John Deere 624J
John Deere 624K
John Deere 624K-II
John Deere 624KR
John Deere 624L
John Deere 644A
John Deere 644B
John Deere 644C
John Deere 644D
John Deere 644E
John Deere 644EH
John Deere 644ER
John Deere 644G
John Deere 644H
John Deere 644H MH
John Deere 644J
John Deere 644K
John Deere 644K Hybrid
John Deere 724J
John Deere 724K
John Deere 744E
John Deere 744H
John Deere 744H MH
John Deere 744J
John Deere 744K
John Deere 744K-II
John Deere 744L
John Deere 824J
John Deere 824K
John Deere 824K-II
John Deere 824L
John Deere 844J
John Deere 844K
John Deere 844K-II
John Deere 844K-III
John Deere 844K-III AH
John Deere 844L
John Deere 844LA
John Deere 844LAH
John Deere 944K
John Deere TC44H
John Deere TC54H
John Deere TC62H
John Deere WL53
John Deere WL56
John Deere 250D Series II
John Deere 300D Series II
John Deere 410E
John Deere 370E
John Deere 310E
John Deere 460E
John Deere 260E
John Deere ISOBUS Implement
TIMBERJACK 850
John Deere 4048
John Deere 110A
Hagie HSTB
John Deere 114A
John Deere HH135
John Deere HH145
Hagie DTB
John Deere HH90
John Deere 201
Hagie NTB
John Deere HH115
John Deere 24
John Deere 23B
John Deere 110
John Deere 23A
John Deere 26
Hagie Boom
Hagie CCI
John Deere 4552
John Deere HH125
John Deere Transaxle
John Deere 1200
John Deere 1400
John Deere 1600
John Deere 310
John Deere 410
John Deere 510
John Deere 300D
John Deere 310A
John Deere 310B
John Deere 310C
John Deere 310D
John Deere 310E
John Deere 310G
John Deere 310J
John Deere 310K
John Deere 310K EP
John Deere 310L
John Deere 310L EP
John Deere 310SE
John Deere 310SG
John Deere 310SJ
John Deere 310SJ TC
John Deere 310SK
John Deere 310SK TC
John Deere 310SL
John Deere 310SL HL
John Deere 315C
John Deere 315CH
John Deere 315D
John Deere 315SE
John Deere 315SG
John Deere 315SJ
John Deere 315SK
John Deere 315SL
John Deere 325J
John Deere 325K
John Deere 325SK
John Deere 325SL
John Deere 410B
John Deere 410C
John Deere 410D
John Deere 410E
John Deere 410G
John Deere 410J
John Deere 410J TC
John Deere 410K
John Deere 410K TC
John Deere 410L
John Deere 415B
John Deere 435E
John Deere 500A
John Deere 500B
John Deere 500C
John Deere 510B
John Deere 510C
John Deere 510D
John Deere 515B
John Deere 610B
John Deere 610C
John Deere 710B
John Deere 710C
John Deere 710D
John Deere 710G
John Deere 710J
John Deere 710K
John Deere 710L
John Deere CH8
TIMBERJACK 1490D
John Deere TimberMatic Maps
John Deere TimberManager
John Deere TimberNavi
John Deere JDLink
HITACHI EX27u
HITACHI Zaxis50u-3
HITACHI Zaxis26u-5N
HITACHI EX17u
HITACHI Zaxis35u-5N
HITACHI Zaxis17u-5N
HITACHI Zaxis27u
HITACHI Zaxis17u-2
HITACHI EX50u
HITACHI Zaxis60USB-5N
HITACHI Zaxis35u-2
HITACHI Zaxis27u-2
HITACHI Zaxis50u-5N
HITACHI Zaxis50u
HITACHI Zaxis27u-3
HITACHI EX35u
HITACHI Zaxis50u-2
HITACHI Zaxis60USB-3
HITACHI Zaxis35u-3
HITACHI Zaxis35u
HITACHI Zaxis30U-5N
John Deere 17D
John Deere 50ZTS
John Deere 60D
John Deere 26G
John Deere 35CZTS
John Deere 27CZTS
John Deere 35D
John Deere 50D
John Deere 27D
John Deere 50CZTS
John Deere 30G
John Deere 17ZTS
John Deere 27ZTS
John Deere 35ZTS
John Deere 17G
John Deere 50G
John Deere 35G
John Deere 60G
John Deere 204L
John Deere 244K
John Deere 304J
John Deere 304K
John Deere 204K
John Deere 244L
John Deere 344L
John Deere 244E
John Deere 324J
John Deere 324K
John Deere 244H
John Deere 244J
John Deere 244K-II
John Deere 304H
John Deere 304L
John Deere 324H
John Deere 324L
John Deere 646
John Deere 646B
John Deere 646C
John Deere 350
John Deere 450
John Deere 550
John Deere 555
John Deere 655
John Deere 750
John Deere 755
John Deere 764
John Deere 850
John Deere 855
John Deere 1010
John Deere 2010
John Deere 1050C
John Deere 1050J
John Deere 1050K
John Deere 1050K PL
John Deere 350B
John Deere 350C
John Deere 350D
John Deere 350WT
John Deere 355D
John Deere 400G
John Deere 450B
John Deere 450C
John Deere 450D
John Deere 450E
John Deere 450ELT
John Deere 450G
John Deere 450H
John Deere 450J
John Deere 450K
John Deere 455D
John Deere 455E
John Deere 455G
John Deere 550A
John Deere 550B
John Deere 550G
John Deere 550H
John Deere 550J
John Deere 550K
John Deere 555A
John Deere 555B
John Deere 555G
John Deere 605C
John Deere 605K
John Deere 650G
John Deere 650H
John Deere 650J
John Deere 650K
John Deere 655B
John Deere 655C
John Deere 655K
John Deere 700H
John Deere 700J
John Deere 700J-II
John Deere 700K
John Deere 750B
John Deere 750BLT
John Deere 750C
John Deere 750J
John Deere 750J-II
John Deere 750K
John Deere 750WT
John Deere 755A
John Deere 755B
John Deere 755C
John Deere 755D
John Deere 755K
John Deere 850B
John Deere 850C
John Deere 850J
John Deere 850J-II
John Deere 850JR
John Deere 850K
John Deere 850L
John Deere 850L PL
John Deere 950C
John Deere 950J
John Deere 950K
Liebherr LR612
Liebherr PR714
TIMBERJACK D245
HITACHI EX5600-7LD
HITACHI EX2600-7LD
HITACHI EX1200-7
HITACHI EX1200-5C
HITACHI Zaxis130-5G
HITACHI EX3600-7BH
HITACHI Zaxis670LC-5A
HITACHI Zaxis350LC-5A
HITACHI Zaxis190W-6N
HITACHI Zaxis210-5A
HITACHI EX3600-7LD
HITACHI EX5600-7BH
HITACHI EX8000-6
HITACHI Zaxis210LC-5A
HITACHI EX2600-7BH
XCG 240LC-8B
XCG 210LC-8B
XCG 330LC-8B
John Deere 30
John Deere 50
John Deere 70
John Deere 80
John Deere 110
John Deere 120
John Deere 370
John Deere 490
John Deere 595
John Deere 690
John Deere 750
John Deere 790
John Deere 792
John Deere 890
John Deere 990
John Deere 120C
John Deere 120D
John Deere 130G
John Deere 130GLC
John Deere 135C RTS
John Deere 135D
John Deere 135G
John Deere 160CLC
John Deere 160DLC
John Deere 160GLC
John Deere 160LC
John Deere 180CW
John Deere 180GLC
John Deere 190DW
John Deere 190E
John Deere 190GW
John Deere 200CLC
John Deere 200D
John Deere 200DLC
John Deere 200G
John Deere 200LC
John Deere 210CW
John Deere 210GLC
John Deere 2144G
https://www.obd2tool.com/blog/john-deere-service-advisor-5-3-166-replaces-5-2-offline-2022-construction-and-forestry-equipment/
0 notes
Text
Vocom 88890300 Good Experience Feedback
Best Quality Volvo 88890300 Vocom Interface PTT 1.12 or PTT 2.8.150 Truck Diagnose Tool for Volvo, Renault, UD, Mack Truck

Volvo 88890300 Vocom is the best and professional volvo truck diagnostic tools by far, i have tested it on my vehicle without any problems. Volvo Vocom 88890300 is a diagnostics application that covers the whole repair process through the use of plug-ins. With Volvo 88890300 Vocom Interface you can diagnose, test, calibrate, and program a product. A product could be a vehicle, engine, or a machine. Volvo 88890300 Vocom Interface also provide functions for updating the tool, communication with the product, and other external applications. The set of plug-ins, user authorizations, and available languages is adjustable to provide every user with what they need.
Volvo 88890300 Vocom Interface Functions Tested Reported
Identify a product—works ! View information history—works ! Diagnose a selected product—works ! Test a selected product—works ! Program a selected product—works ! Calibrate a selected product—works !
Vocom 88890300 Good Experience Feedback
1.Supports Volvo Renault UD Mack Truck Diagnose 2.Diagnostics application that covers the whole repair process through the use of plug-ins. 3.With Volvo 88890300 Vocom Interface you can diagnose, test, calibrate, and program a product. 4.Provide functions for updating the tool, communication with the product, and other external applications. 5.Adjustable plug-ins, user authorizations, and available languages meet needs for different users
Volvo 88890300 Vocom Interface Supported Companies and Electrical Systems
Volvo Trucks (Older electrical system, Vehicle electronics ’98, V2, V3, V4); Volvo Buses (Conventional, Multiplexed, Multiplexed v2, Multiplexed v3); Volvo Construction Equipment; Volvo Penta (VERSION2); Volvo OEM Component Customer (VERSION2); Mack Trucks (V-MAC I/II/III, ITC, IV, IV+); Renault Trucks (VERSION2); UD Trucks (VERSION2)
Package includes: 1pc x 88890300 Vocom Interface 1pc x OBD2 Cable 1pc x 8pin Cable 1pc x 14pin Cable 1pc x 12pin Cable for Renault trucks 1pc x USB cable 1pc x CD or HDD or Second hande Lenovo T420 Laptop(According to your chosen configuration)
0 notes
Text
Caterpillar SIS 2022 CAT SIS 2022 Service Information System
There are 2 options for you to choose before order please: 1. Software is in a 500G hdd before shipment, you need to install it and active it in the laptop by themselves after receive the hdd.(We can remotely assist in the installation and activation of a computer.) 2. Software would be installed well in a second hand Lenovo T410 Laptop before shipment, you could use it directly after you receive Lenovo T410 Laptop
2022 CAT SIS EPC Installation Requirements 1. Please check that your HDD has enough free space. We recommend at least 400 Gb. 2. The CAT SIS works only under Windows 7/8.1/10/11 operation systems. Mac OS, Linux, Windows 11 Home Version etc are not supported. 3. Internet Explorer 9-11 is the only Supported browser because of the application using the WinDjView image plugin, which works with IE only. 4. The setup process estimated time is 2 hours if the download and extraction of the setup files have been finished. 5. If you don’t want to install it yourself, please choose our option 2 : Software would be installed well in a second hand Lenovo T410 Laptop before shipment, you could use it directly after you receive Lenovo T410 Laptop
Brand new release of Caterpillar Service Information database – 2022.
Type of catalogue:repair manual, spare parts catalog Make:caterpillar Region:WorldWide Inclusive languages:English, Spanish, Italian, Chinese, Mexican, German, French Amount of disks: 300 GB (ensure your PC has enough space) OS:Windows 7 32 bit, Windows 7 64 bit, Windows 8/8.1 32 bit, Windows 8/8.1 64 bit, Windows 10 32 bit, Windows 10 64 bit,Windows 11 64 bit
Description: Caterpillar SIS (CAT SIS) 2022 is illustrated as a guide to the maintenance and repair of the full range of cat vehicles, contains guidance on repair equipment and machinery caterpillar, program help diagnose production caterpillar, operating instructions spare parts and equipment caterpillar. Repair manual caterpillar SIS 2022 is intended for engineers and will be useful to all interested in the given direction. E-program caterpillar SIS 2022 allows the owner of specialized equipment to quickly and easily find the required information about the machine because it contains a search function references; helps professionals to calibrate equipment caterpillar, diagnose it and troubleshoot equipment to solve any problems.
We’re getting a lot of questions about how to work with the CAT SIS It’s simple and convenient for use. All you need to know is your model name, or serial number, or prefix. Also, you can use the Parts search function.
Caterpillar Service Information System is a completely offline product, no matter it works using Internet Explorer Browser (You connected to the local web server, which is being installed on your own PC/Laptop). The technical database for all cat machinery stored on 26 DVD-DL discs or (iso images or these DVDs).
2022 CAT SIS EPC Functions: Parts catalogs Maintenance and repair manuals Guidance on repair equipment Wiring and hydraulic diagrams program help diagnose production caterpillar operating instructions spare parts and equipment caterpillar Calibration data, etc
2022 CAT SIS EPC Information Types/Titles >Contamination Control Guidelines >Disassembly and Assembly >General Service Information >Operation and Maintenance ManualParts Identification Schematic >Service Letter >Special Instruction >Specifications >Systems Operation >Testing and Adjusting >Tool Operating Manual >Torque Specifications >Troubleshooting >Truck Engine News
Sections IMDEX MAINTENANCE PARTS LIST MACHINE ARRANGEMENT ENGINE_ARRANGEMENT BASIC ENGINE LUBRICATION SYSTEM COOLING SYSTEM AIR_INLET AND EXHAUST SYSTEM FUEL SYSTEM ELECTRICAL AND STARTING SYSTEM POWER TRAIN FRAME_AND BODY BRAKING SYSTEM STEERING SYSTEM HYDRAULIC SYSTEM OPERATOR_STATION SFRUICE EQUIPMENT AND SUPPLIES
Option 1: Package including: 1pc x 500GB mobile hard disk
Option 2: Package including: 1pc x second hand T410 (with 500GB HDD)
https://www.obd2tool.com/blog/caterpillar-sis-cat-sis-service-information-system/
0 notes
Text
PIWIS 3 Convert PDLS to PLDS+ for Porsche Macan/Cayenne
How to enable pdls plus so first you want to select the front camera, the combi instrument, the headlights and then the bcm vaughan. This is all in german, so I believe it’s front camera instrument. Cluster headlights, you may have to select led links if you have led lights and then front electronics, so we’ll just switch into that. So once you click next, it will then identify the control modules, which is what’s happening now. We then switch to the coding and programming tab at the top uh from there. We choose manual coding and then hit next. Also note: I am using the Porsche Piwis 3 which most garages who work with porsches or have including workshops that are not porsche dealers.
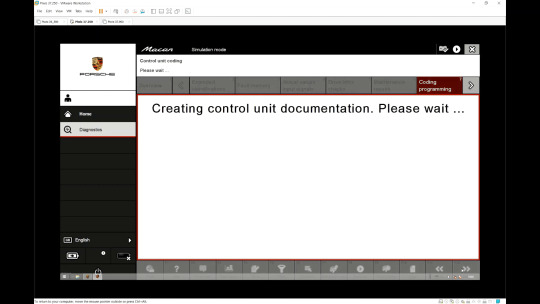
So just shop around or speak to a few local porsche specialists. You may also be able to do this with a launch x431, but I can’t confirm uh so from there we just need to select the year. We need to select the model type which is ticked, so it’s easy to choose the correct one from here. We just scroll down the list and choose pdls plus, which is the 8g2 option, the 8g2 option gives you the high beam assist, which you don’t get on the normal pdls, so make sure you choose the hg2 option from once. We’ve selected the hg2 option I just simply hit next now what’s happening. Is the diagnostic system is going off and code coding the relevant control modules, so the codes are all correct for the lighting system in order to enable pdls plus when I beam assist, I am using a virtual machine and I’m also using this in simulation mode.

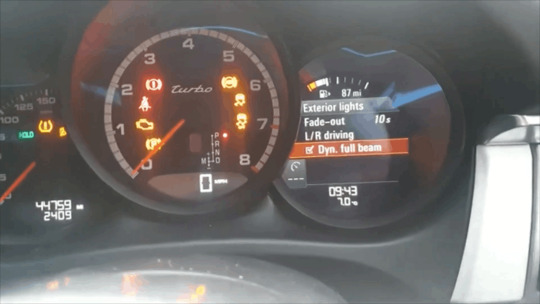
So mine won’t appear with ticks, but if you’re doing this on a live car, you will see ticks appear rather than the explanation mark in the inner circle. You will now see that the coding has been completed and it showed you all the parameters that have been coded, so we just hit next again, and that is it.
0 notes
Text
BMW ICOM ISTA-D 4.35 language Change Guide
06/2022 BMW ICOM ISTA-D 4.35.21 and ISTA-P 3.70.0.200 are multi-language enabled. 2022.06 ista-d language change is different from older versions. If failed to change the language, follow the guide below to fix it.
youtube
Software is in Win10 x64bit HDD/SSD format. It is compatible with BMW ICOM Next , VXDIAG VCX SE BMW and Godiag V600 scanners.
How to Change BMW ICOM ISTA-D language?
ISTA-D Language: Czech, Dutch, French, German, Greek, Italian, Japanese, Korean, Polish, Portuguese, Russian, Spanish, Sweden, Thai, Turkish
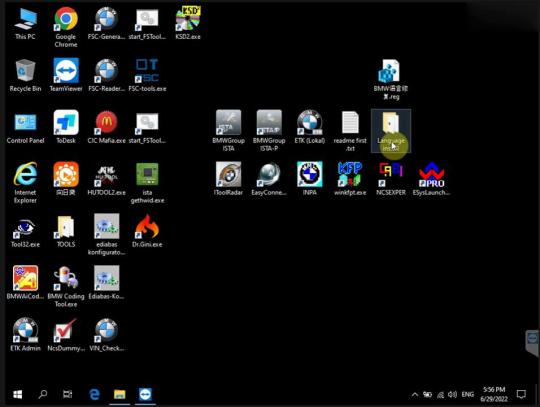
Open Language Install folder on the desktop Open delete all language pack.cmd
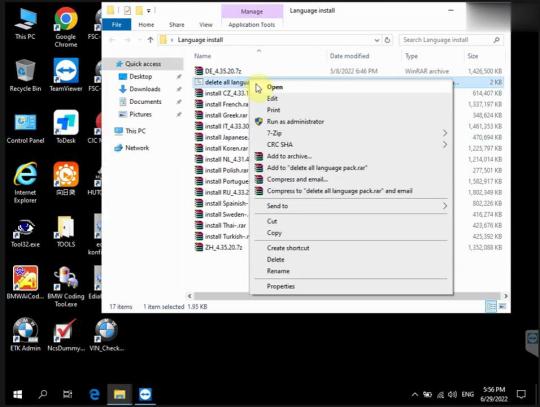
Extract the language pack you desired i.e French. Extract install-French.rar to C:/EC-APPS/ISTA/SQLiteDBs

Merge BMW Language Fix program on desktop
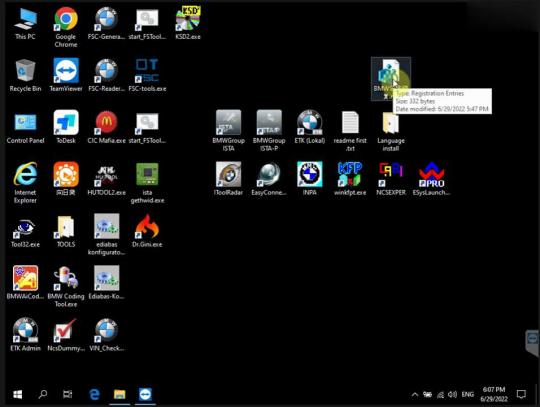
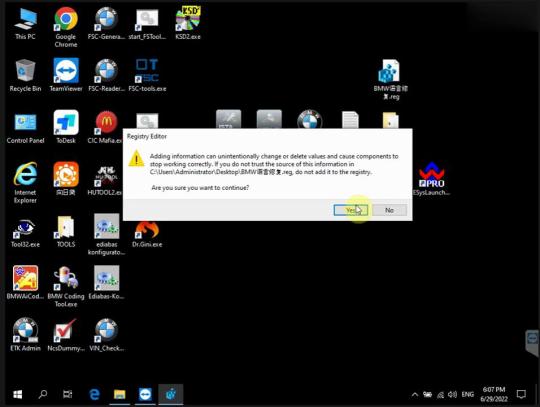
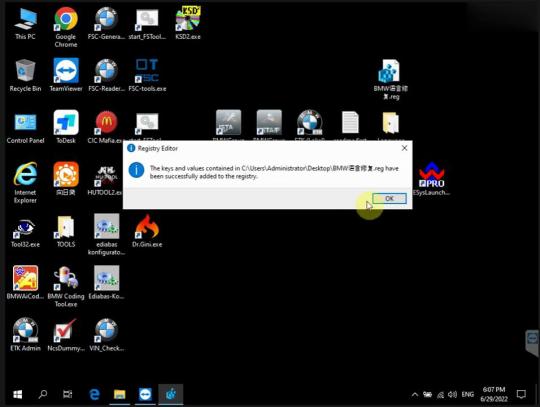
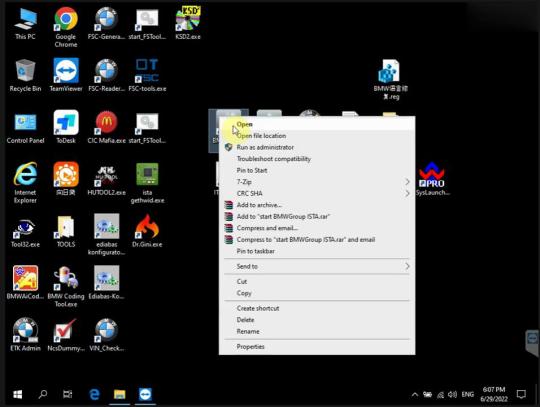
Open BMWGroup ISTA program on the desktop
Select Tool tab- Client settings Select the corresponding language.

The language has been changed to French. Exit ISTA-D and run again.
0 notes
Text
TOYOTA INNOVA 2009 MODEL Test by KTM BENCH 3 IN 1
This is a test about how KTM BENCH 3 IN 1 works on TOYOTA INNOVA 2009 MODEL.
What we prepared: KTM Flash KTM Bench KTM OBD1.20 3 in 1 ECU Programmer DELL Laptop TOYOTA INNOVA 2009
What we did: Connect KTM Bench to the vehicle via OBD cable, and connect to laptop by USB cable Plug the KTM 1.20 32 IN 1 dongle into the laptop
Start the car
Very important!!! Make sure you have downloaded and installed the related KTM BENCH 3 IN 1 software before performing operation. Free download links as below:
1. On mega:
https://mega.nz/folder/ZDIyzD4Q#Vc7l8l3_aMXngXoMDY8gQQ
2. On Chinese weiyun
https://share.weiyun.com/bG2lLOp5
Password: udv8ds Size: 3.56 GB No risk!
The test: Open the PCMflash software Then you can see the interface incl. interface, ECU, File. These functions can be performed * Identification * Read DTC * Clear DTC
Select the corresponding ECU i.e Toyota/Lexus/Hino/Scion>>76F0004/12/23/38/39/40/70/85, MPC565 K-Line New
Step 1: Identify the ECU info Click ‘Identification’ Read out the interface is Scanmatik- SM2 USB DLL: 1.0.0.15 (built 12.02.19) Firmware: FW: 0808 HW: 02 SN: A55259 Protocol: Toyota: 76F0004/12/23/38/39/40/70/85, MPC565 K-Line New Calibration: 30KA3000 Calibration file: 89663- 0KA30 Hardware: KUN#2KDFTV Part Number: 89661-0KD50
Step 2: Read DTC Click ‘Read DTC’ It reads out the number of DTCs stored is 0
Step 3: Clear DTC Click ‘Clear DTC’ Completed
It’s so easy to read ECU, DTC and clear DTC by KTMFLASH KTMBENCH KTMOBD 3 in 1. Hope it helps! Have fun!
0 notes
Text
How to use Launch X431 Subscription to update car software
If your subscription has expired, you may need to purchase a Launch X-431 subscription renewal card. But many users still don’t know how to update the car software. This is what the article speaks of.
How to use Launch Renewal Card?
Step1. Update X-431 app version to V3.00.004 or later.
Step2. Log in X-431 account, check whether the serial number is correct, click “Renewal”.
Step3. There are 2 ways to update software, click “Subscription renewal card”, submit the renewal card password.
After successful activation, a new software expiration date will be displayed. Now you can click “one key update” to update the car software.
Tip: To check pin card or purchase info, go to “Profile >> My order/ Inquire subscription renewal card status”.
Launch X431 Subscription Renewal Card 1 Year/ 2 Years Update Service Work for Launch X431 V, X431 V+, X431 Pro Mini, X431 proS mini, X431 PAD V, X431 Pad VII.
1 Year Update Service Work for LaunchCRP429C.
1 Year Update Service Work for Launch X431 Heavy Duty Diagnostic Tool and X431 HD III Module.
0 notes
Text
How to operate Digimaster 3
How to operate Digimaster 3
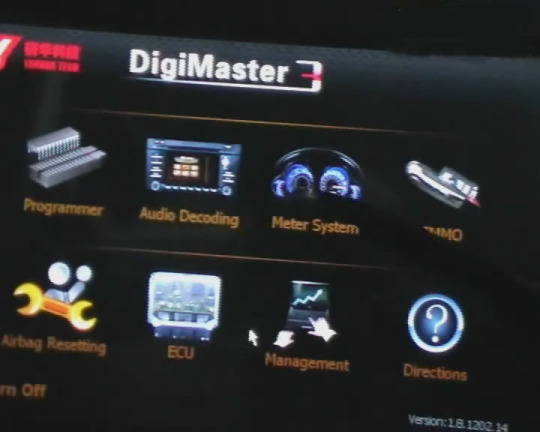
Step 1. digimaster 3 function menu

Step 2. digimaster 3 function
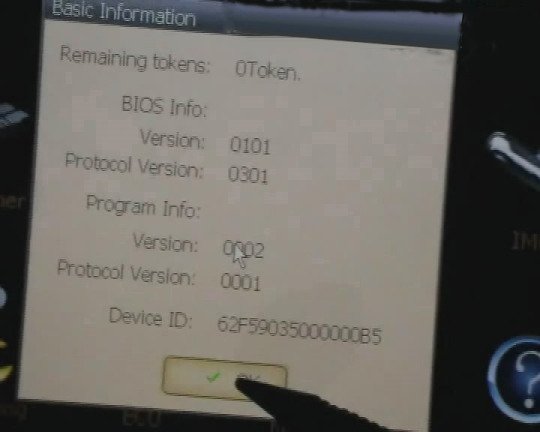
Step 3. digimaster 3 basic info
Step 4. digimaster 3 select car series

Step 5. digimaster 3 adjust odometer

Step 6. digimaster 3 adjust odometer

Step 7. digimaster 3 adjust gls
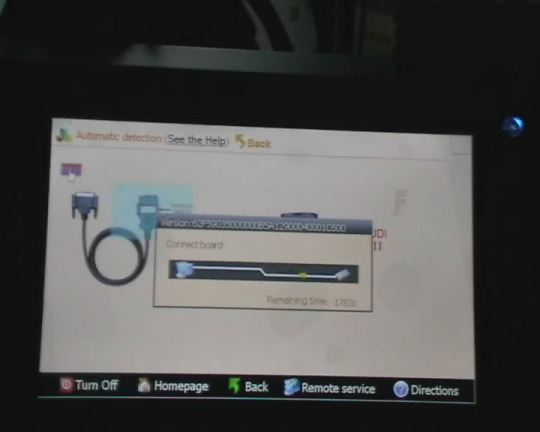
Step 8. digimaster 3 success adjust gls

Step 9. digimaster 3 adjust mileage

Digimaster 3 Update Kernel After update EBOOT, it is necessary to update kernel. Tips: Before update EBOOT, please install D3 TOOL first. Step 1: Press button number 8 and button OK at the same time, and turn the power on. When you see “Press OK to confirm and continue update Firmware” press OK, then it enter the procedure of updating. Step 2: Connect D3 with a computer through Mini USB (purple color), you can see a tip “Found New Hardware wizard”.As the image shown below.
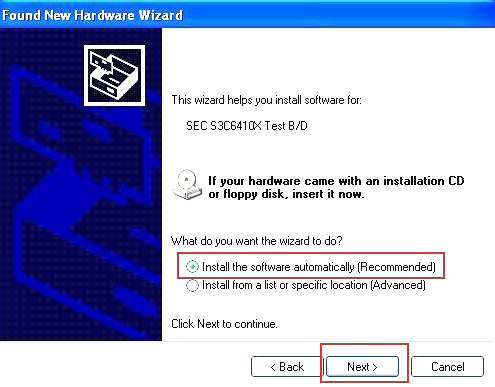
Step 3: choose “install the software automatically”, click “click” Step 4: If DIGIMASTER 3 have been installed already, choose the second “SEC SOC SMDK Board” in dialog box as shown below, and click “Next” to complete driver installation.

Step 5:Double-click Digimaster 3 PC Tools and choose “Kernel Update”.

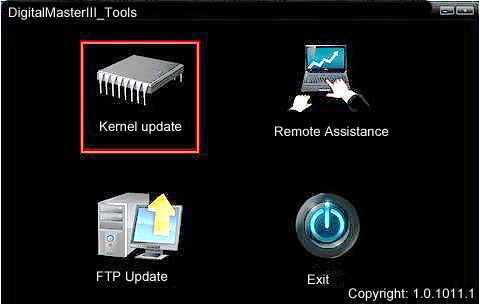
Step 6: Make sure the purple Mini USB is connected, then you can see ” USB connect succeed”

Step 7: click “Kernel Update” and choose “EBOOT_20110427.bin” then click “OK” to start EBOOT program update.
Step 8: After 10sec. the DIGIMASTER 3 screen appears a twinkling red ‘YH’ logo which means EBOOT update is complete. After update EBOOT successfully, please turn the power off and choose a appropriate way to update the kernel. TIPS: Please uninstall the anti-virus software and firewall temporarily in order to run the software normally.

After Update EBOOT, Still Not Work? Second way, please operate by following the next tips: 1.Remove SD card from D3 to cardreader,and connect to PC. After successful connection, click “Removable Disk(E:)” as showed in the picture. 2. Delete the old file “YHTech” which is inSD card. 3. Copy the “YHTech” files from CD, and save it in SD card. 4. Please insert SDcard into D3 after successfully copy and paste. Then connect to network andturn on D3, click “OK” for downloading when appear remark of “Pleaseconnect network download hypervisors!” in the interface. It can befunctioned after successful download.”
Note:
1) When you use digimaster3 ck1200, if the following error appears, this is IP restriction, Please tell us, we will help you remove restriction according to IP.

2) The following digimaster3 BMW adapter has not been concluded:

Now it is replaced by this one:
3) Digimaster 3 English version doesn’t have TMS370 Programmer adpater, only Chinese version has.

0 notes
Text
JPRO Professional Buyers Guide & Reviews
Providing some of the most advanced and thorough diagnostic tools, Noregon is the premier diagnostic and repair company used by the largest garages and fleets of cars today. With JPro you benefit from a detailed insight into every vehicle that you are currently working on. If you want to identify vehicle problems quickly and accurately, JPRO’s exceptional capabilities will give you the vehicle solutions you are looking for.
After 26 years of developing advanced vehicle repair solutions, it’s easy to see why Noregon is the best heavy-duty software in the industry. The JPRO Professional diagnostic tool is becoming the first choice when it comes to helping technicians and businesses maximize their productivity.
The high-performance JPRO Professional scan tool is incredibly easy to use and will help you spot the problem quickly and efficiently. In this useful guide, we want to dig a deep dive into this advanced tool, reviewing its key features, plus its pros and cons. You can also find the answers to some frequently asked questions there.
Whether you are a large service center or an independent repair shop, if you are considering adding the Noregon JPRO professional to your repair kit, this guide is sure to be helpful. So without further ado, let’s take a look at this extraordinary vehicle diagnostic tool.
Noregon JPro Product Overview
Key Features: 1 – Next Step Fault Guidance Feature
This feature allows users to make a full diagnosis of the truck in under 60 seconds. The diagnostic software requires only one screen and it will offer technicians over 44,000 possible OE level fault codes, and will also give in-depth repair information for a fast vehicle solution.
With an incredibly easy to use interface, the vehicle systems are listed and can be read easily in one place on just one screen. FMI assistance has also been added to help you find, read, and understand all FMI definitions. The functionality was also improved on Cummins and Detroit Diesel engines. Not only that but the heavy-duty emissions fault support was improved.
The NextStep Repair is also an annual subscription feature – add it to your JPRO Professional subscription for the ultimate diagnostics and repairs powerhouse.
2 – Virtual Truck Feature
The Virtual Truck is an incredibly useful feature that allows you to use all of JPRO’s advanced features without even pairing to a vehicle. If you have trainees you’ll likely find this will be an invaluable feature for them. It would also be ideal for classrooms when connecting to a vehicle isn’t feasible. Students will have hands-on practice and knowledge without the inconvenience of visiting an actual service center.
Bi-directional tests can be simulated without the risk of an actual connection. You will also be able to view live data in Data Monitor, experience the guidance of NextStep when diagnosing vehicle health, and lots more. It also allows potential customers to use the diagnostic tool before deciding to purchase it.
3 – TripVision Feature
TripVision is a new feature designed to prevent easily-fixed issues that could become extremely costly. With TripVision, you’ll be able to detect errors that will affect fuel consumption, issues with emissions, and many more, helping you to keep your vehicle road-worthy and avoid expensive fines and potential violations.
TripVision will alert you to any faults that could potentially become bigger problems so you avoid time consuming and inconvenient roadside breakdowns and expensive repair bills.
In the trucking industry, it’s vital to be prepared for any obstacle that could prevent you from being productive and therefore unprofitable. Thanks to TripVision, you can increase your productivity and decrease any potential repair and maintenance bills.
The diagnostic software helps make sure your equipment is working correctly and safely, making it possible to get trucks back into use quickly, in a more economical manner.
Unfortunately, when a vehicle fails, the repair costs and lack of transport are just two factors that could affect your fleet. The additional expenses can add up as well, from towing costs to mobile breakdown services.
The great news is, breakdowns are not the only issue that this software helps to prevent. It’ll also alert you to potential CAS violations, fuel inefficiencies, and issues with emissions.
Noregon has also made the TripVision function available in an app form, from Apple and Google Play stores. This gives managers and technicians lightning-quick access to essential information even if they happen to be away from their PC or laptop, thus increasing productivity and profits.
4 – Repair Mentor Feature This improved Noregon vehicle health indicator and diagnostic tool prioritizes issues with the vehicle and offers help with the diagnosis and repairs. Repair Mentor shows all of the current issues with the vehicle and offers alerts to the high priority issues.
It also guides the user to start the correct repair process. Repair Mentor guides the operating technician to the correct starting point for the highlighted issue. For example, the DPF Regen screen or NextStep for troubleshooting guidance.
5 – Vehicle Data Acquisition Feature
In order to perform the correct repairs on any truck, it’s essential to obtain the right vehicle data and decipher it correctly. Quite often, it’s easy to know what information you’re looking for, but you do not know how to interpret the right data.
The Noregon Vehicle Data Acquisition service is an unprecedented and expert feature that helps you to interpret data correctly. By choosing the Noregon Vehicle Data Acquisition, your technicians will save time trying to clarify vehicle data, time that can be spent reducing vehicle downtime, and increasing profits.
If you’re looking for innovative technology, Noregon is the company you’ll want to partner with. They are the go-to brand for vehicle data acquisition, which could revolutionize the way you collect data and manage your fleet or center.
As a business, not only does this feature improve the services and products you provide your customers with, there are many more advantages and benefits to VDAs. You’ll be able to provide your customer with accurate data. A lot of vehicles produce at least 1500 data points so it’s time-consuming to evaluate these points.
A VDA will enable you to evaluate these data collections easily. Any downtime can be costly to your customers. You can’t afford to ignore a potential problem or have a truck sent in for unnecessary services. With accurate and detailed OEM fault descriptions and codes, you’ll have perfect knowledge of what is wrong with the vehicle and how to solve it without affecting profits.
Increase the safety and performance of the vehicle by changing the parameters remotely without the hassle of a shop visit. This will also reduce liability and potential violations. Pros
The industry leader in diagnostic and repair software Incredibly user friendly Helps to decrease repair bills and increase your profits by maximizing efficiency Quickly diagnoses problems and provides vehicle solutions Heavy-duty diagnostic software is time-saving and cost-effective Easy for average truck enthusiasts, but sophisticated enough for professional service centers Easy to read wiring diagrams, vehicle temperatures, and other vital information Product updates three times a year, free of charge with an active subscription Provides the option of test driving JPRO software and functions before purchasing
Cons
It is quite pricey
JPro Compatibility
The Heavy Duty Scanner JPRO Professional heavy-duty diagnostic software is compatible with all car models and types. This is great news for professional garages who deal with all manner of different vehicle brands. Not only will it save time, but it’ll also allow you to increase your profits by being able to work on many different vehicle makes.
The time-saving benefit comes from the fact that you can scan the car in one go and all of the vehicle data and repair information will be available on one screen, making it easy and convenient. Parameter changes are also possible with this vehicle diagnostic software.
If you’re looking to extract reliable repair information and vehicle data, then the JPRO Professional heavy-duty vehicle diagnostic software can do it. Not only that, it’s compatible with iOS or Android devices and if you have Windows 8 or later models, you’re all set. Using the JPRO Professional diagnostic software, you can also obtain a reading on your phone, for even more convenience. Functionality
Noregon is the industry leader in vehicle diagnostic tools. The functions are so comprehensive, it’s no wonder it’s the most trusted scanning tool you can buy. The software has bi-directional controls and is capable of making parameter changes for Volvo and Mack.
The heavy-duty JPRO Professional also performs DPF Regens for Detroit Diesel and Cummins. It also provides OE level fault code information. The easy to use Noregon systems means you get quick fault detection and diagnosis. You’ll be able to view and print off files containing LOV reports and vehicle health results.
Save and store the vehicle data even when the truck isn’t connected to the software. In a single scan, you can see the entire vehicle stats so a swift diagnosis can be made. The JPRO Professional has powerful software and a DLA 2.0 adapter. On top of that, it has a Panasonic Toughbook for an even more effective diagnosis. Verdict
What is making the JPRO Professional heavy-duty diagnostic tool stand out is the sheer amount of functions it boasts and how many different uses it has. The functions enable you to read and diagnose problems so quickly and efficiently, it’s easy for anyone. The results from the Noregon diagnostic and repair tool are displayed in easy to decipher graphs, meaning you’ll be able to read all of the codes easily and make the correct repairs.
If you own a heavy-duty truck or you’re a professional mechanic, this advanced and comprehensive piece of software will save you time, money and will give you the vehicle solutions you need to improve your business. FAQs How to install the JPro software:
Because JPRO is a software program, you’ll need a PC or laptop in order to run it. You’ll also need the correct diagnostic cable and an RP1210C compliant adapter. You don’t need OEM software as JPRO is a standalone device.
It’s clear to see that Noregon JPRO is exceptionally easy to use and the installation is no different. Updating to the latest version of JPRO Professional simply requires that version 5.0 or later is installed on your PC already.
To run your software a Panasonic Toughbook is recommended, however, you can use a modern PC that uses Windows 7, 8 or 10, to run your JPRO software. You can use any RP1210C compliant adapter, but if you want full functioning capacity, you can purchase the Noregon DLA+ 2.0 adapters.
For the initial startup and activation process, you’ll need access to the internet. You’ll also need internet access if you choose to add on any modules.
What makes JPRO so convenient is the fact that it’s an annual subscription. JPRO updates happen three times a year and if you keep your subscription active, these updates are given free of charge. How to use the JPro software:
Whether you’re a complete novice or a professional service center owner, the JPRO Professional is super easy to use. The education portal offers easy access to a library of JPRO specific resources and educational opportunities.
From the education portal landing page, you can navigate to the JPRO certification course, webinar, discover technology tips, view educational videos, and lots more.
As soon as JPRO scans your vehicle, it will display easy to understand wiring diagrams, the vehicle temperatures, battery voltage, switches, and much more. It will read and clear inactive fault codes and will also detect active ones. It’ll also perform commanded tests, bi-directional tests, and cylinder cut-out functions.
In one simple and easy to read screen, the JPRO heavy-duty software lets you see your vehicle’s overall health in the after-treatment system. You’ll be able to clearly see information such as Soot Level and DPF Regen status.
Noregon has made their software incredibly user friendly. You simply connect your heavy-duty vehicle to your PC via a USB cable, to diagnose, reprogramme, or adjust any parameters.
There are six different annual subscription packages to choose from. This allows you to select the package that is most suitable for your fleet so you get a perfectly tailored match. What can the JPro software be used for?
The JPRO software has a multitude of uses. Whether you’re a first time user or an experienced mechanic, you’ll find this heavy-duty diagnostic software extremely useful. Use it to quickly and efficiently diagnose your truck’s problems so you can get a swift and easy repair.
Trucks that are off the road are not cost-effective, but the efficient Noregon systems mean you get a quick diagnosis which in turn results in a swift repair, so you can get your truck back on the road and back to work.
Simply put, the JPRO diagnostic repair software can help your fleet run smoothly and efficiently. Not only will you benefit from the myriad of technical benefits, but you’ll discover that Noregon’s products and services are specially engineered to be flexible and versatile.
The competitively comprehensive diagnostic and repair software ensures that you only need to use one system to diagnose different truck brands. Mack, Volvo, and Freightliner are just a few brands you’ll be able to work on with ease. The software also works with all the components from engines to brakes and chassis. Is the Noregon software easy to use?
Simple to use but incredibly effective and comprehensive, the Noregon Software is compatible with all car models, making it the perfect addition to any professional service center. Providing complete and real-time diagnostic solutions, it’s specifically designed to give an accurate diagnosis and vehicle information.
It’s also fully supplied with bi-directional functions. If you’re looking for hassle-free vehicle diagnosis, the Noregon diagnostic software is the way to go. As a heavy-duty truck owner, you’ll be able to get to the root cause and fully diagnose your car without leaving your garage.
Another easy and useful benefit to the Noregon software is that it allows you to print out reports and give them to your customers. This enables the customer to see exactly what’s wrong with their vehicle and whether they want the problem repaired straight away or not. If you’re a service center manager this benefit could be invaluable to your company.
Noregon prides itself on its incredibly fast, user-friendly products. Business life is busy and you’ll require software that works with you and can keep up with hectic schedules. Noregon products do just as they say, ensuring that your fleet runs like clockwork, resulting in increased profits and happy customers.
The friendly US-based customer service is always at hand to make sure you have a great shopping experience. If you have any problems or you need advice about a product you’ve bought, they’ll be happy to help. All Noregon products come complete with a warranty for worry-free shopping.
0 notes
Text
VXDIAG VCX NANO GM SGM RDS File Verification Failed
Problem:
I had a file verification failed error when installing SGM RDS driver for the vxdiag vcx nango gm scanner. Any idea what’s going on?

Obd2tool.com solution:
You don’t need to install SGM RDS driver.
If install VXDIAG VCX NANO GM VCI Manager sepeartely, you don’t need to install Passthru nor SGM RDS driver.
Free download GM VCI driver
0 notes
Text
How to install and Activate Cat caterpillar III Software
CAT Caterpillar ET Diagnostic Adapter III Compatible Vehicle: For Trucks, Excavators, Air Compressors, Ships, Drilling Rigs.
And the latest software is 2021B : https://www.obd2tool.com/goods-10220-Cat-Caterpillar-ET-Cat-ET-3-Software.html
Recently some friend asked us .when they received the device .and connect with everything well ,but The software is not working to finish the installation like below picture :
The cat caterpillar iii is with laptop and without laptop .if you buy the device with the laptop .you can use it directly .because they have installed the software well on the computer before delivery .if you buy the cat caterpillar III without laptop ,the software is putted in the CD ,when you received the package and want to install the software ,you could not install the software in the CD ,You need copy the software to computer from CD .then you can install it on the computer .
If you want to update the software ,you can search our store : www.obd2tool.com .or contact with us : [email protected] can send the software to you by email after payment .
0 notes
Text
SVCI 2020 Test On VW Touran 2008
This article is about to test this SVCI 2020/FVDI/Abrites, and I really want to see if this could allow us to turn off the immobilizer of VW Touran 2008.
General look First just look at how many brands it has, and the last icon is a short firmware update.
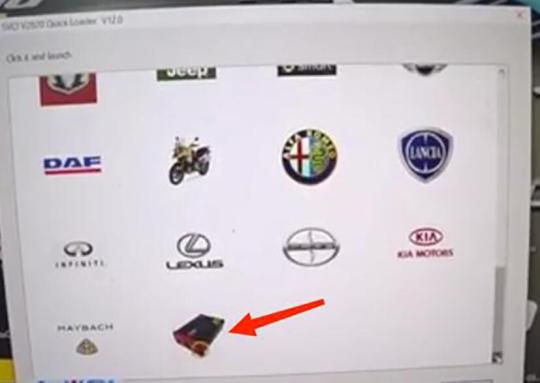

Enter “VAG” menu and select latest version 38.1. Switch all to Russian to see if it allows Russian. It made it.
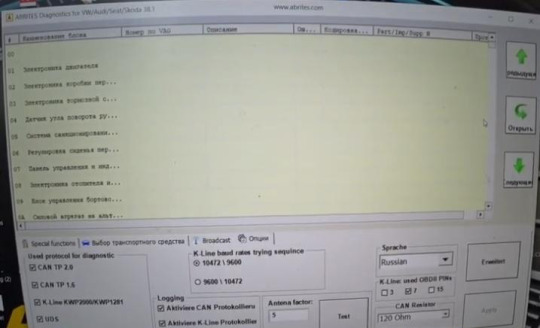
Also, see what special functions we have.

ECM Select “Engine Control Module”

We can clone both engines, turn off the particulate filter, register an ECU. Change the mileage, and you had an engine diagnosis.
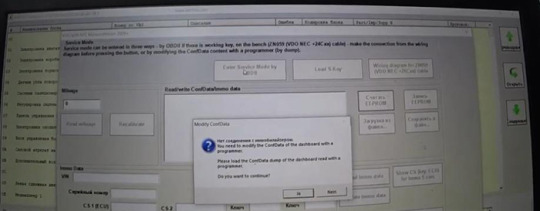
Instrument Now I want to try “Instrument” to read the immobilizer PIN code. Select “VDO with NEC uC 2009+ (CAN UD S)”. Click on “Enter Service Mode by OBDII”, and it asks us to load Conf data file. We don’t have it, so exit the window, turn off and turn on, so the dashboard works again.
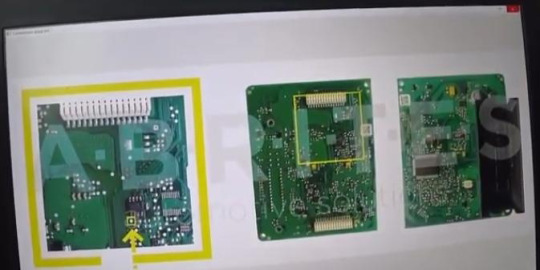
There are diagrams on bench, and you can do it by soldering.
Click on “Read EEPROM” and turn on/off by prompts until we get the result.
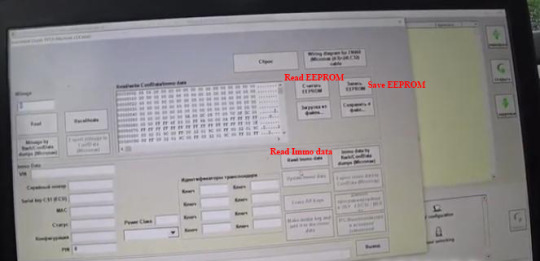
Save EERPOM file. If I do anything wrong to make the dash die, I can fix it by the backup file. Try “Read Immo data”. Short PIN code, two keys written, all there.

Try to read mileage. It fails because of DSG module. But anyway, it made everything clear. Here is the 4th generation immobilizer.
EDC/MED17 (IMMO OFF) Then I want to enter EDC17 menu. Try “IMMO III/IV authorize ECU”, but I don’t want to connect to ECU as it says. Not the entrance I want. Go back to try version 18 of VAG. This version may be with the device of 2014. No right. Try version 24 of VAG. All connected. That’s it.

Go into “Engine Control Unit”. Click on “Read Conf Data”. After several minutes, whole things are here.

Mileage you see, 76053 in the engine. You can change the mileage record but the most important function is this immobilizer shutdown – “Immo OFF”. If it happens that the dashboard get interrupted or disordered and the car won’t start, this function will save you. General procedure is that you enter this menu, turn off the Immobilizer, and you are able to start the car and drive it. Save Conf Data first. Then try to test “Immo OFF”. Follow the prompts. Turn on/off the ignition, press “OK”… Immo OFF success.
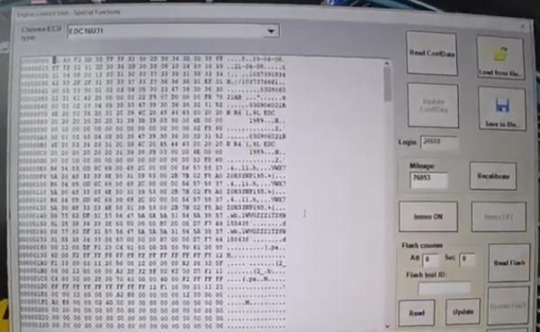
Now read Conf Data again. See the engine won’t remove anything.
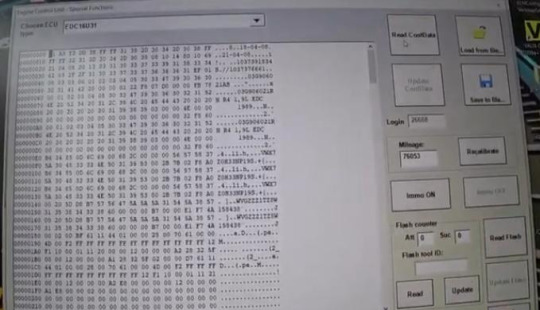
We can disable the immobilizer without soldering anything. Then try “Immo ON” to restore it. So we know with this SVCI we can remotely disable DPF and Immobilizer without connection to them.
Airbag I have an airbag error on dash, so enter “Airbag” menu. After everything is loaded, save the file. Here is a button “Clear crash data”, which allows you to erase the accident record in this car.
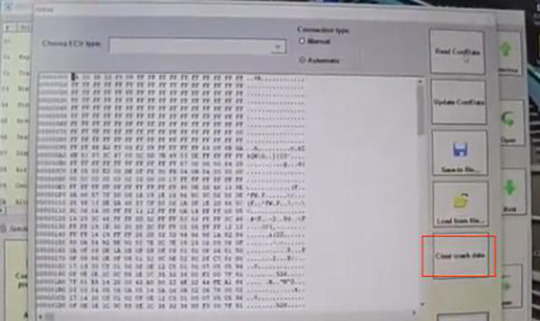
Door unlocking On special function, we have “Door unlocking”. Let me explain this. When someone lost all keys and managed to get into the car by, say breaking the glass, this function allows you to unlock all doors.

Turn off the ignition and close all door, let’s try. Try “Unlock VW Passat”, didn’t open. Try “Unlock VW Touran”, didn’t open, don’t know why. Try “Component protection”. That’s another way to turn off or disable a component.

Alright, for me the most important thing is the immo OFF function, and that’s things for this SVCI in car as much as I can show you.
More functions to be explored!
0 notes
Text
HOW TO USE LAUNCH X431 TO READ OUT IMMOBILIZER SYSTEM SECURITY PASSWORD FOR NISSAN SYLPHY 2008
Remove, reinstall BCM system, or the key lost a new matching key, the key registration function for the vehicle needs to be performed, and the key registration steps need to get the security password and calculate system security password for Nissan Sylphy 2008. For Nissan repair diagnostic work, please check here : Nissan Trouble Repair
What You Need?
Launch X431 V Pro
Procedures:
The following is the 2008 Nissan Sylphy based on the steps of anti-theft password read and calculating operation:
1.Turn on the ignition

2.Select ” NISSAN”
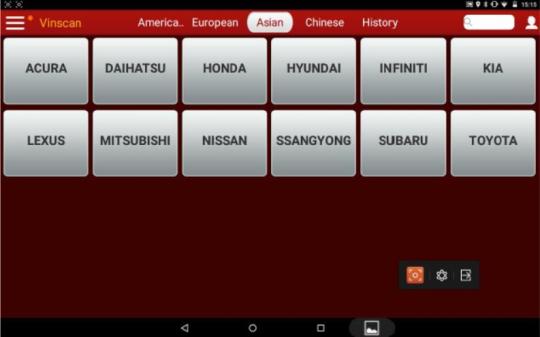
3.Select “V43.20” version

4.Select “16PIN”
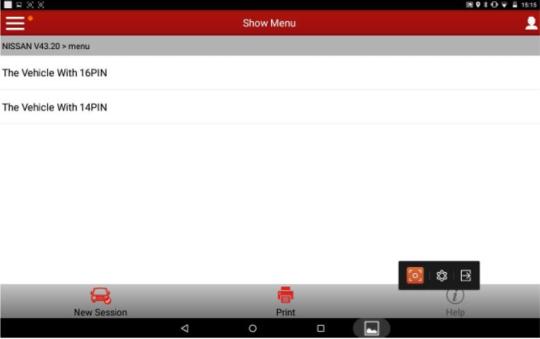
5.Select “Maintenance”
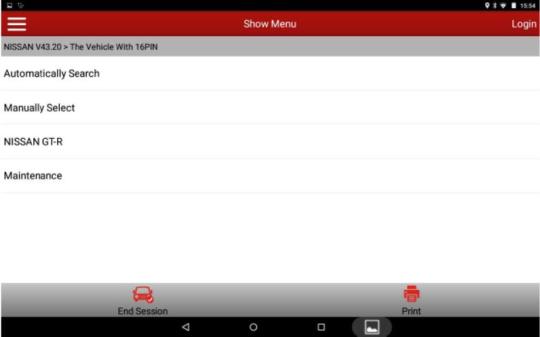
6.Select “NATS”
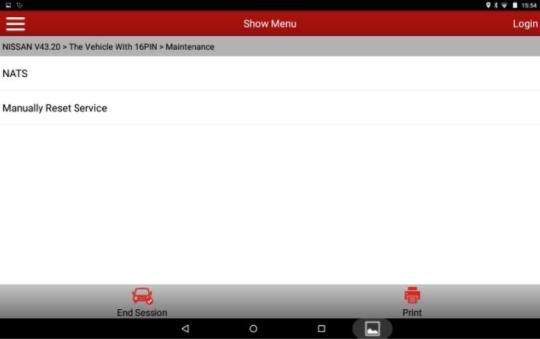
7.Select “General Mode”
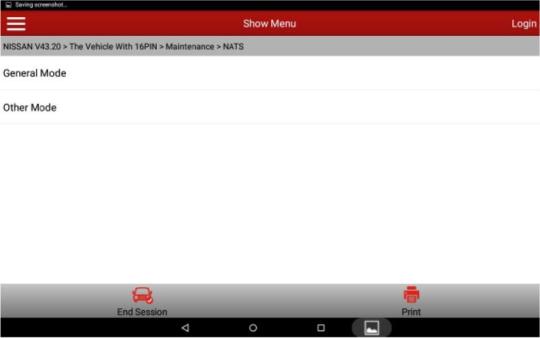
8.Select “Pin Code”
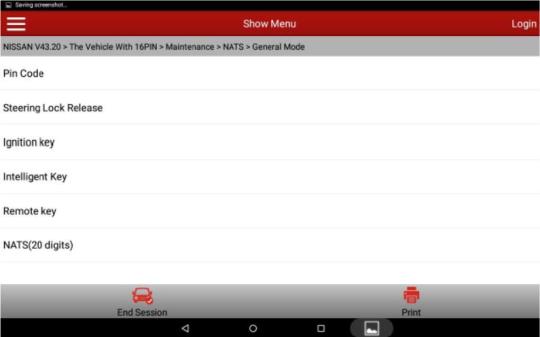
9.It displayed PIN CODE

10.Select OK
More test report about Launch X431 please check:Launch X431 Test report
0 notes
Text
Mercedes Benz C6 Vs SD Connect C4 review
Today we will look at the new generation Multiplexer C6 or to give it is actual designation mercedes Benz VCI and how it will compare to the SD Connect C4 or SD connect C5

To start with both the clone and original C6 or VCI are of lower quality outer shell, yes the genuine one from Mb looks and feels much worse than C4 or C5 copies, because it has a plastic cover and feels very cheap and nasty, yet the only advantage we are aware of so far is the C6 VCI has the DOIP protocol for the latest cars and mainly to communicate with the new wide screen command system, but we have the real C5 which also has this new car diagnostics protocole.
MB Star is undergoing some major changes and many of the services are moving online. This started last year with EPC Electronic Parts Catalog, which is now online only.
also, noted the Mercedes Xentry made for SD connect C4, C5 will not work with C6 VCI because the chinese manufacturers have built their C6 VCI to work with only the software they produce which can be expensive when updating
We anticipate more changes in the coming few months, but here at Pro Auto Diagnostics we are ready for all the changes and we will have solutions for the independent Mercedes specialists and the services garages alike.
in conclusion we think the C4 represents better value for money for the novice user who should wait until they can use Xentry software with confidence before moving to more advanced Vehicle Communication Interface, The C6 VCI seen in the photo is what a good high quality clone should look like and not the VCM2 encased version which is of lower quality We only stock the highest quality VCI call us for free consultation.
If you want to know more about Mercedes Star Diagnostic Tools, please click benz trouble repair.
0 notes
Text
LAUNCH X431 V+ “CAN NOT FIND THE SOFTWARE TPMS” SOLUTION
Problem: tried to bind X-431 TSGUN to X431 V+ V5.00.006, Launch X431 V+ prompts “Can not find the software TPMS, please download or check that the serial No is correct”, then after clicking on “Update Now”, it prompts “Sorry, this product does not support TPMS function.”
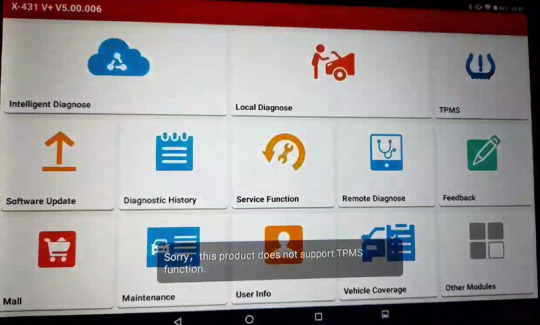

Launch X431 engineer replied:
This is not to bind TSGUN to X431 V+, it is correct to click on “Update Now”, please check if the internet connection is stable, and then click on “Update now” again.
After the problem is fixed, X431 V+ can perform:
1. Instantly read tire pressure, tire temperature and battery status 2. Diagnose tire pressure fault, including read DTC, clear DTC, etc. 3. Ability to perform Resets, Relearns, Diagnosing Issues, Reprogram TPMS Sensors and synchronize with 315/433 MHz sensors. 4. Read, copy and write the sensor ID quickly 6. Reprogram LAUNCH sensors with unlimited times
0 notes
Text
FREE DOWNLOAD FORD IDS & MAZDA IDS V123 FOR VXDIAG VCM2 SVCI J2534
Newer version IDS V123.01 has been tested ok by obd2tool.com engineer. Download software and patch here for free.
Ford IDS
Software:
Ford IDS V123.01
Mazda IDS V123
Multi-languages: English, German, French, Italian, Dutch, Spanish, Swedish, Finnish, Danish, Norwegian, Portuguese (European) , Portuguese (Brazil)
Operating system: Windows 7, Windows 8, Windows 10
For VXDIAG & VCM2

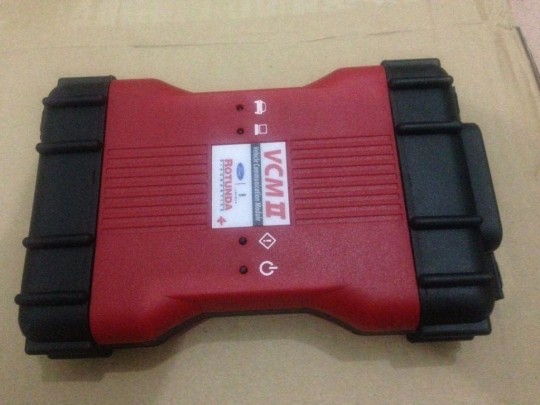
Compatible scanners:
VXDIAG VCX NANO USB/WiFi
Ford VCM2 clone using vxdiag solution
VXDIAG full brands incl. Ford
Free Download VXDIAG Ford IDS V123
https://mega.nz/folder/6dwzgaJR#XW2q1xPdbgKV4XtZQqkB0w
IncludingFordIDS-123.01_full.exeVCI_Software_1.0.0.10.exeVCI Manager (Ford) 20.11.24.exe
Free Download VXDIAG Mazda IDS V123
https://mega.nz/folder/iQp1UACZ#d4ey2cWHmaEMf9n2dTcTAQ
IncludingMazdaIDS-123.00.exe
VCI Manager (Mazda) 20.11.24.exeFree download IDS patch
https://mega.nz/folder/OV4RRC6B#seCWP6UCzOPWEDYlQxZ1iQ
Install Ford IDS V1231. Install IDS Software2. Install VCI_Software_1.0.0.103. Install VCI Manager(Ford) 20.11.244. Connect VCX device and install idspatch5. Use idspatch to open IDs and start diagnosis.
Install Mazda IDS V123
Install mazdaids-123
2. Install VX manager and Ford IDS driver
3. Connect VCX device and install idspatch
4. Use idspatch to open IDs and start diagnosis.
Note:
1. Ford IDS requires VCI Manager driver, Mazda IDS does not.
2. Ford IDS and Mazda IDS need to be installed on separate systems.
3. Don’t install IDS on Home version windows system.
For STIC SVCI J2534
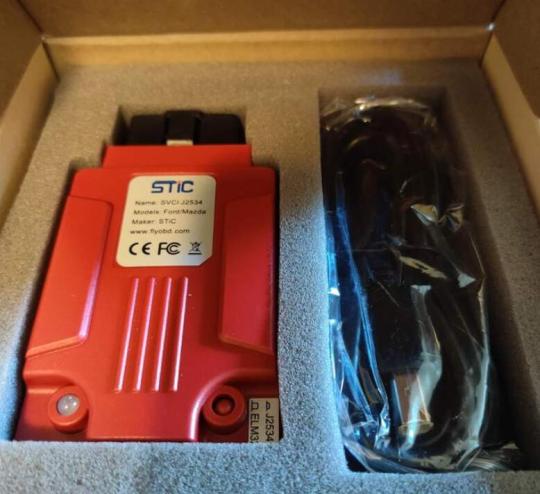
Ford IDS V123
=> Setup: IDS-123.01_full
=> Driver: SVCI_J2534_Ford_Setup_v1.2.3.1
=> VCI: VCI_Software_1.0.1.16
=> Update:
=> Java 32 bit: Download
SVCI Mazda software has not been updated to V123 yet. Contact us if you need V122 version.
SVCI J2534 is a specialized diagnostic device for Ford/Mazda. Support in-depth diagnostics and installation of vehicle control boxes. In addition, SVCI can also support Ford models until 2020 when using FDRS software.
0 notes