
Don't wanna be here? Send us removal request.
Statistics
We looked inside some of the posts by mm8-guide and here's what we found interesting.
Average Info
Notes Per Post
26
Likes Per Post
23
Reblog Per Post
3
Reply Per Post
0
Time Between Posts
15 days
Number of Posts By Type
Text
17
Last Seen Tumblr Blogs


Fun Fact
Forty percent of Tumblr users are between the ages of 18 to 25.
Text
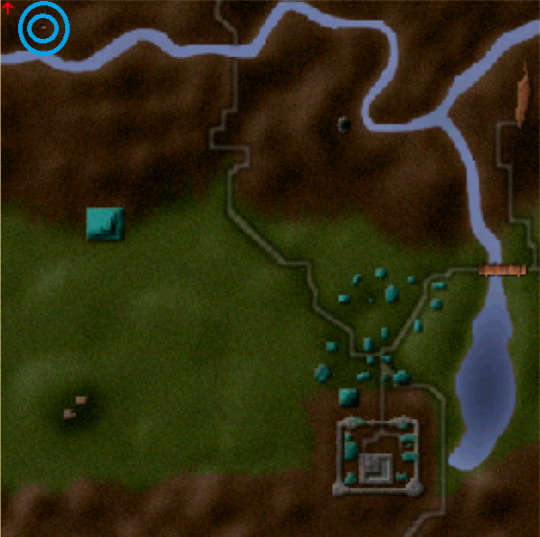
Part 8: Side Quests (Ravenshore)
As with modern open-world games, there are side quests available within each zone, many of which require transfer to other zones to complete. This list comprises only quests that begin and end in Ravenshore.

Bounty Hunters || Guild of Bounty Hunters- to the left of the Adventurer’s Inn || Not a formal quest, or one that I can predict for you. Each month, if you speak to the person inside the Guild, they will challenge you to kill one specific creature. Figure out which zone the creature is in, and kill one in order to collect a reward. Complete the quest enough times to join the Bounty Hunter Guild.
Eclipse || Lathius’ Hut- Across from the Healing House || For this one you must advance to the “Alliance” portion of the main questline. Speak to the guildmaster in Murmmurwoods about an alliance and he will tell you to use Dyson Leyland (found in the Necromancer’s Guild) and use him to destroy part of the guild hall. You do not need to actually ally with the Sun Temple in the Murmmurwoods. Once Dyson is in your party, go to the basement of the Necromancer’s hold via the secret door at the top of the stairs and trigger the guards to turn the whole Guild hostile (I recommend killing everyone in the entryway first). Once the Guild hates you- and it only works if Dyson is alive- you can go back up into the hallways and open the guarded doors to small treasure rooms. Eclipse is within one of those chests. (And if desired you can still speak to Sandro and Thant about allying with the Necromancer’s guild instead).

Arcomage Tournament || Blueswan Home- Across from the path to Shadowspire || Covered more thoroughly within the Arcomage section of this guide, your job here is to win at Arcomage in every single inn at least once. Return after those victories have been achieved and you will be given the key to a chest that sits beside the house, containing a great deal of gold and a legendary sword.

Kill all Dire Wolves || Hall of the Tracker- Left of the North-East inn || You must go through all outdoor areas to the LEFT of the river and into the Dire Wolf Den itself and kill every Dire Wolf. Note- there are no wolves on top of the cliffs, just at sea-level.

Rescue the Smuggler’s Daughter || Smuggler’s Den || You will receive this quest as you complete the mainline quest to blackmail Arion Hunter. Speak to Arion and he will ask you to free his daughter, captured by Ogres. Head to Alvar, and raid the Ogre’s Den. Upstairs you will find a button- if you have Perception, it may be glowing red. Otherwise it will remain normal color. Click the button to lower the bars near the door, and do an all-kill-all-loot of the ogres in the basement. You will receive a key. Arion’s daughter is within a cage on the upper level, open the door to free her and return to Arion to collect the reward.

2 notes
·
View notes
Text
Part 10: Obelisks & The Unicorn King
In every core zone of Might and Magic 8, there is one obelisk hidden somewhere. Finding and clicking all obelisks will give you what at first seems like nonsense, but will provide a valuable bonus in the game.
** You will need to have one ally in your party who can fly in order to reach many obelisks.
The obelisks are:
THEUNICORNKIN (Garrote Gorge)
GHOLDSOLD (Regna Island)
THORNESKEY (Ironsand Desert)
AMONGHISS (Ravage Roaming)
UBJECTSAP (Alvar)
PEARSWHIL (Murmmurwoods)
ETHESUNSH (Ravenshore)
INESONMID (Shadowspire)
SUMMERDAY (Dagger Wound Islands)
Combined, the clues read out “The Unicorn King holds Old Thorne’s Key. Among his subjects appears while the sun shines on Mid-Summer Day.
Once you have found and clicked every single obelisk (you MUST find each one to activate the Unicorn King), make sure you are in the Murmmurwoods on June 24.
Between sunrise and sunset, search the outskirts of the two Unicorn Herd Zones to find one set apart from the other (significantly so), and much larger than a normal Unicorn. If you check their name, it will be listed as “The Uncorn King”.
Kill the Unicorn King, and loot from his corpse Old Thorne’s Key. Please Note: If you kill all the Unicorns in Murmurwoods before June 24, the Unicorn King will not appear.
Take the Key to the large vault in Ravenshore (near the Shadowspire path) and collect large amounts of gold, rare ore, and a legendary sword.
For locations of the obelisks, see below.
#1: Garrote Gorge- Along the far north-west wall, in Dragon Territory.
#2: Regna Island-- On a small island off the “point” of the crescent-moon portion of the islands.

#3: Ironsand Desert- On an island in the middle of the lava lake.
#4: Ravage Roaming-- In a valley to the west of the entrance (either one) of Balthazar’s Lair.
#5: Alvar- On the top of a cliff swarming with Wasp Soldiers.

#6: Murmurwoods- Among the Northern Unicorn Herd
#7: Ravenshore- Tucked in the back North-East corner of the map.

#8: Shadowspire- On a spire of rock along the Eastern wall.

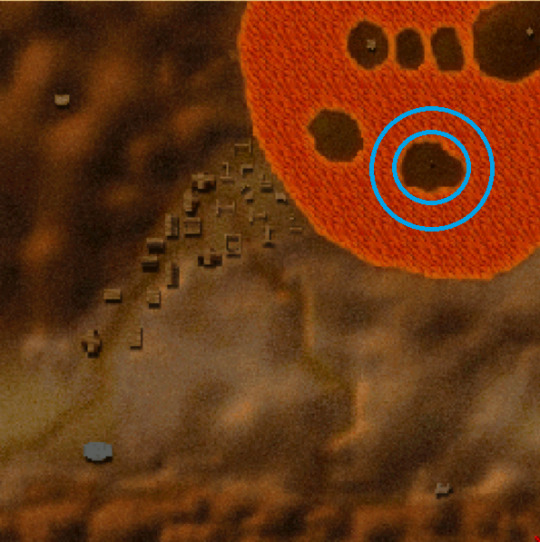
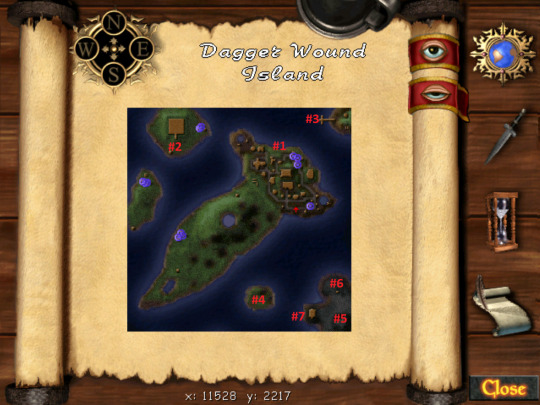
#9: Dagger Wound Islands- Using an ally who can fly, fly up to the absolute maximum height near the Sunken Library. There is an area where the volcano comes down, fly at it and perhaps along the side until you are able to walk up the rest of the volcano and find the obelisk in the crater.

1 note
·
View note
Text
Part 8: Side Quests (Dagger Wound Islands)
As with modern open-world games, there are side quests available within each zone, many of which require transfer to other zones to complete.
This list comprises only quests that begin and end in the Dagger Wound Islands.

Dagger Wound Island
Yellow Fever || Aislen’s House- Near Fearsome Fetishes Item Shop || Completed Via: Dagger Wound Islands || You will be given several “Cure Disease” scrolls. As you travel across the islands to reach the Temple of the Snake, search every chest for more Cure Disease Scrolls. Deliver to houses on the 2 remote islands and return to Aislen.
On the map below, blue indicates quest pick up and turn in, yellow circles indicate chests that may contain Cure Disease scrolls, and red encircles the huts you will have to deliver those scrolls to.

Prophecy of the Snake || Tisk’s Hut- Near Adventurer’s Inn || Completed Via: Dagger Wound Islands (Temple of the Snake) || Retrieve the Prophecy of the Snake from behind one of the red glowing walls just past the raised platform room of the Temple of the Snake (2nd room you enter).


Find Isthric the Tongue || Rohtnax’s House- to the right of Adventurer’s Inn || Completed Via: Dagger Wound Islands || Find Isthric the Tongue. He is located in Isthric’s Hut on the first remote island village.

Idol of the Snake || Hiss’ Hut - Across from Training Academy || Completed Via: Dagger Wound Islands (Temple of the Snake) || Within the Temple of the Snake, near the dock exit, there is a large room with snake heads in it that will shoot fireballs at you if you touch the floor triggers. Go to the totem of heads in the center of the room and stand on the red square to the north side (left) of it. Looking back towards the door, along the western wall, a pannel will slide up revealing a hidden chest door. Click to open and collect the idol.


Portals of Stone || Clan Leader’s Hall- Brekish Onefang || Completed Via: Dagger Wound Islands || Ask Brekish about “Portals of Stone” and then accept the quest- and a purple stone. With your back to the Clan Leader’s Hall, go to the left to find Frederick Talmere’s home. Speak to him to add him to your party, then go across each of the portals on the island to complete.
On this map, portals are color-coded to their partner, but note that the portal to the boat docks (red) will not become active until you use the portal *at* the docks first. As a first-time player (who this guide is geared towards), I recommend using the Temple of the Snake.

Potion of Pure Speed || House of Thistle || Completed Via: Dagger Wound Islands || Bring Thistle regents of any type that fit the following criteria: 4 red potion regents, two blue potion regents, and one yellow potion regent.
I only included the location of the quest giver, as the regents spawn randomly all over the island and in chests.

Antedote || Languid’s Hut || Completed Via: Ravenshore (Smuggler’s Den) || Raid the Smuggler’s Den to find a large cavern near the back. Inside a chest is the Antedote.


1 note
·
View note
Text
Part 7: Promotions Quests
For every single race in the game there are 2 variations. A “base” form, and then an advanced form.
Dark Elf → Dark Elf Patriarch
Dragon → Great Wyrm
Knight → Champion
Necromancer → Lich
Minotaur → Minotaur Lord
Priest → Cleric of the Sun
Troll → War Troll
Vampire → Nosferatu
In order to learn the higher levels of some skills, your party members will have to be promoted to that level. There are no pre-requisites for starting these quests, you can complete them just as the opportunity arises.
Right-click the skills in your skill page, if a skill appears in YELLOW, that means it can only be learned once you’ve been promoted within that character’s specific race. In the example below this character is a mere Knight, while Grandmasters of Repair Item must be ranked Champions.

Below, I will go step by step on promotions quests for each type of character.
If you must pick up a quest first in order to complete it, that will be listed as the starting location. HOWEVER, if you don’t need to pick up a quest and can just turn it in when you’re done, then I specify the location to begin looking for the quest item(s).
***** You do not need to be a certain race or have those races in your party to receive or complete the promotions quests. Regardless, everyone in your party will receive the experience and fame from completing the quests *****
Dark Elf → Dark Elf Patriarch
Starting Location: Relburn Jeebes house in Alvar
** I recommend getting a dragon who can fly before doing this quest. Just for ease sake. And in the screen shot below I did a full shot so you can see the mini-map at the bottom right to help guide you to the location in Alvar.
His house is the furthest one back in the main city, beside the waterfall.
And as an aside, if you want to see colored dots representing, friend, foe, dead bodies, and regents on your mini map, cast the Wizard Eye spell.

Relburn Jeebes will tell you that he needs you to find Cauri Blackthorn, who went missing in the Murmurwoods.
So, head West. You’ll either need to fly up to the hills above Alvar or dodge the ogres blocking the road.
In the Murmurwoods, visit Dantillion’s house and speak to him about the Circle of Stone. He will give you Stone to Flesh scrolls. Cauri was exploring that area when she was turned to stone by the basilisk who roam there (why it is useful to have a flying dragon).
To find Cauri, go first to the circle of stone, then look North-North West. You’ll see an evergreen looking tree with a stone figure at the base. That is Cauri. There are other stone people scattered throughout the area, you can also save them if you want but it gets you nothing.
Ignore the lack of stone person in the screen shot below, Cauri is the 2nd from the left in my party, so obvs she isn’t there :)

Cauri thanks you and goes straight to your Adventurer’s Inn (she will do this even if you have a free spot for her. Rude.). Return to Ravenshore to fetch her and put her in your party somewhere. In general, Cauri is an incredibly useful character to have, I highly recommend having her in your crew in general.
Return with Cauri to Alvar and Relburn Jeebes’ house and he will promote all Dark Elves who travel with you from then on out to Dark Elf Patriarch.
**Pro Tip: Check out the bonus section of the main page guide. There is a way to get Cauri into your party while you’re still Level 1, before you ever even clear the Temple of the Snake.
Dragon → Great Wyrm
Starting Location: Auxiliary Dragon Hunter Camp; Garrote Gorge

West of the main Dragon Hunter Camp in Garrote Gorge there is a field with Pet Dragons and dragon hunters. On the far side of that field is an auxiliary camp.
Home to a handful of dragon hunters with green or blue armor, there will also be a handful or so of purple hunters (the strongest). One of those is Jeric Whistlebone.
Slaughter every single dragon hunter in that Auxiliary Camp, and loot the body of Jeric to receive his sword. With his sword in your inventory, go to the dragon caves in Garrote Gorge, follow the path to the RIGHT (if you go left, guards will stop you. If you INSIST on going left, everyone attacks you).
Head to the very very bottom of the dragon cave and speak with Deftclaw Redreaver. So long as all the hunters in the auxiliary camp- and Jeric- are dead, your dragons will be promoted to Great Wyrm.
It is worth noting that you CAN complete this quest and receive the promotion even if you side with the Dragon Hunters in the alliance portion of the main quest. Trainers and quest ends never disappear because of who you chose.
Knight → Champion
Starting Location: Mad Necromancer’s Lair; Shadowspire

The Mad Necromancer’s Lair lies in the north west portion of the map surrounded by bone dragons, vampires, and skeletal archers. You will need to first fight your way through the basement of the Lair (which can be very difficult) and recover the spear Ebonest from a chest.
** Side note, if you have any Necromancers in your party, search the basement further and take one Lich Jar per Necromancer on your crew.
Once you have the spear, go back to the entrance and this time take the elevator immediately across from the door. Upstairs are more enemies and a single bedroom. Inside is Blazen Stormlance, a knight who was cursed.
He will ask you to find a cure, and send you to speak with Dervish Chevron in Ravenshore (his residence is near the inn on the northern side of the river). Dervish will give you a gemstone. Return to the Mad Necromancer’s Lair and give the gem to Blazen.
He will go to your Adventurer’s Inn. Head to Ravenshore and pick him up, putting him in your party. From there, speak to Charles Quixote, the head of the Dragon Hunter faction, in the main citadel of Garrote Gorge.
*** If you have completed the alliance quests and allied with the Dragon Hunters, Charles Quixote will be in the Merchant House in Ravenshore.
Next, report to Leane Stormlance in Garrote Gorge. She will thank you for saving her father and promote you. DO NOT go to Leane first, as it causes a glitch in the game that will leave it as an un-finished quest no matter what you do.
Necromancer → Lich
Starting Location: Sunken Library; Dagger Wound Island || Mad Necromancer’s Lair; Shadowspire

In the South-East corner of the Dagger Wound map, across the water (so you’ll need someone with the Water Walk spell or a flying dragon) there is a building called The Sunken Library.
Fight your way to the 4th floor and summon a hidden lift to the attic. In said attic, you will find The Lost Book Of Kiehl in a chest. Take that.
Next, travel to Shadowspire and enter the Mad Necromancer’s Lair (pictured in the section immediately above this one). Fight your way through the basement and recover a single Lich Jar *per* Necromancer in your party.
Next head to the main city in Shadowspire. Immediately across from the Inn is Vetrinus Taleshire’s house. Speak with him and he will promote all Necromancers in your party to Lich PROVIDED you brought the number of jars necessary.

** Note: Necromancer to Lich is the only class upgrade that comes with a style change too, as your necromancer will turn into a skeleton from then on out.
Minotaur → Minotaur Lord
Starting Location: Dark Dwarf Compound; Alvar

At the South West corner of the main city in Alvar, there is a mine shaft. Enter the Dark Dwarf Compound and fight your way through until you recover the Axe of Balthazar.
** Tip: You don’t need to enter the Dark Dwarf bunker portion of the zone. Just stick to the main hallways without going through any doors and you’ll find it in a chest within a side cave.
Next, head to Ravage Roaming, and- outlined in Part 3 of the Main Quest guide- clear Balthazar’s Lair and drain the water in order to activate that zone. Once active, speak with Tessalar in Balthazar’s Lair (he lives by Switch E). He will give you the quest to retrieve the axe.
THEN head back to Dagger Wound Island (this is probably the most travel-intensive of the promotions quests). Speak with Dadeross in the main trading house and he will give you a scroll.
Return to Tessalar in Balthazar’s Lair and give him the scroll. All minotaurs in your party will thereafer be promoted to Mintoaur Lord.
Priest → Cleric of the Sun
Starting Location: Temple of the Snake; Dagger Wound Island

It is entirely possible to complete this quest accidentally, depending on how thorough you are at the start of the game.
Within the Temple of the Snake there is an area that is comprised of a network of doors, some leading to other hallways, some leading to alcoves filled with enemies.

If you stick with it and fight your way through, you will eventually come to a large room with a glowing red section on the wall. Click it to expose a book, the Prophecies of the Sun.
Once you have the book, speak with Stephen in the Murmurwoods and any Cleric in your party will automatically be promoted. Return as needed to promote other clerics in your party.
Troll → War Troll
Starting Location: Main City; Ironsand Desert
Speak with Volog Sandwin in Ironsand Desert and accept the quest to find an Ancient Troll Homeland. Volog is located in the house beside the inn.

Head to the Murmurwoods (You can reach them by going from Ironsand to Alvar, then Alvar to Murmurwoods).
North of the main city in the Murmurwoods is a cave surrounded by basilisk. Enter the cave and clear out every single hostile enemy. It isn’t too hard, the cave is a glorified tomb.
Return to Volog in Ironsand and report that the Ancient Troll Homeland is clear. He will promote any trolls in your party to War Troll.
Honestly, this is a pretty easily done promotion quest.
Vampire → Nosferatu
Starting Location: The Crypt of Korbu; Ravage Roaming || Cyclops Larder; Ironsand Desert.

The Crypt of Korbu is located in the northern portion of Ravage Roaming, between the road to Garrote Gorge and the Ogre Fortress. It is the dirt building surrounded by Wyvern (a cousin to the dragon that has no ability to harm you unless it gets close).
Fight your way down (it isn’t a long dungeon, two rooms, but the entrance can be tough) and click on the giant sarcophagus in the basement. You’ll have to clear quite a bit of space in someone’s inventory to fit it.
Next, head to Shadowspire, and from Shadowspire follow the road north-west to head to the Ironsand Desert.
In Ironsand, as soon as you follow the path out of the mountains, you’ll see cyclops to your right. Kill them and follow the mountains to reach the Cyclops Lair.
** Be warned: If a Cyclops gets close enough to do melee damage, your character can be paralyzed. This counts the same as death or unconscious status in the game. There isn’t much difference in appearance once your character is paralyzed, just a widening of the eyes, so check them often.
Within the Cyclops Lair, fight your way down to the basement. In the very back of the basement, in the room with a single large cage, you’ll see treasure chests on either side. One will give you the skeleton of Korbu.
Return to Shadowspire and speak with Lathean. If your back is to the healer’s hut on the southwest side of the city, his house is to the left of the one directly in front of you.
Turn in both the sarcophagus and the skeleton and you will be promoted.
1 note
·
View note
Text
The Main Quest Part 6: Escaton’s Crystal
Maybe you’ve noticed this red thing in the middle of Ravenshore. It’s subtle, so study the screen shot below just to be sure you find it:

1. Level up, visit trainers, and prepare for hell itself.
2. Hit ‘Enter’ beside the door to activate Fight Mode.
3. Open the door and fight like hell.
4. Set a goal of killing just one single thing and then back out and heal.
5. Fight your way through Escaton’s crystal. Hands down, getting in the door is the hardest part of the entire game.
6. At the far end of the crystal is a pad that will light up in a specific sequence when you click it. The sequence is: Left - Right - Middle - Left - Middle - Right - Left - Right - Left.
7. Turn around and the crystals on the two poles will have turned purple if you did this right. Walk between the two poles and you will exit Escaton’s Crystal into the Plane Between Planes.

Marker #1: A replica of Escaton’s Crystal that acts as your bridge back to Ravenshore if you need it. There are no repair locations or vendors in the Plane Between Planes.
Marker #2: A giant helmet. Enter the helmet and work your way through the maze-like passages, flipping every switch you find. Just keep chugging through it, I have no way to provide you with the map of switch locations.
Once you’ve flipped all the switches and pressed all the buttons in the outside 4 sections (they have stairs, go to the 2nd floor for the buttons), you can approach Escaton’s lair in the middle of the Giant’s Helmet.
Speak to him and answer his 3 riddles in order to receive the Elemental Prison Keys. The answers to the riddles in order are Prison - Inside - Egg. You will have to type each one yourself.
Marker #3: A safe zone within the Planes where you can rest without being interrupted by enemies. You can only access it if you have the flute from the temple north of Ravenshore’s passage to Shadowspire.
Marker #4 - 7: The prisons of the elemental lords. The Prison of the Lord of Water is a fire-based prison, and you will die if you try to walk on the floor without a vampire casting levitation. If you have no vamp in your party, climb the walls.
Once you have freed each elemental lord, return through the crystal to Ravenshore. If you have one of the teleportation spells (Lloyds Beacon or Town Portal), Endgame will only trigger once you go to Ravenshore itself.
** Make sure you’ve done all you wanted to do in terms of looting. You will not be able to return.
After you exit the crystal into Ravenshore, a cutscene will play and you will be given your final score for the game. Scores are based on your experience points, time elapsed between the start and end of the game, and your fame level.
You can find full breakdowns of how to achieve high scores. The score really doesn’t matter and there is no way to reference it after you’re done.
You don’t have to stop playing just because the crystal is gone. The game remains open for you to travel around the world and do whatever you want.
2 notes
·
View notes
Text
The Main Quest Part 5: The Elemental Planes
** Once again visit an academy, distribute skill points, and train up before even attempting to begin this. If you have a Necromancer or Dark Elf with Invisibility, you can have some fun here **
1. Speak to Edgar Fellmoon in the Merchant House and he will tell you to speak to the wizard Xanthor. He is in the house immediately west of Escaton’s Crystal.
2. You will be tasked with retrieving the 4 elemental heartstones. To get these, you must enter the elemental planes and fight your way through. Exactly what you do differs depending on the plane.
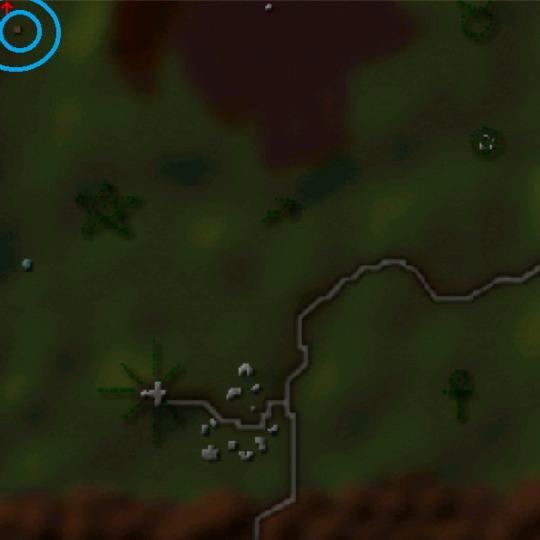
Plane of Air: Murmmurwoods (Entrance in the blasted zone in the middle-north end of the map)

Marker #1: Entrance/Exit
Marker #2: Palace of Air. Enter the palace and fight your way to the 2nd floor, where a false wall hides the Heart of Air. If you have Wizard Eye either via a Dark Elf or a Grandmaster of Air Necromancer, it will appear on your mini map as a blue triangle.
Marker #3: Trainer for Grandmaster of Air. So hit this while you’re here if you have a necromancer who is level 10 of the Air skill (and already trained to Master)
Plane of Earth (Dagger Wound, Marker #6 on Map)
I do not have a map for the Plane of Earth. The Plane of Earth is the only Elemental Plane to register as an entirely indoor location. It is a multi-story web of overlapping tunnels, which makes the in-game map useless.
Fight your way through the halls until you find a massive cavern. At the back is an elevator. Take it down and fight your way up the stairs and around the corner to reach the Heart of Earth.
Plane of Fire (Ironsand Desert, in the North East)

Marker #1: Entrance/Exit
Marker #2: Palace of Fire
Head to the room on the right (keep in mind the floor is lava) and you will see a spiral stair winding upwards. You will be on an increasingly narrow path suspended over lava. Unless you have a vampire with the levitation ability, if you fall you will most likely die.
Save often, and work your way along the path through to the last room, where a tall circular spire sits. Jump on it (get back up and try again if need be) until the spire gradually slides down on its own.
Carefully return to the entrance of the Palace of Fire. That big column that was blocking your path is now down. Step on it and it will raise you up. Fight your way through the Palace of Fire until you get to a room with a lava waterfall. On the 2nd level of platforms is a pedestal with a button.
Press the button, then jump into the lava waterfall. There is a portal behind it that will take you to a tunnel of spinning fire. If you’re prone to visual issues (seizure triggers or motion sickness), look away and use the auto-fire key to attack until the enemies are dead, then move forward to the far side and use the 2nd teleporter to reach the Heartstone Vault.
Marker #3: Trainer: Grandmaster of Fire Magic
Marker #4: A fire war camp that has a rare item or two but really isn’t worth the work to clean it out.
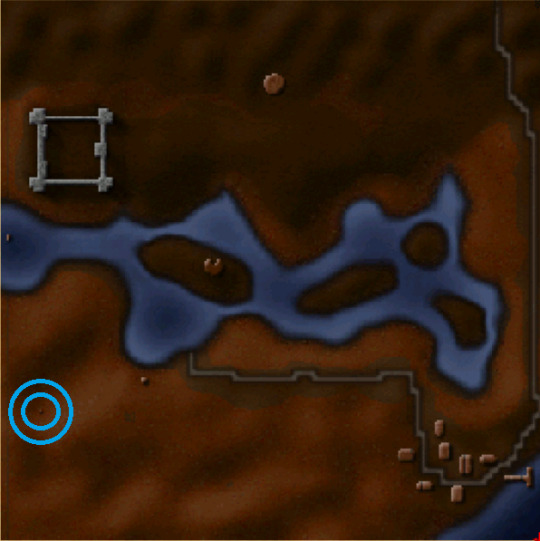
Plane of Water (Ravage Roaming, on the West side in the middle of the bay beside the Ogre Fortress)

Marker #1: Entrance/Exit
Marker #2: Trainer: Grandmaster of Water Magic
Marker #3: Heart of Water, sitting out in the open surrounded by enemies.
Once you have all 4 hearts, return to Xanthor and activate a cut scene.
2 notes
·
View notes
Text
The Main Quest Part 4: Sinking the Regnan Fleet
** You either need someone with the water magic spell “Water Walking”, a scroll of Water Walking, or a flying dragon in order to complete this section.
1. Referencing the map of Dagger Wound Island, you want to head towards #4, that small island. Previously, if you explored the area, there was nothing there. Now there will be a building.

2. Fight your way through the building. Note one stack of crates has a large button atop it. Press it to move the stack and reveal the hidden portion of the fort.
3. Fight your way through to the room in the northernmost part. Kill everyone in that room, and loot a key off the body of the pirate Blackwell Cooper (in red). Click on the keypad on the wall to open the back wall and reveal a submarine bay.
4. Heal your party. Trust me.
5. Click on the submarine to be transported to Regna Island. Kill everyone in the submarine bay. While in Dagger Wound the enemies were Dagger Wound level (weak), Regnan pirates are comparatively very strong. Be ready for a heck of a fight.
6. Exit the Submarine pen. Note that at this point if you return to Ravenshore before the Regnan fleet is sunk, pirates will invade Ravenshore and the city will wholly lock down until you deal with every last one. If you just play through and destroy the Regnan fleet, the invasion will not happen.
7. Climb or fly up to the fortress immediately above. Enter the fortress and kill everyone.
8. Taking the elevator on the right will bring you to a hall filled with enemies. Fight your way to a staircase leading down in the side of the hall, it isn’t far from the elevator.
9. You’ll see a whole wall glowing red. Click it and the wall will fall, revealing a passage to the tunnels beneath Regna.
10. Fight your way through the tunnels to the far side. It doesn’t matter which of the path forks you take, they all lead the same place. HOWEVER, when you first enter the tunnel there are paths on your right and left. These lead back up to the surface and open extra little escape paths for you.
11. At the far end of the tunnels, enter the Pirate Keep.
12. Fight your way through to a large open room with ogre warlocks inside and treasure chests on a second level. One will have a canon ball in it.
13. Take the canon ball and keep fighting your way to the other end of the Pirate Keep. You’ll have to open a door and fight through a crowded room to escape.
14. Just outside, you’ll see slightly to your left a large platform with a huge canon on it. Go to the platform and you will see a gray pad. Click it and you will be prompted “You hear a low rumbling noise”

15. Doesn’t matter if you’re flying or standing, you’ll be thrown back when the canon erupts. The entire Regnan fleet will be destroyed.
2 notes
·
View notes
Text
The Main Quest Part 3: Forging an Alliance
This is where you have options!
That being said, your choices have very very very little impact on the game.
Alliance: Minotaurs of Ravage Roaming

You have no choice here. The Minotaurs are default.
1.Go to Garrote Gorge and follow the road that leads behind the Dragon Hunter’s Camp until it prompts you to travel to Ravage Roaming.
2. Follow the road to the main city, then through it into the mountains. At the end of the road is a black pit in the ground. Click on the pit to enter Balthazar’s Lair.
3. Inside you must fight through the maze-like lair, pulling switches in a special order (outlined on a scroll found inside, select the scroll and click on your portrait in inventory view to read). If you don’t want to read the scroll, the order is: A - B - C - E - G - D - J - C - E - F - D - I - C - Lowest (follow the halls past Switch E and down into the depths).
4. Speak with the chieftain in the room beside the lowest switch to secure the alliance. In the future when you come to Ravage Roaming there will be a small temple with a bull head on top that serves as the entrance to the lair now.
Alliance: Dragons or Dragon Hunters of Garrote Gorge
Choosing to side with the Dragons of Garrote Gorge will make businesses in the city unavailable to you. You can also no longer train at the training hall there (but there are many training halls throughout the game).
Choosing to side with the Dragon Hunters of Garrote Gorge won’t change the quests in the Dragon Cave or the trainers therein, but all Dragons in the mountains will be hostile to you now.
1. Follow the road behind the Dragon Hunter’s Camp to enter Ravage Roaming.
2. Turn right and head North to the Ogre Fortress.
3. It doesn’t matter what entrance you use, there are 4. Just enter the fortress.
4. Fight your way around the top level. Don’t forget to climb the stairs, you’re looking for a switch in the wall. Pulling the switch opens a staircase along one whole length that leads down into the under-fortress.
5. Find the room at the back with stone walls. Inside will be many ogre warlocks, including Zog. Kill them.
6. Standing in the doorway, facing the flat wall, look to the left side of that wall (not the short wall on the left, the left side of the wall). There will be a very small red glowing stone. Click it and the wall slides down.
7. Collect the Dragon Egg from inside, then take it either to the Dragon Cave or the Dragon Hunter Camp to ally with that faction. Whoever gets the egg is your ally.
Alliance: Necromancers (Optional)
You must choose between allying with the Necromancers of Shadowspire or the Sun Priests of Murmmurwoods.
If you ally with Shadowspire, the entire city in the Murmmurwoods turns into enemy territory (but you still have access to all buildings). You will also be unable to complete the side quest involving the shield Eclipse.
If you ally with the Sun Priests, the Necromancer’s Guild atop the mountain at the edge of Shadowspire’s main city will become unfriendly.
** It is worth noting that this is the most inconsequential choice in the game as you really have no business with either faction moving forward anyways. **
1. Enter the Necromancer Guild and head up the stairs. Turn right and work your way through the halls down to the elevator that takes you to Sandro and Thant’s rooms. Speak with them about an alliance.
2. Backtrack and head to the tower on the LEFT this time. Recruit Dyson Leyland into your party. *HE MUST BE A LIVING MEMBER OF YOUR PARTY (and he dies very easily in battle)**
3. Head to the Murmmurwoods. Enter the Sun Temple.
4. Across from you as soon as you enter you’ll notice a red spot glowing on the wall. Click it and the star in the middle of the lower level will rise.
5. Head down and go around the star until you find a hole in the floor. Drop down.
6. Follow the hallway and you’ll see the Nightshade Brazier sitting on a pedestal. Take it.
7. It takes a while to trigger, but once it does, everyone in the room will turn hostile and attack. Hold them off (or just wait) as the pedestal slowly falls down into the floor. Jump in the hole it left behind and you will be in a sub-basement of the Temple.
8. Take the door to escape, then return to Shadowspire. Turn the quest in to Sandro and Thant for the alliance to be secured.
Alliance: Sun Temple (Optional)
You must choose between allying with the Necromancers of Shadowspire or the Sun Priests of Murmmurwoods.
1. Enter the Temple of the Sun in the Murmurwoods and speak to Oskar Tyre in his office. He will ask you to destroy the Nightshade Brazier.
2. Head to Shadowspire and enter the Necromancer’s Guild. Head up the stairs and follow the path on the left down through the Guild until you reach an elevator. Head up.
3. Open a spot in your party for Dyson Leyland. He’s useless and dies easily, have fun.
4. Start killing every necromancer you see. Initially they will be friendly, so you’ll have to cast a spell at them in order to target.
5. At the top of the stairs there was a big mural. Click it with Dyson alive in your party. The door will open.
6. Take the elevator down and try to walk off a ways. You’ll be stopped by a prompt saying guards are telling you to turn back.
7. Press on anyways, ignoring them. This will turn the entire building hostile and release extra enemies between you and the exit. I recommend immediately backing up, heading up the elevator, and re-clearing your path out.
8. Dyson- if alive- can now open all the doors in the halls to the right or left of that hidden door you found. If you wish to complete the side quest looking for the shield Eclipse, do it now. It is in one of the chests in one of those rooms.
9. Head back down that elevator behind the hidden door and clean house.
10. Once everything is dead, put your back to the giant cavernous room. Again, Dyson has to be alive for this bit.
11. Next to the door you see a series of 5 switches. Click them. They go up in a special order, but you don’t have to get the order perfectly right. Just click until things move. Then click the square button on the wall to drop the door, and click the wooden slide to seal it.
12. Walk back into the big cavern and a cutscene will begin showing Dyson destroying the mechanism.
13. Return to the Murmmurwoods to inform Oskar the deed is done.
You have now unified the people of Jadame.
At this point I highly recommend leveling everyone up, distributing skill points, and visiting trainers. It’s about to get wild.
2 notes
·
View notes
Text
The Main Quest Part 2: Smuggler Boats & An Eye Witness

1. After delivering Dadeross’ letter to Edgar Fellmoon, you will be tasked with recruiting smuggler boats to join the Jadamean fleet.
2. Travel along the coast (you can use a bridge to cross the river) heading northwest until you slip behind the mountains and see a cave. The ground looks like water, but you can walk safely.
3. Fight your way through the smuggler’s den to Arion Hunter’s office at the back. Deliver the blackmail letter and he will reluctantly give his boats to the use of the Merchant’s House.
4. Return to Fellmoon. He will next task you with traveling to Alvar, to the Merchant’s main office.
5. Go north out of Ravenshore. Follow the path of the river, fighting enemies as needed, to head to Alvar. ** Tip: The willow tree just past the bridge is actually a chest containing a rare item. But watch out- clicking it activates a trap and your party will be injured.
6. In Alvar, travel to the northernmost end of the map to reach the main city. Find the largest building- the Merchant House of Alvar. Speak to Bastian Loudrin.
7. Head south out of the main city. At the fork, take the path on the left (with a bridge), then keep to the roads heading EAST until you’re prompted to travel to Ironsand Desert.
8. In Ironsand, note the Troll Tomb on the right. Follow the road into town and go to the furthest end, where there is a home surrounded by a tall wall.
9. Speak to the Overdune family inside to get the ashes of Vilebite. Return to the Troll Tomb and fight your way through to the crypt by ALWAYS CHOOSING THE PATH ALONG THE OUTSIDE EDGE, TRAVELING CLOCKWISE. Lay Vilebite’s remains to rest by clicking on the furthest coffin back.
10. Remove a member from your party and speak to Overdune. He will join your party. Return to Alvar and speak to Bastian to activate a cutscene.
3 notes
·
View notes
Text
The Main Quest Part 1: Deliver Dadeross’ Letter to Fellmoon
I’m painting in broad strokes here, the key to this game is to explore and inquire on your own!

1. In the Clan Leader’s Hall, accept the quest to deliver Dadeross’ letter to Fellmoon in Ravenshore. From Brekish Onefang, accept the quest regarding the PORTALS OF STONE to receive a purple crystal.
2. Recruit Fredrick Talimere (Cleric) to your party.
3. Visit the Adventurer’s Inn. Recruit Elzbeth Lamentia (Vampire) and Devlon Arcanus (Necromancer) to your party.
4. Travel southwest, keeping the ocean on your right side, across the island. Dodge pirates as need be. ** Tip: Be careful of the black craters on the ground. Periodically fire will rain down on them and cause significant damage to you if you’re in the area.
5. You will come across a village of 3 huts. At the edge of the village, turn south and you will see something peeking out from behind the hills. Approach the stone platform.

6. Step on the platform to be transported to a nearby island. Travel north to find another platform on the opposite end of that island. Stand on it to be transported to the Temple of the Snake.
7. Enter the temple, and fight your way through to the other side. There are 3 trick rooms to navigate::
Room 1: Jump across the stones to reach the far side. If you fall the walls will drop and release 8-12 coatals. Kill them and look inside the rooms that were exposed. Each has a button inside. Click the buttons in a certain order to raise steps on the far side of the room. If you get one wrong it doesn’t re-set, just keep clicking around.
Room 2: You may or may not see a river of red running along the floor. If you don’t see it, look up and it is reflected on the roof. Walk from one end of the room to the other staying on top of or beneath that red ribbon. If you step off the path, you will fall through the floor and have to fight several coatals.
Room 3: This appears to be a boring square room with nothing in it. Clicking the door on the far side will seal you in the room and the floor will begin withdrawing. Run around the edge of the room, in every corner will be 2 snake panels on the walls with glowing red eyes. Click each once to turn the eyes off. Once all 8 panels in the room are dark, the floor will stop moving and the doors will open.
8. On the far side of the temple you will exit to the boat docks, but hold on a second! First, follow the shoreline to the right and you will find another of the stone platforms around the corner. Step on it to activate the bridge between the Clan Leader’s Hut and the boat docks.
9. Board the ship for Ravenshore.
10. In Ravenshore, visit the Merchant House near the docks (the one with the fountain in front of it) and deliver Dadeross’ letter.
1 note
·
View note
Text
Trading Triangles
In the lore of the game, your job before becoming the Hero of Jadame was guarding caravans of trade goods. The trading triangles are an extension of that.
Trading Triangles are units of 3 NPC that are scattered throughout the maps. Each one will only buy a specific item, and each one will only sell a specific item (you can buy as many as you want in a visit).
I’ve only given you the zone each seller is in, explore the city to find the specific merchant house.
GREEN = Buy RED = Sell ORANGE = Profit margin
The Tobersk Fruit Triangle
** Click through the crates in the wagons by where you begin the game. There are goods for this triangle inside.

Silver Dust & Forged Vouchers

Dried Sunfish & Pirate Amulets

2 notes
·
View notes
Text
Part 4: Item Vendors and Businesses
** Each business has a specific badge on the building. Screenshots are mostly of Dagger Wound locations since that is where you’ll start the game. Look in main cities to find them.
Please be aware in Ravage Roaming you will only be able to find the inn at first. Clear Balthazar’s Lair to activate the rest of the businesses.
Most of these locations have the option to Learn Skills. Skill options will vary character to character, but you only learn the base form of the skill. Leveling the skill after learning it requires trainers (see pinned page guide for more on that).
The Adventurer’s Inn

Locations: Dagger Wound Islands, Ravenshore
Any characters you recruit who are not among the 4 in your party will show up here (see pinned page guide for more on recruitment)! Go here to find characters to “hire” into your party.
The selection of characters will NOT change between the two Adventurer’s Inn locations.
** At the start of the game, the Adventurer’s Inn will contain Necromancer Devlin Arcanus and Vampire Elsbeth Lamentia
The Alchemist Shop

Locations: Dagger Wound Islands, Ravenshore, Alvar, Regna, Ravage Roaming (in Balthazar’s Lair), and Shadowspire.
Potions, ingredients, and recipes will be found here. Of course, if you have characters skilled in alchemy you can also mix your own potions (see pinned page guide for more info)
The Armory

Locations: All maps EXCEPT Murmurwoods and Ironsand Desert.
Shop a small selection of armor, shields, helmets, cloaks, boots, and gauntlets at these locations. You can also have found armor items identified, repaired, or sell unwanted inventory here.
The Bank

Locations: All maps EXCEPT Murmurwoods and Ironsand Desert
What happens if every character in your party dies or is knocked unconscious? You die! You will reappear on the docks in Ravenshore (if you die before making it to Ravenshore you reappear in Dagger Wound) and your gold amount will be ZERO.
That’s right, when you “die” someone loots all your gold. Store extra in banks so that it is protected and you aren’t totally boned. But be careful- every now and then the game refreshes all maps and the bank will re-set to zero.
Like Adventurer’s Inn locations, all banks hold however much money you deposit, so you don’t have to worry about going back to a specific branch.
Caravans

Locations: Ravenshore, Alvar, Garrote Gorge, Ironsand Desert, and Shadowspire
Over-land travel that takes you to maps with Caravan houses, typically in 2 days. Schedules can be found on each map in the pinned page guide.
It is also worth noting that every Caravan location has somewhere around it- sitting on the ground- horseshoes. Pick them up and click the horseshoe, then a character portrait. The horseshoes turn into skill points you can use to level up.
The Inn

Locations: All maps, with TWO inns each in Ravenshore and Alvar.
Buy food at inns to allow you to travel and rest to recover hit points. You can also play the mini-game Arcomage at each inn. The game must be WON at all inns at least once in order to complete the Arcomage Tournament questline (see page guide for more info).
Item Vendor

Locations: All maps EXCEPT Murmurwood and Ironsand Desert (two in Ravenshore)
Identify, buy, or sell a wide array of individual items. This includes magic books, potions and ingredients, rings, amulets, cloaks, helmets, magic wands, and gemstones. Anything you can’t sell to an armorer or weaponsmith can be sold here.
Spellbook Vendors

Locations (Elemental Magic): Dagger Wound, Ravenshore, Alvar
Locations (Spirit, Body, Mind): Ravenshore, Alvar, Ravage Roaming (Balthazar’s Lair)
Locations (Dark Magic): Shadowspire
Locations (Light Magic): Murmurwood
Spellbook vendors ONLY sell spells within specific sets as noted above in the locations listing. They do not identify books. They do not buy them from you.
If you find spell books during your adventures or accidentally buy a spell book for a spell you already know, you’ll have to sell the unwanted items at an ITEMS VENDOR, not a spellbook vendor. They *only* sell.
Traditional looking books are for anyone who knows the skill. Gold books are for those who have trained to “expert” level. Orange books are for those who are “masters” in that skill. Black and red books are ONLY for Grandmasters.
Training Academy

Visit these often to see if any of your characters are ready to level up. These venues increase both your overall level and convert your experience into skill points that you can use to increase the level of specific skills.
Training academies are an integral part of the game, but most have a level cap on what you can train to at that specific location.
Just a note on what you see below, you will most likely beat the game around L60. I usually barely break L100 with maximum leveling work.
Dagger Wound: Up to level 5
Ravenshore: Up to level 15
Alvar: Up to level 25
Garotte Gorge: Up to level 25 *but* will turn you away if you side with the Dragons during ‘Finding an Alliance’
Ravage Roaming: Up to level 200 (basically ∞)
Shadowspire: Up to level 200 (basically ∞)
Weapons Vendor

Locations: All maps EXCEPT Murmurwoods and Ironsand Desert.
As with the item and armor vendor, go here to identify, buy, or sell weapons. Selection will vary location to location. There isn’t much to say about this one, it’s pretty straightforward.
Healers

Locations: All maps EXCEPT Murmmurwoods and Ironsand Desert. **However** The appearance of the temple will be different at each location, so you’ll need to poke around to find them.
If a character dies or is in any way not pristine, the healer will restore them to absolute perfect health (including full spell points) for a fee depending on what is wrong with them and to what degree.
Check characters armor and weapons often, as any damage bad enough to require a healer will likely also break their items.
1 note
·
View note
Text
Part 9: Everything Arcomage
** Arcomage is a mini-game within the Might and Magic 8 world. It can be played at any inn throughout each zone, and there is even a quest to win one game at every single inn.
Arcomage is also a money-making opportunity, as the first time you win at any inn, you will receive a sum of gold. You ONLY get this the first time you win there though.
What is the game?

You will be playing cards (shown at the bottom) to attempt to meet one of three winning criteria:
Have your TOWER reach a certain height.
Have a certain amount of resources.
Reduce your enemy’s tower to 0.
I will include at the bottom of this a guide to the victory conditions at each inn. The conditions differ location to location. In-game, you can always click “Victory Conditions” in order to see what that specific location requires.
Towers and Walls:

Highlighted in yellow is your TOWER. In RED is the wall. Your wall is a protection device. Use cards to keep it high and protect your tower.
At the bottom, arrows point to two different types of damage you can cause in the game. If a card specifically says “### damage to enemy tower”, then the damage applies to the tower directly. If the card says simply “## Damage”, it will deduct from the opponent’s wall.
Say your opponent has a wall of 15, as in the picture, and you have a “20 Damage” card. The opponent’s wall will first be reduced to 0, and then the remaining 5 damage will be applied to the tower.
Read cards carefully, some might have conditions such as “If your tower is larger than the enemy wall, then 12 damage to enemy TOWER. But if not, 5 damage”. That means in that case, if you don’t meet the requirement for the 12 damage to tower, you just do 5 damage to their wall.
Any time it isn’t specified as TOWER, it means the damage first applies to the wall. If the wall is 0, the damage applies to the tower only then.
You cannot win just by making your wall very very tall, so make sure you’re focusing on raising your tower and damaging the enemy one.
Resources:: How to Read Cards

The small number on the bottom right of each card tells you how many specific resources it will take. The color of the card equals which resource it will reduce.
Brown = Bricks Blue = Gems Green = Recruits
Say you only have 5 gems and you have a card that requires 10 gems to cast. The card will be darkened and un-clickable.
If you want to get rid of a card without playing it, right click the card and it will be discarded. You may also have to do this if you don’t have any cards available to play. You will always have 6 cards in your hand.
Resources:: How to Increase Their Number (Win Method #2)

You’ve probably noticed that above those numbers in the previous point, there are big yellow numbers. Those have specific names, I’ve highlighted it above.
At the BEGINNING ONLY of each turn, the number of each resource will increase by the amount of the green number.
SO. What’s that mean? Let me zoom in on that part of the screen::

This is just default how resources begin at the start of the game. It changes per inn.
So at the start of every single round, those resources (Bricks, Gems, and Recruits) will increase by 4. So let’s say I play a card that has 0 cost (there are a few). The next time it’s my turn, all those resource numbers will say 18.
OK, back to this:

Some cards allow you to increase those bigger numbers, so that every round you add more and more. You’ll see that you can also lower your opponent’s numbers, which will make it harder to play the higher value cards that give you boosts to your tower height.
If that big number gets to a certain point- which again varies per inn- you automatically win the game, regardless of your tower height.
Win Conditions Per Inn::
** Please note: The payout happens at first *win*. It’s alright if you lose several games before winning, you’ll still get the gold.
Dagger Wound: The Grog and Grub || Tower of 30 or any resource to 100. || 600 gold for first win
Ravenshore: Kessel’s Kantina || Tower of 50 or any resource to 150 || 1000 gold for first win The Dancing Ogre || Tower of 100 or any resource to 300 || 1700 gold for first win
Alvar: Miho’s Roadhouse || Tower of 125 or any resource to 350 || 2000 gold for first win Profit House || Tower of 50 or any resource to 150 || 1500 gold for first win
Garotte Gorge: Dragon’s Blood Inn || Tower of 75 or any resource to 200 || 2500 gold for first win
Shadowspire: Black Company || Tower of 100 or any resource to 300 || 5000 gold for first win
Ravage Roaming: Bull’s Eye Inn || Tower of 150 or any resource to 400 || 4000 gold for first win
Ironsand Desert: Parched Throat || Tower of 75 or any resource to 300 || 1500 gold for first win
Murmmurwoods: Traveler’s Rest || Tower of 100 or any resource to 300 || 3500 gold for first win
Regna: Pirate’s Rest || Tower of 200 or any resource to 500 || 600 gold for first win
Once you’ve won a game at every inn, speak to Tonk Blueswan in Ravenshore (her home is across from the road to Shadowspire).
She will consider the quest completed even if you did not receive the quest before playing the games, and will give you the key to a chest outside of her home containing large amounts of gold and a rare sword.
** My tip is to play Arcomage first at every inn the first time you visit any map. That way once you’ve accessed Regna, you don’t have to worry about figuring out which one you missed.
If you do need to see the list of taverns you’ve won Arcomage at, double-click any character, click “Awards”, and scroll to the bottom.
You’ll have to look at it for each character in your inventory as whoever is selected when you start playing is considered the winner instead of the whole party.
0 notes
Text
Hey all! Time for the annual rekindling of my love for the game Might and Magic 8, a 1999-2000 era attempt at open world games. But acknowledging it can be confusing for first-time players, I’ve made a guide! It’ll be updating for a while, but you can find it at @mm8-guide!
@mm8-guide
While I get the ‘how to play’ posts up and organized, feel free to send an ask with any questions you have!
5 notes
·
View notes
Text
Map: Plane Between Planes
** This is only accessible upon completing the Elemental Heartstones questline, and can only be entered via Escaton’s Crystal at the heart of Ravenshore.

Marker #1 (Entrance/Exit): A replica of Escaton’s Crystal in Ravenshore. Think of Escaton’s Crystal as a bridge between Ravenshore and this location.
Marker #2 (Escaton’s Palace): You must clear this building and solve Escaton’s riddle to access Markers #4 - 6.
Marker #3 (A Giant’s Sword): A completely neutral and friendly zone where you can safely rest. None of the NPCs within will interact with you. Only accessible if you possess the flute found in the temple surrounded by Cenaturs in Ravenshore.
Marker #4 (Prison of the Lord of Air)
Marker #5 (Prison of the Lord of Fire)
Marker #6 (Prison of the Lord of Water): The ground in this elemental prison is lava, which will cause significant damage to your party every second. To combat this, either stick to the walls or use a vampire with ‘Levitate’ (Vampire GM skill).
Marker #7 (Prison of the Lord of Earth)
0 notes
Text
In-Game Characters & Unlock Requirements::
** Visit these characters at homes in their respective locations to retrieve them. Simply ask “Join”.
**** Characters who are L50 generally are maxed out in terms of skills that they can achieve Master or Grandmaster in rank.
Dagger Wound Island::
Devlin Arcanus; L5 Necromancer || Available in Inn at start of game.
Elsbeth Lamentia; L5 Vampire || Available in Inn at start of game.
Fredrick Talimere; L5 Cleric || Available at start of game after accepting Portal Crystal quest from main office.
Simon Templar; L5 Knight || Available once player tries to enter Temple of the Snake. Typically the game glitches here and he has to be retrieved from the Inn on the main island.
Ravenshore::
Arius; L5 Minotaur || No requirement
Dervish Chevron; L50 Cleric || Unlocked after both ‘Sinking the Regnan Fleet’ and Knight Promotion Questline are complete.
Karanya Memoria; L15 Necromancer || Unlocked after receiving ‘Form an Alliance’ questline.
Maylander; L15 Cleric || Unlocked after receiving ‘Form an Alliance’ questline.
Thorne Understone; L50 Troll || Available after completing ‘Sinking the Regnan Fleet’ questline.
Alvar::
Adric Stellare; L30 Dark Elf || Unlocked after receiving ‘Sinking the Regnan Fleet’.
Jasp Thelbourne; L15 Dark Elf || Unlocked after receiving ‘Form an Alliance’ questline.
Rohani Oscelton; L5 Dark Elf || No requirement
Garrote Gorge::
Ithilgore; L5 Dragon || No requirement
Leane Stormlance; L15 Knight || Only available if player speaks to her with Blazen Stormlance in party.
Nelix Uriel; L30 Knight || Only available if player allies with Dragon Hunters during ‘Form an Alliance’ questline.
Tempus; L50 Knight || Unlocked after completing ‘Sinking the Regnan Fleet’ quest.
Ironsand Desert::
Flamdring; L15 Dragon || No requirement
Overdune Snapfinger; L5 Troll || Available after completing ‘Put Vilebite’s Remains to Rest’ questline.
Sethrc Thistlebone; L30 Troll || Available after completing ‘Form an Alliance’ questline.
Volog Sandwind; L15 Troll || Available after completing ‘Ancient Troll Homeland’ questline.
Shadowspire::
Artorius Veritas; L50 Vampire || Unlocked after ‘Sinking the Regnan Fleet’.
Blazen Stormlance; L50 Knight || Unlocked while completing Knight Promotion Questline.
Brimstone; L30 Dragon || Unlocked once ‘Form an Alliance’ questline is completed.
Dyson (Enroth); L15 Cleric || Recruited as part of ‘Form an Alliance’ questline.
Gethric Mercurtura; L15 Vampire || No requirement
Hevatia Deverbero; L30 Necromancer || Available after completing ‘Sinking the Regnan Fleet’ only if the player allied with the Necromancer’s Guild earlier in game.
Infaustus; L30 Vampire || Available after beginning ‘Sinking the Regnan Fleet’ quest.
Nathaniel Roberts; L15 Necromancer || No requirement
Vetrinus Taleshire; L50 Necromancer || Complete both the Necromancer Promotion Questline AND ‘Sinking the Regnan Fleet’.
Ravage Roaming::
Rionel; L30 Minotaur || Available after ‘Form an Alliance’ questline is complete.
Thanys; L15 Minutaur || Available after relieving the flooding in Balthazar’s Lair.
Ulbrecht; L50 Mintoaur || Available after receiving ‘Sinking the Regnan Fleet’ questline.
Murmmurwood::
Cauri Blackthorn; L50 Dark Elf || Unlocked as part of Dark Elf Promotion Questline. Quest is adopted in Alvar.
Verish; L30 Cleric || Available after completing ‘Form an Alliance’ questline.
Regna::
Duroth the Eternal; L50 Dragon || Unlocked after beginning ‘Sink the Regnan Fleet’ questline.
1 note
·
View note
Text
Skills and Class
**This displays the maximum height a race can reach in each skill. It does not take into account individual race promotions, generally required before attaining peak status.
***** Does not include races measured as skills (Vampire, Dragon, or Dark Elf)
Magic:
Fire Expert: N/A Master: Dark Elf Grandmaster: Necromancer
Air Expert: N/A Master: Dark Elf Grandmaster: Necromancer
Water Expert: N/A Master: Dark Elf Grandmaster: Necromancer
Earth Expert: N/A Master: Dark Elf Grandmaster: Necromancer
Dark Expert: N/A Master: N/A Grandmaster: Necromancer
Light Expert: N/A Master: N/A Grandmaster: Cleric
Body Expert: Minotaur Master: Vampire Grandmaster: Cleric
Mind Expert: Minotaur Master: Vampire Grandmaster: Cleric
Spirit Expert: Minotaur Master: Vampire Grandmaster: Cleric
Arms
Sword Expert: Minotaur Master: Troll, Dark Elf, Vampire Grandmaster: Knight
Axe Expert: Vampire Master: Knight, Troll Grandmaster: Minotaur
Staff Expert: Cleric, Knight Master: Necromancer, Minotaur Grandmaster: Troll
Spear Expert: Troll Master: Minotaur Grandmaster: Knight
Dagger Expert: Necromancer, Knight, Troll, Minotaur Master: Dark Elf Grandmaster: Vampire
Bow Expert: Knight, Minotaur Master: N/A Grandmaster: Dark Elf
Mace Expert: Vampire Master: Minotaur, Knight, Cleric Grandmaster: Troll
Armor:
Leather Expert: Necromancer, Cleric, Knight, Minotaur Master: Dark Elf, Vampire Grandmaster: Troll
Chain Expert: Cleric, Troll, Vampire Master: Knight, Minotaur Grandmaster: Dark Elf
Plate Expert: N/A Master: Minotaur Grandmaster: Knight
Shield Expert: Dark Elf Master: Cleric, Vampire Grandmaster: Knight
Abilities:
Disarm Trap:: Open chests without traps injuring you and your party. Expert: Knight, Vampire Master: Minotaur Grandmaster: Dark Elf
Perception:: Hidden doors, buttons, paths, or traps glow red. Expert: Cleric, Knight, Vampire Master: Dark Elf Grandmaster: Minotaur, Dragon
Merchant:: Buy price on goods is lower, sell price to merchants is higher (GM buys/sells at value) Expert: Necromancer, Knight, Minotaur, Vampire, Dragon Master: Cleric Grandmaster: Dark Elf
Learning:: Gain skill points faster to level higher. Expert: Cleric, Dark Elf Master: N/A Grandmaster: Necromancer, Dragon
Meditation:: Gives characters extra spell points. Expert: Dark Elf Master: Dragon, Cleric, Necromancer Grandmaster: Necromancer
Body Building:: Gives characters extra hit points. Expert: N/A Master: Dragon, Minotaur, Knight Grandmaster: Troll
ID Item:: Character can ID items rather than paying merchants to. Expert: Vampire Master: Necromancer, Dark Elf Grandmaster: Dragon
ID Monster:: Reads an opponent to determine weaknesses and skills. Expert: Troll, Necromancer Master: Dragon Grandmaster: Vampire
Repair Item:: Can repair a broken item rather than paying merchants to. Expert: Cleric, Dark Elf Master: Troll Grandmaster: Knight
Armsmaster:: Improves melee combat abilities. Expert: Dark Elf Master: Troll, Minotaur Grandmaster: Knight
Alchemy:: Character capable of mixing stronger potions, up to potions that grant skill boosts. Expert: Cleric, Dark Elf Master: Vampire, Dragon Grandmaster: Necromancer
Regeneration:: Regenerate hit points over time to recover from damage without resting. Only works if alive or unconscious, not dead. Expert: Dragon, Necromancer Master: Vampire Grandmaster: Troll
0 notes