
Statistics
We looked inside some of the posts by mi5014-frankieharrison and here's what we found interesting.
Average Info
Notes Per Post
6
Likes Per Post
6
Reblog Per Post
0
Reply Per Post
0
Time Between Posts
2 days ago
Number of Posts By Type
Video
3
Text
1
Photo
13
Last Seen Tumblr Blogs


Fun Fact
Tumblr has a 66 index score for customer satisfaction in the US.
Video
tumblr
Tracking shot
This is my tracking shot of my two characters, i had this rendering while i wrote about my milky character renders and didnt want to stop it from rendering because i had noticed something was wrong. i have a feeling i had the exposure wrong on the arnold renderview and that is what made them look far too light. If i had more time i would re render everything properly because i was very proud of my models so its a shame. like i said in an earlier post i was having problems with files and stuff and that pushed me very close to the edge, im just hoping everything works when i upload it here, otherwise i am proud of getting these done and rendered. i didnt have time to put sound to this movie but if i did i would of put a echoey footsteps type of sound like people walking on the concrete floor
1 note
·
View note
Video
tumblr
Turntable renders for my characters
here are all my turntables for my characters. i used the quick rig on maya to pose them but the arms and stuff did distort in a weird way which should of been through about while modelling and the topology of the mesh. i am going to put them both into a scene now modelled for my animation performance module just to show the two characters in a scene together.
1 note
·
View note
Text
file issues
because i do most of my work on my mac i have been transferring things between on my one drive however i seem to be having problems finding and downloading things on the uni computer so to get things in on time i might have to just upload all my stuff on here to make sure it works, this is entirely my own fault and i should of thought about this before it became a problem.
0 notes
Photo


Texturing Freya
i used the same method for painting the textures of her face and then i started modelling the hair, i went really simple compared to the reference image because i dont have that much time left and its my own fault i should of known modelling was going to take longer and i should of taken into account mistakes and hard parts that would happen, but overall im very happy with how shes turning out, Now i just need to rig her and do the turntable render. The eyebrows were so annoying to make because i decided to use the quad draw tool we used earlier in the module and extrude but things kept on going weird so i just made them basic shapes and they look alright so theyre not too bad, ansd because of the quad tool they sit on the face nice enough
i used a smoothed cube to start the hair similar to the way i did for max’s face and then just extruded edges from there.
Because both of my characters have human bodies i am going to just use the quick rig on maya just to be able to pose them as i don’t have time or the knowledge for a better and more advanced rig. the only thing i did factor in time for is the rendering, last year i didnt leave enough time for rendering and ended up not getting the render finished for the deadline so im not going to make that mistake again and get it rendered and finished on time :)
1 note
·
View note
Photo


Max’s Textures pt2
I did the same thing for his dress because it was much easier to make it look like it had holes in or that the fabric was distressed rather than sculpting it like that. I think this worked quite well. I also put the arms and legs fur over the head texture just to get the same look without having to draw a whole new texture.
0 notes
Photo


Painting Max’s Textures
ive decided to paint on the textures for my characters so i started with max and i opened the uv editor and made a planer? and then i selected an edge but not all the way up the head just down the back and cut it and then unfolded the uv mesh and then exported it out to photoshop and drew what id like on it and then added the psd file as a texture and it all worked out fine, gary helped me with this and it is much easier than doing all the fur stuff i considered and it looks more like my original concept art.
0 notes
Video
tumblr
Experimenting with nCloth
I used a sphere and a plane to just get the hang of changing around the settings whole using ncloth, The concept seems quite easy im just unsure how i will freeze the simulation to be able to pose the fabric on my model, but i did find out you can add wind, maybe i will add wind to the silky part of freyas clothing so during the posed turntable render it gives it abit more life ? im not sure we will just have to see.
1 note
·
View note
Photo


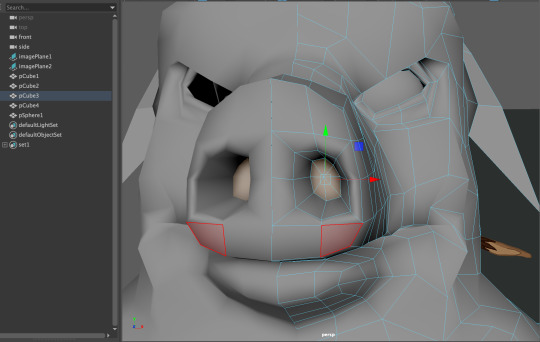
Max’s Face pt2
I watched a tutorial on how to make fur and i think maybe its best i just keep my mesh sort of flat for now so i just finished off the face, added little ears and then mirrored it over so it was symmetrical. then i used a cylinder to make the tusks and mirrored it too and just had it clipping in the lips because i just wanted it to look right and i’m not too worried about functionality right now. I am still unsure about the uv mapping but will hopefully get some help at some point, it just seems quite complicated and no tutorials i watch seem to match up with the things i see in the uv editior i might of messed up on the mesh or something but hopefully gary will be able to help. Now ive sorted the base of the characters im going to attempt the clothes. Ive watched a few videos about n cloths and i think i have a decent idea of how im going to pull this off, just need to do a few experiments first.
1 note
·
View note
Photo


Modelling Max’s Head/Fur
I started off with a cube and then smoothed that to give me a sphere shape but with quads instead of triangles as the faces. Then i shaped that to the head shape and then deleted the faces where the neck would be and extruded edges down to create the fur neck. Im not sure if there was an easier way to do this but ive done so much i might aswell carry on. I tried to use the sculpting tools on the mesh but it didnt work very well and i couldnt get the effect i wanted to i just sort of smoothed it back out so it does look abit textured just not the hair kind of look i wanted. I added edgeloops around the nose and eyes and sculpted the eyes and then added back the body and started moving the hair outward to lay over the body properly. I have a feeling theres something i can do to help myself out here thats why ive takem the break to be able to write this and to have a look at some videos and see if theres a faster way to get the effect i want.
0 notes
Photo


Finishing Freya’s Face
I kept on adding edge loops where needed and then when i was happy with the shape i attached the neck and the head by combining them and using the weld tool and i also added spheres for the eyes and got them into position and then used the plug in we used earlier in the module to keep the eyes attached to the mesh so if i moved it i wouldnt have to move them. I know i can unnatach them at any time so it should be fine. I know my topology on the face isnt the best it could be, mainly because i already spend two days trying to follow a 40 minute tutorial so i decided to finish it to a certain extent and carry on with other things because i was going feral over it. Once i finished modelling both parts i wanted to see if i could do the uv thing but then it looked like the second last image so i was like nope and have decided to move onto modelling max’s head instead because i have learned alot throughout the head process so i dont think it would be too hard.
the hardest part of this process was trying to keep the topology right. i dont think its turned out that bad and im just thankful i dont need to make a facial rig at this stage or i might of cried. anyway ive been looking into making clothes using ncloth so we will just have to see how that goes
0 notes
Photo


Modelling Freya’s Face
I started with freya’s face because i thought it would be much easier than starting max’s face because he is covered in hair and i havent got a drawing of how he looks under the hair, I will talk about how i plan to tackle his face in another post. Anyway, i started with a cube and smoothed out the cube and then added devisions, then i got the basic shape of the head and started moving vertices and edges trying to keep the topology uniform
this is different to the way gary showed us how to make a head but it is faster and you just keep adding edge loops to make the topology better and give the face more definition. I have been watching youtube tutorials for this including garys tutorials. i am yet to make the nose and add detail to the lips i just thought this was a good head start. I really need to keep going and doing as much as possible otherwise i am not going to have enough time to texture things, which is a whole other thing. i plan to render the turntables in univeristy so hopefully that wont take as long as it would ono my mac, i have given myself two days in my schedule to get it rendered but we will have to see how far i get as it gets closer to the time.
things i found difficult: I found the chin area to be difficult but adding essential edge loops really helped and i know the nose is going to be hard but high hopes i guess
0 notes
Photo


Modelling Freya
I started modelling fraya before i carried on with maximus just because i had the process fresh in my head and it took a much shorter time to make this base because i had already done all the trial and error iin the first model. Th eonly thing i came across that i struggled with was the feet. i forgot to sculpt the feet before smoothing and mirroring so i had to go back and undo alot of things to sculpt the feet first but it worked and it looked much better. Same sort of process as max’s model using the instance mirroring its just much easier than trying to get the two halfs of the body similar. I will move onto the head next for both of the models and then i will have to experiment with the clothes, i have watched some ncloth videos but nothing that could help me with this situaiton so i will keep on looking. i have deffo warming up to the tools to model in maya because i mentioned previously that i wasnt that much of a fan of it compared to animating in maya but the more i do it the easier it gets.
0 notes
Photo


Modelling Maximus
I started by creating a project and adding my reference images to the source images folder and then adding them into my scene on image planes. i then started with a cube and used both views to model and move to the basic shape i needed it at. i used the multi cut tool to add devisions into the meh where i needed to add a little bit more detail into the form. i extruded the legs and arms all from the cube and kept on pressing 3 to see what it would look like smoothed as i went. I mainly focused on one side of the body because i went and duplicated it as an instance so that when i change one side of the mesh it changes the other at the same time. this is a great time saver however it does make this harsh line down the middle which is easily fixed once i put more detail into it. now i have the basic shape of the body i can start working on the head. I have done some research into the best ways to do hair and stuff so i think i know how to progress from the head modelling but i might move onto Freya and sculpt her main body so i have a good start to them both
problems i had while sculpting this: the feet/hooves, they were quite difficult because in he wire frame the form is very confusing so i think i might go in and take some edges and vertices out just to make it easier to sculpt and theres a lot at the moment and i don’t want to make it higher poly then it has to be. also the hips and bum became a challenge because i didnt draw Maximus naked to use on the references ive had to go back to my drawing and strip him of his clothes just to get the body right.
0 notes
Photo


my designs next to each other... i drew the boar with its mouth closed as i think that would be easier to model in the tpose position. Now that i have my designs i need to start modelling but i think im going to watch some youtube videos first especially to do with the costumes and see how n cloth works. i have already practiced with baymax sculpting the body and then the face, the thing im sort of worried about is the hair so im going to watch tutorials on that too. i have a feeling that not using the hair mechanic might be the easiest way because it means i dont have to learn a whole new mechanic.
1 note
·
View note
Photo


Changing the design of the boar a little bit to look more like a pig and keeping the hairy feature like my last design. i decided to bring some of the animal farm art style into this design, i used the same pose of my model and decided to roughen up the clothes abit more. I also changed the feet to hooves because it felt like it looked much better and a little bit disturbing, trying to link it all the way back to my inital research into the myths and stuff i feel as through i have strayed away from the desterbing and paranormal aspect that is so prevelant around my area so i wanted to add a little but if a desterbing element by making this character not so typically ‘pretty’ at first i was sort of inpired by inosuke from demon slayer as he wears a boar mask over his head,

i kinda like the way the ive made it so it looks sort of like a mask because it still shows and links to the way Maximus would dress up like different animals to try and win freya over.
0 notes
Photo

Freya
This is the complete tpose for my nymph character. Also name reveal ✌🏻 ive called her fraya because it felt like a nymphy fairy type name. I also went with the green colour dress to have her very foresty. i didnt draw the shawl on the side view because it would be very difficult without seeing the arms but i will once again tackle that as i go. i am very happy with this character and i beleive she is very organic and one with nature. i will use this tpose to sculpt my character in maya. good luck to me
0 notes
Photo


Maximus After his Transformation
as i mentioned in my last post is that i have decided to design and model my male character maximus after his transformation that zeus does to him to make him a boar/ human hybrid. Boars were sent from gods to mortals as punishments. this is why i chose a boar for this. maximus had gotten angry at zeus for rejecting to turn him into a beautiful stag so that the woman he loved would finally love him back and take care of him. zeus didn't like his attitude so he cursed him to be a boar hybrid so no one would like him anymore.
i used my model man to get the pose i wanted because the confident pose i had him in as a human didnt quite capture how he would be after his transformation. i added more fur after the first design to make him look more beastly, but i also kept the clothing on him, i might make the clothes all ripped and dirty for more of a cohesive look. im trying not to think about how i would scuplt this but itll be fine, ill tackle it as it comes.
0 notes