
Statistics
We looked inside some of the posts by makemeupblog and here's what we found interesting.
Average Info
Notes Per Post
2K
Likes Per Post
863
Reblog Per Post
1K
Reply Per Post
0
Time Between Posts
4 days
Number of Posts By Type
Text
8
Photo
9
Last Seen Tumblr Blogs


Fun Fact
Tumblr was attacked by a cross-site scripting worm deployed by the Internet troll group GNAA on Dec 3, 2012.
Text
Heat Protection
Photo by Makemeupblog (Twitter)
I have noticed such a different in the way my hair feels and looks after using this product. I spray it onto damp hair and then blow dry it. After I spray a bit more and leave it in for a few minutes before I use a flat iron. If you use any form of heat protection on your hair you will notice a sort of steam coming off of the styling tool but that is the product that might have water as part of the ingredients (just check the ingredients on the back) so don't worry! It's not your hair burning, it's the water in the product! If you do notice that your hair is becoming worse then stop using the product. I also included a picture of the hairspray in the TRESemmé line. I love this hairspray, especially in the winter months when your hair feels dry and gets a staticky. It also protects your hair against UVA/UVB rays that can cause sun damage to both hair and scalp.
0 notes
Text
Mineral Makeup
Today I wanted to talk about mineral makeup. Minerals are generally mined in the Earth's crust which means they are naturally occurring. The minerals are crushed into micro-particles and are added to things like creams, powders, and liquids. The main minerals used in makeup are zinc oxide, titanium dioxide, iron oxide, and mica.

Photo by Lorena Cupcake via Flickr
Mixing the mineral foundations together is a good idea if you fall between two shades. Sheer Cover also has mineral eyeshadow, as do other brands. Just so you know...I am not being paid to promote this product. The reason I thought I should mention this brand to you is because I personally have used it and I think the convenience is great for people who lead busy lives and they also have great options for every skin type.
Mineral makeup is not harsh on your skin and wont clog your pores. If you have acne prone skin then I recommend trying a mineral product because it shouldn't aggravate your skin or cause an flare-ups. The zinc oxide has an anti-inflammatory property and is good for sensitive skin that has recently been through cosmetic procedures or skin peels. Even though products containing minerals say that they have an SPF for sun protection you should still use a sunscreen before you apply it.
0 notes
Text
Pretty Nails and Flip Flops
Warm weather is finally here and with that comes bare feet and flip flops! So I've been blogging about makeup and skin care for your face but we need to discuss heels. No not high heels (which you can never have too many of) the heels of your feet. Face it...we all get calloused heels and they never look good when you want to wear flip flops. Many people use a pumice stone, which is totally fine, but it doesn't make your skin as smooth as you want it.

Photo by Ambuj Saxena via Flickr
There are a few ways to use a pumice stone and one is to soak your feet in warm water for a few minutes and use lotion with the pumice stone. The other is a great way that I have tried with amazing results and all you need is: 2 cups warm water, 1/2 cup of distilled white vinegar, 1/2 cup of Listerine (or any similar store brand).

Photo by Vox Efx via Flickr
Let your feet soak for about 15-25 minutes or longer for more calloused heels. You can add more of these ingredients depending on how large the bowl or bucket you are using is.

Photo by David Guo's Master via Flickr
After soaking your feet for around half an hour you should use the pumice stone on your heels to remove the calloused skin.
Since you're already taking care of your heels you can take care of your nails while you're at it! When you paint your nails they sometimes get stained or yellowed over time. Time to search in your place again for some DIY ingredients. This time you will need baking soda and hydrogen peroxide. Mix the two together until they form a paste.

Photo by adinaplus via Flickr
Rub the paste on your toe/hand nails and wait for one to two minutes. Wash the paste off and use your favorite hand lotion. Be careful with hydrogen peroxide because it will stain/bleach your skin so just make sure to wash your skin with soap and water. If you have an allergy to hydrogen peroxide you can use lemons to whiten your nails! Just cut up the lemons and squeeze the juice into a bowl of warm water and let your nails soak for a few minutes. Wash your hands and apply your favorite lotion. Let me know if you try any of these DIY beauty tips, if they worked, or if you use a different one that works just as good! :)
0 notes
Photo
Be creative with these awesome hair colors!
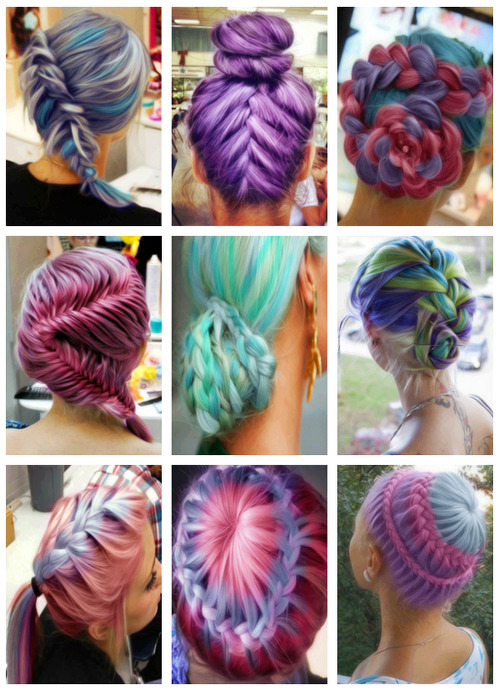
140 notes
·
View notes
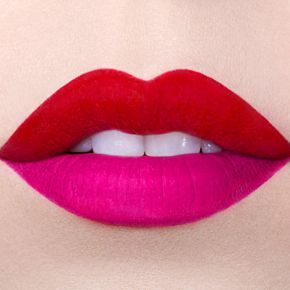
Photo
beautiful hair!

217 notes
·
View notes
Text
DIY Hair Treatments
Spring is finally here and that means sunny days and flyaways. Warm weather always makes your hair frizzy and flat (or maybe it's just mine :P). I have found a few DIY hair care treatments that are super easy to make (hint: most of them use a single ingredient!). Check your kitchen for few items before we get started:
avocado
honey or olive oil
eggs
sour cream or plain yogurt

Photo by bgottsab via Flickr
Eggs can be used for all hair types! This may sound weird but eggs are actually a great conditioner for your hair. You can use the entire egg as a conditioner or separate it. When you separate the egg yolk and the egg white they tend to do different things for your hair. The yolk is great for moisturizing dry, brittle hair whereas the egg white is good for treating oily hair. Whichever way you decide to use an egg just be sure to leave it in for about twenty minutes and rinse it with cold water or else the egg will start to cook (gross!). Once all of the egg is washed out you will need to shampoo your hair. When using the whole egg you should do this treatment once a month and the egg white treatment can be done every two weeks.

Photo by Muffet via Flickr
For frizzy hair try mashing up an avocado, apply it to damp hair, let it sit for fifteen to twenty minutes, and shampoo it out. You can add more moisturizers to this by combining the avocado with a tablespoon of sour cream, mayo, plain yogurt, or egg yolks (sounds like a hair dip lol). This hair treatment can be used every two weeks.

Photo by Thien Gretchen via Flickr
Since Spring is here I'm sure many of you will be spending time outside and hopefully will be using sunscreen on your skin. Did you also know that your hair needs protection from the Sun? Honey can protect the hair by locking in moisture. Use about half a cup, massage the honey onto damp hair, let it sit for twenty minutes, and rinse with warm water. To help loosen the honey, and make it easier to get out of your hair, add about a tablespoon of olive oil to the mixture. If your hair is extremely sun-damaged try adding one to two tablespoons of avocado or egg yolk because it will repair the keratin protein bonds which UV rays cling to. Use this treatment once a month.
0 notes
Photo
I want to do my hair like this<3

70 notes
·
View notes
Text
Cleaning Your Makeup Brushes
Cleaning your makeup brushes is very important. Most people think that you don't have to clean your brushes or just buy new ones. Don't waste any money buying new brushes...just clean them! Makeup can build up in the bristles and harbor bacteria, dirt, and oil that can cause breakouts.

Cleaning your brushes doesn't have to cost a fortune. There are so many different ways to clean them and many of these items might already be in your house or at your local grocery/drug store. You can use an antibacterial soapand run your brushes under warm water...not cold or hot water. Lather the brush with soap and swirl it around in a small dish or in the palm of your hand (make sure your hands are clean!). Gently squeeze the water out of the brush and lay it on a dry towel to dry. Brushes take a few hours to dry so make sure you don't need to use them right away.
Another way to wash brushes is by using baby shampoo. I personally use this method and it cleans the brushes really well and is so gentle on the natural bristles...plus it makes them smell nice! Wet your brushes and squeeze a bit of the shampoo onto your palm. Lather the brush by swirling it around in the shampoo and rinse it off until the water runs clear.
If you have makeup embedded into your brushes you can use olive or almond oil. Take a small amount of oil and swirl your dry brush in it but be careful not to soak the brush in oil...that is not what you want. Swirl the brush with the oil on a clean paper towel to get rid of the makeup and oil. After, clean the brush with any of the above methods and let it dry.

Photo by NanshyOfficial via Flickr
1 note
·
View note

Text
All Day Eyeshadow
As I posted earlier, make sure you check out and do some research on a great foundation primer BUT don't forget about an eyeshadow primer. Eyeshadow primer will keep your shadow from clumping, fading, and it will help brighten or deepen the color you use. My FAVORITE eyeshadow primer is the Urban Decay Shadow Primer Potion.

Photo by Debs (ò‿ó)♪ via Flickr
This primer will make your shadow last throughout the day without worrying about it. That's one less stressful thing to worry about! This product is a creamy beige color and does not feel tacky or gross on your eye lid. Even when the Primer Potion dries it will not flake off or feel brittle. My opinion would be to go for the squeezable tube of Primer Potion because I bought the one with the eye wand (featured above) and something happened where the bottom of it cracked and it started to dry up. Also, I hate when products have an applicator stick because you end up throwing the whole thing out when they leave so much of the product inside the container. If you can find a product that is in a squeezable tube I would go for that because then you can just cut the end of it to get the rest of the product out.
When researching eyeshadow primers don't get intimated by the prices. There are a ton of cheaper primers that work just as good as any of the ones you find in Sephora. Try Elf's eyeshadow primer and even NYX Jumbo Eye Pencil in Milk (which is awesome too and really brightens up neon colors and highlights your brow bone).

Photo by Jerine via Flickr
0 notes
Text
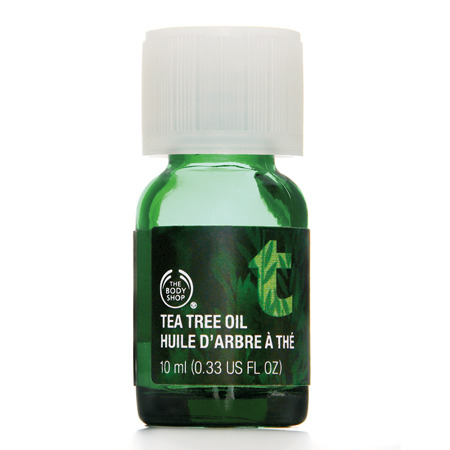
Night Time Skin Treatments
Have you ever watched a movie or show where these girls are having a sleepover and there was always that one girl with the green face mask?! Well we are going to talk about that green face mask because I found one that will not dry up and make you feel like the evil stepmother from A Cinderella Story (please tell me you get this reference. Hint: Botox).

Photo By John Phelan: via Wikimedia Commons
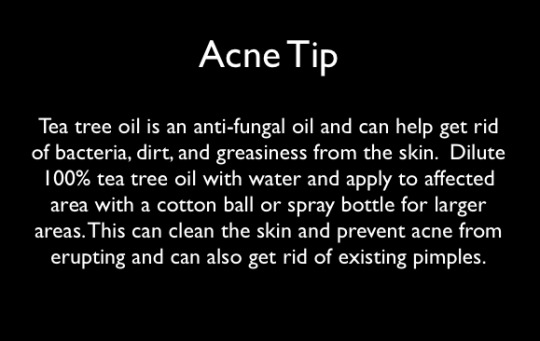
I'm going to be talking about their Tea Tree Face Mask today so check it out here. It is one of the top rated masks in their skin care line. This product is said to remove impurities, absorb excess oil, and soothe your skin.

Photo by MakeMeUpBlog
The directions say to "smooth a thin layer" onto your face and neck. I personally do not put it on my neck because I think that it's unnecessary and sort of weird to be honest. They say to wash the mask off after 5 to 10 minutes but I leave it on over night. FIRST: test the product before you leave it on over night as it may affect your skin differently when left on longer than directed. The Tea Tree mask can be used on blemished skin so if you have a blemish then dab a little bit on it and leave it on over night.

Photo by MakeMeUpBlog
Don't get me wrong...this looks gross but it smells really nice and the benefits aren't bad either. The Tea Tree products at The Body Shop will not dry out your skin like benzoyl peroxide and it shouldn't cause any redness or irritation. It also smooths your skin, which is a plus since every acne treatment out there is trying to turn us into ash. If you have oily skin I recommend trying this product or try your local grocery store to see if they have aromatherapy oils because chances are they have pure tea tree oil that you can dab on your skin when you feel a blemish coming. The tea tree oil is a clear liquid that you can put on before your moisturize and also before you put on your makeup.
You can find tea tree oil at Walgreens, CVS, Whole Foods, Wegmans and Mrs Greens but I'm sure there are more. If you happen to use this product let me know what you think! Make sure you take into consideration that not everyone's daily skin routine will work for you so just take your time in figuring it out. Let me know if you have any questions!
0 notes
Text
The Dreaded Smokey Eye
Okay class, today we will be discussing the "smokey eye." Please take out your brushes and your favorite eye shadow colors.
As a reference I have included a picture of what a colorful smokey eye looks like so just substitute the colors for any color you want to use.

Photos by: Motoune via Flickr
You can create this look using black eyeshadow, which is the common color in a smokey look. You can also use a light or dark grey for the smokey look. If you have black eyeshadow that isn't very dark, or as dark as you want your look to be, try using a white cream based eyeshadow primer because it will make certain colors deeper and others more vibrant.
BE CAREFUL--> eyeshadow primer is not the same as face primer. Face primer has a more water based consistency which doesn't work for eyeshadow because you want it to stay intact for hours. Eye shadow primer will dry or stay somewhat tackey if your using glitter based shadows so they don't fall all over your face. So for your smokey eye try with some classy colors , such as black, gold and white.
Apply your eyeshadow primer, such as: Urban Decay Primer Potion, Too Faced Shadow Insurance, NYX HD Eyeshadow Base. Also try NYX Jumbo Eye Pencil in white because it has a creamy consistency and acts as a prime and eyeshadow color enhancer. With the pencil trace under your lower lash line and along your lid and blend it where you want the eyeshadow to go. I personally use Urban Decay Primer Potion and NYX Jumbo White Pencil.
Use your brush to apply gold on the inner corner and middle of your lid (you can apply the gold all over your lid if you don't mind it mixing with your smokey color).
Apply a black shadow to the outer corner and blend towards the middle of your lid.
Using a smaller brush (possibly and angled eyeliner brush) apply black shadow from the outer corner of your lower lashes to the middle or all the way to the inner corner depending on what you prefer. Follow the shape of your eye when defining your smokey look. Blend the black above the gold in the middle of your lid making a sort of "C" shape.
Make sure there are no harsh lines because dark eyeshadow colors will show any imperfections more than lighter colors so blend them well.
Finish off your look with eyeliner on your waterline and brush your lashes with mascara!

Photos by: Motoune via Flickr
Let me know if this helps and feel free to ask any questions if something is unclear (:
1 note
·
View note
Photo

31 notes
·
View notes