
Statistics
We looked inside some of the posts by livthomasba1b and here's what we found interesting.
Average Info
Notes Per Post
0
Likes Per Post
0
Reblog Per Post
0
Reply Per Post
0
Time Between Posts
19 hours
Number of Posts By Type
Video
5
Photo
3
Text
8
Link
1
Last Seen Tumblr Blogs


Fun Fact
69% of Tumblr users are millennials.
Video
tumblr
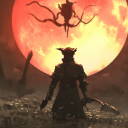
Above is my experimentation reel for my mystery box task. Here I edited together various aspects of the process I undertook to create the final animation.
0 notes
Video
youtube
Above is my final rendered version of my Mystery Box task!
I’m really pleased with how it turned out and feel as though I was able to create a character who put on a performance - with a clear sense of acting and uniqueness.
For some reason the rendered version took away the UV mapping mask I had put on the box to make it appear as though it was a cardboard box, which was a shame, however this model still does the trick. In future I’d like to try be more adventurous with some aspects of the designs like the box in this case.
My robot is also very shiny; which looks nice, however this was not my original intention. This aspect of Maya and materials is something I’d like to learn more about and use better and more effectively in the future - along with the lighting aspects!
0 notes
Photo


While animating I decided to have another look at the materials on my robot and the setting. In the bottom image I’ve added a surrounding wall around the robot, this helps to place the focus on the action and centres the scene nicely.
The materials still aren’t right for me. Since I’ve used the pre set of ‘metallic car’ the bot is TOO shiny and bright. I want to either make this a bit more matte or rusty in some way. Not only is it too shiny on the body, but also on the face - this means that the black eyes are quite hard to see. I either need to brighten the eyes (perhaps making them glow) or lighten and ‘un-shine’ the head more.
For a simplistic design and setting I think the lighting works okay and looks suitable currently - adding in a touch of shadow behind the box and robot, which is quite nice.
0 notes
Video
tumblr
Above is my first spline version of the animation. It’s still quite jerky in places and needs work. Some factors still aren’t quite right, an example of this is how slowly the neck rises when the box is noticed.
I also feel as though I lost some of the weight and bounce in the steps seen at the beginning. This is something I want to look into and try use the graph editor to add in more sharpness and strong movements in certain places.
0 notes
Text
Details!
After getting down all the main key frames of the movement I then moved on to look closer at the small details. This involved aspects like ensuring the feet didn’t go below the ground and that the rotations and positioning was right.

I enjoyed this section of the process as I like things to be just right and spending time to tweak.
I then moved into the graph editor and began the process of adjusting all the right frames and areas to have the right kind of feel and movement, whether this is sharp, slow or heavy.

Using my tablet I was able to split the screens and make adjustments to the graph editor, while able to view the animation at the same time. This helped to make this process much quicker and efficient.

After using and navigating around the graph editor for a while I was starting to understand the different actions, features and axis much easier. Therefore I was able to correct mistakes and other aspects much easier and quicker.
0 notes
Video
tumblr
Unfortunately during the animation of my mystery box I encountered some issues with the sequence. When I set my animation to ‘spline’ the frames messed up a lot and exposed some tweaks that negatively effected my work, an example of this was the floor curve moved half way through - therefore moving my robot in a way that created an annoying jump and blip in the animation. Having spent a while trying to solve this, I decided the best option would have to be to start again!
Above is the new stepped version of my animation. I was really pleased since I was able to replicate the movement from my first attempt well and captured the weight and feeling I wanted. This was also perhaps a ‘blessing in disguise’ since I was able to cut down on the amount I had and make the approach to the box more concise and smoother.
0 notes
Link
Above is the final version of the presentation my group and I put together for our media roles presentation.
I was really pleased with the final outcome and think my group and I worked well together to cover each main aspect of visual development, while incorporating information and examples from professionals in the industry and looked into possible future developments and trends.
We also maintained the same style throughout the presentation which helped to keep the continuity and style consistent - this was a nice aspect to help keep the presentation look good.
I discovered a lot about a visual development artist during this task and now have a better understanding of their role in the industry as well as the importance of the work they must produce - how this work is key for the further development of the production.
0 notes
Text
Visual Development Artist - Conclusion
Having put together all the information my group and I gathered from our research I’ve realised and discovered many aspects about this particular role in the industry that I hadn’t previously known or thought of.
In conclusion I’d suggest that a visual development artist’s role can span over many areas of development and may not just focus on one particular area. This factor can also be due to how each aspect of design ties into one another - for example costume design can be apart of character design since the costumes can reflect aspects of their personality. While prop design can closely relate to environments since props can be a factor that helps to create the environment and bring it to life - adding that extra bit of detail.

A visual development artist’s job will always be needed and relevant since it is the development process of any production and is the a very time and cost efficient way of planning out various aspects, however the way the work will be produced may vary and change over time with future developments in things like technology and how the audience will respond to this.
With the constant development and advancements of factors like technology it’s clear to me that the possibilities for animation and for this role will only improve and become more vast. Details for certain aspects will be seen much earlier in the process, making the pre-production stage more efficient and easier. It also allows for directors to become more flexible and creative due to the opened possibilities and doors - bringing to life worlds, characters and stories in a much more believable way.

Trends can also tie into this where we see things like hyper-realism more often. With the development of technology this can be applied more often and used to suit the audiences likes and demands. This new generation lives and thrives off technology and the internet, therefore the enhancements of these factors in film will only continue to grow and be used more frequently in an effort to remain relevant.
0 notes
Text
Stepped run through.2
Below is another version of my animation in stepped, however this time I’ve added more key frames and poses to bring the character to life and present more acting.
I really focused on presenting that feeling of weight that I wanted to originally show. I think this is clear, especially in the first few steps across the screen where the weight is being transferred from one foot to another with great effort.
vimeo
I really like the reaction and think I captured the shock/fear well. The lead up to this could use improvements since he leans in, then out again and then back in again - which is a bit confusing and use of unnecessary movement.
0 notes
Text
Week 8 Summary 29.4.18
Mystery Box
This week I properly began the animation side of the mystery box task. After laying out the setting and referencing in my own character I created a rough stepped version of the animation. This version presented all the main key frames in the sequence, giving me a chance to experiment and work with the posing and ensuring all the main areas of the movement is captured.
I was pleased with the outcome, however there is only some contact and passing poses in the sequence at the moment and the frames are all equally spread apart. This means the movement is very generic and basic at the movement, therefore the next stage of the task is to increase the amount of characterisation and really work on presenting the illusion of weight in my character - particularly in the steps he takes.
Media and Institutions
This week I focused a lot on the presentation since I’m presenting it next week. I created some cue cards to help prompt me when I’m practising if I forget what I want to say. These were very useful in the practice stage, however having run through my part a few times I’m finding it easier without the cards since I know what I want to say.
I managed to do a run through with my group and it all seems to flow together nicely and work well!
Showreel
This week I selected all my best work from year 1 to include in my showreel. I then put them in a folder and imported them into the premiere pro file. I then decided I needed to be looking into some music since this can give me a good idea of how the pacing and editing should be done. I found a lot of nice music that have potential and struggled to pick one, however I did make a decision on a piece titled “We Are One - Vexento”. I chose this soundtrack, because the pacing is good and maintains a nice beat throughout. The feeling is very joyful and has a good bounce to it, which I think will work well with my style of animations and work.
Lip Sync
This week I was able to more or less finish the lip sync task. Using myself and other references I created a mouth chart to help with the process of animating. I designed an old man character to suit the sound and tone of the voice from the audio track, who in my opinion fits it quite well. I then created various mouth shapes for my character in Photoshop and using my dope sheet I animated him in after effects.
I’m rather pleased with the outcome so far and think I’ve managed to create the illusion that it is him talking. However I want to add a few more areas of expression through the eyes, eye brows and head movement to enhance the acting. But I don’t want to do too much that it becomes distracting or less believable.
0 notes
Video
tumblr
Above is a quick reference video I did, filming myself mouthing to the audio. This was done as a way to see where and how the eyes could move. While doing this I also found some natural movement in the head as the word ‘never’ is spoken, resulting in a shaking kind of motion, increasing the effect of the word and meaning of it.
This was really quick and easy to do and helped to give me an alternative look at how the acting could be produced in my animation. Something with this particular piece of audio is the controlled nature of the voice, therefore I don’t want to overact and use lots of motions in the head and the eyes presenting a more scatty character. I think for this task it has to be a bit more subtle to be more effective.
0 notes
Text
Stepped run through
Below is my first attempt at the animation stages of the mystery box task. This is just the stepped version and only features certain key frames, like the contact poses. This means the robot does a shuffle more then a walk at the moment, however this is okay since this is just the stage to help set the timings and key positions for my action.
vimeo
So far so good. I think I’ve managed to make it quite obvious what the robot is doing and how he reacts to the box’s contents - with a focus on posing and trying to have some strength and variety in them them.
The actual sequence currently is too long at 17 seconds! This means I’m going to have to cut it down and possibly quicken the pace in places. To do this I may cut out 2 or 3 of the first steps at the beginning.
0 notes
Text
Showreel - Music
BACK IN SUMMER - Nicolai Heidlas This week we began the showreel section of the unit, where I’ll compile my best work from year 1 and edit it together in the form of a short video.
An important aspect to consider is the music. This is something that I think needs to have some thought!
The music should support and compliment the work and the style of it, NOT overpower and distract from the animation. It should also be pleasant to listen to and not too annoying/repetitive if possible, since this can be a turn off and cause viewers to stop watching - EVEN if the quality of the work is good!
Another feature of the music is that it should be royalty free in order to avoid copy right issues.
To begin my search I looked in ‘Bensound’ which has a lot of nice royalty free music - however these can be rather overused and get repetitive. The one I did quite like was: Summer and acoustic breeze.

In an attempt to try and find a wider range of music I looked on YouTube at royalty free music and found a nice playlist of music from the ‘audio library’ from sound cloud.
This offered a wide range of music with all sorts of pacing, sounds and feels to them. Whilst listening I noted down a few that I both liked generally and also thought may fit my style of art/animation.
A few can be heard below:
The first is
“Adventures - A Himitsu” :
youtube
I liked this one and thought it had a nice pace to it - it begins slow and simple (nothing too overpowering). It then kicks in with a nice beat which may work with various editing choices. However it dips again at around 30 seconds; which would be a nice place to insert some lip syncing, but it stays dipped and slow til around the 1 minute mark, which cuts it close for me where I need to be ending the video. Which may possibly limit my options during editing.
“We Are One - Vexento”
youtube
The pacing is a bit quicker in this one, but maintains a nice beat throughout. The feeling is very joyful and has a good bounce to it - which is good if I want to edit in a bouncy and fun way. at around 0:45 the beat kicks in a bit more as the sound gets quite pump..y - this may be too much more the showreel, or may add to the current pacing and allow for more action packed clips.
“BACK IN SUMMER - Nicolai Heidlas”
youtube
This soundtrack has a real chill vibe to it and creates a feeling of ease, but also joy - I think this is particularly due to the inclusion of a ukulele type instrument. The beat is also prominent from the beginning and sets the tone nicely - this may be a nice soundtrack to use if I want to have a light hearted kind of feel. However the beat never really changes throughout meaning the sound is very consistent and samey which could get boring quickly and become tedious.
“Roots - Tobu”
youtube
This one has a nice beat and a light feel to it using softer instruments with some chime like sounds, which are quite uplifting. Around 1 minute it gets quite quick and sets the pace a bit faster - this may not necessarily be an issue, it just depends of the style of animation to fit with it.
After looking at these and a few others I think I’m happy to go with “We Are One - Vexento”. This is mainly because of the sweet and pleasant vibe it has, while maintaining a fun beat throughout, one I think could work with the style of my animations. However this will only be evident when I actually begin editing, then can I see if the music is right and is working with my art.
0 notes
Text
Lip Sync - First Attempt
After creating and finalizing the design of my character I decided to begin the animation process. The first thing was to listen closely to the audio and create a dope sheet to help me when I actually start animating - this is the section when I can attempt to figure out and plan what sounds occur where and then what mouth shapes should be used in order to represent each sound.
Below are my draft dope sheets I created before animation to help with the efficiency and ease of the process.


I then began the animation process and used my dope sheets as a guide, but I also played it a bit by ear and would make adjustments where seemed fit.
Below is my first full attempt at animation just the mouth:
vimeo
I was very pleased with the outcome and think I managed to create a nice flowing piece of animation, that seemed to match the audio. However due to the limited amount of mouths I had created, the process was a bit tricky at times when I was unable to find the right match of shape to sound.
Something else that was noticeable was that the voice slurred his words a lot into each other. The sounds at the ends of the words tended to run into and lead into the next word, meaning there wasn’t a lot of clear cut words and separations.
Animations/characters have to breathe too!
Before he speaks his next sentence/line he takes a breath in, in preparation to talk. This meant that I had to create a few more mouth shapes, including a open resting mouth and one that looks as though he slightly breaths in.
An example of this was seen between the lines “Playing.....the movie” this pause where the mouth shuts looked too abrupt and unnatural, therefore a resting, slightly open mouth here would look better.
0 notes
Photo


Having noted that I had written too much in my first attempt at creating my slides, I decided to cut some things out. Even though I really didn’t want to cut out any of the ‘colour’ sections, it was the only added extra information that I wasn’t initially meant to include - since my actual section is on Costume design.
In the research process section of this task I really enjoyed learning about the importance of and various uses for colour in film and animation. In a desperate attempt to keep all of this info, I cut down on the opening slides (as seen above). However it was still much too long and simply needed to be sadly cut out.
What I had planned to say about the colour slides can be read below:
Colour!
An article from the ‘Concept Art Empire’ describes the job role to include creating the mood, tone and colour palette for the entire film. The colour and tones are extremely important aspects of a film; especially animation. Therefore colour keys can be produced to represent what the colours will look like during a scene - with these a colour script can be created.
This is essentially a glance at the colour keys and tones for the entire film. It gives us a pretty good look at how the colour arcs in a film relate to the story. They also help to keep the look and feel consistent throughout.
Planning the colour and then exploiting its possibilities can create a richer and more emotionally engaging film experience for the viewers. This is one of the main reasons why Pixar use colour scripts for all their films - it allows them to map out the experience from start to finish.
Up Colour script:
Here we see the colour script for Pixar’s Up, its clear how each scene is intended to pan out and look – the colours and tones are easy to understand and gives a good impression of the whole film.
0 notes
Photo


Above is my first draft of my contribution to the group presentation. I really liked the slides and thought I was able to add in a lot of useful information about a visual development artist. However it was pretty clear from the beginning that there was TOO much information and slides.
My work in its current state could be a presentation all on its own. Therefore I’m going to have to cut it down considerably in order to meet the time constraints.
0 notes
Text
Premiere Pro
Today we looked at Premiere Pro and was shown how to navigate around the software and all the important features we may wish to use for the creation of our show reels. Below are some of the features and set up we were shown that are important to remember:
1. Set up the work space
Insert folder + work
Adjust footage size - may all be different = bad quality and loss of continuity. To change the settings to a set size go to:
File -> New -> Sequence
Here select the option below:

Ensure frame rate is 24 or 25
By left clicking the coloured boxes to the left you can change the label colours to help with organisation and ease of work.

This tool bar at the top of the software is where you can change the work space to suit certain aspects like for editing or audio etc:

If the option bar at top is missing, go to:
windows -> work spaces = and find the desired option
2. Add a title first
Title option 1:
File -> new -> legacy title
Effects: drag chosen one onto the film in the timeline

Title option 2:
Graphics at top -> open up preset titles:

To help edit the visuals to the audio you can add in ‘markers’, this places a marker at any point you chose to help make it obvious where certain things happen, like a beat or change in pace.
To do this click ‘M’ on the keyboard.
Select the piece of audio on timeline. Then select the ‘effect controls’ option to the left oft the software - here you can change the audio controls like the sounds = if you have lip sync or other pieces of sound you can lower the volume at certain points.

Similar to software like aftereffects the little clock next to the options are where you set key frames to indicate where the sound will go down and up etc.
Ripple edit tool:

Ripple delete, deletes the section of footage you want and brings the footage back with it.
Export Settings:

0 notes