sewing, baking, cooking, navigating life as a young adult <3
Don't wanna be here? Send us removal request.
Text
Sourdough Raisin Bread

Hey Y’all!
So, here is the post about the sourdough raisin bread. At last!
I started baking raising bread during winter break when I was spending a lot of time at home. It looked like a fairly easy recipe, and my dad’s favorite type of break is cinnamon-swirl raisin bread, so I decided to try it. The recipe I used the first half-dozen times comes from the zonacooks website.
https://zonacooks.com/homemade-cinnamon-swirl-raisin-bread-recipe/
It’s a wonderful recipe, and the bread comes out light and fluffy and very dessert-y. It also includes hand-kneading which is one of my favorite things when the dough is of the right consistency. It’s very satisfying.
Anyway, lately I’ve been on a sourdough kick, and I also couldn’t find any dry active yeast starter, so I decided to use one of my sourdough starters instead.
I put the called-for amounts of all the rest of the ingredients of the dough from the website, and then I added about a half-cup of white-flour sourdough starter that I had fed the previous day.

After kneading, it came together very nicely, as you can see in the above picture.
Since I used sourdough starter rather than commercial yeast, I knew I had to let it rise for much longer than an hour, so I covered the dough with a towel and let it rise on the counter overnight. It helped that it was a warm night.
The next morning, I took off the towel, and the dough was a wonderful springy texture that was very similar to what I usually get from the commercial yeast, but with a few more bubbles.

You can see a few stiff parts on the surface of the dough -- They tend to stick out as the dough grows overnight, and since I cover the dough with a kitchen towel rather than plastic wrap, humidity is not conserved in the bowl. They look a little ugly, but don’t really affect the end result. I like to use a towel rather than plastic wrap when possible to reduce waste. Plus, it feels more rustic and fun :)

The next step is kneading the dough again and adding the raisins in. I used craisins this time, and very much recommend them. Now, you might be worried about using sourdough starter and then kneading the dough after an overnight rise, but it worked out for me just fine!
After kneading in the raisins, I rolled it out into a large circle (the idea is to do a rectangle, but you know, a circle/vague flat shape also works), and covered it in the cinnamon/sugar/oil mixture. As it turns out, in pictures that mixture has a tendency to look a bit bloody. :p

...It looked more red on the camera.
Anyway, I then rolled it into a log, and set it into a bread-pan to rise for another 4.5 hours. I cover it with a towel at this stage too -- more to prevent flies than anything else.
At the end, you give it an egg wash and stick it in the oven at 375 F for a while, until the internal temperature is 200 F. If you don’t have a bread/candy thermometer, bake it until it looks crispy in top, and then for another 10 minutes or so.

This is the same picture as from the top of the post, and also how it looks.
The top is a good bit more crusty than when I make the bread with commercial yeast. In the picture you can see where there are cracks in the surface? That doesn’t usually happen -- its usually more bubbles than cracks.
It tasted really good! It makes better toast than the original recipe I think, and is chewier, but at the same time it’s less fluffy and more structured. All in all, a success.
:)
kisses,
Kissnknits
3 notes
·
View notes
Text
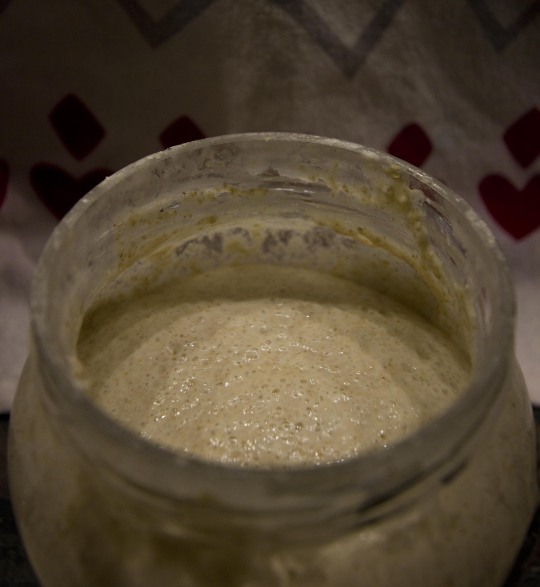
Hi y’all!
I know I said that the new bread experiments would be coming soon, but life caught up with me, and I’ve been a bit delayed. Thanks for being patient!
Anyway, you’ll recognize Kiwi in the above picture -- Kiwi is doing well, and behaving nicely. You can see how many bubbles there are on the surface, and they are about the same all the way through. Lots of bubbles means the sourdough yeast is happy.

The first experiment/recipe I am going to talk about is the sourdough buns recipe. It’s one that I like a lot, and make all the time. I originally got it from butterforall.com (http://www.butterforall.com/traditional-cooking-traditional-living/soft-chewy-sourdough-burger-buns/) who has a lovely, easy to follow recipe with nice follow-along photos.
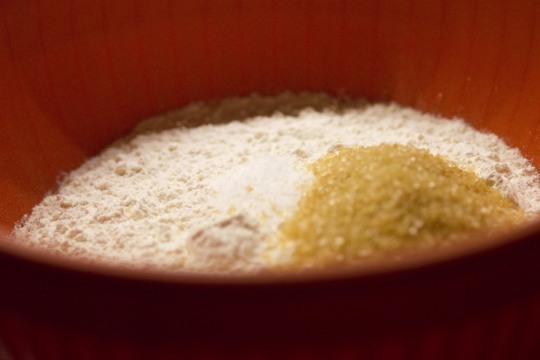
Anyway, the first step would to be combine all the ingredients in a large bowl. In the above photo, all the dry ingredients are all in the bowl, without Kiwi (the starter). I usually mix the ingredients by hand. Meaning -- without a stand mixer, and usually literally using my hands. I don’t have a stand mixer, so that’s out of the questions, but if I don’t feel like getting my hands dirty, I use my mom’s dough-mixing tool. It’s a pretty sweet thing to have if you’re into bread baking or really any kind of baking.
https://www.amazon.com/Blender-Admixer-Dessert-Kitchenware-Stainless/dp/B06ZYLPDYV/ref=sr_1_6?ie=UTF8&qid=1531598734&sr=8-6&keywords=dough+hand+mixer
Using it doesn’t count as kneading the dough, but it’s super useful for mixing dry and wet ingredients together, and it’s super easy to clean by hand.
After I mix and knead all the ingredients, I put a kitchen towel over the bowl, and leave it on the kitchen counter to rise overnight. Personally, I love kneading bread. It’s therapeutic in it’s own way. As you knead (and you gotta do this by hand), you can see the dough gathering together and gaining a shape. By the time you are done kneading, you should be able to (gently!!) poke the dough and have your finger come away clean.
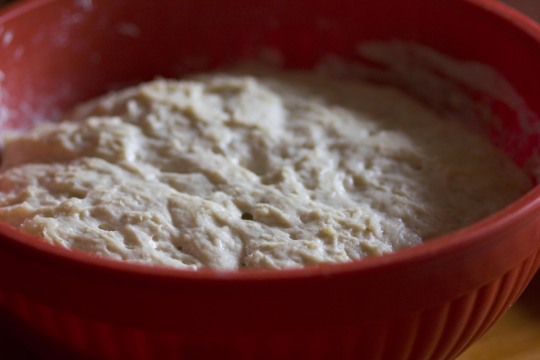
The next morning, you get this lovely dough. You can see the popped bubbles on the surface. At this point, the dough is still pretty sticky -- that’s ok! After we gather it together and knead it again, it wont be sticky anymore.
At this point, it’s nice to have a pastry scraper and some loose flour on the counter. You gather up the dough in your hands, and plop it onto the flour, then kind of shape the dough into a log shape, without squeezing it too much. Then use the pastry scraper to cut the log into about 8 pieces.
Each of these pieces will become a bun -- you gotta knead each piece, and turn it from a sticky bit of dough into a nice, tight bun. butterforall.com has a nice explanation and pictures for this part. At the end, you should get something like this:
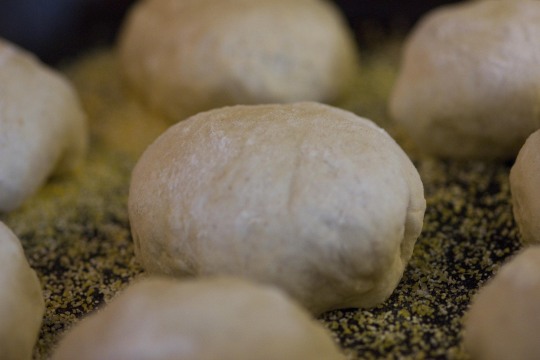
They are pretty small in this picture, but you then let the buns rise for 3-6 hours, depending on how warm your kitchen is, and they expand to about twice their size.
The yellow stuff you can see under the buns is cornmeal. Personally, I love cornmeal for de-sticking bread from whatever container it was baked in. It’s not greasy like butter is, it’s shelf-stable, so it doesn’t take up space in the fridge, and it gives a nice crunch to the bottom of the bread that doesn’t get as browned as the top. Plus, it’s pretty cheap.
After the buns rise again, it’s time to put them into the oven.
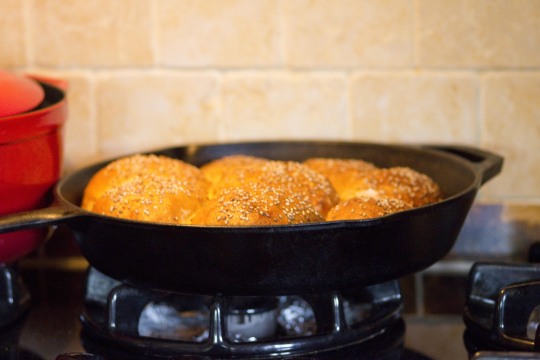
I didn’t get a picture of them in the oven, so here they are, out of the oven.
I tend to bake them in a cast-iron pan. It’s nice because the pan stores the heat of the oven, and gives the buns a more thorough bake all the way through than if you were to use a glass baking dish or a cookie sheet or so on. Of course, you can use any of those baking vessels, along with a dutch oven, an oven-proof pot, or any other vaguely flat, oven-safe surface. Depending on the surface you might want to bake the buns for a longer time.
Using a dutch oven is especially interesting because you can leave the lid on for the first half of the baking time which gives the bread a moister texture on the inside, while still being baked all the way through. You should take the lid off for the second half though to give the buns a nice crisp top.

All in all, this is a nice weekend recipe. I like to start it Friday night, since there isn’t much to do in the first step, and then the buns will be ready for dinner on Saturday. They keep pretty well for home-made bread, especially if you put them in an air-tight container, they’ll keep for about 5 days. They are good for burgers, sandwiches, or with a bit of butter and jam.
Keep on the lookout for my recipe for sourdough raisin cinnamon bread!
kisses,
Kissnknits
0 notes
Text
coming soon...
a whole lot of sourdough:
my strategy for burger buns and how I guessed on using sourdough starter for raisin bread.
0 notes
Photo

Please meet Squash and Kiwi (Kiwi doesn’t have a name-tag yet). They are both sourdough starters, but Squash is entirely white flour, while Kiwi is half white flour, half rye flour. They are about three weeks old, and actually came from the same original starter who didn’t have a name.
I’ve already used Squash several times to make some super tasty bread - two loaves of traditional sourdough, and a whole lot of sourdough burger buns! Kiwi was on time-out because it was a little too liquid-y to use.
I’ll be completely honest -- I don’t do the right thing and weigh out the flour and water I use to feed them, I more or less eyeball it. I don’t have a functional balance in the kitchen, and even if I did, I am not quite dedicated enough to use it. Despite this, both starters are now doing well, and are of the correct consistency.
To explain what sourdough starters are: They are a mix of flour and water that house tiny yeast colonies, which I then use to make bread. Think of the yeast you see in little packages at the grocery store -- usually in yellow? It’s essentially the same thing, but home-grown. You can’t directly see the yeast that grow in the mixture, but you can see the bubbles they produce when they are happy. And happy yeast means good bread!
By using sourdough starters, I cut out the price of commercial yeast, add a complex flavor to my bread, and get to experience some extra pride. :)
I’ll explain in a later post how I got hold of Squash and Kiwi, and how I feed them.
kisses,
kissnknits
1 note
·
View note
Text
First post on my blog
Hey y’all! I guess this is kind of like a statement of purpose for this blog. I am currently a college student, entering my sophomore year. I have been sewing since I was 8 years old, and it’s one of my very favorite hobbies. I also have recently begun cooking and baking, and am really enjoying that as well. I intend for this blog to be a place to put my recipes, DIY instructions, and possibly some thoughts on life. I hope it will be a useful resource for other young folks to learn to navigate adult life along with me.
kisses,
kissnknits
0 notes