reminders of what inspires me and what i am passionate about. references for drawing and animations. and also reblogging art from artists!
Don't wanna be here? Send us removal request.
Photo


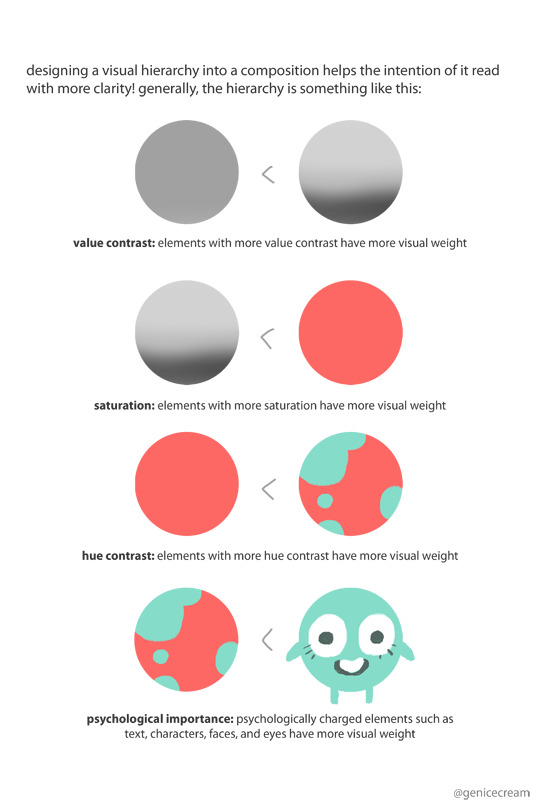
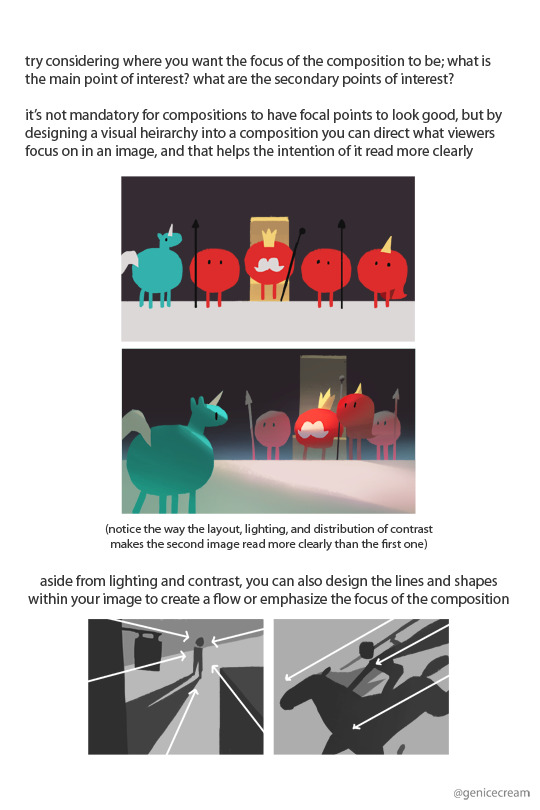
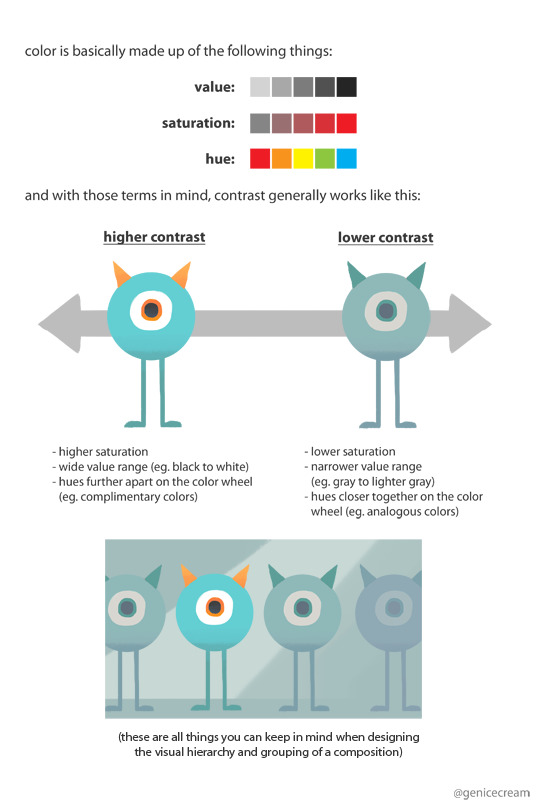
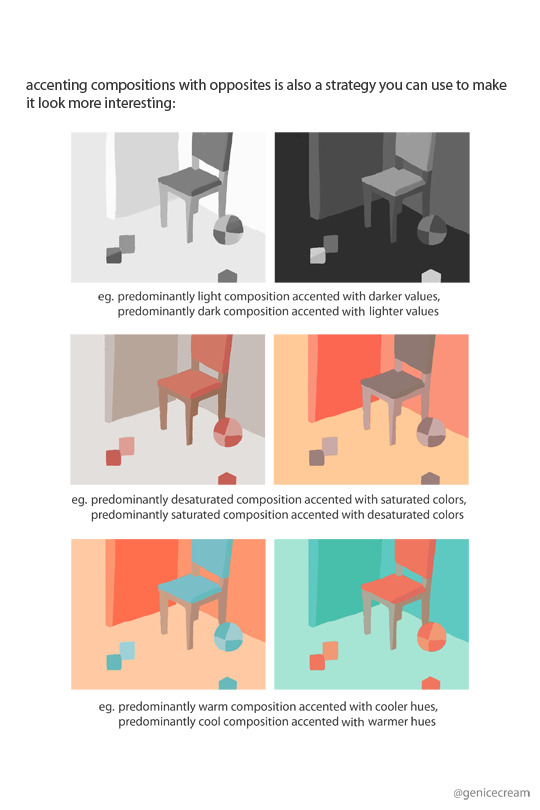


a series of composition tips i’d been sharing on twitter!
and since some people had asked, i’ve put up a pdf version of this on gumroad along with a layered psd of one of the example images too
tips would be really appreciated, but it’s up for free!
54K notes
·
View notes
Photo


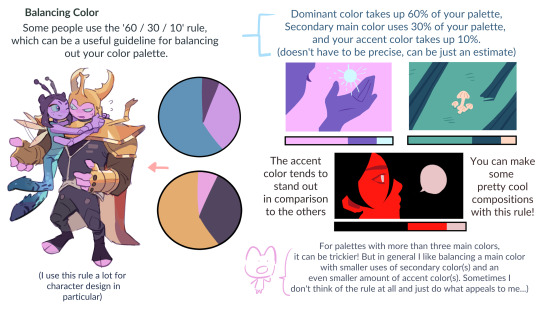
my color tips pdf is now available ! i had a lot of fun with this, i hope you enjoy ^^
BUY HERE or HERE
56K notes
·
View notes
Text

My mom and I are excited about Splatoon 3
187 notes
·
View notes
Photo


have your regrets begun?
been having lots of akira!palace thoughts lately
3K notes
·
View notes
Text
internet printing services reference list
*smooths tablecloth* So. I’ve gotten some questions. I’m just gonna go ahead and be exhaustive here for maximum [hopeful] usefulness. Will probably update over time, so additions are welcome.
Keep reading
3K notes
·
View notes
Photo


Last drawing of 2019!! Link and Kirby at the flower shop 🌸 another #illustration heavily inspired by doggie corgi! 💕 also added a work in progress gif for fun!!!
10K notes
·
View notes
Text

yee! ill put this under a read more bc its long(ish)
Keep reading
664 notes
·
View notes
Photo

A lot of friends in one place (and one bonus friend you haven’t met yet)!
4K notes
·
View notes
Photo


I am an animation major but I am not good at animation. I’m a constant C+ average in all my 2D animation classes and I really wanted to do something to prove to myself that I can make something decent. I know this isn’t perfect, I can spot so many mistakes that I never fixed in the final render, eg body parts jitters, volume inconsistencies, off-model frames, etc. I spent 17 consecutive days working on this and I was close to losing it a couple of times. I really tried my hardest. I had a lot of friends helping me with this project. They guided me with many animation lectures haha (Shout out to @RetromapleArt and @ajondc (Twitter)). I learnt a lot from this project and I am excited on working on more animations in the future to hopefully improve further.
Timings are different because I was always playing around with the timings of some frames. Had to keep adding and removing minor frames in the final line art because I was unable to achieve the desired outcome.
Animated in Flash CS5 - It’s so badly unstable please use Animate CC instead. I wish I could but CS5 was the only available version I have
Lined and Coloured in Photoshop CC 2018 - 107 unique frames 24 FPS
Shout out to @lostin7ym3 and @saz.zki’ve (Instagram) for helping me colour in some of the frames. Without them, I would still be working on this project.
3K notes
·
View notes
Text
Tsuyu vs Toga step by step

*Rising from the dark, he finally decided today was the faithfull day of the step by step*
Chapter 1, the references.
As an animator, one of the first thing i need is basicly references. Why? Well because you can’t learn a dance you’ve never seen, you can’t draw someone without knowing how he looks like, and you can’t animate a motion you don’t know.
So, for Tsuyu, i kinda pictured her having a kind of Muay Thai-y style, with maybe small karate parts, using a lot of kicks, and having a “solid” style. For Toga, i thought that a kind of northern wing chun, maybe mixed with Zui quan, sometimes attacking with scratchs, and having a more “elusive” style would be more fitting of her personality. My main reference was actress “Jeeja” Yanin Vismitananda, and her fights in respectively Chocolate and raging phoenix. Let’s say that the Chocolate fights were more for Tsuyu, and Toga was more into Raging phoenix https://www.youtube.com/watch?v=S2Lkl6HX19o https://www.youtube.com/watch?v=bV-QOCV6LTA https://www.youtube.com/watch?v=_0H0LUZROws
But once everything is said, still, i didn’t really pictured Tsuyu nor Toga to be martial art experts, so i had to see these references, but during the animation part they were only fragments of my motion library, stocked in my mind, to use, and to temper, but never to be copied and pasted.
Chapter 2 [part1], the storyboard
As an animator, my storyboards have a tendancy of being nearly animated, hence, this chapter will be pretty fast, as it is linked to the rough part. Storyboarding is something i enjoy, but on this animation, what i really wanted to do was animating, so rather than actually do a storyboard, and then animating, i directly went to the rough part, and animated the whole motion straight on, cuting time to time, when i needed to have a new information, like space location, expression, etc. The things i kept in mind, storyboard-wise were as it follow:
-The distance between what is filmed and my camera need to REALLY change between each shot, going from medium close shot, then long shot, then close shot, into medium long shot etc. The point is to avoid weird transitions,like as if the camera had a small uncanny jump, this way you get really clear transition and your brain is not lost. -Of course the 180° rule, but i mean, even people who are not into cinema know this rule so… Basicly the goal is to have the same character in the same part of the screen except if you actually see the characters change places within the same shot, and as you may have noticed, tsuyu and toga change their position a lot, but you always see them exchange within a shot, rather than during a cut -having time to time close shot to see and focus on the character expression, on how they feel in order to feel both characters emotion and avoid having something too documentary-like, -Having sometimes big large shot to understand space.
Chapter 2 [part2], The rough
Yeah, now let’s jump to the most creative part animation-wise, the rough animation!

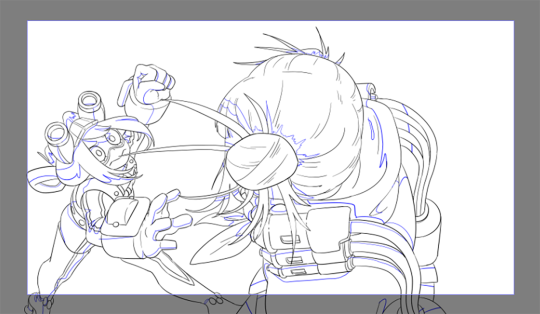
Basicly you can find every informations from the finished product here (plus a small part at the end i thought i would do, but i was not really that much happy with it, and did not wanted to take too muche time on it). As you can see, the drawings are kept to the utmost minimum, the goal being here to focus on the movement rather than the drawings, basicly, and it’s even more true on complicated characters such as BNHA’s, drawing the characters on model takes time, of course thou’ll have to take that time later on, but here, as i want to focus on movement, and only movement, working too much on the character would be useless. At this stage, if, for exemple i wanted to change some movements, and already had a lot of details, i would have to throw a drawing that tooks me a lot of time, and redo an other that would takes the same amount of time, that’s why stickmans are better when working with movement, if one doesn’t work you just throw it, you’ve lost only 10 seconds, and you can do an other one in ten other secondes or less.
Once that part is done, the only thing i may change is the timing, and some small spacings, but as you ‘ll see, the movement stayed mainly the same.
Chapter 3, the tie down.
Okay, now we go into the drawing part.

(as you can see at this point it gets harder and harder to get a gif that tumblr can upload without losing A LOT of quality on pixels and colors) The work process i use during the tie down is kind of peculiar… And it was even more so on this one. Usually when i tie down i do it in two parts, a first one where i just check the volumes, and a second one where i go back and put the characters on model, here, i jumped to the second part without doing the first one, i could go on and give excuses, but the main reason is: i was lazy.
Going really deep into the process could takes a lot of time, so to makes it short, i have a lot of theses things in my animation, i have one at each key
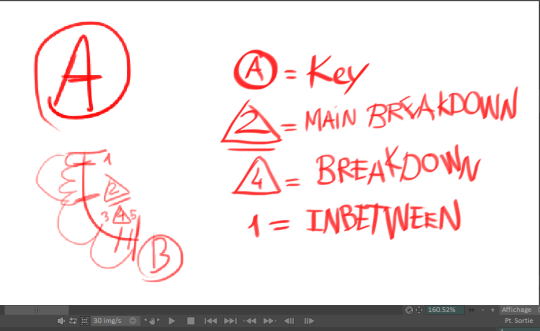
The idea is, i start drawing from the keys, they are the drawings that need to be the bests one, they are the one you’re going to feel the most during the animation, then i draw the breaks downs (if i have multiple breakdown between one key, i’ll mark the most important one, they’ll be the first one to be drawn), and then finally the inbetweens. the idea is, the lower you go, the less you draw, because at this moment, your drawings are starting to take a lot of time, and you still have the cleaning to do, so you want to avoid doing unecessary drawings.
Chapter 4, the cleaning.
Cleaning is hell. There’s nothing else to say. Run from it, or die. As i didn’t have assisting animator or anything i had to draw absolutly every last frame. This part took like 60%, or more of the work…
The process is the same than for the tie down, starting by the keys, finishing with the inbetweens…

(Now, doing gifs for tumblr starts becoming a nightmare.) As you may have noticed, it’s also during that part that i do FXs, i don’t do a lot of roughs for FXs, once i have my characters, and know precisely where they are, doing FXs on top of that is really easy and don’t require a lot of time.
The tool i used to clean is TVPAINT’s default round brush, with a size of 1, i would have liked to have a smaller brush, but tvpaint have issues with them when it comes to coloring.
Well, the cleaning part is pretty much self explanatory, so, onto the next phase!
Chapter 5, Coloring, Shading, lighting.
This part is again, pretty much self explanatory (and now it’s impossible to make a gif for tumblr). Coloring was neither hard, nor long, using TVPAINT, you have a tool called “lazybrush”, basicly it’s a tool that help you do the coloring super fast, you just do a brush stroke with the color you want in the place you want, and the software colorise the place just perfectly, with no hole in the coloring, no small pixel that exceed the lining, just perfect.
Shading was pretty much the same, once you have your character, just putting shadows is kind of refreshing, and does not take much time at all.
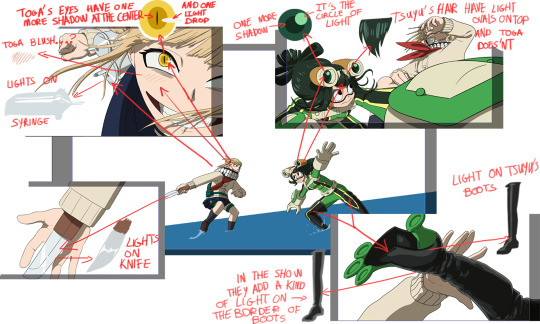
Now, what was actually tricky was all the additional lighting/Shading, small stuff you don’t always notice in the show, i had to look at how and where they put those small details. Also, when i was doing this animation, Toga had only appeared at the end of season 2 so i didn’t had a lot of references except from the manga.
Once i had all of this done, i just had the background left before the compositing.
Chapter 6, a small talk about the backgrounds.
One of the main thing i wanted for this animation was to have simple backgrounds, something i could do in like one day, so i could be focusing on animation. Thankfully, BNHA have lazy backgrounds, and their skies are especially perfect! I don’t even count the number of times the exact same clouds reappear during the three seasons.
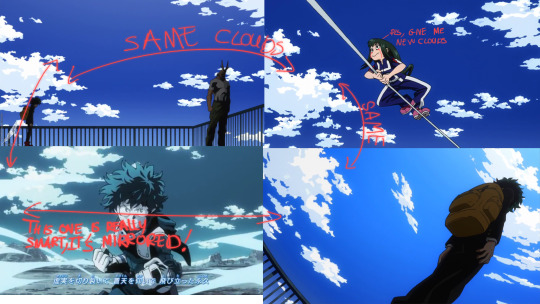
Well, my clouds weren’t that goods though, what i did was more “bubbly”, but hey, i’m no background artist.
Anyway the last thing needed was the compositing!
Chapter 7, the compositing.
To tell you the truth, i don’t have a lot of things to say about the compositing, it’s really technical, and i still feel i messed up a lot on that part. Basicly, i aded the camera movements, smooth gradients on the characters, small rimlights, some blurs here and there. Again i don’t know a lot about compositing so can’t really go on a lot on that part, but anyway, once everything’s done, all you’ve left to do is sleep a lot!
6K notes
·
View notes
Photo
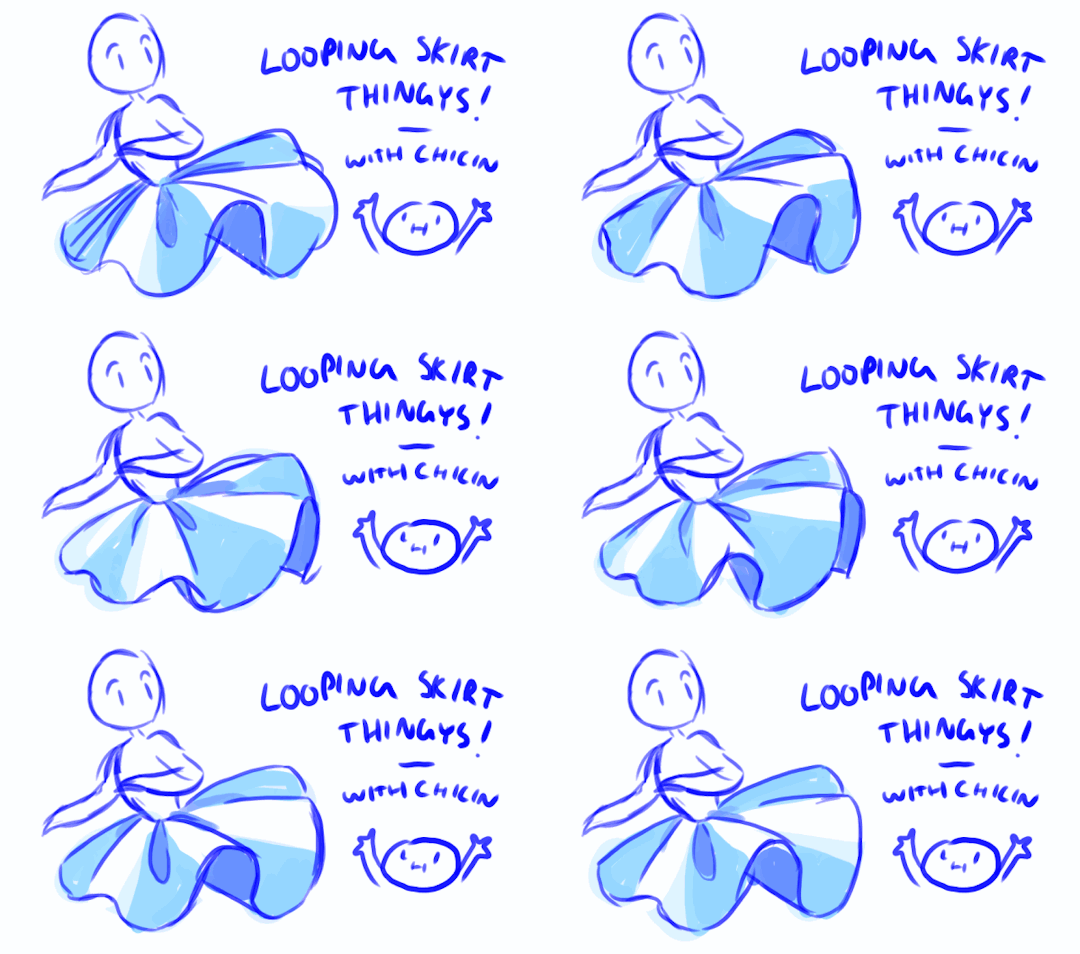
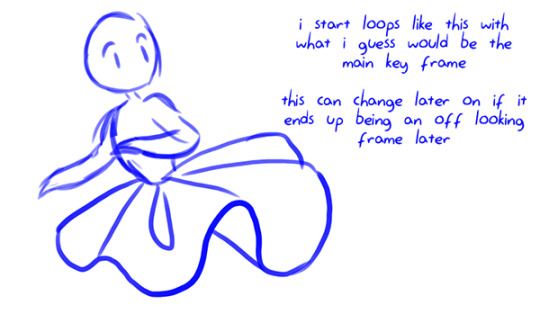
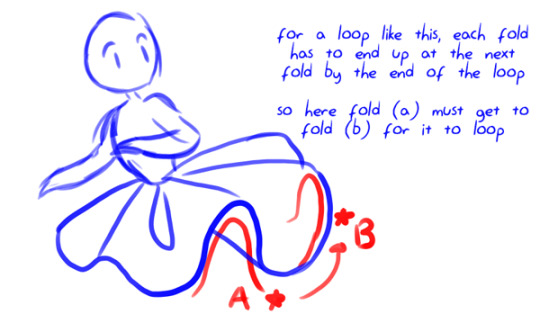

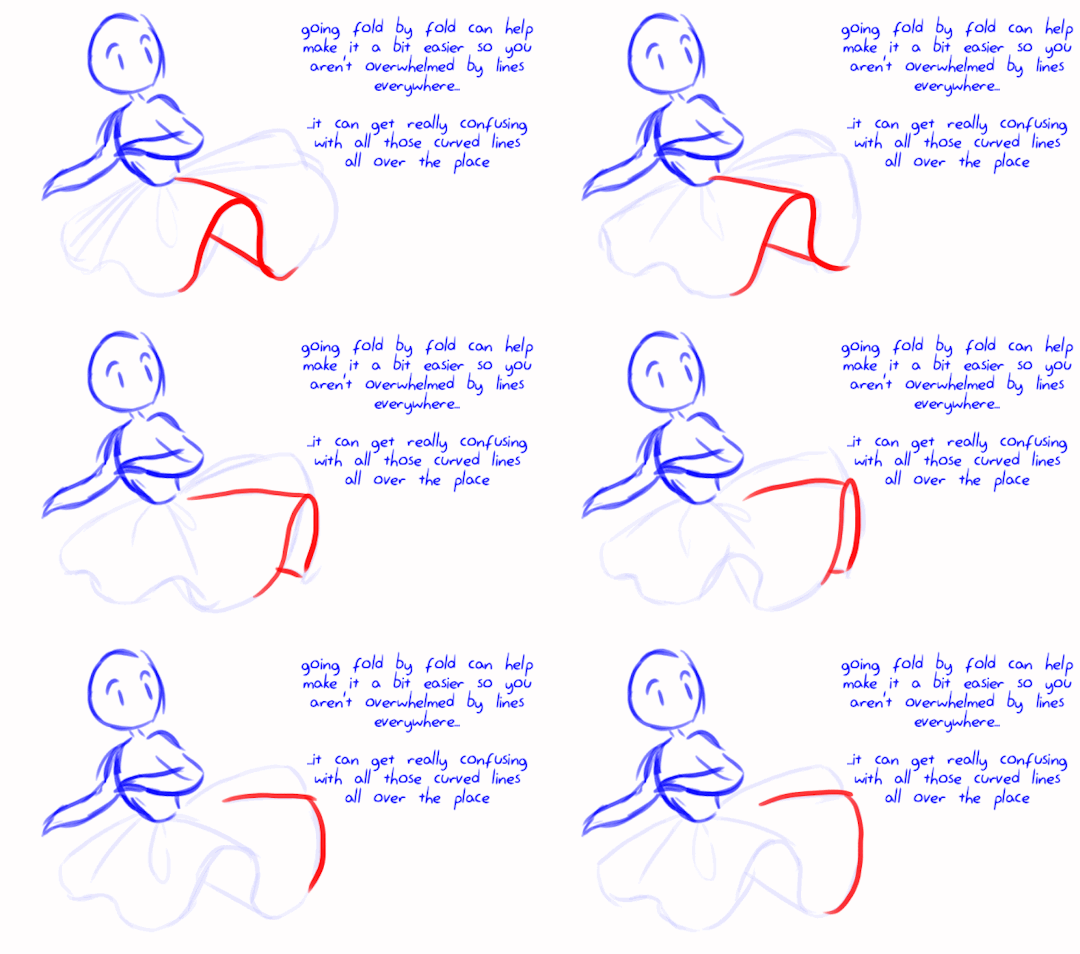
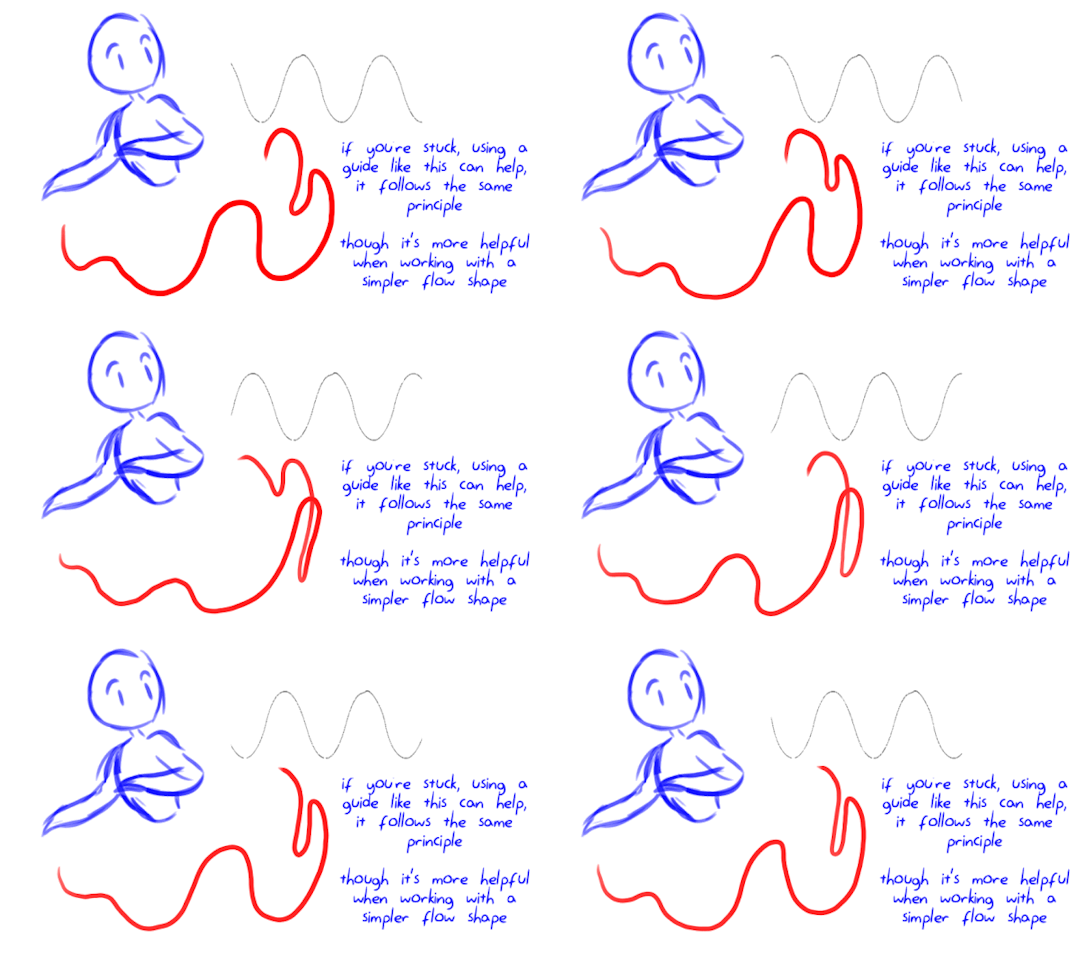
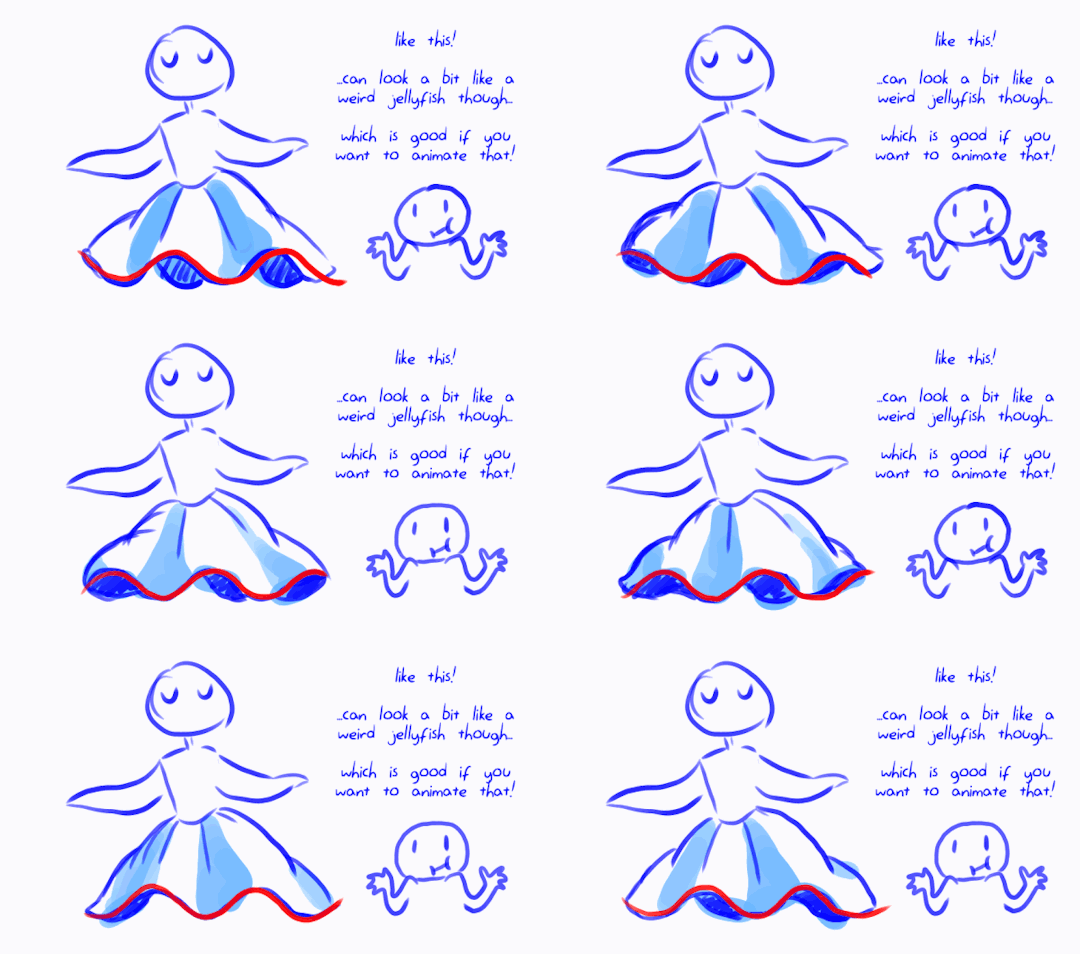
Sort of follow up from the hair tutorial yesterday, mixing in a bit of this quick tutorial too. Hopefully this is easy enough to understand ^^’ one of those things that can change a lot depending on the animation.
And if you’d like a little wave guide, I’ve got one here!
55K notes
·
View notes
Photo
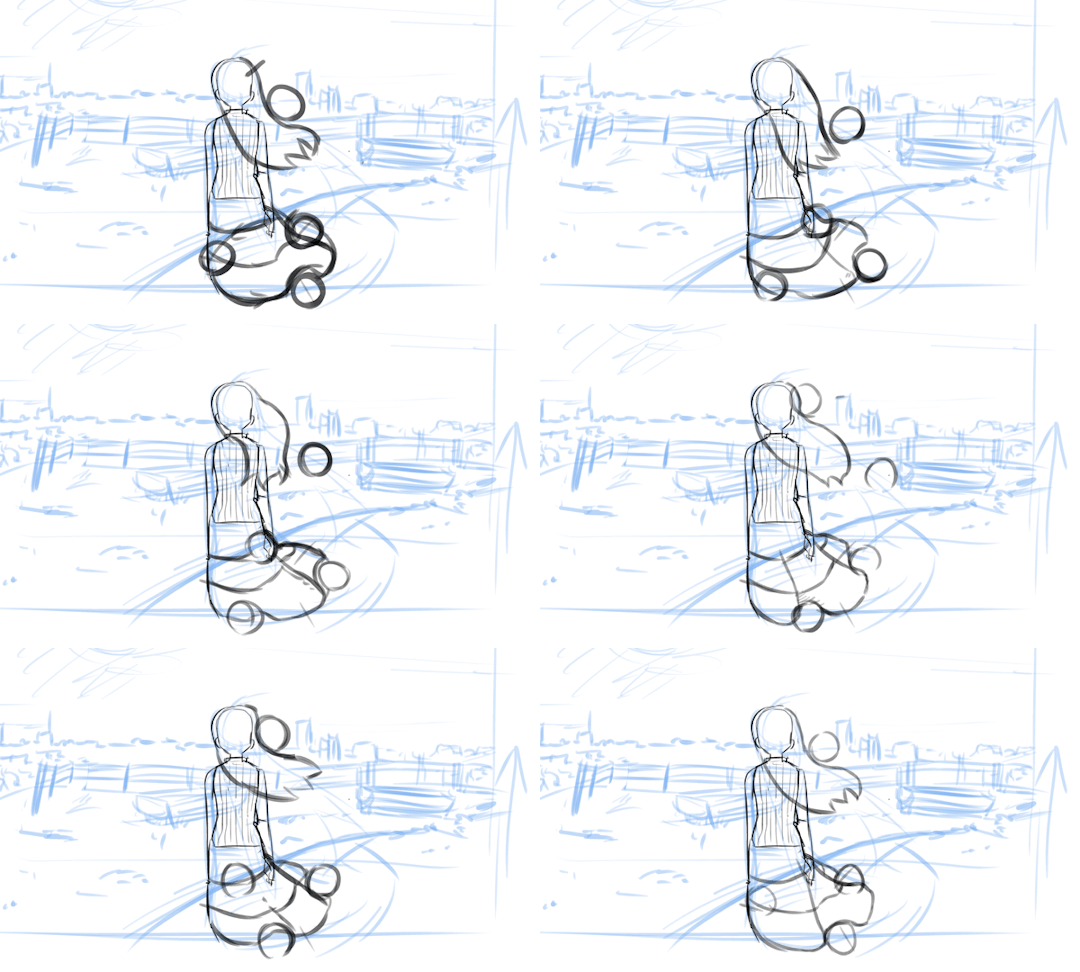
風で髪なびきアニメ下書き 風になびく旗や布、髪はこんな風にして丸にそって動かすといいそうです… on Twitpic
53K notes
·
View notes
Text

I want to share a little animation that James made as an anniversary gift. It’s what we wish we could do in Animal Crossing New Horizons when we play together.💕
54K notes
·
View notes
Text


Making Memories 🐠🐟
2K notes
·
View notes

