
Don't wanna be here? Send us removal request.
Statistics
We looked inside some of the posts by ingued and here's what we found interesting.
Average Info
Notes Per Post
167K
Likes Per Post
116K
Reblog Per Post
51K
Reply Per Post
229
Time Between Posts
5 days
Number of Posts By Type
Text
17
Last Seen Tumblr Blogs


Fun Fact
28.6 is the average number of monthly visits per US mobile user.
Text
post nut clarity except it’s “i realised i’m autistic and everything makes sense now” clarity
9 notes
·
View notes
Text
compilation of yuri stsg someone sedate me pls 😍

Kinda old but I still like them
628 notes
·
View notes


Text

Fandom: 逆転裁判 | Gyakuten Saiban | Ace Attorney, 大江戸戦士: トノサマン | Ōedo Senshi: Tonosaman | The Steel Samurai: Warrior of Neo Olde Tokyo, The Pink Princess: Warrior of Little Olde Tokyo, Samurai Series (Ace Attorney) Rating: Teen And Up Audiences Warnings: No Archive Warnings Apply Relationships: Ayasato Mayoi | Maya Fey/Karuma Mei | Franziska von Karma Characters: Karuma Mei | Franziska von Karma, Ayasato Mayoi | Maya Fey, Himesaman | Pink Princess, Tonosaman | Steel Samurai, Wakasaman | Iron Infant, Original Characters, Original Female Character(s) Additional Tags: Post-Gyakuten Saiban 123 | Phoenix Wright Trilogy, Slow Burn, Pre-Relationship, Metafiction, Fandom Allusions & Cliches & References, Fanfiction, Characters Reading Fanfiction, Emotional Constipation, No Sequel Trilogy Spoilers, AU where the 7YG doesn't happen immediately, nor does AAI, my attempt at countering the 'franmaya are hypercompetent' trope, where they are emotionally mature & wingmanning for nrmt, click here if you want to see them be fucking messes, Post-Case 3-5: Bridge to the Turnabout, We Introduced A Federal Prosecutor To The Concept of Fandom, what happens next will shock you!, excessive amounts of steel samurai lore, (aka shit i just made up)
Summary:
Since the day they met, Maya and Franziska have been nervously hovering near one another, dancing around a connection they just can’t seem to make. An off-kilter sick day spent binge-watching Pink Princess changes all of that, as Franziska finds herself thrust into the strange new world of fandom and fanfiction with Maya as her enthusiastic guide. A metafiction-y love letter of a story about the two of them slowly falling for each other—all they will say, all they will not say, and the catharsis and perils of escapism through fandom.
Written by myself & @pictureswithboxes
[READ ON AO3]
141 notes
·
View notes
Text
How to Make Your Own Binder that Fits Well and Looks Good
A while back I was in need of some new binders and thought hey, I bet I can make one way cheaper than buying it from somewhere (especially cus some of the ones I’ve bought in the past didn’t really fit right). Except when I started looking for a binder patterns online, I was very surprised that I really… couldn’t find many that looked very nice lol. Most of them had really wrinkled necklines, or didn't bind well, or just overall looked weird. A lot of the patterns also required a serger, which I don't have.
So I just said fuck it and made my own pattern! And it ended up being relatively easy! And the binders fit REALLY WELL and are comfortable to wear, even for long periods. The neckline doesn't show under shirts with loose collars, and the bottom hem doesn't gap or stick out. Here's me wearing one:
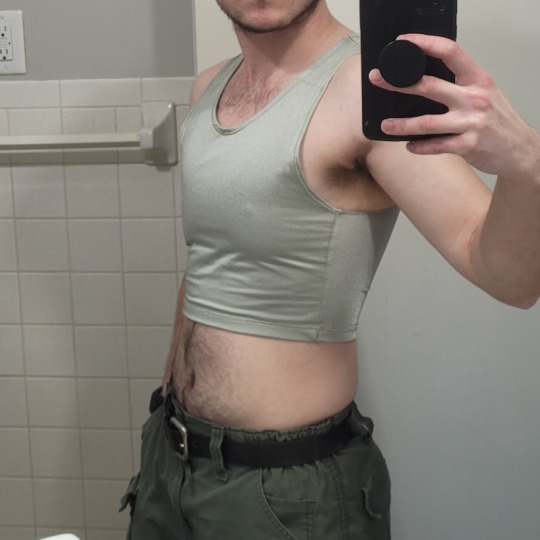
(plus I was able to make myself 5 of them for a total of like ~$50.)
So I figured I could throw together a guide to help out anyone else who wanted to make their own binder but was dissatisfied with the patterns available!
Disclaimer: This tutorial is going to assume a baseline level of sewing experience, and also will require access to a sewing machine. It is not a complicated pattern, but it will most likely require some tweaking and adjustments after you make the first one. Don’t be afraid to make alterations to make it fit better!
This tutorial is for a gc2b-style half-tank binder. It could be altered to be a full-tank binder, but all instructions will be for the half-tank design.
Materials needed:
Stretchy fabric, probably listed as 'athletic fabric' (I use this kind from Joann’s. Most athletic stretch fabrics should work, look for around 80% nylon/20% spandex blends)
Stiff fabric (I use this shirting cotton because I like how lightweight it is. If you want something a little stiffer with more structure, you can use a cotton or cotton/poly blend twill like this. gc2b binders use twill for theirs.)
Lightweight fusible interfacing (I use this kind) (get FUSIBLE not sew-in)
Fusible webbing like Pellon Wonder-Web (this is technically optional but it WILL make your life easier when you’re sewing - just make sure to get the kind with the paper backing!!!)
“But kiwisoap thats 4 whole kinds of materials, surely I don’t need that many!” Ok sure, you can probably get by without the fusible web and interfacing, but consider: they are both dirt cheap (im talking like $1-2/yard), they will make it much easier to sew the final product, and will give you an overall better-looking result. This tutorial is written with the assumption that you’ll use them.
"How much fabric will I need?" Measure the circumference of your chest below your armpits. Add 6 inches just to be safe. This is the yardage of stretch fabric you’ll need, and should give you enough material to make at least 3 binders without much excess left over. You will need around half as much stiff fabric.
Other supplies:
Big Paper (for drawing the pattern)
Flexible measuring tape
Sewing machine
Iron
Pins
Step 1: Measuring
You will need 4 main measurements for this pattern.

A) Measure the circumference of your chest just below your armpits, then divide the number in half. This will be the widest part of the pattern.
B) Measure from the top of your shoulder down to where you want the binder to end. For most folks, this will usually be around the natural waist (narrowest part of the torso), about 3-6 inches above the belly button. This will be the overall height of the pattern.
C) Measure the distance from below your armpit to where you want the binder to end. This will determine where the arm hole starts.
D) Measure the circumference of your waist where you want the binder to end, then divide the number in half.
So for example, after dividing A and D in half, my measurements are 17", 15", 7", and 14.5".
Next:
Subtract one inch from measurement A - This will help provide some compression. You might need to take it in even further depending on how it fits, but one inch is a safe starting point. I take mine in around 1.5 inches.
Subtract half an inch from measurement D. This will help prevent the bottom edge of the binder from gapping. Again, you may need to take it in more or less, depending on your own body.
Add 1.5 inches to measurement B and one inch to measurement C. This is to account for the hems and armhole placement.
This makes my final measurements
A = 16"
B = 16.5"
C = 8"
D = 13.5"
From here on out, we are only going to be working with the measurements that we have added/subtracted to, NOT the ones we initially took.
Step 2: Drawing the Pattern
You will need a piece of paper large enough to accommodate the entire pattern. This may involve taping multiple pieces together, or using a piece of newsprint, etc.
I recommend folding the paper in half to ensure that you get a symmetrical pattern. However, this means you will need to divide measurements A and D in half again, or else you’ll end up with a pattern that’s twice as wide as it should be!
Also note: the pattern is drawn with the seam allowance built in! You don’t need to add any seam allowance.
To draw the pattern:
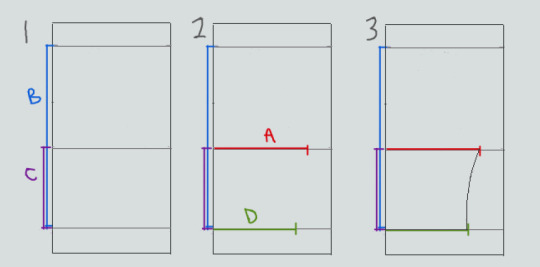

Begin with your folded paper. Measure and mark B and C on the paper, and draw a line extending across the paper. These will be your guidelines.
Measure and mark A and D along the middle and bottom guidelines, respectively. Remember, the paper is folded, so you only use half of the measurement for A and D.
Draw a loose curve connecting the endpoints of A and D. If needed, you can also just draw a straight line between the two.
Mark the opening for the neck hole. Depending on your size, it will measure around 6-8 inches across at the top (remember to divide this in half for the folded paper) and about 5-6.5 inches deep. (mine is 6.5" across and 5.5" deep) Draw a curve to connect the two points. This part will take some tweaking and adjusting to get it to look right lol.
Measure the width of the strap - this should be somewhere between 2.5 - 4 inches wide. They will end up about 1/2” to 3/4” narrower once you sew them. Draw the line at a slight angle, as shown.
Connect the endpoint of the strap to the endpoint of line A with a curve like in the diagram.
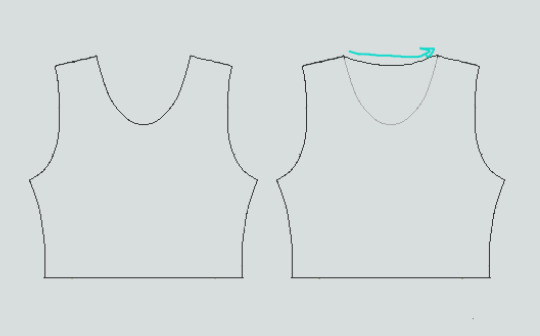
This will be the pattern for the front piece.
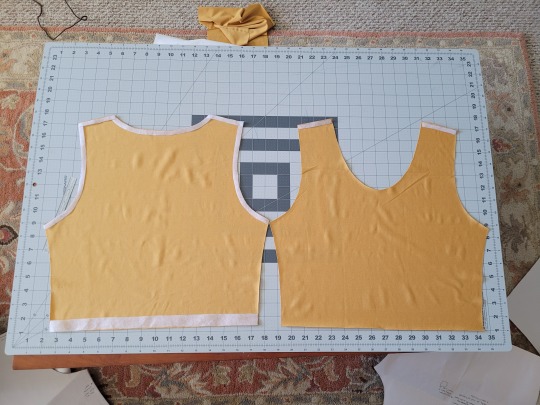
To make the back piece, trace the front pattern, but make a very shallow curve for the neckline instead of a steep one, as shown:
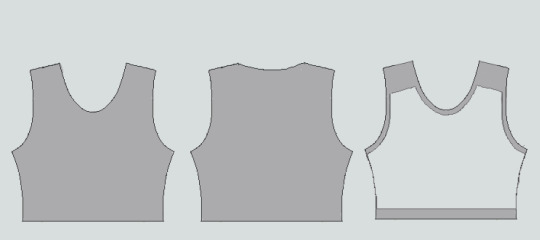
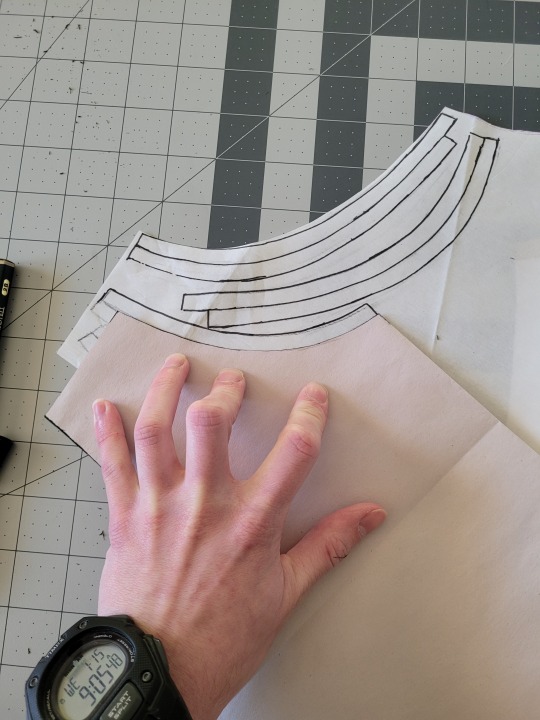
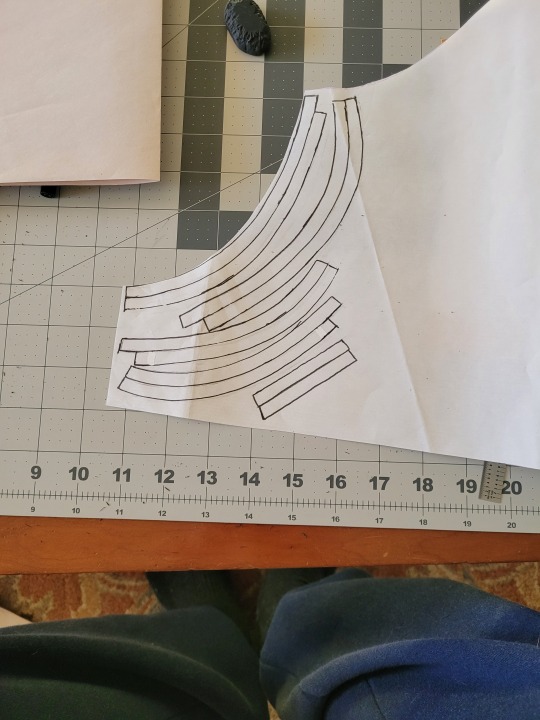
The last piece is the stiff front panel. This is what provides the flattening effect of the binder. To make the pattern, trace the front pattern again. Trim 3/8” in on the sleeves and neckline, and 3/4” to 1” along the bottom. This gives a flatter hem. Then trim the straps shorter by a few inches. This helps the binder lay flatter along the shoulders.
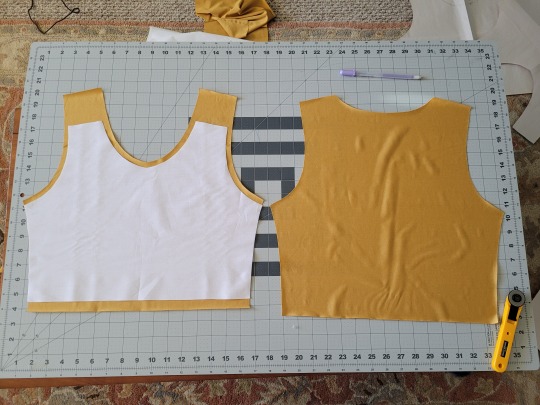
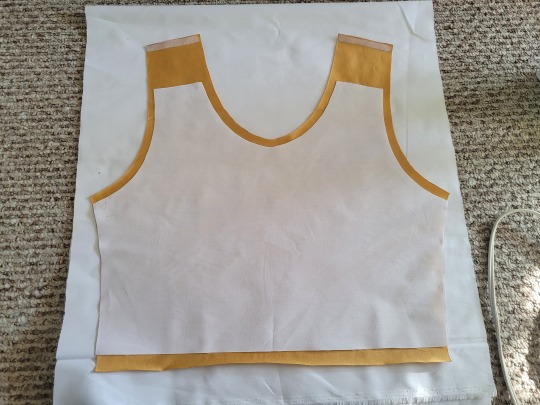
When you're done, you should have 3 pattern pieces that look approximately like this (stiff panel shown overlaid on the stretch fabric to show how it fits together).
NOTE: If you want more compression or just want to make it a bit sturdier, you can add a second panel of stretch fabric to the back piece. Just use the bottom half of the back pattern (from the widest part down to the bottom hem) to cut out another piece of stretch fabric. Attach it to the back piece with a strip of fusible webbing and a zig-zag stitch along the top.
Step 3: Putting It All Together
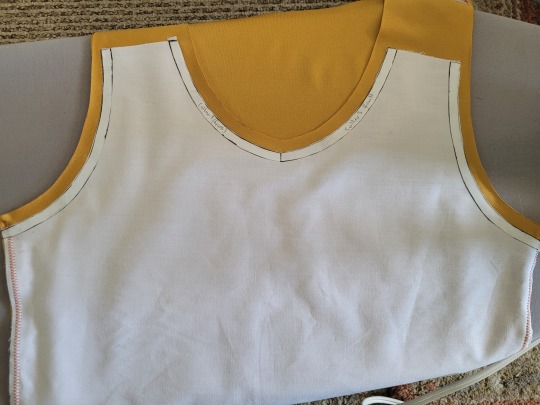
Once you’ve made the patterns and cut out the pieces of fabric, you should have something that looks like this:
The next step is adding interfacing and fusible webbing. Use your pattern to cut out 3/8" strips to fit on the top of the straps for both pieces, and to the neckline, sleeves, and bottom hem of the back piece, as shown:
If you want to add it to the bottom hem of the front piece, it will help keep that hem flat when sewing it down later, but it's not essential.
If you choose to also use fusible webbing (WHICH I RECOMMEND), you will apply it to the stiff front panel similarly to how the interfacing was applied, ~3/8” strips along the neckline, sleeves, and top of the straps. Cut out two strips for the neckline and sleeves, because we'll use those later too.
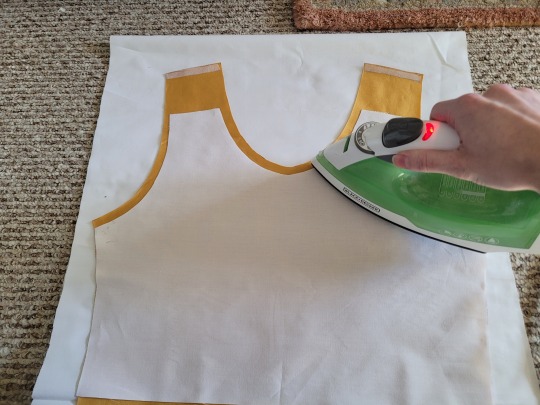
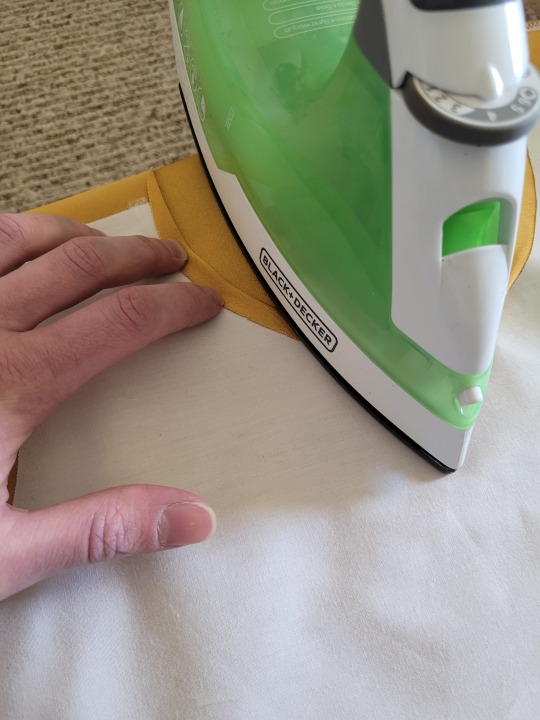
Iron the strips onto the front panel as shown:

Once it's on, just peel off the paper, position it webbing-side down on the stretch fabric, and iron it to fuse the two pieces together so everything stays in place while you sew. THIS MAKES IT WAY EASIER TO SEW.
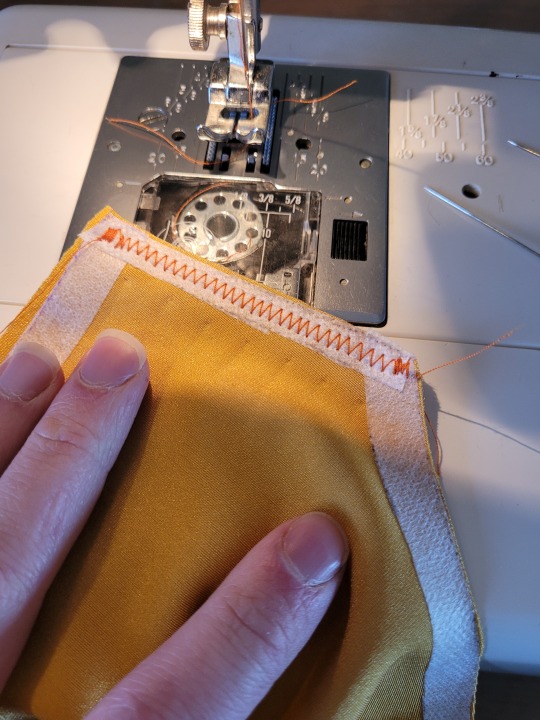
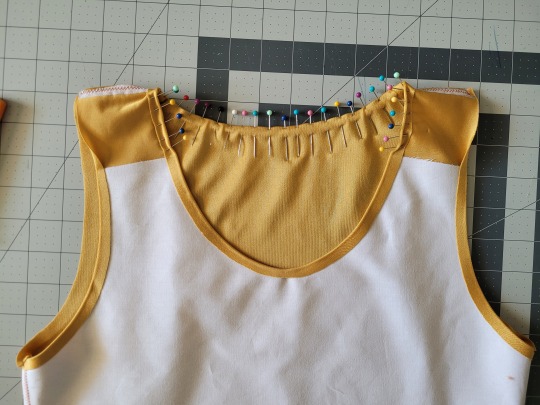
After the stiff front panel is fused to the stretch fabric, you’ll sew the straps of the front and back pieces together, then join the pieces along the sides. Pin the hell out of it to keep everything in place -this type of material is VERY prone to puckering.
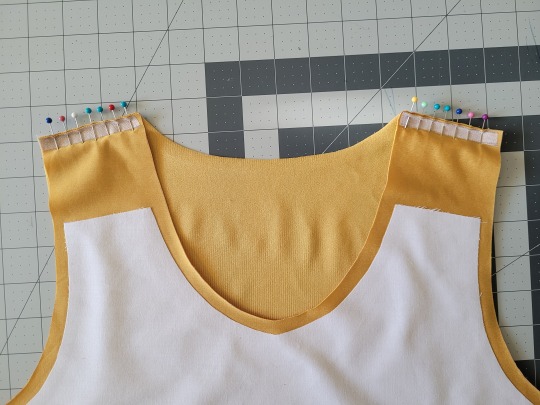
When sewing, USE A ZIGZAG STITCH. A straight stitch will NOT WORK for stretch fabric. I adjust mine to 1.3mm long and 3.5mm wide which has worked well. If your machine doesn’t let you adjust stitch length or width, well. That sucks, I don’t really have any advice.
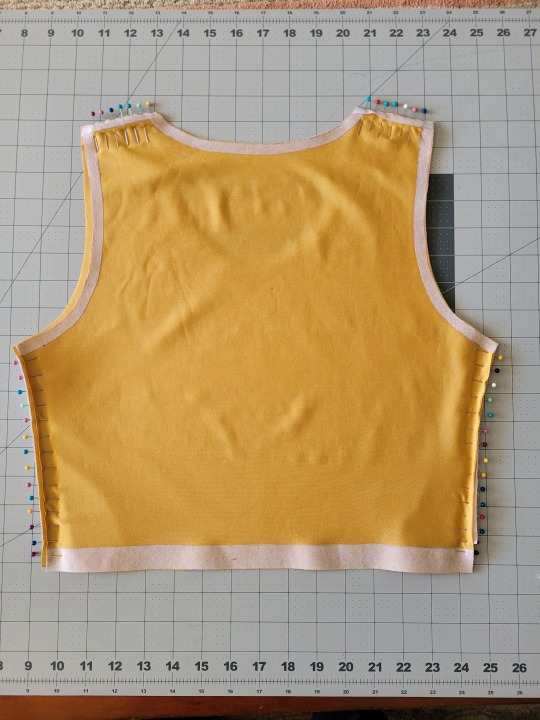
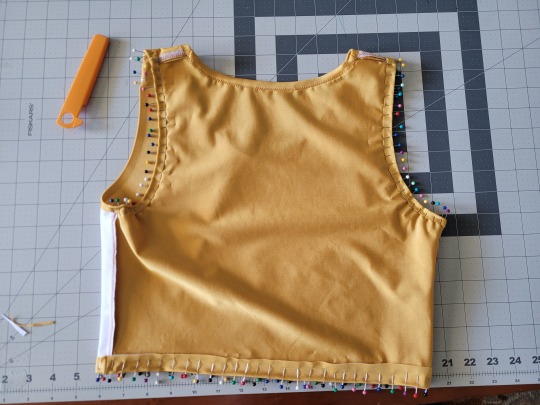
After you sew the front and back pieces together, you can add more fusible webbing to the front panel to help hold the hem down flat and prevent it from puckering while you sew it. Just add the strip, peel the paper off, then fold the hem over and iron it down. This part isn’t really necessary, but it does make the hems look nicer. If nothing else, I would recommend adding it to the neckline.
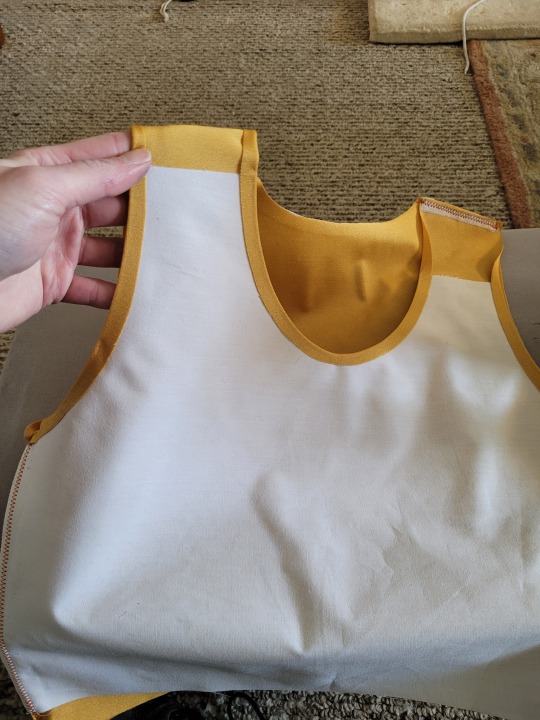
After that, you just fold & pin all the hems and sew them up with a zigzag stitch, then go over the raw edge at the top of the stiff panel (where we cut the straps shorter).
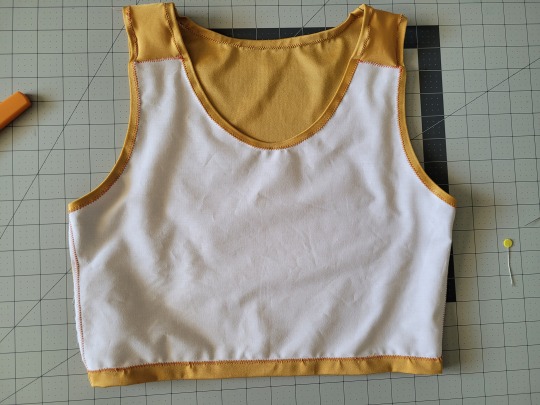
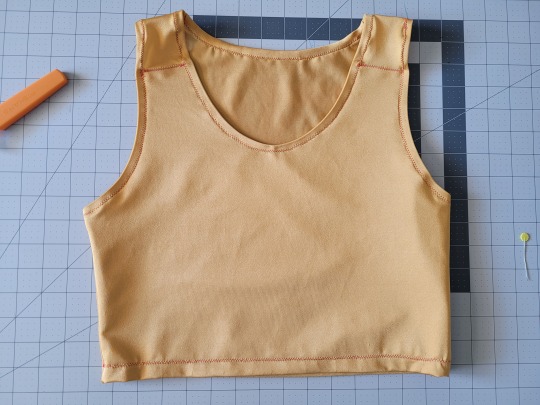
And that’s it! You’re done! And now you can make your own binders whenever you want!
And hey! If you used this tutorial and wanna throw me a dollar or two on ko-fi, I wouldn't complain.
1K notes
·
View notes

Text
When writing emotionally reserved characters:
Show your character's struggles with holding in emotions. Just because your character won't let themself go in public, doesn't mean they don't struggle holding everything in.
Find a motive. Pride and/or consideration for those around them can make emotionally reserved people hold back more than would be considered good for them. There are other reasons too, perhaps the initial cause and the reason now are different, but try to give them a reason.
Show side-effects. Everything you bottled up shows itself in another way, whether it's physical or mental. This can be long- and short-term, depending on the severity of the emotions.
Give them coping mechanisms. Everyone who wishes not to show certain emotions has a trick or two to keep themselves in check. Taking a sip of water, not looking people in the eyes, clenching their fists, breathing just a bit too deeply.
Write subconscious signs that they give off, which close friends or family might pick on. Just because these characters want to keep their emotions to themselves, doesn't mean they don't give off signs. Some manage to keep said signs well hidden from those closest to them, but it's more common for environment to pick up on something at the very least.
7K notes
·
View notes
Text
How To Make Your Writing Less Stiff 6
Part 5
Part 1
Adverbs
Gasp! Oh no. Dare come yet more writing advice burning adverbs at the stake? Vindictively, gleefully, manically dancing in the ashes?
No.
This is not about whether or not you should use them, but their frequency and obvious places to replace them. Most bad adverbs are the common ones that could be replaced by verbs we all know.
“She ran quickly” // “She sprinted”
“He said angrily” // “He snapped” “He chided” “He chastised”
vs.
“He ate voraciously”
“She swayed solemnly”
“She laughed sadly”
Bonus if you can add in some alliteration like ‘swayed solemnly’
If you can come up with an obvious verb to replace your verb + adverb combo, do so. If it would take more words or the closest applicable verb doesn’t hit the same vibe, then leave it. Adverbs should enhance the verb, not be redundant. Verbs shouldn’t be pretentious just to avoid them.
“She smiled happily” — most smiles are happy. Happily is redundant.
“He ran quickly” —a run is, by nature, quick
vs.
“She smiled sourly”
“He ran erratically”
Also!
The adverb need not always be after the verb.
“C accepted gladly” // “C gladly accepted”
But also
“Glad, C accepted”
“A shook their head resolutely” // “Resolute, A shook their head”
“The child skipped excitedly away.” // “Excited, the child skipped away.” // “The child skipped away, excited.”
English is flexible like that.
Which is what I mean with managing your adverb frequency. As most end in the -ly, too many in succession, on top of the repeat syntax of Subject - Verb - Adverb looks boring and dull (and so does beginning every sentence with the subject). It helps with your cadence and flow if you don’t have entire paragraphs at a time all starting with “He [verb]” or “She [verb]” or “They [verb].” We don't speak like this in natural conversation.
But at the end of the day, there are some juicy adverbs that have no equal without busting out the thesaurus for some obscure lexical nugget that no one would understand anyway.
4K notes
·
View notes
Text
Advice for writing relationships
Ship Dynamics
How to create quick chemistry
How to write a polyamorous relationship
How to write a wedding
How to write found family
How to write forbidden love
Introducing partner(s) to family
Honeymoon
Date gone wrong
Fluffy Kiss Scene
Love Language - Showing, not telling
Love Language - Showing you care
Affections without touching
Giving the reader butterflies with your characters
Reasons a couple would divorce on good terms
Reasons for breaking up while still loving each other
Relationship Problems
Relationship Changes
Milestones in a relationship
Platonic activities for friends
Settings for conversations
How to write a love-hate relationship
How to write enemies to lovers
How to write lovers to enemies to lovers
How to write academic rivals to lovers
How to write age difference
Reasons a couple would divorce on good terms
Reasons for having a crush on someone
Ways to sabotage someone else's relationship
Ways a wedding could go wrong
Arranged matrimony for royalty
Signs of a Toxic Relationship
If you like my blog and want to support me, you can buy me a coffee or become a member! And check out my Instagram! 🥰
26K notes
·
View notes
Text
Details That Convey Intimacy

Developing fictional relationships that feel authentic takes more than dialogue and grand gestures. Every detail below can be used to show platonic, familial, agape, or romantic love depending on context.
cooking a meal for someone, bringing them food, or spontaneously sharing a snack
sharing body heat/warming someone with outerwear like jackets and scarves
fanning them with something if overheated
getting a cold/hot drink for them
offering to carry something, whether it's heavy or just a jacket, to lighten someone's load or free up their hands
more below the click!
changing the subject of a group conversation that will be personally discomforting to someone in the group
making sure to include someone in a group conversation, especially if it's a topic they have special knowledge of
waiting for someone to catch up when the rest of the group has walked ahead
remembering preferences/allergies ahead of time when preparing/ordering food
planning trips, whether in a pair or as a group, that provide something positive for every individual to enjoy
procuring personal healthcare items like sunscreen, moisturizer, lip balm, pain relievers, or a snack and keeping them on hand for that friend who frequently needs them
making room for someone in a crowded vehicle or on public transit
making room for someone under an awning or in another limited space to help them avoid bad weather
warning or wordlessly covering for someone with a wardrobe/cosmetic malfunction
remembering a small luxury someone mentioned they enjoy, and getting it for them the next time it's convenient
running an errand for someone to make their day easier ('importance of errand : depth of relationship' ratio should be explored)
escorting someone to safety in a sudden unsettling event
escorting someone who is drunk, sick, infirm, injured, or emotionally compromised
asking if light, noise, or other sensory factors are bothering someone and taking steps to make them more comfortable
getting gag gifts for someone to show you reciprocate their sense of humor or quirky self-expression (not everyone does this, not everyone appreciates it, and some people predominantly express love through humor and gag gifts; works well with some characters more than others)
holding someone's hand or arm as reassurance, especially when they are afraid*
using their body to block someone from wind, rain, or heat
picking up a dropped item, or carrying a train or other dragging garment for someone else
returning a recognizable possession to someone who may have lost it
This is an inexhaustible list as humans have many ways of showing love for each other. If you are writing spec fic with non-human characters, you can play with variations on these by remembering three core values the "lover" has to consider:
physical comfort of others
emotional comfort of others
social reputation of others
I'd add "sensory comfort" though I think it's tied to physical and emotional comfort.
Please do not try and force any of these into the mold of the misogyny-based "Love Language" trend. Human emotions and expressions of love are diverse and endless.
*While hand holding can be construed as romantic, in reality it varies. Some cultures do not see this as romantic, and some individuals only mean it as a sign of support or compassion. Same goes for long embraces and kissing, both can be done platonically and of course naturally between close family members or friends.
---
HEY! Writers' Links
Tip Jar! If you enjoy my blog and advice, support me on Ko-fi!🤗
Follow me on AO3 for fanfiction
Visit my Pinterest & Unsplash for visual inspiration
4K notes
·
View notes
Text
10 World-Building Aspects You Probably Overlooked
When crafting a fictional world, it's easy to focus on the big picture—epic battles, grand landscapes, and memorable characters. However, it’s also important to flesh out your world-building to create a ‘real’ world. Some aspects to consider when world-building are:
1. Local Cuisine
Consider the types of food your characters eat and how it reflects their culture, geography, and economy. Unique dishes can reveal societal values and local ingredients.
2. Currency & Trade
Explore the forms of currency used and the trade systems in place. This can include bartering, precious metals, or unique items as currency, influencing economic interactions.
3. Timekeeping Practices
Different cultures may have their own methods for measuring time, whether it's a unique calendar system, seasons, or celestial events, affecting daily life and traditions.
4. Cultural Taboos
Consider the unspoken rules and taboos that govern behavior in your world. These can drive conflict and character motivations, adding depth to societal interactions.
5. Local Flora and Fauna
Unique plants and animals can shape the environment and influence the culture, whether through medicine, food sources, or as part of local mythology.
6. Rituals and Festivals
Incorporate unique rituals or festivals that celebrate historical events, seasonal changes, or important life milestones, providing insight into cultural values and traditions.
7. Language Nuances
Explore dialects, slang, or even the use of sign language that reflects the culture and social dynamics, enriching dialogue and interactions between characters.
8. Architecture and Housing Styles
The design and materials of buildings can reflect climate, resources, and cultural values. Unique architectural features can tell a story about the society that built them.
9. Social Hierarchies and Classes
Examine how social structures affect character relationships and interactions. Class distinctions can influence everything from daily life to political power.
10. Environmental Impact
Consider how the natural environment shapes societal behaviours, resource usage, and conflicts. Climate and geography can drive migration patterns and societal development.
Looking For More Writing Tips And Tricks?
Looking for writing tips and tricks to better your manuscript? Check out the rest of Quillology with Haya; a blog dedicated to writing and publishing tips for authors!
Instagram Tiktok
6K notes
·
View notes
Text
Soft Gestures for Comfort
Bringing them a blanket when they’re curled up on the couch.
Whispering, "It’s okay, I’m here," when they wake up from a bad dream.
Stroking their hair gently when they’re lying on your lap.
Running a warm bath for them after a tough day.
Holding them close and saying, "I’ve got you," when they’re upset.
Preparing their favorite comfort food when they’re feeling low.
Turning off their alarm and letting them sleep in when they’re exhausted.
Reading their favorite book to them before bed.
Playing their favorite soothing music to help them relax.
Just sitting in silence with them, letting them know your presence is their safe space.
10K notes
·
View notes
Text
Ideas to Show Secret Pining
"Why don't you join me?"
"I'll give you a ride, don't worry."
*does something they don't like* "What? I like it."
*immense staring at every chance they get*
*thinking of their crush while listening to songs*
"You said you liked it so I brought it for you."
*finds ways to spend more time with them*
*friendly bullying intensifies*
"I'm looking forward to seeing you there."
"Are you gonna be there?"
"How about we sneak off, just you and me?"
"Why don't I cook for them? What's their favourite dish again?"
*aggressive google searches about how to propose to your crush*
"I'll join those dance lessons, maybe then she'll notice me."
*hopeless around them*
*failed flirting attempts*
*increased compliments*
"My problem is that I like them a little too much for my sanity."
*gets jealous* "So, are you seeing them or something?"
"Are you okay?" // "Completely okay!" (definitely not okay)
*tries to sabotage their crush's date*
*gets into trouble so they can be scolded by their crush*
"I want you to come with me, please?"
-ashlee
9K notes
·
View notes
Text
Writing tips for long fics that helped me that no one asked for.
1.) Don't actually delete content from your WIP unless it is minor editing - instead cut it and put it in a secondary document. If you're omitting paragraphs of content, dialog, a whole scene you might find a better place for it later and having it readily available can really save time. Sometimes your idea was fantastic, but it just wasn't in the right spot.
2.) Stuck with wording the action? Just write the dialog then revisit it later.
3.) Stuck on the whole scene? Skip it and write the next one.
4.) Write on literally any other color than a white background. It just works. (I use black)
5.) If you have a beta, while they are beta-ing have them read your fic out loud. Yes, I know a lot of betas/writers do not have the luxury of face-timing or have the opportunity to do this due to time constraints etc but reading your fic out loud can catch some very awkward phrasing that otherwise might be missed. If you don't have a beta, you read it out loud to yourself. Throw some passion into your dialog, you might find a better way to word it if it sounds stuffy or weird.
6.) The moment you have an idea, write it down. If you don't have paper or a pen, EMAIL it to yourself or put it in a draft etc etc. I have sent myself dozens of ideas while laying down before sleep that I 10/10 forgot the next morning but had emailed them to myself and got to implement them.
7.) Remember - hits/likes/kudos/comments are not reflective of the quality of your fic or your ability to write. Most people just don't comment - even if they say they do, they don't, even if they preach all day about commenting, they don't, even if they are a very popular blog that passionately reminds people to comment - they don't comment (I know this personally). Even if your fic brought tears to their eyes and it haunted them for weeks and they printed it out and sent it to their friends they just don't comment. You just have to accept it. That being said - comment on the fic you're reading now, just do it, if you're 'shy' and that's why you don't comment the more you comment the better you'll get at it. Just do it.
8.) Remove unrealistic daily word count goals from your routine. I've seen people stress 1500 - 2000 words a day and if they don't reach that they feel like a failure and they get discouraged. This is ridiculous. Write when you can, but remove absurd goals. My average is 500 words a day in combination with a 40 hour a week job and I have written over 200k words from 2022-2023.
9.) There are dozens of ways to do an outline from precise analytical deconstruction that goes scene by scene to the minimalist bullet point list - it doesn't matter which one you use just have some sort of direction. A partial outline is better than no outline.
10.) Write for yourself, not for others. Write the fic you know no one is going to read. Write the fic that sounds ridiculous. You will be so happy you put it out in the world and there will be people who will be glad it exists.
32K notes
·
View notes
Text
12 Red Herrings to Keep Your Readers Distracted
I’ve seen mystery/thriller authors use the same handful of red herrings too many times to count. So here are some (hopefully not as common) red herrings for your writing.
1. The Unreliable Narrator's Bias
Your narrator can play favourites and scheme and twist the way your readers interpret the story. Use this to your advantage! A character portrayed as untrustworthy can really be someone innocent the narrator framed, vice versa.
2. The Loyal Traitor
A character with a history of betrayal or questionable loyalty is an obvious suspect. They did it once, they could do it again, right? Wrong! They’ve actually changed and the real traitor is someone you trusted.
3. The Conflicted Expert
An expert—like a detective, scientist, or historian—analyses a piece of evidence. They’re ultimately wrong, either due to bias, missing data, or pressure to provide quick answers.
4. The Overly Competent Ally
You know that one sidekick or ally who’s somehow always ahead of the curve? They’re just really knowledgeable, your characters know this, but it makes it hard to trust them. Perfection is suspicious! But in this case, they’re actually just perfect.
5. The Misleading Emotional Clue
Maybe one of your characters is seen crying, angry, or suspiciously happy after xyz event. Characters suspect them, but turns out they’re just having a personal issue. (People have lives outside of yours MC smh). Or it could be a cover-up.
6. A Misleading Alibi
At first this character’s alibi seems perfect but once the protag digs into it, it has a major hole/lie. Maybe they were in a different location or the person they claimed to be with was out of town.
7. The Odd Pattern
Have a seemingly significant pattern—symbols left at crime scenes, items stolen in a specific order, crimes on specific dates. Then make it deliberately planted to mislead.
8. The Misinterpreted Relationship
A character was secretly close to a victim/suspect, making them a suspect. Turns out they were hiding a completely unrelated secret; an affair, hidden family connection, etc.
9. A Forgotten Grudge
Create a grudge or past feud and use it to cast suspicion on an innocent character. Introducing an aspect of their past also helps flesh out their character and dynamics as a group + plant distrust.
10. The Faked Death
Luke Castellan, need I say more (I will)? A supposedly innocent character dies, but turns out they faked it and were never a victim in the first place. They just needed to be out of the picture.
11. The Mistaken Eavesdropper
A character overhears a threat, argument, etc. They suspect B based on this convo, but turns out they just came to a false conclusion. (Or did they?)
12. The Forgetful Alibi
Someone confesses to hearing/seeing a clue, but turns out they were mistaken. Maybe they thought they heard a certain ringtone, or saw xyz which C always wears, but their memory was faulty or influenced by stress.
Looking For More Writing Tips And Tricks?
Check out the rest of Quillology with Haya; a blog dedicated to writing and publishing tips for authors!
Instagram Tiktok
8K notes
·
View notes
Text
Symbolism in Writing
Weather Symbolism
Rain: cleansing, sadness, renewal, obstacles
Sunshine: happiness, hope, clarity, energy
Storms: conflict, turmoil, dramatic change
Snow: purity, stillness, coldness, isolation
Fog: confusion, mystery, uncertainty
Wind: change, freedom, unrest, communication
Animal Symbolism
Eagle: freedom, vision, strength, courage
Lion: bravery, power, leadership, pride
Dove: peace, love, innocence, spirituality
Wolf: loyalty, cunning, survival, community
Snake: transformation, danger, temptation, wisdom
Butterfly: transformation, beauty, impermanence
Plant Symbolism
Rose: love, beauty, passion, secrecy
Oak Tree: strength, endurance, wisdom
Willow Tree: sadness, flexibility, resilience
Lotus Flower: purity, enlightenment, rebirth
Ivy: friendship, fidelity, eternity
Cactus: endurance, protection, warmth
Object Symbolism
Mirror: self-reflection, truth, illusion
Key: opportunity, secrets, freedom
Bridge: connection, transition, overcoming obstacles
Candle: hope, spirituality, life, guidance
Clock: time, mortality, urgency
Mask: disguise, deception, concealment
Number Symbolism
One: beginnings, unity, individuality
Two: partnership, balance, duality
Three: creativity, growth, completeness
Four: stability, order, foundation
Five: change, adventure, unpredictability
Seven: mystery, spirituality, luck
Season Symbolism
Spring: renewal, birth, growth, hope
Summer: vitality, abundance, joy, freedom
Autumn: change, maturity, decline, reflection
Winter: death, stillness, introspection, endurance
Light and Darkness Symbolism
Light: knowledge, purity, safety, enlightenment
Darkness: ignorance, evil, mystery, fear
Shadow: the unconscious, secrets, mystery
Twilight: ambiguity, transition, mystery
Element Symbolism
Fire: passion, destruction, energy, transformation
Water: emotion, intuition, life, change
Earth: stability, grounding, fertility, growth
Air: intellect, communication, freedom, change
11K notes
·
View notes