
I am an artist and animator who loves to animate cartoons, and teach others how to make their own cartoons.
Don't wanna be here? Send us removal request.
Statistics
We looked inside some of the posts by ianmaiguapictures and here's what we found interesting.
Average Info
Notes Per Post
157K
Likes Per Post
95K
Reblog Per Post
62K
Reply Per Post
37
Time Between Posts
2 months ago
Number of Posts By Type
Text
2
Video
3
Photo
12
Last Seen Tumblr Blogs


Fun Fact
1,644 Tumblr posts in 1 second.
Text
Free Animation Course (limited time)

Premium: https://skl.sh/2lIH5id
Free: https://skl.sh/2mv73Gr
Are you struggling with animating dialogue? If you are, you seriously need to check out my course called "How to Animate Dialogue for Beginners animation course. In this course, you will the step by step process that I personally use to create my animation dialogue scenes. This course is 100% Free for up to the first 150 students. Enroll in this class today before it quickly fills up.😍😍😍😍😍😍💯💯
3 notes
·
View notes
Video
youtube
Get the course for $10 dollars for a limited time: http://eepurl.com/gd_9HP 😄
Animating dialogue is an important skill to master because it plays a big part in expressing your character’s personality. Learning how to animate dialogue can be very frustrating especially if you don’t know the fundamentals of animating dialogue. Thankfully we have created an easy course that will teach you the fundamentals of animating dialogue.
Introducing “How to Animate Dialogue for Beginners” animation course. This course will show you the process of turning your voiceover into a beautifully animated dialogue scene.
✅ We will start off by learning about the Preston Blair mouth chart. This chart will help you to choose the correct mouth shapes that will be in sync with your voiceover.
✅ After going through the chart, we will begin to animate our very own animated scene by drawing the mouth thumbnail and syllable charts. We will use these charts to guide us as we are animating our scene.
✅ In Lesson 4, we will use the mouth thumbnail chart to help us draw the key poses that we need for our character’s performance.
✅ After drawing the key poses, we will show you how to use both the mouth thumbnail and syllable charts to create a believable dialogue scene.
✅ Finally we will wrap up the course by showing you how to smooth out the lip sync animation by drawing the inbetweens.
By completing this course, you will be able to animate dialogue scenes that will wow your audience. Discover the secret to animating dialogue like a boss by enrolling in this course today.
------------- Social Media -----------------
Facebook: http://on.fb.me/1HMpk4B
Twitter: http://bit.ly/1DE6lIL
Pinterest: https://www.pinterest.com/ianmaigua/
3 notes
·
View notes
Photo

Click here to watch the Tutorial: https://youtu.be/MYIBhylLnYI
If you are animator who uses free animation programs, you have probably struggled with exporting your scene into a video file that you can share on Youtube. Well the good news is that Openshot is a free video editing software that can allow you to turn your animated scenes into actual videos. Check out the link to find out how to use this awesome program. #firealpaca #freeanimationprograms #freevideoeditor #freevideoeditingsoftware #openshotvideo
4 notes
·
View notes
Video
instagram
Hi guys. I just recently finished a jumping frog animation. I used some squash and stretch because I wanted to prevent the frog from feeling stiff as it was jumping up and down. I would really like know what do you think about this animation? Comment below #toonboom #2danimation #characterart #characteranimation #characteranimator #traditionalanimation #framebyframe
#toonboom#characterart#2danimation#characteranimator#framebyframe#traditionalanimation#characteranimation
4 notes
·
View notes
Video
tumblr
Hi guys. I just wanted to show you the finished storyboard for my upcoming fan animated film called "Ex-men Iceman". The storyboard process was very long, but it will definitely be very useful because I will use it to create the final version of this film.
4 notes
·
View notes
Text
Step by Step Guide to Animating a Head Turn

Click here to Watch the Full Video Tutorial: http://bit.ly/2eyVAgo
Hey guys. I am providing you with the full blog article that shows you how to animate a head turn. Now if you enjoy this tutorial, you can be able to watch the full video tutorial on my website. Please like and reblog this post. Thanks!!
Introduction
Learning how to animate head turns is an important skill that every animator should master. As an animator, you will be given various situations where a head turn is necessary for the performance of a character.
For example: if you have a boy that is using his cellphone, and all of a sudden hears an explosion that is behind him.
The most natural thing for the character to do is to quickly turn his head to see where the sound came from.
The ability to animate the head turn in this situation would help the performance of the cartoon character.
This is the major reason why I decided to create this step by step tutorial that will show you exactly how I animate head turns.
Step 1: Draw your Thumbnails
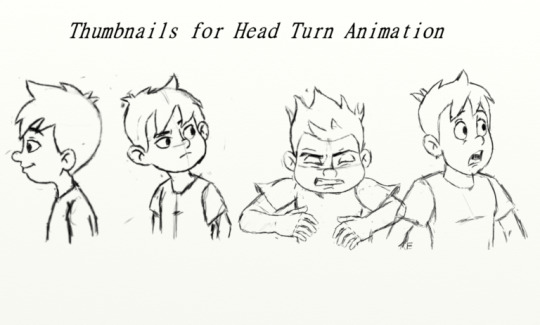
The first step that I usually take before I create any animation is to first draw thumbnails. Thumbnails are simple drawings that shows the story behind your animation.
For example: when you look at my thumbnails for this tutorial, you will see that the story is about a boy who is looking at the left side of the screen.
However, the boy hears a sound that causes him to turn to his head.
As the boy looks towards the direction where he hears the sound, he quickly realizes that he is seeing something that is shocking.
This causes the boy to dip his head down, and quickly lift up his head with a shocked expression on his face.
The reason why I always start off my animations with thumbnails is because it gives me a rough idea of what drawings will be used in the animation.
This technique is effective because it prevents me from spending several hours drawing unnecessary images that won’t be used in the animation.
Step 2: Draw the Key Frames
The next step is to draw the key frames for this animation. Key frames are basically a series of drawings that tell the audience the story behind your animation.
For example: The thumbnails for this animation are a perfect example of key frames because they tell the story of a boy who is shocked by what he sees.
Key Frame #1
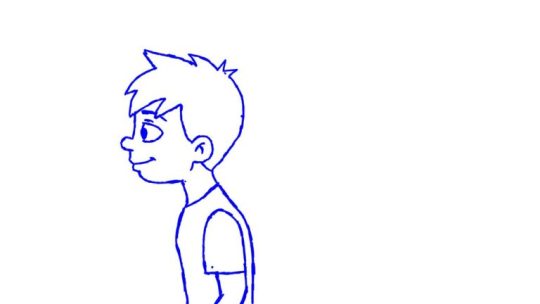
In this key frame, I drew the character in its side profile view. This key frame is important because it is the first frame that establishes the volume of the character.
This means that the next key frames should maintain the same body proportions as this drawing.
Key Frame #2

In the second key frame, the character is looking towards the direction where he first hears the sound. If you now look at the face, you will start to see more of the character’s left side.
This includes the face, and the rest of the whole body. At this moment, the character is currently looking at something that is shocking.
Key Frame #3

The shocking event in key frame 2 is what causes the character to dip his head downwards. This frame is an anticipation pose for the shocked expression that will happen in the next key frame.
An anticipation pose is a drawing that helps the audience to predict what will happen next.
For example: If a boxer is about to punch his opponent, he will usually pull back his arms before landing the punch.
The drawing where it shows him pulling back his arm, would be a good example of an anticipation pose.
This is because the audience can predict that he is going to punch his opponent.
Key Frame #4

In this last key frame, I drew the character with a shocked facial expression. This is an important key frame because it will ultimately cause the audience to wonder why is he so shocked?
Step 3: Draw your Breakdowns
After I drew my key frames, I began to draw the breakdowns for my head turn animation. Breakdowns are drawings that help you transition from one key frame to another.
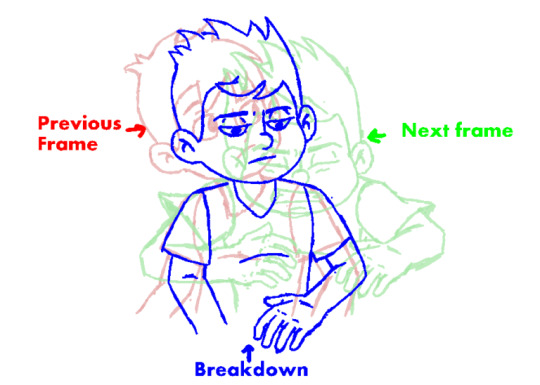
Breakdown #1

Before I begin talking about my breakdown animation process, I needed to let you know about onion skinning.
Onion skinning is an animation feature that shows you the frames that come before and after your breakdown image.
This tool really comes in handy when you are animating because it helps you to quickly figure out where you should place your drawings.
Now as I was drawing the breakdown, I made sure to dip the head and close the eyes of the boy. I did this because when a person turns their head, they naturally tend to dip their head, and close their eyes.
Breakdown #2
As I was flipping through the second key frame and the third key frame, I noticed the hair in key frame 2 is completely still. However in the next frame, the hair is standing all the way up.
So in my breakdown, I drew the hair slighting going up. This helped the character’s hair to look like it was gradually lifting up as I flipped towards key frame 3.
Breakdown #3

When I was flipping through key frame 3 and 4, I noticed the hair in key frame 3 was standing up. However in key frame 4, the hair is back to it normal design.
After thinking about the motion, I made the decision to drag the hair of the character as he was lifting up his head.
This choice was based on the reality that when a person quickly moves their body upwards, the hair will naturally tend to drag behind.
The additional benefit of dragging the hair is that it prevented it from feeling very stiff.
Step 4: Timing your Animation
Once you have drawn your keyframes and breakdowns, it is now time to time your animation. Whenever you are timing your animation, you basically trying to figure out how long should each drawing should last on the screen.
Typically animators tend to animate at 24 frames per second. So this means that if I pressed the preview button at this time, I would be unable to view the animation because the speed would be too fast.
So to solve this problem, I usually tend to duplicate each drawing for several frames. This make it easier for me to judge how long each pose should stay on the screen.
Step 5: Understanding Timing charts
After I fully timed my animation, I usually draw timing charts. Timing charts are small charts that are usually placed at a corner of an animation frame. These charts are designed to help the animator determine the speed of a moving object or character.
Even Spacing Timing Chart

In an even timing chart, the drawings are evenly spaced between each other. This means that when you play the animation, the drawings will move at a constant speed.
When I looked at the chart, I decided to draw the circles in this sequence:
I first drew circle 1 and 4
Then I drew circle 2 and 3
I first drew circle 1 and 4 because I needed to establish the starting point and endpoint for my animation.
After drawing circle 1 and 4, I then drew circle 2 and 3. I made sure that both circle 2 and 3 were evenly spaced between circle 1 and 4.
This even spacing technique is usually used for things that may move at a constant speed like an assembly line in a plant.
However the downside of using this spacing is that character’s movement tends to feel feel robotic. This is why I prefer using their a slow in or slow out timing charts.
Slow- In Timing Chart

In a slow in timing chart, you will always have more drawings towards the end of the animation. This means that when you preview the animation, the circle will start to slow down towards the end of the line.
This slow in technique is used to slow down the speed of your character or object.
When I looked at this timing chart, I choose to draw the circles in this exact sequence
Circle 1 and Circle 6
Circle 2
Circle 4
Circle 3 and 5
I first drew circle 1 and 6 because I needed to establish the starting point and endpoint for my animation.
After drawing circle 1 and 6, I then drew circle 2 because it was halfway between circle 1 and 6. If you look at the timing chart, you will notice that drawing #2 should be halfway between 1 and 6.
The next circle that I drew was circle 4 because it was halfway between 2 and 6. As I continued drawing I made sure that circle 3 was halfway between 2 and 4.
Finally I wrapped by the animation by drawing circle 5 halfway between 4 and 6.
Slow- Out Timing Chart
Finally the last timing chart you will see is the slow out timing chart. In this timing chart, you will notice that there more drawings in the beginning of your animation than towards the end.
This technique is used to increase the speed of your character or object.
I looked at the charts, in order to figure how I should draw the circles. I soon decided to draw them in this sequence.
Circle 1 and 6
Circle 5
Circle 3
Circle 2 and 4.
This sequence is very similar to the slow in chart, however this time you will have more drawings in the beginning of the animation.
Step 6: In-between your Head Turn
Now that you have a good understanding of how to read timing charts, it is now time to use them to create in-betweens.
In-betweens are drawings that are in-between your key frames and breakdowns. Since in-betweening is a lengthy process, I decided to only look at the most important in-betweens in this animation.
In-between #1
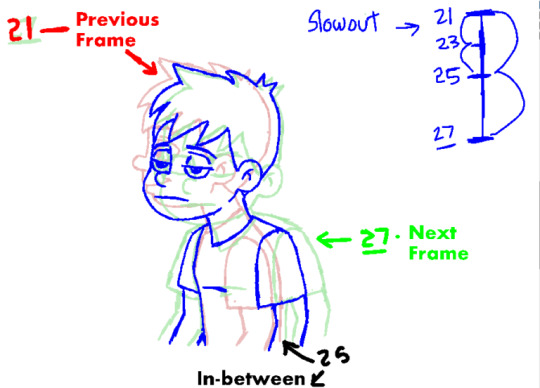
Before I drew in-between #25, I looked at the timing chart to clearly see where I should place the drawing. According to the chart, I knew that the in-between should be halfway between 21 and 27.
So I decided to draw the nose to be exactly half way between the nose in frame 21 and frame 27. The advantage of drawing the nose first is that it makes easier for me to draw a head that follows the timing chart.
In-between #2

In this in-between, I flipped through the previous frame and next frame. I noticed that the eyes were closed on frame 27, but on frame 33 they were completely open.
This meant that I should make sure that the eyes were halfway open as the character turning his head. I did this because the timing chart wants to me to applying this halfway spacing for the entire body.
In-between #3
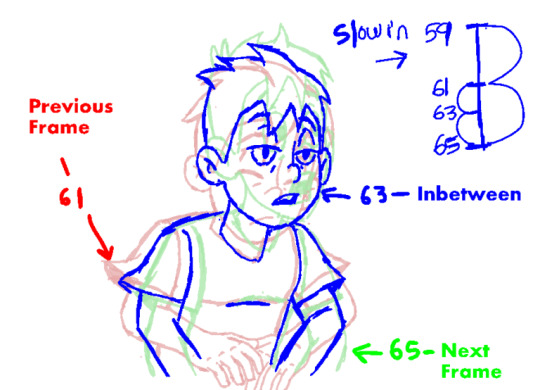
This particular key frame caused me to really use my animation skills. You see as I flipped through frame 61 and 65. I discovered that the hair on frame 61 is still dragging, However on frame 65, the hair has returned to its normal design.
I concluded that the best way to draw this in-between was to drag part of his hair, and have the other part going up. As I flipped through the frames, I was able to make it look that I hair transitioning back to it’s normal design.
In-between #4
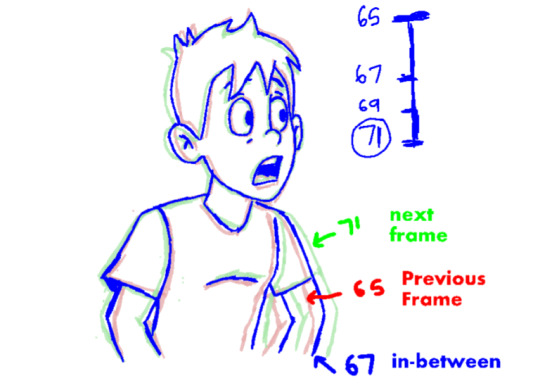
After several hours, I finally came toward the last timing chart for this animation. As I looked at the slow in timing chart, I knew that frame 67 should be halfway between 65 and 71.
So I simply wrapped up this animation by placing the breakdown halfway between frame 65-71.
Step 7: Preview your Final Animation

It is finally time to preview the head turn animation. You will notice that the animation is much smoother than the first head turn preview.
This is because I drew all the in-betweens that were required for the animation. You will also notice that the use of the timing charts increased the appeal of the animation.
This is because humans and other creatures don’t generally move at a constant speed. Their movement tends to either slow down, speed up, or use a combination of slow in and slow outs.
Conclusion
Congratulations on learning how to animate a head turn. I hope that you mastered the two most important lessons about animating head turns.
The first lesson is that you should always dip the head, and close the eyes of character as they are turning their head.
This is important because people tend to dip their heads and close as their eyes as they turn their heads.
The second lesson is that you should use a slow out at the beginning of a head turn. However as your character is about finish the head turn, he or she should start to slow down.
If you apply these two important principles to your head turns, your head turn animation will become more believable.
If you enjoyed this tutorial, please share it with you friends.
Sign up for my newsletter, so that you can stay updated whenever I release an animation tutorial on my blog.
28 notes
·
View notes
Photo

I just finished creating this practice logo that based on CreatNprocess evolve logo. #logodesign #adobeillustrator
1 note
·
View note
Photo
This movie was awesome.


Three pages of Glen Keane’s dynamic animation of Ratigan from Disney’s The Great Mouse Detective (1986).
1K notes
·
View notes
Photo

I have been recently been practicing my logo design skills. So I decided to test the skills that I learned from creating the "Cool" logo into this concept logo for Metermate. I just want to let you know that this particular piece was a personal concept logo for Metermate
2 notes
·
View notes
Photo
This advice is helpful.


1. Ah Fai was a chief animator for McDull’s animated features. He’s super cool. Ultimate senpai.
2. Previous post on breakdowns right here
Some thoughts on acceleration and force
I presented this in the order of how I slowly understood the trick of delivering force - first an abstract concept of impact taught by Ah Fai, then a more complicated discovery on the acceleration pattern, last back to a more abstract concept of breakdowns.
Like I’ve previously stressed, 2D animation is everything but one single approach. There’s no one rule that rules them all, but interchangeable ideas with math, or physics, or music, etc. There’s no “perfect” animation either, but what is perceived as organic and dynamic. E.g., using the Fibonacci numbers to animate didn’t bring me a perfect animation! On the other hand, a tiny change in the pattern could already make the feeling of force so much more powerful.
Not so much of a tutorial than a personal experience. I hope you find this interesting hahaha
156K notes
·
View notes
Photo

Watch the tutorial: http://bit.ly/2eyVAgo The long awaited head turn animation tutorial is officially available on my animation blog. This is a great resource for any animator who wants to improve their head turn animation. So check it out, and let me know what you thought about the tutorial.
8 notes
·
View notes
Photo

I just created some thumbnails for my upcoming 2danimation tutorial that I will release on my animation blog. Stay tuned.
13 notes
·
View notes
Photo

It is so nice to get back to animating cartoons again. Today I decided to animate cartoon duck turning his head because I wanted to practice improving my head turns. Also it is also serves as a way to me to practice for my upcoming head animation tutorial that will I release on my animation blog very soon.
7 notes
·
View notes
Photo

Hey guys. I decided to create a "cool logo" for you. Enjoy #textlogo #illustrator #logodesigns #vectorlogo
5 notes
·
View notes
Photo

A client approached me about creating a flyer that would encourage Uber riders to give more tips. This was definitely a interesting project because I heard one of the major things Uber drivers dislike is that Uber discourages riders to give tips. So I was definitely glad to hear that when the customer posted this flyer, his tips he received began to increase #uberx #rideshare #uberselect
0 notes
Photo

I just finished drawing a pencil portrait of the legendary martial artist called Bruce Lee. I have definitely upgraded my shading skills from the previous pencil portrait that I did a few months ago. I will definitely create more pencil portraits in the future. #pencilportrait #brucelee #krita
6 notes
·
View notes
Photo

I just finished creating a cow mascot for a client's real estate company called "mooving" Get it. :) #logodesigns #mascotlogo #animaldesign #characterdesign
1 note
·
View note