
just a blog where i can dump a bunch of wip cosplay stuff/log progress to keep me motivated! :P currently working on: judeau berserk
Don't wanna be here? Send us removal request.
Statistics
We looked inside some of the posts by hamukosandwich and here's what we found interesting.
Average Info
Notes Per Post
221
Likes Per Post
188
Reblog Per Post
33
Reply Per Post
0
Time Between Posts
1 month
Number of Posts By Type
Text
12
Last Seen Tumblr Blogs


Fun Fact
The most popular pages on Tumblr are about Minecraft, GIFs, and David J. Peterson.
Text


Sakura Haruno from Naruto Shippuden cosplay crafting progress log :D Yapping under the cut
I started this project in early February with the goal of finishing for Wondercon at the end of March. I was kind of intimidated by the project because I am not a huge fan of modifying or drafting patterns since I like to cut and sew without having to do math or thinking too hard, but I love Sakura so much I was willing to do it for my girlie <3
Fabric: I needed some kind of red medium-ish weight fabric for the shirt, stretch fabric for the arm warmers, and then a tough medium or heavyweight fabric for the skirt/apron thingy. I wanted fabrics that had a tough feeling to them since my biggest beef with the premade costumes I saw online was that a lot of them looked smooth and flimsy instead of like something that a field medic + fighter would wear. I ended up settling on a pink duck canvas from Joann for the skirt, a red Sicilian stretch twill from Fabric Wholesale Direct for the shirt, and a pink double-brushed DTY knit fabric for the arm warmers. I was really happy I was able to color match the canvas and the DTY together bc I really wanted them to be the same shade of light pink.

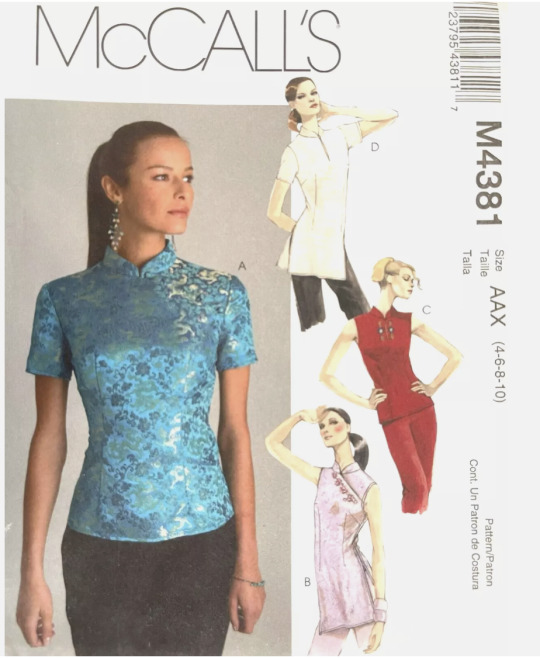
Pattern: I searched Ebay for as close of a pattern as I could find and found McCalls M4381 which is a blouse pattern with a mandarin collar and a sleeveless variation. (I also liked how there is a longer variation with short sleeves and slits in the sides since I feel like that could easily be modified for genin Sakura if I ever want to make her in the future!)
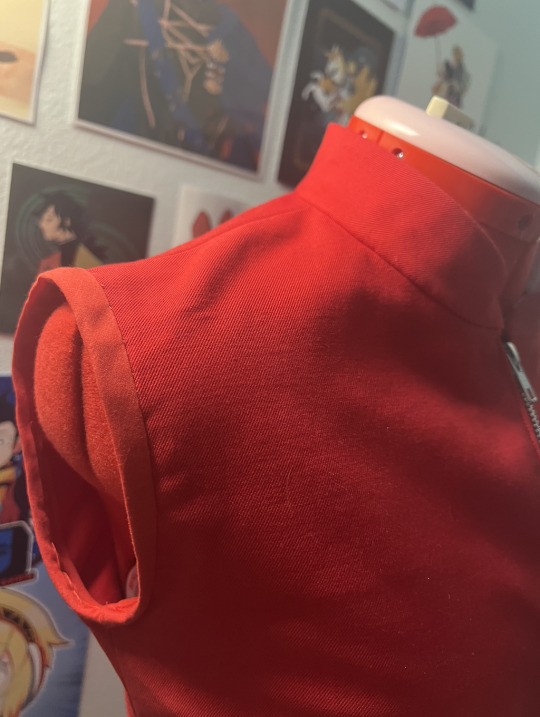
From there I made a mockup in a wrinkly cheap broadcloth, slashed the front to modify it to have Sakura's asymmetrical front zipper, and then transferred the new pattern to paper.


Then I cut and sewed the top. I'm glad I picked fabric with a good amount of structure and a bit of stretch bc it made fitting it easier. (Making adjustments to fit is my biggest struggle every time LOL)

After sewing in the zipper (no pic sorry), I attached the collar, understitched it, and then tucked the seam allowance of the facing under and hand-sewed it to the top's seam allowance to make sure the stitches aren't visible from the outside.

I got pressed for time towards the end bc March was kind of crazy for me so I don't have progress pics of this, but after attaching the collar, I hemmed the bottom of the shirt and finished the armholes with pre-made bias tape binding. (I tried to use the armhole facing pattern that came with M4381, but idk I think I was too doopid to figure it out or I messed up something by modifying the pattern bc the armhole ended up being uncomfortably tight after sewing it together...) Bias binding worked out okay though bc I was just happy to have a finished armhole after many frustrating attempts with the facing pattern LOL
For her back emblem, I harvested floral brocade from an obi I got off of Ebay. I thought the floral pattern would add some texture and femininity to the costume, and that it would be cool to have authentic Japanese fabric for this small detail. I fused it to the back of the shirt with Wonder Under and then satin stitched around it to cover the raw edges of the applique. (Of course I placed it off center the first time and had to rip it up and redo it which was really fun 🙃)


Arm warmers/elbow pads: Fell into a bit of a slump while working on the shirt so I cranked out the arm warmers as a motivation-booster. Just measured my arm, cut out the fabric, and sewed a tube. Easy peasy and honestly very soft and comfy.

The skirt: I haaate patterning from scratch because I haven't done it much and hate doing math and like to follow pre-written instructions. Luckily this skirt pattern is pretty basic: a waistband, front + back panels with a zipper in the middle, and straps on the sides.
I sketched out a concept for the garment in Procreate and drafted some instructions for myself and went off this as a starting point. Honestly making Indigo Patterns' Persona 3 uniform a year ago really helped me figure out a lot of the details with this pattern like how to attach the waistband and how to do the zippers on the front. (my Gekkoukan uniform was the first non-elastic waistband skirt I ever sewed LOL)

I don't have pics of this bc I was in the zone and finished a lot of it pretty quickly, but I ignored the zipper sandwich idea I had in the sketch above and actually sewed facings for the zippers to the front and back panels, cut a slit in them, and then flipped and inserted the zippers and topstitched them down. It's the same method Indigo Patterns uses in her instructions for the Persona 3 uniform jacket sleeves. (I wish I took pics bc it's honestly kind of hard to explain without images </3) Her patterns are really really good though and I highly recommend checking her website out! I've legit learned so many techniques from making FE3H Ingrid and P3P FEMC + Mitsuru with her patterns.
I sewed the two panels for the front together and then did the same for the two back panels. After that, I measured and sewed the side straps onto just the outer layers on the front and back so that you wouldn't be able to see the stitching on the lining of the skirt if you looked at the underside.
Next, I pinned and stitched the front and back panels to the waistband.

For the side closure, I wanted something unique and kind of tactical-feeling, so I bought a 1.5 inch G-hook slide buckle. (Pic below)
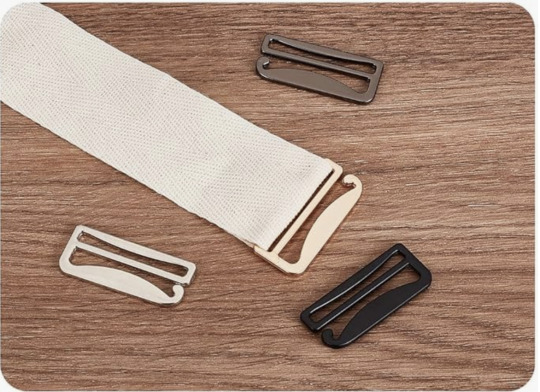
(Which was honestly weirdly hard to find in a big enough size for the waistband so idk where the idea to use one came from but I just thought they looked cool and would be slim enough to accommodate the narrow gap between the panels.)
Lastly, I attached belt buckles onto the side straps and added eyelets to the belt holes to finish them. I also added small snaps to the underside of the ends of the belt to attach them to the other strap and keep it from sagging.
Overall, I'm proud of how this costume came out. :) I've been feeling inspired by how some other crafters think so carefully about fabric choice and wanted to challenge myself to find fabrics that matched the lifestyle of the character and the harsh world around her. I also feel like I utilized a lot of skills I learned from earlier projects, and I'm happy I was able to challenge myself by modifying and drafting patterns!
I'm def looking to upgrade her before going to Anime Expo in July since I think she's a good weather-appropriate summer costume. I wasn't able to make her leg holster or get proper open-toed boots for her, so I'm hoping to get those done for AX! Also looking forward to getting some nice pics of her in late April since I didn't take any good ones at Wondercon </3
also fun fact i finished and wore this costume on sakura's birthday on march 28th!
#sakura haruno#naruto#naruto shippuden#naruto cosplay#sakura haruno cosplay#cosplay#sewing#costuming
20 notes
·
View notes
Text
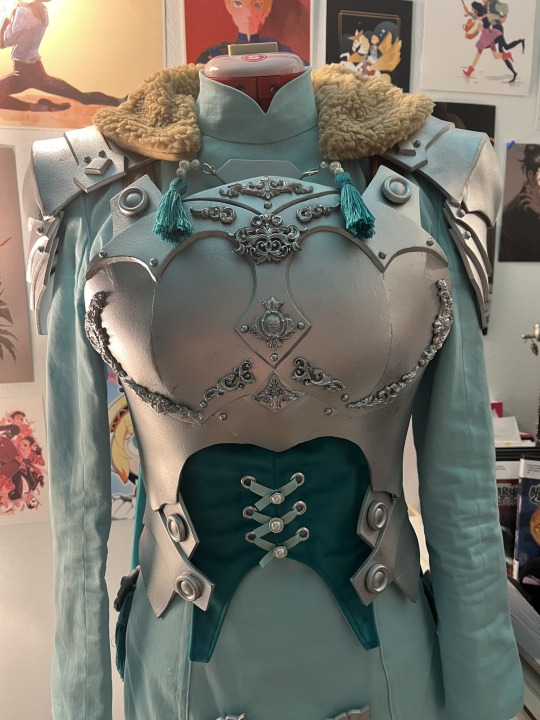


close up shots of my ingrid breastplate + corset! i was really happy with the buttons and the ribbon i found
#cosplay#fire emblem three houses#ingrid brandl galatea#fe3h#fe3h cosplay#fire emblem cosplay#sewing
38 notes
·
View notes
Text


“your death is my duty”
my finished ingrid costume yay!!!
(top two pics are by @alteraa.aperture on IG and the bottom two are by my friend dalia 🤓)
#fire emblem three houses#fire emblem#fe3h#ingrid brandl galatea#fire emblem ingrid#fire emblem cosplay#cosplay
43 notes
·
View notes
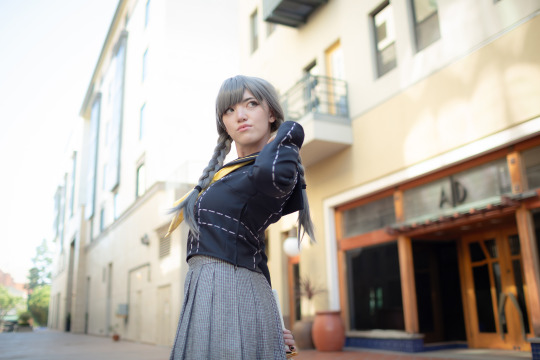
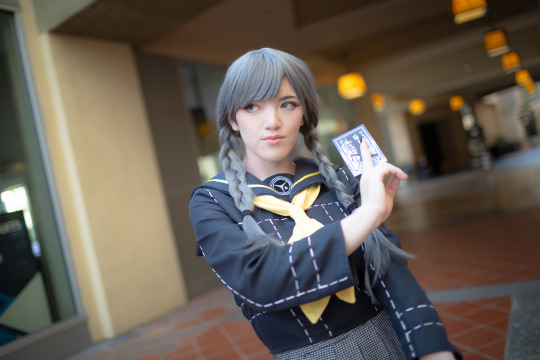
Text


final batch of ingrid wip photos—will post the full costume soon for posterity 🤓
#cosplay#sewing#fire emblem cosplay#fire emblem#fe3h#fe3h cosplay#ingrid brandl galatea#fire emblem three houses
20 notes
·
View notes
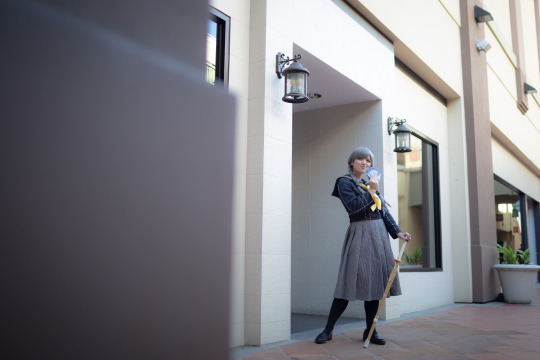
Text


oops i forgot abt this blog lol
here is a giant dump of timeskip ingrid progress pics!
#fire emblem three houses#fe3h#fire emblem cosplay#fe3h cosplay#cosplay#sewing#fire emblem#ingrid brandl galatea
28 notes
·
View notes
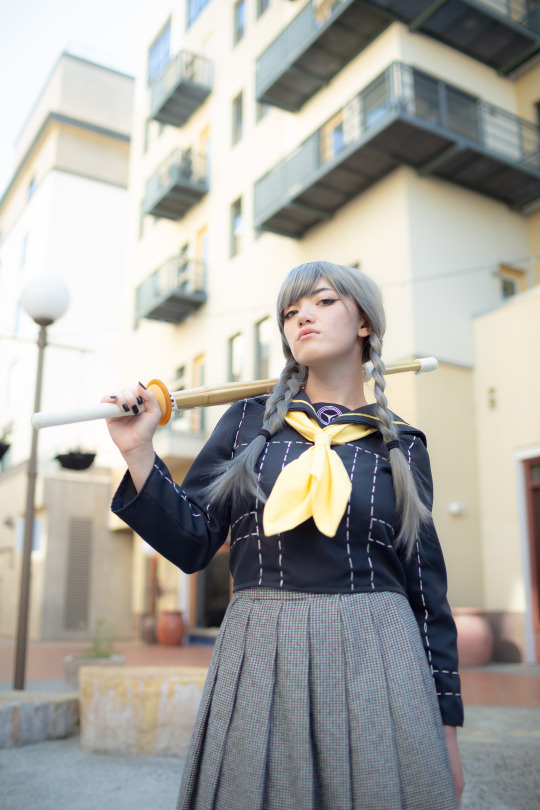
Text

"I mustn't falter."
📸 + layout: @/jomariresare
18 notes
·
View notes
Text

+ a pic of the finished costume and the epic sword i put together! (sword kit from the Dangerous Ladies!)


ended up finishing this mitsuru blouse so quickly that i only have two progress pics LOL it was my fastest project ever and took a little over a week!
7 notes
·
View notes
Text
ended up finishing this mitsuru blouse so quickly that i only have two progress pics LOL it was my fastest project ever and took a little over a week!
7 notes
·
View notes
Text


some pictures of my summer femc costume from AX 2024! we got to shoot in a fancy hotel :^)
10 notes
·
View notes
Text
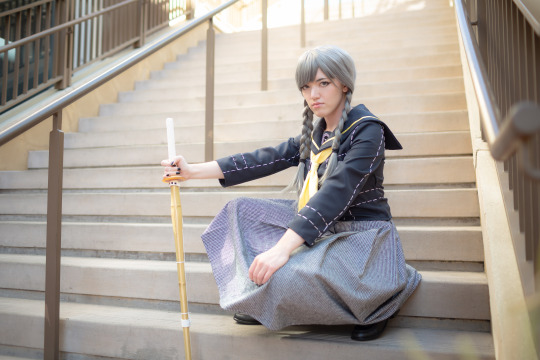
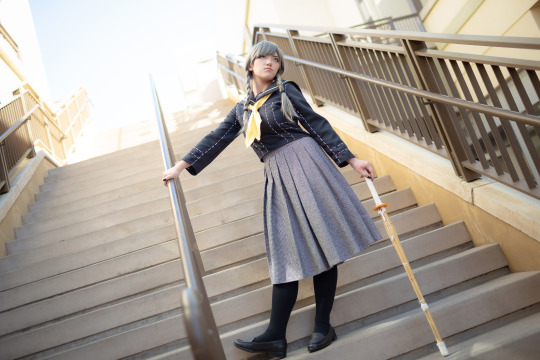
got some cool pics of my girlboss yu narukami cosplay!!! my first fully handmade costume :''') if you wanna see some of the process of sewing it i made a little post here
(photos by @wickedapricot on instagram!)
9 notes
·
View notes
Text
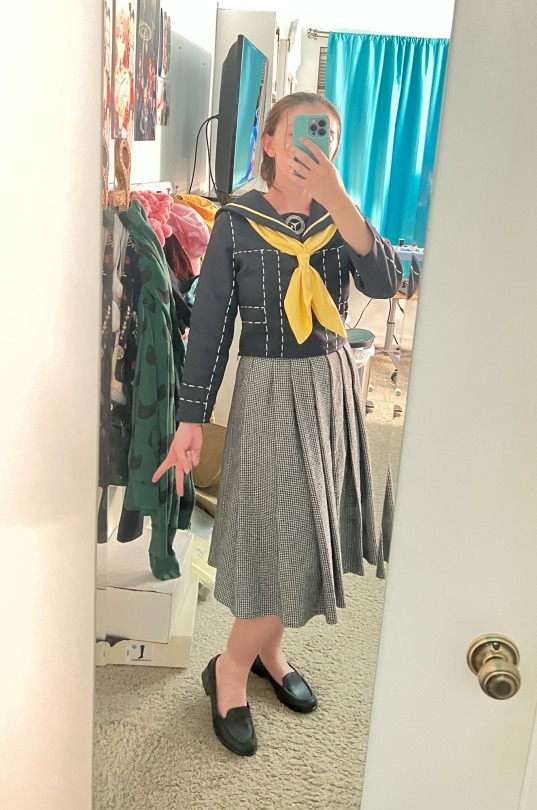
Finished my Persona 4 beauty pageant Yu Narukami cosplay! Really proud because it’s my first fully handmade costume. 🥹 Progress pics under the cut!
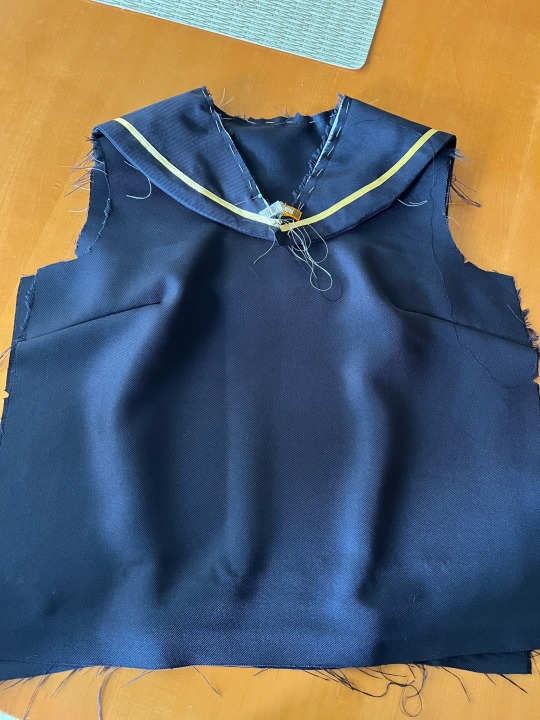
1. This is after I cut the pattern pieces out of my fabric (black gabardine), sewed + interfaced the sailor collar, and sewed the darts on the front and back. I used Simplicity 8160 but honestly did not really like it and found it pretty confusing at times as a less experienced sewer.
Also added the ribbon trim onto the collar. This picture was right after I basted the collar onto the neckline.
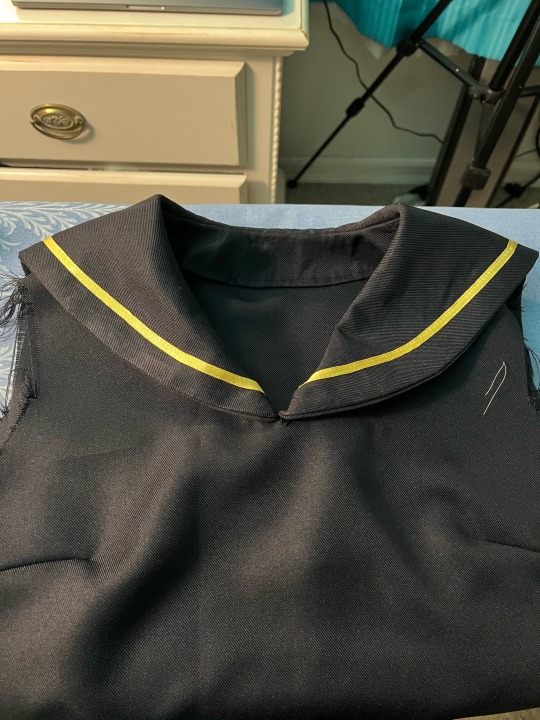
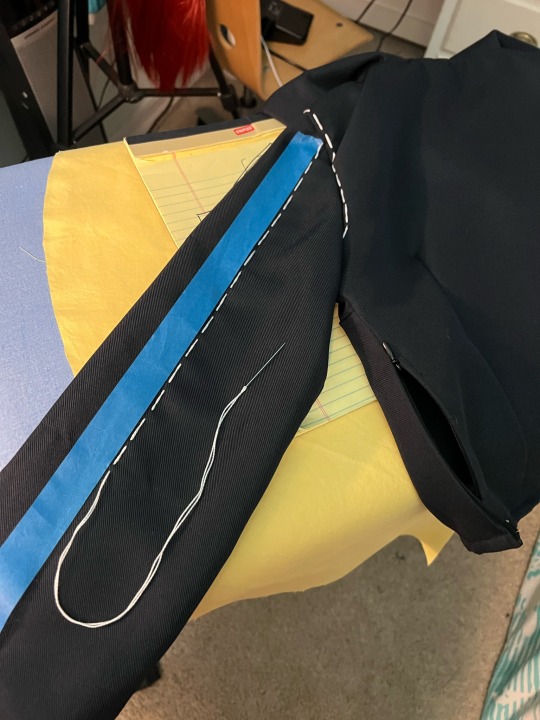
2. This was after I attached the facing and collar to the neckline! My first time sewing a facing. It didn’t come out exactly as I wanted it to, but I feel like I learned a lot for next time.
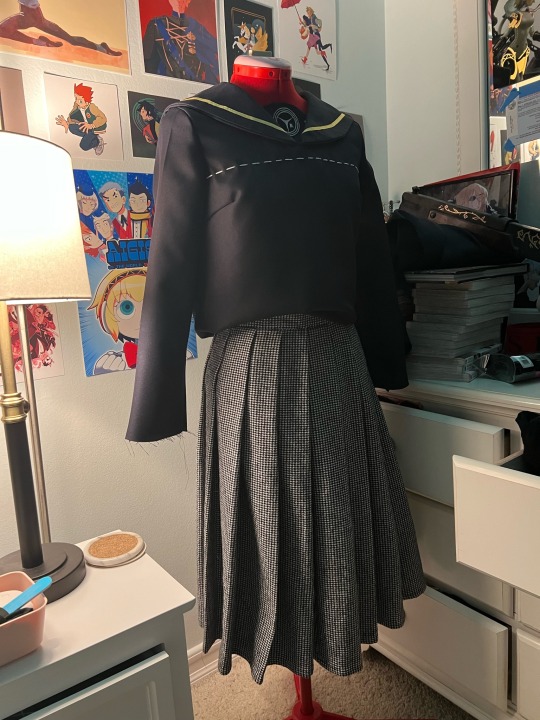
3. Got a lot done this day: sewed the sides together and attached sleeves and started the white stitching detail.
At first I tried to just topstitch with my machine, but it kept coming out wobbly and regular sewing thread was too thin-looking. I ended up using embroidery floss instead.
(Also I can’t find my progress photos of the skirt but it was relatively simple since it’s just a regular long knife pleated skirt.)
4. More hand stitching. Used masking tape to help me keep my lines straight. Also took in the bodice, cropped it, and added a side zipper after agonizing about the fit being a little unflattering.
5. Sewed the tie (which entailed me drafting my *~first pattern~* because I really hated the one from the pattern I was using) and then voilà--costume is done!!! :D wahoo
10 notes
·
View notes
Text
Making Kasumi's Rifle from Persona 5 Royal
Here's a process log of making Violet's gun from Persona 5 Royal for my cosplay!


To start with, I looked up a bunch of pictures and combed through gameplay footage to try to find good reference pictures of her gun. The best reference turned out to be pictures of Amakuni's scale figure that included her gun since the photos had clear shots of the gun from the side.

2. Then I made a pattern in Photoshop by tracing a picture of the gun from the figure and printed it out at the scale that I wanted it to be. To size it accurately to my proportions, I used nifegun.com.
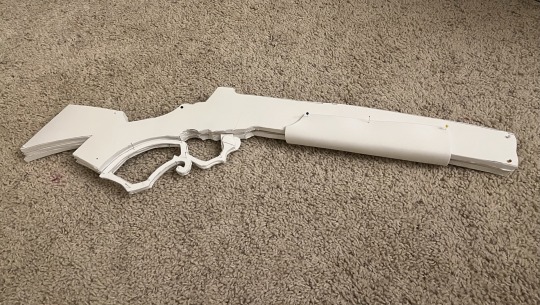
3. After that, I cut out 3 layers of 5mm foam for the main part of the gun and 3 layers of 3mm foam for the lever/trigger section. Here I had them pinned together so I could double check the thickness/scale before gluing it all together. (I didn't take a picture of this part, but I also carved out space inside the gun to fit two small PVC pipes taped on top of each other to make the barrel on the inside and to give the floppy EVA foam a stable core.)
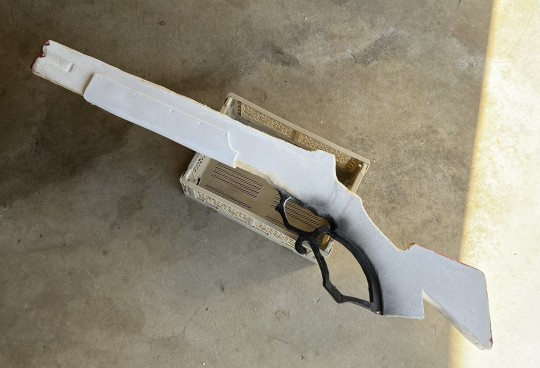
4. I glued it all together with contact cement. Here I also used a dremel to carve an indent into the side of the barrel at the front end. I also tested the primer I was planning to use (black Plastidip) on the lever/trigger part at the bottom.


5. Ignore how crusty everything looks here LOL but this is the part where I experimented a lot on how to smooth out the seams on the top, front, and bottom of the gun. I'm not 100% happy with the level of smoothness I ended up with, but this was a last minute 1-week build before a con so I settled with a couple layers.
First I tried foam clay but had a lot of trouble sanding it because the brand I bought was super cheap/sticky and would not dry. Then I moved on to wood filler, which was slightly better and actually sandable but I still wasn't really liking the gritty texture. So as a last resort I ended up using Bondo glazing putty (which is super toxic and not fun to be around--wear a respirator!) since it's my go-to when I'm working with 3D printed props. Bondo ended up working the best, but I still want to keep experimenting with other less-toxic methods for future foam props...
I also added some more panels here on top and on the sides to add some dimension.

6. I spray painted the gun black and brown and added googly eyes for rivet-like details.

7. Finished the gun by adding all the rest of the details! Glued a black plastic gem onto the front of the barrel with hot glue for the front sight, bought some brass embellishments like the little framing piece on the stock and the metal rivet on the forestock, and hand-painted the filigree on the side of the gun with a gold paint pen.
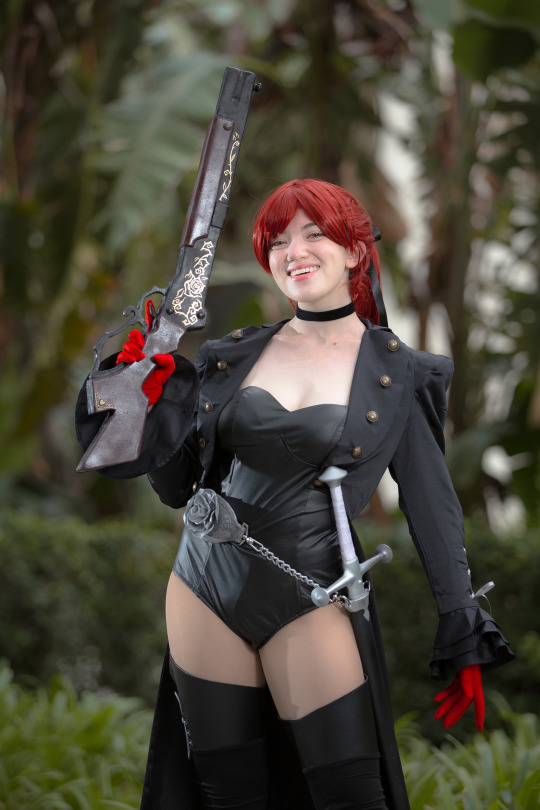
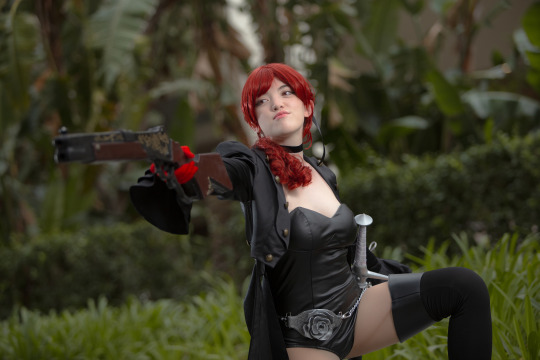
(Photos by @wickedapricot on Instagram)
Overall, I'm pretty happy with how it came out considering it was a one-week build and my first ever gun prop! This is also the second foam prop I've made, and I feel like I learned a lot from the process.
If I ever remake it, I'd really like to add a hinge to the lever to make it functional like it is in the game like in her introduction where she spins it by pulling the lever down. I'd also probably give myself like a month or more to work on it instead of a single week LOL I got so many mosquito bites from working on this in my hot garage at night in the summer 〒▽〒
If any other cosplayers are making her gun and want to use my pattern or have any questions about the materials/process, feel free to shoot me a message :^) I haven't seen any other cosplayers make her gun but it's such a cool design!
#persona 5#cosplay#kasumi yoshizawa#violet#violet persona 5#persona#persona cosplay#cosplay prop#cosplay tutorial
11 notes
·
View notes