Hi guys! I'm Elle. Gonna be cooking my way through some of the classic Gaia Cooking cookbook with new recipes posted Wednesday biweekly. Join me! (This is a Final Fantasy 7 AU. Enjoy the recipes!)
Don't wanna be here? Send us removal request.
Text
Custard Coconut Cake
Hey!
Today’s recipe is one of my new favourites: Custard Coconut Cake.
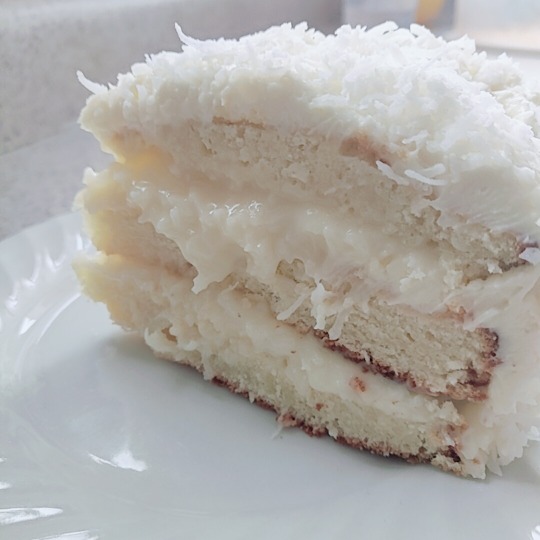
I’m actually obsessed with this unique Corel cake. It’s rich without being too rich, sweet without being too sweet, and crunchy because of all. the. coconut.
Sometimes, in Corel, this cake is just referred to as “the butters”, because there’s butter in every part of this 3-part recipe. I get it, sure, but to call it ‘the butters’ doesn’t do it justice! You have coconut sprinkle in the icing, you have coconut cream in the cake, coconut flakes in the custard--this is literally just a large coconut cake.
It’s perfect for any occasion, but I like it the most for holidays! It’s just my excuse to bake it several times throughout the year ;)
CUSTARD COCONUT CAKE
Ingredients
Cake 2 1/2 cups of cake flour (important! All-purpose won’t work here) 4 teaspoons of baking powder 1 teaspoon of salt 1/2 cup of unsalted butter, room temperature 1 cup of sugar 4 large eggs 1 1/2 cups of heavy whipping cream 1 tablespoon of vanilla extract 1/2 cup of coconut cream
Custard Filling 1 1/4 cup of heavy whipping cream 2 tablespoons of corn starch 1/2 cup of unsalted butter 1/2 cup of sugar 2 1/2 cups of shredded coconut (Corel sweetened is preferred) Vanilla extract
Icing 400g of cream cheese (or, if you’re going by 250g packs, this is like a pack and a half) 1/2 cup of butter, softened 3 cups of icing sugar 1 cup of shredded coconut (once again, Corel sweetened is preferred)
Method
1. For the cake, you want to measure out all your ingredients first before beginning. Start with the wet stuff and move to the dry, as usual. Preheat the oven to 350F and grease two 9-inch cake pans.
2. Using a stand or hand mixer, mix the butter, sugar, and heavy whipping cream together for about 4 or 5 minutes until completely combined. Then, add the eggs one at a time and mix until combined again. Then, add the coconut cream and vanilla extract and then (surprise!) mix till combined. ;) You should get a creamy texture.

3. In a separate bowl, combine the dry ingredients (baking powder, flour, and salt) and whisk together. Then, add then slowly to the wet mixture, mixing well till combined.

4. Split the batter between the two pans and bake for about 25 minutes. Then, let the cakes cool completely. We’re onto step two!
5. For the custard filling, melt the butter in a saucepan on the stove at medium heat. Then, add in the 1 cup of the whipping cream, sugar, and coconut. Mix well and let it continue to simmer. Then finally, dissolve the corn starch in 1/4 cup of whipping cream, and pour into the mixture on the stove. Raise the heat a little, add a dash of vanilla extract, and continue stirring until it thickens. Then, set it aside and let it cool completely. Step three!

6. For the icing, mix the softened butter and cream cheese together with a hand mixer. Then, add the icing sugar one cup at a time. Mix well until smooth and creamy, and set aside.

7. Finally, time to combine the layers! So with the cake, what you want to do is split each layer into two so that instead of 2 layers, you have 4. I say this, of course, but when I did this recipe, one of my layers turned out smaller than the other lol, so I only split one in two, and had 3 layers. If you end up in this situation too, that’s totally fine!
8. Decide which layer will be your base. Around the edges of the layer, put some of the icing, almost as a sealant, and then pour the cooled custard filling in the center. Spread evenly. Put a layer of cake on top and repeat until you get to the top layer.

9. Place the top layer on the cake and, instead of the custard, ice the entire cake with the cream cheese icing. Once done, you can sprinkle the one cup of shredded coconut on top. Let the cake sit for about half an hour in a chilled environment and then cut to serve. Enjoy!

#ff7#ff7 remake#final fantasy 7#final fantasy#recipes#custard coconut cake#coconut recipes#cake recipes#cake
32 notes
·
View notes
Text
Easy Raspberry Bars
Hi everyone!
Today’s recipe is truly one of the easiest: Easy Raspberry Bars.
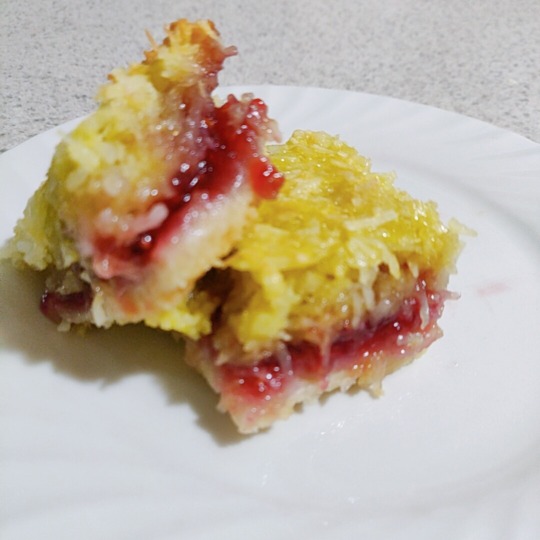
They’re called Raspberry Bars, but if you prefer a different type of jam, you have the opportunity to substitute. What’s funny is that, even if you do, they’d still just be referred to as ‘Easy Raspberry Bars’ with blueberry, or ‘Easy Raspberry Bars’ with lemon... I don’t pretend to understand what goes on in Kalm.
In any case, this is a fun, quick recipe that’s great when you need to put something together fast. I personally like these the best with the raspberry because of the combination of sweet and tangy when mixed with the crumb base. It’s honestly so good! And the best thing about it is that this recipe legit takes less than an hour to make.
EASY RASPBERRY BARS
Ingredients
1/4 cup of sugar 1/2 cup of butter, softened 1 1/4 cups of flour 1 cup of raspberry jam (or blueberry, or lemon, or, or, or...) 2 eggs 2 cups of coconut, shredded or flaked 1/2 teaspoon of baking powder 1 teaspoon of vanilla
Method
1. Preheat your oven to 350F while you grease a 8x8-inch pan with butter.
2. First we’re going to make the crust! Mix the sugar, softened butter, and 1 cup of flour together (do not mix in the other 1/4 cup of flour!! You’ll need it later.) Then, pat it firmly into the greased pan. Let it bake for about 10 minutes, or until lightly golden.

3. Take the crust out of the oven and let it sit for about 5 minutes. Then, spread the cup of jam evenly across.
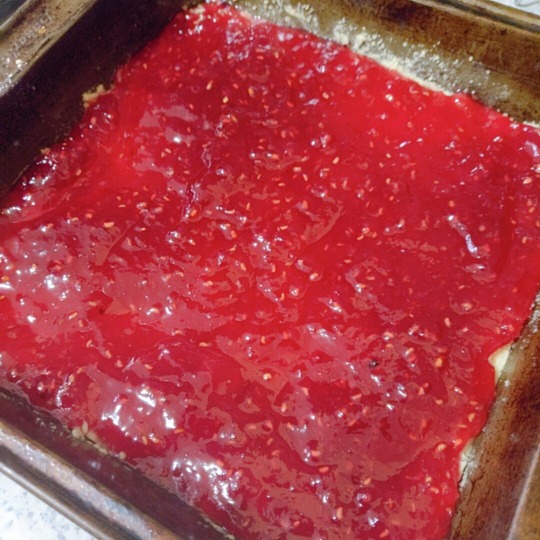
4. Mix the eggs, coconut, baking powder, vanilla, and 1/4 cup of flour together. Pour the mixture on top of the jam, making sure to spread evenly.
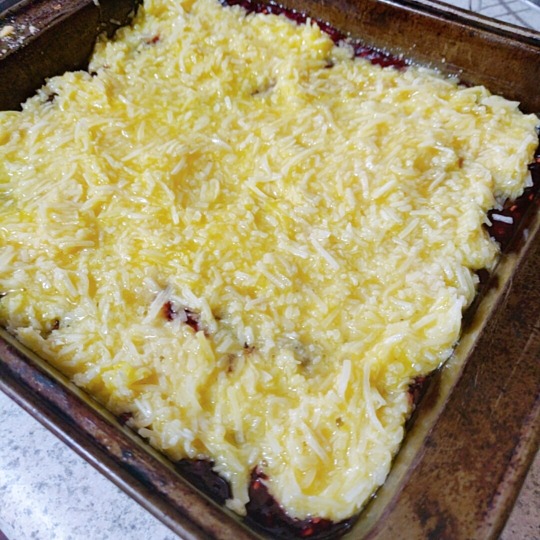
5. Bake for about 20-25 minutes and let it cool completely before serving. Enjoy!

8 notes
·
View notes
Text
Midgar Sliders
Hey everyone!
Today’s recipe is classic pub food: Midgar Sliders.

There was a point where you could pretty much get these anywhere in Sector 8, but those days are long gone now. Luckily they’re not too difficult to make at home! These are such a great and quick staple because, for the most part, the items are assembled for you and all you have to do is put them together and bake. :)
You may be familiar with my previous slider recipe, Nibel Sauersliders, and might be wondering exactly what the difference is here. The main one is that these are chicken, not beef, and that the chicken is seasoned in an entirely different way. The sauersliders are tangy, but these Midgar sliders can be spicy if you want. Try them out and see which ones you prefer!
MIDGAR SLIDERS
Ingredients
1 pack (12-14) of dinner rolls 6-10 slices of cheese (Midgar cheese is cool, cheddar or mozzarella work too) 2 tablespoons of olive oil 2 cloves of garlic, chopped 1/2 cup of onion, chopped 3 cups of shredded chicken 2 cups of barbecue sauce (I’m partial to the Corel variety, but it’s your choice!) 2 tablespoons of hot sauce 3 tablespoons of garlic butter, melted (or, butter with oregano and parsley) Salt and pepper to taste
Method
1. In a skillet, cook the onions and garlic in 1 tablespoon of the oil until browned. Then, add in the shredded chicken.

2. Then, add the barbecue and hot sauce. Cook about 3-5 minutes on medium.

3. Preheat the oven to 350F. Grease the bottom of a tray with the remaining oil (butter could work here too). Then, cut the pack of dinner rolls in half so that you have a bottom half and a top half. Put the bottom half on the tray, seen below.

4. Spread the chicken on top of the buns evenly.

5. Then, top with the cheese slices. Shredded cheese could work here too!

6. Finally, put the dinner roll tops on and brush them with the garlic butter.

7. Bake for 15 minutes and serve warm. Enjoy!

14 notes
·
View notes
Text
Nibel Cinnamon Buns
Hi everyone!
Today’s recipe is a classic cinnamon bun from Nibelheim. I love love love this recipe!

YES I went overboard with the icing lol.
Anyway, why do I love this recipe so much? It’s easy, it’s not-too-sweet, and it’s actually a lot of fun to bake with company, if that’s something you’re into. It’s made even more delicious if you decide to use pure Nibel cinnamon. Of course, any other variation is fine, but with this, there’s a different kind of kick that I think makes this recipe really unique.
Oh, and the icing!
Other cinnamon bun recipes might use a sugar-based glaze, but this is one heavy cream cheese, and it’s beautiful. :’) This is a multi-layered recipe, so there’s a lot of moving parts, but it’s very very very worth it in the end!
NIBEL CINNAMON BUNS
Ingredients
Buns 2 1/2 cups of flour 1/4 cup of white sugar 1 teaspoon of salt 1 pack of instant dry yeast 1 egg 3 tablespoons of butter, softened 1/2 cup of water
Filling 1 tablespoon of Nibel cinnamon (or regular cinnamon) 3 1/2 tablespoons of butter, softened to spread 1/4 cup of brown sugar
Icing 1 pack (250g) of cream cheese, room temperature 3 tablespoons of butter, softened 1 cup of powdered sugar 1 teaspoon of vanilla 1/4 cup of water or milk (I used water)
Method
1. First, we make the dough! In a large bowl, combine the dry ingredients and stir. Then, in a separate bowl combine the wet ingredients, making sure the butter is completely melted before pouring the wet ingredients into the bowl with the dry ingredients.


2. Lightly flour a countertop and begin to knead the dough. Knead for about 5 minutes before placing it back in the bowl, covering it, and letting it rest for anywhere from 10 to 30 minutes.
3. Afterwards, bring the dough out and begin to roll it out in a rectangular shape. Spread the softened butter on top.
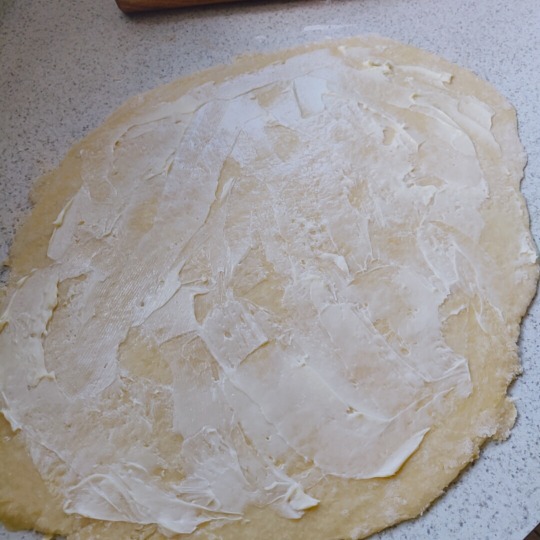
4. In a separate small bowl, mix together the cinnamon and brown sugar. Then, sprinkle it evenly across the buttered dough. Yes, I definitely could’ve sprinkled mine a bit better lol.
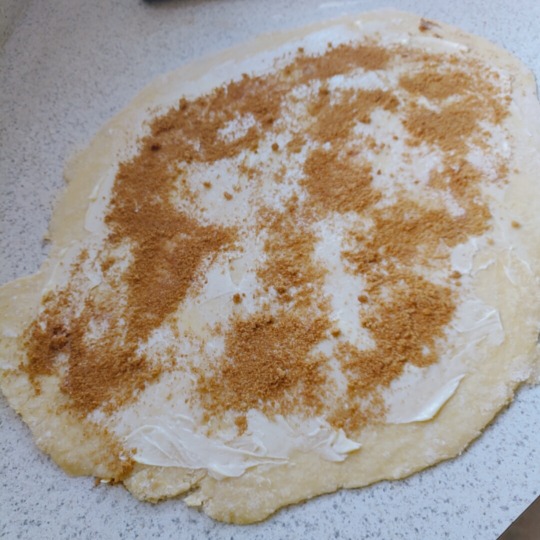
5. Finally, roll the dough from one end to the other tightly. Cut it into even sizes.

6. Lightly grease a 9-inch cake pan and place each roll upright inside. Cover with plastic wrap and let it rise in a warm environment for about an hour.

7. Preheat the oven to 375F. Once the buns have risen, pop them in the oven for 25-30 minutes until golden brown. In this time, you can start to make the icing.

8. Once done, bring the buns from the oven and smother them in the icing while still warm. And enjoy!
#ff7#final fantasy#final fantasy 7#ff7 remake#recipes#cinnamon buns#cinnamon rolls#nibel cinnamon buns
16 notes
·
View notes
Text
Dish Pizza
Hey everyone!
Today’s recipe is one I tested out for my birthday: Dish Pizza.

I love the way this turned out for several reasons, but the main one is that there’s a middle layer, so if you decide to add a bunch of extra toppings, you have have a stacked pizza. Stacked! Seriously, who wouldn’t want that? I mean, yes, it’s a bit messy to eat, but that’s just logistics.
In any case, this pizza recipe isn’t like the Midgar Special wherein the freshness of the ingredients is the most important thing. For the dish pizza, which is lovingly called that because it’s baked in a deep dish, quantity appears to be the most important thing. More cheese, more pepperoni--I’ve even seen versions with those baby sausages you can get at Gold Saucer, so really anything is fair game. If you’re looking for a solid but very chaotic pizza recipe, I’d give this a try!
DISH PIZZA
Ingredients
Pizza Dough 3 cups of flour 1 pack of instant dry yeast 2 teaspoons of sugar 1 teaspoon of salt 1 cup of water 2 tablespoons of salted butter at room temperature 2 tablespoons of oil (I used olive, but others work well here too)
I used the pizza sauce recipe from the Midgar Special.
3 cups of shredded cheese 2 cups of pepperoni 1 cup of mushrooms, chopped ...and any other toppings you’d like!
Method
1. Mix the ingredients for the crust first. You want to let the yeast dissolve in warm water before adding the rest of the ingredients (dry first, then wet). Once the dough is mixed, knead for about 5 minutes, forming it into a ball. Then, let cover in the bowl and let it rise for an hour. (For added flavour: drizzle the bowl with some of the oil!)
2. While that’s rising, combine ingredients for the pizza sauce and prepare the toppings. Then, chill. As in, you, relax for a bit. ;p
3. Once the rising time has passed, begin to preheat your oven to 425F and grease a 9-inch springform pan (or any 9-inch deep dish pan). You’ll want to now bring out the dough and begin to roll. I cut mine into thirds--2 thirds for the main crust and one third for the middle layer. With this particular recipe, there is a middle layer of dough, but if you’re not keen on it, it’s not mandatory to add.

4. Roll out the larger portion and wrap it inside the pan. Now we can begin layering toppings!

5. Dunk all the cheese into the bottom of the pan and cover with that remaining dough. Then, poke holes across it so the sauce can seep through and it can cook thoroughly.


6. Next, pour your sauce on top of this layer. Then, add your toppings and spread evenly on top.


7. Bake for 25-30 minutes until the crust is golden brown. Then, lower the temperature to about 400, and bake for another 5-10 minutes. To prevent the edges from burning, you can cover them with foil as well.

8. Let the pizza cool and set for about 10 minutes before serving. Enjoy!
9 notes
·
View notes
Text
Wutai Cheesecake
Hey guys!
Today’s recipe is one of my favourites: a Cheesecake from Wutai. :)
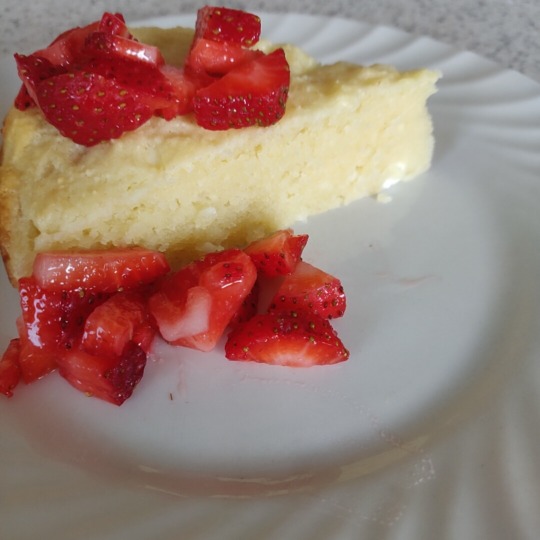
Wutai isn’t really known for its desserts, which is why it’s a really cool surprise that this dessert was even featured. I loved attempting it. Cakes are my favourite thing to eat but not my favourite thing to bake (hi, it’s me, an amateur), but this one is surprisingly easy. And it tastes great! Not too sweet, not too dense. The strawberries are optional, but I think they add a really great layer and I highly recommend adding them to your dish! :)
Now, I know this recipe isn’t a “cheesecake” in the traditional sense, but if you’re looking for a moist cake with a creamy taste, I highly recommend checking this one out :)
WUTAI CHEESECAKE
Ingredients
1 1/3 cups of flour 1/4 teaspoon of salt 2 teaspoons of baking powder 1/2 cup of sugar 1/2 cup of butter (either salted or unsalted works) 2 teaspoons of lemon juice 1 1/4 cup of ricotta cheese 3 large eggs 1 teaspoon of vanilla
Method
1. Preheat the oven to 350F. This recipe works best with springform, so grease a 9-inch pan on the bottom and sides. (It’s optional but you can use parchment paper on the bottom as long as you grease that as well).
2. In a bowl, mix flour, baking powder, and salt.

3. In another bowl, use an electric mixer to fluff the sugar, butter, and lemon juice until well-combined. Mix in each egg and the vanilla.

4. Now, begin to add the flour mixture in increments to the butter mixture. Don’t overmix here! You want to add about half the flour mixture, mix a bit, then add the ricotta cheese, and mix a bit too.
5. Finally, add the remaining flour mixture and mix until it’s just combined. It may be a bit thick, but that’s fine.

6. Pour the batter into the pan and spread it evenly. Let it bake for 40 minutes.

7. Remove from the oven and let it cool for about 5 minutes before popping open the springform pan. Let it cool further in the pan.
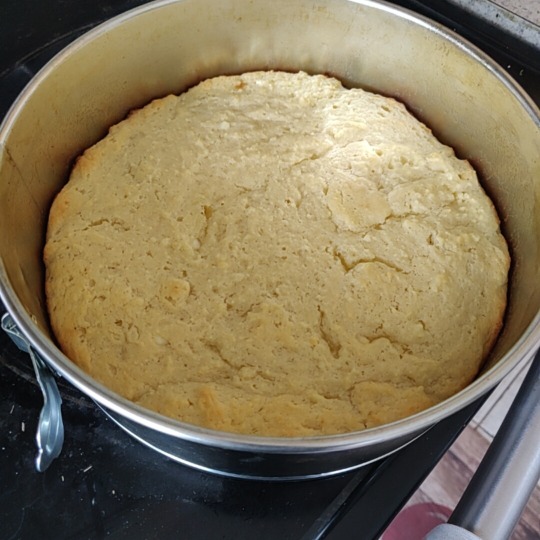
8. Slice and serve alone or with diced strawberries. Enjoy!
#ff7#final fantasy#final fantasy 7#ff7 remake#recipes#cake recipe#cheesecake recipe#wutai#wutai cheesecake
25 notes
·
View notes
Text
Cosmo Mini-Pies
Hey everyone!
Here’s a fun (but somewhat complex) recipe that makes a great appetizer: Cosmo Mini-Pies.

I love these! This dish actually has a different name in Cosmo Canyon, but I’m not sure what it is, and the cookbook doesn’t explicitly say what it is except that it exists. It’s fine, though, because that doesn’t take away from how good these taste lol. These pies are crisp, savoury, and a great midday snack. What’s great about them is that every culture has their own rendition of the “meat pie”, but the Cosmo version is my favourite.
I’ve seen some recipes where these mini-pies have chicken or chocobo or something, but I’ve chosen to go with the beef version. Also, I realize the existence of a mini-pie means that there’s probably a “full pie” out there, but no such thing exists as far as I know. Plus, who doesn’t love the prospect of eating through a million tiny pies? ;)
COSMO MINI-PIES
Ingredients
The Pastry 3 cups of all-purpose flour 1 cup of butter or margarine, cold 1 teaspoon of salt 1 teaspoon of baking powder 1/2 cup of cold water 1 egg
The Filling 500g of ground beef (or pork, or chicken, or chocobo) 1/2 cup of oil (vegetable or olive) 1 potato, diced 1 large carrot, diced 1 green onion, diced 2 tablespoons of onion powder 1 teaspoon of ground chili pepper 1 teaspoon of thyme 1 teaspoon of curry powder 1 seasoning cube 1/2 cup of water 2 tablespoons of flour A dash of salt
Method
1. You wanna make the dough first to set aside, so begin by mixing the flour, salt, and baking powder together. Add margarine or butter and mix until the consistency is crumbly.
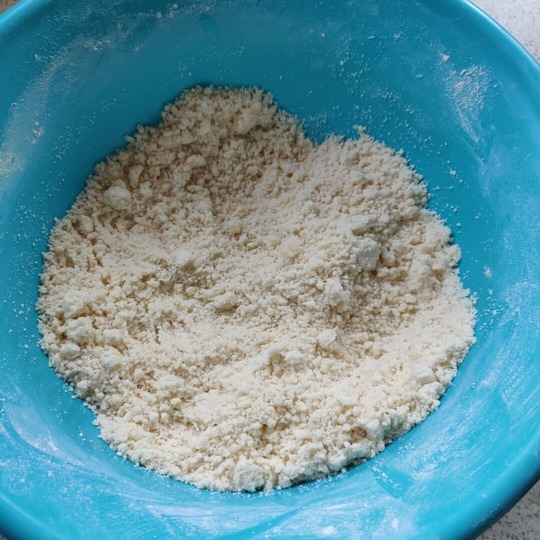
2. Add water bit by bit until the dough becomes stickier and moulds better. It should look something like this.

3. Set the dough aside. Time to make the filling! Cook beef for around 5 minutes on medium-low heat until all the pink is gone. Then add the vegetables and seasoning.
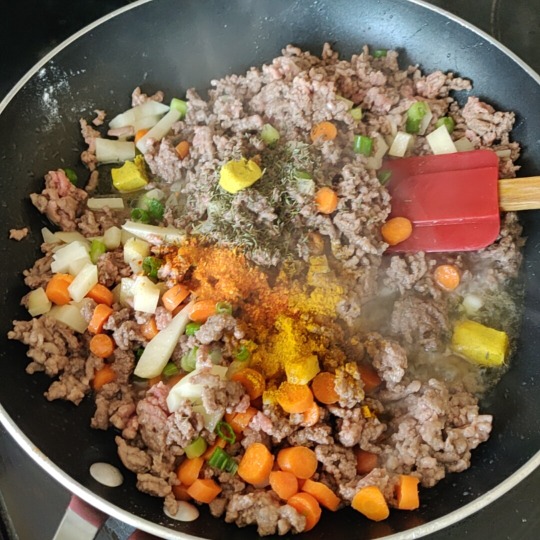
4. Cook for another 4-5 minutes. Then, add the water and flour, stirring into the beef filling until it thickens and takes on a creamier texture.

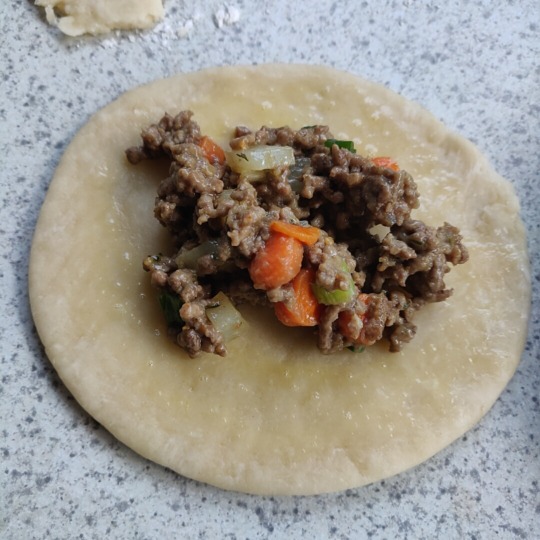
5. Back to the dough. Roll it out, cutting it in circles (I used a pot cover to help measure, but feel free to use whatever you have on hand). On the perimeter of each dough circle, brush some of the whisked egg. This will help keep the pies from separating. Then, place a spoonful of the beef filling in the center.
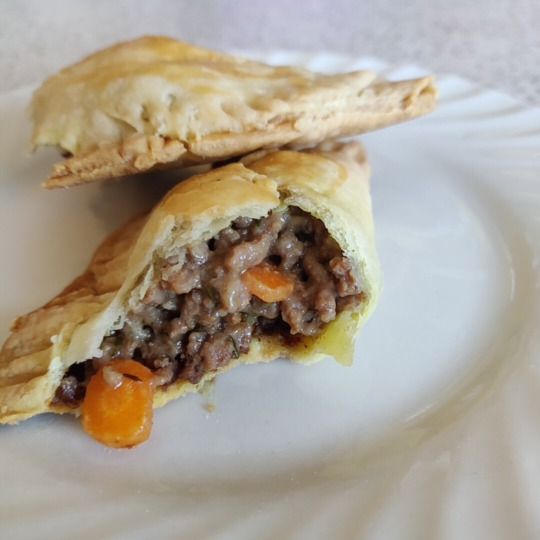
6. Close the dough in half and use a fork to press down on the edges to seal it further. Then, use the same fork to poke holes in the tops of the pies to allow steam to exit easily. Brush each pie with the whisked egg for some extra colour ;)

7. Bake for 30-40 minutes at 350F. Once done, remove from the oven and enjoy!

20 notes
·
View notes
Text
The Cheese Pie
Hi guys!
Today’s recipe is a pretty basic but really delicious Midgar staple: The Cheese Pie.

Okay, even I have to admit Midgar isn’t super clever when it comes to naming dishes. The Cheese Pie is a pretty generic name for what is -- if I can be pretty honest -- a fairly generic layered pasta dish. You can definitely customize it and add or take away components as you like.
What I like the most about this recipe is that it’s easy, as far as baked pasta dishes go, and it’s really flavourful. Personally, I think the basil adds a really great touch, and depending on the crushed tomatoes you use, there’s a certain sweetness in the sauce that’s awesome.
This recipe uses ground beef, but if you’d like to make it vegetarian, I’ve heard chopped mushrooms is a great substitute. If you try it out, let me know!
THE CHEESE PIE
Ingredients
1-2 packs of dry lasagna noodles 1 can (28 oz) of crushed tomatoes 1 cup of ground beef (you can substitute this for chopped mushroom) 1 clove of garlic, minced 1 small white onion, chopped (or green onion, if you prefer) 1 teaspoon of thyme 1 teaspoon of oregano 1 teaspoon of basil 500g of cottage cheese 2 cups of spinach, chopped 3 cups of Midgar blend cheese (any mozzarella-based cheese blend is fine) 2 teaspoons of salt 1 teaspoon of black pepper 1 tablespoon of olive oil 1 cup of water
Method
1. Cook and strain the noodles. Set them aside for now. It’s always a good idea to measure the pan you’ll be using to bake everything in later so you know the amount of noodles you’ll need. For example, I used a 13x9 pan, so I cooked 15 noodles (3 layers of 5 noodles each).
2. Now for the sauce! :) In a pot on medium-low heat, heat the oil, onion, garlic, and beef. Cook until the beef is browned.

3. Then, add the water, crushed tomatoes, and seasoning. Cook for 8-10 minutes, stirring until combined and simmering. At this point, you may also want to start preheating the oven at 375F.

4. Now, time to make the cheese and spinach filling. In a bowl, mix the cottage cheese and chopped spinach until you get something that looks like this.

5. Now to combine everything and start layering. Place a cooking spoons-worth of sauce on the bottom of the pan before putting your first layer of noodles on top. Then, cover with another layer of sauce.

6. Now to add the cheese and spinach layer. Spread it evenly across the pan and top with about a cup of the mozzarella cheese blend.

7. Add another layer of noodles, the remaining sauce, and the remaining mozzarella cheese blend to top it off. Bake for 25-30 minutes.
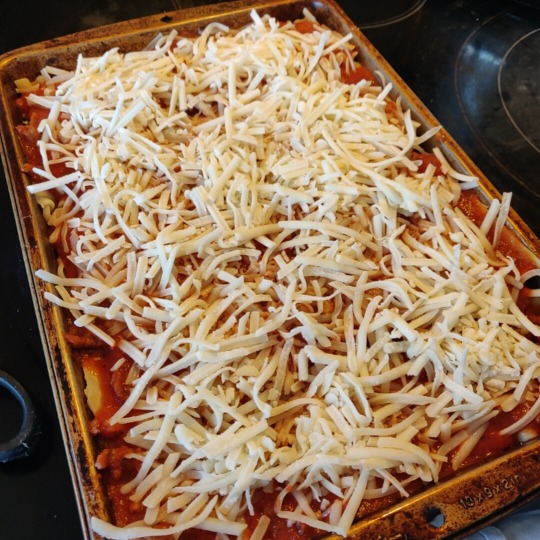
8. Once it comes out of the oven, let it sit for about 10 minutes. Then, serve and enjoy!

10 notes
·
View notes
Text
Choco’s Cookies
Hi everyone!
I can’t believe I’ve gone this long without trying out such a simple recipe! Today’s recipe is: Choco’s Cookies.

Before you ask, no one knows who Choco is lol. There’s some speculation this could be chocobo related, but there’s no meat in these cookies, so that theory is dead. A handful of people seem to think that this recipe comes from the Kalm region, which is already known for chocobo farming, but even still, these are chocolate chip cookies. Meatless cookies.
In any case!! I’m excited to show off this one today because of its simplicity and sweetness. It’s the end of the year and what better way to cap it off with a fun batch of cookies :) There are other modifications of this recipe, but this one is pretty basic. Also, I’d implore you to make these ahead of time -- they refrigerate overnight, so if you know you’ll want cookies tomorrow, better start today.
Also also, this recipe yields like 40 cookies. So be prepared for that lol.
CHOCO’S COOKIES
Ingredients
2 3/4 cups of flour 1 1/4 teaspoons of salt 1 teaspoon of baking powder 1 teaspoon of baking soda 1 1/4 cups of butter, softened and room temperature 3/4 cup of brown sugar 1/2 cup of white sugar 2 eggs 1 teaspoon of vanilla 2 cups of semi-sweet chocolate chips
Method
1. First, prep the dry and wet ingredients separately. Know that the recipe calls for a stand mixer, but I don’t have one (only a hand mixer!) so if you too are stand-mixer-less, don’t worry about it.

2. Mix the flour, salt, baking powder, and baking soda in a medium bowl. Then, in a larger bowl (or your stand mixer), beat the butter and sugars on medium for about 5 minutes until fluffy. Beat in the eggs one at a time. Then the vanilla.

3. Then, gradually add the flour mixture. Mix until just combined. Choco’s cookies are best when they’re not over-mixed.

4. Fold in the chocolate chips and mix until evenly distributed.

5. Now for the fun (not fun) part: refrigerate overnight! I packed my dough in cling wrap to make it easier. (Note: To be fair, I’ve seen recipes where you don’t have to refrigerate overnight, just for a few hours. If you’re short on time, feel free to try that [and let me know how it goes!])

6. Good morning, it’s 11am, time to bake! ;) Preheat the oven to 350F.
7. You may either use an ice cream scoop or, if you wrapped the dough like I did, you can just slice each cookie about an inch each and place them on a lined baking sheet. Make sure each cookie is about 2 inches apart or you’ll end up with a pizza.

8. Bake for 15-18 minutes, or until the edges are golden brown.

9. Take them out of the oven and let cool for 5 minutes. Then transfer them to a cooling rack to cool completely. Enjoy!
15 notes
·
View notes
Text
Condor Chicken
Hi everyone!
Today’s recipe is a good one for the holidays: Condor Chicken.

This recipe has some similarities to Wutai cuisine, but the biggest difference is in the addition of apple cider vinegar. A few popular dishes from the Fort Condor area use vinegar in everything. The result? A subdued tang for meat and vegetables. Not too tart and not too sweet. It’s a really great balance for those who want a flavourful dish without that cheek-pinching sourness.
In any case, this recipe yields 10 servings (or 5, if you’re adventurous) and is perfect for larger dinner gatherings. It’s one of my favourite chicken recipes from the cookbook too!
CONDOR CHICKEN
Ingredients
10 chicken thighs, boneless and skinless 1/4 cup of soy sauce 1/4 cup of sugar 1/4 cup of apple cider vinegar 1 clove of garlic, minced 1/4 teaspoon of black pepper 1/4 teaspoon of ground ginger 1 tablespoon of cornstarch 1 tablespoon of cold water
Method
1. Mix the soy sauce, sugar, vinegar, garlic, black pepper, ginger, cornstarch and water together in a bowl. Then, add the chicken, coating the chicken with the mixture. Refrigerate for 30 minutes.

2. Preheat the oven to 400F. Grease a 9x13 pan and place the chicken inside.

3. Bake for 30 minutes on one side. Flip over, pour the remainder of the marinade over the chicken, and bake for another 15 minutes.

4. Broil on each side for 4 minutes. Just for a bit of colour :)

5. Take out of the oven and let cool for a few minutes before serving (I served mine with garlic mashed potatoes, but you can choose whatever you’d like). Enjoy!
5 notes
·
View notes
Text
Gold Gravy Fries
Hi everyone!
It’s the festive season, so what better way to celebrate it than with today’s recipe: Gold Gravy Fries.

If you’ve ever been to the Gold Saucer around this time of year (and select times during the summer), you’ll remember these monstrosities. I only say monstrosities because no one should be eating this much gravy and cheese and fries on the regular lol. It’s a once-in-awhile treat and one I was really eager to recreate at home!
The key to good Gold Gravy Fries is to remember that more is better. Seriously, you don’t want to skimp on any part of this otherwise you’ll be doing yourself a disservice. Enjoy the grease. Become one with the cheese.
For this recipe, you can make what you like from scratch or be like me and buy everything separately to assemble. I also won’t tell you what quantity to use. The choice is yours!
GOLD GRAVY FRIES
Ingredients
Taters (can use fries, but taters or even wedges are better) Gravy (chicken preferable) Mozzarella cheese White cheddar cheese curds Sour cream Green onion
Method
1. Fry up the taters first. Ideally you want enough for one portion and then some, but I won’t tell you how to live your life.
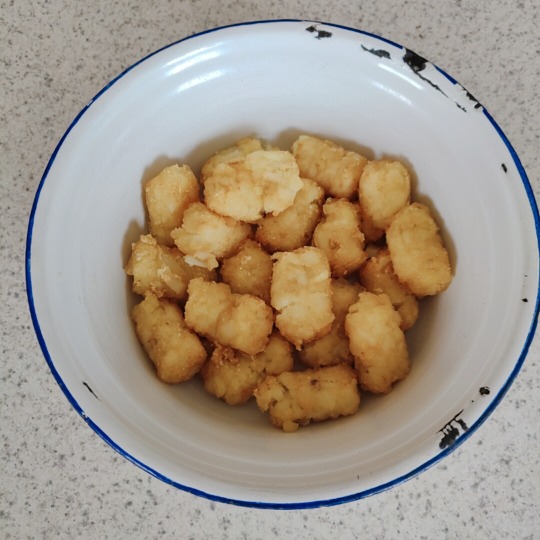
2. In a flat-based bowl (not like a mixing bowl, but an actual bowl for one person!), line the first layer of taters. Pack it in as much as possible. Then, layer with mozzarella cheese.

3. Toss on the second layer of taters. Seriously, pack it in as much as possible. A good Gold Gravy Fries is dense (and, therefore, worrying).

4. Dump on a decent handful of the cheese curds. Shyness is not necessary.

5. Then, slather the whole thing in hot gravy. Your gravy shouldn’t be too thick or too watery. The official Gold Gravy Fries are cool because the gravy permeates both layers of taters easily. If you’re unsure if it’s dripped to the bottom layer, add more.
6. Add a dollop of sour cream in the centre. Top with a handful of cut green onions.
7. Enjoy!

12 notes
·
View notes
Text
Mideel Half-Moon Cake
Hi everyone!
Today’s recipe is a quirky fave: Mideel Half-Moon Cake.

This cake is named this way as a part of a festival that takes place in Mideel around the half moon, naturally. It’s a vegan cake (minus the icing, which is optional!) and, according to the cookbook, it wasn’t always chocolate, but over time, constant imports from Gongaga has made this traditionally vanilla cake a chocolate or cocoa one. I’ve even seen some older recipes where the cake isn’t chocolate, but if you go to Mideel, you’re more likely to get this version.
I know this cake is often advertised as 100% vegan, but what I like the most about it is the icing. Sorry y’all lol. It’s light, it’s fluffy, and it makes for a good garnish on top of a semi-sweet cake. In general, this is a good cake to eat at night, if you’re having it as part of the festival or as a nighttime snack. Plus, chocolate is my favourite food, so I might be a bit biased. ;)
MIDEEL HALF-MOON CAKE
Ingredients
Cake 1 1/4 cups of all-purpose flour 1/4 cup of cocoa powder (Gongaga cocoa is ideal) 1/2 cup of powdered sugar 1 teaspoon of baking soda 1/2 teaspoon of salt 1/2 teaspoon of instant coffee 1/3 cup of oil (olive works best here) 1/2 teaspoon of vanilla extract 1 cup of warm water 1 teaspoon of white vinegar
Frosting 5 cups of icing sugar 1/2 cup of cocoa powder 1 cup of butter, softened 1/2 cup of milk 1 teaspoon of vanilla
Method
1. For this recipe, it’s best to make the frosting first since it needs to cool. Whip the softened butter for about 5 minutes. Once the butter starts getting light, add the icing sugar in thirds, and mix well. Then, add the cocoa powder slowly and continue to mix, even if it looks dry (and it will look dry). Once everything is combined, add the milk slowly and continue to mix until you get a lighter texture. Mix well and refrigerate for 30 minutes. It should look like this:

2. Preheat the oven to 350F and grease a round 9″ cake pan.
3. In a bowl, combine the cake’s dry ingredients. Then, add the vanilla and oil. Finally, add the remaining wet ingredients and mix well. If you’re using an electric beater, it’s best to beat on low.

4. Pour batter into pan and bake for 40-45 minutes.
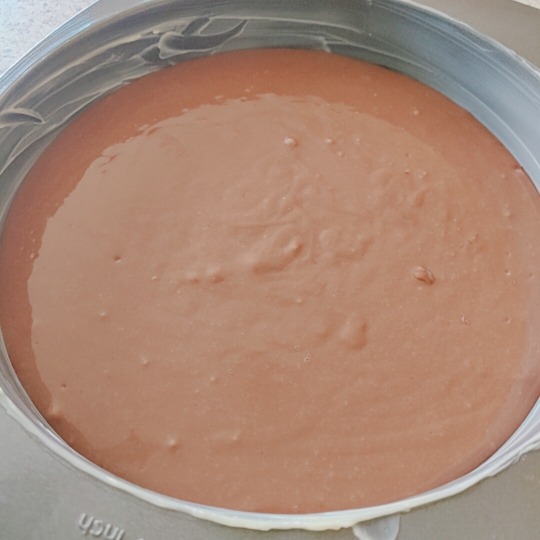
5. Remove from the oven and let it cool for 10 minutes in the pan. Then, remove it from the pan and cut the cake directly in half. Let the cake cool completely.

6. Ice the cake once chilled and serve. Enjoy! :)

#ff7#final fantasy 7#ff7 remake#final fantasy#recipes#vegan#chocolate cake#mideel#mideel half moon cake#chocolate cake recipe
8 notes
·
View notes
Text
Wutai Stir-Fry with Chicken
Hiya!
Today’s recipe really leans into the healthy trend: Wutai Stir-Fry with Chicken.

This is just one of many stir-fry recipes from Wutai (and one of many in the cookbook!) but it’s my favourite because it’s. so. good. I know that isn’t a good enough reason, but it’s the only reason I have, soooo. ;)
In any case, this recipe has a lot of moving parts, but the result is well worth it. What’s cool about this recipe in particular is the tangy sweet taste, the use of what some people refer to as the “Wutai vegetable mix” (broccoli + cauliflower + carrots), and the flexibility of the meats. You can use beef, you can use tofu, you can use chocobo if you want. I used chicken because it produced the best taste for me, but I implore you to try out whatever you traditionally enjoy most! You can pair this dish with noodles or with rice, or on its own if you prefer a carb-less option.
WUTAI STIR-FRY WITH CHICKEN
Ingredients
1 large chicken breast, skinless, boneless, sliced into bite-sized long pieces (or beef, or tofu, or chocobo, etc) 1 green onion, sliced 2 cloves of garlic, minced 1/4 cup of soy sauce 1/2 tablespoon of sugar 1/3 cup of water 1 tablespoon of cornstarch (1/2 tablespoon of flour works ok here too) 1/2 teaspoon of red pepper flakes Olive oil 2 cups of broccoli, sliced* 1 cup of carrot, sliced* 1 cup of cauliflower, sliced*
*You can change the amounts here depending on preference. I’ve seen some Wutaian Blend vegetable packs that contain all three, so using a pack of that in any quantity is perfectly fine too.
Method
1. Slice the chicken into long, bite-sized pieces. In a bowl, combine the soy sauce, garlic, sugar, red pepper flakes, and green onion. Then let the chicken marinate for about 30 minutes.

2. After 30 minutes, separate the meat from the marinade. Dissolve the cornstarch in water, and add that to the marinade and mix well.

3. Now time to fry! Heat a skillet or pan on medium-low and add about a tablespoon of olive oil. Then, fry the vegetables for about 2-3 minutes. (If they’re frozen, fry them for about 3-5 minutes instead). Then, remove the vegetables from the pan and set aside.

4. Add another tablespoon of olive oil into the now-empty pan, and fry the meat. Stir-fry for about 3-4 minutes or until the meat is no longer completely raw. Then, add the vegetables back in. Then, add the marinade. Cover and let cook for 2 minutes. Then, uncover and continue to cook for another 5-7 minutes, depending on how much longer the meat requires.

5. And you’re done! Serve with fresh white rice or noodles. Enjoy! :)
17 notes
·
View notes
Text
Mideel Creamy Tomato Pasta
Hi everyone!
Today’s recipe is a much-easier-than-it-looks pasta dish from Mideel: Creamy Tomato Pasta.
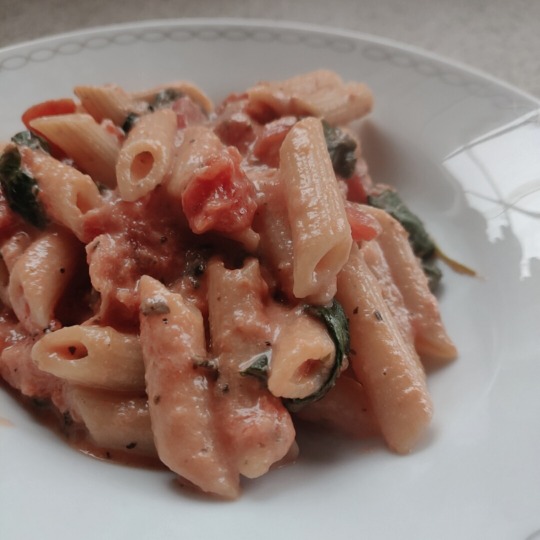
Mideel was almost a vacation spot until that lifestream accident, but really, what can we expect from a place where the lifestream flows pretty close to the surface? Mideel is literally an ecological wonder. Fruits grow fresher, and vegetables are much juicier in this area. That’s why I’m not at all surprised by how good this recipe is.
A standard size of this dish calls for using about half a dozen diced tomatoes, fresh spinach, and cream cheese. All delicacies! Because of the mixing of flavours and the (assumed) freshness of the vegetables, this dish ends up being surprisingly healthy. As long as you don’t eat the whole pot, that is. Which is a real problem, I’m telling you ;)
CREAMY TOMATO PASTA
Ingredients
3 cups of pasta (penne is preferred, but use whatever you prefer) 1 28oz can of diced tomatoes (or 4 large tomatoes, diced) 1 1/2 teaspoon of oregano 1 1/2 teaspoon of basil (fresh and dried is best. The Mideel variety is A+!) 1/2 cup of crushed tomatoes 1 tablespoon of tomato paste 1 small white onion, diced 4 cloves of garlic, minced 1 1/2 teaspoon of salt 2 tablespoons of olive oil 1/3 cup of cream cheese, softened 3 cups of spinach
Method
1. Boil the pasta, strain, and set it aside. Only boil it for 7-8 minutes. You want to make sure it’s not too soft.
2. In a saucepan or nonstick pot (I used a pot), on medium-low heat, heat oil, add onion and garlic, and saute for 3-5 minutes. Then, lower the heat, and add the tablespoon of tomato paste, the diced tomatoes, the crushed tomatoes, and the seasoning. You can add some of the water from the diced tomatoes, if you use a can. If you used fresh tomatoes, then adding 1/2 cup of water is fine.

3. Let it cook for about 3-5 minutes. Add the cream cheese. Once it mixes in, you should get something like this:
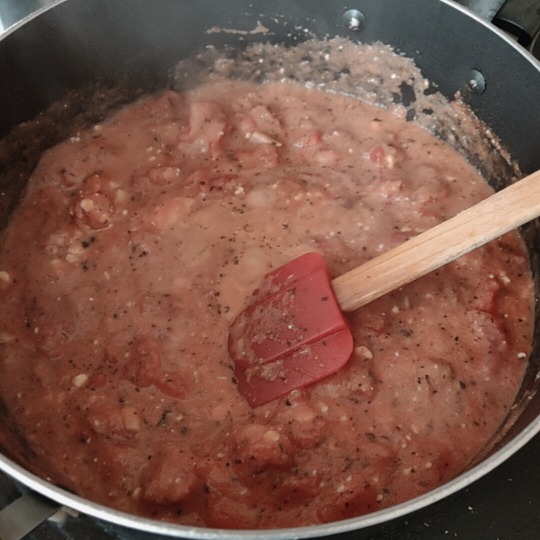
4. Now, add the spinach.

5. Cook until the spinach practically disappears. So it should look something like this:

6. Finally, add the pasta and let cook for another 5 minutes. Remove from the fire and serve warm.
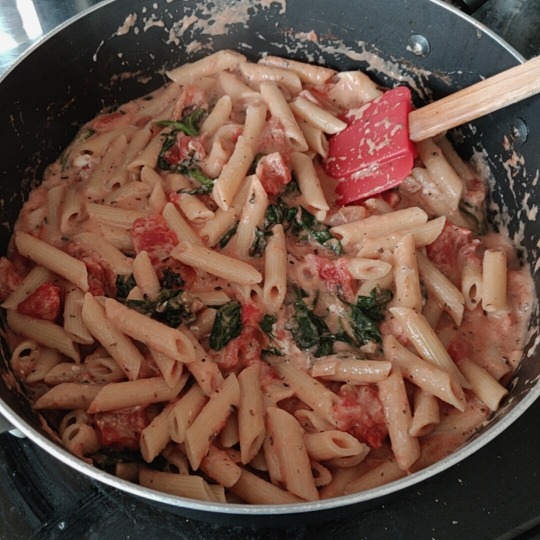
7. Enjoy!
#ff7#final fantasy 7#final fantasy#ff7 remake#mideel creamy pasta#recipe#pasta recipe#mideel#mideel creamy tomato pasta
9 notes
·
View notes
Text
Cosmo Flatbread
Hi everyone!
Here’s another traditional recipe straight from Cosmo Canyon: Cosmo Flatbread.

What I think is really cool about the Cosmo Canyon portion of this cookbook is the authenticity of each of the recipes and the diversity in the selection. It's obviously hard to make a recipe like this and not draw attention to the cultural context, so here goes: this flatbread was often made before important ceremonies, like naming ceremonies or weddings, and apparently used to be given at events like housewarmings. The significance changed over time, but the cookbook says it symbolizes a fresh beginning. So here you all go: a fresh bread for a fresh beginning! :)
A lot of Cosmo cuisine is simple and hearty, and this flatbread is no exception. What I like most about it is that it’s dense without being overly filling, and it has such a nice, almost corn-like taste. I’ve heard a variation can be made with cornmeal or corn flour, but don’t quote me on that.
COSMO FLATBREAD
Ingredients
3 cups of flour (all-purpose works best here) 2 tablespoons of baking powder 1 1/2 teaspoons of salt 1/2 cup of butter, melted 1 1/2 cups of water
Method
1. Preheat the oven to 350F. Combine the dry ingredients first in a large mixing bowl. I’d suggest not using a mixer for this as it’s easier (and fun!) to mix by hand. Plus, traditionally, Cosmo Canyon residents mixed by hand to get a better texture and we want to get ours as close to authentic as possible :)

2. Add melted butter and water and mix until the batter becomes dough. Turn the dough onto a lightly floured surface and began to knead. You don’t need to over-knead the bread here, by the way.

3. Here’s where you can shape the bread however you want. Some recipes have it sectioned into hand-sized balls, but I’ve decided to go with a large loaf. Use your hands to press out the dough until it’s just under an inch thick.

4. Then, on a lightly greased pan, place the dough in the center and bake for about 25-30 minutes.
5. Take out of the oven and let cool for a few minutes. Enjoy! :)

4 notes
·
View notes
Text
Nibel Lemon Chicken
Hiya!
Today’s recipe is a tangy take on a classic meat-and-potatoes dish: Nibel Lemon Chicken.

Do you remember when I said mostly all Nibelheim cuisine is meat and fermented vegetables? Well, here’s a real vegetable for you! Although fermented veggies tend to be more popular, potatoes seem to have found their way into almost every cuisine on Gaia. I suspect it’s their versatility, but the cookbook doesn’t say much about a historical importance. Either way, this recipe has been around for decades.
If you’re a fan of succulent but tangy chicken recipes, you’ll really, really, really like this :) I’ve seem some recipes that substitute the chicken for chocobo, and while I can’t 100% recommend that, you’re obviously welcome to try whatever bird you prefer. Chicken is a bit more tender, and coupled with the lemon and the potatoes? God tier, I’m telling you!
NIBEL LEMON CHICKEN
Ingredients
6 chicken thighs, skin-on, bone-in 4 tablespoons of butter (salted or unsalted is fine) 12 small red potatoes, each cut in quarters 1/2 teaspoon of salt 1/4 teaspoon of oregano 1/4 teaspoon of chili powder 1/4 teaspoon of black pepper 1 cup of water 1 lemon, cut into 7-8 slices 4 cloves of garlic, thinly sliced Parsley
Method
1. Season the chicken with 1/4 teaspoon of salt and the oregano, chili powder, and black pepper. (You’ll need the last 1/4 teaspoon of salt later!) Then, in a saucepan or skillet, on medium-high heat, melt the butter and place each piece of chicken skin down in the pan. Cook for about 5 to 6 minutes, or until the skin is properly brown.

2. Flip the chicken over and lower the heat to medium. Scatter the potatoes around the chicken. Then, place the lemon and garlic around the pan. Add 1/4 teaspoon of salt and 1 cup of water. Cover and let cook for about 8-15 minutes. The key is to let it cook long enough that the potatoes are softened. You want to be able to poke a fork through one easily.

3. Uncover the dish and let it continue to cook on medium for about 8 minutes, until the liquid has dried up for the most part. You may also want to shift the potatoes around a little so prevent burning.

4. Then, remove from heat, remove the lemons, and sprinkle with parsley to finish.
5. Enjoy!

7 notes
·
View notes
Text
Nibel Sauersliders
Hi everyone!
Today we’re trying out a cool, perfect-for-lunch recipe: Nibel Sauersliders.

Cuisine from the Nibelheim region features two things: a lot of meat and a lot of fermented vegetables. Though the fermented vegetables may not appear in every dish, it’s pretty scarce to find a traditional Nibel dish that is vegetarian. Doesn’t mean you can’t try, if that’s what you’re looking for! It’s kinda hard to grow anything in a quantity necessary for exporting out in this mountainous region (uhhh vodka is another story), so cattle farming became a serious business venture for most of the town. Wasn’t there that one statistic? Nibelheim had the highest concentration of cattle farmers? I can’t remember.
Anyway! Sauersliders are great because they’re mild in taste and traditionally used both of Nibelheim’s prime exports. Of course with trade opening up, you can get the ingredients from anywhere, but this recipe is a great ode to a time long past.
NIBEL SAUERSLIDERS
Ingredients
2 pounds of ground beef (for 8 even sliders) 1/2 teaspoon of: salt, thyme, and paprika 1/2 teaspoon of chopped garlic (can opt for garlic powder here) 1/2 teaspoon of chopped onion (can opt for onion powder here) 1/4 teaspoon of black pepper 1/4 teaspoon of chili powder 8 dinner buns Ketchup Dijon mustard Wine sauerkraut (or, sliced dill pickles if you prefer)
Method
1. In a medium bowl, combine ground beef and spices. Mix everything up until it’s semi-uniform.
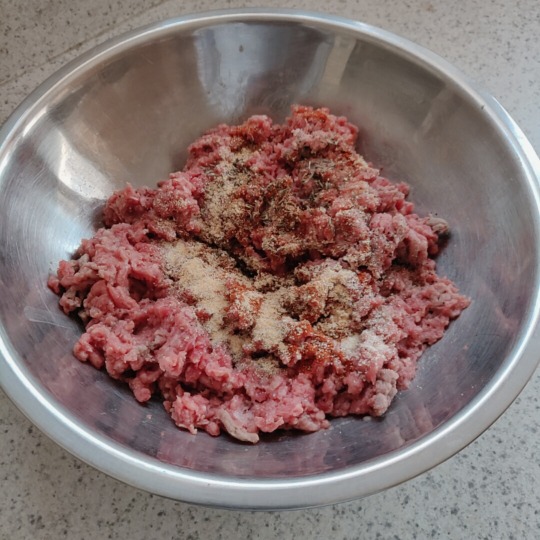
2. Separate the beef mix into eight different burger patties. They shouldn’t be any bigger than the palm of your hand.
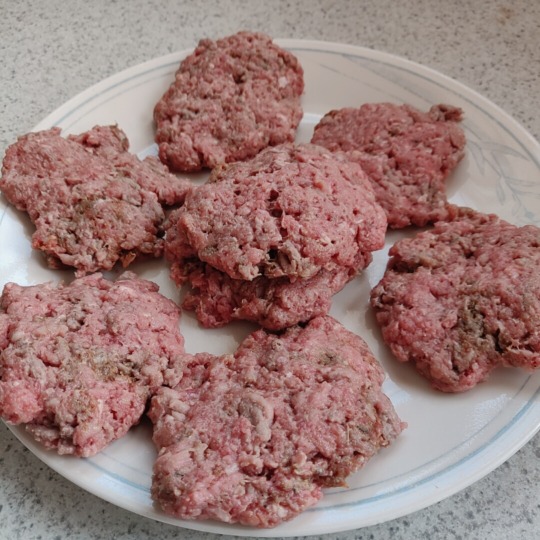
3. Prepare the grill! Heat the grill for about 3 minutes before setting the first batch of sliders on there. I only had room to do about four at a time, and I cooked them uncovered. If you don’t have a grill, a saucepan on medium-high heat will be fine, just be careful to not let the burgers get too dry.
4. Cook on one side for about 5 minutes before flipping over for another 4.

5. Once done, remove from the grill and set each slider on a bun.
6. The traditional sauce really is a glorified Dijon mustard and ketchup mix (don’t tell anyone I said that), so mix a one-to-one ratio for each together and spread across the top side of the bun.

7. Top the burger with about a 1/2 teaspoon of sauerkraut. Put the top bun over the sauerkraut and you’re done!
8. Enjoy!

5 notes
·
View notes