Text


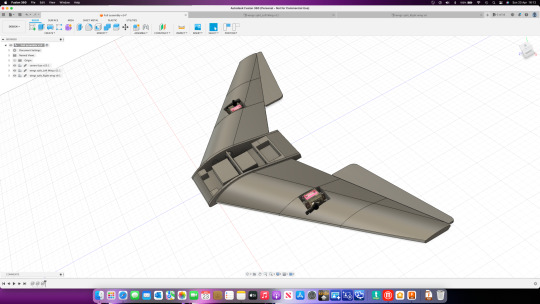
New brain for my large 3D printed wing
Absolutely no documentation on this thing, bought it many years ago and used it on a large tricopter, wanted to reuse old parts.
0 notes
Text


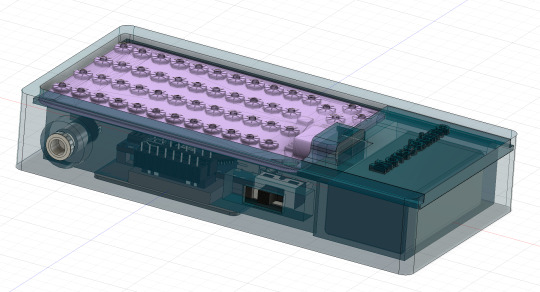
Morseduino keyboard based CW keyer
Based on an Arduino nano and CardKB mini keyboard. The parts you need to build it are
Arduino nano
CardKB mini keyboard
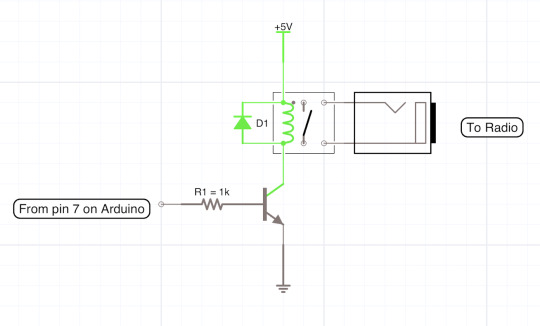
BC547 NPN transistor
1K resistor
5v reed relay
Socket for the reed relay
Stereo jack for the output
Two on-off-on switches, for speed and power
3D printer to make the enclosure
link to enclosure below


Wire up the speed switch with the centre pin to D13 of the Arduino, this is the reference pin. Connect the either side of the speed switch to D2 and D3 respectively
Wiring up the relay

The diode is not needed with a reed relay IC

The Arduino code
You will need this for the hardware to work, copy and paste it into Arduino IDE. Please respect my work and leave the top comment in.
/*
(c) 12/10/2024 Morseduino by Robert Rayner, M0YNW
This software has no warranty and you use it at your own risk.
*/
#include <Wire.h>
// Define pins for relay and LED
const int relayPin = 7; // relay output
const int ledPin = LED_BUILTIN; // built in LED (specify pin number if using an external LED)
const int speedSwitchA = 2; // Pin connected to one side of the switch
const int speedSwitchB = 3; // Pin connected to the other side of the switch
const int fastWPM = 20; // Fast speed (20 WPM)
const int slowWPM = 12; // Slow speed (12 WPM)
int wpm = fastWPM; // Default WPM is set to fast
// Morse code timing variables
int dotDuration, dashDuration, elementSpace, letterSpace, wordSpace;
// Morse code representation for characters (A-Z, 0-9, /, =, . ?)
const char* morseCodeMap[43] = {
".-", "-...", "-.-.", "-..", ".", "..-.", "--.", "....", "..", ".---", // A-J
"-.-", ".-..", "--", "-.", "---", ".--.", "--.-", ".-.", "...", "-", // K-T
"..-", "...-", ".--", "-..-", "-.--", "--..", // U-Z
"-----", ".----", "..---", "...--", "....-", ".....", "-....", // 0-5
"--...", "---..", "----.", // 6-9
"-..-.", "..--..", "-...-", ".-.-.-" //Special characters: / . ? =
};
// CardKB I2C address
#define CARDKB_ADDR 0x5F
// Function to map character to Morse code
const char* getMorseCode(char c) {
if (c >= 'A' && c <= 'Z') {
return morseCodeMap[c - 'A'];
} else if (c >= '0' && c <= '9') {
return morseCodeMap[26 + (c - '0')];
} else if (c == '/') {
return morseCodeMap[36]; // Morse for /
} else if (c == '?') {
return morseCodeMap[37]; // Morse for ,
} else if (c == '=') {
return morseCodeMap[38]; // Morse for =
} else if (c == '.') {
return morseCodeMap[39]; // Morse for .
} else {
return ""; // Return empty for unsupported characters
}
}
// Function to read the slide switch and set WPM
void readSpeedSwitch() {
// Read both switch states with internal pull-up resistors enabled
int switchAState = digitalRead(speedSwitchA);
int switchBState = digitalRead(speedSwitchB);
// Update WPM if one switch is high and the other is low
if (switchAState == LOW && switchBState == HIGH) {
wpm = fastWPM; // Set WPM to fast speed (20 WPM)
} else if (switchAState == HIGH && switchBState == LOW) {
wpm = slowWPM; // Set WPM to slow speed (12 WPM)
}
// Update timing variables based on the current WPM
updateWpmTiming();
}
// Function to transmit Morse code
void transmitMorse(const char* morse) {
while (*morse) {
if (*morse == '.') {
digitalWrite(relayPin, HIGH);
digitalWrite(ledPin, HIGH); // Turn on LED
delay(dotDuration);
digitalWrite(relayPin, LOW);
digitalWrite(ledPin, LOW); // Turn off LED
delay(elementSpace);
} else if (*morse == '-') {
digitalWrite(relayPin, HIGH);
digitalWrite(ledPin, HIGH); // Turn on LED
delay(dashDuration);
digitalWrite(relayPin, LOW);
digitalWrite(ledPin, LOW); // Turn off LED
delay(elementSpace);
}
morse++;
}
delay(letterSpace); // Space between letters
}
// Function to read a key from CardKB
char readCardKB() {
char key = '\0'; // Initialize with null character
Wire.requestFrom(CARDKB_ADDR, 1); // Request one byte from the CardKB
if (Wire.available()) {
key = Wire.read(); // Read the byte from the CardKB
}
return key; // Return the key (or null if nothing was read)
}
// Update WPM and timing variables based on new WPM
void updateWpmTiming() {
dotDuration = 1200 / wpm;
dashDuration = dotDuration * 3;
elementSpace = dotDuration;
letterSpace = dotDuration * 3;
wordSpace = dotDuration * 7;
}
void setup() {
Serial.begin(9600);
pinMode(relayPin, OUTPUT);
pinMode(ledPin, OUTPUT); // Set the LED pin as OUTPUT
Wire.begin(); // Initialize I2C communication with the CardKB
// Enable internal pull-up resistors for the switch pins
pinMode(speedSwitchA, INPUT_PULLUP);
pinMode(speedSwitchB, INPUT_PULLUP);
digitalWrite(13, HIGH); //connect this to the centre pin of the speed switch
updateWpmTiming(); // Set initial WPM and timing values
}
void loop() {
// Read the current position of the slide switch
readSpeedSwitch();
// Read key from CardKB
char c = readCardKB();
if (c != '\0') { // If a key was pressed
Serial.print("Key pressed: ");
Serial.println(c);
const char* morse = getMorseCode(toupper(c)); // Convert to uppercase and get Morse code
if (morse[0] != '\0') { // If valid Morse code
transmitMorse(morse);
} else if (c == ' ') { // Handle space between words
delay(wordSpace);
}
}
}
0 notes
Text


KK2 tricopter complete, also crashed on maiden flight, broke the servo, the frame remained rock solid, my fault for using a plastic geared servo.
Replaced it with an MG servo, flies great.
#rc#tricopter#fpv#drone#3dprinting#3dprint#mini tricopter#3d printed#flying#flight#crash#tricopter crash#servo
0 notes
Text

Rebuilding my KK2.0 based tricopter in 250 style frame fully 3D printed.


0 notes
Text

My new UMX Timber Turbo 😊
The most docile and fun thing to fly, it's really lightweight, with full flaps engaged it lifts off effortlessly, even hand launching is a breeze, no need to throw, just a push and it takes off.
If you're new to the hobby, I highly recommend this plane, very beginner friendly.
I recommend not flying in wind over 10mph due to its small size and weight
Horizon Hobby recommends a battery 3s 350mAh, I was flying a 3s 450mAh.
I do have an 850mAh 3s lipo but it's heavier than my 450mAh, so it could make it nose-heavy, meaning I'll have to move it back, the only issue with that is the FC with the servos are right behind the battery, so there isn't much room to move it back, the 450 battery seemed about right.
😊☁️
1 note
·
View note
Text

Close up macro of my nixie clock
10 notes
·
View notes
Text


Update on the 3D printed plane.
I've installed all the electronics and it's ready for a maiden flight, I will hook it up to the laptop to make sure everything is set correctly, then check the CG, fit the prop and fly 🙂
1 note
·
View note
Text

It's my 10 year anniversary on Tumblr 🥳
0 notes
Text


Got a new 3D printer, the Bambu Labs P1P, after using it to print its own enclosure, I loaded it with red PLA, downloaded the Eclipson model A plane and printed it in 2 days 😊
0 notes
Text


A new wing build,
Designed Autodesk Fusion 360 on an M1 MacBook Air and printed using my CTC printer that's around 8 years old.
I'm using tough PLA.
It had its maiden flight today, flew nice and level until the glue holding one of the wings on let go, fortunately it was on the ground when it happened, so just reattached it with a little more glue then I'd used before, it's holding well.
If the weather holds out I'll take it for another flight.
0 notes
Text


Pizza box flying wing, made entirely from one pizza box and two toilet roll centres for the EDF motor.
I'm using a Frsky nano receiver going into a FC151 dualsky unit.
Two 9g servos.
This is the second of two wings I've built this weekend, the first failed the test fight, as I stupidly forgot the centre spar and the wing flattened out, caused loss of lift. 🤣
This thing needs a name.
0 notes
Photo

This is the state of the oled display on my Pi-Star hotspot, I set it to show all pixels on with no other text displayed, the worn parts of the screen are clearly visible.
It’s burned in after 4 years of constant use.
0 notes
Photo

Hazy Autumn Sunset taken with my Mavic Pro
0 notes
Text


Got some stick time between the rain showers.
There’s something nice about capturing photos on a cloudy day, processed in black and white, it really makes the clouds pop out 😊
0 notes
Photo


The previous crash in the woods did more damage than I previously thought, it cracked the top case (circled in the first picture).
I ordered a replacement part and set about replacing it, the second picture shows the Mavic with the top off. Don’t be like me and forget to transfer the compass over to the new top before doing it all up, or you’ll end up having to take it all apart again, also use good quality Allen keys or you’ll strip the screw heads, they’re quite soft.
To cut the long story short, it’s working again, damage free, just like it was.
0 notes
Video
youtube
I crashed my Mavic Pro for the first time in 5 years since I bought it.
It was a combination of software failure and accidental human error. Luckily nothing serious in terms of damage, just four props and covered in mud, these things are really built tough. I think what also saved it is the arms fold up, when I got to it, one of the front arms was folded back, I’d thought it had snapped, you could imagine my relief when I saw it wasn’t.
Did a motor test and checked it over, camera and all, everything checked out, so it must be a problem either with my phone, or the cable connecting it to the controller that caused the freeze up.
0 notes
Video
youtube
Flying my Mobula 6 around the woods.
0 notes