
Tips, tricks and tutorials for cosplay plus cosplay photos. Expect a lot of shenanigans, fun and derp.
Don't wanna be here? Send us removal request.
Statistics
We looked inside some of the posts by cosplay-with-maru-and-nans and here's what we found interesting.
Average Info
Notes Per Post
633K
Likes Per Post
346K
Reblog Per Post
286K
Reply Per Post
50
Time Between Posts
2 months ago
Number of Posts By Type
Text
3
Photo
12
Video
1
Note
1
Last Seen Tumblr Blogs


Fun Fact
The total number of visits Tumblr.com received during January 2021 is 327 million.
Text
How to Make Quick and Easy Tattoo Sleeves
Got a cosplay idea but the character has lots of arm (or leg) tattoos? Don’t feel like painting on yourself with body paints or hunting down that horrendously expensive temporary tattoo paper? Here’s a quick tutorial for making tattoo sleeves using nylons and sharpie markers!
Upsides:
- Supplies are cheap! You may even have many or all the supplies you need right at home.
- Quick and not very messy! No paint is involved, and sharpie marker dries instantly.
- Easy! Great artistic skill not required.
- They move with your skin! People have legit thought these were real tattoos. From a distance, yes, but I had guys at cons with actual ink on their arms come over to compliment on my full (fake) sleeves.
- You get to eat pringles! More on that later.
Downsides:
- They are delicate. Nylons get holes in them super easy and forearms run into stuff, lean against things, and generally make it hard for the sleeves to survive. But if you only need them for a weekend, that’s ok.
- I haven’t experimented too much, but unfortunately this technique probably doesn’t work for wearers with darker skin tones. Sharpie ink is transparent, so any color it rests on just multiplies and the tattoo won’t show up very well. You’ll want to go the fabric paint or body paint route to get the best bold, bright tats.
- Can’t do white sections, because sharpie ink is transparent and doesn’t come in white. I leave them blank and they read OK, but the white areas will always be pink, tan, brown, etc. unless you dab in a little fabric paint, which will not be covered in this tutorial.
- Sharpie is supposed to be permanent marker, but on skin…it’s not. The ink will most likely wear off onto adjacent clothes. Not that big of a deal for me, as I tend to wear my tats with white shirts that can be bleached, but other shirts may not survive as well.
OK, let’s go! Here are your supplies:

You’ll need a pair of nylons, scissors, tape, a set of sharpies, your designs printed out on 8.5 x 11 paper, some bracelets, and a can of Pringles. You can use any design you want, of course, but Here is the link to these fine Newt Kaiju tattoo designs.

If your nylons have an undies part, cut the legs off and wear the undies on your head for the rest of the tutorial, if desired. Put the legs on your arm like so, and cut the toes off so you can slip your hand through. You can cut some of the top of the sleeve off as well, but don’t cut too much because you can’t put it back on if your sleeves are too short.

Here are my creepy sleeves. Now for the pringles.

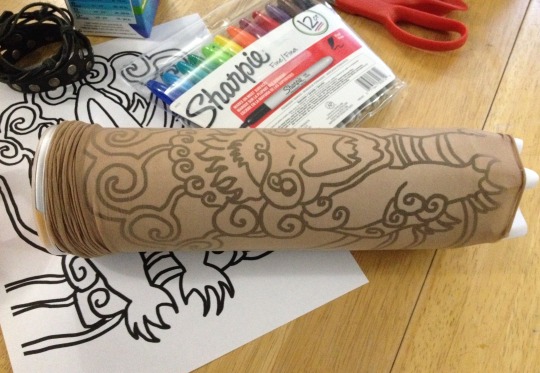
Tape your design template to the Pringles can. It doesn’t reach all the way around but eh. The Pringles can gives you a nice stable surface to draw on that is roughly the shape and size of an arm. It’s a little short, so just roll up the rest of the nylon above the workspace and adjust both template and nylon down when you get to working on that part of the sleeve.

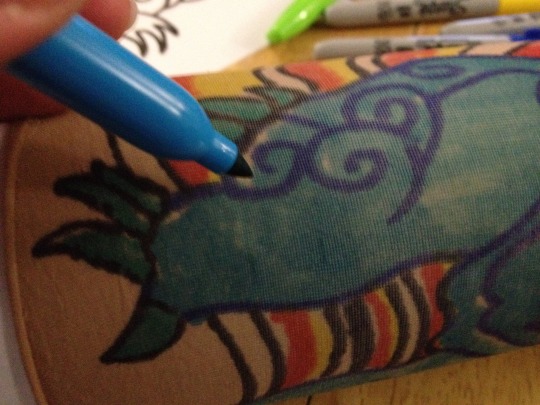
Color with the markers! I recommend doing the colored areas first and then doing the black outlines on top of it, to avoid the black ink contaminating the ink pads of the lighter markers. Remember how that always happens to the yellow ones? Eww. Nylons are thin and slide around a bit, so it’s best to use short strokes and dotting to get the ink on.
Take the template off the Pringles tube, flip the paper to the blank side and put it back on again. The paper collects the extra ink, so it’s hard to see any missed spots. Now you can see any bits you may have missed. Fill them in for completion. Also, the paper doesn’t manage to wrap all the way around the Pringles can, so now is the time to free-hand a bit of the design where the template doesn’t reach. For Newt tattoos, that’s the back of the arm.
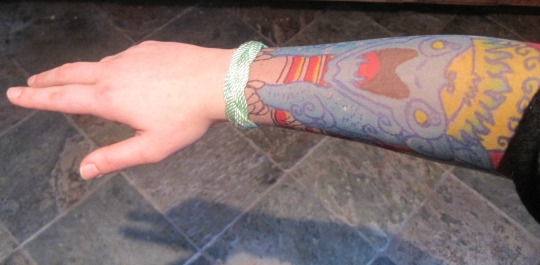
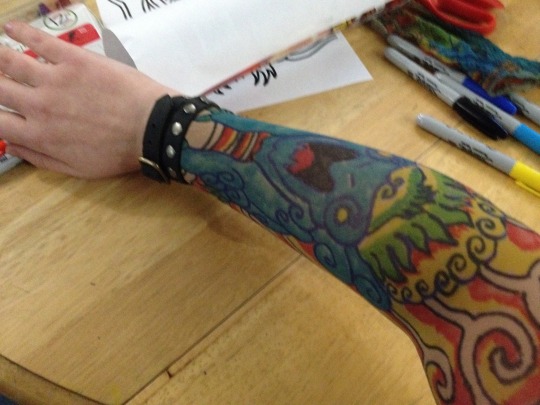
When you’re all done coloring, put them on!

There’s a rough end to the tattoo right at the wrist, of course. Disguise where the sleeve ends and your skin begins with some pretty bracelets:
There we are, much better!
Now…you’re done! Have some Pringles!
113K notes
·
View notes
Text
HOW TO SEW SLEEVES WITHOUT WANTING TO MURDER EVERYTHING: A TUTORIAL
Someone asked that this be rebloggable so HURR YOU GO
Some patterns are really dumb in telling you to finish the body of an outfit, then finish the sleeve, then attach a circle to a circle. It’s possible to do, and once in a while it’s necessary, don’t get me wrong, but unless you have a lot of experience it’s sometimes very aggravating trying to evenly distribute the sleeve around the “hole” cut out for it and match up the seams under the armpit!
(Please note…some patterns, especially to achieve tailored looks, require you to do it the traditional way. Don’t use this method for fashion school assignments or super-complex garments as it will probably screw up the way it ends up fitting in the end. This is mostly for the use of cosplayers to make their job a little easier.)
EDIT:// thevvioletprince, a fashion student, says she’s been taught this method in school so HAVE FUN, NEVER MIND
EDIT DEUX:// If you are doing a traditional garment of some kind, for instance, something that has a multi-piece sleeve or that requires gathers, you may need to do it the “old-fashioned way”!
ANYWAY SO THIS IS WHAT I DO.


PLEASE DO NOT REMOVE SOURCE OR REPOST, THANK YOU
53K notes
·
View notes
Photo
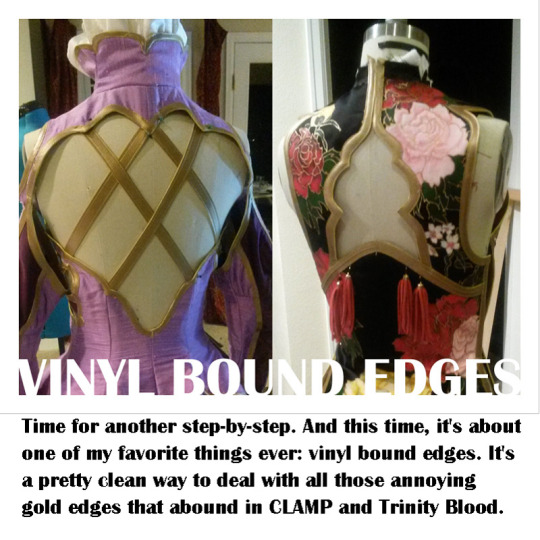
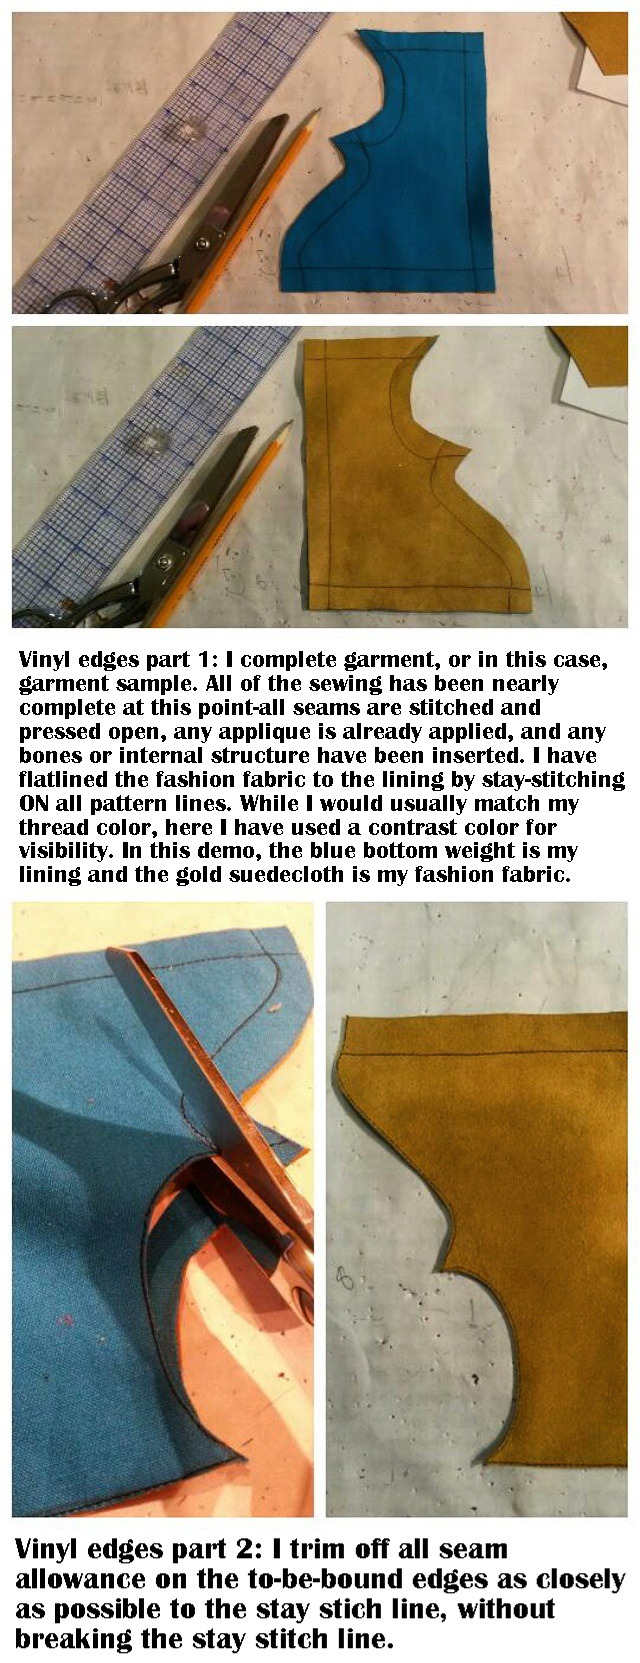
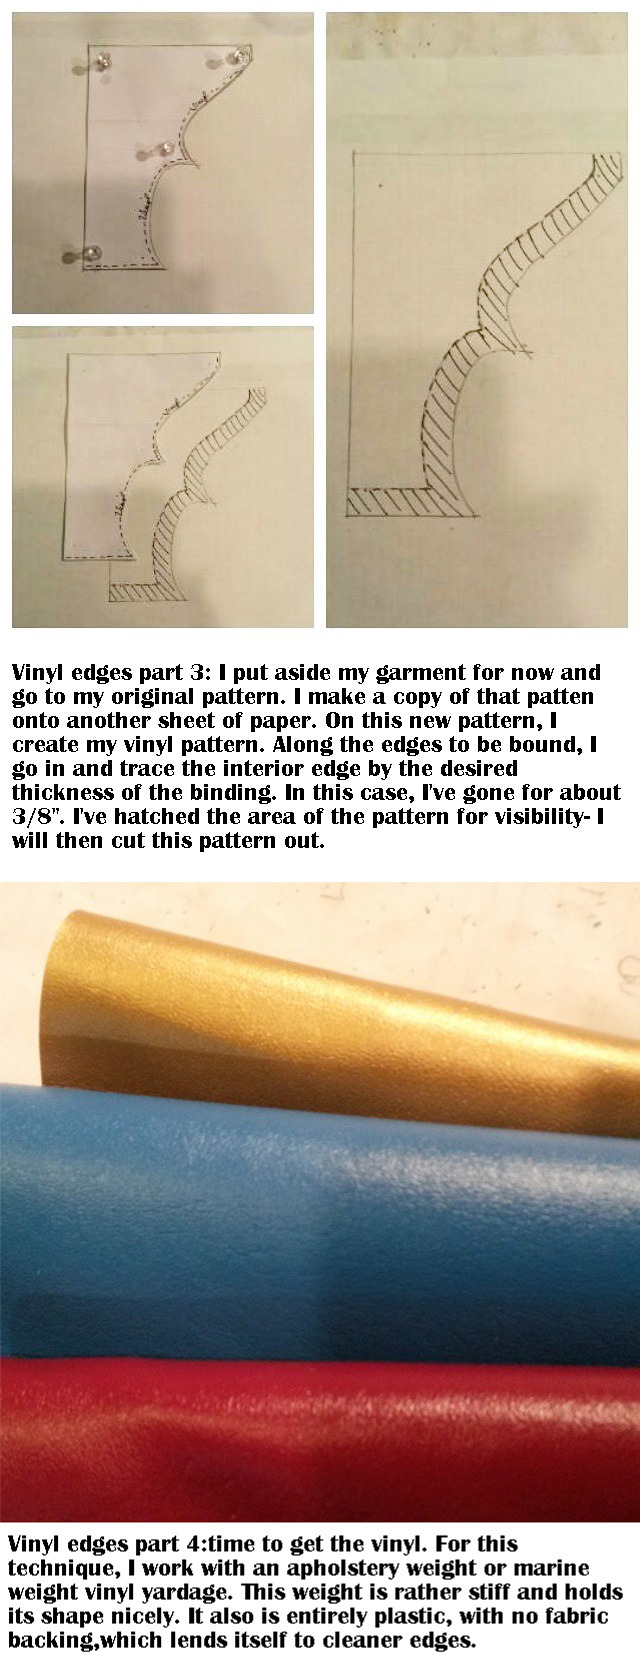
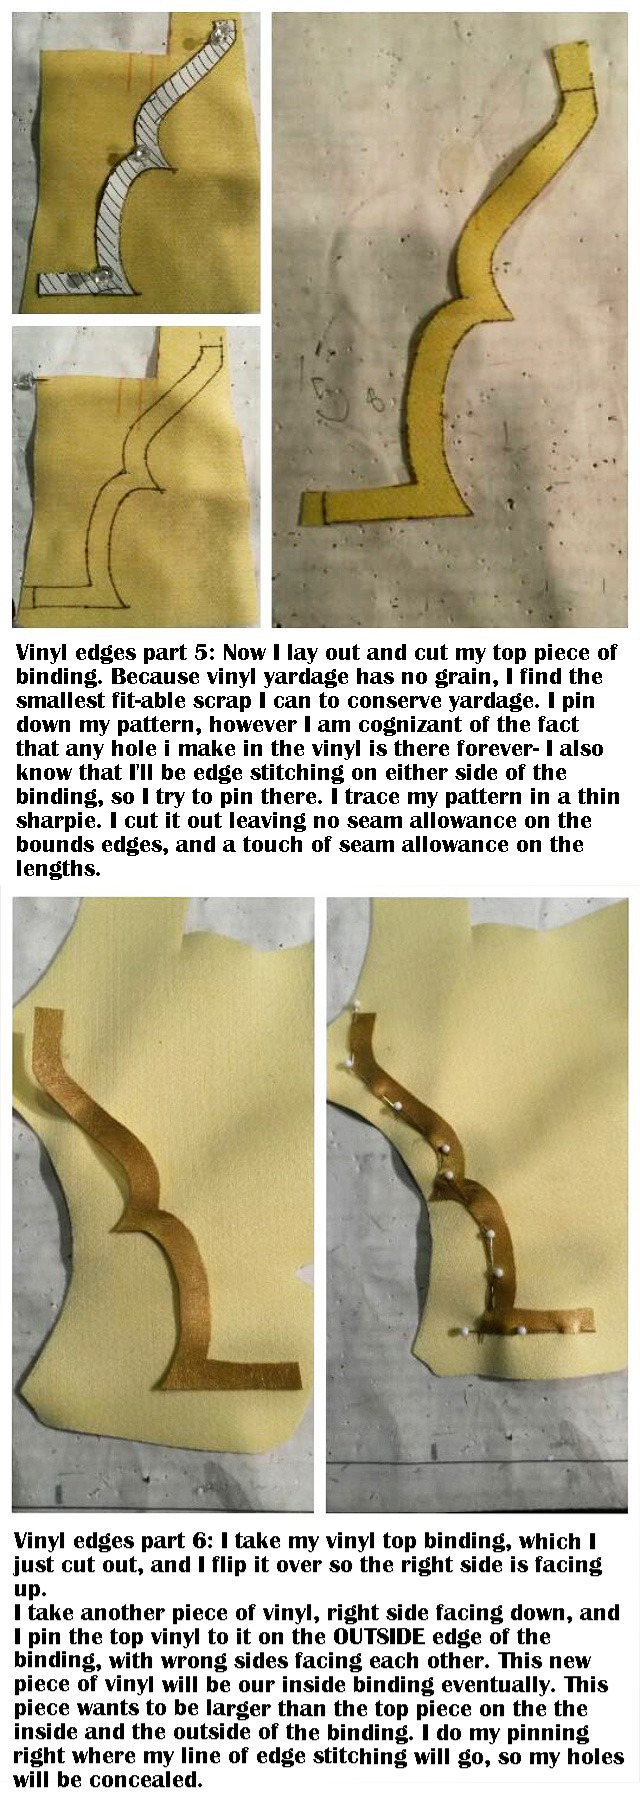
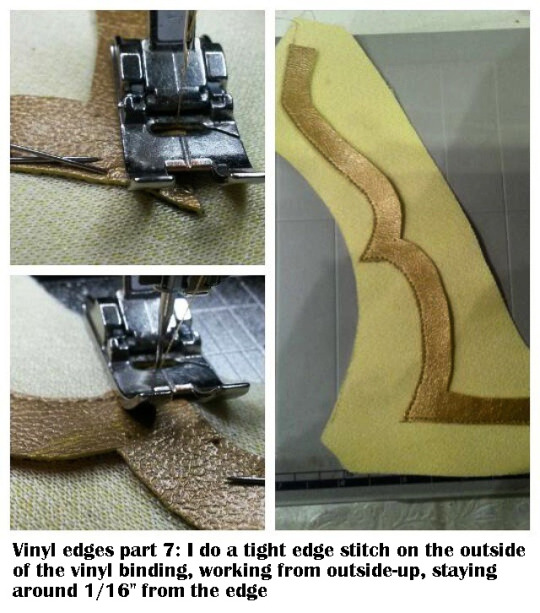
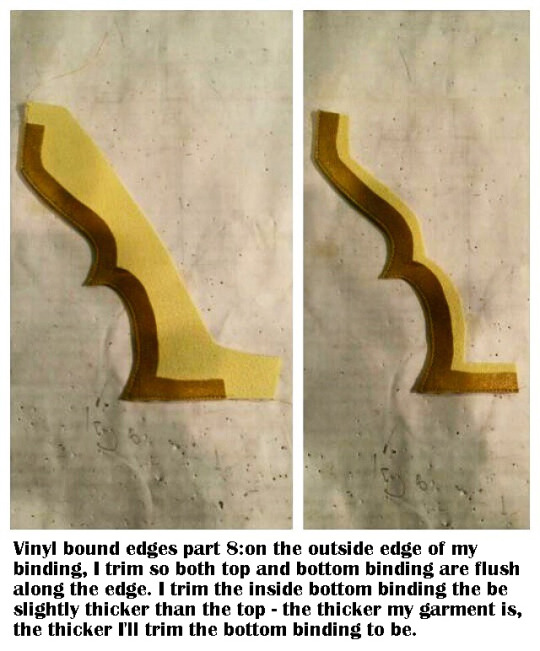

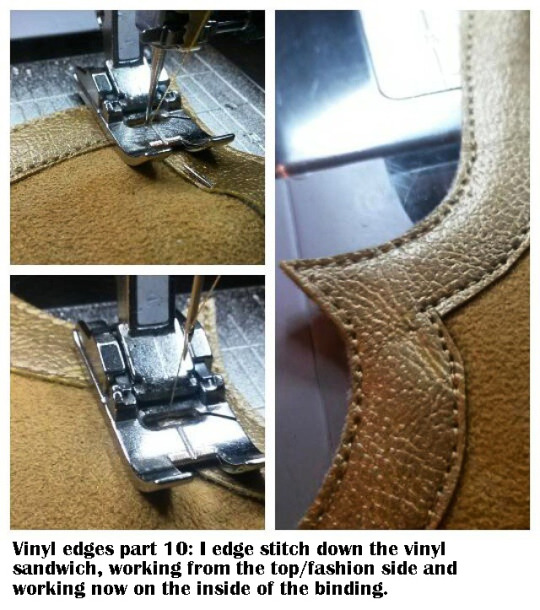

I spiffed up this tutorial I made a while ago. And by spiffed up I mean I added the text to the pictures.
16K notes
·
View notes
Photo

Hipster Levi and Hanji checking in
2 notes
·
View notes
Video
youtube
Really cool and fast way to cover foam!
31K notes
·
View notes

Photo

During SVScon we and cosplayinglalle competed in Hobo Cosplay. You get six minutes to make a cosplay from a pile of random trash and tape. So basically Maru stood very still while Nans and Lalle scrambled to make something.
This A+ assassin qualified us to the finals (where we were beaten, but that’s ok).
9 notes
·
View notes
Photo

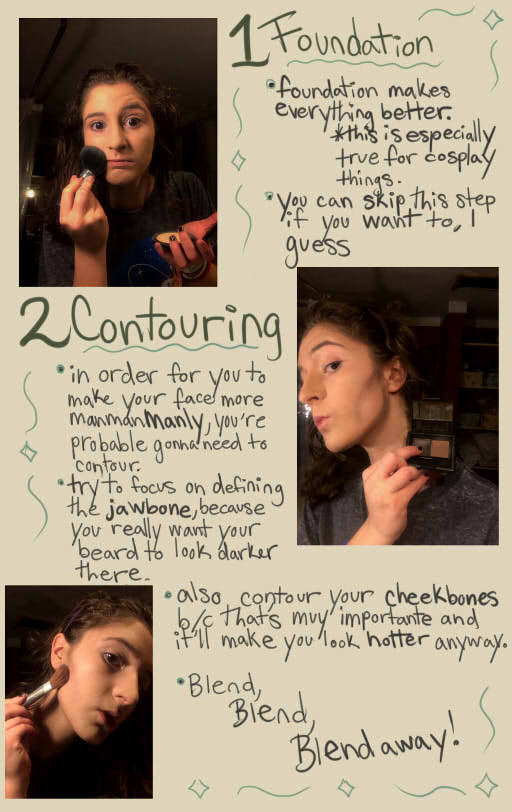
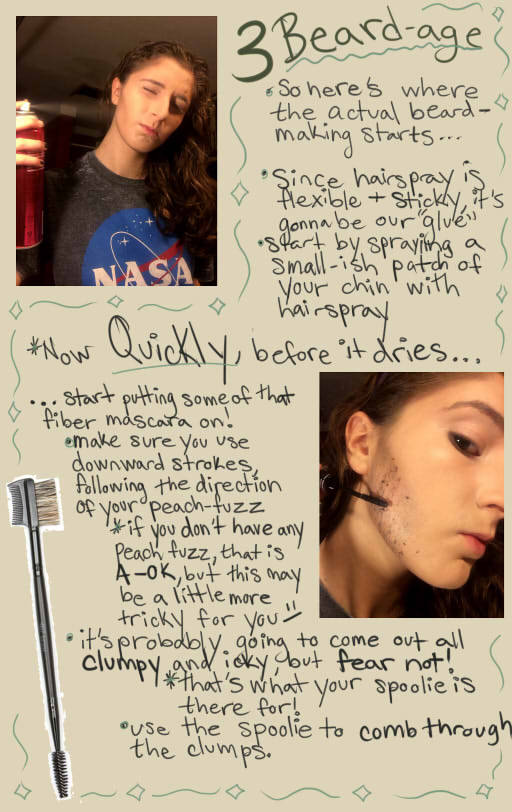
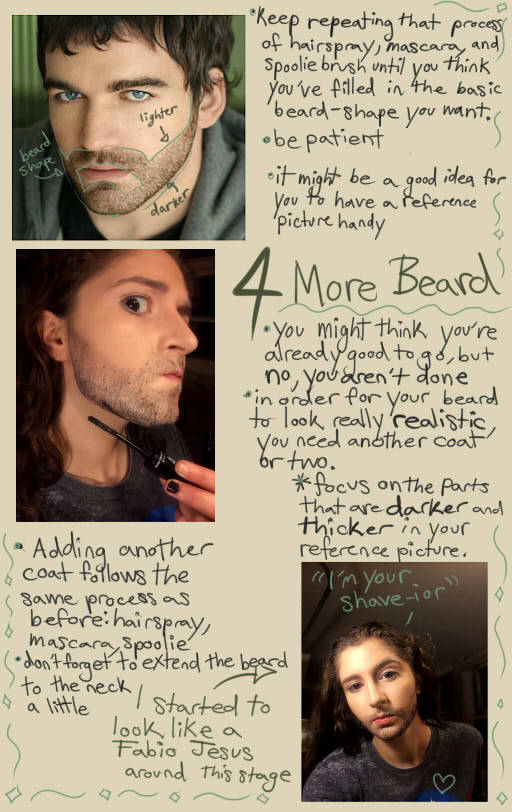
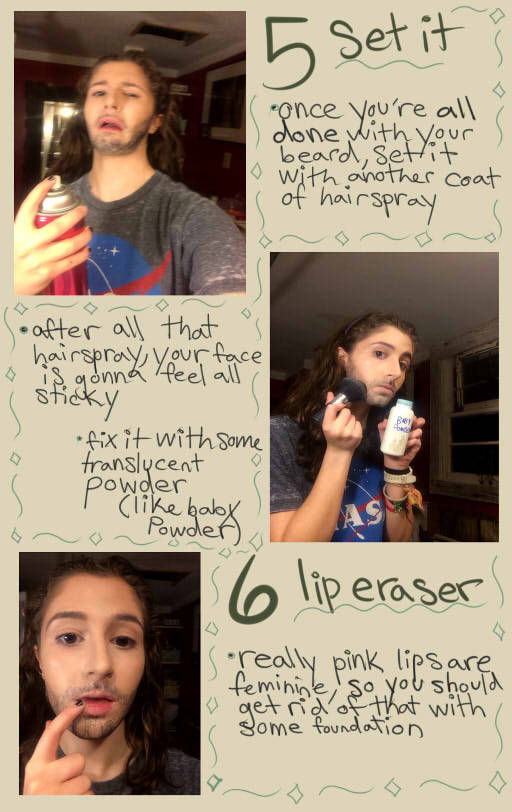
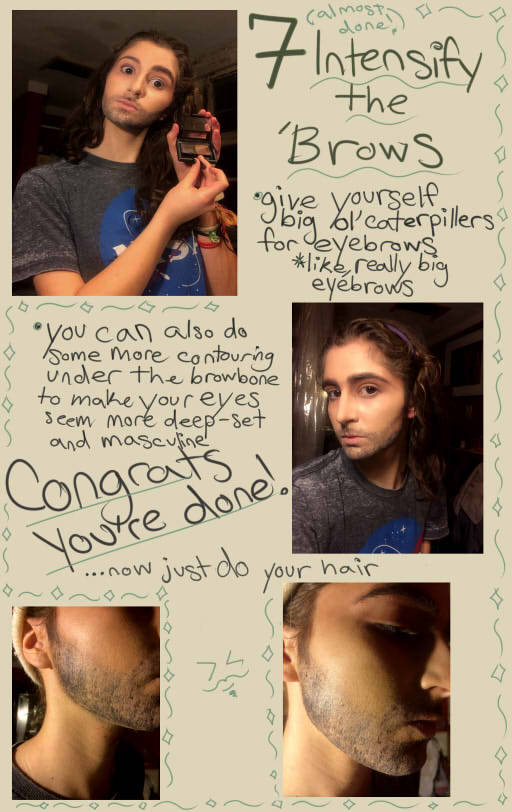

So I came up with this great idea for a fake beard using fiber mascara and I realized there were no tutorials out there for this already. So I made one myself. It works really well and is very realistic!!
here are some links to some fiber mascaras as well as the type I used (I’m sure you guys can find one at a cheaper price though)
here is the absolute best crossplay makeup tutorial I highly recommend it
I’m so sorry for my handwriting I did my best I swear
329K notes
·
View notes
Photo


Maru as Sauron, Nans as Varda (Elbereth)
Photos from Köyöcon by the darling Skymone
5 notes
·
View notes
Text
Cosplay Progress Photos: The making of Demon Ciel
Unfortunately I forgot to take pictures of all the parts of the costume that I should have taken pics of. Con rush took over, but I’m going to share what I have anyway. Horns: Step 1: take a bunch of foil and crumple it into a tube shape. curl into the desired shape and test shape/size on your head in a mirror. continue adding foil until just slightly under desired size Step 2: cover entire surface in tape of some sort (to make it smooth for when you add the clay later on) (if you plan to put your horns in the oven instead of letting them air dry, i suggest using a type of tape that can survive the oven. AKA not duct tape) Step 3: take rope/cord and wrap it around the horns. glue or tape the cord in place. (Hot glue is probably the best method. I was lazy and used tape, but I ended up having to take off the pieces when adding clay because they stuck out a bit) (If you plan to put your horns in the oven, don’t use nylon rope)

Step 4: Make sure they look good against your head and appear symmetrical. Then cover them in paperclay or similar (paperclay is an air dry clay so it’s a lot lighter weight than other clay types, which is good because large horns that defy gravity need to weigh less. The package of paperclay that I got was $9, and I only used half of it and still covered both horns entirely. So pretty good deal. You can also smooth the clay with your fingertips dipped in water so it’s really easy to work with. It drys really slowly though, like a few days, so if you use materials that can go in the oven, that helps speed up the drying time. or you can do like I did and use a heat gun)


Step 5: Let dry completely (make sure it’s not squishy anywhere), then sand out all the bumps to get a nice smooth surface. Then paint. (I just used acrylics -shrug-)

Step 6: Put a headband on your head and hold the horns up to the headband to measure where they should be attached. Hot glue the fuck out of the horns to attach them to the headband. Realize you attached them to the wrong spot, cry, rip the horns off the headband, do panicked repair work, re-paint, re-attach, then paint over the hot glue and the horrible mess that you made when ripping of the horns to try and hide your mistake ;___; (AKA don’t make the same mistake as me, folks. Make sure you glue it right the first time) Final step: Put the horns on your head. Pull some of your hair/wig over the top of the headband to hide it. bobbypin in place. Hat: I followed this tutorial, just modified the proportions a bit to get a mini hat instead of a tall one. http://chioky.deviantart.com/art/The-Tip-Top-Hat-Tutorial-103451650 I then added a bunch of roses and ribbons and random crap I found around the house. This hat was free for me cause I already had the materials from previous projects >_> heh.


Sock Garters:
Buy black pants suspenders from a thrift store. Mine were $3. cut off all of the suspender clips, but leave enough fabric attached to them to sew them back on. With the remaining elastic from the suspenders, wrap them around your legs where you want them to go and measure them. Sew on a buckle, as well as something for the extra “belt” part to tuck under. Measure where the clips need to go and sew them onto the straps and ta-da, done. The pic shows me with the suspenders facing the wrong direction. Ciel’s go to the side, not the front. But whatever, you get the point.

Cane:
Buy a simple cane from walmart. Get out your hot glue gun and draw a bunch of pretty swirls and dots and “s” shapes on the top and bottom


As you can see I’ve already done here, wrap the cane in masking tape anywhere that you DON’T want to be painted. Then, take it outside, lay down a protective surface like cardboard, and spray it with a metallic silver or gold spray paint. BE CAREFUL. Do VERY thin coats at first, and LET IT DRY between coats. Don’t make the mistake I did, which was add coats too quickly. What should have only taken a day to dry took ages and was still tacky by the time the con came around. (which is why i don’t have it in my pics from the con) You may also want to consider using a primer before hand as well if the material of your cane isn’t a good surface for paint. Let dry, remove the masking tape, and done!


Wings:
I totally ran out of time here so I apologize for the lack of decent pics. But basically I started with a simple wire coat hanger, and I folded it into the shape I wanted with pliers. Notice how it’s curved slightly inwards. Then, while wearing protective eyewear, use a tool to cut off the excess hanger that you don’t need. I used aviation snips, but I imagine other types of wire cutters or other tools like hedge clippers or bolt cutters or something might work as well.


Next, cut fabric of the same color as your feathers to the shape of your wire and slide it over the wire like a glove, then sew it in place. This is the base of your wings. The fabric is where you’ll attach the feathers to. It doesn’t have to be pretty cause it will be covered with feathers later. Then, get your feathers and sort them into left-wing and right-wing. YES IT MATTERS. The feathers curve different ways. I HIGHLY recommend rainbowfeathers.com, because if you order at least a pound, the feathers will come already sorted into left-and-right. You can also buy feathers at craft stores, but the problem there is that the right-to-left ratio is super off in the packages. You may buy 20 packages and only get 4 feathers that curve to the left. Which doesn’t help you much. Anyway, Basically you take your longest, prettiest feathers first, and line them up on the outside of the wing, fanning out and curving along the wing. The ends of the feathers can end in the middle of the wing, or even close to the edge, it’s okay because the ends will be covered by more feathers later as you layer them. (I wish I had better pics to explain this part) Then, glue those in place, and use those main feathers you just attached as reference points. Continue to add and glue layer after layer of feathers on both sides until you have the whole wing covered. Then get some really fuzzy/fluffy feathers and glue those on top. This part is also useful in covering up any mistakes you made. Here’s some pictures of the finished wings: Inside view of wings:


Outside view:


Also here’s a white wing from a previous cosplay I did cause i figured maybe it would help you be able to see it more easily? Apologies for my kitty she wouldn’t stay out of the photos. Inside:

Outside:

Then, you need some way to attach them to your back, which can be tricky. I personally just found something from the craft store that would work for me, and attached the wings to it by wrapping the coat hanger wire around it and then taping it in place with electrical tape. What you want is that nice square shape though, cause that’s the part that rests against your back. I guess maybe search google for some good wing harnesses? Or maybe find some sort of metal base yourself or make one out of wire to attach your wings to. After that, I just tied on elastic straps for my arms. I also went the extra mile and cut a hole in the back of my costume for my wings to come out of, because I don’t like the harness being visible, but most people don’t want to cut their costume so that’s just a personal preference thing. Hope this helped some of you guys! Feel free to ask me any questions. Happy cosplaying!
360 notes
·
View notes
Photo


Latex Molds and Resin Casting Tutorial by NeferCosplay
12K notes
·
View notes
Photo

Disclaimer: This is not my own idea; I got the tip from the lovely Elentari-liv, who was kind enough to share her technique with me. This is only showing the basics I’ve used to knit the scales, not how to make any certain piece.
Also, keep in mind that I’m still a beginner at knitting. I’ve been doing it for approximately two weeks.
What you’ll need:
circular knitting needles
yarn
small scales
You’ll probably want to choose a yarn close to your scale colour, or one that complements it (I used a contrasting one here to make things easier to show). You may have to experiment a bit with the yarn gauge and size of the needles. I ended up using gauge three yarn and size six needles after some testing. Larger needles widened the gap between scales, so that the yarn was visible in between, which I didn’t want, and thicker yarn made the scales stick out too much as opposed to hanging. It looked like I was knitting a very ruffled dragon.
Scales can be purchased from The Ring Lord, with multiple choices of colour and material. I’ve experimented with both aluminum and steel; the steel seems to hang better because of its weight, but it all depends on what you need for your project!
(I’m putting the actual process under a read more because I do have a lot of photos.)
Read More
13K notes
·
View notes
Note
I dont exactly know how to put on a wig. They seem too loose but there are these straps for tightening and I don't understand how they work. This seems so common sense I feel kind of lame for having to ask but I would hook the hooks together and there would be a bump but if I didn't the wig felt too large otherwise.

not a silly question at all, it IS a little complicated :) On the back bottom of your wigs there should be the straps that you already found. As you can see (and they might be a tad hard to see, because they're usually the same colour as the lace) there should be this little line/strap that's sewn onto the lace in little increments:
What you do is simply place the hooks onto that piece of strap with a distance that makes it comfortable, but not too tight :) you can of course adjust the hooks until you feel it fits - it should be loose enough to feel like nothing more than a slightly tight hat, but tight enough for you to headbang :) Now the wig should be ready to put on.
1 note
·
View note
Photo
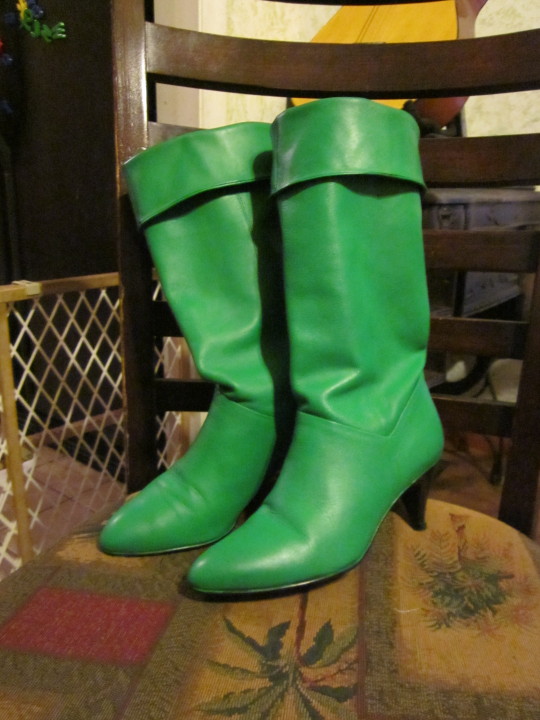
Ever have trouble finding boots in the right color? Tried spray-painting them and ended up with a dry, cracked mess? A fantastic friend recently advised me to paint leather boots (and any other leather goods) with floral paint. This is a spray paint that is light and flexible enough to use on live flowers. Above are the Poison Ivy boots I painted for a friend, which turned out fantastic.
One thing though: Wear them while you paint them, and maybe stretch your foot around in between coats. I didn’t think of this, and while the paint did not crack at all, it started to split where the boots were stretched from walking. Next time I paint some boots, I’ll let you know if I was able to fix this problem.
The paint I used is called Design Master, and you can find it at Michael’s or Joann Fabrics. In the stores near me, Michael’s had a better selection of colors and a slightly better price, but that may not be true everywhere. This color is “Holiday Green.”
42K notes
·
View notes
Photo


Original design: Annie Wu
Cosplay: Maru as Spock, Nans as Kirk
Photography: Lalle
63 notes
·
View notes
Photo


how do you pack for con without breaking the laws of physics?
we just don't know.
1 note
·
View note
Photo


Embroidery by hand: A summary.
3 notes
·
View notes