i like chicken and my discord is jandia#5508/you can join my server and add me hehe
Don't wanna be here? Send us removal request.
Text
How To Add Transparency to a Clothing (Adding a New Cut)
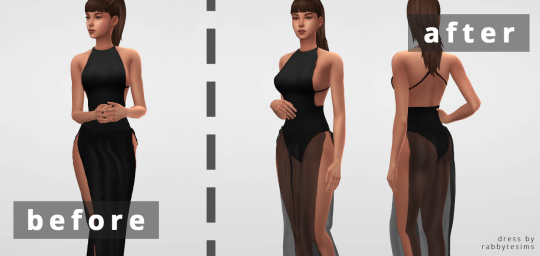
note - you can view the images in full resolution here
Hiya, this tutorial is on how to add a transparent part of your clothing (and keep the other part as non-transparent).
I’ll be starting with a dress that only has 1 cut, and I’ll be creating a completely new cut to put the transparent part of the mesh into. This should work for clothing with any number of cuts, but like always I suggest only using 1 cut clothing to make your life easier.
You might want to pick up these skins to show alpha properly in S4S.
Also I’d like to credit @untraditionalnerd as I used their tutorial as a base for this.
For your dress to be transparent, you need two things.
A transparent texture, that’s quite straight forward so I won’t go through that here.
A transparency-enabled mesh/meshgroup - that’s what this tutorial is for!
STEP 1 - blender cuts Go into edit mode, select the parts of the mesh you want to be transparent and press P to separate to a new mesh.
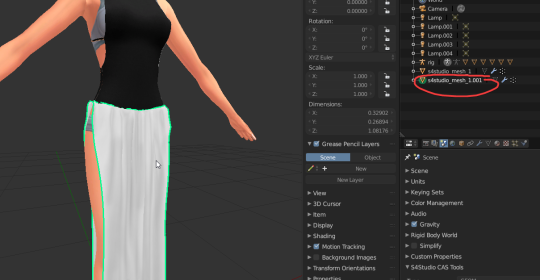
Then change the name (doesn’t affect anything but stops you from going crazy), and change the cut number.
The cut number will be the next number after whatever is already used. For instance, my mesh started with one meshgroup, and its cut number is 0000. Therefore I gave the new mesh a cut of 0001 as it’s the next logical number to use.
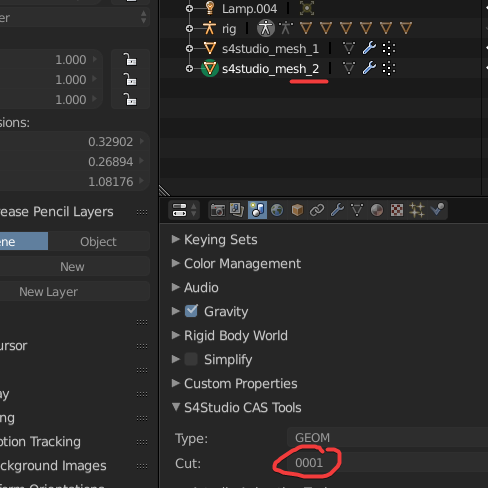
If your mesh uses cuts 0000, 0001, and 0002, then you make your new mesh 0003. Simple :-)
STEP 2 - importing geometry & duplicating
Import your .blend with the new meshgroup/cut into s4studio.
Then, go to the warehouse page, and find your LOD0. It’ll be the geometry with the biggest filesize, and you should be able to see your mesh in the preview.
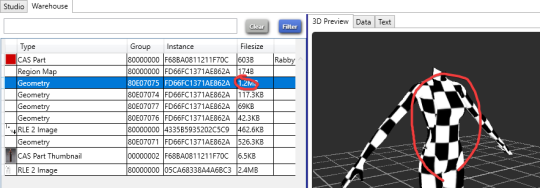
As you can see above, the transparent group is not visible in the mesh preview, don’t worry about this.
First, you need to duplicate this geometry.
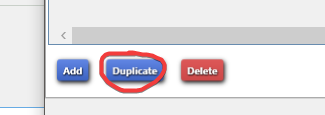
When the box pops up to duplicate, change the last character of the group to ‘1’. If that doesn’t work, just try any number/character until it’s accepted.
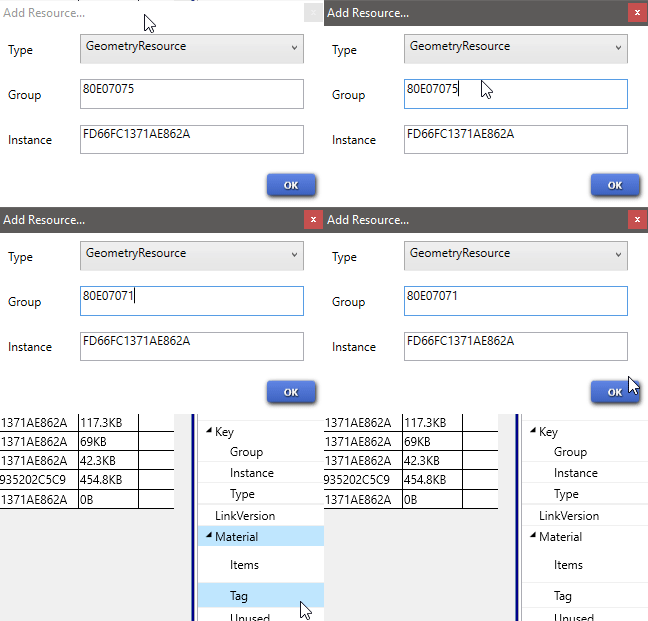
It doesn’t matter that the filesize of the duplicated geometry is 0b Cool, now we’ve got the base for the transparent geometry.
STEP 3 - make new geometry simglass
This is a small but vital step. Go to the data section of your new geometry, and change the shader to simglass. This is the transparency shader Sims 4 uses.
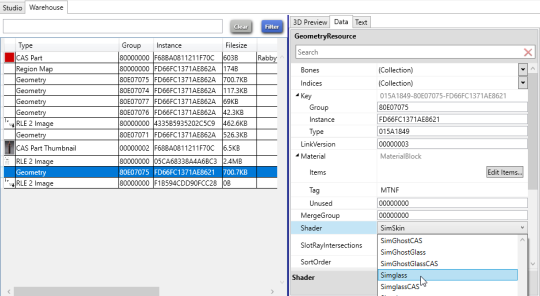
STEP 4 - region map editing
This can be tricky so follow closely. On your duplicated/new geometry, go to the data tab, and copy and paste the group, instance and type somewhere because you need these values.

Find your region map, go to edit items, then add a new entry. Select your new entry, enter the cut number that we gave the new meshgroup earlier in the blender step. Keep the regiontype as base.

Next, click the edit items button with your new cut selected. Then add a new model entry, and paste the values that you copied earlier for the new geometry you made into the boxes. Then save the models and entry, and save the region map entry.
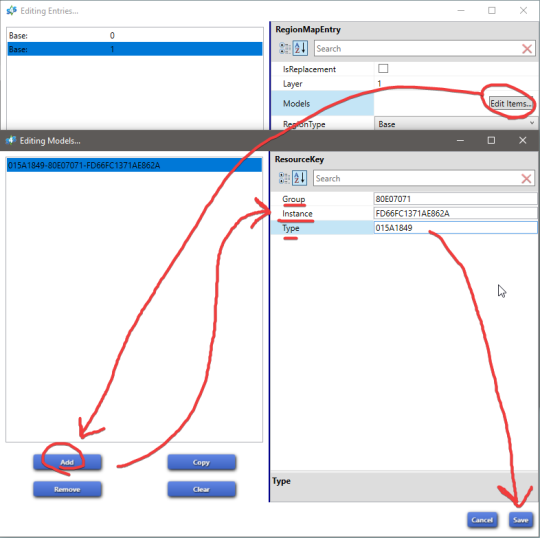
This step has created the new cut number in the package, and linked the mesh we duplicated earlier to that cut.
After that, make sure you re-import your mesh. As you can see the transparent part shows up in the 3d preview again, and it also shows up isolated in the new geometry in warehouse which is good (means you’ve done it right).


STEP 5 - adding new geometry to LODs / swatches
This process is much easier if you only have one swatch for the moment (you can add more swatches after this and that’ll be fine), as if you already have multiple swatches you need to do this process for every swatch.
Go to your swatch (cas part), and scroll down till you find the Lods part, and click edit items.
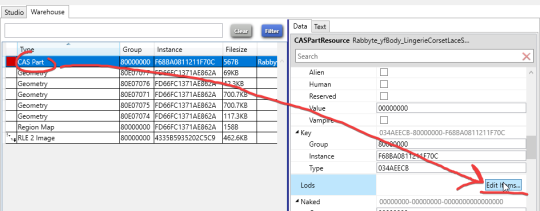
Then, go to level 0 (LOD0), and click edit items. Then add a new entry, and again fill in boxes with the values that you copied earlier for the new geometry (the same ones you used earlier). Once you enter the values, press save.
Ignore in the image that my entry says -000000000-, it just doesn’t update instantly sometimes.
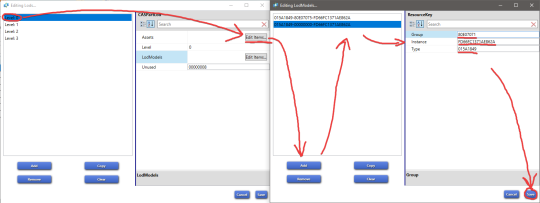
Now your transparent mesh is rendered for LOD0 and you’re actually all done!!…. Except for LOD1, LOD2, and LOD3..
You now have two options to finish up:
(easy) Use the LOD0 transparent mesh for all LODs.
In the LOD entries, for level 1, 2, and 3, do the same thing for what you did level 0, pasting that same information in. This adds the transparent mesh you made to each LOD.
This means that your LODs will be like normal, except the transparent mesh will stay the same throughout all the LODs (it’ll stay high poly in the lower LODs).
This choice is not as good as the next one, but if you’re not really confident with messing around with this stuff, just do this as it’s easier since bad LODs for one item won’t have a major performance hit.
or..
(hard) Make a seperate LODs for the transparent mesh.
This basically means repeating the whole tutorial for each LOD which can be a lot of work (however trust me when you know the process it gets really easy).
It’s all the same but you duplicate the corresponding LOD geometry for the start, and you when you change the last character of the group, instead of 1 you just use a different number. If you remember the numbers you change it to, when you’re entering all the details into the different entry boxes, you can just copy existing entries, and change the last character of the group to the different numbers you used (that’s what I mean it can get easy when you’re doing the process, and you do like 3-4 meshes at a time).
This is superior choice to the first one, as you’ll have proper LODs, so the transparent mesh will get low poly in LOD 1, 2, 3 etc along with the other part of the mesh (if you imported lower poly meshes for lower LODs).
Andd after that, you should be finished! Woo!
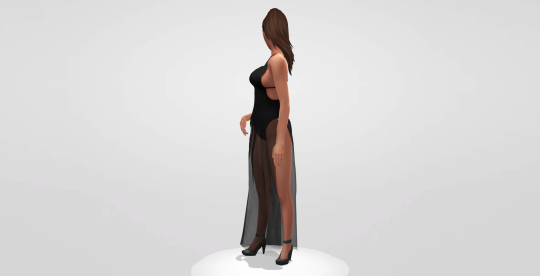
Dress by @rabbytesims / Hair by @notdaniella
EXTRA NOTES
If your transparent mesh in game has triangles/alpha issues, follow this tutorial (u gotta triangulate and do alpha order). There are blender instructions in the replies.
If your transparent mesh in game is shiny, make sure you have a proper spec map (with no shine) and a normal map (can be a blank normal map, just any normal map).
Make sure you have laptop mode turned off, as this setting disables transparency.
Use these skins to show alpha in sims 4 studio.
If something didn’t make sense or you want to ask a question, feel free to reply or contact me :)
551 notes
·
View notes
Text
Tutorial: How to make a preset for face TS4 (EN)
We will need MorphMaker and Blender (v 2.78) I attached the archive with an empty blend file and texture maps, it is convenient for future work => CLICK Simplified version (only in screenshots) => CLICK Русская версия => ЗДЕСЬ
Keep reading
650 notes
·
View notes
Photo
Here’s a full list of Sims 4 tutorials I’ve made over the years. I hope this will be helpful to you. ✨
Creating Poses
How to Create Custom Poses: click
How to Create CAS Poses: click
How to Create All in One Pose Pack: click
How To Make Poses With Accessories: click
How to make poses for Different Height Sims: click
How to Create Couple/group Poses: click
How To Make Poses With Objects: click
Creating Makeup
How to create custom content Eyeliner: click
How to create custom content Lipstick: click
CAS Background
How to Create a custom CAS Background: click
Photo editing
How I take super high-quality pictures in The Sims 4: click
Photoshop Tutorial - Smooth Skin: click
How to Download Backgrounds directly in Photoshop: click
Drawing the perfect Eyeliner in Adobe Photoshop: click
How to Create Glitter Text in Photoshop: click
How to create a Drop Shadow in Photoshop: click
Removing Green Screen Background using GIMP: click
Removing Green Screen Background in Photoshop: click
My favorite Adobe Photoshop Brushes: click
How to Add Filters in Photoshop: click
How to edit Sims 4 Screenshots - Quick & Easy: click
How to draw hair with a mouse in Photoshop: click
Miscellaneous
My favorite Alpha Custom Content creators: click
The best Maxis Match CC creators: click
My favorite Sims 4 Sliders and Presets: click
How To Post To Instagram From PC: click
How to remove unwanted CC with the Sims4Studio: click
How to Install ReShade on The Sims 4: click
My favorite ReShade presets for The Sims 4: click
Quick The Sims 4 Tray Importer Tutorial: click
How To Download My Sims From The Gallery: click
How to install custom content in The Sims 4: click
Pose creators you should check out: click
A cure for Adf.ly/Shorte.st links: click
Free and good music for your Youtube videos: click
The Best Build and Buy mode CC creators: click
Custom Content for Sims with disabilities: click
Must-have 3D eyelashes: click
7K notes
·
View notes