
Don't wanna be here? Send us removal request.
Statistics
We looked inside some of the posts by alternativecontrollersgdd and here's what we found interesting.
Average Info
Notes Per Post
0
Likes Per Post
0
Reblog Per Post
0
Reply Per Post
0
Time Between Posts
2 days
Number of Posts By Type
Text
17
Last Seen Tumblr Blogs


Fun Fact
Post activity is at the highest at 4:00 pm EDT; notes peak at 10:00 pm EDT.
Text
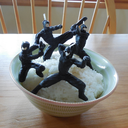
3D Model Printed
I recently got a 3D printer which has allowed for me to print my little robot character off and be able to visualise him physically. I think this is reall neat as it has allowed for me to understand some different design choices and routes I could persue instead. One of these being that the arm joints need adjusting as theyre mostly stuck in place.
Here is the model:


0 notes
Text
Goals for today
Morning:
Finish Importing the robots textures into Blender ✔️
Create a high quality render ✔️
Afternoon:
Finish Posts ✔️
Write outcome
0 notes
Text
VR
This is just a short post about VR, we got to try out the a headset in class to experience VR. I have a lot of personal experience with around 5 years now. Its a emerging sector still with lots of room for accessibility. In terms of accessibility, I think it can be adapted to different needs. I think it provides a good opportunity for people with mobility issues to be able to explore virtual spaces without physical barriers as youre able to use a variety of controllers (xbox controller to full motion controllers).
I also think that VR is a good source of physical training which can be used in many sectors such as the medical one. It also allows for many social interactions through different games and apps, making experiences more inclusive.
0 notes
Text
Games Anglia
Yesterday we visited the University of suffolk for the games anglia event where our games were presented for people to play!
In terms of presenting it was okay I found that the 2 people who played it understood the controls so I didnt have to intervene. The visuals got compliments which was nice to hear as I put so much time into it. Moving on from this we encountered a big issue. One of Georges Puzzles didnt work so it did not allow for you to complete the game. I thought I had a build of the game on my drive but quickly found that I didnt. I think what I learnt from this in future is to come more prepared and always double check things. What I just cant understand is why it broke then and worked perfectly fine in all our testing before hand?
Overall I think players understood our game. Found the instructions nice and easy to follow and managed to get to the island fine and complete the one puzzle that they could!

During the event I went around and played all of the games on show, there were defintely some interesting ones there and two that stood out to me were: Outclaw and Nine Round Rapid.
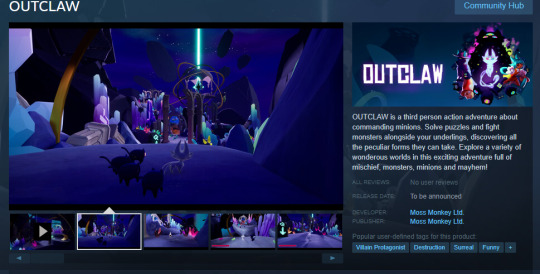
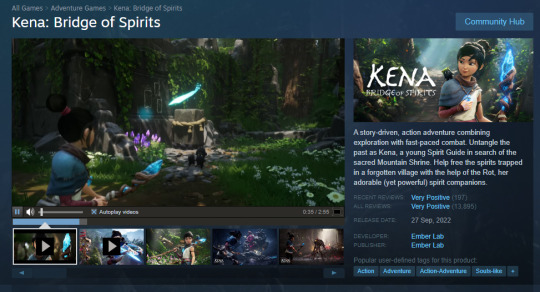
I really enjoyed the gameplay and visuals of Outclaw and found it was a Uni studenet project of around 3 years. The gameplay reminded me a lot of Kena: Bridge of Spirits which employs a similar concept of having little 'minions' that help you to solve puzzles.
Moving on
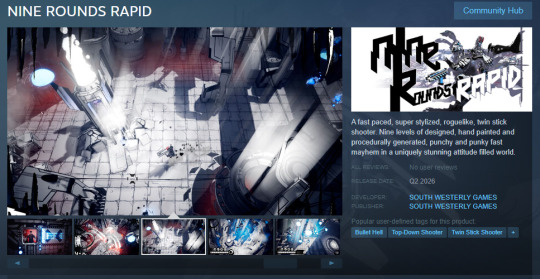
This game is a comic book style roguelike bullet hell which I spent far too long playing at the event. It overall was really fun and its unique visual style made me want to keep playing more. I also spoke to the creator and signed up to the Alpha testing so thatll defo be interesting once I hear from them!
0 notes
Text
Goals for today
Morning:
Finish write up for generating robot model
Download Substance Painter
Find some tutorials
Afternoon:
Texture model
0 notes
Text
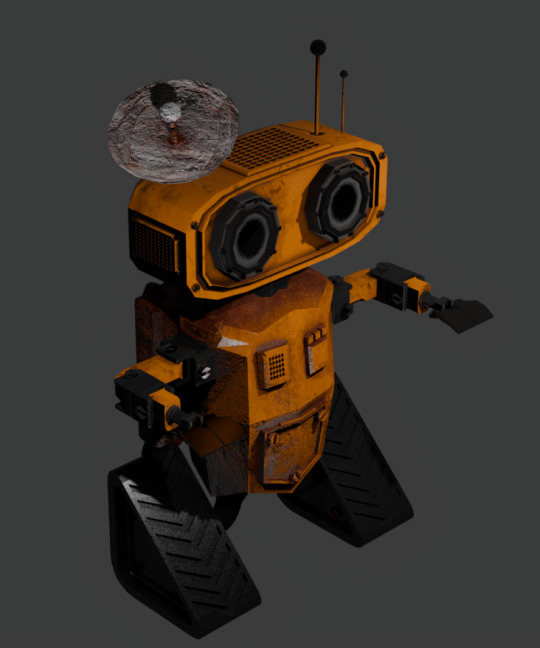
Robot Render
Here is the second rending I did after playing around and adjusting the lighting up:
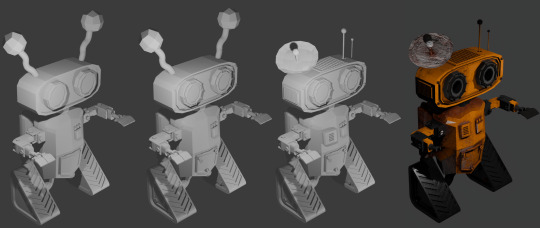
and here is a comparison of the models evolution:
0 notes
Text
Robot Texturing
For this section to start texturing I had used my previous research to help aid in how I am going to texture my own design. I also wanted to do a little bit more further research into colour blindness.
GAME PLAN UPDATE:
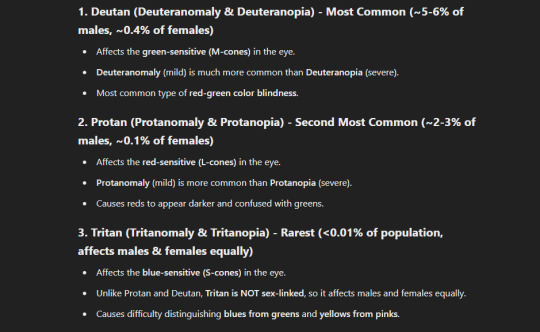
I want to do this as I intend to aim for the designs of textures to be able to be switched in game by using this microphone plugin. I want for the player to be able to say "Switch" and it will change all the models designs from Deutan/Protan to Tritan (Basically just for the neon parts of models as thats the most visible, e.g. the arrows). I did a little bit of research into how common the main 3 types of colour blindness are and here is what I found online:
Next I wanted to find a comparison image to show off how the colours are represented for different types of colour blindess compared to someone who can see full colour:
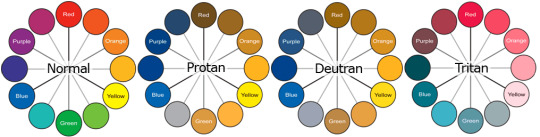
From what I have gathered it seems to me that using just Blue and Green will provide the best overall resaultsfor colour continuity across both protan and deutran!
Next I found a really good website which provides really good colour palettes that are colour blind friendly (only for Protan and Deutran unfortunately) so I can potentially base my choice of colours around one of these!
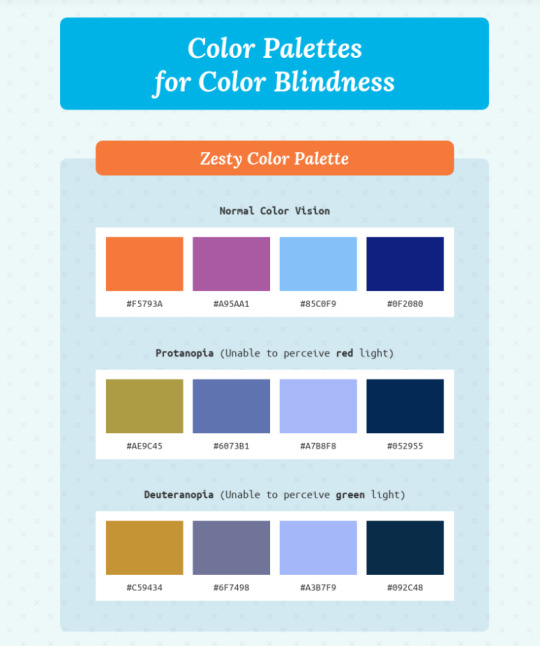
^ Use for rusty parts maybe and general colour
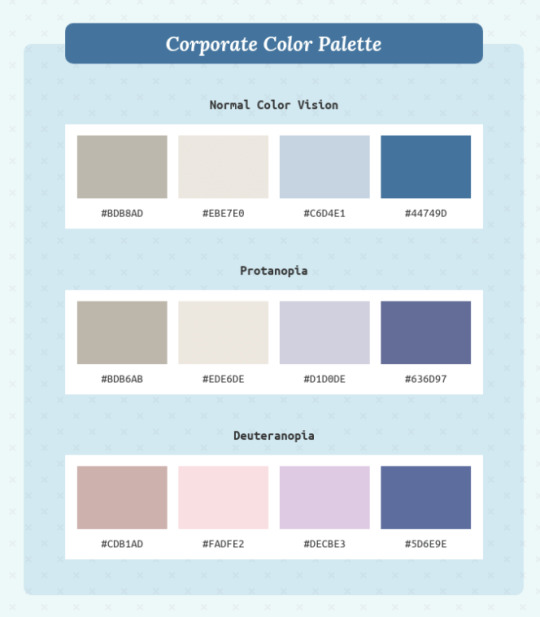
^ Use for more metalic parts

^ Use for wheels

^ Use for logos on model etc
------------------------------------------------------------------------------
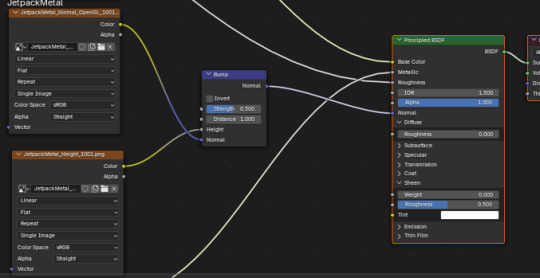
Texturing
I imported my model into substance painter all fine. I then baked the UV meshes for the model in order to paint onto it.

after this I then added textures to different parts of the models body. Sam then showed me how to add a dirt mask which I applied to both the antenna and body!

Once I was happy with the textures I then exported the textures as 4K and started to add them to the model in Blender so then I could render it!
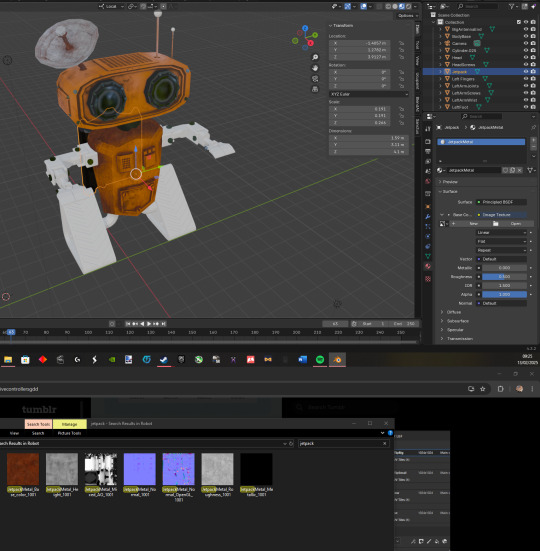
I used an assistant plugin I have to figure out how to add a height map to the model:
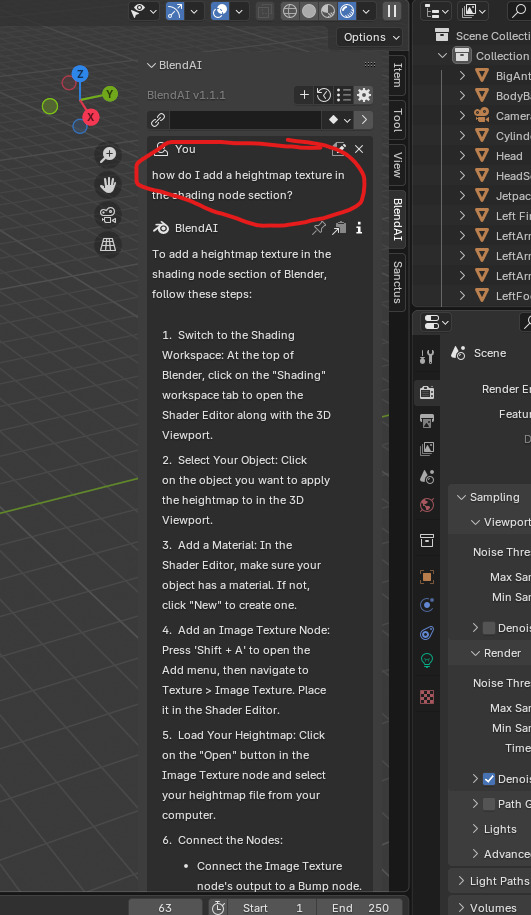
and here is how that looks:
and then next here is the render:
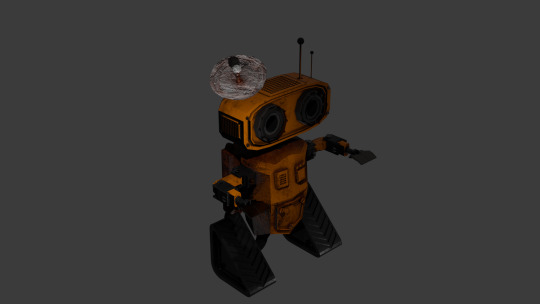
I do believe the lighting needs some adjusting before I do the final render!
------------------------------------------------------------------------------
Overall I am pretty happy with how the textures came out considering it was my first time using Substance painter. I think I really captured that Rough deserted feel I was intending for. The only next thing I would need to do is get him in game and make him hold a little scoreboard but I dont believe that is happening in this time frame!
0 notes
Text
Robot Character Creation
Okay so to start off I lost some of the SS's I originally saved of the initial processes I took of designing this model but to sum it up I used a bevel modifier on the head which was a rectangle to create its curvature, the eyes were cylinder which I lowered the sides down to get a decagon shape, the chest I used a subdivision modifier on a rectangle to get that torso shape, the legs are a cylinder that I extrude rotated, the wheels are inspired by WALL-E's ones with their shape which I made from dissolving a corner of a cube and lastly his antennas are extrude rotated cylinders that I tried to make look bent and wobbly. Overall I think I started off with a good base to work from but I cant lie in all honesty I do not like how the antennas look as I think they feel quite off. Here is what it looks like:

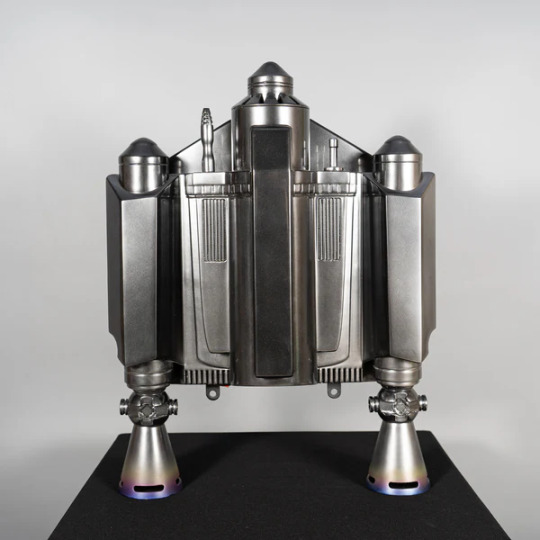
Next I wanted to create an alternativae way for him to get around and I thought why not give him a little jetpack! I looked up some references and landed on the mandalorians jetpack (which you can see below) and just subdivided and pulled around the edges until I got the rough shape!

After this I moved onto adding the Treads to the models wheels. I decided it would be easieset to make a model pattern and then use a boolean modifier to cut it into the wheels:


Next I had to move onto the arms so I started by creating the hands as a reference:

after this I wanted to make all the joints realisitically make sense with the degrees of rotational freedom if that makes sense? I was kind of applying my engineering knowledge that I had previously learnt to this part of the model I cant lie haha !


Next I duplicated the joint part and resized them all around:
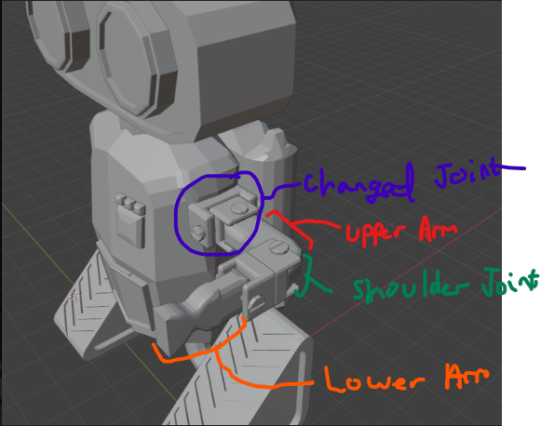
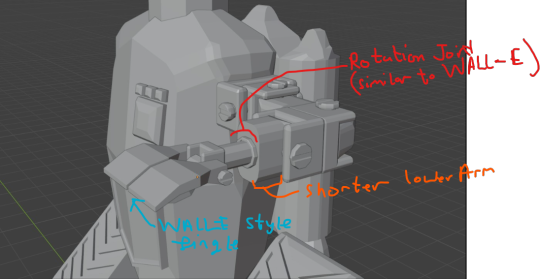
Next I wasnt particulary happy how the lower arm was looking, I felt it looked too smooth and lacked some form of rotation for the hand. I also did not like the hand design so I used my previous research to help inform the necessary changes:
I then duplicated the arm and mirrored it to the other side:

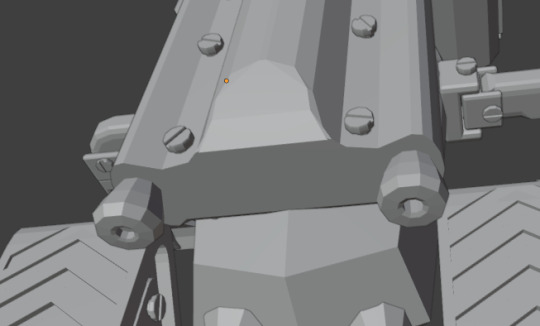
after this I changed up the eye design adding a bit more complexity to them with screws and extra width. Along with this I also added more screws/bolts to other parts of the bot to add detail !

Lastly I changed up the antenna design and added some vents + Speakers to the model and then created this Render evolution picture of the model:
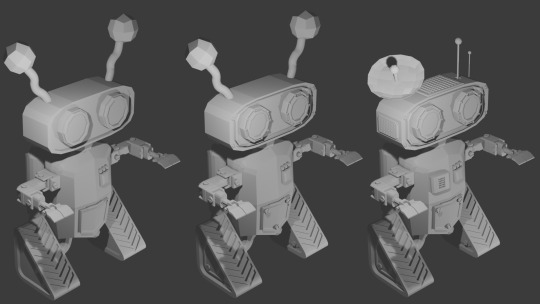
In Conclusion I think I have created one of my best models and b best characters yet. I had a lot of fun with creating this model and I am happy I didnt settle for anything less than I wanted with design choices. An example of this is when I created the antennas as I wasnt super happy with them but I didnt just forget about them, I iterated on it!
0 notes
Text
Robot Character Research
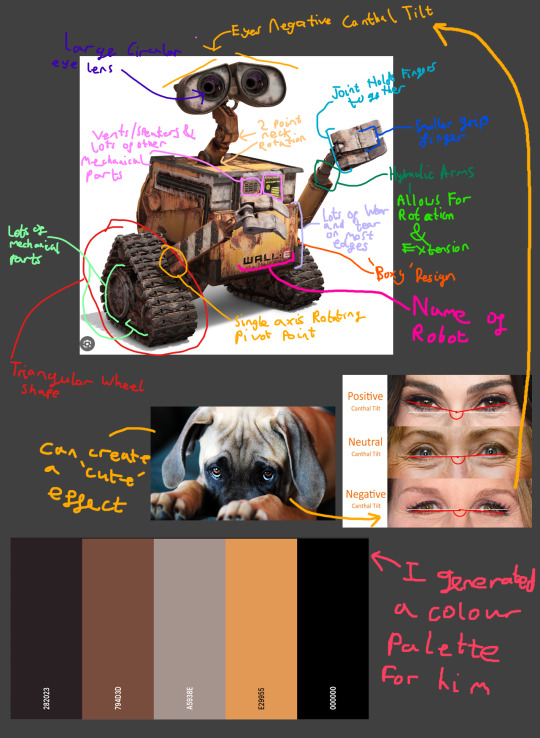
I wanted to start by doing a thorough analysis on a couple of different types of cute robot designs and gather images of them into a reference sheet. The first character I did an analysis on was WALL-E:
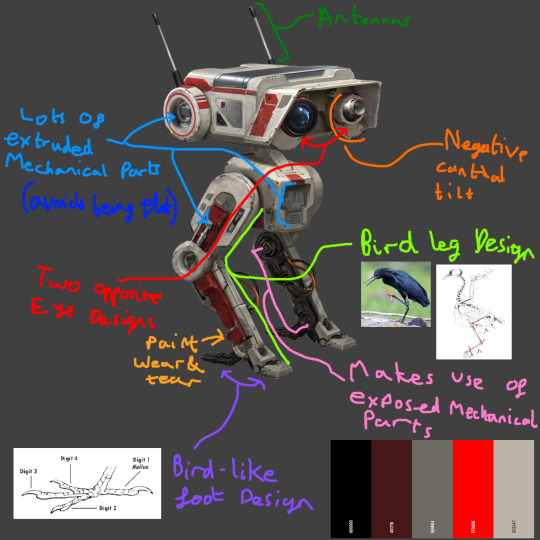
Following on from this the next character I wanted to look at was from one of my personal favourite games, Jedi Fallen Order. This character is BD-1:
Lastly I chose to look at another star wars droid but this one is the Astromech Chopper from Star Wars Rebels! Here is my analysis on him:
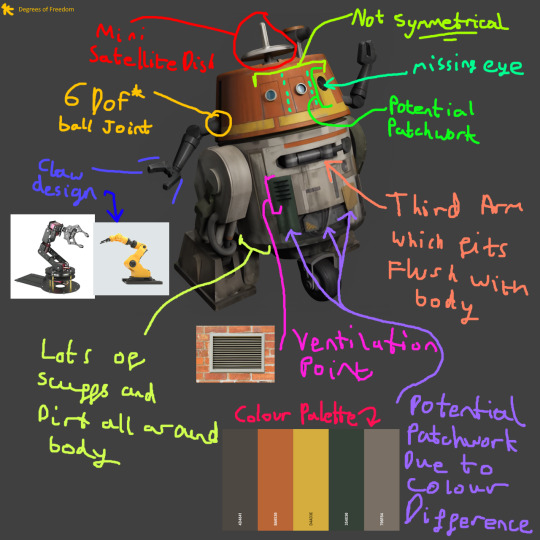
In Conclusion I think I have learnt a lot in terms of similarities in design choices and also colour palettes. In terms of my own design I have made a note of what I would like to incorperate: WALL-E style eyes, WALL-E Style Wheels, BD-1 Style Antennas, Chopper Style Dish on head and lastly I want to try and capture this wear & tear look all of them have to their texture designs!
0 notes
Text
Progress.
I wanted to write a blog post which discusses my progress, how well I have kept to my planner and where I am going to go from here. First off, so far I believe that this project has been a big dissapointment for me in terms of the games development. I feel that I bit off way more than I could chew with this wanting to develop all these features in such a short amount of time (Animations, Assets, UI with mechanics, Voice activated mechanics, a rythm track, scoreboard etc.).
I think I was very over ambitious with the amount that I thought I could get done in such a small timeframe as I had done the same before for the arcade project. But then I sat down today and really thought about why this hasnt gone as smoothly which made me realise that for that project I barely made any assets and the rest were free ones. This has all in tern made me realise how I cant always do it all and that it should be best I focus on my chosen specialism rather than what I think I can do and get everything done.
From this point onwards I am just going to purely focus on my asset design for this project incorporating what I had previously learnt from my research for this project.
I really like the idea of creating a character as in the previous project I never achieved this. I really like the idea of creating some type of neon robot that will still fit with the current games theme. So I will aim to create a really high quality asset from now until the end of this project and anytime I have left to do anything else will just be a bonus.
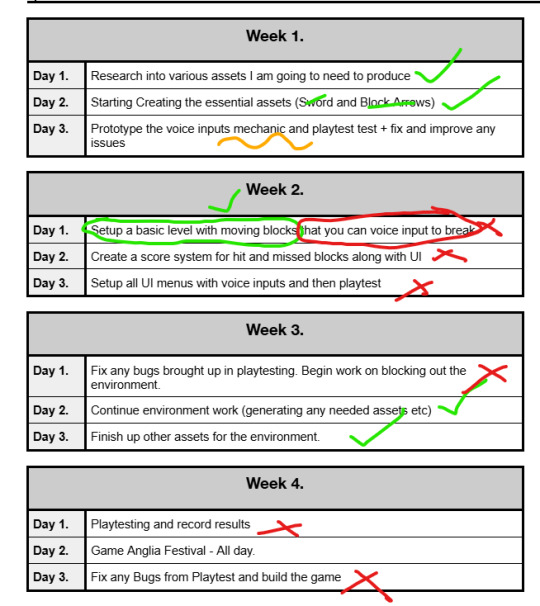
Here is my project plan with what I have achieved and then not achieved:
I have made:
A level with neon environment art
A Platform for the player Asset
A Sword Asset
A Note Block Asset
0 notes
Text
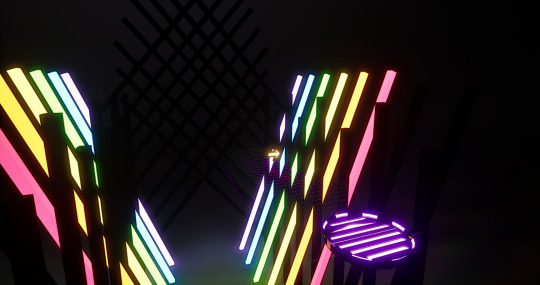
Environment update
I wanted to give the environment a bit more detail as it was quite bare. I looked at my examples of games I researched and focussed mostly on the sharper geometry of their environements adding it to my own. I wanted to incorperate lots of neon themed aspects which contrast with darker parts as this is what beat saber does and it creates a lot of depth in my opinion!
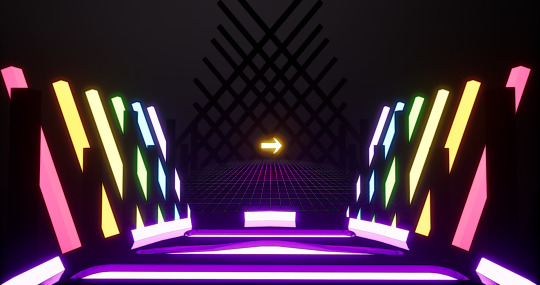
^ Here in this example I wanted to create an effect of depth with the platform to feel like it extends far away. The pillars originally I had quite bright but soon found that it got all too washed out with the platform. So to make the platforms neon effect stand out I decreased all the pillars emmsive colours to cool the effect down!

^All the colours I made
0 notes
Text
Goals for Today
Morning:
Update blog posts for where sword swing is at
Finish the sword swing
Add more detail to the levels environment ✔️
Afternoon:
intergrate the voice recognition plug-in
0 notes
Text
Sword Animation
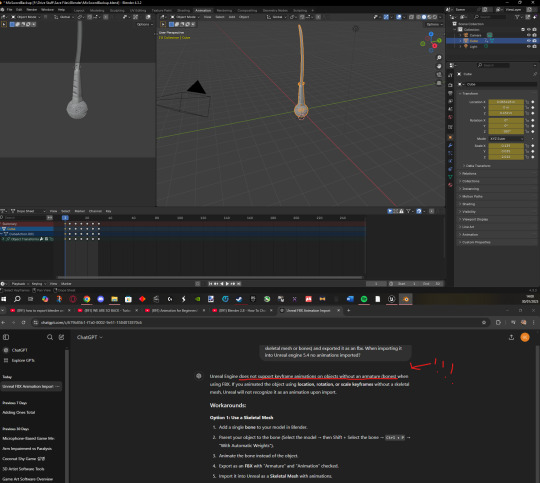
I wanted to start this off by making a sword swinging down animation to import into UE5. I had made the animation with the keyframes timeline at the bottom. I then looked online to see if there was any special format I needed to export the animations with but it said to export as a standard FBX file.
^Animation
After importing it into UE5 I found that the animation was nowhere to be found and did not import. I tried reimporting it again into ue5 and double checked all the fbx import settings to make sure nothing was unchecked that needed to be and found nothing!
I then did some research online and found that my static mesh needed a bone or else it would not import into eu5:
I then tried this and indeed it did import an animation. The only issue was that the animation was B L A N K ! As far as I could find there was no one else having the same issue as me online so I have hit a dead end. :/
Overall this has really been a hair pulling situation as I have not been able to achieve what I originally set out to do no matter what I have tried so for now I think it is best to put this on hold and focus my time elsewhere.
0 notes
Text
Goals for Today
Morning:
Continue working on the sword swing system 🚧
Afternoon:
Voice Recognition Plugin🚧
0 notes
Text
Sword Swinging Code
Okay so to sum up what my plan is for this sword swinging system, I wanted to make the individual sword swing in the direction that it was interacted with. I thought about using a timeline as that is what I have used before to get this desired effect.
It was all going well as I had gotten the sword to swing downwards smoothly. Here was the code that I used to make this sword rotate:
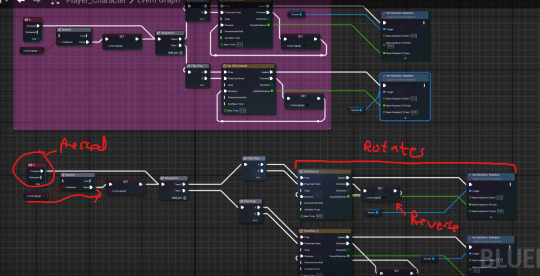
After then trying to add a seperate sword rotation in for the swing right which in my opion looked very "Janky" and tacky. This also introduced a big issue with that being the singular static mesh did not like having multiple seperate timelines to rotate the sword and would completely stop working.
------------------------------------------------------------------------------
I then tried a different approach of having multiple seperate sword meshes to swing individually for each direction and I would be able to control the visibility of each mesh based on the direction. This also created issues as the timeline was never consistent so I would sometimes have swords popping in and out of visibility.
Here is the code below that I tried to use to get this to work:
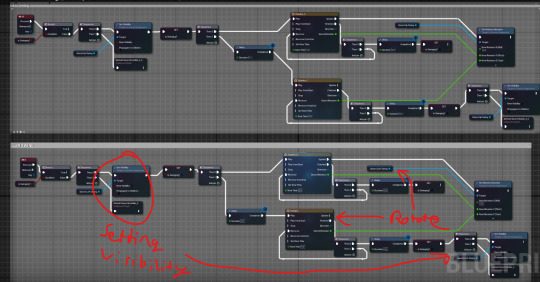
As I could not get this to work with timeline I thought it was best to maybe look into creating a set of animations in blender instead!
0 notes
Text
Goals for Today
Finish Sword model write up ✔️
Add voice recognition plug-in 🚧
Work on Sword Swing 🚧
0 notes