
Don't wanna be here? Send us removal request.
Statistics
We looked inside some of the posts by 332440physicalcomputing2020-blog and here's what we found interesting.
Average Info
Notes Per Post
1
Likes Per Post
1
Reblog Per Post
0
Reply Per Post
0
Time Between Posts
17 days
Number of Posts By Type
Video
1
Text
9
Last Seen Tumblr Blogs


Fun Fact
Tumblr.com is the 103rd most visited website in the world.
Video
tumblr
In this experiment I decided to play around with the speed and revolution of the Stepper motor to figure out its minimum, maximum and optimal speed what it could dp.
The challenges for this experiment was to figuring out the best combination of speed and steps per revolution as a incorrect number would result in the motor stalling.
I started it off with a speed of 10 and a revolution of 2048
#include <Stepper.h>
const int stepsPerRevolution = 2048; int stepNumber = 1;
// Create stepper object called 'myStepper', note the pin order: Stepper myStepper1 = Stepper(stepsPerRevolution, 8, 10, 9, 11);
void setup() { // initialize digital pin LED_BUILTIN as an output. pinMode(LED_BUILTIN, OUTPUT); myStepper1.setSpeed(10);
}
void loop() { myStepper1.step(2048); digitalWrite(LED_BUILTIN, HIGH); }
The steps revolution means how many ‘ticks’ it turns per full turn so to do one full turn the motor will move 2048 time before staring over again.
0 notes
Text
Playing with speed
In this experiment I decided to play around with the speed and revolution of the Stepper motor to figure out its minimum, maximum and optimal speed what it could dp.
The challenges for this experiment was to figuring out the best combination of speed and steps per revolution as a incorrect number would result in the motor stalling.
I started it off with a speed of 10 and a revolution of 2048
#include <Stepper.h>
const int stepsPerRevolution = 2048; int stepNumber = 1;
// Create stepper object called 'myStepper', note the pin order: Stepper myStepper1 = Stepper(stepsPerRevolution, 8, 10, 9, 11);
void setup() { // initialize digital pin LED_BUILTIN as an output. pinMode(LED_BUILTIN, OUTPUT); myStepper1.setSpeed(10);
}
void loop() { myStepper1.step(2048); digitalWrite(LED_BUILTIN, HIGH); }
The steps revolution means how many ‘ticks’ it turns per full turn so to do one full turn the motor will move 2048 time before staring over again.
0 notes
Text
Its not pretty but it works
The final product of this experiment project. Its not exactly pretty but its main components works and while the material makes it a bit lacking this still presents the job that i created it to do.

The final evaluation for this project would be that i would change he material it is made out of to give it a nicer appearance such as wood and then I would get a stronger motor to accommodate for that in future experiments i might try adding a sound component to this so that it would play soothing music as well. What could be improved on would be that this project was too simplistic and could have done with more technical difficulties and challenges.
1 note
·
View note
Text
Materials
The material for this project are simple.
A Stepper Motor + board
6 Cables with female ends
2 standard cables
An Arduino board
as many LED as wanted
Foam or any other light weight material
a small bread board
-----------------------------------------------------------------------------------------------------------
Most of these materials can be found in beginner sets and are easy to assemble making this a great project for other such beginners in Arduino

d
0 notes
Text
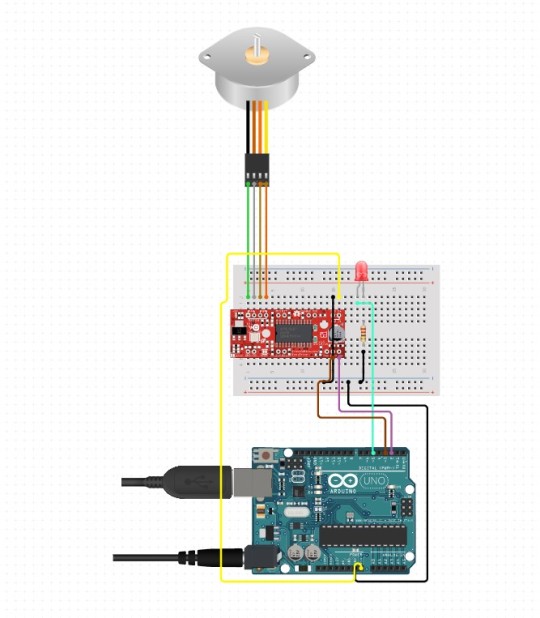
Its all coming together
All of the components are now working together, this experiment was to test if all the components would work smoothly together, which it did. I t took a bit of trial and error to see what was the best way to get the LED to work through the foam but after much deliberation I came to the conclusion to just leave it as it is on top of the motor instead of under it.
------------------------------------------------------------------------------------------------------------

v
0 notes
Text
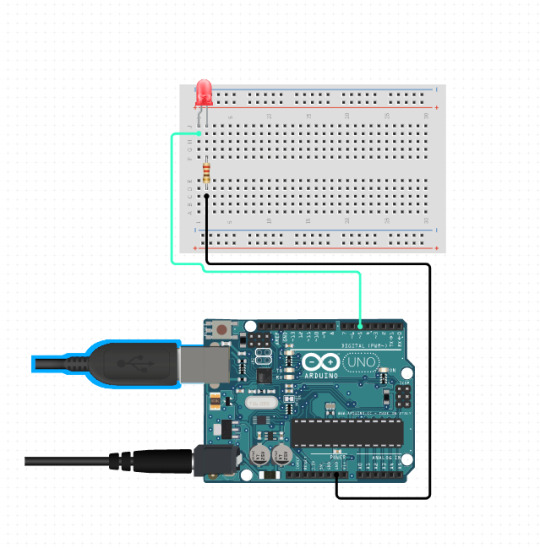
Lights on
For this experiment i was using a slightly different equipment so i re did my lights. As well as finding a simpler way to have it wired out as supposed to some of the previous experiment I've done. Thankfully just having the lights on required no coding at all and a simple LED like this does not require a resistor.
For future experiments i would look into an LED that can change color with a controller as that would give it a more appeal
------------------------------------------------------------------------------------------------------------

.
0 notes
Text
Nightlife
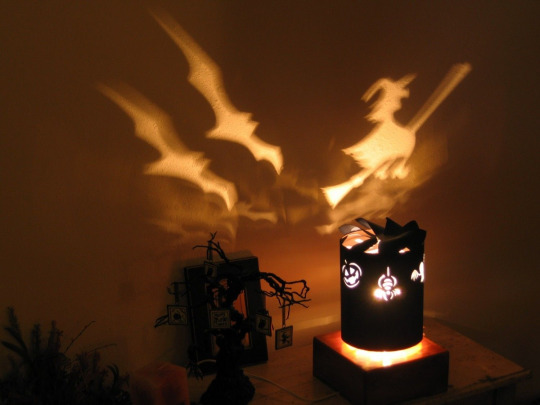
For this project i decided to create a little night light that would spin on the spot to give it some life or even the appearance of an moving image.
What would be required for his project is something to assemble the components and light on which I decided to create out of hardened foam.
My inspiration for this project came from the photo below as i always found something like this soothing, so I redounded to create my own instead of buying one.
c
0 notes
Text
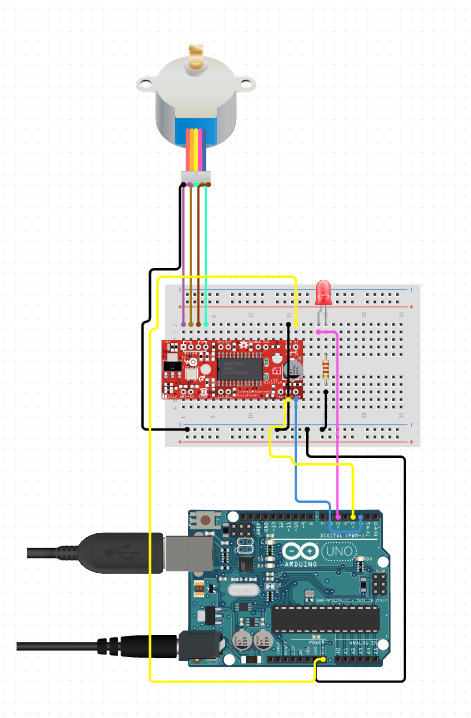
Working of a Stepper Motor
For this project I had decided to try working a stepper motor to give the light a bit more life to it.
This took some trial and error as this particular stepper motor had a very specific speed that it could go until its stops, unlike other of similar models.
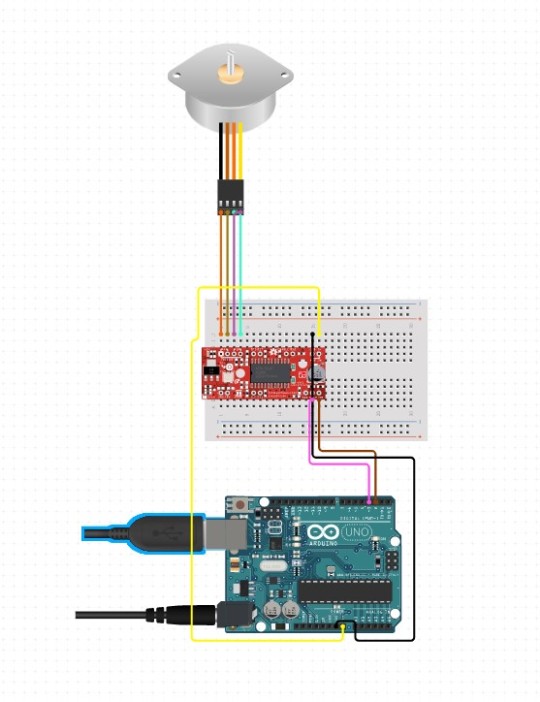
-----------------------------------------------------------------------------------------------------------
The codes for this are as follows.
#include <Stepper.h> #include <NewPing.h>
// Define number of steps per rotation:
const int stepsPerRevolution = 2048; int stepNumber = 1;
// Create stepper object called 'myStepper', note the pin order: Stepper myStepper1 = Stepper(stepsPerRevolution, 8, 10, 9, 11);
void setup() { // initialize digital pin LED_BUILTIN as an output. pinMode(LED_BUILTIN, OUTPUT); myStepper1.setSpeed(10);
}
void loop() { myStepper1.step(2048); digitalWrite(LED_BUILTIN, HIGH); }

If possible in future experiments i would like to find a way to simplify this, as well as look into other motors that would be stronger. This would allow me to use a stronger material for the basis of the project as opposed to something light like foam.
0 notes
Text
Analog Read - 27/02/20
In this class I learnt about analog input and how to use a LDR which is a resistor sensor and how to connect it with the resistor to vary the amount of voltage that travels through the circuit.
________________________________________________________________
The code for the this lesson.
int sensorPin = A1;
int ledPin = 13;
int sensorValue = 0;
void setup() { pinMode(ledPin, OUTPUT); }
void loop() {
sensorValue = analogRead(sensorPin);
digitalWrite(ledPin, HIGH);
delay(sensorValue);
digitalWrite(ledPin, LOW);
delay(sensorValue); }

________________________________________________________________

We also played around with measuring the resistor using an multi-metre to view the difference in charge it makes depending on the amount of light available to the LDR.
0 notes
Text
Playing with Arduino
The First Session of the physical computing class went well. After a mishap with the light burning out by unknowingly placing the wrong LED leg into to power successfully burning it out. After some tutoring I had finally got a circuit working and then proceed to upload the blink example code which worked well.
I decided then to switch out the light in the circuit so it was no longer a white LED and instead it was a blue LED to reduce eye fatigue, I decided to make the light switch on and off using Morse code to make the light it self say “Hi” it took some fiddling with the delay timing but i finally got the LED to blink in this pattern 0000 00 The code for that is as shown:
digitalWrite(LED_BUILTIN, LOW); delay(800);
digitalWrite(LED_BUILTIN, HIGH); delay(500);
digitalWrite(LED_BUILTIN, LOW); delay(800);
digitalWrite(LED_BUILTIN, HIGH); delay(500);
digitalWrite(LED_BUILTIN, LOW); delay(800);
digitalWrite(LED_BUILTIN, HIGH); delay(500);
digitalWrite(LED_BUILTIN, LOW); delay(800);
digitalWrite(LED_BUILTIN, HIGH); delay(500);
digitalWrite(LED_BUILTIN, LOW); delay(1500);
digitalWrite(LED_BUILTIN, HIGH); delay(500);
digitalWrite(LED_BUILTIN, LOW); delay(800);
digitalWrite(LED_BUILTIN, HIGH); delay(500);
digitalWrite(LED_BUILTIN, LOW); delay(1500);

I also learnt that the LED_BUILTIN means the pin it self which for this line of code was 13 and the HIGH and LOW can be replaced with 0 or 1 which is on and off where 0 mean 0V and 1 means 5V.

0 notes