1991 Jeep Wrangler YJ - this is a rescue, not a rebuild - via @jron
Don't wanna be here? Send us removal request.
Text
Sometimes you gotta spring for new parts.

Was the girl’s first lesson in driving a manual today. Seemed it would be helpful to have the shifting diagram visible again. It not being covered in some sort of unremovable mildew gunk was a good bonus.
Note: the transfer case knob and the transmission knob are identical except for the printed pieces of plastic in the center, but were different prices. Turns out this is because the cheaper one didn’t include that metal ring that you tighten up to the bottom. Check for that if you order one.
0 notes
Text
Put a new top on today! The weather was perfect, cool out but the sun was bright, so it was a good day to get the new one hot enough to install. Here’s a before & after:


Had to bend the metal frame clips back down around the back corners. They were coming up and couldn’t hold the plastic clips any longer. Hammered them pack into place, and used a wood block to keep from damaging them.
Spent almost as much time cleaning the tracks and such as installing it. It was all easy up to this point:


Getting the window skins on their frames was tough. Had to come up with a way to stretch the fabric around the 4th corner, and I still can’t quite get that front snap snapped.
But I drove it around for about 10 miles, filled up the tank, and can now park it in the driveway. My mom was excited to see it. She’s was even out snapping her own pictures. She thinks the black looks a lot better so I’m glad I went with it.
I’ve got some old gray windows to sell cheap if anyone wants them!
1 note
·
View note
Text

Honestly those 80s headlights are really growing on me. I kinda like them better than round ones.
0 notes
Text
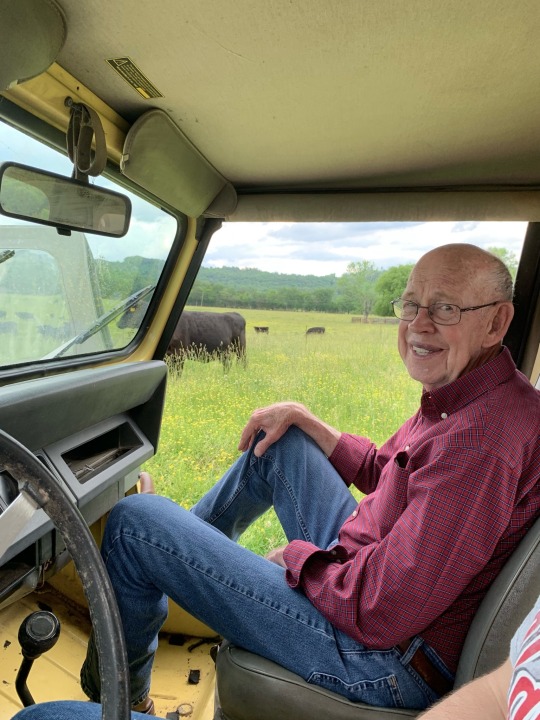
I haven’t had as much time to work on the Jeep these past few months as I’d planned. My dad died in June after being sick for a few years, and now when I’ve visited my Mom, we mainly just spend time together, which is nice. She’s travelled a lot as well, so I haven’t been over as often as I was before dad passed. Here’s dad back in happier and healthy days:

I think I’ll keep a copy of that pic in the glove box when I get it cleaned out properly.
I’ve done a few things with it. For one, I’ve driven it around the countryside near the farm, which has been nice. The shrinking top had pulled up the clips so much the top would come loose in the wind, so I learned it’s best to drive it top down. I had to put in new spreader bars for the top frame—dad had replaced them with homemade fixed bars at some point and the top couldn’t go up & down properly.
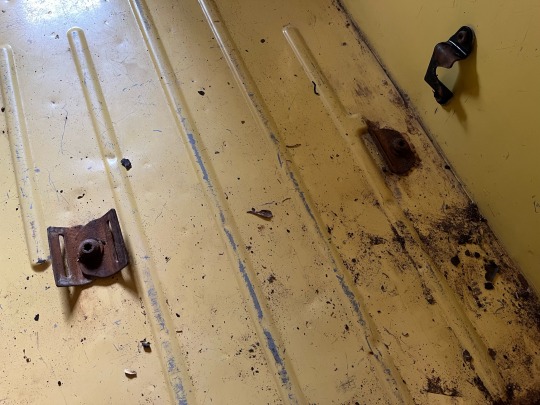
Started sanding down the rust by the tailgate so I can stabilize it—dad used it for hauling feed and salt blocks in the back so that had an effect. Decided there’s no way to really make the tub look great with the tools and time I have, so I’ll get it to a good point and carpet it eventually. The original carpet was black (I found half of it in the barn), so I’ll probably go with that.
Reinstalled the passenger seat with its new seat belt—looks awesome. Then I stripped the top of one of the torx bolts for the driver side belt, so that’s waiting. It’s the problem of working a little at a time. I can only do small jobs and if something goes wrong I have to fix it on my next trip when I have more of my tools.


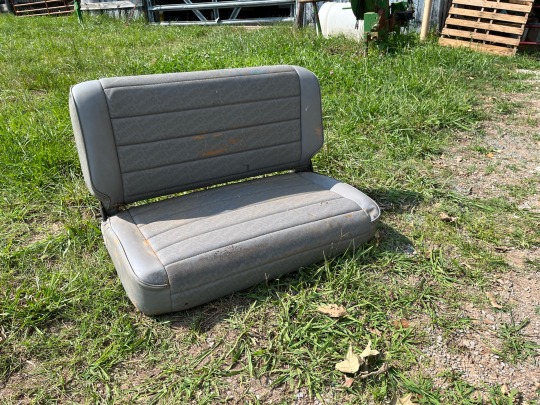
I found the back seat in the barn and cleaned it up and stored it. Haven’t really scrubbed and treated it yet, but I don’t have the hardware to reinstall it yet either. Besides I want to stop that rust in the back first. So there’s time for that.


And I bought a new top that arrived yesterday. Found a Smittybilt one in black denim for $200!! Hopefully I can install that next week when I visit, after hammering the edge clips back into place so they’ll hold it down. I was going to go gray so it matched how dad had it, but asked Mom her preference and she thought black would look better. I agree.
If Mom doesn’t mind I plan to bring it home for about a month or two so i can actually focus on it and do things that take more than about an hour. That way I can tune it up, finally replace the damn starter, remove and repair the drivers seat (the bolts are screwed up so that may take a little time), clean and condition the interior plastics, stop that rust in the bed, remove and reinstall the sifter boot properly, stop the body and bumper rust, pull out a couple dents, etc, etc. I can’t wait to have a little fun with it!
Hoping then I can take it back to her so her grandkids (and I!) can actually enjoy driving it around. 🙂
3 notes
·
View notes
Text
It’s the last real Jeep.
Haven’t posted here in awhile, but hoping to get back at it soon.
0 notes
Text
Well I bought the wrong seat belts accidentally and sent them back. Looked at so many sets that I lost track and bought some non-retractable ones by mistake.
Messing around with the wrong ones convinced me to make sure the new set will fit in the sleeve. I thought I could trim the sleeve down for a slightly shorter buckle end but it just doesn’t seem that will work right. So for the next set I’ve ponied up for the pricey set from Seatbelt Solutions that actually fits properly.
The ‘91 is sort of an in-between year for a lot of things, and the seatbelts apparently fall into that too.


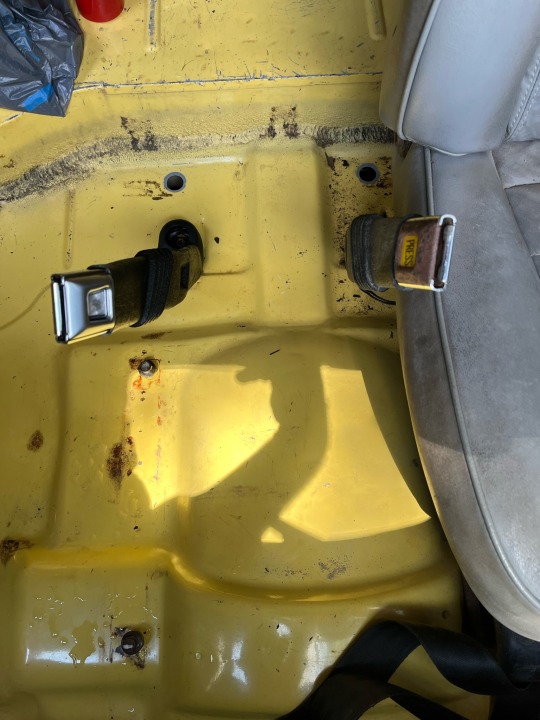
The 82-91 should have the shorter buckle end on left instructions, but this one has the sleeve in the photo, like a 92-95. So I bought the belts on the right. But as you can also see the newer models have a different mount, with one less bolt on the floor.
Should work fine to skip the floor bolt, but it’s a minor difference to note. By the way, it’s hard as heck to pull the new belts through the old sleeve, but not as hard as getting the old bolts loosened up. Had to soak them in PB Blaster for days.
Update: The belts from Seatbelt Solutions arrived and they’re beautiful.
0 notes
Text
This Jeep has got me thinking. What other vehicle is out there that’s just as good without carpet or AC as it is with it? I mean besides a pickup?
I’m racking my brain here — is there any other used vehicle with an engine simple enough for the likes of me, that still looks cool with dents and oxidized paint?
0 notes
Text
Tried out some VHT Rust Converter on the rusty seat bracket today, but forgot to take pictures. Sanded it and cleaned it up a bit first. It seems to really work, but in a few spots it’s just a clear finish over the rust. Will put a light topcoat on before reinstalling.
I’m curious what it would look like over a large rusted sheet.
After putting on the light topcoat—seems like Bandit’s ready to ride:

0 notes
Text
Brought home the passenger seat to have a go at cleaning it up and repainting the base, so I can put it back in before swapping the belts. I didn’t bring home both seats because I’m not very bright. Guess I’ll do them one at a time. I also didn’t bring home my torx set, so I can’t take the base apart. (Again, not thinking.)
Here’s a first pass at scrubbing it with Simple Green to loosen the dirt, then wiping that off:


The change seems more dramatic in person. You can see a light spot on the before pic at the front part of the middle of the seat, where I first started. The color now is distinctly more gray, and you can see the pattern all the way up again.
Haven’t touched the base or conditioned the vinyl with 303 yet. Will definitely take another pass with the APC and a brush before I do that, since this is what a closeup STILL looks like:

0 notes
Text
New tires and brakes! It's roadworthy! Put in some fresh gas and it ran noticeably better. Still needs that new starter, which I’ll order soon. Yes they’re highway tread, don’t at me. Tires are crazy expensive right now & I found these Kumho 225/75R15’s for $80 each. Good A/T’s were much pricier and they add up quicker when buying five. Slightly bigger than what was on it (these are Sahara-stock sized), but they look good to me.

Lights are all working-- I want the interior bulbs to be all the same color, but this is fine for now, especially since they look more alike in person. I’m still thinking about LED’s there but I probably want warm white anyway so may as well keep cheaper incandescents. Amber LED’s could look cool, but I’m not sure the different size LED bulbs would colormatch correctly either.


Turns out all the exterior lights are working fine, even the bent & broken ones—I just needed to see them in the dark. So that’s great news, something else to not spend money on, though I’d love to replace them at some point in the future.
Sadly, thwarted in my plans to take off the trailer hitch over the weekend. One side is installed through the leaf springs (is that normal?) and the other side is welded. Sooo, maybe I’ll just scrape and spray rust converter on it. It looks terrible, so maybe soon.


I have to reevaluate my plans for the tub. There’s really no way I can spend the time it needs to get it looking good. I’ve bought some Malibu yellow in a rattle can for touch up but doubt I’ll be needing it for a bit. I need to focus on the basics instead, like how it runs.
Will fix the seat belts and put the tub refinishing on hold. I got two of the passenger seatbelt bolts out but two won’t budge. Soaked them in PB Blaster overnight and still no luck. Will try again in two weeks, at which point I’ll have the new belts on hand to install. Opted to buy a set of TJ belts off eBay for $40. A pair of belts for the YJ were about $200 everywhere I looked, and it seems like the TJ buckle end is the right length for the stock sleeve below, which I’d like to reuse. They were cheap enough to risk it!

And no new wasp nests yet.
1 note
·
View note
Text
Well I gave it a good pressure wash last weekend. Most of the mud was inside, from years of use and old dirt dauber nests. There were only about 5 or 6 new wasp nests hanging from the ceiling this time. Left it with cinnamon pest repellent bags in the cab and under the hood—hopefully they’ll help keep them away.
There was so much dirt inside that I really couldn’t get so far as cleaning it, I was just removing mud and draining it out. I wiped it down but it will need more work to actually be clean. I decided not to replace the metal floor drain plugs, and bought a set of black rubber ones instead.


I opted to take out the passenger seat for now, just to get in there easier, and it was really quick. I thought the bolts might be rusted on but I had no problems.
I uncovered a good bit of rust in the floor though, likely from standing water. It’s especially bad around the tailgate, where I plan to start grinding & treating with VHT rust converter soon. Will need to do a small section at a time since I can only work an hour or so here and there.
Also gave the dash and door panels a first pass at cleaning, but they’ll need fairly intensive reconditioning later. Nice to see what I’ll be working with, though. Looks like I may need to take the doors apart to do that right.


Checked all the exterior lights and they’re good except for one side marker (photo before the wash) and part of one taillight, both in places where it’s been hit. I’ll need to bend the front fender out to fix the side marker but the taillight will be an easy swap.


I was running out of time, so I didn’t clean up the wheels as I’d planned, but did do one of them. Light scrubbing with an SOS pad still does well on light surface rust. The trick with that is to scrub & rinse quickly before it starts to dry. Here’s a shot before the wash & another about five minutes of scrubbing. Not perfect, but way better. I could eventually repaint them but they might look better like this, with a bit of wear.


You can really see where that rust converter is going to be needed on these bumpers. The seat frames can use a good scraping & spray as well.
I took loads of pictures to help me plan this time. But I realized that I also should’ve measured several things, like the seatbelt strap lengths to know what set will fit.
And I popped in some new wiper blades so I don’t accidentally gouge up the windshield.
0 notes
Text
After getting the engine running, two things were obvious: first, the starter squeals like I’ve stepped on its tail. And second, the brakes are seized up.
I drove it around close to their house for just a bit to get the brakes to pop loose, or to see which ones got hot. They didn’t pop loose and I couldn’t tell whether one was hotter than the rest. That was all I had time for on this visit, so I cleaned it out with the leaf blower and parked it.
So for my next trip I’ll need a starter; I can handle that. And then I’ll need to find someone local to fix the brakes. I don’t have the time or the tools for that job. In watching YouTube videos, it doesn’t look all that hard to do one, but they have to be done in pairs, and for all I could tell, that might mean both pairs.
And I need to take a lot more pictures on my next visit, since I can’t just run outside and check things on it. Here’s the overall shape of it now:


Not bad, but needs a good pressure wash inside and out, and many details replaced.
0 notes
Text
My first step was to get the car started. When I jump it off it runs only while the charging car is connected. Sounds like the alternator isn’t doing anything. I also noticed the spark plug wires are fairly chewed up (they have a ton of chipmunks).
So here’s a big part of my challenge. This is still my parents’ Jeep and they live about 3-4 hours away. I have to be prepped and ready to do any work when I get there, and can’t leave a job unfinished. There’s no garage so I can’t leave things in progress, and I’m only there every few weeks. I also need to spend time with them, not outside tinkering on the Jeep.
So to prep for this visit I bought a rebuilt alternator, spark plug wires, cap & rotor, plugs, di-electric grease, and terminal clamps (an old one was broken). Picked up a new battery in town near them, since I didn’t want it sitting around at my house in case I couldn’t get over there for a while.
It was running fine when I parked it, and I thought I had put in a new battery just before then, but it turns out I was mistaken. The one I’d bought must’ve been for their pickup, because the existing one was nine years old. When I arrived with all my gear in tow, I also found out that the two fuses to the alternator were blown. So that was a 45-minute trip to town and back to buy those.
The good news was that the fuses, clamps and battery were all that was needed. It cranked up with an unsettling screaming noise, and after a few minutes of warmup, it even kept running with my foot off the gas. I kept the alternator in its box and returned it.
Step 1 is done—the engine runs. Minor work, but here’s the before & after:


0 notes
Text
Back in 1991, my dad bought a new Jeep Wrangler. Base model, no AC, no radio, no option added except power steering. At the time I was fairly unimpressed by it, especially its lack of options, small engine and general lack of bling. I remembered the one he had in the 70s, with its bigger tires and chrome wheels, bigger engine, deeper yellow paint, black—not gray—top and seats, and thought this one (literally) paled in comparison.
But 30 years can change a person’s outlook.
All of their grandkids learned to drive a stick shift in it (except one, and I’ll get to her), and beyond that he used it almost exclusively for hauling feed, seed and fencing around the farm. Since it was 4wd and fairly small and lightweight it went lots of places the pickup trucks simply couldn’t go. It got a lot of use.
He can no longer drive, and mom never enjoyed it much, but that youngest grandkid, my daughter, still needs to learn to drive a stick. And while she is devastated that her grandad won’t get to teach her, she wants me to.
And now I love this Jeep. It’s still bone stock, with nothing added except a trailer hitch, and that’s perfect. BUT, it’s not currently drivable because it’s been sitting for years. So I plan to document here what it takes to get it going after a couple decades of farm use and a few years of neglect.
Here’s a photo of it after a wash in better days when Dad was well:

1 note
·
View note