
Don't wanna be here? Send us removal request.
Statistics
We looked inside some of the posts by wasting-the-dawn and here's what we found interesting.
Average Info
Notes Per Post
21K
Likes Per Post
12K
Reblog Per Post
10K
Reply Per Post
5
Time Between Posts
5 days
Number of Posts By Type
Text
7
Photo
8
Note
2
Last Seen Tumblr Blogs


Fun Fact
28.6 is the average number of monthly visits per US mobile user.
Text
Making Screencaps
1- Open KM PLAYER and choose the video you want, open it.
2- Click ctrl+G and a window will open. These should be your settings:

I know its in portuguese, but its porably in the same order.
Format: JPEG
Method: Only video image (it gives you an option to capture with the subtitles, but we dont want it)
Numbers to Extract: Continuously
Size: Original size (always have HQ episodes, cause it makes a difference when giffing)
Frames to extract: All frames
They should probably be like this already, but check anyway.
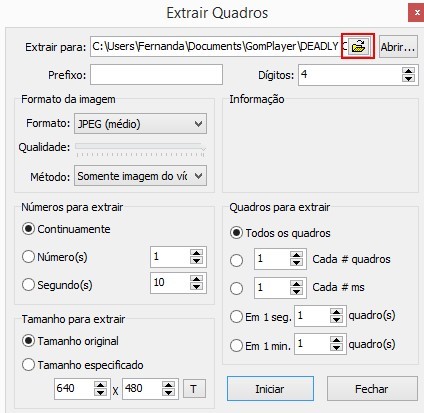
On this little folder you can choose where you're gonna save your screencaps, I always make a folder for every scene I want to gif, its just easier this way.
So this is how I make it
Documents>Deadly Class>Folder 1
So you just make folders inside the DC one, that way they are in the same place but different folders.
Now that the settings are okay, you can start capturing your scene.
Go to the scene you want to gif (I always start a few seconds earlier just to make sure the frames I want are being capture, you can delete what you dont need later)
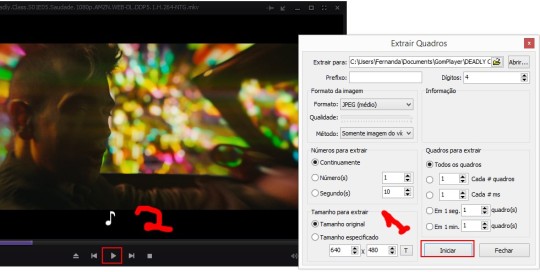
Then you can start, start first on the grey window and then start the video so the scene you want can be capture.
After that, its photoshop time lol
You can cap a bunch of scenes and then separate them in folders too, I always do this so I dont have to open KM Player every time I want a different scene.
1 note
·
View note
Text
Graphic Tutorial by starlightiel
Someone asked me to do a tutorial for this graphic, so here it is.
For this tutorial, you’ll need
Photoshop (I’ll be using CS5 Extended)
Basic Photoshop skills
Keep reading
3K notes
·
View notes
Photo


We’re just a bunch of teenagers. We can’t handle this.
12K notes
·
View notes
Note
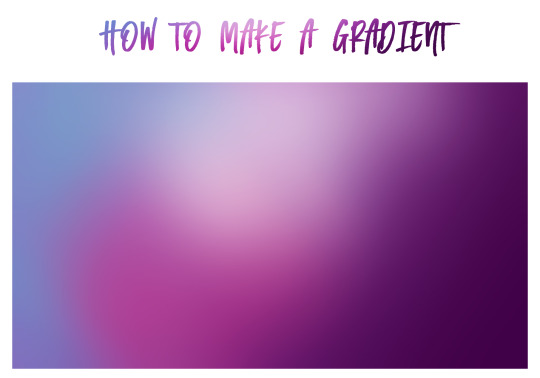
hi there! sorry to bother, this must get annoying. but i was wondering about how you do your gradient backgrounds, like the one you JUST posted with the come home nell, i think it's the very first one. but it looks SO SOFT and mine just come out looking blotchy?? yours just blends together better? sorry for bothering!!
hey! you are not bothering me at all! i love being able to help you guys in any way i can.
Keep reading
1K notes
·
View notes
Text
how i make my colorful gifs
Okay I was asked to explain a little of how I do my colorful gifsets since I use a base psd and then color depending on the gif. I have a couple ways that I will do this depending on the shot. Typically a shot with a lot of negative space, especially if it’s one solid color works best, also I’m partial to shots with explosions, steam, or smoke. They’re just fun.
I’m using shots from Buffy just because it’s my favorite show but this translates to pretty much anything. I have another tutorial explaining my typical coloring routine which includes the settings for my base psd. If you’re interested in that it’s here. Otherwise, I’m just going to focus on the color aspect.
Here are the gifs I will explain:
Continuar lendo
526 notes
·
View notes
Note
hey love! i love this set, would you share this psd? /post/184181806066/100ishdaysofst-day-eleven-favourite-romantic x
hi there!
i tend not to save colourings since each gif has to be coloured individually depending on the lighting/colouring in that particular scene anyways. however, the process that i use tends to be the same for all the gifs that i make. for these st gifs i decided to try something a little different by isolating the reds, and making the rest of the scene black and white.
i did my best to recreate the colouring for the above gif and i have uploaded that particular psd here for anyone who wants to use it. although you’ll have to remember that the psd will have to be adjusted for each scene as this one was specifically created for this scene. feel free to message me for any tips on how to do this (eg. which layers to adjust - and preferably off anon, if you feel comfortable with that, so i’ll be able to go through it in more detail) and i’ll try and work on a tutorial in the future about how i colour my gifs normally, and how to isolate a particular colour in a scene like i’ve done with the reds in the above gif.
please like or reblog this post if you use/save this psd.
thank you so much for liking my gifs x
10 notes
·
View notes
Text
MAKING GIFS WITHOUT WHITEWASHING PT. 2
i made this tutorial a while ago but ive picked up a few things since then and thought id make an updated version. learning how to not whitewash has made my psds infinitely much better, the ones without poc in them too. its a great way to get better at coloring in general. heres the psds i used in my examples.
Keep reading
365 notes
·
View notes
Photo
psd one — legacies (download)
you will need to adjust the color balance and levels (which was done for every gif above) but it’s a base i really like. i made this for my ships series and i’ve been using it on my legacies gifs (more examples of this psd can be found here).
like or reblog if you download and do not repost! i’d love to see this in action so feel free to tag me in any edits.
39 notes
·
View notes
Text
how i color the magicians
hello! i had a request to show how i color the magicians so that’s what i’m going to try to do. under the cut, i’ll be taking you through how i’d color an individual scene.
i will be turning this:

into this:
disclaimer: like i stated up top, the coloring is for this particular scene so it won’t work on EVERY scene, but at the end, i’ll paste this psd to different scenes, and tell you what i’d change to make it work.
Continuar lendo
85 notes
·
View notes
Text
How to Sharpen All Frames at Once in A GIF (Very Quickly and Easily!)
Requirements: Photoshop CS5 Extended or Later (I am using Photoshop CS5 Extended in this tutorial)
Before GIF:
(I apologize. I’m using this same GIF for all my examples tonight. :p)
After GIF (I only sharpened, no coloring):
Step 1:
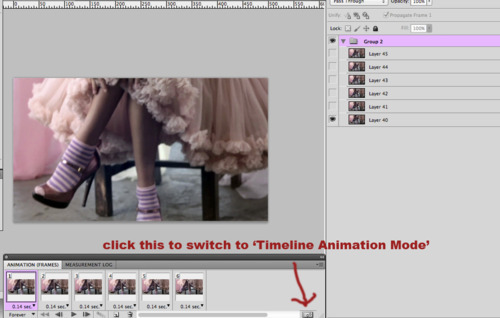
When and only when you’re done with the basics of your GIF and ready to sharpen your frames (read this tutorial of mine if you do not know how to make a basic GIF), you’re going to switch from ��Frame Animation Mode’ to ‘Timeline Mode’ in the Animation Window (see screencap below)
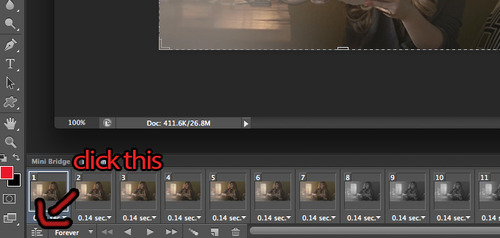
EDIT: In CS6, to get to Timeline Mode, you have to either select “Convert to Video Timeline” in the Animation Window drop down or click the very bottom left icon of the Animation Window.
CS5:
CS6:
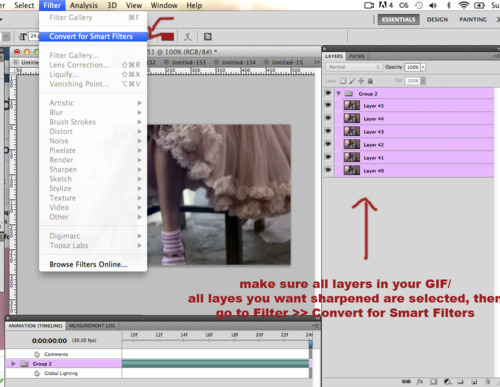
Step 2:
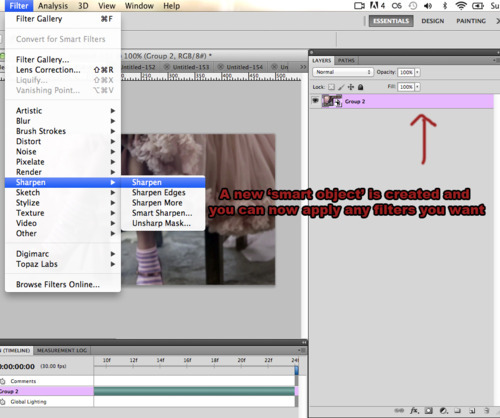
When in Timeline Animation Mode, select all your GIF’s layer/layer groups and go to Filter >> Convert For Smart Filters
Step 3:
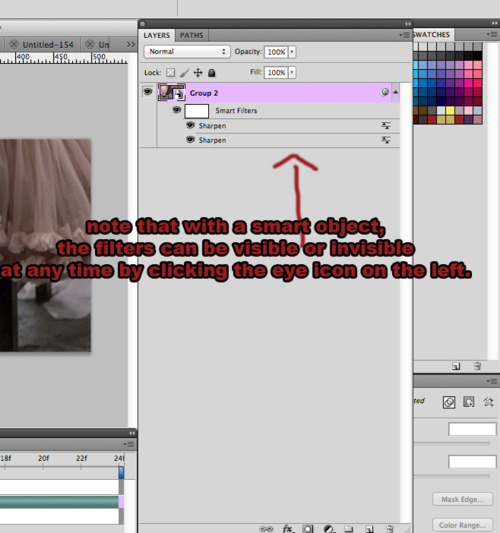
This will now turn all your GIF’s layers into one smart object that you can apply any filter to. But since we’re sharpening, go to Filter >> Sharpen >> Sharpen. You can repeat this as many times as necessary.
Step 4:
That’s it! :) I told you it was quick and easy! You can now save the GIF under File >> Save for Web and Devices, making sure 'GIF’ is selected from the drop down and that your “Looping Option” is set to 'Forever’ rather than 'Once’! Enjoy!
457 notes
·
View notes
Text
Tired of going layer by layer to sharpen your gif? Want a solution?
If you have made gifs before, then it’s likely that you have found out how tiring it is to sharpen them. You basically have to go through each frame/layer and sharpen all separately. Since I got tired of doing that too, I decided to try finding a solution.
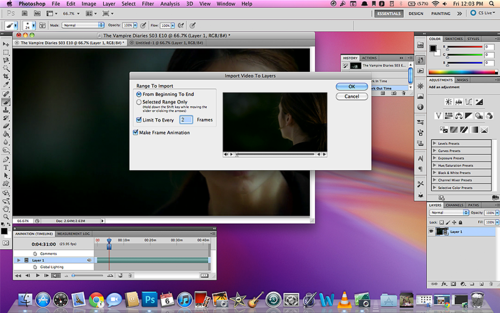
You may have heard of a little thing known as ‘actions’. You can download actions, load them into Photoshop and press play. You then sit back as the action is applied to your file. Well this is the solution I’m providing; an action that will sharpen up to 500 frames/layers for when you are making gifs. I made it to sharpen 500 because when you import video frames to layers in Photoshop, it limits the number of frames to 500.
I know you’re probably sitting there, growing impatient. You probably don’t want to keep reading and would instead prefer you just download the action and start using it. I would love for you to do that but there are a few things you need to know first and so I advise you read this. First, check out my gif tutorial here so as to know how I make my gifs. This could be important if you make yours in a completely different way than I do. As long as you import video frames to layers like I do, this should work fine.
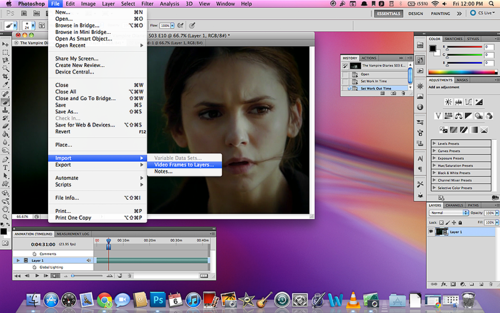
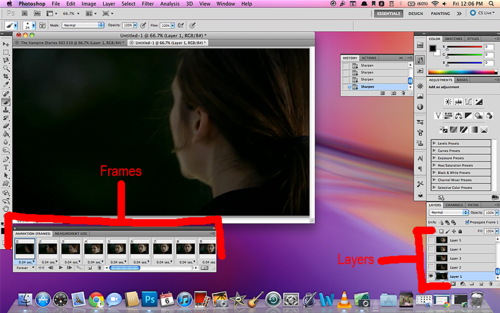
So after you’ve imported video frames to layers, you end up with a file that has a number of frames/layers that all need sharpening. I usually delete some frames that I feel are unnecessary but don’t do that if you want this action to work properly!
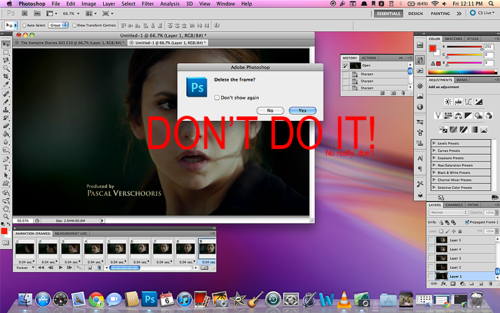
The way that I’ve made the action is this: it selects the first frame and Layer 1 then it sharpens. After that, it selects the second frame and Layer 2 and so on. This is why if you delete anything, it probably won’t work right since it needs to go according to the names of the layers. Don’t change their names and don’t delete any yet.
You may be thinking, “500 frames? But what if I only want to sharpen 100? Would it still work?” Yes actually, it will work no matter how many frames you have. Let’s say you have 100 and you apply the action. It will sharpen all 100 frames/layers and then an error window will pop up that states the following: The command “Select” is not currently available.
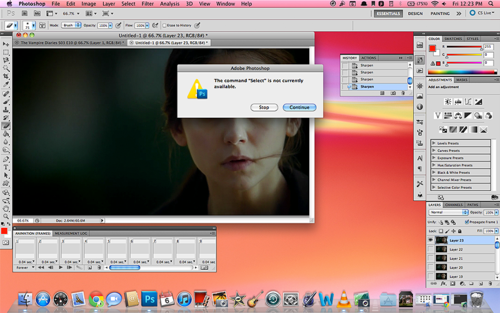
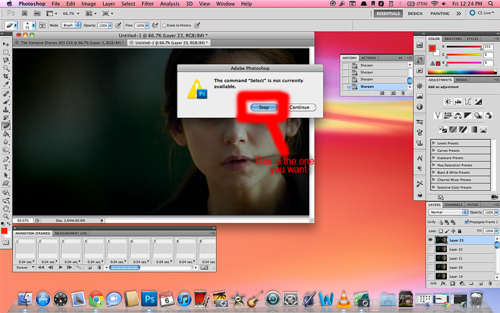
You have the option of continuing or stopping. There’s no point continuing because it will keep showing you errors since you don’t have another 400 frames for it to select and sharpen. So instead, just press stop.
And viola! It should have sharpened all the frames that are present.
It’s very important that the name of your layers be, “Layer 1, Layer 2, Layer 3…” and so on or else this will not work properly. I’m repeating this just in case you missed it above.
Anyways, you’ve waited long enough. Here is the action:
Download my action for sharpening gifs
Download the file and save it anywhere you like. Then, in Photoshop, press on Load Actions in the Action window drop down menu. Load the action from wherever it is that you saved it.
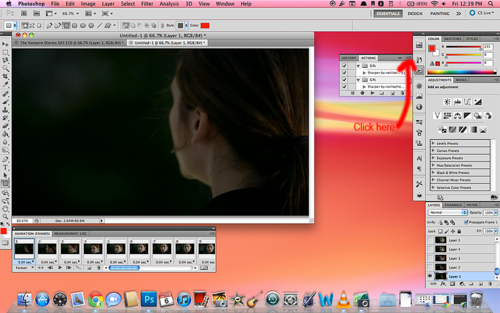

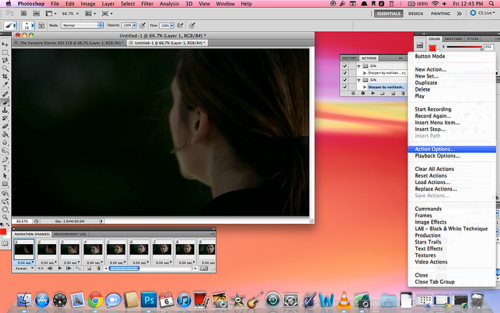
I advise you add a shortcut key to the action so that you can just press that whenever you want to play it. Select the action itself (which is basically the part that says ‘Sharpen by notliketheothers’) and in the drop down menu, choose Action Options.
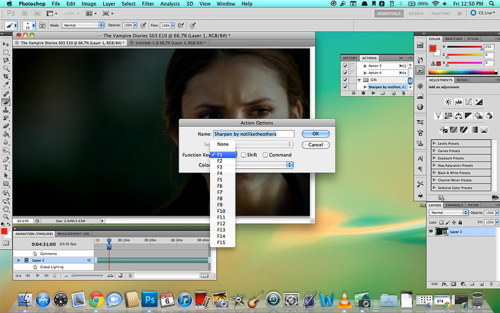
Choose any Function Key you please. Now whenever you press that key, it should play the action. (If you use a Mac, you have to hold the function key on your keyboard as well as the Function Key you’ve chosen for your action when you want to play it.)
Note: Keep in mind that it may take awhile for the action to be applied. It all depends on the number of frames/layers that you have (and the speed of your computer or laptop). Either way, no matter how long it takes, it probably won’t be as long as if you were to do the sharpening yourself.
Now, as far as I know, everything should work properly as long as you read the above. If for some reason, something goes wrong, then please let me know. I’ll try to figure out and solve whatever problem may arise. I really hope this does work for you though because I would love for everyone to never have to be annoyed by sharpening their gifs again :D
2K notes
·
View notes
Photo


Photoset Layout Ideas + Tumblr Dimensions for optimal display of your gif/graphic on the dashboard. ←268px→ ←268px→
167 notes
·
View notes
Photo


Photoset Layout Ideas + Tumblr Dimensions for optimal display of your gif/graphic on the dashboard. ←540 px→
159 notes
·
View notes
Photo


Photoset Layout Ideas + Tumblr Dimensions for optimal display of your gif/graphic on the dashboard. ←268px→ ←268px→
197 notes
·
View notes
Photo
Photoset Layout Ideas + Tumblr Dimensions for optimal display of your gif/graphic on the dashboard. ←540px→
90 notes
·
View notes
Photo


Photoset Layout Ideas + Tumblr Dimensions for optimal display of your gif/graphic on the dashboard. ←268px→ ←268px→
255 notes
·
View notes
Photo


Photoset Layout Ideas + Tumblr Dimensions for optimal display of your gif/graphic on the dashboard. ←177px→ ←178px→ ←177px→
197 notes
·
View notes