
Don't wanna be here? Send us removal request.
Statistics
We looked inside some of the posts by vanehernandezblog and here's what we found interesting.
Average Info
Notes Per Post
0
Likes Per Post
0
Reblog Per Post
0
Reply Per Post
0
Time Between Posts
3 days
Number of Posts By Type
Text
17
Last Seen Tumblr Blogs


Fun Fact
The average Tumblr user visits about 67 pages every month.
Text
Live Brief Project Idea Generation and Developement
Goals and challenges One of the less explored areas in the park is the Hypocaust and the Roman Mosaic building, mainly because of its relatively difficult-to-get location. When talking with the client, she told us that many times, groups of students go to the park as part of their 'My Local Area' study but that even if they are exploring the park in almost its totality they usually tend to avoid going to the Hypocaust because of this factor. This building/location is actually one of the most interesting places in the park and it is full of history and fun facts; like the mistake in the mosaic; so when I started to think about ideas for the project this area caught my attention right away and I could see a lot of potential for it to attract people, especially kids/young people. In the client's brief, they specified some of the project's goals and success criteria; my idea will approach these two specific points from the client's brief:
Increase by 30% hypocaust visits (1000 visits a month)
Improve the offer for local schools 'My Local Area Study'
One of the primary aims that the client has for this digital project is to engage audiences who already explore the park but are perhaps unaware or disengaged with its historical significance, so I'm focusing my idea on achieving that. At the same time, this idea will create a link between the St. Albans Museum, the Hypocaust-Mosaic building, and the Verulamium Museum.
The idea MOS-AR: Explore the Hypocaust My idea is to do a Web-AR Experience for the Hypocaust-Roman Mosaic Building. The experience will be called 'MOS-AR' (Mosaic + AR) and it's a series of puzzle games and interactive information ('fun facts', 'did you know...') triggered by the actual mosaic inside the Hypocaust building. The experience will be guided by a virtual character named Mos, a character inspired by the Roman Sea God from one of the other mosaics found in St. Albans, and will have 3 different levels depending on the age of the user:
Game 1 (Easiest Level): For kids between the ages of 3 and 9 years.
Game 2 (Mid Complexity Level): For teens between the ages of 10 to 15 years.
Game 3 (Complex Level): For audiences from 16 years onward; adults in general
With this experience, the user gets the chance to win a variety of prizes if they can successfully complete the game under the time limit; these prizes will renew each month and will have some constraints so that they are not overused by the public.
At the end of each game, Mos will invite the users to visit his mosaic 'portrait' at the Verulamium, where his soul is trapped. This will serve as a link between the Hypocaust and the Verulamium Museum, and can potentially become another similar WebAR experience where the users scan the Roman God Mosaic and 'free' his soul after completing a quiz or a puzzle. This will eventually attract more people to these locations and get them to engage with the Hypocaust-Mosaic Building and its history, and at the same time create a link between the Hypocaust and the Verulamium Museum.


Rules and Prizes
The prizes will be the same for all the games. The dynamic will work this way: each time the user wins they will unlock two things, a filter for them to take pictures/selfies and a ‘Spin the Wheel’ where the user gets the chance to win different prizes from the St. Albans Museum Café or Gift Shop, such as coffee discounts, specific merch discount (like extra discounts on clearance stuff, a free pastry when you buy a large coffee, a set of stickers from the gift shop, etc.) This will be completely random and the prizes will change each month.

Promotion of the Experience
The experience will be 'promoted' with several posters located in key areas of both St. Albans town (inside the Museum, walls, poles, etc.) and the actual park (the entrance, benches, boards), inviting the visitors to go visit the Hypocaust.
Developement of the AR Experience
One of the client's requirements for the project is using an App-free methodology to prevent users from dropping out of the experience and effectively engaging with them. Because of this, the perfect approach is to create the experience using Web AR Technologies.
What are WebAR Technologies? Web-based Augmented Reality (WebAR) is the technology that allows augmented reality experiences to run in a web browser. It is a very useful technology as it doesn't require the user to download or buy any apps or special equipment to access the experiences.
Why Web AR? Several studies have shown that adding interactivity to advertisement content can make its message stick to the audience's mind up to 80% more than static content does. What makes this technology so attractive and user-friendly is that you can achieve that extra level of interaction without the need for a third-party app or website, users just have to enter a link or scan a QR code that immediately directs them to the browser to 'live' the experience. 'Offering the opportunity to ‘live the experience’ and ‘touch and feel a product’ is a powerful way of encouraging user engagement and purchase intent.' (Blippar, 2018)
There are many Web AR tools/software out there and they each have their pros and cons. However, after extensive research on these tools and what they offer, I concluded that the best option to develop this AR experience further would be 'Blippar'.
Blippar offers 3 main types of AR experiences that you can create with their Studio:
Marker-based AR: A specific picture (marker) is used as a target for the experience: the user points to their live mobile camera and the device must recognize the target to trigger the AR content.
Markerless AR: The user is the one who moves the virtual content through the space and decides where they want to place it. There's no need for a specific marker or a real-world anchor to trigger the AR content.
Location-based AR: The AR content is tied to a specific location in the real world. For this type of AR experience to work correctly, the device must be able to accurately figure out the location of the user.
The type that will be used for the creation of this experience is Marker-based AR: the experience will be triggered by the real-time 'image' of the mosaic.
Alongside the many functionalities that Blippar offers, they offer real-time feedback on your experience to monitor how many people interact with it and how your audience grows; this is ideal for the client as they want to know and monitor if and how the visits to the park improve.
References
What Is WebAR? How Web-based AR Works | Built In
Reinventing digital ads: AR increases engagement by 30% (blippar.com)
3 different types of AR explained: marker-based, markerless & location - News - Blippar
0 notes
Text
Live Brief Project Research: Examples
Many AR experiences have been done that are similar to what I want to create, especially when talking about AR games for kids. When looking at the Blippar portfolio of clients I found many interesting examples that demonstrate that my idea could be done perfectly with the help of this platform; there's not exactly an example with a puzzle like the one I want to create but the functions are pretty similar to what I want to achieve. Here are some projects that have been created with Blippar:
Dr Pepper Half-Time Challenge With this experience, the audience scanned a QR code that led them to the WebAR experience where they could play a little football game and they won prizes.

AT&T WebAR Experience In this WebAR experience, the audience scanned a QR code and it directed them to a little game where they 'scanned' their surroundings and small hearts started to fall through the screen in real-time and they had to catch them and achieve a certain score for them to have the chance to win prizes. What I like from this experience that I want to implement in my own is the way they display the rules of the game at the beginning of the game as 'steps to follow' and how the experience recognizes when you have already played the game, so this limits the number of people who get the chance to win a prize. I also like that once it recognizes that you've already played the game even though it doesn't let you play again, you can access a cute filter to take pictures of yourself or with your friends.

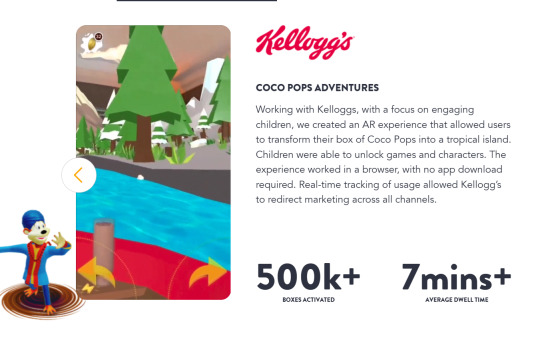
Kellog's AR Experience With this WebAR experience, children could scan their Coco Pops cereal boxes and unlock different games and characters. The main target audience of this experience was children, Blippar helped Kellog's track how many people used the experience so they could gather marketing information. This function is something that Blippar provides and it would be a perfect tool for the St Albans AR experience.
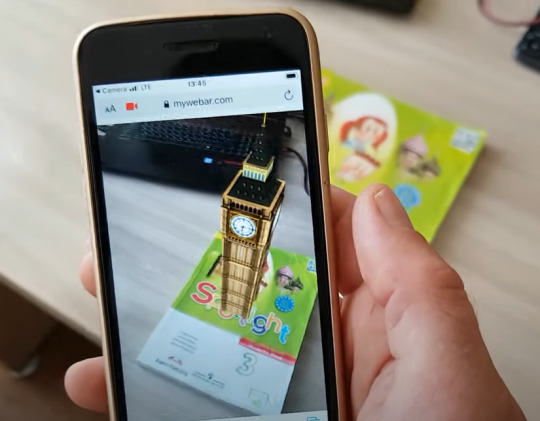
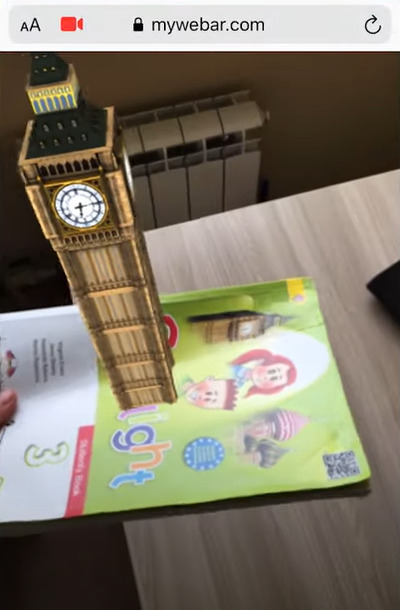
Apart from the Blippar examples, there exist many other AR experiences in the market that are triggered by a 'target' image or real surface. This is called Marker-based AR, and it's one of the most common kinds of AR experiences. This is what I want to do with my idea; for it to be triggered when the phone 'scans' the real mosaic at the Hypocaust building. I feel like these types of experiences are especially interesting to the kids and they can create a great amount of engagement. Here's one example made with MyWebAR where the experience is triggered by a page from a book and it displays a 3D model.

References
Blippar (2024) Blippar. Available at: https://www.blippar.com/ [Accessed 16 February 2024]
Yuri Volobuev (2020) 'WebAR image tracking creation in 5 minutes without special skills (brand new way 2020)', 11 May. Available at: https://www.youtube.com/watch?v=2dERIze1bVo [Accessed: 16 February 2023]
0 notes
Text
Live Brief Project Technical Research: Blippar
Even though there are plenty of WebAR software out there, after doing plenty of research I concluded that one of the two best options to develop the project further would be BlippAR. This software is pretty easy to use, it doesn't require any coding knowledge (unless you want to produce very complex artifacts) and you can create plenty of user-friendly experiences.
I will dive briefly into how it works and the possibilities it offers. Blippar is one of the first tech companies in the UK that specializes in AR technologies; it publishes experiences on the web and smartphones. Blippar offers AR content creation and focuses on mobile and WebAR. They have created AR campaigns for several brands such as L'Oreal, Procter and Gamble, Heinz, Stranger Things, and others. It has its own building and publishing platform where everyone can create and publish their own web AR experiences: Blippbuilder, and a more complex creating studio: WebarSDK, where you can develop more complex AR content for existing websites. It offers a variety of licenses and options for both of their studios, but even though it has free versions available they each have their limitations.
However, if the project were to be developed further, I strongly believe that this would be the perfect platform to do it, and upgrading to one of the developer plans would be worth it and very useful.

Blippbuilder For this project, the best option would be to use the Blippbuilder studio. It offers a platform to create your own web-based AR experiences. These are some of the things that the platform offers; (Retrieved from the official Blippar page)
Create AR to consume on any device: mobile and AR headsets
Become an AR creator in just a few clicks, with free access to thousands of 3D models
Instantly publish and share your experiences across the web and social media
Harness powerful AR features like surface, marker, and face tracking
Collect real-time feedback and iterate as your audience grows
Out of the 4 types of AR project features that they offer, the one that would be perfect for developing the project is the 'Surface' AR one, where the AR experience presents on top of a physical surface.

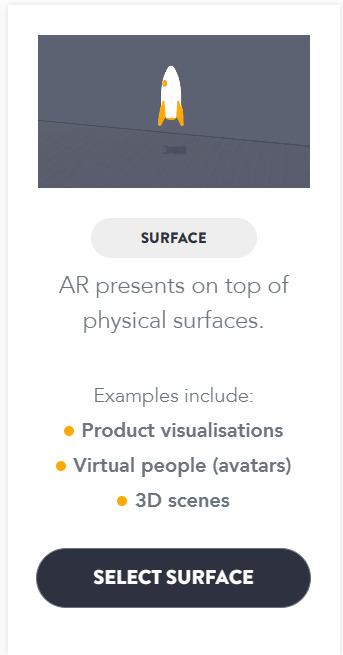
For the user to interact with the AR experiences created with Blippar, they'd just need a QR code that can be scanned with any smartphone regardless of the operative system as it is merely Web-based, so it is very accessible.
youtube
References
Blippar (2024) Blippar. Available at: https://www.blippar.com/ [Accessed 16 February 2024]
Blippar (2022) Blippbuilder tutorial: How to preview a project. 24 May 2022. Available at: https://www.youtube.com/watch?v=0MZvZ66QTuQ&t=86s [Accesed 16 February 2024]|
0 notes
Text
Brief Project Technical Research
I started researching about WebAR platforms and the options that exist. I honestly wasn't aware that AR experiences could be made inside web browsers, so I was surprised and intrigued.
I started doing a general research to know which platforms exist in general amd so I can evaluate which one would me more helpful. I found many useful articles about the best Web AR tools and started looking more about them. The downside is that many of these platforms are not free, so it worries me a bit that this slows or affects the testing/prototyping stage of the proposal, or that it could become an issue for the client's budget in the long run; however there are some usueful free tools, so it's just a matter of fiñtering which option would work best for the client's vision and brief. Either way here are some of the options I found:
8th Wall '8th Wall is a cross-platform AR web development solution for building augmented reality experiences that run on the web and mobile. The platform provides a powerful suite of developer tools, including a сloud-based code editor, AR engine, and templates to work with World Tracking and Image Targets.' (Arsenova, 2023)
XR+ 'XR.+ is among the top cloud-based no-coding web based AR examples with diverse possibilities for 3D content creation. In addition to all basic features like world, image, and object tracking, it provides many additional modules like alpha blending for extracting background in videos, movement detection, hand tracking for natural user interfaces, and 360 image view for virtual portals.' (Arsenova, 2023)
My Web AR With this platform you don't need to have any coding knowledge. All you need to do is drag the elements you need to the scene (images, videos, 3D Models, etc.) and add interactive actions. It seems like a really good tool and very user-friendly, but it is not a free platfrom.
youtube
Blippar 'Blippar specializes in augmented reality and computer vision solutions for advertising, print, and entertainment. Its platform lets developers create and publish AR content cross-platform for mobile and web apps. Among key features, it provides image and object recognition and surface tracking, letting users scan objects, and logos and discover virtual content with ease.' (Arsenova, 2023) This one is one of my favorite options because it has a free version, it does not require coding and it's user-friendly.
References
Arsenova A. (2023) '15 Best WebAR Platforms and Tools', Banuba, November 27. Available at: https://www.banuba.com/blog/best-web-ar-platforms-and-tools It´s always a matter of will. [Accessed 15 February 2024]
Yuri Volobuev (2020) 'WebAR image tracking creation in 5 minutes without special skills (brand new way 2020)', 11 May. Available at: https://www.youtube.com/watch?v=2dERIze1bVo [Accessed: 16 February 2023]
0 notes
Text
Final Project 2 - Reflection Project 3: Making it Real
What went well? I was very happy with the result of this project. It was really nice to see my character come to life; first with the 3D printing and then with the projection mapping. It was also a really fun project to carry out, I felt so excited all the time and was eager to keep experimenting and projecting things! I think it's important that we enjoy the projects we are working on and that they don't feel like a burden or something like that; I think that actually helps get better and more creative results.
What could have gone better? I definitely felt a bit restrained with the size of the model. I honestly wasn´t expecting it to be so small, but I had to work with what was at hand; I would have probably chose to print it again and bigger, but the time was limited. I would have also liked to try and use other software, more Project-mapping focused software, but it was an expensive option for now, still, I would really like to do that in the future.
Overall, I am really satisfied with the result of this project and I feel very happy that I could finally experiment with Projection Mapping since it is something I would like to fully learn and implement in my career.

0 notes
Text
Final Project 2 - Final Result Project 3: Making it Real
So after all the testing and having everything in place, I started planning the final animation for the mini-installation. All the animation was made inside Blender with textures/visuals I created. I was really excited to see it come to life! It looked so cute and tiny and real. I tried to make as if the character was looking around and it was alive; even though I didn´t get the chance to make a more complex animation, I really like how this turned out.
Here is a video of what the mini-installation looks like:
0 notes
Text
Final Project 2 - Making Project 3: Making it Real
I continued to make more tests, I was also trying to see what the overall design from the mini installation looked like what things would look great, and which ones wouldn't. It took many trials and errors, but I finally managed to better fit the visuals with the tiny character's body and also for the visuals to look as detailed as possible. I tried different angles and distances with the projector
0 notes
Text
Final Project 2 - Making Project 3: Making It Real
I did several tests to try and get the visuals to work in the character. It was actually a bit hard because the technique we learned from the workshop is focused more on just squared-like things or flat things without any curve whatsoever, and my tiny character is the whole contrary of that. I was thinking I could just try to fit my actual digital 3D model to how the 3D print was set on my scene and try to fit the visuals as well as possible, but I'm not going to lie it was a a bit hard.
The first tests with my visuals using the technique worked pretty well, all things considered, but I realized that I needed to put the projector closer for the visuals to look with their actual definition. Since I put the projector too far and the target is just a 10 cm installation I obviously made everything look pixelated. So I learned that from the first experiments.


You can see that the visuals projected on the box work actually pretty well because it is a squared-like surface, but the tiny character one's look weird and very low definition; so I had to work a bit harder to try and manually fit them even more to the scene.
0 notes
Text
Final Project 2 - Making Project 3: Making It Real
The first thing I did for this project was pick up my 3D print from the workshop. I was honestly expecting it to be bigger, so this was my first worry. It looked too small for what I was planning to but it still looked really cute and detailed. I felt very excited about seeing my creation come to life.


I carefully removed the extra material from it and it was perfect!
I then proceeded to test how and if the visuals would project correctly even though it was a tiny 5 cm piece. I thought if it worked it would actually be really cute seeing a mini projection, so I was hoping for the best.
0 notes
Text
Final Project 2 - Technical Research Project 3: Making It Real
For this project, I already had the visuals and 3D print part, but I was struggling with figuring out how to carry out the projection part of it with the tools I had available.
At first, I was planning on using Resolume Arena, but even though they have a free accessible version, it has a watermark popping up every few minutes, so it wasn´t gonna work for the purposes of this assignment because it will keep interrupting whatever I was projecting into the model. I was worrying a little and was starting to consider other options and alternatives, but I was very lucky that one of the workshops that Ian brought for us was one Video Mapping with Blender, so I was really excited to learn everything about it and I also felt relieved.
Alex May taught us how to project map visuals into things during class, and we got to make some initial experiments just to understand how it worked. I was honestly impressed that this could be done in Blender; I honestly would have never imagined it. I felt like fish in the water because everything was really easy to understand and I was very excited of being able to do this.
Here´s how those initial experiments looked like:


Alex told us he learned everything from this tutorial, so it was very useful because I could come back to it during the development of my final project.
youtube
References:
FaterTutorialsCom (2021) '3D Projection Mapping in Blender'. 11 September. Available at: https://www.youtube.com/watch?v=l4vhXj-tPrs&t=469s [Accessed: 10 December 2023]
0 notes
Text
Final Project 2 - Artists Research Project 3: Making It Real
Projection Mapping is a tool that has been used for quite a while now, but it's a technology that just keeps gaining more and more presence with the passing of time.
For this project, I got inspiration from these two projects. Artist/Project 1: Motomichi Nakamura, Project 'JACK'
'JACK' is an art installation commissioned to Motomichi by the Museo de Arte Contemporáneo de Monterrey. It is a projection mapping project and it was part of the exhibition 'Character Portraits'
youtube
Artist/Project 2: VANS Video Mapping Projection on 3D Surface/Intro
This is a project carried on by Massive Display MX for Vans. They video-mapped some tridimensional VANS letters and projected different visuals onto them, making them the canvas. I find this really inspirational and beautiful, I think that projection mapping is a really useful technology and that you can achieve many creative and innovative things with it.
youtube
References:
Motomichi Nakamura (2015) 'JACK, Projection Mapping Sculpture @Museo de Arte Contemporáneo de Monterrey'. 5 February. Available at: https://www.youtube.com/watch?v=dIN8FYTU8P4 [Accessed: 20 December 2023]
MASSIVEDISPLAYMX (2015) 'VANS Video Mapping Projection on 3D Surface / Intro'. 22 March. Available at: https://www.youtube.com/watch?v=tDs6FsrqS84&t=2s [Accessed: 20 December 2023]
0 notes
Text
Final Project 2 - Further Development Project 3: Making It Real
For my second project, I want to further develop Project 3: Making it Real. My original idea for this project was to print a little 3D character and then project different faces/expressions onto it, but last time I didn't get to the actual projecting part because I didn't have the printed 3D model.
So this time, I do have the 3D printed model and I'm gonna project some visuals onto it with the help of Blender. Let's get into it!

0 notes
Text
Final Project 1 - Reflection Project 1: Self-Portrait
What went well? I really liked developing this project, even though I faced some issues along the way and it didn't turn out 100% like I had it planned in the beginning, I think I did a great job managing everything considering the time and resources I had in my hands. The final result is really good and it looks cute and is basically what I wanted to achieve only with much less detail... but it works and I'm so happy to see my model pop out of my presentation card!
What could have gone better? Definitely having the whole model with the animation function properly for the interactive experience, and being able to look at all the details and textures that I worked so hard on. I really would have loved that and if I had more time I would have turned to another software like Unity for example, because it supports more complex models and workflows, it would probably be a better option since Spark AR is a pretty basic one.
But overall, I'm really happy with how this project turned out and the result I achieved. I learned how to use new software and learned a bit more about how AR interactive things work. I look forward to creating more complex projects with the new tools and skills I learned with this project and I will definitely explore other AR software(s).

0 notes
Text
Final Project 1 - Final Result Project 1: Self-Portrait
After doing the tests and seeing that everything worked great, I proceeded to print some samples of the card.

Once I had them printed out, I tried the final AR filter with them and this is what the final result looks like:
0 notes
Text
Final Project 1 - Reflection Project 1: Self-Portrait
What went well? I really liked developing this project, even though I faced some issues along the way and it didn't turn out 100% like I had it planned in the beginning, I think I did a great job managing everything considering the time and resources I had in my hands. The final result is really good and it looks cute and is basically what I wanted to achieve only with much less detail... but it works and I'm so happy to see my model pop out of my presentation card!
What could have gone better? Definitely having the whole model with the animation function properly for the interactive experience, and being able to look at all the details and textures that I worked so hard on. I really would have loved that and if I had more time I would have turned to another software like Unity for example, because it supports more complex models and workflows, it would probably be a better option since Spark AR is a pretty basic one.
But overall, I'm really happy with how this project turned out and the result I achieved. I learned how to use new software and learned a bit more about how AR interactive things work. I look forward to creating more complex projects with the new tools and skills I learned with this project and I will definitely explore other AR software(s).

0 notes
Text
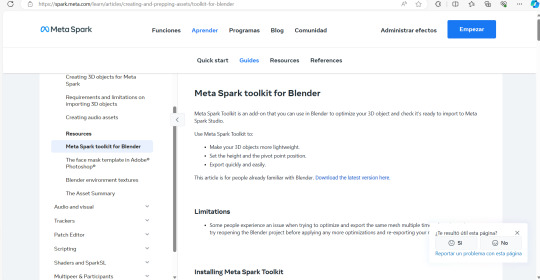
Final Project 1 - Making Project 1: Self-Portrait
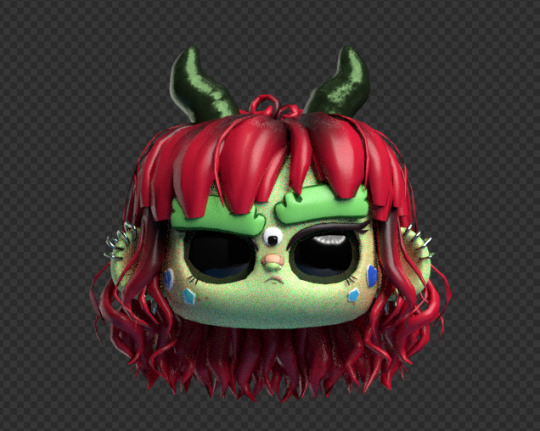
To start working on the interactive card in Spark AR, I first needed to design the card I was going to use as a target in Spark AR, so I went to Adobe Illustrator and worked on that. This is what my card design ended up looking like, I really liked it and I am very happy with how it turned out.
Once I had this ready, I started exploring and experimenting with Spark AR. After exporting my 3D model as an FBX, I proceeded to add it to the project on Spark AR, but I found myself with a setback: my full-body model was too heavy for Spark AR to support, because of all the image-based textures and numbers of geometry it has it was just too much information for the software to process. So, I went to Google to try and find a solution, and I found out there was a Blender add-on to optimize your models and export them directly to Spark AR. I downloaded, it installed it, and started optimizing my model, but I found myself with another issue... optimizing my model meant decreasing the geometry hence the detail of the model, so my model started to look very low poly and different from what the original model was; you couldn't even distinguish many of the little details anymore.
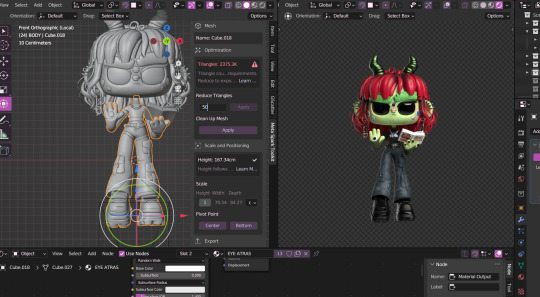
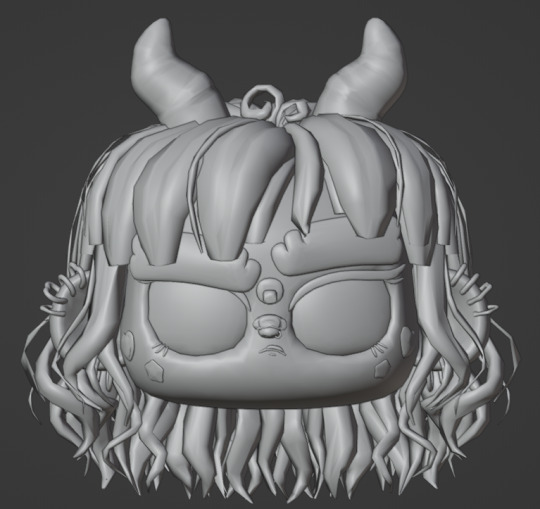
I found out later that Spark AR couldn't support the image-based materials my model had, so I would have to use normal materials and plain color for it to work better. I was a bit discouraged at this point because I had spent a great amount of time and effort working on my model and textures and it was what made my model look the way it did and it was part of the whole card idea. I really wanted the model to pop out and have an animation, but I just kept hitting walls and I didn't have that much time to create another thing, so I decided to focus on just the head, and try to optimize it the best I could without compromising too much of the details. So I optimized the head with the help of the add-on and it ended up looking like this. You can see that the geometry isn't as smooth as the original one, but it still looks like the model and doesn't lose as much detail as it did when I was trying to reduce the geometry of the whole full-body one.
After having this, I was ready to return to Spark AR and start working on the interactive card.
Making the card work was actually a really fun and easy going process. I added the card target and started adding my optimized model and some extra things to make the AR design a bit more interactive with the user.
After having my AR interaction designed and ready, the filter was ready to be exported and tested on Instagram and/or Facebook, so I did that. But before printing my cards I wanted to make sure that everything was working out great, so I tested the filter with just an image of the card in my computer screen and it worked.
0 notes
Text
Final Project 1 - Technical Research Project 1: Self-Portrait
For the technical research, I had to look at how to use Spark AR, which was the software I decided to use to create the AR part of my project. I had heard many times about it and I was aware that it is a very friendly software and that it wasn´t so hard to learn. So I started watching some tutorials to get a grasp of how it worked and I could start developing my project.
youtube
youtube
References
Domestika (2020) 'Spark AR Tutorial: How to Turn Your Illustrations into Augmented Reality - Naranjalidad' - Domestika' 1 April. Available at: https://www.youtube.com/watch?v=WNFXUGQmdsM&t=340s [Accessed: 17 December 2023]
DJS CREATE (2021) 'Image Target Tracking - Spark AR Studio Tutorial! | Track Images in your Instagram Filters'. 7 December. Available at: https://www.youtube.com/watch?v=7KP9RN2iiGM [Accessed: 17 December 2023]
0 notes