
tdwr
The Digital World Reviewed
I get asked various technical questions on a daily basis.. I found this forum a good place to display a few of those questions as well as display some new and emerging technology. "Simplify your Life!"
139 posts
Don't wanna be here? Send us removal request.
Last Seen Blogs

evieandthewolf
Kingdom Of The Pop punk princess

musicistheair-blog
Music Is The Air

violetvolk
Violet Storm

heron0320
@heron0320

chenfordss
to the end of the world
Text
youtube
Get a Cheap Privacy and Security VPN on Azure Using OpenVPN!
Credit "Tech on Fire"
0 notes
Text
Powershell fails Help-Update
You can use this command and no error will be generated
update-help -verbose -force -erroraction silentlycontinue
.
0 notes
Text
Excel File says locked by a user (who is the author)
1. Start a command prompt with admin rights on the server/computer hosting that file and run
openfiles.exe /query
This will list all the files open and the users who locked them.
To disconnect that file from the user openfiles.exe /disconnect /id 45656 (replace 45656 with the id of the file shown in the list above)
2. Sometimes the files are locked by defective non-visible instances of Excel (kill them in task manager)
Possible prevention strategy
====================
Go to Excel - File - Info - Protect Workbook - Always Open Read Only
This will ask users to open the file in read-only, but even if they do, it's not always working properly.
0 notes
Text
Reset the ESXi Default Password USING AD
Any user who installs the ESXi hypervisor must set the root password, but users and administrators cannot change the ESXi default password if it gets forgotten/lost. This approach may not be the best from s security point of view, but sometimes it’s inevitable. When an ESXi server is set up and configured, everything is working correctly, a system administrator may not log in to the ESXi server for a long time. The ESXi host can be restarted sometimes after power failures or some other issues. However, the password is not required if you are not going to reboot the ESXi host from the ESXi console. Time goes on and the server is working properly, but at some point, a system administrator may want to make some changes in the ESXi server’s configuration. They try to enter the root password that is required to log in and reconfigure the server, only to discover that the password has been forgotten.
Under these circumstances, how can you log into the ESXi server? Reinstalling ESXi is not a good solution, because creating a new configuration from scratch as well as creating and configuring VMs needs a lot of efforts. Is there an ESXi default password? How to reset the ESXi default password without reinstalling the server? Keep calm, there is the answer on this question. The steps below explains how to reset the ESXi password for the root user without reinstalling ESXi on the server.
ESXi Password Recovery in Active Directory
If you don’t have the Enterprise Plus license for your vSphere, there’s no reason to be sad. You can reset a forgotten ESXi default password by using Active Directory integration that doesn’t require the top class license.
VMware vSphere can be integrated with Active Directory that is usually used for the centralized management of users and computers. You can join each ESXi host into an Active Directory Domain and then use the account created on the Active Directory Domain Controller to log in to the ESXi host. The Active Directory authentication mechanism can be utilized in vSphere, thanks to the implementation of the PAM (Pluggable Authentication Module) framework for ESXi. This capability can be used to reset the ESXi password for the root user on a host. The ESXi host must be managed by vCenter in order to use this method and you should have an Active Directory Domain controller in your inventory.
Note: In VMware ESXi settings the IP address of the domain controller should be specified as a DNS server since the ESXi server must be able to resolve the domain and domain controller names. As you may recall, the IP address of the DNS server in the network settings of your ESXi server differs from the IP address of your existing domain controller, and you can deploy a temporary machine (physical or virtual) as Active Directory Domain Controller (set the DNS server IP address that is defined in network settings of the ESXi server as the IP address of the domain controller), connecting the ESXi server to that temporary domain controller, and joining the domain.
As an alternative, if you have a configured domain controller in your environment, you can open vSphere Client, select the ESXi host whose password must be reset, go to the Configure tab, select Networking > TCP/IP configuration and edit or add the IP address of the appropriate existing domain controller as the DNS server.

Let’s consider using this method step by step. The input data in the current example is the following:
ESXi with unknown root password: 192.168.101.211
vCenter: 192.168.101.103
Domain Controller: 192.168.101.21
The Active Directory Domain Controller (ADDC) is deployed on Windows Server 2008 R2 in this example.
Step-by-step instructions
Create a new user whose name is, for example, esxi01 on the domain controller in Active Directory Users and Computers. In order to do this, open Server Manager, go to Roles > Active Directory Domain Services > Active Directory Users and Computers > [your domain name] > Users. Click Action > New > User and enter esxi01 as the user name. Hit Next. In our example, the domain name is domain.net.

Now set the password for this esxi01 user, for example, ESXiDomain_777. This password is used as an example only for this demo and it is recommended that you change the password to a strong, unique password after recovering the root access for your ESXi host. Hit the Password never expires checkbox. Hit Next and Finish.

Now you have to create the ESX Admins group on your Active Directory Domain Controller. The group name must be exactly the same. Users who are members of the ESX Admins global security group automatically get root privileges on an ESXi host after logging in. Later, you should add the esxi01 user to this group. It is preferable to add your user for logging in to the ESXi host into the ESX Admins group instead of adding the user to the Domain Admins group for security reasons.
In order to create a new group, in the Server Manager go to Action > New > Group. Set ESX Admins as the group name as shown on the screenshot.

After creating the ESX Admins group, open the group properties and in the Members tab, hit the Add button. Enter the name of your ESXi user account (esxi01 in this case) and hit Check Names. If the name is entered correctly and is underlined, hit OK to finish.

Now you have the esxi01 user that is a member of the ESX Admins group in your Active Directory domain.
It’s time for the ESXi server whose root password you cannot remember to join the domain. Open the vSphere HTML5 Web Client in your browser. Open Hosts and Clusters.
Right-click your ESXi host, switch to the Configure tab and then select Authentication Services in the list. Click the Join Domain button.
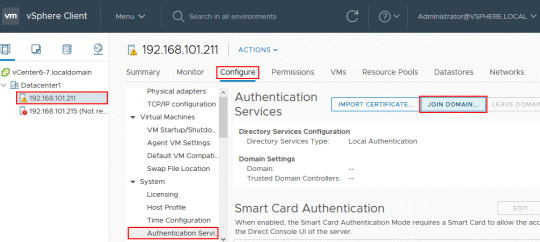
Use the credentials of the domain administrator to join the domain. By default, Administrator is the member of the Domain Admins group.

When your ESXi host is in the domain, use VMware host client to log in to the ESXi host whose root password must be recovered. Enter the IP address of your ESXi host in the browser. In our example, https://192.168.101.211 should be entered.
Enter [email protected] (the Active Directory user you created before) as the user name and the password set on the domain controller for this user (ESXiDomain_777 should be used as the ESXi default password in this case).

Once you have logged in to the ESXi host whose password you have forgotten, you can reset the password for the root user.
Go to Manage > Security & Users > Users, select root and click the edit icon.
Set a new, strong and unique ESXi password for root on the ESXi host. Try not to forget the password again!

Once you have reset the ESXi root password, make the ESXi host leave the Active Directory domain if the domain will not be used for ESXi authentication in the future.
0 notes
Text
RDP authentication error due to the CredSSP encryption oracle remediation error
When you try to connect to a computer that does not have the CredSSP encryption oracle remediation error update, the Remote Desktop Connection will display the an error message telling that you that an authentication error has occurred due to CredSSP encryption oracle remediation.
Microsoft released a security update to address vulnerabilities for the Credential Security Support Provider protocol (CredSSP) used by Remote Desktop Protocol (RDP) connections for Windows clients and Windows Server.
Previously, you were able to connect remotely from the updated machine to machines without the update. However, with the latest update released this May, Microsoft hardened security, and you can no longer connect to machines without the update.
You will face the CredSSP encryption oracle remediation error if you have applications or services such as the Remote Desktop Connection that use CredSSP on an updated machine. Authentication will not work and you will get this error message:
An authentication error has occurred. The function requested is not supported. Remote computer: This could be due to CredSSP encryption oracle remediation.

To work around this issue until you can patch the servers you have to edit the registry. Open an elevated command prompt then add the command below.
reg add hklm\SOFTWARE\Microsoft\Windows\CurrentVersion\Policies\System\CredSSP\Parameters /v AllowEncryptionOracle /t REG_DWORD /d 2
0 notes
Text
Convert MBOX TO PST Conversion Tool

This utility converts the email database files from the MBOX format to PST for Outlook. You can get one or more PST files from MBOX files in different folders. The contents of each MBOX file can be saved in a separate folder in the PST file. In the process of conversion, you can immediately split the resulting PST files by size or year.
The MBOX format is used by some email programs to store email messages, such as Mozilla Thunderbird. MBOX files contain all mailbox messages or each folder separately. To make these messages available to Outlook or Exchange Server, you must import them into Outlook or convert to Outlook PST data files. After the message base is converted from MBOX to PST, you can open it in Outlook.
In addition, MBOX files are used by some email services to migrate message databases, such as Google Takeout. When you convert such MBOX files, the utility recognizes email labels and can create the Gmail folder structure in a PST file. You can also use Gmail labels to assign Outlook categories to messages.
When converting MBOX files to PST, existing or new PST files are used, and importing messages to Outlook requires existing mailboxes, PST data files, or Exchange Server public folders.
When converting a message base from MBOX to PST, you can use macros in the PST file name and sort messages by date, domain, sender, and other message fields. There are macros for the date/time and Windows environment variables, which allows you to create sets of PST files, depending on your needs.
When converting emails from MBOX files to PST files, you can limit the maximum size of PST files being created. The original MBOX message database is not simply converted but is immediately split into PST files of the desired size and does not require additional operation of splitting PST files.
0 notes
Text
Auditing in Office 365 (for Admins) Keeping “Admin” Honest !
Enable auditing
Sign into the Security & Compliance Center with your Microsoft 365 Admin account.
Select Search & Investigation, and then select Audit log search.
Select Start recording user and admin activity. If you don't see this link, auditing has already been turned on for your organization. A message alerts you that the audit log is being prepared.
You can search the audit log for a variety of activities including uploads to OneDrive or SharePoint Online or user password resets.
For more information about activities you can audit, see Search the audit log in the Microsoft 365 Security & Compliance Center.
If you want to enable Mailbox Auditing, see the next tab: Enable mailbox auditing.
0 notes
Text
A SharePoint Online list item attachment doesn't open in the Office client application as expected
Solution
To resolve this issue, activate the Open Documents in Client Applications by Default site collection feature in Site settings. To do this, follow these steps:
1. Click the gear icon to open Settings, and then click Site settings.
2. Click Site collection features.
Note: If the Site collection features option isn't present, you must first click Go to top level site settings.
3. Locate the Open Documents in Client Applications by Default feature in the list, and then click Activate.
Note: This setting will affect the behavior of the SharePoint Online site collection
Scroll down the page and “Active “Open Documents in Client Applications by Default” on the Site Collection Features page.

1 note
·
View note
Text
How to Remove Duplicate Emails from Outlook?
This built-in duplicate email removal feature removes duplicate emails from Outlook.
To access this feature select mail folder, go to Home tab > Delete section > Delete > Clean Up.
To remove duplicate emails in Outlook you have 3 choices:
Clean Up Conversation - Selected Conversation is deduped.
Clean Up Folder - All Conversations in the selected folder are deduped.
Clean Up Folder & Subfolders - All Conversations in the selected folder and any subfolders are deduped.
0 notes
Text
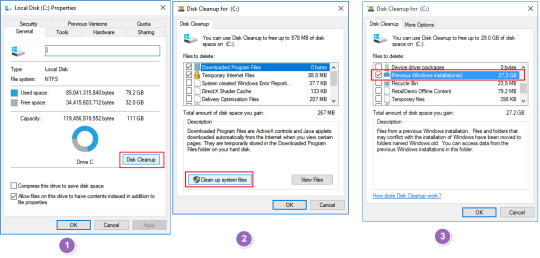
Remove Windows.old Folder in Windows 10
Windows.old folder cannot just directly delete by hitting the delete key and you may try to use the Disk Cleanup tool in Windows to remove this folder from your PC:
Press Windows + E, click This PC.
Right-click the drive with Windows installation and click Properties.
Click Disk Cleanup and select Clean up the system.
Select the Previous Windows Installation(s) option to delete Windows.old folder.
You can also choose to delete other installation files including Windows upgrade log files and Temporary Windows installation files etc.
Click OK and select Delete Files on the pop-up dialog to confirm the deletion.
Click Yes.
0 notes
Text
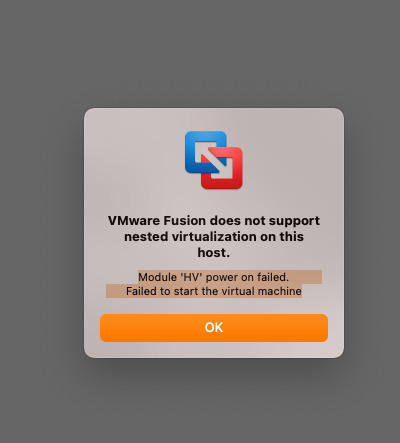
Attempting to do nested virtualization
I am running Mac - Big Sur. I see that VMWare Fusion has full Big Sur support based on the website. Currently, I'm trying to run a nested virtualization instance and i'm getting the error "VMware Fusion does not support nested virtualization on this host. Module 'HV' power on failed. Failed to start the virtual machine"
I have enabled hypervisor applications in the virtual machine under Processors and memory.
A simple fix was to go to the VM settings select the processor and memory, and on the bottom in "advanced options" disable the HyperVisor.
0 notes
Text
How to Expand a VM Hard Disk in Hyper-V on Windows Server 2012
Prerequisites
– A server with Windows Server 2012.
– Hyper-V Role installed
– An existing VM (Virtual Machine)
Expanding a VM Hard Disk in Hyper-V 2012
Before we begin, we must make sure that your VM is completely turned off. Open your server manager/select Hyper-V/Right click your host server and select Hyper-V Manager. Your Host server will be available, and when you click on it, you will see your VM or VM’s also available. Right Click your VM and select “Turn Off”.
Expand your VM’s Hard Disk
To expand the Hard Disk, Right Click on your Virtual Machine/ click “Settings”/ Select SCSI/Select the Virtual Hard Drive that you want to extend and Click Edit.

You will then be taken to the “Edit Virtual Hard Disk” wizard to locate the Virtual Hard disk. Click next to continue.

Following that, you will be asked to “Choose Action.” There are three choices to choose from, Compact, Expand, and Shrink. Select “Expand” then Click Next proceed.

Finally, you will be asked to “Expand Virtual Hard Disk.” This is where you Specify the size of your virtual hard drive. Do so and then click “Finish” to complete the expansion.

Extend your VM’s Hard Disk
Once you have successfully expanded your Virtual Hard Disk, you will need to turn on your VM following the same process previously used to turn off your VM and log into the server.
Open your server manager/Select “Local Server”/Click “Tools” and Select “Computer Management”. Now, Open “Disk Manager” on your Virtual Machine. You will see your current C: Drive Partition and along with an Unallocated Partition with the amount of hard disk space that you created earlier.

In conclusion, to finalize your expansion you will need to complete your expansion with the following:
Right-click on the volume you want to extend (in this case C:\ Partition) and select “Extend Volume”. This will open up the Wizard screen for your extended volume and follow the on-screen instructions to complete the process.

0 notes
Text
How To Delete A Mailbox Content In Office 365 Or Exchange?
During your testing, it might be useful to be able to empty a mailbox to perform several tests.
This article explains how to empty a mailbox in Office365 or Exchange using PowerShell.
How to delete mailbox content in Office 365 or Exchange
There is a useful command in PowerShell (search-Mailbox -DeleteContent)
This cmdLet is available by default in Exchange OnPremises.
However, an additional step is necessary in Office365 to enable this cmdLet: By default, it’s not exposed because the “Mailbox Import Export” role is not set.
1. Enable “Mailbox Import Export” role
Connect to Office365 Portal.
Select Admin -> Exchange.
Click on Permissions.


1.2 Add permissions with Powershell
you can also use the following cmdlet to add the described above permissions:
New-ManagementRoleAssignment -Name "Import Export Enterprise Support" ` -User "[Admin Identity]" ` -Role "Mailbox Import Export"
2. Delete the content of a mailbox
This will delete all content (mails, contacts, calendars).
To verify, you can issue the command :
Get-MailboxFolderStatistics -Identity [email protected] | Select FolderPath,ItemsInFolder
Example:
Search-Mailbox -Identity "John Doe" -DeleteContent
Note: You will notice that it does not delete personal folders.
Deleting folders needs an additional step.
2.1 Delete the Calendar folder of a mailbox
This will delete only calendar entries in user’s mailbox.
Search-Mailbox -Identity "John Doe" -SearchQuery "kind:meetings" -DeleteContent
0 notes
Text
How to exclude individual users or computers from a Group Policy Object
One of the common question I see on the forums from time to time is how to exclude a user and/or a computer from having a Group Policy Object (GPO) applied. This is a relatively straight forward process however I should stress this should be used sparingly and should always be done via group membership to avoid the administrative overhead of having to constantly update the security filtering on the GPO.
Step 1. Open the Group Policy Object that you want to apply an exception and then click on the “Delegation” tab and then click on the “Advanced” button.

Step 2. Click on the “Add” button and select the group (recommended) that you want to exclude from having this policy applied.

Step 3. In this example I am excluding the “Users GPO Exceptions” group for this policy. Select this group in the “Group or user names” list and then scroll down the permission and tick the “Deny” option against the “Apply Group Policy” permission.

Now any members of this “User GPO Exceptions” security group will not have this Group Policy Object applied. Having a security group to control this exception makes it much easier to control as someone only needs to modify the group membership of the group to makes changes to who (or what) get the policy applied. This makes the delegation of this task to level 1 or level 2 support much more practical as you don’t need to grant them permission to the Group Policy Objects.
0 notes
Text
Remove Private Key Password From PFX (PKCS12) File
SSL
If you have a PFX file that contains a private key with a password, you can use OpenSSL to extract the private key without a password into a separate file, or create a new PFX file without a password.
For those running macOS or Linux, I've created a Bash script to automate the process, which you can download from GitHub. You set the PFX_PASSWORD and PFX_FILE_IN variables at the top of the file with your own values, and don't forget to make it executable by running chmod +x pfx-remove-password.sh in Terminal.
For those running Windows, you can download OpenSSL for Windows binaries from SourceForge.
The manual instructions are below.
If you only want the private key file, you can skip steps 5 and 6.
If you want a PFX file with no password, you can delete TargetFile.Key when you're finished.
MyPassword is your current password
SourceFile.PFX is the PFX file you want to convert
TargetFile.Key is the name of the private key file without a password that will be generated
TargetFile.PFX is the name of the PFX file without a password that will be generated
1. Extract the certificate:
openssl pkcs12 -clcerts -nokeys -in "SourceFile.PFX" -out certificate.crt -password pass:"MyPassword" -passin pass:"MyPassword"
2. Extract the certificate authority key:
openssl pkcs12 -cacerts -nokeys -in "SourceFile.PFX" -out ca-cert.ca -password pass:"MyPassword" -passin pass:"MyPassword"
3. Extract the private key:
openssl pkcs12 -nocerts -in "SourceFile.PFX" -out private.key -password pass:"MyPassword" -passin pass:"MyPassword" -passout pass:TemporaryPassword
4. Remove the passphrase from the private key file:
openssl rsa -in private.key -out "TargetFile.Key" -passin pass:TemporaryPassword
5. Create a new input file to generate a PFX file:
On Linux/macOS: cat private.key certificate.crt ca-cert.ca > pfx-in.pem On Windows: type private.key certificate.crt ca-cert.ca > pfx-in.pem
6. Generate a new PFX file without a password:
openssl pkcs12 -export -nodes -CAfile ca-cert.ca -in pfx-in.pem -passin pass:TemporaryPassword -passout pass:"" -out "TargetFile.PFX"
0 notes
Text
Install Microsoft Office Picture Manager in Windows 10
Office 2016, Office 2010 and Office 365 does not ship with Picture Manager. Microsoft Picture Manager let users view, edit & manage images easily and many liked it. On Windows 10, you now have the Windows Photos app that lets you manage your pictures. Microsoft removed the Picture Manager, as the basic image editing tools which were included there, are already included in Word, PowerPoint or Excel. But if are missing it and want to install the Picture Manager, you can do so as follows.
Install Microsoft Office Picture Manager in Windows 10
Download Microsoft Office SharePoint Designer 2010 or 2007. It is free to install and does not require a license. Mind you; you need to install the 201 version – 32-bit or 64-bit, and not the 2013 version, as SharePoint Designer 2013 does not include the Picture Manager.
Once you have downloaded it, start the installation, accept the licensing terms and select the Customize button for installation, when it is offered.
Now in the next screen, select Run from My Computer for Microsoft Office Picture Manager and Not Available for all the other programs, as shown below.

Click on Install now, and the installation will proceed. Once it is completed, you will be able to see Microsoft Office Picture Manager under Recently added in your Windows 10 Start Screen.
0 notes
Text
GPO to lock the computer after 10 minutes of inactivity

Computer Conifg>Policies>Windows Settings>Security Settings>Local Policies>Security Options and find Interactive logon: Machine inactivity limit. Set that to whatever time you want and it will lock the PC after it hits that timer.
Run Gpupdate /force on DC to deploy faster.
0 notes