#you could have chosen any other time to test the strength of the glue
Explore tagged Tumblr posts
Text
Tup *watching Fives stick Rex's entire office to the ceiling*: Did you just wake up one day and choose violence?
Fives *standing back to admire his handy work*: No, no, it's a conscious everyday decision.
Echo *who helped but will deny it*: This isn't violence, this is anarchy.
Jesse *making sure nothing will fall off the roof*: No, this is controlled chaos.
Dogma *starting to understand that following the Domino Twins around is a bad idea*: This is a one way ticket to the medbay if he finds us.
Hardcase *stuck to a wall*: Ha! Like he'll know it was us!
Rex *opening the door*:.......
Fives *smug*: He won't know it was us Dogma, the security tapes aren't even recording at the mo- what's with those faces?
Echo *look of dread*: Well-
Fives *hangs his head*: He's right behind me isn't he?
Rex *wishing he had given them to Cody*: He is.
Kix *in the corridor wheezing into his comm*: I'm going to need six stretches at the Captain's office as soon as possible.
Taglist: @sexy-rex @soliloquy-of-nemo @jiabeewrites @staycalmandhugaclone @nekotaetae
#make that seven you wheeze bitch#hardcase honey why are you stuck to the wall?#you could have chosen any other time to test the strength of the glue#but here we are#letting impulsive thoughts win#yet again#fives just because you were protesting having to clean your barricks doesn't mean sticking stuff to the ceiling was the best plan#woke up and chose violence#yes i tend to everyday#arc trooper echo#arc trooper fives#arc trooper jesse#clone trooper tup#clone trooper hardcase#clone trooper dogma#captain rex#clone medic kix#star wars#incorrect star wars quotes#the clone wars#tcw#clone wars#incorrect clone wars quotes#501st#501st shenanigans#domino twins more like di'kut twins#torrent company#domino twins
30 notes
·
View notes
Text
‘Explorer’ Bag.
Hi Guys, I finally managed to find the time to build the ‘Explorer’ Bag. It may have been my hands that put this together but all Credit for the Original Idea and the Pattern goes to ‘Tony See’ at Dieselpunkro. He makes some amazing patterns and sells them at very affordable prices. Ok, lets go. First I bought the pattern from Dieselpunkro, downloaded it, stuck all the pieces together as required and then cut out and stuck to the 6-7oz leather I chose to use ready to transfer from paper to leather. You don’t want a thin leather for this that will just fall/collapse it’s shape, but you also don’t want it so thick that it’s difficult to bend cut and stitch. I also chose a Veg Tan and dyed it myself, more on that later, but you can buy a factory ready dyed piece if you so choose.
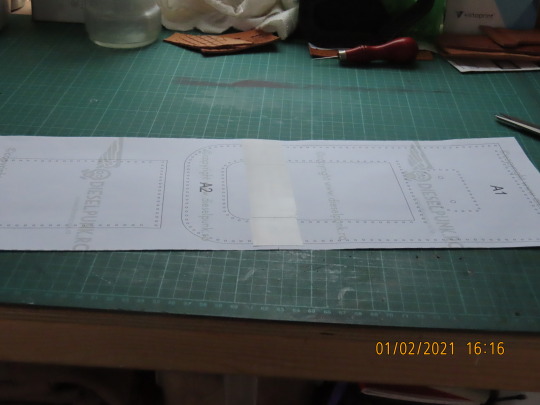
Pic 1 : Stick all the pattern pieces together as required to create the ‘full’ patterns, I use Decorators white / Cream paper tape, it doesn’t mark the leather to any great degree when you take it off.
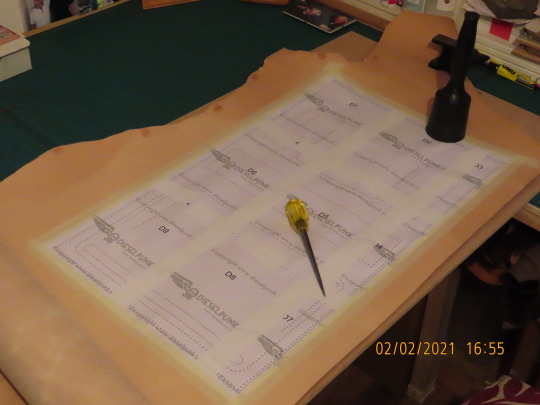
Pic 2 : The patterns come in several pieces, this main boddy section pattern was in about three pieces but just stick them together as shown on the instructional video on YT.

Pic 3 : Here is the main body section after the pattern is removed, the holes are punched through the patterns before removal.

Pic 4 : Here you have one of the side psections with Pattern stuck to the leather with decorators tape and I used a 1.5mm hole punch for the stitch holes and a larger one ( what ever you feel necessary for your rivets to fit ) where necessary.

Pic 5 : All the patterns are treated the same and eventually you will end up with a big pile of cut out and punched pieces as seen here, there were 64 pieces here, the most I’ve ever done.

Pic 6 : Here are the same pieces all dyed ready to start the build. I decided on a Nice walnut color by Fiebings, I achieved this particular look by rubbing harder in certain areas as it was drying and then it was down to a bit of luck. At this point I could not know what the final look would be, but from past experiences I had a ‘hopeful’ idea. Once dyed I coated in ‘Tan Kote’ and wiped it off before buffing to a shine, this also added darker areas here and there.
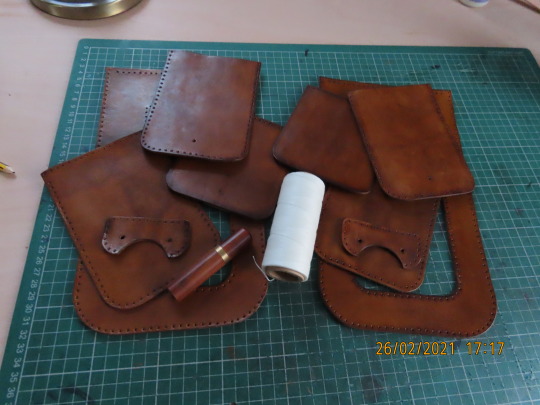
Pic 7 : I started by putting together a side pouch so seperated the pieces of the two. I used a waxed thread and a saddle stitch, which was the stitch I used on all of this bag.

Pic 8 : Somehow I forgot to take pics of the first stitching, which was adding the side to the front piece of a pouch, you can see it through the back piece I’m about to start stitching here. this pic shows me placing the front and side section ‘through’ the hole to stitch the inner edge of the side piece ‘inside, there will also be another piece of leather going over the hole at the back, that makes three layers of leather to stitch through, hence why your hole punching should be done carefully and slowly, if all in their correct place they will match up and make for a reatively ‘easy’ (ish) time of it.

Pic 9 : seen from the back, the stitching joing the three pieces, the front and side pieces now being attached to the side panel and attaching the ‘back’ panel to fully create the pouch, lots of stitching on this Project and you might find your fingers getting very sore, I have a little ‘thing’ I now do which cuts down the number of times I have to pull the thread tight thereby reducing the strain on my fingers considerably. I now stitch forwards four holes pulling them in..but loose after the fourth is in I then pull all four tight, I find It saves my fingers ...oh also, don’t pull so tight like you are trying to strangle it...with all those stitches....’it ‘will’ hold, believe me.
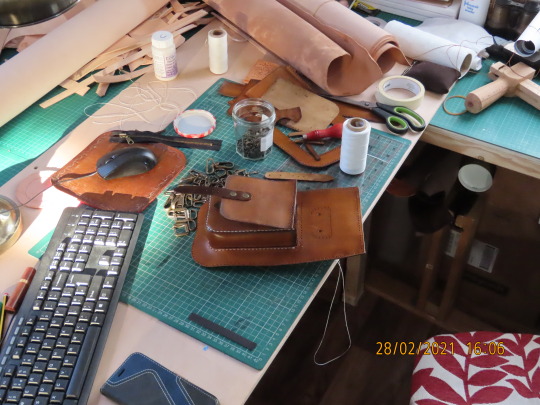
Pic 10 : The pouch is now attached to the actuall ‘side’ section, well...’one’ of them, remember you have to make two of them. You can see the ‘flap’ sitting on top waiting to be attached, if you zoom in you can see the holes in a line where it will attach to.
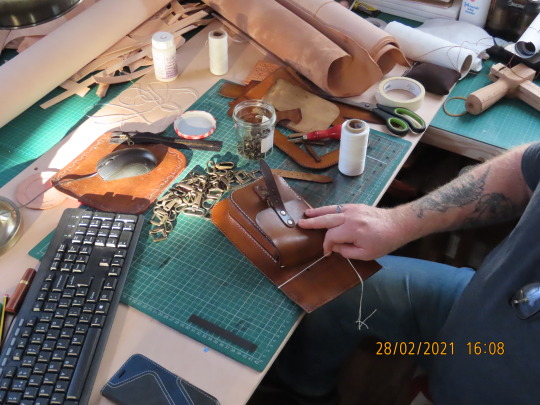
Pic 11 : Holding in position to test fit.
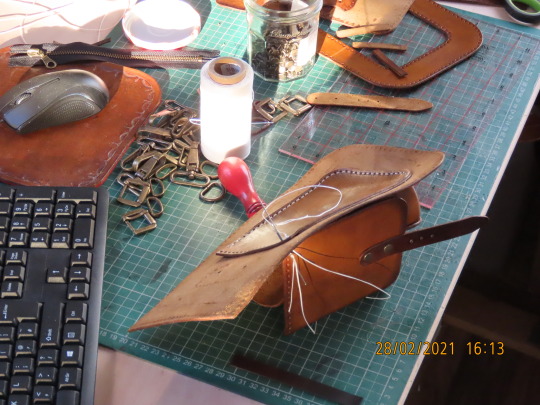
Pic 12 : Here you can see the process, it always seems, no matter how deep I sink the 1.5mm punch for the stitch holes I still have to push an ‘awl’ through each one to open enough to pass the two needles more easily.
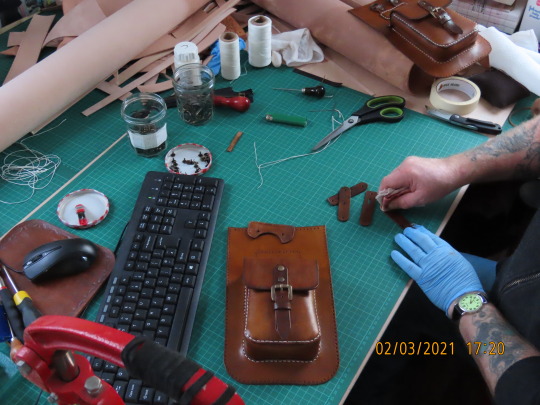
Pic 13 : Ready for the next step, attaching the pices that will hold the D’rings for shoulder strap attachement and attaching the fasten strap and Buckle. Here I’m rubbing hard to darken at the ends, just my touch, if you are making one..it’s your project you go with your own ideas.
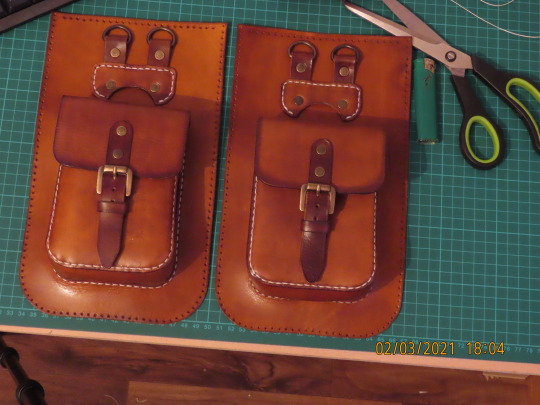
Pic 14 : Both side panels with pouches now ready to stitch the small inner flaps that will prevent things from falling out of the main bag.

Pic 15 : I attached the small inner flaps to each side pouch section using a Saddle stitch.

Pic 16 : I next stitched ( Yup...I said there was a lot . )...the ..errrm, not sure what this bit is called so just for the purpose of moving forward i’ll call it the ‘skirt’ piece...So, I stitched the ‘skirt’ piece to the outside of both side pouch sections as shown here.
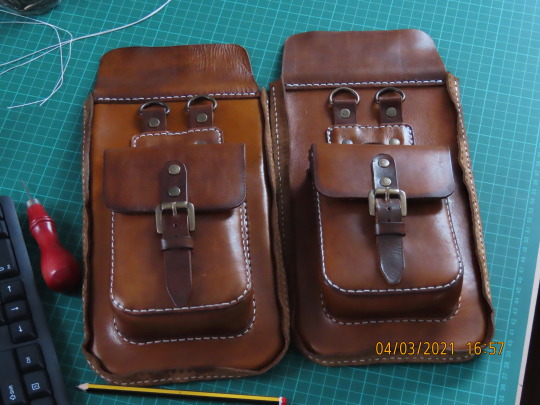
Pic 17 : Ta daaa..looking great. Very impressed with how the color looks, I love the ‘aged’ look on leather.
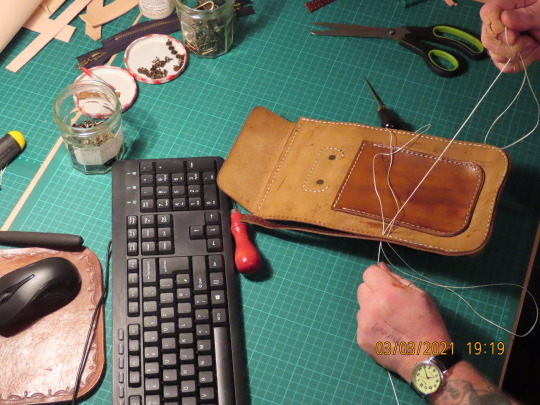
Pic 18 : An extra pic to show it going all the way around and to prove it was my sore hands that did it..hahaha.

Pic 19 : Next I cut the zipper to the required length, glued it into place trying to keep the zip central and then punched stitch holes all around it. I have found, that after marking the hole for the zipper that once cut it leaves very little of the edge of the zipper to attache to the leather...it’s very close to the edge, so I now try to cut the zipper hole less wide than what the pattern says, I find it easier to attach it and punch the holes with more material under and around it. But you will find your own way with it as I have done, if my tip helps you then that’s great.
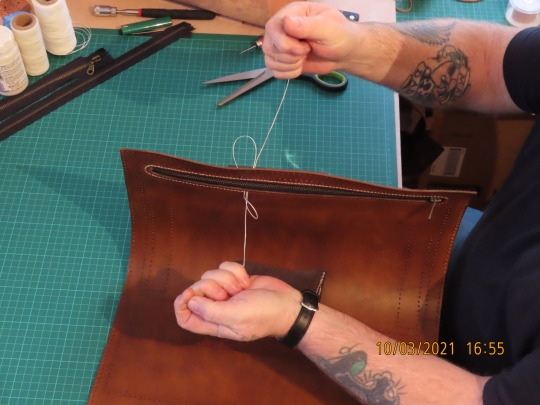
Pic 20 : As well as the contact cement I used to stick it in position I’m also using a saddle stitch and stitching around the zipper for extra strength.
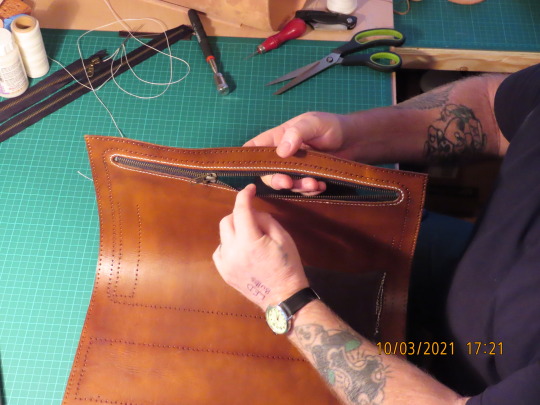
Pic 21 : Done, the zipper works fine.
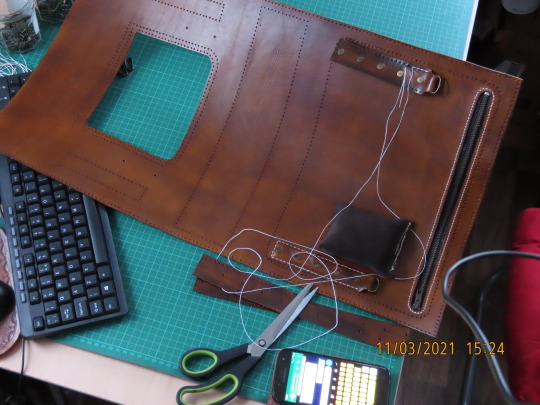
Pic 22 : Now I’m attaching two of the ‘four’ Handle strap holders with D-rings., you can see the positions for the other two on the left.
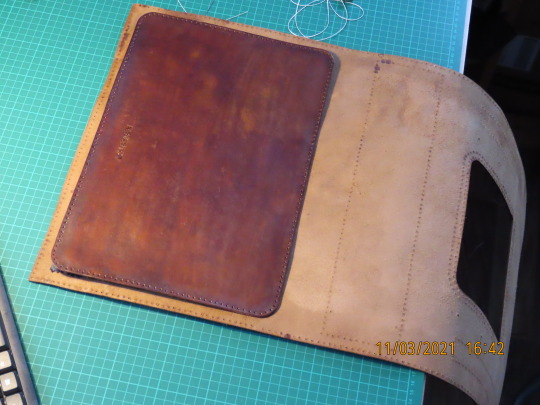
Pic 23 : After adding my ‘Sharman’ mark to the inner back piece I stitched it in place to finish the creation of the zipper pocket.

Pic 24 : Whilst stitching the back to the zipper pocket I had the other side flapping around everywhere so had to get creative and here’s how I resolved the problem, I tied string around the other flap and threw it over a beam in the work shop...worked a treat.

Pic 25 : All four bag handle connectors are now in position as seen here, stitched and rivetted. I’ve chosen to use the Antique rivets, buckles and D-rings for this project and it seems to suit it very well.

Pic 26 : Next I fitted the inner bottom strengthener piece.
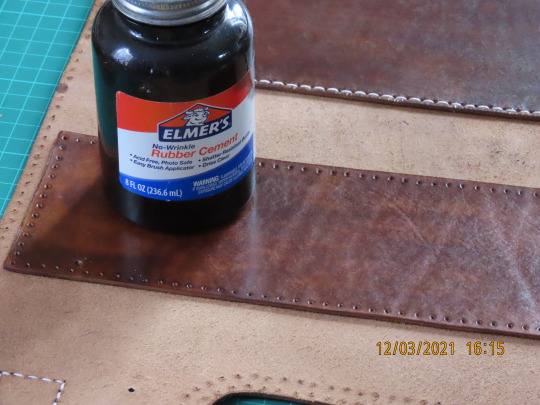
Pic 27 : I used Elmers rubber solution glue to stick the bottom strengthener into position so that I could adjust it if I needed to whilst stitching, as it turned out the holes had lined up really well and the job went smoothly.
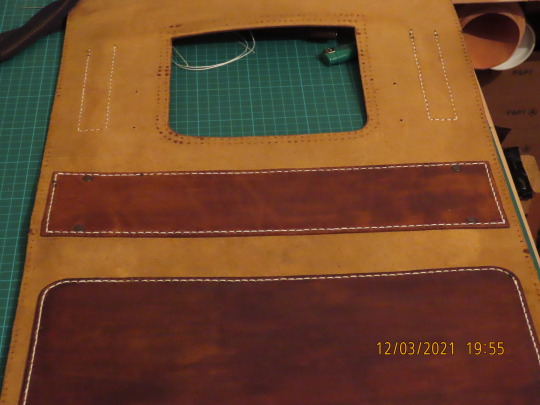
Pic 28 : All stitched in,ready to move forward. Incase I didn’t mention it already I also dyed the flesh side of the leather, the walnut gives it a nice look I think.

Pic 29 : I added rivets too, there’s no chance of this coming off, it’s glued, stitched and rivetted with x4 antique rivets.

Pic 30 : Now I had to put together the outside pouch which will be on the front below the main flap, I did it the same as the side pouches, attached the side to one edge then attached the buckle systems as shown here, after that I stitched the other edge ‘through’ the hole and stitched it underneath to the inside edge at the same time attaching the back section which will finish the creation of the pouch.
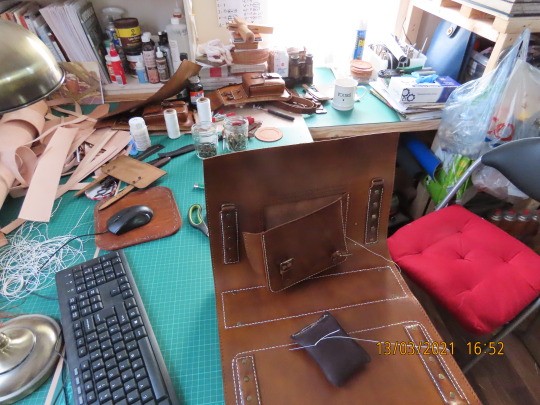
Pic 31 : Attaching the pouch to the front of the main body section. The following pics from 32 to 39 are extras to show the stitching a bit closer.

Pic 32 : the reason to stitch the edge on the inside is to give a much smoother look along the edge when completed.
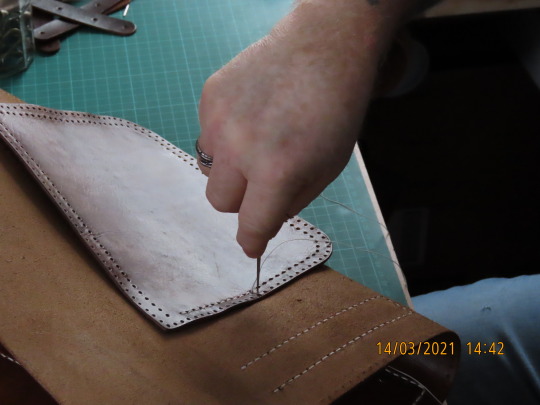
Pic 33 : having to use a stitch awl to widen each hole slightly, I stabbed muself more than a few times, so many that I had to wash my hands and coat in antiseptic cream each night. All that ontop of arthritis and carpul tunnel issues, sometimes it can be a little hard to manipulate the needles, but...if at first you don’t succeed ehy.

Pic 34 : you can see the three layers here the outer, the gusset tucked under and the flesh side of the ‘backing’ piece.

Pic 35 : showing the spike (Awl) that keeps stabbing me.

Pic 36 : Needles come through fine now.
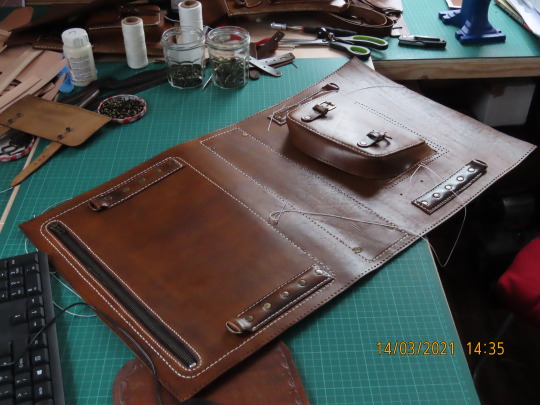
Pic 37 : Another view of the whole thing. It’s starting to make me believe I can actually do this if I just keep going.
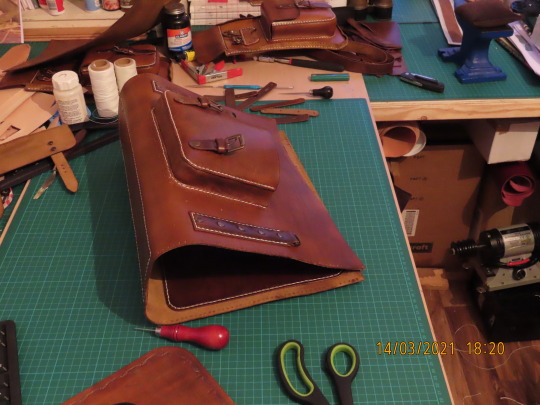
Pic 38 : Pouch attached.

Pic 39 : View of the bottom section now strengthened. I decided later to add some metal ‘Bag feet’..not part of the plan..but Didn’t want to do all this work just to have the bottom get scratched up without at least trying to prevent it. I’ll show that at the end.

Pic 40 : I then realised, I wasn’t quite done with that as the inside backing piece had an ‘outer’ line of stitches as well, as seen here, but if you are someone that gets frustrated easily I would find another hobby, by this point I had been making this for two weeks because real life kept getting in the way and stopping me, very frustrating but hey..what can ya do except suck it up and keep moving forward.

Pic 41 : People wonder why they have the holes so big..well the good thing is they allow two needles to pass through smoothly, if you are doing hundreds of stitches you really don’t want them getting snagged all the time, but anyway not to worry because once done I either lay it on an anvil if it will fit or put a small anvil under it inside on my hand..and tap with a carpenters hammer gently flattening all the thread and closing the holes a bit more. I always tell people, there will always be a point where you will think something bad about the job you are doing...don’t give up, keep going forward and you will be surprised at just how good it ‘ will’ look when ‘Everything’..all the polishing and treatments etc are completed. remember, until it’s fully completed it’s just a W.I.P. ..a work in progress so don’t judge it until it’s done.
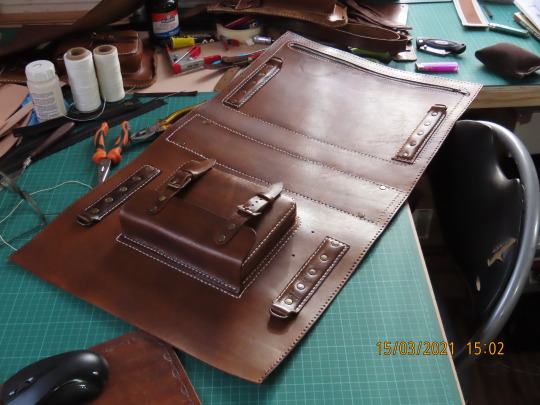
Pic 42 : The front pouch fully attached.

Pic 43 : Here I have sat the side section in place whilst I begin to stitch it to the main body.

Pic 44 : Same thing ..another angle.
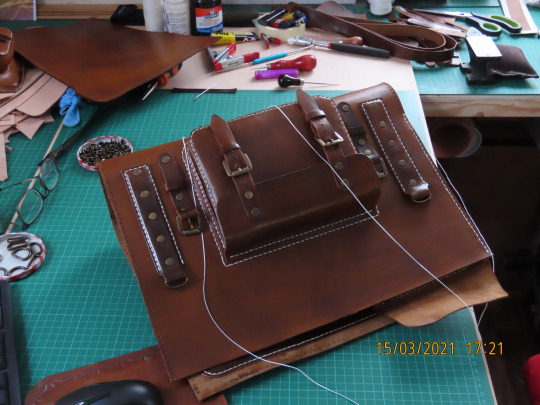
Pic 45 : attaching side panel..Other angle.
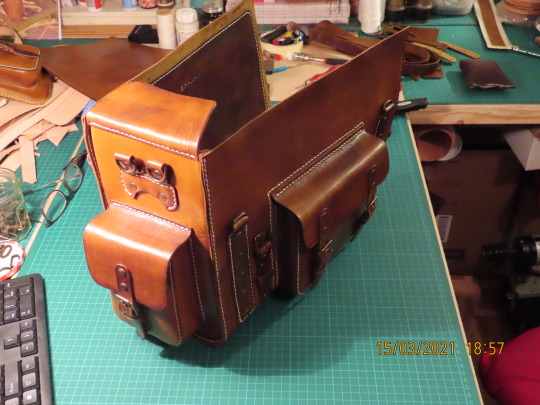
Pic 46 : First side panel attached fully to main body.
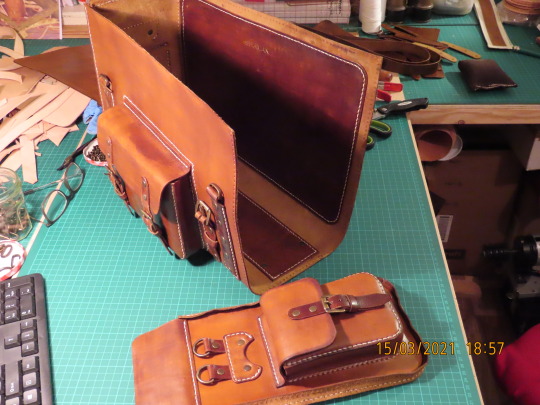
Pic 47 : Other side section ready to fit. The colors are not really as different as the lighting makes them look check out pic 48 for what it really looks like.

Pic 48 : halfway there.
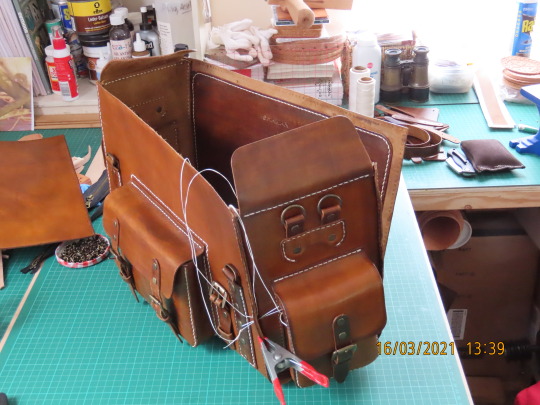
Pic 49 : Clips come in very handy at times like this, the section itself is wanting to fall all the time, ..problem solved.

Pic 50 : Using the Awl to widen the hole, not fun when it catches you...but all part of the game.
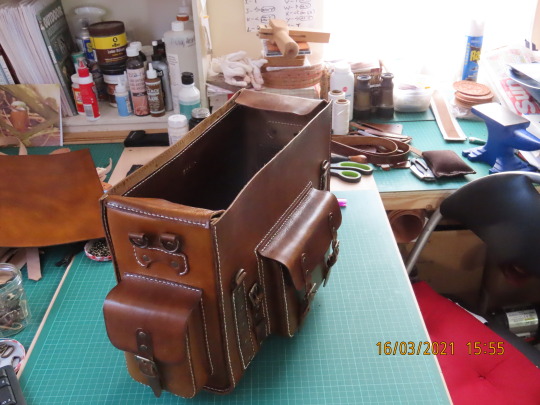
Pic 51 : Done, both side sections now firmly attached and the whole thing is starting to come together.

Pic 52 : Now it needs the main flap, but that needs some work first.

Pic 53 : Different angle.

Pic 54 : View of the back and the zipper pocket.
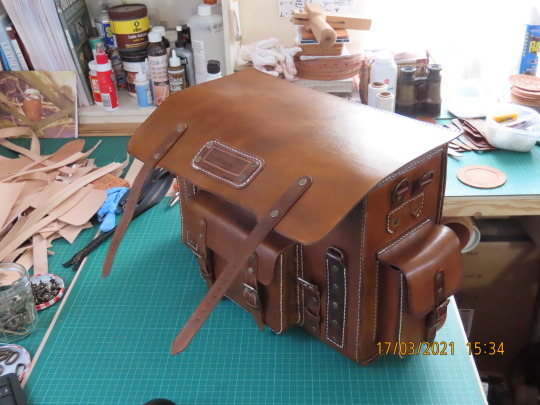
Pic 55 : First I had to attach the closure straps using rivets (Double Cap, you can use single cap but I prefer double.) I also stamped the ‘Shaman’ Mark on the Leather label then riveted that to a back piece and stitched that to the front edge of the main flap as seen here, now..we’re ready.
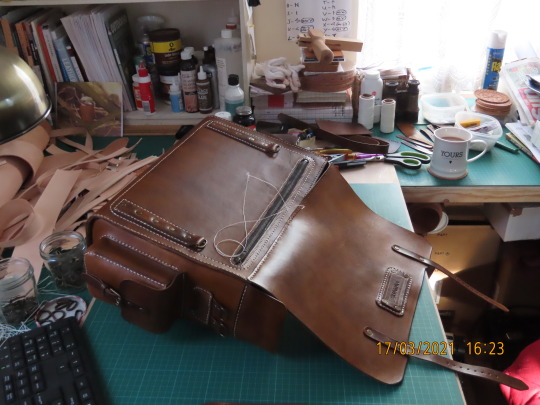
Pic 56 : Again I used a saddle stitch for extra strength, once at the other end ..just because I wanted to...I came all the way back again, no real reason to do that, it’s perfectly fine without the extra, but I ‘m keeping this bag and I wanted it, so I did.

Pic 57 : main flap...Attached.

Pic 58 : Main flap rear view.

Pic 59 : Angle shot shows how well all the colors have matched.

Pic 60 : Now I have to make x2 bag handles.
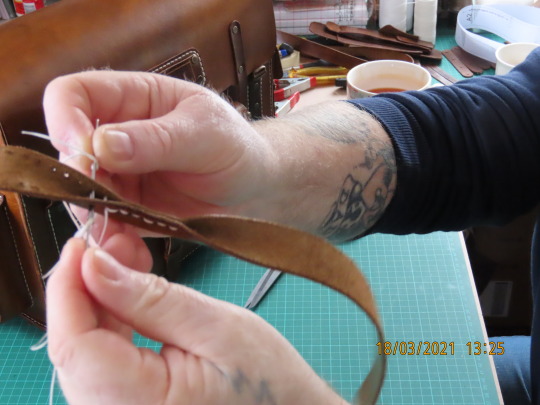
Pic 61 : Using the saddle stitch. All you need to do here is stitch all the holes together pulling the two sides together as shown and make two of these.
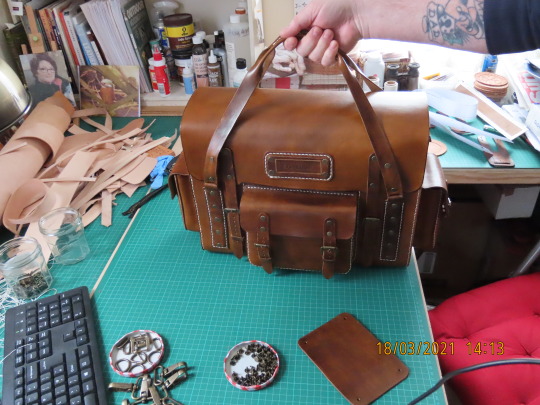
Pic 62 : Connect the bag handles to the D-rings as seen here. I used rivets to fasten them on.

Pic 63 : I attached the clip end sections using rivits and stitching to the main shoulder strap at either end, then the clips were attached, again using rivets.

Pic 64 : Attach the shoulder strap to the side rings.

Pic 66 : As I said earlier, I attached ‘Metal bag feet’ to try to avoid damage to the base from dragging, might not stop everything but should help and looks good I think.

Pic 66 : And we are done. This took me four weeks in the end, but we’ve had a lot of ‘Life’ getting in the way. If I had nothing else to do but this I reckon I could do it in about a week to ten days. I wouldn’t recommend this particular project to a beginner mainly because of the expense, I wouldn’t practice on this one. But there are many more projects out there online and if it suits you to do so you could visit my Blog ‘A Journey into Leather Craft’ and check out my archive, you’ll see the things I’ve made from the very first knife sheath to this amazing bag. I can’t believe I made this, Just shows you never really know what you can do until you try. I look forward to the next project, hope you will come back and check out the next one. To all those who have followed my projects for a long time thank you, hope you enjoy them and hope I have inspired some of you to give it a go yourself. If you are new, thanks for stopping by for a look, hope you liked what you found and hope you will also come back for the next one, maybe tell your friends about my blog, I’d appreciate that. Until then, as always, stay safe and to all the makers out there, Stay Crafty.
#leather#leather craft#leather bags#hand made#hand made goods#posh bags#expensive bags#expensive goods#hell yeah
7 notes
·
View notes
Text
How to layer kicks in Pro Tools
There are a whole bunch of hundreds of kick-drum samples to select from and plenty of, many extra devices able to producing kicks. however scouring by means of the entire samples usually isn’t sufficient. You would possibly discover one kick pattern that has a deep, low-end weight you want, however doesn’t minimize by means of the combination strongly sufficient, whereas one other kick pattern would possibly minimize by means of with loads of power, however not carry the low finish. By layering a number of samples right into a single sound it’s potential to mix the relative strengths of two or extra samples, to create your individual, new sound, one thing distinctive to you, with the proper traits in your combine.
The easiest way of doing that is merely to layer one kick on prime of the opposite in the combination, aligning the beginning time of every, such that the 2 samples play on the similar time – being very cautious to test that the polarity of the 2 samples is aligned. This gives you one thing of the sound of the 2 indicators. The solely downside is that in addition to providing you with the very best of each worlds, you’ll get the worst bits of each samples, too.
But will it mix?
Instead, what we’ve to do right here is to mix the 2 samples collectively, eradicating the components of each that we don’t like, and leaving solely the very best of each. This can contain chopping the samples up somewhat, altering the amplitude envelope of every in the method; or it may be an easier activity of merely EQing the 2 samples to depart solely the very best components.
In this tutorial, we’ve crafted two kick samples, one with a pointy assault and lengthy tonal tail, whereas the opposite has a shorter tail, however a deeper, extra weighty physique. We need to attempt to use the assault of the primary pattern, together with the physique of the second to make a single kick drum that kicks more durable than both of the 2 samples alone.
We begin by altering the envelope of the 2 samples, such that we immediately lose among the lengthy tonal tail from the primary kick pattern, being positive to preserve the entire assault. Pro Tools permits for unimaginable management over the amplitude envelope, in ways in which no sampler can come even shut to. For now, although, we’re simply utilizing easy fades. Feel free to dig in with quantity automation if you’d like better management.
Once we’ve formed the 2 kicks we’re going to add EQ to each, to additional isolate the sounds we would like from every, utilizing a high-pass filter to take away the low-end from one pattern and a equally positioned low-pass filter on the second pattern to take away any excessive finish that might be clashing between the 2 kicks.
Holding it collectively
Finally, we strive to glue the kicks collectively somewhat to bin them collectively as a single factor. To do that, we’ve bussed the 2 samples to a single Kick buss channel, and added an occasion of the Avid Channel Strip plug-in. Experimentation doesn’t have to finish right here, although: if the 2 samples you utilize are pitched aside, you may strive pitch-shifting one to extra carefully match the opposite. However, any heavy processing like this could even have the impact of altering the traits of the kick that you simply favored in the primary place, so make certain to experiment with quite a lot of totally different pitch-shift algorithms to attempt to preserve the components of the sound that you simply like most.
Of course, whereas kicks are the plain alternative for this sort of therapy, you may carry out related actions on different, related sounds inside your combine, most clearly snare hits – however we’ve additionally seen this executed with crashes, chopping collectively the wash from one sound with a extra aggressive assault.
In truth, it’s not even needed to stick to a single pattern kind when performing this sort of sound-design exercise. We’ve had nice outcomes including the assault of a wooden block to a deep kick drum sound, to create a sound that sounds extra like a standard kick drum than both of the samples we started with. Once you get the hold of designing your individual appears like this, it’s arduous to return to simply utilizing one pattern.
Layering kicks in Pro Tools: step-by-step
1. Open the Pro Tools Workshop file. The undertaking accommodates two single kick-drum samples, named Kick A and Kick B. Solo every one in flip and take a hear to them.
2. We’ve bussed the 2 samples to a single grasp buss and turned the person channels down by 3dB. This is as a result of whereas neither pattern peaks by itself, they do push the grasp buss into clipping when performed collectively.
three. We need to use Kick A for the assault, and Kick B for the physique. So let’s begin by altering the envelope of Kick A. Place the cursor simply after the top of the waveform and press [S] to shortly edit the top of the pattern. You can do the identical on the entrance by urgent [A].
four. Now apply a fade over the top of the pattern by highlighting a area you prefer to to fade over and urgent [F]. You can fine-tune the size of this fade with the Trim Tool [F6].
5. Double-clicking on the fade with the Grabber Tool chosen [F8] will open the Fades dialogue window. From right here you may additional edit the form of the fade, utilizing linear, curved or S-shaped fades as you see match.
6. You can do one thing related to the second pattern, nonetheless, keep in mind we would like to attempt to preserve the physique of this pattern as sturdy as potential.
CLASSIC TRICK Kick drums don’t have to be layered with different kick drums. A traditional drum ’n’ bass trick is to layer the kick with a 40Hz sine wave gated to the assault of the primary kick. A fantastic different to that is to use a triangle or sawtooth wave as an alternative of a sine wave for better low-end weight. Be positive to combine it in low.
7. Add an occasion of your favorite surgical EQ to each channels. We’re utilizing the easy one-band model of Avid EQ III right here for instance, however you may use any EQ with high- and low-pass filters.
eight. On the EQ for Kick A, apply a 12dB/octave high-pass filter at round 100Hz and with the channel solo’d and looping, hear to how the kick sound responds. We need to pull out the entire low-end power with out spoiling the power of the assault.
9. On the EQ for Kick B, apply a 12dB/octave low-pass filter at round 300Hz. Again, solo the channel and hear to the impact the EQ is having on the kick sound.
10. With each samples enjoying over one another, fine-tune your EQ settings. It is critically essential that you simply do any fine-tuning in context, not with the channels in solo, as the general sound will likely be very totally different to the sound of both one pattern.
11. As properly as fine-tuning the EQ stability of the 2 samples, you may also fine-tune the general stability between the 2 samples at this stage, just by adjusting the faders. To our ears, there may be now an excessive amount of assault to this kick, so we’re going to drop Kick A barely.
REVERSE THE POLARITY Pay very shut consideration to the polarity of your samples. You can check this by commonly flipping the polarity of 1 pattern and listening for which approach spherical has the strongest backside finish. Remember, making use of EQ will alter the section relationships of the remaining audio, so even when it was in section earlier than you utilized EQ, it won’t be afterwards.
12. Finally, buss the 2 channels to a single channel and add an occasion of Avid Channel Strip plug-in to the buss channel.
13. In the Channel Strip, we’re going to add further glue utilizing a really low-ratio compressor with a reasonably low threshold.
14. It’s crucial that you simply get the assault and launch settings proper when setting this, or your kick may flip into mush. We’re utilizing a reasonably sluggish assault of 20ms, which ought to give the entrance finish of the kick loads room to breathe, with a reasonably quick assault of 40ms to form the feel of the physique and tail.
15. At this stage, we like to export our pattern as a single WAV prepared to be used in this and plenty of extra initiatives. By setting the output of the buss channel to a mono location, we will bounce that as a single mono file, fairly than making a mono file out of the summed stereo buss.
16. In the bounce window, make certain to set the Bounce Source to the identical place because the output of the kick buss channel.
17. Alternatively, if you’d like to use the kick immediately in the undertaking you’re engaged on, group the 2 samples as a single clip group by highlighting each clips and urgent Ctrl+Alt+G (PC) or Cmd+Opt+G (Mac).
18. You can now copy the clip group and paste it to create your rhythm inside your undertaking with out bouncing the brand new pattern out and reimporting it, enabling you to additional alter the sound additional down the road.
For extra Pro Tools tutorials and workshops, test right here.
from Heavy News https://thisisheavynews.com/how-to-layer-kicks-in-pro-tools/
0 notes
Text
Best Tips for Refinishing Furniture

If you’ve decided that you are going to move forward with refinishing your wood furniture, then there are a few guidelines to follow.
Below are six essential steps that address how to refinish wood furniture and how to strip finished wood:
Stage 1: Clean the Piece:
The most major advance of any furniture revamping or recharging venture is to give the piece being referred to a decent and altogether perfect. This is particularly valid if the piece has been away or has been kept outside for an all-encompassing time. Furthermore, on the off chance that you don't know precisely where the piece originated from, it's feasible canvassed in a layer of grime from residue and soil development.
Numerous individuals surmise that utilizing a rock solid cleaner will work all the more adequately on a particularly filthy piece. Be that as it may, the easiest and best approach to clean the piece and ensure it is to simply utilize a blend of dish cleanser and warm water. A portion of the experts propose utilizing Dawn or a comparable brand of dish cleanser to take care of business.
Scour the surface utilizing delicate strokes with a soaped-up wipe, or utilize a paintbrush if your piece has moldings and carvings to get into. Once you've scoured the surface clean, flush it off with crisp water utilizing the wrung-out wipe. When the cleanser has been gathered up, congratulate the piece dry with a towel.
Stage 2: Assess the Furniture's Current State:
Once you've cleaned the piece, you'll have a superior thought of the general size of the undertaking. In case you're managing a particularly old piece, you may discover there are white rings, paint stains, gouges, chips, and splits.
Take a general evaluation of the piece and figure out what should be done to make these fixes. This will enable you to figure out which supplies you'll need, for example, scrubbers, epoxy putty, and wax filling compound.
Stage 3: Remove Old Finish:
On the off chance that you've never done as such, at that point you might think about how to strip the complete off of wood. There are two primary approaches to do it. The primary path is to sand it off, and the second route is to utilize a synthetic stripper:
• Sanding: Use a coarse sandpaper, a sanding square or a power sander to strip the complete off until the point when the surface is smooth. When the vast majority of the complete is off, change to medium coarseness sandpaper to additionally evacuate any sparkle. At last, complete off with a fine coarseness sandpaper to smooth out the wood until the point that all complete is totally evacuated.
• Chemical Stripper: Chemical stripping items are intended to easily strip the complete of the wood. Pick a fluid or semi-glue item that contains methylene chloride (MC). Spread the stripper over the surface of the wood uniformly utilizing a fiber brush.
Give the stripper a chance to sit for no less than 10 minutes until the surface material wrinkles up and you can strip it off with a scrubber. Keep on utilizing a scrubber until you've scratched all the complete off. Apply an enamel more slender to wipe down the wood and expel any remaining buildup, complete, or wax from the stripper.
On the off chance that you've never stripped the complete off of wood previously, here are a few hints you can pursue to make the activity more secure and less demanding:
• Wear defensive rigging including eye goggles, confront veil, and substance safe gloves.
• Read the synthetic stripper item mark before starting and pursue as coordinated.
• Use drop fabrics or cardboard underneath the furniture before sanding or utilizing the synthetic stripper.
• Apply concoction stripper utilizing quick and even brush strokes as the item will vnish.
• Use a brush with characteristic fibers to get into furrows.
• Reapply another layer of stripper over the best if the complete doesn't evacuate following 30 minutes of splashing.
• Let the piece air dry for 24 hours before proceeding onward to the following stage.
• Dispose of the extra compound items securely by first checking with your neighborhood squander transfer organization.
Stage 4: Apply a Coat of Sealant:
After you've stripped the complete and let the piece completely dry, it's an ideal opportunity to proceed onward to covering. On the off chance that you've utilized a concoction stripping item, you may need to sand the furniture surface utilizing 120 coarseness paper to guarantee you've totally expelled any buildup.
A discretionary advance is to fill in the grain of your wood furniture to your enjoying. In the event that your furniture has a tight wood grain, at that point it won't require grain filler. Be that as it may, if your furniture has a more open grain, for example, with oak or mahogany woods, at that point you can apply a grain filler. You'll have to pick the right grain filling item relying upon whether you need to accentuate or de-underscore the grain and what the coveted shading will be at last. Likewise check whether the grain filling item ought to be connected previously or in the wake of recoloring.
At long last, you'll need to seal the wood to set it up for recoloring. A sealant item ensures the wood and makes a base for the stain to spread all the more equitably. Apply a thick layer of sealant and enable it to drench into the wood. Wipe off any overabundance utilizing a spotless cloth. When the sealant has dried, sand down the furniture surfaces again with fine coarseness sandpaper.
Stage 5: Stain or Paint the Wood:
The following stage subsequent to applying the sealant, is to stain or paint your wood furniture piece. This is an individual choice, and there isn't really a privilege
or on the other hand wrong answer. While picking between recoloring or painting your wood furniture piece think about the accompanying:
• If the piece is a collectible, you might not have any desire to paint over it so it can hold its genuineness.
• If you don't care for the current shading or grain of the wood, at that point you may favor it to be painted an alternate shading.
• If the piece will be utilized in a high-activity region, it might be more impervious to harm with a stain and sealant than with paint.
• If the piece isn't built from top notch materials, at that point you may paint it to improve it look.
There are a few choices to look over with regards to stains. There are water-based, oil-based or gel stains. There are additionally items that are a two-in-one stain and wrap up. Make certain to adhere to the directions on the item name before starting the recoloring step.
Paints additionally have different alternatives to browse. There are diverse paint completes, for example, oil-based lacquer or latex that will give a strong covering. Adhere to the guidelines on the item mark before applying the layer of paint.
Stage 6: Apply a Coat of Finish:
The last advance in the wake of recoloring or painting your wooden furniture piece is to apply a complete coat. There are diverse complete items to browse. Your decision will rely upon a few components including:
• The wood furniture look you want
• The strength you require
• The kind of wood your furniture is produced using
• How the thing will be utilized and how often
• Your possess ability level
Since specific completions are intended to be splashed on, they require extra shower devices to take care of business. For apprentices and specialists, it's prescribed to utilize completes you can wipe or brush on.
Here are a portion of the numerous sorts of brush-and wipe-on completions to browse:
• Oil completes: These are simple items to drop by, and they are easy to utilize. Oil completes will in general splash into the wood well and make for simple revival later. They don't offer much surface insurance, so they are smarter to use on pieces like seats or dressers rather than tabletops.
• Wipe-on varnish: Wipe-on varnish items can be connected in numerous coats whenever wanted. This enables you to control the level of sheen that your furniture will have at last.
• Polyurethane varnish: Oil-constructed brush-with respect to polyurethane varnishes are strong and can shield your furniture from scratches and marks for a considerable length of time to come. This sort of complete is appropriate for espresso, eating and kitchen tables that endure a considerable measure of wear and tear.
Once you've chosen the best complete item for your particular furniture piece, you can include a layer of glue wax to improve its gloss and further shield it from scratches.
Last-Minute Tips on Refinishing Wooden Furniture:
Since you have a superior comprehension of the way toward choosing when to restore wood furniture and how to do it, here are some useful hints to consider en route.
1. Use Full or Natural Light: When recoloring or painting and completing your wood furniture piece, make certain that you're working in a completely lit space. This will assist you with seeing any dribbles, runs or missed spots previously it's past the point of no return.
2. Keep Your Workspace Clean: Throughout the entire furniture resurfacing process, make sure to keep your workspace as spotless as could be allowed. This incorporates vacuuming up residue subsequent to sanding. Residue particles can get caught to the wood's surface and get underneath the stains and topcoats. Once you've vacuumed the residue, wipe down the wood with a clammy material before applying the wrap up.
3. Stir Products: Never shake a compartment of stain or wrap up. Rather, tenderly blend the blend to guarantee all fixings are appropriately scattered and not settled at the base.
4. Test the Stain Color: Don't depend on what the examples reveal to you when choosing how the stain will look. Continuously test the stain first on a discrete region of your furniture before applying everywhere. This will keep any undesirable shocks when you start to cover the more noticeable territories.
Visit us to know more about Furniture restoration In Dubai
#sofa upholstery#dining sofa#wooden flooring dubai#Furniture restoration In Dubai#looking for mattress in Dubai#best sofas in dubai#Curtains and blinds in Dubai
0 notes
Text
Harnessing spider powers to heal human bodies
check it out @ https://tuthillscopes.com/harnessing-spider-powers-to-heal-human-bodies/
Harnessing spider powers to heal human bodies
(CNN)Professor Fritz Vollrath keeps his spiders in luxurious accommodation on the top of Oxford College.
A large number of plump Golden Orb Weavers cover the ceiling of the converted green house, basking within the tropical humidity and plush foliage, his or her intricate webs pluck delicacies from your ever-present swarm of flies.
“I do not understand arachnophobia,” states Vollrath, because he inspects his brood.
After 4 decades dealing with spiders, the German-born zoologist is promoting an in-depth appreciation of the near-miraculous forces.
Spiders create webs by spinning liquid protein into silk that’s pound-for-pound stronger than steel, yet very flexible. The highly efficient process requires little energy, and lots of spiders recycle when you eat and spinning a brand new web every day.
Vollrath’s mission would be to harness the spider’s forces to be used inside human physiques, and that he is creating silk implants that may transform regenerative medicine.
Finding the net
Like a student in the College of Oxford throughout the 1960s, Vollrath initially focused on the airplane patterns of homing pigeons, supervised by Nobel Prize-winning ornithologist Nikolaas Tinbergen. But his curiosities soon brought him to pay attention to spiders as well as their webs, this was largely overlooked in academic research.
“In the past it had been about passion for complex systems,” Vollrath recalls. “The net is really a complex, geometric structure, and also the spider builds it, from itself, with very fine material. You believe: ‘How does that actually work? What rules will the animal use?'”
Vollrath printed his first paper on spiders in 1976, and adopted up having a flurry of groundbreaking studies that explored the initial qualities and processes of the webs. His field research required him around the globe, including lengthy spells in Panama and Papua New Guinea, around the trail of exotic species with rare characteristics.
“I spent considerable time just relaxing in a seat inside a forest watching spiders do their factor to know their behavior,” he states. “If you discover a fascinating one with unusual silk…you are able to dissect the spider to determine the silk gland and just how the silk is spun.”
The zoologist’s revelations brought to diverse collaborations.
He labored carefully with architects to design buildings according to webs, as well as nets for catching space debris. He required commissions in the U.S. military to review how drugs, including LSD, affected a spiders’ web building.
“Caffeine was the worst since the spider is really nervous,” he learned.
However the most promising applications were in medicine. Since Ancient A holiday in greece, cultures have treated wounds by rubbing all of them with spider webs, believing this avoided bloodstream loss and infection. Vollrath put this tradition towards the test by creating spider silk dressings in a number of animal trials, and located they blended seamlessly within host tissue.
“Spider silk is inherently biocompatible therefore the wound doesn’t reject it,” he states. The silk can also be biodegradable, meaning the dressing is just eaten away because the wound heals.”
“Even if your silk wasn’t cleaned and merely harvested from the web it might seal the wound, so we did not need to take it off after.”
Read: The bionic skin that can feel a tumor
The silk code
Next, Vollrath attempted to evaluate the thread itself because it was reeled from the spider’s abdomen.
The zoologist discovered a distinctive alignment from the protein structures within, which demonstrated resilient to worry and deformation. He identified this to cause the silk’s unique strength and versatility.
Vollrath found that a Golden Orb Weaver spider produces seven kinds of silk — each for various purposes. Dragline silk, that the spider uses to hold from, demonstrated the most difficult. This grew to become the model for any new kind of biomedical implant that will provide the same supreme strength and resilience in the body, while solving a production problem.
Manufacturing spider silk in large quantities was impossible, as it may simply be harvested one thread at any given time from anesthetized spiders, so that as arachnids they can’t be farmed since they’re cannibals.
Vollrath searched for rather to usher in the forces of silkworms, which with each other produce over 150,000 tons of silk every year with an industrial procedure for rearing and boiling the worms. This process has offered to create luxury fabrics for more than 5,000 years, dating back Neolithic China.
The silk from the silkworm, however, lacks the effectiveness of spider silk, and possesses a toxic glue which makes it less well suited for surgery — however it would function as a canvas to construct upon.
After becoming the mind from the new Silk Group at Oxford College, Vollrath discovered stress of untamed silkworm whose silk had similar protein patterns to what spider.
He sequenced the silkworm’s proteins and matched these to the dwelling of spider dragline silk. The merchandise of the ended up being dissolved to get rid of the toxic glue after which reconstituted like a tough, clean material the Group named Spidrex.
Read: How to create opioids for the masses
Spider surgery
The Silk Group’s progress attracted commercial interest, which permitted Vollrath to produce spin-off company Oxford Biomaterials to add mass to medical applications.
He checked out using Spidrex to create artificial bone, as well as tested it to be used as dressings and sutures, but he eventually chosen knee replacements — a place in desperate necessity of new solutions.
You will find 600,000 such procedures annually within the U . s . States alone for around $13 billion, which figure is forecasted to increase dramatically.
“With cartilage there is nothing,” he states. “There have been plastics, however they really didn’t get the job done.Inch These implants need to be removed eventually, which could have huge complications, Vollrath highlights.
The Audience launched its second spin-off, Orthox, which used Spidrex to produce a malleable material that may be formed to exchange knee cartilage and function a biocompatible scaffold to aid tissue that will then regenerate regarding this.
“You would like cells to develop in it, to populate the brand new cartilage and re-enforce it as being they develop,” states Vollrath. “Because the material degenerates cells utilize it like a scaffold.”
The perfect for that team ended up being to create an implant that might be substituted for original cartilage within 5 years.
The implants are actually halfway through numerous studies, and Vollrath is happy with their progress. “The folks are pleased and also the surgeons are pleased,Inch he states, believing the implants might be broadly available by 2018.
An identical scaffold concept has been requested nerve repair, through another kind start-up Neurotex. They are wishing to use this towards the nervous system which help reverse paralysis brought on by severe spine injuries — another field in dire necessity of more options.
The concept of silk-based prescription medication is now teeming with options.
The Silk Age
New research is printed nearly every day exploring applications for silk in regenerative medicine. Research teams all over the world are creating new materials using a variety of creative techniques, for example implanting spider DNA into goats as well as using yeast to spin silk.
Silk materials are now also getting used for sutures, scaffolds, grafts along with a vast choice of biomedical implants.
“(Silk) might be standard practice for a lot of surgical procedures,Inch states Professor Insup Noh, editor of Biomaterials Research journal. “Silk materials happen to be approved like a medical raw material, that is a huge advantage in contrast to other emerging polymeric biomaterials.”
Vollrath’s group has become focusing on bicycle helmets, plane panels and military uniforms, and staring at the spider’s ultra-efficient spinning process to be used in advanced manufacturing. Spider webs have grown to be one for pollution sensors,, while synthetic spider silk is more and more popular for clothing.
After 4 decades of rapid progress, the zoologist remains convinced he’s still just scratching the top of the items his green house visitors delivers.
“Spider have been in existence for countless years,” states Vollrath. “There’s a lot more to grow from them.Inch
Find out more: http://www.cnn.com/2016/05/24/health/healing-powers-of-a-spiders-web/index.html
#blue economy#Health#knee replacement#silk implants#silk knee replacement#silk medical#silk nerve repair#silk stronger than steel#spider silk#spider silk implants#Spiderman scientist is making us superhuman - CNN.com#vollrath
0 notes