#warning the file size is huge (over 6gbs) because the quality is very good
Explore tagged Tumblr posts
Text
download a copy of monsta x’s shape of love comeback show here.
#monsta x#warning the file size is huge (over 6gbs) because the quality is very good#also i apologise for leaving in the first / last couple of minutes of the broadcast...#idk how to edit videos ..... (cringe lol)#it's an mp4 because the method i use to dl live streams uses mp4#but i promise it is hq !!!#if u would like .ts u can check out monstaxmas on twitter#anyway enjoy :)#**vid
1 note
·
View note
Text
How to gif without photoshop (second method)
Hello! A couple months ago I made a tutorial on how to gif without photoshop using the website ezgif. I got a really great response for it and received some requests for the other giffing program I use when I don’t have access to photoshop. The program is called instagiffer; this is a software so it needs to be downloaded but I have never had any trouble with my version.
Warning that this is VERY text and image heavy because I know how frustrating it can be when a tutorial feels like it’s skipping steps and I want this to be as clear as possible. Also please read this on desktop, tumblr mobile kills the quality of gifs inside text posts.
Please reblog if you found this helpful!
This is the video I will be giffing and here is the gif I will be making!
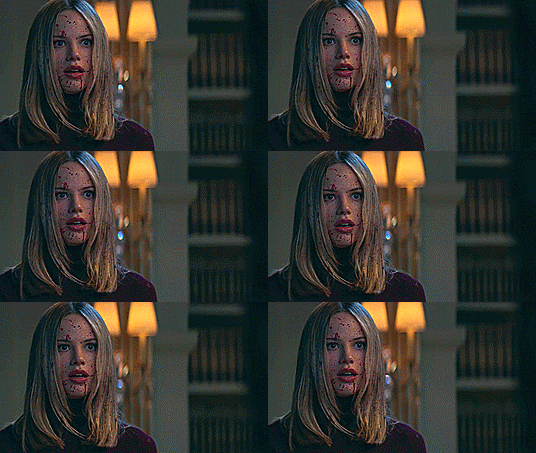
What you need:
Instagiffer
This program has been around since 2013 and I have used it since 2016. Unfortunately, it hasn’t been updated since 2016 and the download link on the official website is broken. That being said, there are a few other websites that still have a working download, which is what I linked to above.
ezgif
Although we aren’t going to use this website to make the gif, we are going to use it to add more color and brightness to the gif.
A video downloader
This is the video downloader I use but basically any youtube/video download website works. There are two ways to gif on instagiffer; using a video and using the built in screen recorder. I will show you how to use both.
A video to gif
This program is a lot more forgiving about video quality than ezgif is, but for best results 720p or 1080p is still the standard. Scenes with good lighting and bright colors turn out the best, but you can still make good looking gifs from darker or unsaturated scenes if you know what you’re doing.
1. Making a gif with a downloaded video
Step One: Getting the frames
First, you download the video you want to gif. Then you open up instagiffer and click on “load video.” Scroll down until you find the video you want to gif and click on it.
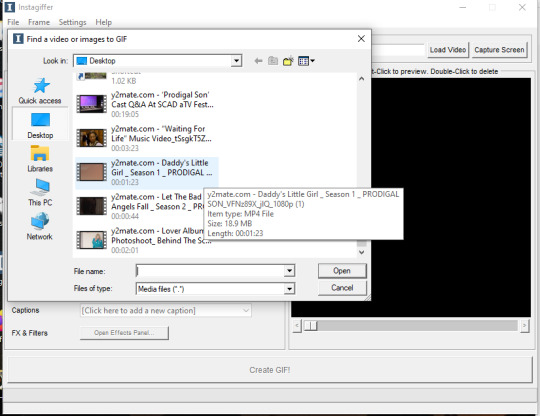
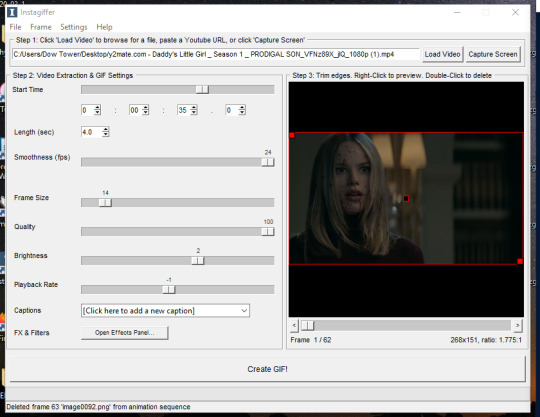
The video will appear on the screen in the right hand side. Go ahead and put “smoothness” up as high as it can go. This increases the frames per second and makes the gif look smoother. It also makes the gif longer, so you may have to bring it down later so it doesn’t go over tumblr’s size limit, but I always start as high as possible then work down.
Next, find the moment in the video you want to gif. You can either use the sliding bar or just type in the start time (you can use hours, minutes, seconds, and millisecond). You also want to put how long the clip you want to gif is. 3 seconds is the default but I usually bump it up to at least 4 (unless I know it’s a really short clip) just because it’s a lot easier to delete frames than add them.
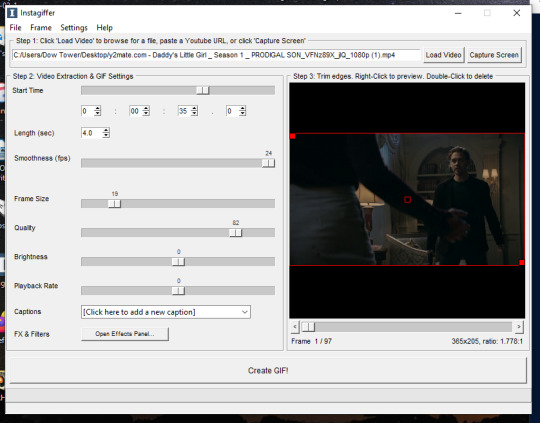
If you do this, you’ll quickly realize your gif has extra frames that appear slightly before and slightly after the moment you want to gif. It’s really easy to get rid of those frames; just click on them until you only see the frames you want in the gif. Use the scroll bar at the bottom of the gif to move around the frames, and use it to make sure the only thing on screen is the clip you want included in the gif.
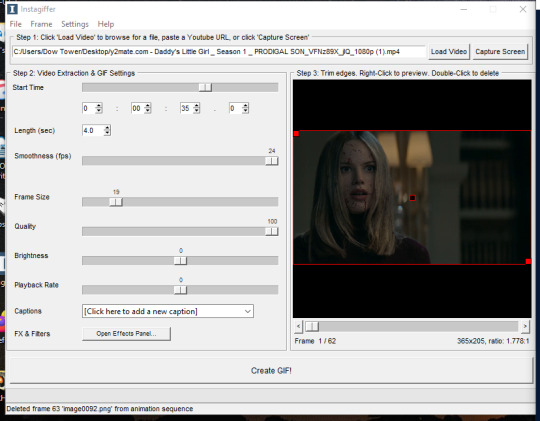
Step Two: Resize the gif, brighten the gif, change the speed and add captions
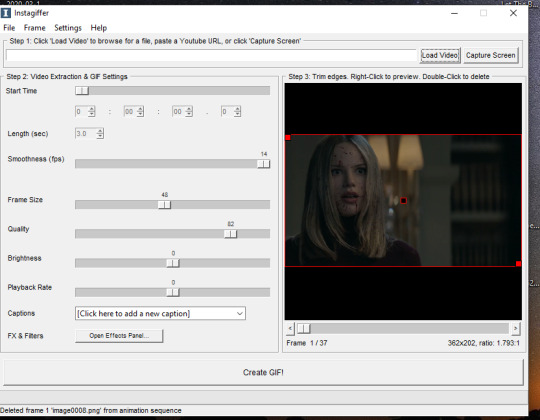
Now, it’s time to size, brighten, and color your gif! First look at the “frame size” option. Using the correct gif size for tumblr is one of the easiest ways to make sure the gif looks good. For gifs that take up a whole row, the size should be 540p wide. For two gifs in one row, the size is 268p each. For three gifs in one row, the sizes are 177p, 178p, and 177p in that order. Here is a visual of it. You can see what the width/height of the gif is in the bottom right hand corner of the gif screen. I am making this gif 268p. Get the frame size as close to the width you want as possible; right now, it is 269x151. To get it down to 268 exactly, go up to the top of the program, click on “frame” > “manual crop”. This little box will pop up. Just set the width to 268 and make sure the size is listed as 268 under the gif as well. The height can stay the same.

Keep quality up to 100 obviously. I almost always brighten by 2. Unless you’re giffing something with a huge spot of light, 2 is basically standard. Going up any higher usually makes the gif just look grainy, but if the scene is REALLY badly lit, you can go up to 3. Playback rate is usually -1, just to make the gif look smoother. Unless it’s a super long gif or a super short gif, I don’t mess with it further.
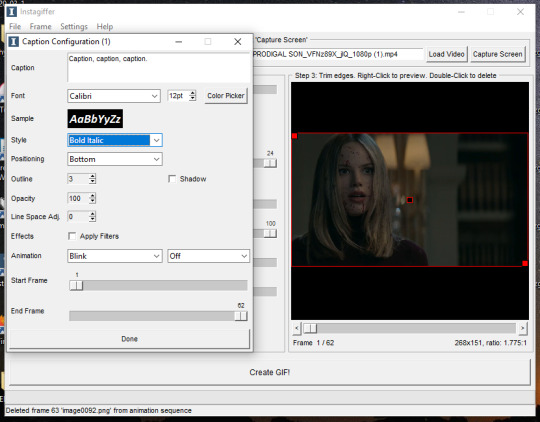
Captions are obviously optional but if you want to add one, click on “click here to add a new caption.” A box will pop up with options of how you want the text to look. I only use this to “caption” gifs (aka add dialogue). The settings I use are 12pt font, calibri, white, bold italic, bottom of gif, outline up to 3. You can also chose what frame you want the caption to start/end on if you want. Since this gif doesn’t have talking, I’m not going to include the caption in the final gif, but I wanted to show how to use this function.
Step Three: Color the gif
There are two parts to this. The first place I color the gif is on instagiffer, and then I use ezgif to add more effects. The second part is totally optional but they have more choices for coloring there.
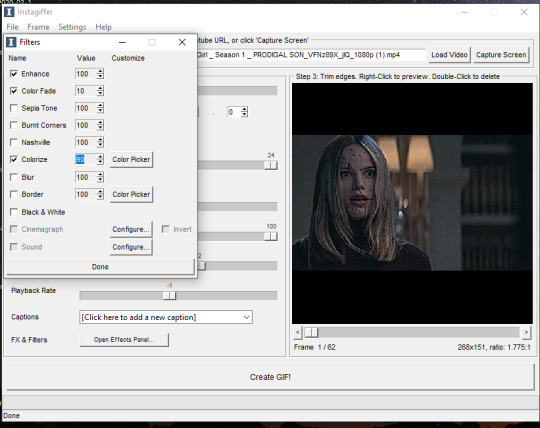
Click on the “open effects panel”. A window will open showing what the gif currently looks like, along with a variety of filters you can use. Ignore how grainy it looks, it won’t look that way when it’s finished.

First thing is keep “enhance” up to 100. This is basically a sharpening function and without it the gif will get super blurry. There are a ton of filters you can play around with, but the only two I focus on usually are “color fade” and “colorize.” For color fade, I click it on and set it at 10. Obviously, if you’re trying to make a desaturated gifset, you can raise it up for a faded color effect, but I use it more for color balance than desaturation. Next click on colorize, and then color picker.
I almost always pick a light shade of blue, purple or pink; it brings out the color in the gif and tends to keep skin tones from being washed out. This is usually my default:
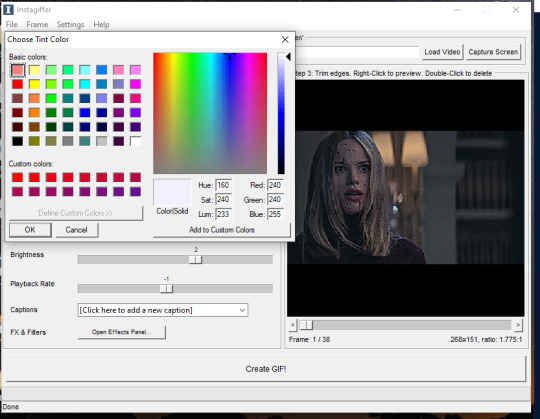
Then, I bring the “colorize” option down to 90 to increase the effects of shadows.
Last thing to do is click create gif! It’ll take a few seconds, especially for longer gifs, so be patient. ALSO there is a good chance you’re going to get a message saying something to the effect of “this gif is too big for tumblr’s photo limit.” Feel free to ignore that; the software being old means it still has the photo limit as 2gb when now it is 5-6gb so almost any gif you make will be considered “too big.”
Your gif now shows up in a preview tab! It should also show up as a file labeled “insta” on your desktop.
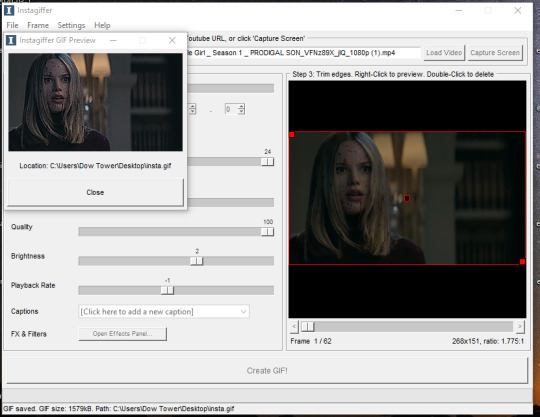
Here is the gif so far.

You can end here if you want. But when using instagiffer, I always go to ezgif to brighten up the colors further.
This part is basically the same as how you would color a gif you made in ezgif (see this tutorial) but I’ll quickly walk through what I do.
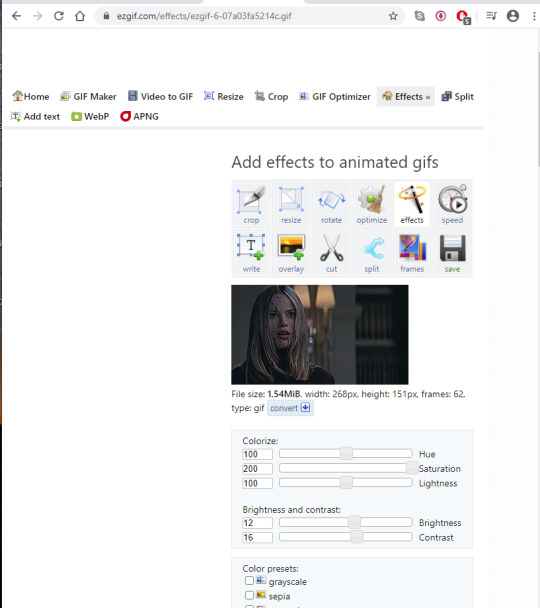
Go to ezgif.com/effects. Click chose file and upload your gif. First, you’re going to want to up the saturation, brightness, and contrast. You have to play around with these functions a lot because every scene is different, but in general, I have my saturation up pretty high and my brightness and contrast at at least 8. For a scene as dark and desaturated as this, I put saturation at 200, brightness at 12, and contrast at 16.
Afterwards, you want to go down to “color presets” and select “tint.” In my other tutorial, I recommended tinting with a light red or light blue, but for gifs made on instagiffer, I tend to use a light yellow/gold. I already tinted the gif purple in instagiffer so adding yellow in ezgif tends to balance it out. The shade I used for this gif is #fffcf0.
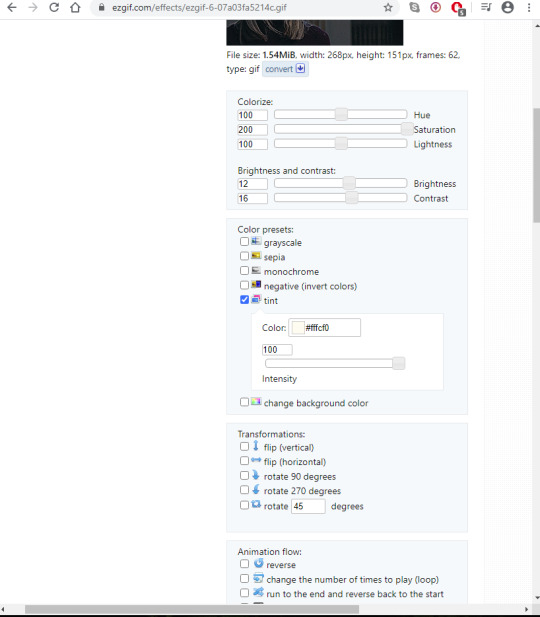
If the gif ends up looking too yellow, either decrease saturation, or click the “effects” button under the gif and add a layer of light purple to balance the colors more.
Your final gif should look like this.

2. Making a gif with the “capture screen” feature
This only changes the method of how you get gif frames. Everything related to resizing, coloring/effects, and adding captions is the same as above.
What if you don’t have a download of the thing you want to gif? The great thing about instagiffer is it has a built in screen recorder so you can gif any video you want, even if you can’t download it (or if you’re like me and don’t want to deal with downloading a 45 minute episode of something just to gif one scene).
To use this tool, click on the “capture screen” button on the top right corner next to “load video.” Then this screen will pop up.
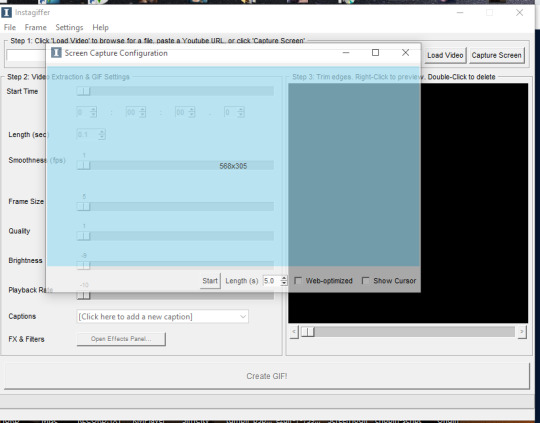
You’re going to want to take this blue screen over to the screen you want to capture. I’m going to put it over the youtube video I am giffing. Adjust it so the only thing it’s focused on is the video and set the length in seconds. I usually set it for longer than the clip is just because it’s easier to remove extra frames than rerecord a scene. There is also sometimes a lag so starting it right before the scene you want to gif helps with that. For example, if the clip I’m giffing is 3 seconds long, I set it to 3.5. Then start running the video and click “start” on the screen!
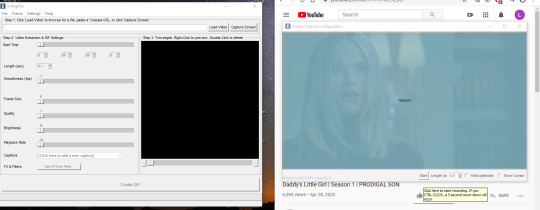
Your frames will now show up on instagiffer. Everything is the same, except you can’t change the frame rate or timing. Go ahead and delete frames that you don’t need by clicking on them. After that, just use the same resizing, and coloring method I outlined above.
Some notes:
When using the video download option, the effects you use will save, as will the size of the gif. So if you gif one part of a video, then move the time stamp to another part, it will stay in whatever size you put the gif as. However, when using screen capture, you have to resize the gif and go to the effects menu each time because they reset after each use of the screen recorder.
You can also just paste a youtube link into the white bar at the top of instagiffer to gif it, but I’ve found that the quality is much better if you download or use the capture screen.
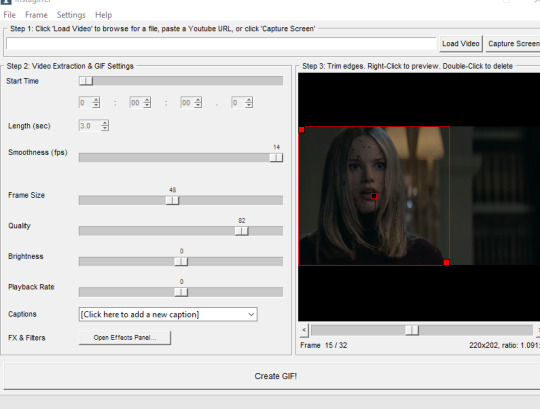
To crop a gif, move the red box around (just make sure it stays the right width size!)
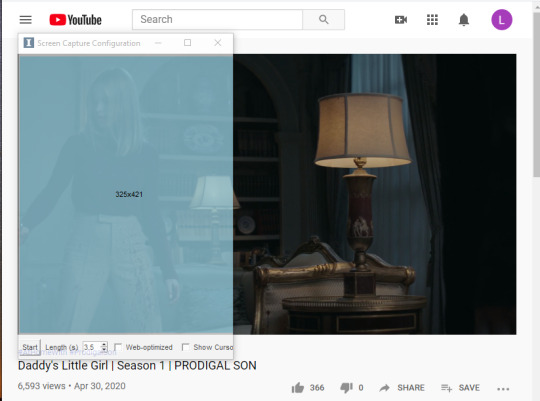
If you are using the screen recorder and only want to record part of the video (like just a characters outfit) size the gif recorder so it’s just surrounding the part of the video you want to see.
I hope this made sense lol, it took me a few days to write it all so please let me know if you have questions or need anything clarified! Support me on Ko-Fi if you’d like and are able 💕💕💕
#gif tutorial#giffing tutorial#giffing#gifmaking#mine#my gifs#blood //#long post#@ anon hope this helps!
82 notes
·
View notes