#unraid plex server
Explore tagged Tumblr posts
Visit Tumblr Blog
Explore Tumblr blogs with no restrictions, modern design and the best experience.
Last Seen Tumblr Blogs


Fun Fact
In 2020, Tumblr had 29.4 million users in the US.
Text
How to Install Unraid NAS: Complete Step-by-Step Guide for Beginners (2025)
If you’re looking to set up a powerful, flexible network-attached storage (NAS) system for your home media server or small business, Unraid is a brilliant choice. This comprehensive guide will walk you through the entire process to install Unraid NAS from start to finish, with all the tips and tricks for a successful setup in 2025. Unraid has become one of the most popular NAS operating systems…
#2025 nas guide#diy nas#home media server#home server setup#how to install unraid#network attached storage#private internet access unraid#small business nas#unraid backup solution#unraid beginner tutorial#unraid community applications#unraid data protection#unraid docker setup#unraid drive configuration#unraid hardware requirements#unraid licencing#unraid media server#unraid nas setup#unraid parity configuration#unraid plex server#unraid remote access#unraid server guide#unraid troubleshooting#unraid vpn configuration#unraid vs synology
1 note
·
View note
Text
An Ultimate Guide to Unraid OS NAS

Network Attached Storage (NAS) has become an essential component for both home and small business (SMB) environments. With the need for data accessibility, backup, and storage scalability, a reliable NAS system is indispensable. Among the various NAS solutions available, Unraid OS stands out due to its versatility, user-friendly interface, and robust feature set. This guide will explore what Unraid OS is, the advantages of using an Unraid OS NAS, and provide a detailed look at the LincPlus Unraid OS NAS, along with a step-by-step guide on how to use it.
What is Unraid?
Unraid is a Linux-based operating system designed to provide an easy-to-use and flexible platform for building and managing a NAS. Unlike traditional RAID systems, Unraid allows you to mix and match drives of different sizes, which can be added to the array as needed. This makes it an ideal choice for users who want to expand their storage capabilities over time without being constrained by identical drive requirements.
Key Features of Unraid:
Flexibility: Add any number of drives, of any size, and mix and match them in your array.
Simplicity: Easy-to-use web interface for managing your storage, VMs, and Docker containers.
Protection: Offers parity-based protection to safeguard against drive failures.
Scalability: Easily expand your storage by adding more drives.
Virtualization: Run virtual machines (VMs) directly from the NAS.
Docker Support: Host Docker containers to expand functionality with apps like Plex, Nextcloud, and more.
Unraid OS NAS
An Unraid OS NAS leverages the power of the Unraid operating system to provide a versatile and high-performance storage solution. This type of NAS is suitable for both home users who need a media server and small businesses requiring reliable storage for critical data.
Advantages of Unraid OS NAS:
Cost-Effective: Use off-the-shelf hardware and avoid the high costs of pre-built NAS systems.
Customizable: Build a NAS that fits your specific needs, whether it's for media streaming, data backup, or running applications.
Performance: Optimized for speed and efficiency, especially with 2.5GbE connectivity, ensuring fast data transfer rates.
User-Friendly: The intuitive web interface makes it easy for anyone to set up and manage.
Community Support: A large, active community provides a wealth of knowledge and assistance.
LincPlus Unraid OS NAS
One of the top choices for an Unraid OS NAS is the LincPlus NAS. This device offers an excellent balance of performance, features, and affordability, making it ideal for both home and SMB users.
Specifications:
Feature
Specification
CPU
Intel Celeron N5105
RAM
16GB DDR4
Storage
Supports up to 6 drives (HDD/SSD)
Network
2.5GbE port
Ports
USB 3.0, HDMI, and more
OS
Unraid OS pre-installed
How to Use the LincPlus Unraid OS NAS:
Setup and Installation:
Unbox the LincPlus NAS and connect it to your network using the 2.5GbE ports.
Attach your storage drives (HDDs or SSDs).
Power on the NAS and connect to it via a web browser using the provided IP address.
Initial Configuration:
Log in to the Unraid web interface.
Configure your array by adding your drives. Unraid will offer options for setting up parity drives for data protection.
Format the drives as required and start the array.
Adding Storage:
You can add additional drives to the array at any time. Unraid will incorporate them into the array and adjust parity as needed.
Mix and match drives of different sizes to maximize your storage efficiency.
Setting Up Shares:
Create user shares for different types of data (e.g., media, backups, documents).
Configure access permissions and set up network sharing (SMB, NFS, AFP).
Installing Applications:
Use the built-in Docker support to install applications like Plex, Nextcloud, or any other Docker container.
Alternatively, use the Community Applications plugin to browse and install from a wide range of available apps.
Running Virtual Machines:
Utilize the virtualization features to run VMs directly on the NAS.
Allocate CPU, RAM, and storage resources as needed for your VMs.
Backup and Maintenance:
Set up automated backups to ensure your data is protected.
Regularly check the health of your drives using the SMART monitoring tools built into Unraid.
Keep the Unraid OS updated to benefit from the latest features and security patches.
Conclusion
An Unraid OS NAS, particularly the LincPlus Unraid OS NAS, offers a powerful, flexible, and cost-effective solution for both home and SMB users. With its robust feature set, including 2.5GbE connectivity, easy scalability, and support for Docker and VMs, it stands out as an excellent choice for those looking to build a versatile and high-performance NAS system. By following the setup and usage guidelines, users can maximize the potential of their Unraid OS NAS, ensuring reliable and efficient data storage and management.
Additional Resources:
Unraid Official Website
By leveraging the capabilities of Unraid and the LincPlus NAS, you can build a storage solution that meets your unique needs, whether for personal use or to support your small business operations.
FAQ: Unraid OS NAS
What is Unraid OS and how does it differ from traditional RAID?
Answer: Unraid OS is a Linux-based operating system designed specifically for managing NAS devices. Unlike traditional RAID, Unraid allows you to use drives of different sizes and types in the same array. You can add new drives to expand your storage at any time, without needing to rebuild the array or match the sizes of existing drives. This flexibility makes Unraid ideal for users who plan to expand their storage over time.
What are the hardware requirements for running Unraid OS on a NAS?
Answer: To run Unraid OS, you'll need a 64-bit capable processor (x86_64), at least 2GB of RAM (though 4GB or more is recommended), and a USB flash drive of at least 1GB to boot the OS. The LincPlus Unraid OS NAS, for instance, comes with an Intel Celeron J4125 processor and 8GB of DDR4 RAM, which provides ample performance for most home and small business applications. Additionally, having 2.5GbE network ports enhances data transfer speeds.
Can I use different sizes and types of drives in my Unraid NAS?
Answer: Yes, one of the key advantages of Unraid is its ability to mix and match different sizes and types of drives within the same array. This flexibility allows you to maximize your storage capacity and easily expand your system over time without the need for drives to be identical. You can start with a few drives and add more as needed, making Unraid a cost-effective and scalable solution.
How do I ensure my data is protected on an Unraid NAS?
Answer: Unraid offers several methods to protect your data:
Parity Protection: By configuring one or two drives as parity drives, Unraid can recover data from a failed drive.
Automated Backups: Set up regular backups using plugins or Docker applications to ensure your data is always backed up.
SMART Monitoring: Utilize the SMART monitoring tools in Unraid to regularly check the health of your drives and receive alerts about potential issues.
Redundancy: Keep multiple copies of important data across different drives or even in different locations to prevent data loss from hardware failures.
source:
https://www.lincplustech.com/blogs/news/unraid-os-nas-guide
0 notes
Text
Emby server transcoding on live playback

#Emby server transcoding on live playback Pc
#Emby server transcoding on live playback download
#Emby server transcoding on live playback windows
If its on the Disk, too, you must stop the docker engine, execute the mover and recheck through "Compute", after the mover has finished its work. It shows if your data is located only on the SSD or on SSD and Disk. If you are changing the path of multiple containers, do this every time after you stopped the container, before changing the path!ģ.) This works only if appdata is already located on your SSD which happens only if you used the cache modes "prefer" or "only":Ĥ.) To be sure that your Plex files are only on your SSD, you must open "Shares" and Press "Compute" for your appdata share. Usually you set your Plex docker paths as follows:Īnd this path for your AppData Config Path (which contains the thumbnails, frequently updated database file, etc):īut instead, you should use this as your Config Path:īy that you bypass unraid's overhead (SHFS) and write directly to the cache disk.ġ.) Create a backup of your appdata folder! You use this tweak on your own risk!Ģ.) Before changing a path to Direct Disk Access you need to stop the container and wait for at least 1 minute or even better, execute this command to be sure that all data is written from the RAM to the drives: (I placed this post here because it should not be about the dockers but things around it and Unraid, please move it if you find a better place for it!) Thanks for a really great forum with so many help-full people Looking forward to getting some input from the power users! 👍 and updating this post with new things! Speed up the UI? have anyone tried to move the DB to RAM? and did it help? What other things or tips do you have to speed things up? Use direct /cache/ path: Big thanks to sharing this! (If you have space then adding Appdata/Docker.img really makes a difference!) Link from Reddit - I guess it would just be a matter of copying to /temp? (If you already have your Appdata on M.2 then might not be big difference).Moving transcoding to RAM (Update better guide for doing this)ĭB optimize over time (Mostly Plex not Emby) - people with large collection run this even if the DB is not corrupt? And afterwards should load much faster? Structure of media in each folder/optimize files for transcoding? HW encoding using Unraid Nvidia plugin + GPU So I would really like to collect all the tweaks and "Hack" done by others to increase performance of large Media servers doing transcodingįirst just to get the "normal" recommendation listed:Īppdata on cache drive (Fast as possible - SSD/M2) Thanks to the path substitution technology, clients can be allowed direct access to the server, which facilitates direct playback, without additional resource usage to transcode content.Unraid is great and I am like many others using my Unraid server for Plex (And of course other things) It is a UPnP media server that allows data sharing over the network, without requiring advanced configuration. Media Browser Server allows media file sharing and streaming between multiple devices and platforms.
#Emby server transcoding on live playback download
From the dashboard, you can easily change the server configuration, create and manage users, add media to the library and delete existing files, download and attach subtitles, artwork and metadata information to the media folders, extract chapter images and many more. Media Browser Server features a web-based interface that requires any modern web browser to run. Moreover, it takes care of the file transfers and the transcoding process, ensuring compatibility with the target device without requiring prior conversion. The server offers a secure and comfortable way to organize and manage your multimedia library, as well as keep an eye on the initiated connections.
#Emby server transcoding on live playback windows
And thanks to the available mobile apps for devices running on iOS, Android, Windows Phone or Windows 8, you can pick up exactly where you left off, regardless of your location. With its help, you can stream multimedia content to a compatible device that has a dedicated client installed, such as Emby Theater, Media Browser Classic or XBMC (now known as Kodi), which require an API key in order to initiate the connection.įurthermore, the developers provide media clients or plugins for Roku, Samsung Smart TVs and MediaPortal, allowing fast access to the media library.
#Emby server transcoding on live playback Pc
Previously known as Media Browser Server, Emby Server facilitates the communication and data transfer between your PC and DLNA-compliant devices in your network, enabling you to enjoy videos, music and photos on any platform.
0 notes
Text
Los mejores dispositivos para usar Plex Media Server
Si tienes una gran colección de películas, programas de televisión y de música, y por lo tanto quieres lograr a las mismas en todos tus dispositivos, Plex Media Server es una de las mejores soluciones para ti.
Así pues, para que puedas poner en funcionamiento el sistema, debes designar al menos uno de tus dispositivos como servidor. Suena admisiblemente, pero ¿Cuáles son los mejores dispositivos para usar como servidor de medios Plex?
Por esta razón, te mostraremos algunas opciones que puedes tener en cuenta al momento de que tengas que tomar esta valentía.
¿Qué es un Plex Media Server?
En primer lado, Plex viene dividido en dos componentes: el primero es el Plex Media Server y el segundo es Plex media Player.
Del mismo modo, el Plex Media Server es el responsable de lograr a tus vídeos y enviarlos a las aplicaciones de Plex Media Player en otros dispositivos.
Asimismo, el dispositivo en el que estás ejecutando la aplicación Plex Media Server necesita tener comunicación a todos tus vídeos. Y segundo, debe estar funcionando a toda hora y todo el día.
En este sentido, Plex Media Server está acondicionado de balde en Windows, Mac, Linux, unidades NAS y Docker. Igualmente hay una interpretación única para Android TV. Plex Media Player está acondicionado en todas las plataformas, desde Amazon Alexa hasta Oculus Go.
¿Cuál es el mejor dispositivo para usar Plex Media Server?
En esta parte, puedes escoger distintos tipos de opciones. Asimismo, es posible que puedas ejecutar la aplicación Plex Media Server en una laptop, computadora de escritorio, mini pc, Android TV y Raspberry Pi. Así como incluso, unidades de almacenamiento conectada a la red o cualquier disposivo en el que puedas instalar Linux.
Aquí tienes una inventario de dispositivos con sus ventajas y desventajas, para que elijas el que se ajuste a tus evacuación.
1.- Plex Media Server en Laptops
Una de las cosas que necesita Plex Media Server es potencia en la CPU. Por lo tanto, si no hay suficiente, acondicionado, tu servidor tendrá dificultades para transcodificar vídeos y no podrá manejar usuarios simultáneos.
Como tal, las laptops antiguas com poca potencia podrían no ser adecuadas, no obstante, si tienes una laptop de segunda o tercera coexistentes, podría servir muy admisiblemente y vale la pena intentarlo.
Del mismo modo, no es recomendable que ejecutes Plex Media Server en tu computadora portátil principal. Esto por la razón de que el sobrecalentamiento podría convertirse en un problema decano. Por lo tanto, si estás utilizando una laptop antigua, lo mejor es que compres una mecanismo de refrigeración para corregir este posible sentencia.
2.- Computadoras de escritorio
Una de las mayores ventajas que ofrece una computadora de escritorio es su potencia. Incluso si una PC con especificaciones de media grado podrá mejorar de modo significativa todo lo que Plex ejecute en ella.
Del mismo modo, si esperas que varias personas accedan a tu Plex media Server al mismo tiempo, seguramente la PC de escritorio es la mejor posibilidad.
Sin requisa, se aplica la misma advertencia sobre el uso de la máquina principal. ya que no querrás estar trabajando incómodo en un documento importante mientras tu tribu está usando Plex en diferentes pantallas.
3.- Mini PC
A aseverar verdad, las Mini PC casi siempre se pasan por stop como posibles dispositivos para Plex Media Server. Pero aún así, tienen algunos beneficios que pesan sobre las computadoras de escritorio.
estos beneficios incluyen: un último consumo de energía, menores costos si estás comprando un nuevo dispositivo y con frecuencia, último ruido.
Las Mini PC incluso logran una buena combinación entre tamaño y portabilidad. por supuesto, no estamos hablando de que caben en tu boolsillo, pero son fáciles de sumar detrás de un televisor o en un soporte para TV. Igualmente, hay docenas de Mini PC disponibles en una amplia grado de especificcaciones y precios.
4.- Android TV
¿Sería una Nvidia Shield tan bueno como un servidor Plex? Podría funcionar si textualmente estás buscando poco que básicamente puedas meter en un armario y olvidarte de que existe.
Así pues, Plex no ha podido usar dispositivos Android como servidores de medios desde la desaparición de la aplicación Plex Media Center hace unos pocos primaveras.
Sin requisa, parece acontecer una excepción y esta es Nvidia Shield. Del mismo modo, Nvidia ha establecido una asociación única con Plex y los dispositivos pueden desempeñarse como servidores de medios.
Y oportuno a que tanto la interpretación habitual de Nvidia Shield como la interpretación Pro tienen puertos USB, puedes conectar un disco duro forastero que contenga todas tus películas y programas de TV para transmitir el contenido. Así pues, no necesitas mover tus archivos a Nvidia Shield.
Por desgracia, Nvidia Shield tiene un problema considerable. Y es que varios usuarios han informado que este dispositivo no es apto para bibliotecas muy grandes. Algunos se quejan del espacio insuficiente para la transmisión en 4K, mientras que otros dicen que la coexistentes de miniaturas devora la memoria.
5.- Raspberry Pi

Asimismo, los dispositivos Raspberry Pi tienen pros y contras particulares cuando se usa con Plex Media Server.
La decano contra que podrías notar, es la desliz de potencia de la CPU. Del mismo modo, el Raspberry Pi 2 tiene una CPU Cortex-A7 de cuatro núcleos a 900 MHz próximo con 1GB de RAM. Igualmente, el Raspberry Pi 3 utiliza una CPU ARM Cortex-A53 de 1.2GHz y 1GB de RAM.
Por otra parte, están por debajo de los requisitos recomendados por este servidor de medios para dicha aplicación: al menos, un procesador Intel Core i3 y al menos 2GB de memoria RAM.
A pesar de esto, la Raspberry Pi tiene algunos pro formidables en este sentido. la más importante de ellas es su gran portabilidad. La web está llena de usuarios que buscan consejos sobre el dispositivo más rebajado para usar con Plex Media Server en hoteles y oficinas.
Y podemos decirte que la Raspberry Pi es la mejor posibilidad. Lo que si no esperes de este dispositivo, es que transcodifique contenido en 4K.
6.- Unidades NAS
Para las personas que necesitan lograr a su contenido multimedia de forma remota, una mecanismo NAS es la mejor opción. Demasiadas personas se han quejado de la desliz de confiabilidad de la aplicación en cuestión mientras se usa en una laptop o PC de escritorio; para que sea una opción confiable.
Como empresa, Plex se esmera en impulsar sus soluciones de disco NAS. Hay versiones personalizadas disponibles para unidades NAS de Synology, Netgear, QNAP, unRAID, Drobo, Asustor, Seagate, Película del Oeste Digital y TerraMaster.
Pero antiguamente de que vayas a una tienda a comprar uno, hay algunas cosas que debes considerar. Según la compañía, tu mecanismo NAS necesitará de una CPU x86. Y si compras un maniquí ARM, la transcodificación no estará acondicionado. Por lo tanto, deberás asegurarte de que tus medios de vídeo se guardan en un formato que tu Plex Media Player pueda cobijar.
Para que la reproducción sea más universal, la aplicación recomienda un contenedor MP4, el códec de video H.264, audio AAC y una tasa de bits de menos de 8Mbps.
En cambio, si deseas una mecanismo NAS para Plex, te recomendamos el QNAP TS-453Be 4-Bay Professional NAS, Synology DS218play. Igualmente te recomendamos el TerraMaster F4-220 4-Bay NAS.
¿Cuál es el mejor Plex Media Server?
Si eres un espectador ocasional, puedes usar esta aplicación en tu dispositivo principal sin muchas preocupaciones. Los usuarios más asiduos deberían considerar una computadora antigua dedicada o una Mini PC. Así pues, cualquier favorecido que delirio mucho debería comprar una Raspberry Pi. Y si el comunicación remoto es importante para ti, entonces tu mejor opción sería comprar una mecanismo NAS.
La entrada Los mejores dispositivos para usar Plex Media Server se publicó primero en El rincon de diego.
Por El rincon de diego
0 notes
Text
NAS devices and Restrictions
NAS devices and Restrictions
Plex Media Server for NAS devices
Plex Media Server is available for many NAS devices, including:
Asustor (Intel, ARM)
Drobo (ARM)
Netgear ReadyNAS (Intel, ARM)
QNAP (Intel, ARM)
Seagate (Intel, ARM)
Synology (Intel, ARM)
TerraMaster (Intel)
unRAID (Intel)
Western Digital My Cloud
Information about other Linux-based NASs can be found on the Plex Media Server for Linux forum.

Limitations of NAS
W…
View On WordPress
0 notes
Link
Ask HN: What do you self-host? 34 by aeleos | 23 comments on Hacker News. I know this is has been posted before but that was a few years ago so I wanted to restart the discussion, as I love hearing about what people host at home. I am currently running an Unraid server with some docker containers, here are a few of them: Plex, Radarr, Sonarr, Ombi, NZBGet, Bitwarden, Storj, Hyrda, Nextcloud, NginxProxyManager, Unifi, Pihole, OpenVPN, InfluxDB, Grafana.
0 notes
Text
New top story on Hacker News: Ask HN: What do you self-host?
Ask HN: What do you self-host? 35 by aeleos | 24 comments on Hacker News. I know this is has been posted before but that was a few years ago so I wanted to restart the discussion, as I love hearing about what people host at home. I am currently running an Unraid server with some docker containers, here are a few of them: Plex, Radarr, Sonarr, Ombi, NZBGet, Bitwarden, Storj, Hyrda, Nextcloud, NginxProxyManager, Unifi, Pihole, OpenVPN, InfluxDB, Grafana. from Blogger https://ift.tt/2MFcs6R
0 notes
Link
Ask HN: What do you self-host? 38 by aeleos | 24 comments on Hacker News. I know this is has been posted before but that was a few years ago so I wanted to restart the discussion, as I love hearing about what people host at home. I am currently running an Unraid server with some docker containers, here are a few of them: Plex, Radarr, Sonarr, Ombi, NZBGet, Bitwarden, Storj, Hyrda, Nextcloud, NginxProxyManager, Unifi, Pihole, OpenVPN, InfluxDB, Grafana.
0 notes
Link
I know this is has been posted before but that was a few years ago so I wanted to restart the discussion, as I love hearing about what people host at home.
I am currently running an Unraid server with some docker containers, here are a few of them: Plex, Radarr, Sonarr, Ombi, NZBGet, Bitwarden, Storj, Hyrda, Nextcloud, NginxProxyManager, Unifi, Pihole, OpenVPN, InfluxDB, Grafana.
Comments URL: https://news.ycombinator.com/item?id=21235957
Points: 38
# Comments: 26
0 notes
Link
V1.0 - Original ReleaseV1.1 - Added more to "So what exactly do I need to buy?" to clarify the details if you already own a PC that you'd use for Plex.V1.2 - Updated RAID/Backup section.Here’s what you need for a Plex server for local content (assuming a “good” playback device) and for some remote streaming (assuming a “good” internet upload rate). I’ll go over exactly what this means, what you get, and what you need to buy. I’ll also go over what is unnecessary spend, and why some people spend.Mission statement: What do I WANT to do? The objective is to run a Plex server, be able to identify and catalog the Plex content (Radarr, Sonarr are typical), to be able to download the Plex content (NZBGet is typical), and honestly, that’s about all you need. Tautulli is commonly used for playback history (what movies is Joe watching, and did transcoding work for Joe? Who has watched XYZ show in the last week?) but Plex now has excellent data on playback transcoding details and on basic media play history - and the web GUI does a great job showing you exactly what part of your system - CPU, disk, RAM - is 'stressed' or busy.So don’t I need a supermegaCPU? Or two? More is better, right? And a Xeon is even better, right? And a big, noisy server box too? If you don’t plan to upload (share content remotely) with others, and if you have modern playback devices like an nVidia Shield, reasonably modern Roku (2014 or better), AppleTV 4 or better, or Amazon Fire Stick 4k or v2 of non-4k, or better, you literally don’t need anything more than a cheap ARM-class CPU or old Intel Celeron-class CPU running Linux and Plex, sharing a USB drive of your movies. That said, sometimes you might need to “transcode” – to change the media format of your media – in order to play subtitles, serve to a new device, serve to a device running a web browser rather than AppleTV/FireStick, etc. To do that, you are transcoding. And modern Intel hardware – or a modern nVidia video card – can do this very, very efficiently. So efficiently that it’s mostly foolish to run older hardware or try to brute-force transcoding with Plex nowadays – either get a cheap nVidia 1050/1050Ti graphics card for your Plex server, or get a modern Intel CPU with integrated graphics (an i3-9100 is a great low-end choice). Sure, you could get a superfast AMD CPU for $300, but why? Save your money and your electricity! Put your expensive CPU on your desk, and keep the 1050/low-end Intel CPU on the cheap Plex server where it belongs.What else do I need? You need about 4GB of RAM, a 240GB SSD for the C: drive, and then for the D: (Media) drive you need enough space to hold all of your media. A cheap 10TB USB 5400 RPM hard drive is $160 these days and is a good starter setup. Add another 10TB USB drive in the future and break out “Movies” and “TV” to each drive if you want to ever get fancy.Don’t I need RAID5 with 5-6 disks? Redundancy! Backups! Not really. You can get all of this content again by a simple download; why bother with complicated setups? Keep it simple, keep it cheap. * There is a bit of risk in this, because if you lose the USB hard drive (theft, dropping, dog chews it up, etc.) your content is gone forever. Only you can decide if having copies of content is worth having another backup disk. Windows 10 comes with Storage Spaces free, which can assist, for those wanting redundancy (but note this isn't a backup): https://ift.tt/2PQTNbP has a brief primer on the topic. For a literal backup, Macrium Reflect Free is a good free backup product: https://ift.tt/2YCcC6I what exactly do I need to buy? A cheap i3-8100, i3-9100, i5-8400, i5-9400-based system is really all that you need. Anything more is typically wasted. If you have 4GB or 8GB of RAM, you’re all set. Start with that. Buy PlexPass. Turn on hardware-based transcoding in Plex. Then you’ll use Intel’s graphics acceleration for transcoding your content, and for most people, that will be plenty of horsepower right there. If you needed more (and most won’t!) an nVidia 1050 or 1050Ti will handle 7-15 transcodes and is $80-$120 these days; the “driver patch” required to make it handle over 2 transcodes should take about 5 minutes to put into place. Then you just need a 10TB USB drive, and you’re literally done! And the best part - if you already own a PC - even an old one - you might consider just buying an nVidia 1050/1050Ti card (for transcoding capabilities), putting it into the PC, and then .. you're done! Easy, fast, and affordable - for what just a few years ago would be considered high-end workstation performance.So now I want to stream to my 10 best friends remotely– what do I do? This setup will literally do that. However, you’ll likely want to cap your upload rate (per-client) to 4Mbps or so, and you’ll likely want to get a pretty good internet upload rate (# clients * 4Mbps is a good start)… Given that all of your friends won’t be watching all the time, a 20Mbps upload rate is a good start for trying out remote sharing. Speedtest.net gives a good estimate of speeds. Then modify your settings to suit your setup.So now I want to stream to 10 AppleTVs in my house….This setup will easily do that. You’ll likely want to wire (gigabit) the server to your router, and wireless may strain a bit with so many concurrent streams, but this server can easily handle that and more. Since AppleTV plays most content natively (without transcoding) you won’t be stressing the CPU/GPU in this at all.So now I want to stream to 10 Chrome web browser users in my house... This setup will do that. Transcoding will be required, since Chrome can't play back some common formats, but Plex handles all the heavy lifting. Ensure your wifi network is up to the task.What about 4K? I want to transcode 4K. Transcoding 4K doesn’t work well because HDR (a technology used to make 4K look fantastic) doesn’t transcode well (yet), and so to share 4K content locally, this server can easily do that (assuming your network can handle it) but to stream and share remotely, either your internet upload rate must be very, very fast (to avoid transcoding!) or … this won’t work. This (HDR transcoding) is something to be worked on and solved by Plex; for now there is no good solution. So for now, if you must stream something to others remotely, get both the 4K version and the 1080p version – 4K for yourself, 1080p for others.I still don’t understand transcoding. Transcoding takes media in one format and puts it into another format; that’s all. If your media is in format XYZ and your AppleTV doesn’t understand that format, Plex handles things so your media becomes playable on the AppleTV. Fortunately, there’s very little that isn’t directly playable on the AppleTV or modern Roku or nVidia Shield or Amazon FireStick device, so transcoding is very rarely needed on local playback (local networks). Transcoding is usually required when you share your media to others on other (remote) networks, where, due to limited bandwidth, you must compress (shrink) your media’s size so you can set it over the internet to your friend’s AppleTV (or other Plex playback device). Hence the need for transcoding, a modern Intel CPU, or an nVidia 1050/1050Ti.Does more RAM help Plex? Plex doesn’t need much RAM. 4GB is fine.Does having an SSD to store my TV/movies media help? Not really. Even with 10 clients, you just don’t need it. Plex buffering and playback speeds are efficient and superfast media generally isn’t required.I have 50GB Blueray MKVs! Everything you’re saying is wrong! Yes, in some scenarios, with massive, high-bandwidth files, sometimes you will need to transcode more often than I’m indicating here, and sometimes you will need more i/o or bandwidth. If you are the type that MUST have the best quality, and you MUST have 50GB 3-hour movie files (rather than 8-15 GB movie files), you may want to check your i/o on your server when you get 10 concurrent shares / movie playbacks going at once. For the typical user with one or two playbacks locally and 2-3 remote streams, a single USB drive setup is easy, economical, and plenty fast.I say that lightly – in other words, in the rare case in which you have an unusual scenario with super-high bandwidth files, sometimes you might have an issue. So adjust accordingly. This guide is made for the 99% that don’t stress the server that much, with that many concurrent connections.Why do some people buy 2012-era hardware to run Plex? I've done this myself. Until recently, Plex hardware-assisted transcoding didn't work very well, but now, with good support for nVidia hardware and Intel iGPU hardware, and with the introduction of the nVidia Plex transcoding patch, there is no reason to do anything else. That said, 2012-era hardware is nice because it tends to be very cheap, and some people love running old hardware because "it's a server; it's tough!"; either of those two reasons might be enough to appeal to you. Bear in mind that in the past 7 years, hardware has gotten quieter, far less power-hungry, and far simpler to support. My advice: avoid the old stuff unless you've already bought it. If you already bought it, add an nVidia 1050, consider adding a USB3 PCIe/PCI card, and add the 10TB USB drive, and call it a day.But UNRAID! Linux Docker! New Technologies! If you're an IT technologist, or you do this for a living, those are great choices. If you just want a Plex server, keep it simple, energy efficient, and fast and easy to troubleshoot. via /r/PleX
0 notes
Text
Windows : Plex Media Server for Windows
After completing this guide, you will be able to build a media server that meets the following criteria:
Transcoding: Transcode media to portable devices
Meta data: Automatically scrape movies, music, and TV series meta data
Music: Play music on all devices from a shared library
Storage: Store and backup media files with RAID capability
Streaming: Stream media to HTPC using SMB and other protocols
Reliability: Provide peace of mind with minimal amount of maintenance
Energy efficiency: Consume as little power as possible
Price: Reasonably priced
Choose Media Server Hardware
Either your current or spare PC :
When building your own media server, it is good to keep these basic recommendations in mind:
3 GHz dual-core processor (2.4 GHz is a minimum for 1080p transcoding)
4 GB RAM (minimum 2 GB)
3 TB hard drives
Gigabit Ethernet recommended for HD streaming
or
On a smaller pc – the Intel NUC [Celeron Processor]
get the set here :
/|\
//ws-in.amazon-adsystem.com/widgets/q?ServiceVersion=20070822&OneJS=1&Operation=GetAdHtml&MarketPlace=IN&source=ac&ref=tf_til&ad_type=product_link&tracking_id=okinteresting-21&marketplace=amazon®ion=IN&placement=B00XPVRR5M&asins=B00XPVRR5M&linkId=f401c6ba145156c783f7e09e65963fce&show_border=false&link_opens_in_new_window=false&price_color=333333&title_color=0066c0&bg_color=ffffff //ws-in.amazon-adsystem.com/widgets/q?ServiceVersion=20070822&OneJS=1&Operation=GetAdHtml&MarketPlace=IN&source=ac&ref=tf_til&ad_type=product_link&tracking_id=okinteresting-21&marketplace=amazon®ion=IN&placement=B005LDLV6S&asins=B005LDLV6S&linkId=cd7c2b5a1dbc45de31a55dbee270e748&show_border=false&link_opens_in_new_window=false&price_color=333333&title_color=0066c0&bg_color=ffffff //ws-in.amazon-adsystem.com/widgets/q?ServiceVersion=20070822&OneJS=1&Operation=GetAdHtml&MarketPlace=IN&source=ac&ref=tf_til&ad_type=product_link&tracking_id=okinteresting-21&marketplace=amazon®ion=IN&placement=B01FJ4UN76&asins=B01FJ4UN76&linkId=4c2d9ded7c4e1d7620a6b7d6a79dce28&show_border=false&link_opens_in_new_window=false&price_color=333333&title_color=0066c0&bg_color=ffffff
Set Up Windows Storage Spaces
You may be surprised to learn that Windows allows you to organize hard disks into storage pools, which use RAID-style mirroring and parity techniques to keep your media files safe.
This new capability is called Storage Spaces that is included by default in Windows.
I was positively surprised how easy it was to set up storage spaces. In fact, after installing 2 x 1TB spare hard drives to the media server case, it took me only a couple of minutes to configure the system. Configure storage spaces
In this section, you will learn in practice the steps you need to take to keep your data safe with Windows storage spaces.
First, go to Control Panel and select administration options under System and Security. Select the “create a new pool and storage space” option, and you will be prompted to create your first storage space. You will see a list of available hard drives that can be incorporated into your pool. In order to be able to utilize RAID-style resiliency features, you should use at least two hard drives. Next, enter a name, drive letter, and resiliency type for your storage space. I decided to use two-way mirroring resiliency type to protect my data from a single drive failure.
Finally, click “Create storage space”, and your storage pool will be created. Now, set up is completed and you can start copying media files to the storage space. Set Up Plex Media Server
Plex Media Server is a back-end application that you have running all the time at home on various platforms such as Windows, Mac OSX and Linux. The Plex Media Center is actually a fork of the open-source project, XBMC, but particularly the Plex Media Server is closed-code and actively developed by the Plex team.
In addition to it’s own front-end software, Plex Media Center, the back-end server application is compatible with many other front-ends such as XBMC (with Plexbmc add-on). There are also mobile front-end apps available on iOS, Android and Windows Phone operating system.
Plex consist of three main components: Media Server that runs on your Windows, Mac OSX, or Linux computer Media Manager that points Media Server to media folders and automatically scrapes the meta data and organizes them into a beautiful media library Plex clients that provides a simple front-end user interface to access media
The most interesting feature of Plex Media Server is the ability to transcode your videos depending on your device and network. In practice, this means that it will dynamically squish videos so that they still play smoothly on your mobile phone or your iPad over wireless network.
Another great feature of the Plex is that you can continue the video file from where you left off on any device.
Setting up the Plex Media Server is easy. Simply follow these steps, and you will have it set up in less than an hour. These instructions are for Windows, but you can also find instructions to set up Plex Media Server on unRAID Linux OS. Install and Configure Plex Media Server Download the Plex Media Server here. Install the server application on your computer Open the Plex Media Server by right clicking the application icon on your start bar and selecting “Media Manager” In order to create a new folder, click “Add a section” under “My Library”, and select the folder where the media files are located Repeat step four to link all your media folders into Plex Media Server Allow the PMS to go through your media files and scrape the meta data
Now you are ready to add some online content. Configure myPlex Service
MyPlex is a free service that allows you to watch your media over the Internet, share it with friends, or bookmark interesting videos for later viewing. First, go to plex.tv, and setup your free account.
While setting up myPlex service is easy, many people are facing technical issues when attempting to get the connection working over the Internet. A common error message with myPlex is, “myPlex was unable to connect to your server”. Usually, this connection problem relates to the firewall port forwarding issues. You will need to allow the TCP 32400 port through your router’s firewall to enable access for the Plex Media Server. The specific steps to allow port forwarding depends on your router model, so you should check the instructions from portforward.com.
I was not able to get the myPlex service working even after configuring the port forwarding properly. In my particular case, the issue was my router’s firewall settings. After disabling the active firewall in the routers security settings, I was able to get the myPlex working. Add Channels
You can find and install approved channels by going to the “Channel Directory” section.
There are Hulu and Netflix channels available as well. Unfortunately, on Plex, you can forget Hulu and Netflix channels as they do not work (at least according to my experience).
Fortunately, there is an easy way to get Hulu, Netflix and other premium content channels working with PlayOn Media Server.
That’s it; you have completed setting up your own media server. Set Up Plex Clients
Now, you are ready to set up one of the Plex Clients, such as Plex Home Theater (they have rebranded the Plex Media Center desktop app), PleXBMC add-on for XBMC, Plex app for iOS, Plex app for Windows, or other Plex compatible devices. You can also simply use the Plex Web Browser to access and play media files.
However, the most comprehensive Plex client is the Plex Home Theater (a.k.a Media Center) software that is available on Windows, Mac OS X, Apple TV2, and Raspberry Pi. Just download the front-end application here, install it, and you are ready to enjoy your media with Plex.
By the way, if you want to make your Plex client look even cooler, you should download a custom skin called PlexAeon, which is a port from the popular Aeon skin on XBMC.
Download the latest version of the PlexAeon skin here.
Unzip the PlexAeon-master.zip, and copy the content of the PlexAeon-master folder into Program FilesPlexPlex Media Centeraddonsskin.plexaeon (you will need to create the skin.plexaeon folder yourself).
Launch Plex Home Theater (a.k.a Media Center), and go to Preferences > Appearance > Skin > PlexAeon to select the custom skin. Summary
In this article, you have learned how to set up Plex Media Server with Windows 8 Storage Spaces in order to build a media server box to rule them all.
Plex’s strengths are in finding all of your movie and music metadata without any problem, while the channel app store is simple and easy to use. Plex really shines when you need to have your media collection available and in sync in multiple rooms with TVs, and you want to access media files with your table or Roku type media streaming devices.
If your main consideration is to stream online content channels instead of local media files, then you should consider trying PlayOn Media Serverinstead of Plex, as it is much more capable to stream premium content channels.
On the other hand, if you have only one room and will be using a HTPC, then Kodi Media Center should be your main consideration.
source : https://goo.gl/aVvdg3
via Blogger https://ift.tt/2PhlVAI
from WordPress https://ift.tt/2NvNDJI
0 notes
Video
youtube
Buy it on Amazon - https://ift.tt/2vRxj1l - Buy at Best Price! HPE 819185-001 ProLiant MicroServer Gen8 Entry Server, 4 GB RAM, No HDD, Matrox G200, Black/Silver -- Click the link to buy now or to read the 2 4 & 5 Star Reviews.Subscribe to our Channel: https://www.youtube.com/channel/UCSHsCmSPA5laL8dnFHxSqVg?sub_confirmation=1 Buy at Best Price! HPE 819185-001 ProLiant MicroServer Gen8 Entry Server, 4 GB RAM, No HDD, Matrox G200, Black/Silver Awesome, small and near silent server. Works great for SMB or even as an inexpensive home NAS / Plex server (I have one for work, liked it so much I replaced my much larger and louder home media server (running unRAID 6.x). Works like a champ. The iLO management platform works great for amdmisitering this machine as a headless box (no monitor, mouse or keyboard needed). HP even has an iLO remote management app for my iPad, which works very well). If your in the market for a powerful little serve... Reviewer : Jeff D. These little guys while a little slower on the processor they are great for the form factor. Small quite and you can fill the crap out of them with hard drives. ... Reviewer : Mcchan Rawson Click https://ift.tt/2vRxj1l to buy now on Amazon or to read more reviews. Hp ProLiant Micro server Gen8 is available with tool-less access to hard drives, Memory, and PCI slots for simple installation or Upgrade Hp ProLiant Micro server Gen8 allows you to personalize your Micro server with the front bezel faceplate Kit Hp ProLiant Micro server Gen8 support PS110 wireless vpn router which provide an access point for wireless connectivity in office as well as vpn technology for secure remote accessClick https://ift.tt/2vRxj1l to buy now on Amazon or to read more reviews. ***Let Us Know What You Think… Comment Below!!*** Watch my other review Videos – https://www.youtube.com/channel/UCSHsCmSPA5laL8dnFHxSqVg Subscribe to our Channel: https://www.youtube.com/channel/UCSHsCmSPA5laL8dnFHxSqVg?sub_confirmation=1 #HPE, #HPE 819185-001 ProLiant MicroServer Gen8 Entry Server, 4 GB RAM, No HDD, Matrox G200, Black/Silver This is a review video for : B0150O8G1U Manufacture : HPE Related Videos in Channel
0 notes
Text
COD Dual CPU Server Build 2017 - Part 1 - The Parts List
New Article has been published on http://computingondemand.com/cod-dual-cpu-server-build-2017-part-1-parts-list/
COD Dual CPU Server Build 2017 - Part 1 - The Parts List

It comes as no surprise to my friends and family that the time has come for me to set aside some of my storage devices and server builds of the past for something bigger and better in 2017. Over the years, we have embarked on a couple of projects related to building a NAS and piecing together a 40TB server using parts left over. This year, I have decided that I would go a few steps further…I decided that this build would last more than just a year. With that said, I started to scour the web for components and started planning the next CODServer, but why?
To be honest with you, an 8-bay QNAP TS-863+ had been doing just fine as the hub of my home network. With eight 4TB drives humming away in the background and PLEX Media Server doing its thing, there had been little need for me to stray. The QNAP platform had provided me with everything I needed. I could install apps like Sonarr, SABNZBD, Crashplan, and much more while the container station provided me with a virtualization platform to run other operating systems to perform functions I couldn’t squeeze out of the NAS itself. The only drawback was when I got the dreaded message telling me my volumes were nearly full.
I suppose I could have just spun up one of the other NAS and solved the problem using some clever iSCSI magic, but I am now looking for consolidation. Instead of running a bunch of devices, I want one device. My home office had become a whirlwind of spinning disks and fans. It was the warmest room in the house and with all the LEDs blinking, it looked like the inside of a spaceship.
With the decision made, and support from my wife secured, I started scratching down a list of components and hitting all the regular sites to plan the build. Having done my homework, I pieced together what would become the server that would last at least another year. Luckily, there was a slew of components I already had, however, for your purposes, I will list them out for a total build cost. This would be, by far, the most expensive storage build COD has had to date… so take a deep breath, get your safety goggles on, and let’s dive right in.
The Case: SilverStone RM420
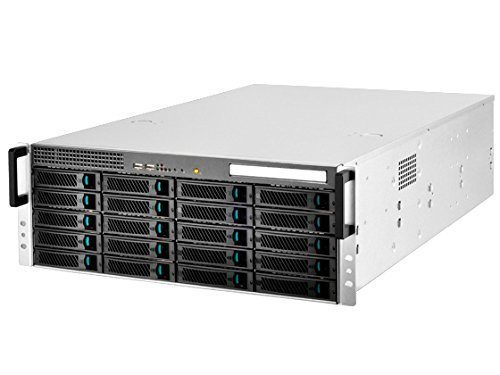
The case for this build would be one of the most researched bits of hardware. I had seen plenty of folks piecing together unRAID builds with NORCO 4020 chassis and absolutely raving about them. While the NORCOs looked good, I just seem to have an affinity towards SilverStone. Their products are always high quality, and I know what to expect. First thing I did when looking for a case for this build was hit the SilverStone website, that is when I came across the SilverStone RM420.
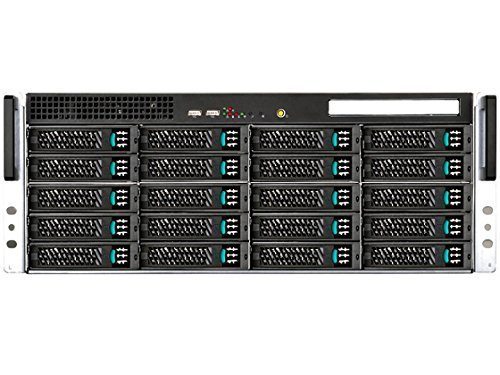
This case really has it all. It is a 4U chassis with 20 drive bays, tons of cooling, and can home an SSI-EEB motherboard. The backplane uses SFF8087 connectors and sits right in front of four hot-swappable 80mm fans. The case can not only house twenty drives, but it can also support a 2.5″ drive as well as a slim optical drive. Stay tuned for a detailed review.
Budget Choice: Norco 4220 $329.99 – 20 Bay Hotswap Economy Choice: Rosewill RSV-L4412 $229.99 – 12 Bay Hotswap
Price: $599.99 Marketplace: Amazon.com
BUY NOW: AMAZON
A big thank you to SilverStone for sponsoring the case for this build, stay tuned for our full review.
CPU(s): Intel XEON E5-2670s

It may be one of the best-kept geek secrets out there; you can get some great processors on the cheap from dismembered servers on eBay. I am not particularly worried about “new”. You may know this by my home full of refurbished or open box media and computer equipment. I found a pair of E5-2670’s on ebay waiting to find a home in my upcoming server build. The E5-2670 is by no means today’s best processor, but with 8 cores and 2.60GHz each, they will definitely serve you well. Pairing these puppies up will give me 16 cores to play around with. Perfect for a home server build.
Price: $216.00 Marketplace: ebay
Memory: Samsung 128GB (16x8GB) DDR3-1333 ECC REGISTERED
With RAM on the move, I figured buying a stick for each available slot would be a good idea. While you will not likely need 128GB of RAM, having the room to grow means this server will last just a bit longer. Can you get away with 64GB, 32GB, even 16GB? I would say yes, depending on use. I plan on running a few applications and a virutal machine here or there… so why not.
Price: $240.00 Marketplace: ebay
Budget Choice: Anything on sale
SAS RAID Controller: HighPoint RocketRAID 2720SGL
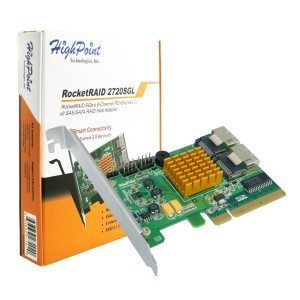
No server would be complete without the ability to connect a few hard drives. Typically, NAS run variations of Linux and provide some software RAID functionality. With Software RAID, it is easy to expand arrays. For a few extra dollars, you can get a SAS card that is capable of connecting more drives than a SATA controller card and is RAID capable giving you some options. With this in mind, the HighPoint RocketRAID 2720SGL 8-Port PCI Express controller card is a perfect fit. There are two SFF-8087 mini-SAS connectors and the card is capable of transfer rates of up to 6Gb/s. Additionally, the card supports passthrough so you are not limited to a controller based RAID array.
If you are in the market to save some coin, you could easily save a few bucks by buying a used controller from ebay. I have no reservations about it. In fact, my original purchase for this build was an LSI MegaRAID 9261-8i that I purchased for $92.75.
Budget Choice: LSI MegaRAID 9261-8i – $92.75
Price: Free (leftover), but if you were to buy $161.99 Marketplace: Amazon
BUY NOW: AMAZON
SAS Expander: Intel RAID Expander Card (RES2SV240)

Having a case with backplanes that support SFF8087 means that a SAS expander is in order. Incorporating an expander card helps to relieve the price burden on more robust controller cards. It doesn’t hurt that it comes with all the cables necessary either saving you some money on additional accessories. While there is no shortage of options out there, this one seemed to be the most affordable I could find.
Price: $218.03 Marketplace: Amazon
BUY NOW: AMAZON
CPU Cooling: 2 x NH-U9DXi4
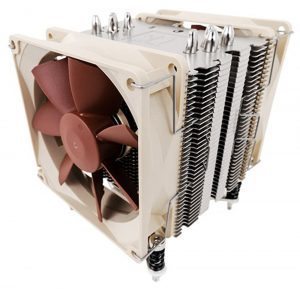
You know as well as I do, Noctua has a reputation for producing high-quality CPU cooling. When it came to cooling my E5’s, the first place I turned to was Noctua. The NH-U9DXi4s sport dual 92mm SSO bearing fans, 4 heat pipes, and more than 3800cm^2 of surface area. These 4U compatible coolers are a no brainer. Although they aren’t the cheapest option I looked at, their reputation for quality and my experience with their products makes the additional money easily worthwile.
Our budget choice for CPU cooling isn’t exactly a bottom of the barrel pick. The Supermicro coolers have withstood the test of time and have the endurance and quality to be high on anyone’s list for quality components.
Budget Choice: Supermicro 4U SNK-P0050AP4 $41.99
Price: 2x $55.99 Marketplace: Amazon
BUY NOW: AMAZON
Motherboard: ASRock Rack EP2C602-4L/D16
The second most expensive component in this build is the motherboard. There was plenty of competition out there from some pretty recognizable names, but I needed some bang for my buck on this build. The EP2C602-4L/D16 supports dual LGA2011 CPUs and features the Intel C602 Chipset. Aside from that, there are four ethernet ports, 6 x SATA3, 8 x SATA2, integrated graphics, and supports up to 512GB of RAM! Form factor? SSI EEB (12.0 x13.0 inch / 30.5 x 26.7 cm).
Dual Socket R (LGA2011), supports Intel Xeon 5-1600/2600/4600 & v2 series
Supports Quad Channel DDR3 1866 memory, 16 DIMM slots, Max. 512GB
4 PCIe 3.0 x16, 1 PCIe 3.0 x4, 1 PCI
ASPEED AST2300 graphics, 1 VGA : D-Sub
SATA2 (3.0 Gb/s) by Intel C602, Supports RAID 0, 1, 5, 10
2 SATA3 (6.0 Gb/s) by Intel C602, Supports RAID 0, 1
7 USB 2.0 (2 from rear I/O, 4 from onboard headers, 1 Type A port)
Integrated IPMI 2.0 with KVM and Dedicated LAN (RTL8211E)
4 Intel 82574L LAN, Support PCIE Quad Gigabit LAN
If you decide that a single processor will do, you really open your doors to plenty of options. However, there are so many that I just couldn’t pin down anything that would be the best fit for a budget option. If I were going to go single CPU, it would end up being some leftover motherboard and CPU I have lying around.
Budget Choice: ASRock Rack Motherboard EP2C612D16C-4L – $319.99
Price: $425.55 Marketplace: Amazon
BUY NOW: AMAZON
OS Hard Drive: Samsung SSD 850 Pro (256GB)
I have been a longstanding fan of separating my OS from my data. Having a dedicated SSD for the operating system allows me to quickly switch things up if I need to without too much hassle. Samsung SSD’s have provided me with plenty of performance over the years and have proven to be reliable enough for me to slap this OS on it without much worry. I could have used a drive in the 128GB size range, but I just happen to have this 256GB lying around collecting dust.
With read and write speeds in the 500+ MB/s range, there is plenty of horsepower.
Unfortunately, I didn’t have two of these lying around, so I used my Crucial MX200 500GB drive as dedicated storage for HyperV.
Budget Choice: SanDisk SSD PLUS 120GB – $44.99
Price: $129.00 Marketplace: Amazon
BUY NOW: AMAZON
Power Supply: Corsair HXi Series, HX1000i

In an ideal world, I would have outfitted this server with redundant power supplies. However, living in the real world, I don���t have the budget, nor the separate poles to make it worthwhile. With that in mind, I have to ensure that my efficient PSU would power the dual Xeons and the 22 hard drives this system has running. To be honest with you, 1000 Watts may be a bit much, but with a 80+ certification, the unused power will be unused efficiently.
Budget Choice: Rosewill RBR1000-M 1000-Watt – $109.46
Price: $207.90 Marketplace: Amazon
BUY NOW: AMAZON
Storage (HDD): Anything I can get my hands on
As for filling this thing with hard drives, I can’t say that I am going to source any specific drive. There are a lot of great options out there but many of them are just not within my reach. As for me, I will be pilfering drives from various NAS I have around to fill this thing as much as I can. That means a mix of Seagate NAS drives, some Iron Wolf Drives, some Hitachi NAS Drives, some Hitachi standard drives, and whatever else may be sitting about in the basement.
With the parts ordered and delivered, piecing together this 2017 COD Server will be the next order of business. With a total cost of $2310.44 as configured, it may seem like a steep investment, but in all reality, it really isn’t. It falls right in line with many high-quality 10-bay NAS making it an easy investment if you are shopping for storage.
Device Description QTY Unit Price Total Price OS Drive Samsung SSD 850 Pro (256GB) 1 $ 129.00 $ 129.00 Motherboard ASRock Rack EP2C602-4L/D16 1 $ 425.55 $ 425.55 CPU Cooler Noctua NH-U9DXi4 2 $ 55.99 $ 111.98 Expander Intel RAID Expander Card (RES2SV240) 1 $ 218.03 $ 218.03 Controller HighPoint RocketRAID 2720SGL 1 $ 161.99 $ 161.99 Memory Samsung 128GB (16x8GB) DDR3-1333 ECC REGISTERED 1 $ 240.00 $ 240.00 CPU Intel XEON E5-2670s 2 $ 108.00 $ 216.00 Case SilverStone RM420 1 $ 599.99 $ 599.99 PSU Corsair HXi Series, HX1000i 1 $ 207.90 $ 207.90 Total $ 2,310.44
You can save yourself some money by switching around some of the components of this build. For instance, you can save $100 by switching out the PSU, $80 for the SSD, $70 on the controller, and more than $250 on the case bringing the total cost down to $1,563.19, cheaper than a 10-Bay QNAP NAS!
Device Description QTY Unit Price Total Price OS Drive SanDisk SSD PLUS 120GB 1 $ 44.99 $ 44.99 Motherboard ASRock Rack EP2C612D16C-4L 1 $ 319.99 $ 319.99 CPU Cooler Supermicro 4U SNK-P0050AP4 $41.99 2 $ 41.99 $ 83.98 Expander Intel RAID Expander Card (RES2SV240) 1 $ 218.03 $ 218.03 Controller LSI MegaRAID 9261-8i 1 $ 92.75 $ 92.75 Memory Samsung 128GB (8x8GB) DDR3-1333 ECC REGISTERED 1 $ 120.00 $ 120.00 CPU Intel XEON E5-2670s 2 $ 108.00 $ 216.00 Case Norco 4220 1 $ 329.99 $ 329.99 PSU Rosewill RBR1000-M 1000-Watt 1 $ 109.46 $ 109.46 Total $ 1,535.19
0 notes