#uhhhh I need a skill share tag so im gonna make it
Explore tagged Tumblr posts
Visit Tumblr Blog
Explore Tumblr blogs with no restrictions, modern design and the best experience.
Last Seen Tumblr Blogs


Fun Fact
Tumblr is available in 18 languages.
Text
Okay I’ve learned a cool trick well enough to share it now
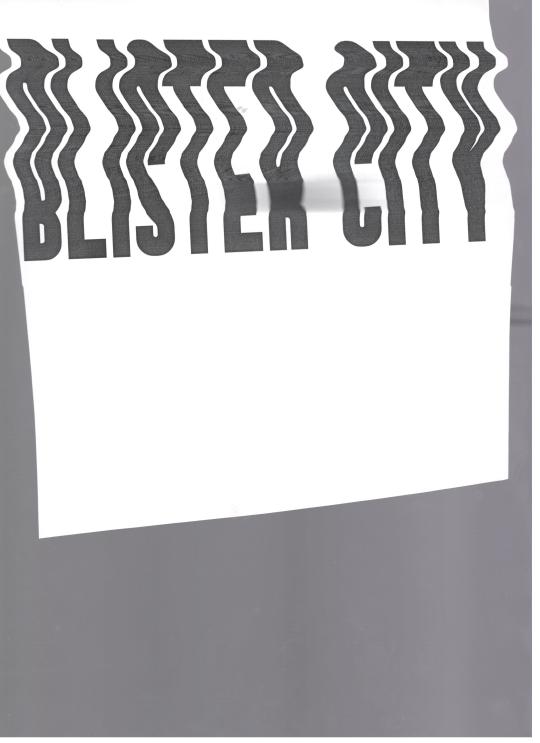
So I’ve been trying to do a lot of like physical manipulation to make cool digital effects for ttrpgs so I wanna show folks how to go from like this

to this

Using a combo of physical and digital manipulation. You’ll need a printer, a scanner, and something to cut with; and then I used the Affinity Suite for digital (especially photo), but you can probably do some similar shit with Adobe
The big things in here are “fucking up text with the scanner” and “creating threshold maps for texture and to hide issues”
so here we go
Okay so you’re gonna need a scanner I’m so sorry, but just print out whatever text (or images! It works on images too!) you can as big as your scanner bed will allow. You can go smaller, but you’ll lose a lot of sick texture on the way, and we don’t wanna do that tbh
The short version of this tutorial is “now drag it funny as the scanner goes down the page” but I’m gonna explain longer how that works practically haha
So print it out, cut off the white space on the left and right of the text to make it easier to work with (and I did under as well, but that’s less important). On the back of the paper with a pencil, mark the lines where you want the text to drag. For me that was above the midline on the E, but below the bottom of the top line

Like roughly here?
Set your scanner at a decent DPI, but beware the higher the DPI the harder this gets to do, because the super slow moving scanner light thing really highlights any amount of shaky. For my scanner the sweetspot is like 400 for good texture, but you’re gonna fuck up a lot doing it tbh so trial and error.
As the scanner comes though, keep the light between those lines, and drag it and wiggle it around! Just try to keep a consistent speed and have fun. After a number of scans you’ll pull something like this, there is a weird grey bit I don’t love and it’s gonna fuck us up just a little, but I’m gonna go over how I dealt with it as well~
Pull it into Affinity! If you have Publisher open it here, even if we are planning to work in Photo mostly, because the Persona manager is a life-saver when you’re doing cross program work.
So I first cut out the text, you don’t need to be super exact, but you only want the white paper, and the black text, not the grey of the scanner bed.

I usually then slap this text into a new document, because cropping is for idiots
then lets hop over to the Photo Persona~
Duplicate the layer that is just the text, lock it, and hide the bottom layer because we’re gonna start destroying shit and we want old copies that aren’t fucked up. With your fresh layer, hop into Adjustments>Threshold at the bottom of the Layers Menu, and drag around the preset until the text looks how you like. This gets us cool texture, but also hides that weird grey blob on the page from where I squeeze the paper during the scan and fucked it up some. For me that’s around here, but obv ymmv
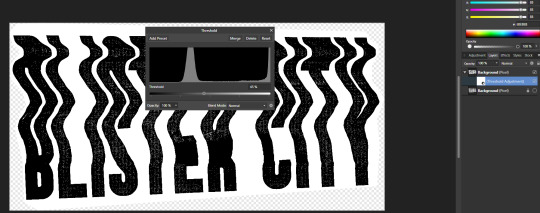
After doing this right click and rasterize your later
Now at the top of Affinity go into Filters > Colors > Erase White Paper

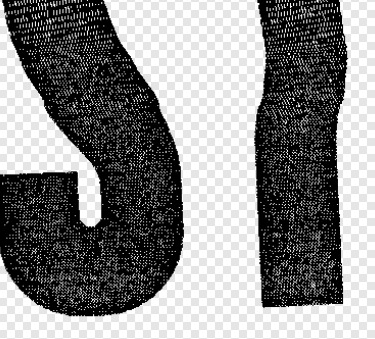
Where this leaves you might be perfect on it’s own! For me there are some areas I don’t love, so now we’re gonna texturize the whole thing. I circled the areas that I don’t love, but the tldr is I need to hide my sins where I had fucked up the scan some, and as a result have no texture

So if we zoom in on the gain some it is strongly vertical instead of just square
If your grain is a different shape you’ll wanna find different stock for this, but this looks a lot like denim to me? So I’m going into the Stock screen (View>Studios>Stock will bring it up if you don’t have it enabled already, but it just goes to Pexels and Pixabay to grab images for you is the tldr) and grabbing a high quality scan of some denim. You’ll wanna resize it so the fabric texture is around the same size as what’s here already. This might mean making it smaller than the whole page and that’s fine, for me I just duplicated it till I had enough to cover the whole image, but the tldr here is “cover the whole page in denim or concrete or whatever texture you’re using”
If you used multiple images group them, rasterize the entire group, tldr make it one big image. Afterwards hop back into the Threshold page, and try to replicate the grain pattern! You’re gonna slap it over the whole image so don’t worry about getting it perfect. You want the image to be mostly white, with black as a the textured bits, BUT if you can only get it to mostly black with good white texture? Totally fine, you’ll just want to inverse the image at the end (I personally find this way easier, but like ymmv)
anyway for me we ended up here

Because it’s mostly black we are gonna want to Adjustments>Invert on this. Same as before now we want to rasterize the image, and go to Filter>Colors>Erase White Paper. Set the blending mode to Erase
This whole thing requires a lot of patience, and a lot of trial and error, but eventually you’ll land on something like this

We aren’t going for a ton of texture, just enough hide some of our mistakes along the way
Group the whole thing, duplicate it, lock and hide the original again
Now on one group go ahead and rasterize it again, slap some color under it (or idk a book cover? That’s what this is for) and you’re good to go!
Anyway hope this is helpful, I do a lot of threshold maps on stock photos to get cool texture so I can zoom through this pretty quick, but like it takes some time and effort!
#uhhhh I need a skill share tag so im gonna make it#skillshare#yeah that'll do it#its nice not being on twitter because I can just do something like this without making a thread of it now
128 notes
·
View notes