#ttp223
Explore tagged Tumblr posts
Text
ESP32 - kapazitiver Touch Sensor

In diesem Beitrag möchte ich dir zeigen, wie du einen kapazitiven Touch Sensor am ESP32 in der Arduino IDE programmiert.

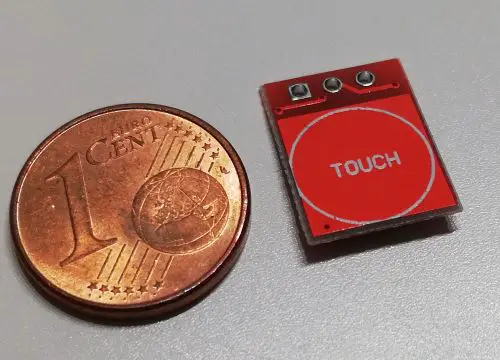
Den hier verwendeten Touch Sensor habe ich dir bereits für den Arduino in dem Beitrag Arduino Lektion 92: kapazitiver Touch Sensor vorgestellt. Der Touch Sensor ist nicht viel größer als eine 1-Cent-Münze und kann sogar durch eine dünne Schicht Holz / Pappe bedient werden.

kapazitiver Touch Sensor

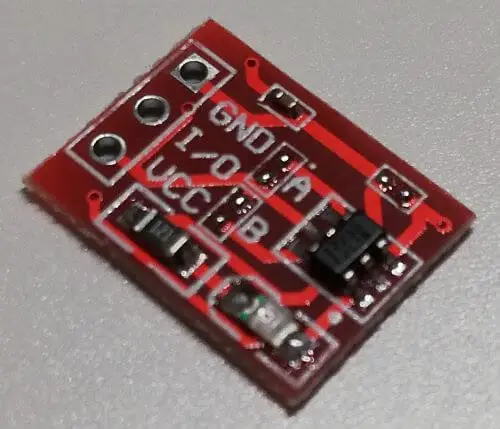
kapazitiver Touch Sensor - Rückseite
Benötigte Ressourcen für dieses Projekt
Wenn du die kleine Schaltung nachbauen möchtest, dann benötigst du: - einen ESP32, - ein Micro-USB Datenkabel, - ein oder mehrere kapazitive Touch Sensoren (TTP223), - 5 mm, LEDs, - 220 Ohm Vorwiderstände, - diverse Breadboardkabel, - ein 400 Pin Breadboard
Aufbau der Schaltung
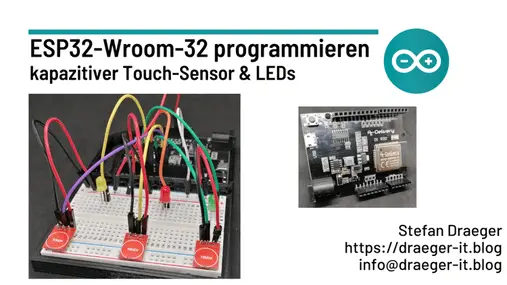
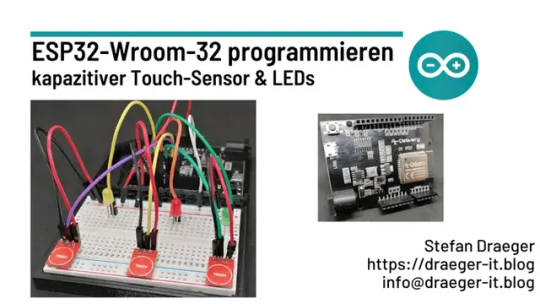
In meiner Schaltung verwende ich drei kapazitive Touch Sensoren, welche wie folgt angeschlossen sind.

Schaltung - ESP32 mit kapazitivem Touch Sensor & LEDs Im nachfolgenden YouTube-Video habe ich dir den Aufbau und die Programmierung in der Arduino IDE ausführlich erläutert. https://youtu.be/gqbOAhIwXy0
Programmieren in der Arduino IDE
Im Programm legen wir zunächst die Felder für die LEDs sowie die kapazitiven Touch-Sensoren an. #define ledRed 14 #define ledYellow 27 #define ledGreen 16 #define cts1 5 #define cts2 13 #define cts3 12 Damit wir die verbauten LEDs toggeln können, müssen wir uns den Status merken, hierzu nutze ich drei Felder vom Typ Integer. int ledRedState = 0; int ledYellowState = 0; int ledGreenState = 0; Da die Sensoren sehr empfindlich sind, müssen wir, nachdem ein Kontakt erkannt wurde, eine kleine Pause einlegen, dieses nennt man auch entprellen. Der Wert hierfür wird in einer Konstanten abgelegt. const int PAUSE = 350; In der Funktion setup werden die Pins des ESP32 definiert, die Pins der LEDs als Ausgang und die der Sensoren als Eingang. void setup() { pinMode(ledRed, OUTPUT); pinMode(ledYellow, OUTPUT); pinMode(ledGreen, OUTPUT); pinMode(cts1,INPUT); pinMode(cts2,INPUT); pinMode(cts3,INPUT); } In der Funktion loop wird fortlaufend geprüft, ob eines der Sensoren betätigt wurde, wenn dieses so ist, dann wird das Feld umgekehrt und der LED zugewiesen. Danach legen wir eine kleine Pause ein. if(digitalRead(cts1) ==HIGH){ ledYellowState = !ledYellowState; digitalWrite(ledYellow, ledYellowState); delay(PAUSE); } Das fertige Programm: #define ledRed 14 #define ledYellow 27 #define ledGreen 16 int ledRedState = 0; int ledYellowState = 0; int ledGreenState = 0; #define cts1 5 #define cts2 13 #define cts3 12 const int PAUSE = 350; void setup() { pinMode(ledRed, OUTPUT); pinMode(ledYellow, OUTPUT); pinMode(ledGreen, OUTPUT); pinMode(cts1,INPUT); pinMode(cts2,INPUT); pinMode(cts3,INPUT); } void loop() { if(digitalRead(cts1) ==HIGH){ ledYellowState = !ledYellowState; digitalWrite(ledYellow, ledYellowState); delay(PAUSE); } if(digitalRead(cts2) ==HIGH){ ledRedState = !ledRedState; digitalWrite(ledRed, ledRedState); delay(PAUSE); } if(digitalRead(cts3) ==HIGH){ ledGreenState = !ledGreenState; digitalWrite(ledGreen, ledGreenState); delay(PAUSE); } } Read the full article
0 notes
Link
0 notes
Photo

TOUCH ACTIVATED RELAY 👉🏻Follow @diyusthad 👉🏻Follow @diyusthad 👉🏻Follow @diyusthad 🌎https://diyusthad.com #relay #ttp223 #touchswitch #capacitiveswitch #diy #electronics #diyprojects https://www.instagram.com/p/B_Cjz7xje09/?igshid=1vew3a5xmc21p
0 notes
Photo

📸 Photo of the day: TTP223 touch sensor module #Enewground #ttp223 #touch #sensor #arduino #arduinouno #arduinomega #arduinonano #arduinopromini #arduinopromicro #raspberrypi #raspberrypi4 #maker #electronic #newarrival https://www.instagram.com/p/B5G3S9qnC0x/?igshid=13xusiqgnvtu7
#enewground#ttp223#touch#sensor#arduino#arduinouno#arduinomega#arduinonano#arduinopromini#arduinopromicro#raspberrypi#raspberrypi4#maker#electronic#newarrival
0 notes
Video
#TTP223 12 #В 1-#канальный #сенсорный #релейный #модуль, #емкостный #сен...
#Электронные #компоненты #и #комплектующие #Electronic #components #and #components #TTP223 12 #В 1-#канальный #сенсорный #релейный #модуль, #емкостный #сенсорный #переключатель #с #кнопкой, #самоблокирующаяся/#не #блокирующаяся #сенсорная #кнопка #файтм #для #Arduino.#ИНТЕРНЕТ #МАГАЗИН #ONLINE #STORE https://www.youtube.com/channel/UCVnJieMS52vKlq7NADGt98A .Цена 29,04 - 116,91 руб.29,80 - 118,44 руб.34,39 - 137,54 руб.Цвет:TTP223B Blue,HTTM Green,HTTM Red,TTP223 Red,HTTM Blue,HTTM Yellow,HTTM Colorful,12V Touch Switch,Touch Relay Module.Бесплатная доставка .#ССЫЛКА #НА #ВИДЕО #ТОВАР https://youtu.be/wsgu3Wr63j4 .#Ссылка #на #покупку #товара #и #на #пожизненный #кэшбек http://alii.pub/5yjrp3 ХАРАКТЕРИСТИКИ Название бренда: TZTПроисхождение: КитайСостояние: Новы��Тип: Регулятор напряженияНомер модели: TTP223 TTP223B Capacitive Touch Switch Relay moduleПрименение: КомпьютерНапряжение электропитания: 5V 12VУпаковка: SMDИндивидуальное изготовление: Да #Electronic #components #and #components #Electronic #components #and #components #TTP223 12 #IN 1- #channel #touch #relay #module, #capacitive #touch #switch #with #button, #self-#locking / #not #locking #touch #button #fightm #for #Arduino. #INTERNET #STORE #ONLINE #STORE https://www.youtube.com/channel/UCVnJieMS52vKlq7NADGt98A .Price RUB 29.04 - 116.91 RUB 29.80 - 118.44 RUB 34.39 - 137.54 Color: TTP223B Blue, HTTM Green, HTTM Red, TTP223 Red, HTTM Blue, HTTM Yellow, HTTM Colorful, 12V Touch Switch, Touch Relay Module Free shipping. #LINK #TO #VIDEO #PRODUCT https://youtu.be/wsgu3Wr63j4 . #Link #for #purchase #goods #and #for #lifetime #cashback http://alii.pub/5yjrp3 SPECIFICATIONS Brand Name: TZT Origin: China Condition: New Type: Voltage Regulator Model Number: TTP223 TTP223B Capacitive Touch Switch Relay module Application: Computer Power Supply Voltage: 5V 12V Packing: SMD Custom Made: Yes
0 notes
Video
So, let's combine the currently established coffee notification button circuitry with the new capacitive touch plate made of conductive PLA filament. It works so fine, it's amazing. Until now this was just working in my mind, and I'm very pleased with the result and quick success. 🚨✔️ #maker #tinkering #electronics #capacitive #touch #sensor #ttp223 #pcf8883 #button #switch #arduino #esp #esp8266 #esp8285 #electronics #neopixel #rgb #led #lights #ring #3dprinting #conductive #filament #experiment #proof #concept #test #hobby #fun #👨🔧 (hier: Berlin-Fennpfuhl) https://www.instagram.com/p/By6TTILIVMq/?igshid=wx3c5ingq0of
#maker#tinkering#electronics#capacitive#touch#sensor#ttp223#pcf8883#button#switch#arduino#esp#esp8266#esp8285#neopixel#rgb#led#lights#ring#3dprinting#conductive#filament#experiment#proof#concept#test#hobby#fun#👨🔧
0 notes
Photo

TTP223 touch sensor #electronicsprojects #electronics #electricalengineering #tech #diy #techvideo #arduino https://www.instagram.com/p/CdBMaQvBQ7r/?igshid=NGJjMDIxMWI=
0 notes
Text
Watch "How to Make Door Bell|With TTP223|UM66|BT66 IC Base project" on YouTube
youtube
0 notes
Text
Ver "✅ COMO ENCENDER y APAGAR una LAMPARA de MANERA TACTIL SIN CONTACTO MUY FACIL | TTP223 | UTSOURCE" en YouTube
youtube
En este video conoceremos el Interruptor Táctil basado en el TTP223 ideal para nuestros diversos proyectos de Electrónica y realizaremos un pequeño Proyecto para encender una Lámpara de manera Touch, si deseas apoyar esta labor Educativa dale Like y Comparte mis videos.
0 notes
Text

Descrição
O botão de toque é usado para criar uma lâmpada Guyver - uma lâmpada LED controlada por smartphone com vários efeitos interessantes: fogo, arco-íris, floresta, etc. O botão é baseado no microcircuito "TTP223". Possui vários modos de operação que determinam a reação do botão (e de todo o dispositivo controlado por ele) ao tocar a mão ou trazê-la a uma curta distância (na região de 4-5 mm).
Para conectar o botão de toque, você precisa de um ferro de solda e algum conhecimento de eletrônica, por isso antes de comprar é melhor estudar cuidadosamente os vídeos e as instruções nos fóruns correspondentes. Em particular, as instruções de montagem para o GyverLamp acima mencionado podem ser encontradas no site Alexgyver.ru.
Conexão
Solda + para a saída VCC (o rótulo se parece com UCC)
Solda - para o pino GND.
Solde o canal de dados para a saída de I / O
Exploração
O botão de toque deve ser usado em ambientes com ventilação seca, seu desempenho em ambientes externos, bem como em condições de alta umidade, não é garantido.
Se você nunca trabalhou com esses botões, recomendamos que você estude as instruções correspondentes antes de comprar.
Este é um equipamento de baixa tensão com tensão de até 5,5 v. Isso significa que não pode causar danos físicos a uma pessoa.
0 notes
Text
10pcs!!! TTP223 touch button module self - locking point - moving capacitive switch single - way transformation
10pcs!!! TTP223 touch button module self - locking point - moving capacitive switch single - way transformation

10pcs!!! TTP223 touch button module self - locking point - moving capacitive switch single - way transformation
Price
1.01 Catch me HERE
0 notes
Video
instagram
TTP223 Pinout explained. Follow us in IG⬇️ @diyusthad @diyusthad @diyusthad #ttp223 #ttp223b #touchswitch #capacitiveswitch #pinout #pinouts #ttp223pinout #diy #electronics https://www.instagram.com/p/B_M7qfojwqY/?igshid=1d9qxwct9gxby
0 notes
Text
20PCS TTP223 TTP223-BA6 SOT23-6 touch keys ic
20PCS TTP223 TTP223-BA6 SOT23-6 touch keys ic

20PCS TTP223 TTP223-BA6 SOT23-6 touch keys ic
Price
1 Catch me HERE
0 notes
Video
First test with conductive filament as a capacitive touch button. 🔘⚡ Instead of a TTP223 as a sensor IC I used the PCF8883. • The filament is some no-name brand ("ezPrint", never heard of, no real info in the interwebz), so expectations were extremely low, like the advertised voltage range it should be used with. But it works extremely well, better than expected definitely. I guess such filament is kinda perfect for this use case. Yay! 🙌 • Can you guess what I will use it for? • #maker #tinkering #electronics #capacitive #touch #sensor #ttp223 #pcf8883 #button #switch #arduino #3dprinting #conductive #filament #experiment #test #hobby #fun (hier: Berlin, Germany) https://www.instagram.com/p/By3heWDo8Uf/?igshid=mxhq009ec23c
#maker#tinkering#electronics#capacitive#touch#sensor#ttp223#pcf8883#button#switch#arduino#3dprinting#conductive#filament#experiment#test#hobby#fun
0 notes
Text
Electronicspices PACK OF 5 TTP223 Touch Key Switch Module Touching Button Capacitive Switches Self-Locking/No-Locking Jog 2.5-5.5V
Electronicspices PACK OF 5 TTP223 Touch Key Switch Module Touching Button Capacitive Switches Self-Locking/No-Locking Jog 2.5-5.5V
Price: (as of – Details) Ttp223 capacitive touch sensor module. The ttp223 is a touch pad detector ic replicating a single tactile button. This touch detection ic is designed for replacing traditional direct button key with diverse pad size. Features: supports momentary or latching/toggle modes. Supports active high or active low output signal modes. Dimensions: 15mm x 11mm. Input voltage: 2v-5.…

View On WordPress
0 notes
Text
How to Make A Simple WiFi Controlled Robot Car (NodeMCU) | Wifi RC Car ESP8266 App - NodeMCU (ESP12E)
youtube
Smart Robot: NodeMCU ESP8266 WiFi Robot Car + L293N + Wifi RC Car ESP8266 (NodeMCU) | How To Make A Simple WIFI Car (NodeMCU) | Wifi RC Car ESP8266 - NodeMCU (ESP12E). ****************************************************************** If You Want To Purchase the Full Project or Software Code Mail Us: [email protected] Title Name Along With You-Tube Video Link Project Changes also Made according to Student Requirements http://svsembedded.com/ è https://www.svskits.in/ M1: +91 9491535690 è M2: +91 7842358459 ****************************************************************** 1. How To Make A Simple WIFI Controlled Car (NodeMCU), 2. How to Make Arduino ESP8266 WiFi Robot Car | Controlled with Application, 3. ESP8266 NodeMCU RC car control over WiFi using RoboRemo app, 4. Smartphone controlled NodeMCU (ESP8266) 4WD WiFi Robot Car & DIY Android application, 5. How to Make Mobile Remote Controlled Car with Nodemcu | Indian LifeHacker, 6. Esp8266 NodeMcu wifi bot tutorial, 7. Arduino Project: IOT Car Parking System using Nodemcu esp8266 wifi + Blynk (Tabs + led widgets), 8. WIFI Controlled Robot | NodeMcu ESP8266, 9. How To Make A Wi-Fi Car Using NodeMCU esp8266 | Mobile Phone Controlled Car, 10. ESP8266 - WiFi Car, 11. Robot Wifi con ESP32 y Arduino Tutorial, 12. How to make Internet Controlled Car | IoT | Blynk | NodeMCU | esp8266, 13. Smartphone Controlled Arduino&NodeMCU 4WD Robot Car | WiFi Arduino&NodeMCU Robot, 14. IOT NodeMCU ESP8266 - Control de Foco Relay WebSocket WebServer, 15. How To Make A Mobile Phone Control WiFi Car Using Node MCU ESP8266 | DIY , 16. Creating a Nodemcu (Esp8266) Android phone controlled rover, 17. Arduino IOT Project: Nodemcu ESP8266 wifi Robot Car “L298N motor driver + Blynk + Joystick”, 18. Diy Amazing WiFi car mobile controlled | WiFi car V/S RC car challenge, 19. Adding WiFi controls to a RC car using Arduino, 20. NodeMcu(ESP12E) Android Wifi Controlled Rc Car Full Tutorial, 21. Arduino Project: Safe distance maintaining Car to Avoid accident” L298N and Ultrasonic Sensor”, 22. Doit.am WiFi Car and Tank Based on ESP8266 Dev Kit, 23. Arduino WİFİ Kontrollü Araba | Nodemcu Kontrollü Robot, 24. Wifi | ESP8266 NodeMCU | robot car WIFI | carrito robot con ARDUINO, 25. Wifi Robot Car/RC Car NodeMCU ESP8266 -Blynk App, 26. How to make Internet Controlled Car | IoT | Blynk | NodeMCU | esp8266, 27. V380 WiFi Camera Setup & Installation , 28. Control FAN Speed and LIGHT using TV Remote, 29. Build a surveillance robot that video streams with Arduino - Skype Shield Tutorial, 30. IoT based Smart Parking System using ESP8266 NodeMCU, 31. Smart Crop Protection From Wild Animals With Alert Using Arduino | Field Sensor Monitoring with WiFi, 32. Industrial Inspection Robot The Front Tilt Minibot, 33. How to Make Arduino ESP8266 WiFi Robot Car | Controlled with Application, 34. IOT BASED SMART BLOOD BANK SYSTEM, 35. CameraIP+ESP8266(MCU E-12), 36. Arduino DS WiFi Camera Robot - Assembly and Presentation, 37. V380 wifi Camera software installation & Setup & remote viewing on Laptop or PC Over Wifi / Local, 38. Make wireless CCTV camera using Action cam | Arduino project, 39. Make your own GPS SMS Security Tracking System, 40. WiFi Home Door Lock| Blynk | iot project, 41. How to Make a Gesture Control Robot at Home, 42. TOP 5 ESP8266 (NodeMCU) PROJECTS, 43. program arduino with android smartphone, 44. How to Make Water Overflow Alarm at Home, 45. How To Make A Simple WIFI Controlled Car (NodeMCU), 46. Arduino UNO & ESP8266 and control using smartphone, 47. How to make a | SPY Camera with | esp 8266 | Node MCU | wifi | IoT projects, 48. How To Make A DIY Arduino Obstacle Avoiding Car At Home, 49. Google Assistant | Home Automation IOT | NodeMCU ESP8266, 50. Arduino Powered Automated Security Camera, 51. Arduino RFID Solenoid Lock, 52. Arduino infrared thermometer with case MDF, 53. Bluetooth 8-Channel relay control ( Fan and Light ) board (with Android App), 54. 360° Fisheye Panoramic Wifi LED Bulb Light with Spy Camera, 55. esp8266, internet camera position control, 56. DIY | Easy IOT controlled robot With wifi camera for live streaming, 57. Top 10 IoT(Internet Of Things) Projects Of All Time | 2020, 58. Basic concept of Arduino in Hindi | Arduino tutorials for beginners, 59. how to make a ttp223 touch based Light Mirror Touch Switch Controller, 60. What is Arduino- Arduino Projects-Arduino Vs Raspberry Pi., 61. Top 7 Most Innovative Electronics DIY Projects For 2020, 62. Sonoff WiFi Smart Switch Tutorial, 63. Arduino RFID Sensor (MFRC522) Tutorial,
1 note
·
View note