#tostring() method in java with an example
Text
Understanding the Java toString() Method: Advantages and Disadvantages
Understanding the Java toString() Method
In Java, the toString() method is an essential part of the Object class, the superclass of all Java classes. This method returns a string representation of the object, which can be useful for debugging, logging, and displaying object information in a human-readable format.
In this blog post, we will explore the advantages and disadvantages of the…
View On WordPress
#java tostring method#java tostring method override#java tostring() method#java tostring() method with example#method#object tostring() method#override tostring() method in java#the tostring() method#tostring method#tostring method in java#tostring method java#tostring()#tostring() method#tostring() method in java#tostring() method in java with an example#tostring() method in javascript#tostring() method java in tamil
0 notes
Text
12 Top Kotlin Features to Enhance Android App Development Process

Kotlin is a modern and concise programming language that is designed to run on the Java Virtual Machine (JVM). Kotlin is officially supported by Google as a first-class language for Android app development since 2017. Kotlin has many features that make it a great choice for Android app development, such as interoperability with Java, null safety, coroutines, extension functions, data classes, and more. In this article, we will explore 12 top Kotlin features that can enhance your Android app development process and make your code more readable, maintainable, and efficient.
1. Interoperability with Java: Kotlin is fully interoperable with Java, which means you can use existing Java libraries, frameworks, and tools in your Kotlin code without any hassle. You can also mix Kotlin and Java code in the same project and call Kotlin code from Java and vice versa. This makes it easy to migrate your existing Java code to Kotlin gradually or use Kotlin for new features in your existing Java project.
2. Null Safety: Kotlin has a built-in null safety feature that prevents null pointer exceptions, which are one of the most common causes of crashes in Android apps. Kotlin distinguishes between nullable and non-null types and enforces you to check for null values before using them. You can also use the safe call operator (?.) or the Elvis operator (?:) to handle null values gracefully.
3. Coroutines: Coroutines are a way of writing asynchronous and non-blocking code in Kotlin. Coroutines allow you to perform multiple tasks concurrently without blocking the main thread, which improves the responsiveness and performance of your app. You can use coroutines to handle network requests, database operations, background tasks, etc. Coroutines are also easy to write and read, as they use a sequential and suspending style of coding.
4. Extension Functions: Extension functions are a way of adding new functionality to existing classes without modifying them or creating subclasses. You can define extension functions for any class, even if you don’t have access to its source code. Extension functions are useful for adding utility methods or customizing the behavior of existing classes.
5. Data Classes: Data classes are a way of creating classes that mainly hold data and provide some basic functionality, such as getters, setters, equals, hashCode, toString, etc. You can create data classes by adding the keyword data before the class declaration. Data classes are useful for representing model objects or data transfer objects in your app.
6. Destructuring Declarations: Destructuring declarations are a way of unpacking multiple values from a single object or collection into separate variables. You can use destructuring declarations to simplify your code and make it more readable. For example, you can use destructuring declarations to assign the properties of a data class or the elements of a list or a pair to separate variables.
Continue reading 12 Top Kotlin Features to Enhance Android App Development Process
#Kotlin Features#scottsdale#arizona#phoenix#app development company#mobile app development company#app development#android app development
3 notes
·
View notes
Text
Not For Me, Thanks! Overriding in Java
Need to take a different approach than your parent class when it comes to some method? In Java, a child class can often override the logic from an inherited method. #java #tdd #objectOriented #inheritance
💚 TIP: References Quick List
Java: Overriding Methods
Example Code
Example UML Class Diagram Source Code
Table of Contents
Table of ContentsIntroductionDiagramUnit Test for Object’s toString() ImplementationTDD CycleUnit TestsRuntime UpdatesMaven BuildCommit
Introduction
When inheriting method logic from a parent, we may need to alter that logic in the child. When we do so, this is called…

View On WordPress
1 note
·
View note
Text
Change spinner selected text color android

Change spinner selected text color android android#
Change spinner selected text color android code#
For that we have used parent.getItemAtPosition(position).toString() method. We can get the value of the selected class name from the ClassSpinner. set divSpinner Visibility to void onNothingSelected(AdapterView parent) GetResources().getStringArray(R.ems_div_class_4))) GetResources().getStringArray(R.ems_div_class_3))) GetResources().getStringArray(R.ems_div_class_2))) GetResources().getStringArray(R.ems_div_class_1))) assigning div item list defined in XML to the div SpinnerĭtAdapter(new ArrayAdapter(MainActivity.this,Īndroid.R.layout.simple_spinner_dropdown_item, String selectedClass = parent.getItemAtPosition(position).toString()
Change spinner selected text color android code#
So add the following code inside classSpinner's onItemSelected() method.ĬtOnItemSelectedListener(new void onItemSelected(AdapterView parent, View view, int position, long id) options to divSpinner from the string-array resource. Inside the onItemSelected() method of classSpinner, you have to get the selected item from the dropdown list and based on that value, you have to assign entries i.e. Spinner classSpinner, void onCreate(Bundle savedInstanceState) Changing Value of second Spinner based on first Spinner value MainActivity.java public class MainActivity extends AppCompatActivity We will start by creating instances of both the spinners and then, assign the setOnItemSelectedListener() on both the spinners. To handle the GUI events, we need to implement the code inside the MainActivity.java file. We will do this through Java code as the user will select from the first dropdown at run time i.e. Doing so will assign the values present in the items_class array to the classSpinner.Īs per the user's selection of the option from the first spinner, our second Spinner will appear along with options based on the first spinner's selection. To add these entries to the spinner all we have to do is add a property in the main activity layout XML file. In our dataset, string-array named items_class will be assigned to the classSpinner to display the class items in the dropdown list. We have also defined our dataset for the Spinners.We have defined the layout XML for the User interface.
Change spinner selected text color android android#
We have understood the design that we are creating in our Android App, which will have 1 TextView and 2 Spinners.
In Android, we must put the data XML files like our strings.xml file in app → res → values → strings.xml.īy now, we are done with the following things: We can define a string array in XML like we have shown below in the strings.xml file. But for this example, we will try the other way i.e. One by declaring an array and defining the items in it. To add items to the Spinner, there are two possible ways to provide it with a set of options. Once you will create that, the error in this file will be resolved.Īs you can see, we have one TextView and two Spinner views inside the xml file along with a few properties specified. NOTE: If you are getting an error in this, that is because you have not yet created the below data XML file. If you want, copy paste the below XML to start with this example in your local machine. So let's start, here we have the layout XML file. When user selects an optin from the second spinner too, then we will create a Toast and display the chosen values on screen. The first Spinner( classSpinner) holds the list of classes(in school) to be selected by the user and based on that choice we will assign the values to the second Spinner( divSpinner). But you can try and change the value of isVisible to VISIBLE to see if it is there or not. Hence, in the image below, it looks like it's not there. The second spinner has the property isVisible equals to GONE, which means it exists in the layout but it will not be visible(or it will be hidden). So we need to customize the layout(shown in below image) where one Spinner is placed below the TextView and the other spinner is below the first spinner.Īs the options inside the second Spinner will depend on what we select in the first Spinner, hence initially the second spinner will be hidden and it will only appear when user has selected one option from the first spinner. The main layout of the application will contain our one TextView and two spinners as its child component views. In this tutorial, we are going to create an application that works with two Spinners, which are inder-dependent. So let's checkout an example and learn how we can implement it in our Android App. You have already studied about what Spinners are and how they work.
Android SDK Manager & required Packages.
0 notes
Text
How do I change the string representation of a Python class? [duplicate]
This question already has answers here:
How to print instances of a class using print()? (11 answers)
Closed 3 years ago.
In Java, I can override the toString() method of my class. Then Java's print function prints the string representation of the object defined by its toString(). Is there a Python equivalent to Java's toString()?
For example, I have a PlayCard class. I have an instance c of PlayCard. Now:
>>> print(c)<__main__.Card object at 0x01FD5D30>
But what I want is something like:
>>> print(c)A♣
How do I customize the string representation of my class instances?
I'm using Python 3.x
https://codehunter.cc/a/python/how-do-i-change-the-string-representation-of-a-python-class-duplicate
0 notes
Text
selenium online training | selenium online courses
Apache Ant with Selenium and flash testing overview
When producing a full software product, numerous third-party APIs, their class route, the cleaning of previous binary executable files, the compilation of our source code, the execution of source code, the development of reports and the deployment code base, etc. You need to take care of everything. It would take an immense amount of time if these tasks are performed one by one manually, and the process will be vulnerable to errors. selenium online training
Apache ANT with Selenium
The meaning of a building tool like Ant comes here.
The benefit of creating an Ant
The application life cycle is generated by Ant, i.e. clean, compile, dependency set, run, report, etc.
The third-party API dependency can be set by Ant, i.e. the classpath of another Jar file is set by the Ant build file.
For End to End Delivery and deployment, a full application is developed.
It is a simple build tool where you can use the XML file to make all configurations and which can be executed from the command line.
As the configuration is separate from the actual application logic, it makes the code safe.
How to install Ant for installation
The following steps are taken to mount Ant in Windows
Step 1)
Download the .zip file from apache-ant-1.9.4-bin.zip to http:/ant.apache.org/bindownload.cgi
Step 2)
Unzip the folder and go to the root of the unzipped folder and copy the path.
Step 3)
Go to Start -> Machine -> right-click here and choose 'Properties' and then click Advanced Device Settings
Step 4)
This opens a new window. Click on the 'Factor Environment...' icon.
Step 5)
Click 'New...' and set the name of the variable as 'ANT HOME' and the value of the variable as the root path to the unzipped folder, and then click OK.
Step 6)
Now select the 'Path' variable from the list, and then click Edit' and add;%ANT HOME%\bin.
You can restart the machine once and now you are ready to use the Ant build tool.
Step 7)
Use the command line to verify your version of Ant:
Ant-Version Build.xml comprehension
The most critical component of the Ant compilation tool is Build.xml. For a Java project, all tasks related to cleaning, setup, compilation, and deployment are specified in this XML format file. If we use the command line or any IDE plugin to execute this XML file, all the instructions written in this file will be executed sequentially.
Inside a sample build.XML, let's understand the code.
The project tag is used to define a project name and an attribute-based on it. The foundation is an application's root directory.
● Property tags are used in the build.xml file as variables to be used in further steps.
<property name="build.dir" value="${basedir}/build"/>
<property name="external.jars" value=".\resources"/>
<property name="ytoperation.dir" value="${external.jars}/YTOperation"/>
<property name="src.dir"value="${basedir}/src"/>
● Goal tags are used as steps to be performed sequentially. The name attribute is the target's name. In a single build.xml, you can have different targets
● The path tag is used to logically bundle all files that are in the commonplace
● Path element tag sets the generic location root path where all files are stored.
● The path convert tag is used to convert all common file paths within the path tag to the classpath format of the framework.
● Used to set classpath for various third party jars in our project files tag
● The echo tag is used on the console to print text.
● The Delete tag cleans data from the designated folder
● A new directory will be created with the mkdir tag
● Used to compile java source code and transfer .class files to a new folder, javac tag
● The jar tag creates a jar file from the .class files
● The manifest tag will set your key execution class to
● The attribute 'depends' used to make one goal depend on another destination
● The java tag executes the main function from the jar created in the target compile portion.
Run Ant using the plugin Eclipse
Go to build.xml file to run Ant from eclipse -> right-click file -> Run as... -> click Build file -> right-click file -> Run as... -> click Build file
EXAMPLE:
We will take a small sample program that will very clearly demonstrate the features of Ant. Our project architecture is going to look like follows.
We have 4 goals here in this example.
Class route setting for external jars,
Clean code, previously complied with,
Compile current Java code for yourself
Run the code, run it
AntClass.class
TestAnt's package;
Java.util.Date import;
AntClass Public Class {
Static public void main(String...s){
System.out.println('HELLO PROGRAM ANT');
System.out.println("DATE IS TODAY->"+ currentDate());;"
}
Public static String currentDate(){
Fresh Date().toString() returns;;
}
}
Construct.xml
How to execute code for TestNG using Ant
Here we will construct a class using the TestNG method and set the Testing classpath in build.xml.
Now we'll create another testng.xml file to run the test method and call this file from the build.xml file.
Step 1)
In the testing kit, we build the "AntClass.class"
TestAnt's package;
Java.util.Date import;
Org.testng.annotations.Test imports;
AntClass Public Class {
The @Test
AntTestNGMethod(){{ Public Void
System.out.println('HELLO PROGRAM ANT');
System.out.println("DATE IS TODAY->"+ currentDate());;"
}
Public static String currentDate(){
Fresh Date().toString() returns;;
}
}
Step 2)
Construct a target for this class to be loaded into Build.xml
Step 3)
Create testng.xml
Testng.xml for checking
rg/testng-1.0.dtd" ">
Step 4)
In Build.xml, create a Target to run this TestNG code.
Step 5)
Absolute Build.xml Complete
Selenium Ant with Web driver:
We have discovered so far that we can place all third-party jars in a specific place in the system using ANT and set their direction for our project. Using this approach, we set all of our project's dependencies in a single place and make it more stable for compilation, execution, and deployment.
Similarly, we can easily discuss selenium dependency in build.xml for our testing projects using selenium, and we don't have to manually add a classpath to our program.
So now you can disregard the conventional way to set classpaths for the project listed below.
EXAMPLE:
The previous example we are going to change is
Step 1)
In the resource folder, set the selenium. jars property to a selenium-related container.
Step 2)
Add the selenium files to the set classpath target
Step 3)
Build.xml Com
Step 4)
Update the previously generated AntClass.java class to a new code.
TestAnt's package;
The java. util.List import;
Org.openqa.selenium.By import
Org.openqa.selenium.WebDriver Import;
Org.openqa.selenium.WebElement Import;
Org.openqa.selenium.firefox.FirefoxDriver importation;
Org.testng.annotations.Test imports;
AntClass Public Class {
The @Test
AntTestNGMethod(){{ Public Void
Driver for WebDriver = new FirefoxDriver();
driver.get;
List listAllCourseLinks = driver.findElements(By.xpath("/div[@class='canvas-middle']/a"));););
For(WebElement WebElement: listAllCourseLinks){ WebElement WebElement: listAllCourseLinks
System.out.println(webElement.getAttribute("href"));
}
}
}
Step 5)
The production after successful execution looks like this.
Flash testing varies from other component components
Flash is a technology that is obsolete. Capturing a flash-object is challenging as it is distinct from HTML. Flash is also an embedded SWF file that is (Small Web Format). Accessing Flash artifacts on a mobile device is often challenging.
Flash creation is more complex than SEO (Search Engine Optimization) HTML page development because flash is not completely readable by the search engine. Advanced technologies such as HTML 5 are, however, applied to solve problems such as performance and security.
Check it with the flash application.
There are two methods of testing Flash Applications:
Manual
By running test cases manually, you can test the Flash object as it is quick and easy to test. You ensure that the flash works properly as planned after bug fixation and provide sign-off.
Automation:
Use any automation method such as Selenium, SoapUI, TestComplete, etc to write a script and execute the script.
Conclusion
The key difference between flash and other elements, as described above is that Flash is embedded in SWF files, while other elements are embedded in HTML files. This is why, compared to flash, HTML is simple to catch. You can learn more about Ant build and flash test in selenium through Selenium online training.
#selenium online training#selenium online courses#selenium online training Hyderabad#selenium online training India#selenium with java online training#best selenium course online#selenium testing course online
2 notes
·
View notes
Text
Guidelines for Using Exceptions in Java
Note: Whitespace has been automatically removed by this site for all the code examples.
You may want to read and adopt the guidelines that help you get the most out of Java's exception handling mechanism. You can write powerful and effective Java code by adopting most, or all, of the things recommended here.
Remember that exception handling provides a way to process synchronous errors such as divisions by zero and out-of-range array indexes. It's not meant for handling asynchronous events such as disk I/O completions and mouse clicks and keystrokes.
When to use Exceptions
You may be wondering as to how you actually decide to create and throw an exception. As a rule of thumb, create exception classes for all common exceptions that are likely to occur in multiple classes of an application. In order to deal with simple errors that are likely to occur only in individual methods, try not to create an exception class. You can use an if statement in most cases to trap these types of errors.
Here's a simple example that shows when not to use a try-catch block in your code. The code throws an error when there's an exception of the type NullPointerException.
try {
System.out.println(refvar.toString()};
}
catch (NullPointerException e) {
System.out.println("refVar is null!");
This is pure overkill. You can instead use the much simpler if statement to handle these types of simple errors.
if (refVar!=null)
System.out.println(refVar.toString()};
else
System.out.println("refVar is null");
If your code can perform a simple logic test, as shown here, to handle an error, do so, rather than using an exception object to handle the error.
When you neither catch nor throw exceptions
When you call any method that throws a checked exception, you must either throw the exception or catch it. If you decide that you can't handle the exception in the method where it occurs, write a throw statement to send the exception up to the calling method, which must then either handle it with an exception handler, or throw it up to its calling method.
The following set of examples show how you must either catch or throw a checked exception, in order to avoid compiler errors.
The first example shows code that throws an IOException. The statement in the method getFileLength may throw an IO exception when it calls the constructor of the RandomAccessFile class. In addition, the statement that calls the length method of the RandomAccessFile object may also throw an IOException. You thus specify the throws clause in the declaration for the getFileLength method to trap IOException.
public static long getFileLength() throws IOException
{
RandomAccessFile in = new RandomAccessFile("mytext.dat", "r");
long length = in.length();
return length;
}
Our next example shows code for a method that calls the getFileLength method. Since we already know that the getFileLength method call throws an IOException error, our new method must either handle the IO Exception or throw it. Our example here shows how to handle the IOException by catching it with a try statement:
public static int getRecordCount()
{
try
{
long length = getFileLength(); // this may throw an IOException
int recordCount = (int) (length / /RECORD_SIZE);
return recordCount;
}
catch (IOException e) // this will catch the IOException
{
System.out.println("IO Exception!");
return 0;
}
}
The third example shows how a method can call the getFileLength method without catching IOException. Instead, it throws the exception.
public static int getRecordCount() throws IOException
{
long length = getFileLength(); //this may throw an IOException
int recordCount = (int) (length / RECORD_SIZE);
return recordCount;
}
The getRecordCount method here includes a throw clause, which ensures that any IOException is thrown up to the calling method.
Our fourth example shows what happens when you don't catch an exception or throw it.
public static int getRecordCount()
{
long length = getFileLength(); //this may throw an IOException
int recordCount = (int) (length / RECORD_SIZE);
return recordCount;
}
Since your code fails to catch or throw a checked exception, you'll receive a compile error:
MyExceptionTest.java.26: unreported exception java.io.IOException;
must be caught or declared to be thrown
The following is a quick summary of best practices and guidelines that enable you to take advantage of Java's exception handling mechanism, without succumbing to common missteps in the use of exceptions.
Begin Early
It is a good idea to incorporate exception handling into your applications from the get go, before you even start programming. That is, you must do this at the design stage, as it gets much harder to do it after implementing your applications.
Don't Ever Ignore an Exception
Regardless of whether you're dealing with a checked or an unchecked exception, don't ever ignore the exception. Sometimes, you might see code such as the following:
//Following is an empty catch block
try {
...
} catch (SomeException e) {
}
The empty catch block means that the exception is simply ignored - it's not dealt with. You don't want to do this in your programs. At the minimum, if you must really, really ignore the exception, put a comment explaining why you wanted to ignore the exception. You can use printStackTrace to output a simple error message to tell you there was a problem. If you ignore the exception, because of a condition that you've predicted, it means that the program will run on despite the error. However, you're going to run the risk of a complete program failure down the road when conditions change. If you propagate the exception out, you can ensure that the program fails quickly and captures information that helps you fix the error.
Don't use Exception Handling for every Statement
The goal of exception handling is to clarify programs - try not to use a try/catch/finally mechanism for every potential exception generating statement. A simple strategy is to enclose a significant amount of code within the try block and specify multiple catch blocks to account for all possible exceptions. End the whole thing with a single finally block if you need to release any resources held by the program. In any case, avoid placing try/catch/finally around each statement that might throw an exception. Your goal is to use exception handling to remove error processing code from the main program code.
Maintain Failure Atomicity
Always strive to ensure that when an object throws an exception, the object continues to remain in a well-defined and usable state. Ideally, even after a method fails due to an exception, the object should be left in the state it was before the method was invoked, When a method can do this, it's said to possess the property of failure atomicity.
You can achieve failure atomicity by using any of the following programming techniques.
Design Immutable Objects
The easiest way to achieve failure atomicity is by designing immutable objects. Although when you create an object you can change its contents, occasionally, it's a good idea to create objects whose contents cannot be changed after creation. An object such as this is called an immutable object and its class, an immutable class. A good example is the String class, which is an immutable class. You get automatic failure atomicity when an object is immutable, because the state of an object can't be modified after you create the object.
Check Parameters for Validity before the Operation
If you're stuck with mutable objects, the best way to achieve failure atomicity is to perform a check for the validity of parameters before the program commences the modification of an object. The following example shows how you do this:
public Object pop() {
if (size == 0)
throw new EmptyStackException();
Object result = elements[--size];
elements[size] = null; // Eliminate obsolete reference
return result;
}
The initial size check ensures that the method will do two things when it tries to pop an element from an empty stack: it will throw an exception and it will do so while leaving the size field in a consistent state. Otherwise, the attempt to pop the element from an empty stack will leave the size field in a negative state which, of course, is an inconsistent state for the object to be in.
Attempt to Execute the Code before you Modify the Object
You can write your programs in a way where the code that is susceptible to a potential exception, is run before any code that modifies an object. A good example would be where you would like to add an element to a TreeMap, wherein the new element must be compared using the TreeMap's ordering. If your code attempts to add an incorrect type element, it will fail when a search for the element in the tree is made, before the tree is modified.
Intercept the Failure
Another strategy to achieve failure atomicity is to put in code that intercepts a failure that occurs during an operation, and which rolls back the object's state to what it was before the operation began. This strategy is often adopted when modifying disk based data, that is, data contained in a relational database, for example.
Perform Operations on a Temporary Copy of the Object
You can limit state changes made to an object by changing a temporary copy of the object. You replace the contents of the object with the temporary copy once you complete the computational operations. If, for some reason, the computational work (say, a sort) ends up failing, no harm is done to the original object, as you're working with just a copy of the object.
Collect Failure Details
If you're troubleshooting an easily reproducible failure, it's no big deal whether you're collecting detailed failure information. When dealing with exceptions that are not easily reproducible, it is critical that your exception's toString method captures sufficient details about the failure - to help diagnose and fix the failure.
When an exception occurs, your details message of an exception should capture the current values of all parameters and values that contributed to the exception. If your error message simply states IndexOutofBoundException, it's only of limited use and may, or may not, help you fix the data problem. If, on the other hand, your detail message for the IndexOutofBoundException contains the lower and upper bounds and the index value, you have something meaningful in your hands with which to proceed towards a fix of the failure condition.
Since the stack trace of the exception always contains the precise file and line number that threw the exception, you don't need a lot of information about the source code in your exception messages. To ensure that your exceptions always contain adequate failure details in their details message, use one of the constructors I explained about earlier in this chapter. It is better to do this than to capture the details within a simple string detail message.
The following example shows how you can use a more helpful constructor than the simple String constructor.
/**
* Construct an IndexOutOfBoundsException.
*
* @param lowerBound the lowest legal index value.
* @param upperBound the highest legal index value plus one.
* @param index the actual index value.
*/
public IndexOutOfBoundsException(int lowerBound, int upperBound,
int index) {
// Generate a detail message that captures the failure
super("Lower bound: " + lowerBound +
", Upper bound: " + upperBound +
", Index: " + index);
// Save failure information for programmatic access
this.lowerBound = lowerBound;
this.upperBound = upperBound;
this.index = index;
}
Top Tip: Provide accessor methods for all exceptions, especially for checked exceptions.
As mentioned earlier, it's sometimes useful to provide accessor methods to capture details regarding exactly why a failure happened. In the case of the example just shown, you can, for example, provide accessor methods for lowerBound, upperBound and index. It's critical that you provide such accessor methods for all accessor methods.My site list to string in java
Use Standard Java Exceptions
As discussed earlier in the book, the Java platform offers a built-in set of unchecked exceptions which will take care of most of your exception mechanism setting needs. Make a point to try and use these preexisting exceptions before you run off coding your own custom exceptions. Other programmers are familiar with these preexisting exceptions and, therefore, they can easily understand your code. Also, since you'll be using just a set of basic exception classes and not a whole bunch of custom exceptions, your programs need less time to load.
Here are brief descriptions of the most common standard Java exceptions.
IllegalArgumentException
You throw this exception when a caller passes in an argument with an inappropriate value. For example, a calling program that passes a negative number in a parameter that denotes how many times you repeat an action.
IllegalStateException
This is the exception thrown when an object is illegally invoked because of its state - say, when a calling program tries to use an object before it has been initialized.
NullPointerException
Used when a parameter value is null when it ought not to be.
IndexOutofBoundsException
An exception thrown when a caller passes an out of range value in a parameter representing an index into a sequence.
ConcurrentModificationException
Thrown when an object designed for single thread usage finds that it was, or is, being concurrently modified.
UnsupportedOperationException
Thrown when an object doesn't support a specific operation such as when a program tries to delete an element from an append-only list.
Although in most cases it's quite apparent as to which exception applies to an error condition, sometimes, you may find that more than one exception might be correctly used for an error condition. There aren't any cut and dry rules for the specification of exceptions - as with some other things in Java, handling exceptions is an art as well as a science!
Document All of a Method's Exceptions
Spend the necessary time to fully document all exceptions thrown by each method in an application. Declare all checked exceptions individually and use the Javadoc tag @throws to document the conditions under which each of the exceptions can be thrown.
It is critical that you don't fall into the bad habit of declaring that a method throws some super class of multiple exception cases that the method is set up to throw. That means that you never declare a method that can throw the generic exception classes Exception or Throwable! Using generic exceptions might handle the exception all right, but it keeps you from understanding the precise error that caused the exception to be thrown.
Top Tip: Always attempt to document every single exception that can potentially be thrown by each method in a program.
Take care to document both checked and unchecked exceptions. Since unchecked exceptions normally represent programming errors, documenting them can keep you from avoiding those errors. You can use the same Javadoc tag @Throws to document unchecked exceptions, as is the case for checked exceptions.
If multiple methods in a class can throw the same exception, you may document the exception once in the class's documentation comment. This is much more efficient than documenting the exception separately for each of the methods.
Finally, a useful rule of thumb when handling Java exceptions is to always throw early and catch late!
This finally wraps up our discussion of Java's exception handling mechanisms and how to make the best use of them in your code. Our next topic is the effective use of pre and post conditions in your code within the framework of what's called Java assertions, primarily as a way of testing code before you move it to production.
1 note
·
View note
Text
Multiple Inheritance in Java
See the Java code
Ever since Java 8 introduced default interface methods, I felt there had to be a way to use it for multiple inheritance. I have never needed it, but I was bored for a bit today, so decided to try the following idea:
- Create a non-public class XData to hold the fields the interface needs to work with, and a public interface X in the same X.java source file
- The interface has one virtual method getXData() that returns the XData instance
- The remaining interface methods are default methods that call getXData() to read and write the fields as necessary to perform some useful operations.
- Create another interface Y and class YData in the same pattern
- Create a class XY that implements both interfaces X and Y
- The class XY has XData and YData fields, which are returned by getXData() and getYData(). These are the only two interface methods XY is required to inplement.
- I didn't bother in my example, but XY would have to decide how to implement the Object methods hashCode, equals, and toString. These methods cannot be implemented by interfaces (but they could be implemented in XData and YData classes, if desired)
The end result is the XY class is an instance of both X and Y interfaces, and inherits the encapsulated behaviours of both X and Y default methods - multiple inheritance by any reasonable measure.
It is better than C++ multiple inheritance, in that all constructor logic and declared fields are in the XY class. The only problem you could get is if X and Y interfaces declare the same method that differs only by return type - but this is just a general problem of implementing multiple interfaces.
0 notes
Text
Spring Digging Road 2-> Assembly of SpringBean
# Assembly of SpringBean
##SpringBean allocation plan
Spring container is responsible for creating bean in applications and coordinating the relationships among these objects through dependency injection.
But as a developer, you need to tell Spring which bean to create and how to assemble them together. When describing how bean are assembled, Spring has great flexibility and provides three main assembly mechanisms:
```
1. Implicit bean discovery mechanism-annotation;
2. Explicit configuration in Java -- JavaConfig;
3. Explicit configuration in XML -- XML configuration.
```
###Annotation assembly Bean
Spring realizes automatic assembly from two angles:
```
Component scanning : Spring will automatically discover bean created in the application context
Automatic assembly : Spring automatically satisfies the dependencies between bean.
```
**PS : The combination of component scanning and automatic assembly can minimize explicit configuration.
**
```
1.Create bean that can be discovered
2.Name the bean scanned by the component
3.Set the basic package for component scanning
4.Automatic assembly by adding annotations to bean
```
The directory structure is as follows

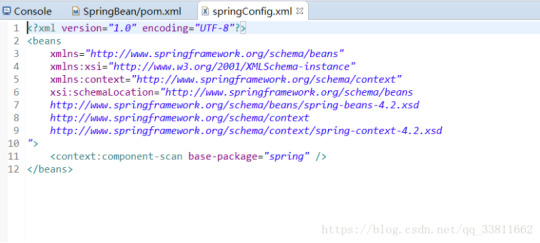
First of all, let everyone look at the contents of pom.xml and springConfig.xml on my side, as shown in the figure:

Several ways to annotate Bean assembly
```
Member variable injection
Constructor injection
Setting mode injection
```
Ok, it's time to code.
The following is member variable injection, which mainly adds @Autowire annotation to A to be passed into Class B.
public class SpringTest {
public static void main(String[] args) {
AbstractApplicationContext context = new ClassPathXmlApplicationContext("/spring/springConfig.xml");
B b = (B) context.getBean("b");
b.print();
}
}
@Component
class A {
@Override
public String toString() {
return "introduce Class A";
}
}
@Component
class B {
@Autowired
A a;
void print() {
System.out.println("In the method of Class B" + a);
}
}
Then there is constructor injection, at this time, the constructor of B is added @Autowired
public class SpringTest {
public static void main(String[] args) {
AbstractApplicationContext context = new ClassPathXmlApplicationContext("/spring/springConfig.xml");
B b = (B) context.getBean("b");
b.print();
}
}
@Component
class A {
@Override
public String toString() {
return "introduce Class A";
}
}
@Component
class B {
A a;
@Autowired
B(A a) {
this.a = a;
}
void print() {
System.out.println("In the method of Class B" + a);
}
}
Finally, set the way to inject. In one method, automatic assembly is performed. The method name can be arbitrary, only @Autowired needs to be added to the method name. here, for the sake of standardization, setA is used as the method name
public class SpringTest {
public static void main(String[] args) {
AbstractApplicationContext context = new ClassPathXmlApplicationContext("/spring/springConfig.xml");
B b = (B) context.getBean("b");
b.print();
}
}
@Component
class A {
@Override
public String toString() {
return "introduce Class A";
}
}
@Component
class B {
A a;
@Autowired
void setA(A a) {
this.a = a;
}
void print() {
System.out.println("In the method of Class B" + a);
}
}
###Java code assembly Bean
Although it is a more recommended way to realize automatic configuration of Spring through component scanning and annotation in many scenarios, sometimes the scheme of automatic configuration does not work, so it is necessary to explicitly configure Spring Bean.
For example, when you want to assemble a component in a third-party library into an application, you can't add @Component and @Autowired annotations to its class, so you can't use the automatic assembly scheme.
In this case, explicit configuration must be adopted. There are two alternatives for explicit configuration: JavaConfig and XML, and JavaConfig is a better one because it is more powerful, type-safe and friendly to refactoring. After all, JavaConfig belongs to Java code.
At the same time, JavaConfig is different from other Java codes, which is conceptually different from business logic and domain codes in applications. Although it uses the same language as other components, JavaConfig is the configuration code.
This means that it should not contain any business logic, and JavaConfig should not intrude into business logic code. Although it is not necessary, JavaConfig is usually put in a separate package, which makes it separate from other application logic, so that there is no confusion about its intention.
Several ways of assembling Bean with Java code:
```
Constructor injection
Setting mode injection
```
The first is constructor injection
@Configuration
public class JavaConfigTest {
@Bean
A newA() {
return new A();
}
@Bean
B newB() {
return new B(newA());
}
public static void main(String[] args) {
AbstractApplicationContext context = new AnnotationConfigApplicationContext(JavaConfigTest.class);
B b = (B) context.getBean("newB");
b.print();
}
}
class A {
@Override
public String toString() {
return "introduce Class A";
}
}
class B {
A a;
B(A a) {
this.a = a;
}
void print() {
System.out.println("In the method of Class B" + a);
}
}
Then setting mode injection
@Configuration
public class JavaConfigTest {
@Bean
A newA() {
return new A();
}
@Bean
B newB() {
B b = new B();
b.setA(newA());
return b;
}
public static void main(String[] args) {
AbstractApplicationContext context = new AnnotationConfigApplicationContext(JavaConfigTest.class);
B b = (B) context.getBean("newB");
b.print();
}
}
class A {
@Override
public String toString() {
return "introduce Class A";
}
}
class B {
A a;
void setA(A a) {
this.a = a;
}
void print() {
System.out.println("In the method of Class B" + a);
}
}
###Assemble Bean through XML
When Spring first appeared, XML was the main way to describe configuration, but XML was no longer the only alternative way to configure Spring. However, in view of the large number of Spring configuration projects based on XML, it is very important to understand how to assemble Sping projects through XML.
Several ways to assemble Bean through XML
```
Constructor injection
Setting mode injection
```
The first is constructor injection:
Project code is:
public class XMLTest {
public static void main(String[] args) {
AbstractApplicationContext context = new ClassPathXmlApplicationContext("/xml/springConfig.xml");
B b = (B) context.getBean("b");
b.print();
}
}
class A {
@Override
public String toString() {
return "introduce Class A";
}
}
class B {
A a;
B(A a) {
this.a = a;
}
void print() {
System.out.println("In the method of Class B" + a);
}
}
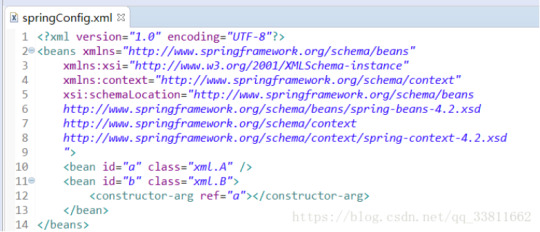
springconfig.xml As shown in figure:
Then there is the setting mode injection
Project code is:
public class XMLTest {
public static void main(String[] args) {
AbstractApplicationContext context = new ClassPathXmlApplicationContext("/xml/springConfig.xml");
B b = (B) context.getBean("b");
b.print();
}
}
class A {
@Override
public String toString() {
return "introduce Class A";
}
}
class B {
A a;
public void setA(A a) {
this.a = a;
}
void print() {
System.out.println("In the method of Class B" + a);
}
}
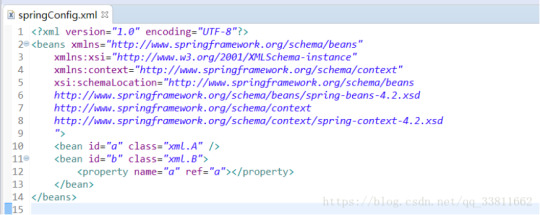
springconfig.xml Figure:
###Spring annotation
@Autowired : Automatically assemble member variables, and @Autowired(required=false) will not report an error if no matching Bean can be found.
@Qualifier : Comments specify the ID of the injected bean
@Component : Define a bean
@Controller : Controller
@Service : Define a service bean
@Repository : Used to take the class identity of data access layer (DAO) as a bean
@Scope : Set the type of bean
###Others:
Singleton: In the whole application, only one instance of bean is created :
```
value=ConfigurableBeanFactory.SCOPE_SINGLETON
```
Prototype : A new bean instance is created every time it is injected or acquired through Spring context
```
value=ConfigurableBeanFactory.SCOPE_PROTOTYPEE
```
Request : In a Web application, a bean instance is created for each request :
```
value=WebApplicationContext.SCOPE_REQUEST
```
Session : In a Web application, a bean instance is created for each session
```
value=WebApplicationContext.SCOPE_SESSION
```
0 notes
Text
Download Java MSI

Download Java MSI.
Java logo 512x512 for Microsoft EndPoint Configuration Manager (SCCM/MECM/MEMCM) deployments:

Java 8.0.2510.8
TLS Application-Layer Protocol Negotiation Extension
JEP 244 has enhanced the Java Secure Socket Extension (JSSE) to provide support for the TLS Application-Layer Protocol Negotiation Extension (RFC 7301). New methods have been added to the javax.net.ssl classes SSLEngine, SSLSocket, and SSLParameters to allow clients and servers to negotiate an application layer value as part of the TLS handshake.
Added Support for PKCS#1 v2.2 Algorithms Including RSASSA-PSS Signature
The SunRsaSign and SunJCE providers have been enhanced with support for more algorithms defined in PKCS#1 v2.2, such as RSASSA-PSS signature and OAEP using FIPS 180-4 digest algorithms. New constructors and methods have been added to relevant JCA/JCE classes under the java.security.spec and javax.crypto.spec packages for supporting additional RSASSA-PSS parameters.
WebEngine Limits JavaScript Method Calls for Certain Classes
JavaScript programs that are run in the context of a web page loaded by WebEngine can communicate with Java objects passed from the application to the JavaScript program. JavaScript programs that reference java.lang.Class objects are now limited to the following methods:getCanonicalName
getEnumConstants
getFields
getMethods
getName
getPackageName
getSimpleName
getSuperclass
getTypeName
getTypeParameters
isAssignableFrom
isArray
isEnum
isInstance
isInterface
isLocalClass
isMemberClass
isPrimitive
isSynthetic
toGenericString
toString
No methods can be called on the following classes:java.lang.ClassLoader
java.lang.Module
java.lang.Runtime
java.lang.System
java.lang.invoke.*
java.lang.module.*
java.lang.reflect.*
java.security.*
sun.misc.*
New Oracle Specific JDK 8 Updates System Property to Fallback to Legacy Base64 Encoding Format
Oracle JDK 8u231 upgraded the Apache Santuario libraries to v2.1.3. This upgrade introduced an issue where XML signature using Base64 encoding resulted in appending or to the encoded output. This behavioral change was made in the Apache Santuario codebase to comply with RFC 2045. The Santuario team has adopted a position of keeping their libraries compliant with RFC 2045.
Oracle JDK 8u221 using the legacy encoder returns encoded data in a format without or .
Therefore, a new Oracle JDK 8 Updates only system property, - com.sun.org.apache.xml.internal.security.lineFeedOnly, is made available to fall back to legacy Base64 encoded format.
Users can set this flag in one of two ways:
-Dcom.sun.org.apache.xml.internal.security.lineFeedOnly=trueSystem.setProperty("com.sun.org.apache.xml.internal.security.lineFeedOnly", "true")
This new system property is disabled by default. It has no effect on default behavior nor when com.sun.org.apache.xml.internal.security.ignoreLineBreaks property is set.
Later JDK family versions might only support the recommended property: com.sun.org.apache.xml.internal.security.ignoreLineBreaks
x86
msiexec.exe /i "jre1.8.0_251.msi"/qn JU=0 JAVAUPDATE=0 AUTOUPDATECHECK=0 RebootYesNo=No WEB_JAVA=1
x64
msiexec.exe /i "jre1.8.0_25164.msi" /qn JU=0 JAVAUPDATE=0 AUTOUPDATECHECK=0 RebootYesNo=No WEB_JAVA=1 REMOVEOLDERJRES=1
For uninstall use:
x86
msiexec /x {26A24AE4-039D-4CA4-87B4-2F32180251F0} /qn /norestart
x64
msiexec /x {26A24AE4-039D-4CA4-87B4-2F64180251F0} /qn /norestart
Java MSI x86 download
Java MSI x64 download
Java MSI 8.0.2410.7
Release Highlights
IANA Data 2019c
JDK 8u241 contains IANA time zone data version 2019c. New Feature: Allow SASL Mechanisms to Be Restricted
A security property named jdk.sasl.disabledMechanisms has been added that can be used to disable SASL mechanisms. Any disabled mechanism will be ignored if it is specified in the mechanisms argument of Sasl.createSaslClient or the mechanism argument of Sasl.createSaslServer. The default value for this security property is empty, which means that no mechanisms are disabled out-of-the-box.
New Feature: SunPKCS11 Provider Upgraded with Support for PKCS#11 v2.40
The SunPKCS11 provider has been updated with support for PKCS#11 v2.40. This version adds support for more algorithms such as the AES/GCM/NoPadding cipher, DSA signatures using SHA-2 family of message digests, and RSASSA-PSS signatures when the corresponding PKCS11 mechanisms are supported by the underlying PKCS11 library.
Other notes: New Checks on Trust Anchor Certificates
New checks have been added to ensure that trust anchors are CA certificates and contain proper extensions. Trust anchors are used to validate certificate chains used in TLS and signed code. Trust anchor certificates must include a Basic Constraints extension with the cA field set to true. Also, if they include a Key Usage extension, the keyCertSign bit must be set.
Other notes: Exact Match Required for Trusted TLS Server Certificate
A TLS server certificate must be an exact match of a trusted certificate on the client in order for it to be trusted when establishing a TLS connection.
Other notes: Added LuxTrust Global Root 2 Certificate
LuxTrust root certificate has been added to the cacerts truststore
Other notes: Added 4 Amazon Root CA Certificates
Amazon root certificate has been added to the cacerts truststore
Bug Fixes: Support for OpenType CFF Fonts
Previously, Oracle JDK 8 did not include OpenType CFF fonts (.otf fonts) into the standard logical fonts (such as "Dialog" and "SansSerif"). This resulted in missing glyphs when rendering text. In the most extreme cases where only CFF fonts were installed on the system, a Java exception could be thrown.
Several Linux distributions were affected by this issue because they rely on CFF fonts to support some languages, which is common for CJK (Chinese, Japanese, and Korean) languages.
Oracle JDK 8 now uses these CFF fonts, and this issue has been resolved.
Bug Fixes: Better Serial Filter Handling
The jdk.serialFilter system property can only be set on the command line. If the filter has not been set on the command line, it can be set can be set with java.io.ObjectInputFilter.Config.setSerialFilter. Setting the jdk.serialFilter with java.lang.System.setProperty has no effect.
For Configuration Manager deployments (or another authomated deployments) use:
x86
msiexec.exe /i "jre1.8.0_241.msi"/qn JU=0 JAVAUPDATE=0 AUTOUPDATECHECK=0 RebootYesNo=No WEB_JAVA=1
x64
msiexec.exe /i "jre1.8.0_24164.msi" /qn JU=0 JAVAUPDATE=0 AUTOUPDATECHECK=0 RebootYesNo=No WEB_JAVA=1 REMOVEOLDERJRES=1
For uninstall use:
x86
msiexec /x {26A24AE4-039D-4CA4-87B4-2F32180241F0} /qn /norestart
x64
msiexec /x {26A24AE4-039D-4CA4-87B4-2F64180241F0} /qn /norestart
Java MSI x86 download
Java MSI x64 download
Java MSI 8.0.2310.11
Release Highlights
IANA Data 2019b
JDK 8u231 contains IANA time zone data version 2019b. For more information, refer to Timezone Data Versions in the JRE Software. New Feature: New jdk.jceks.iterationCount System Property
A new system property has been introduced to control the iteration count value used for the jceks keystore. The default value remains at 200000 but values between 10000 and 5000000 may be specified. The new system property name is jdk.jceks.iterationCount and the value supplied should be an integer in the accepted range. The default value will be used if a parsing error is encountered.New Feature: New Java Flight Recorder (JFR) Security Events
Four new JFR events have been added to the security library area. These events are disabled by default and can be enabled via the JFR configuration files or via standard JFR options.Removed Features and Options: Removal of T2K Rasterizer and ICU Layout Engine From JavaFX. The T2K rasterizer and ICU layout engine have been removed from JavaFX.Other notes: GTK3 Is Now the Default on Linux/Unix. Newer versions of Linux, Solaris, and other Unix flavor desktop environments use GTK3, while still supporting GTK2.
Previously, the JDK would default to loading the older GTK2 libraries. However, in this release, it defaults to loading GTK3 libraries. Loading is typically triggered by using the Swing GTK Look And Feel. The old behavior can be restored by using the system property: -Djdk.gtk.version=2.2Other notes: Remove Obsolete NIST EC Curves from the Default TLS Algorithms. This change removes obsolete NIST EC curves from the default Named Groups used during TLS negotiation. The curves removed are sect283k1, sect283r1, sect409k1, sect409r1, sect571k1, sect571r1, and secp256k1. To re-enable these curves, use the jdk.tls.namedGroups system property. The property contains a comma-separated list within quotation marks of enabled named groups in preference order.For example:
java -Djdk.tls.namedGroups="secp256r1, secp384r1, secp521r1, sect283k1, sect283r1, sect409k1, sect409r1, sect571k1, sect571r1, secp256k1" ...
For System Center Configuration Manager deployments (or another authomated deployments) use:
x86
msiexec.exe /i "jre1.8.0_231.msi"/qn JU=0 JAVAUPDATE=0 AUTOUPDATECHECK=0 RebootYesNo=No WEB_JAVA=1
x64
msiexec.exe /i "jre1.8.0_23164.msi" /qn JU=0 JAVAUPDATE=0 AUTOUPDATECHECK=0 RebootYesNo=No WEB_JAVA=1 REMOVEOLDERJRES=1
For uninstall use:
x86
msiexec /x {26A24AE4-039D-4CA4-87B4-2F32180231F0} /qn /norestart
x64
msiexec /x {26A24AE4-039D-4CA4-87B4-2F64180231F0} /qn /norestart
Java MSI x86 download
Java MSI x64 download
Read the full article
#Java#MECM#MEMCM#MicrosoftEndpointConfigurationManager#MSI#SystemCenter#SystemCenterConfigurationManager#Windows#Windows10
0 notes
Link
Did you ever forget to bring what your girlfriend asked you to take from the market? What is your reaction? Oh no honey, I was supposed to do this and that but forget and feel sorry about that. Similarly, while writing programs, programmers sometimes forget to handle scenarios which hamper the program execution. Such problems in programming languages are often called Exceptions. Java Exceptions are the way to identify such problems and Exception handling is the same as managing your girlfriend so that execution goes on smoothly.
Java provides rich implementation to handle java exceptions. Exceptions are event occurred during compiling or execution of a program which hamper the normal execution of the program. If exceptions are not handled properly, they can abort the program execution. An exception can happen because of numerous reasons e.g. file is not found, invalid data encountered, divide by zero condition, network connection lost in the middle of operations, etc.
So, cause of exception can arise from user input, programmer mistake or resource on the system, etc. Based on the various scenario, exceptions can be divided into below categories as follows
CHECKED JAVA EXCEPTIONS
A checked exception is thrown by the compiler at compile time so these are also called compile-time exceptions. These can not be ignored and must be handled by the programmer. e.g. If you try to read a non-existing file, then compiler throws FileNotFoundException at compile time.
import java.io.FileReader; import java.io.File; public class CompileTimeExceptionExample { public static void main(String args[]) { File file = new File("C://myfile.txt"); FileReader fr = new FileReader(file); } }
If you try to compile the above program using the command
“javac CompileTimeExceptionExample.java”, it will throw FileNotFoundException which will read like below
CompileTimeExceptionExample.java:6: error: unreported exception FileNotFoundException; must be caught or declared to be thrown FileReader fr = new FileReader(file); ^ 1 error
Note: read(), close(), write() etc operations thrown IOException so compiler notifies to handle IOException along with FileNotFoundException.
UNCHECKED JAVA EXCEPTIONS
These exceptions occur at runtime and are a result of improper use of operation and APIs. These are also called runtime exception. Runtime exceptions are ignored at compile time. e.g exception is thrown when divide by zero is attempted.
Also, you have n elements in an array and tries to access (n+1)th element and ArrayIndexOutOfBoundException is thrown.
ERRORS IN JAVA
These are beyond the control of the programmer and a programmer can hardly do anything with them. Errors are very severe and result in program abort.
Now we are familiar with what are exceptions and how many times of are they. Let’s look into the Exceptions hierarchy.
All exception classes are a subclass of java.lang.Exception class. Exception class is driven from Throwable class. Error class is also a subclass of Throwable. Error is a severe condition in program execution which can not be handled by code. Errors are thrown by JVM like OutOfMemoryException.
Java Exception Classes

Java Exception Classes
Exceptions can be divide mainly in two main categories namely Runtime exception and IO exceptions (compile-time exceptions).
Below table lists the methods exposed by Exception class
Method Description public String getMessage() Returns a detailed message about the exception that has occurred. This message is initialized in the Throwable constructor. public Throwable getCause() Returns the cause of the exception as represented by a Throwable object. public String toString() Returns the name of the class concatenated with the result of getMessage(). public void printStackTrace() Prints the result of toString() along with the stack trace to System.err, the error output stream. public StackTraceElement [] getStackTrace() Returns an array containing each element on the stack trace. The element at index 0 represents the top of the call stack, and the last element in the array represents the method at the bottom of the call stack. public Throwable fillInStackTrace() Fills the stack trace of this Throwable object with the current stack trace, adding to any previous information in the stack trace.
HANDLING EXCEPTION IN JAVA
Exceptions can be handled by using “try{}catch(){}” block. The code snippet likely to produce Exception is put inside try block and is called protected code. And if anything unexpected happens and catch block and handles it according to exception defined in the definition of catch block.
Syntax of using try-catch block is below:
try { // Protected code..likely to produc exceptions } catch (ExceptionName e1) { // ExceptionName represents exception type handled in catch block. // Catch block }
If an exception occurs in the protected code, then control is passed to the catch block with an exception object.
A single try-catch block and handle multiple exceptions in the catch block. One can specify actions for each type of exception which are likely to occur in the protected code placed inside the try block. Syntax of handling the multiple exceptions in the catch block is shown below:
try { // Protected code likely to encounter exception } catch (ExceptionType1 e1) { // Catch block } catch (ExceptionType2 e2) { // Catch block } catch (ExceptionType3 e3) { // Catch block }
A single try block can have any number of catch blocks to handle exceptions. The type of the exception thrown in the try block is matched against the exception handled in catch block from TOP to BOTTOM and if anywhere down the ladder, the exception thrown and exception handled by catch block are matched then control is passed to matching catch block and is handled by that catch block.
If no catch block handles the exception thrown then the exception is thrown to the last method in the execution stack and current method execution stops here.
Since Java 7, single catch block and handle multiple exceptions. This approach simplifies the code. e.g.
catch (IOException|FileNotFoundException ex) { logger.log(ex); throw ex; }
Throws and Throw usages in Java
If the method in execution does not handle the checked exception then it must declare exceptions it is going to throw using “throws” keywords. "Throws" is appended at the end of the method signature and specify the Exceptions it can throw using comma like below
import java.io.*; public class ThrowsExample { public void methodName(double amount) throws Exception1,Exception2 { // Method implementation throw new Exception1(); ….. throw new Exception2(); } // Remainder of class definition }
throws is used to postpone the handling of exception and throw is used to raise the exception explicitly.
Finally{} block: finally block is placed after either try or catch depending on whether the catch is used or not. It also occurs after catch if catch block is used otherwise put after try block. “finally” block always executes irrespective of any exception is thrown in try block or not. This block is normally used to do cleanup and resource release kind of activities.
Syntax of finally block
try { // Protected code } catch (ExceptionType1 e1) { // Catch block } catch (ExceptionType2 e2) { // Catch block } catch (ExceptionType3 e3) { // Catch block }finally { // The finally block always executes. }
Popular use of finally block is found in closing sessions/connection after doing DB operations. It is where your program normally release the resources if it has to.
KEY POINTS TO BE NOTED HERE
- try block has to have at least one out of catch block and finally block.
- no code can appear between try-catch and finally block
- catch or finally can not appear without try block
- finally block is not a compulsion to have
try-with-resource:
Since Java 7, try-with-resources is supported. What it means is it automatically releases the resources used inside try block. Generally, we have to close the connection, streams created in try block using finally block. To avoid such explicit code management, Java 7 provides try with resources wherein it automatically releases the resources as the control moves out of try block. Let’s look at an example:
import java.io.FileReader; import java.io.IOException; public class TryWithResourceExample { public static void main(String args[]) { try(FileReader fr = new FileReader("E://temp.txt")) { char [] a = new char[50]; fr.read(a); // reads the content to the array a for(char c : a) System.out.print(c); // prints the characters one by one } catch (IOException e) { e.printStackTrace(); } } }
try-with-resource is also referred to as automatic resource management. To use automatic resource management, you just need to declare the resource inside parentheses with a try statement like in the above program.
KEY POINTS TO USE try-with-resource MECHANISM:
- To use a class with try-with-resource, the class must implement AutoCloseable interface. Close() method is implicitly called after try-catch
- multiple class can be used with try to automatically manage them
- All instances of the class declared with try are instantiated before try block and are final by default.
USER DEFINED JAVA EXCEPTIONS:
User can create own exception by extending Throwable class in java. To create a self-defined Exception class, one should following key points listed below:
- All exceptions must be a child of Throwable
- to write check exception, one must extend the Exception class.
- To create a Runtime exception class, one must implement the RuntimeException class.
Syntax to define Exception class
class MyException extends Exception { }
Basis the origin of exception, Exceptions in java can be divided into two categories like
JVM Exceptions: these are thrown by JVM. e.g. NullPointerException, ArrayIndexOutOfBoundException, ClassCastException
Programmatic Exception: thrown by a programmer like IllegalArgumentException, IllegalStateException etc
So key take away from the post:
- Error are not something programmer can handle through code but however writing code efficiently can reduce the chances of their occurrences.
- checked exceptions are caught by the compiler at compile time and include IOExceptions/ FileNotFoundExceptions etc
- unchecked exceptions occur at runtime and are something programmers can manage using try-catch block
- finally block always execute regardless of what happened in the try block.
That's it, folks!!
Related items: Java Interview Questions and Java Basics
#java exceptions and exception handling#exception handling best practices#error in java#checked and uncheck exceptions in java
0 notes
Text
DPoP with Spring Boot and Spring Security
Solid is an exciting project that I first heard about back in January. Its goal is to help “re-decentralize” the Web by empowering users to control access to their own data. Users set up “pods” to store their data, which applications can securely interact with using the Solid protocol. Furthermore, Solid documents are stored as linked data, which allows applications to interoperate more easily, hopefully leading to less of the platform lock-in that exists with today’s Web.
I’ve been itching to play with this for months, and finally got some free time over the past few weekends to try building a Solid app. Solid's authentication protocol, Solid OIDC, is built on top of regular OIDC with a mechanism called DPoP, or "Demonstration of Proof of Possession". While Spring Security makes it fairly easy to configure OIDC providers and clients, it doesn't yet have out-of-the-box support for DPoP. This post is a rough guide on adding DPoP to a Spring Boot app using Spring Security 5, which gets a lot of the way towards implementing the Solid OIDC flow. The full working example can be found here.
DPoP vs. Bearer Tokens
What's the point of DPoP? I will admit it's taken me a fair amount of reading and re-reading over the past several weeks to feel like I can grasp what DPoP is about. My understanding thus far: If a regular bearer token is stolen, it can potentially be used by a malicious client to impersonate the client that it was intended for. Adding audience information into the token mitigates some of the danger, but also constrains where the token can be used in a way that might be too restrictive. DPoP is instead an example of a "sender-constrained" token pattern, where the access token contains a reference to an ephemeral public key, and every request where it's used must be additionally accompanied by a request-specific token that's signed by the corresponding private key. This proves that the client using the access token also possesses the private key for the token, which at least allows the token to be used with multiple resource servers with less risk of it being misused.
So, the DPoP auth flow differs from Spring's default OAuth2 flow in two ways: the initial token request contains more information than the usual token request; and, each request made by the app needs to create and sign a JWT that will accompany the request in addition to the access token. Let's take a look at how to implement both of these steps.
Overriding the Token Request
In the authorization code grant flow for requesting access tokens, the authorization process is kicked off by the client sending an initial request to the auth server's authorization endpoint. The auth server then responds with a code, which the client includes in a final request to the auth server's token endpoint to obtain its tokens. Solid OIDC recommends using a more secure variation on this exchange called PKCE ("Proof Key for Code Exchange"), which adds a code verifier into the mix; the client generates a code verifier and sends its hash along with the authorization request, and when it makes its token request, it must also include the original code verifier so that the auth server can confirm that it originated the authorization request.
Spring autoconfigures classes that implement both the authorization code grant flow and the PKCE variation, which we can reuse for the first half of our DPoP flow. What we need to customize is the second half -- the token request itself.
To do this we implement the OAuth2AccessTokenResponseClient interface, parameterized with OAuth2AuthorizationCodeGrantRequest since DPoP uses the authorization code grant flow. (For reference, the default implementation provided by Spring can be found in the DefaultAuthorizationCodeTokenResponseClient class.) In the tokenRequest method of our class, we do the following:
retrieve the code verifier generated during the authorization request
retrieve the code received in response to the authorization request
generate an ephemeral key pair, and save it somewhere the app can access it during the lifetime of the session
construct a JWT with request-specific info, and sign it using our generated private key
make a request to the token endpoint using the above data, and return the result as an OAuth2AccessTokenResponse.
Here's the concrete implementation of all of that. We get the various data that we need from the OAuth2AuthorizationCodeGrantRequest object passed to our method. We then call on RequestContextHolder to get the current session ID and use that to save the session keys we generate to a map in the DPoPUtils bean. We create and sign a JWT which goes into the DPoP header, make the token request, and finally convert the response to an OAuth2AccessTokenResponse.
Using the DPoP Access Token
Now, to make authenticated requests to a Solid pod our app will need access to both an Authentication object (provided automatically by Spring) containing the DPoP access token obtained from the above, as well as DPoPUtils for the key pair needed to use the token.
On each request, the application must generate a fresh JWT and place it in a DPoP header as demonstrated by the authHeaders method below:
private fun authHeaders( authToken: String, sessionId: String, method: String, requestURI: String ): HttpHeaders { val headers = HttpHeaders() headers.add("Authorization", "DPoP $authToken") dpopUtils.sessionKey(sessionId)?.let { key -> headers.add("DPoP", dpopUtils.dpopJWT(method, requestURI, key)) } return headers }
The body of the JWT created by DPoPUtils#dpopJWT contains claims that identify the HTTP method and the target URI of the request:
private fun payload(method: String, targetURI: String) : JWTClaimsSet = JWTClaimsSet.Builder() .jwtID(UUID.randomUUID().toString()) .issueTime(Date.from(Instant.now())) .claim("htm", method) .claim("htu", targetURI) .build()
A GET request, for example, would then look something like this:
val headers = authHeaders( authToken, sessionId, "GET", requestURI ) val httpEntity = HttpEntity(headers) val response = restTemplate.exchange( requestURI, HttpMethod.GET, httpEntity, String::class.java )
A couple of last things to note: First, the session ID passed to the above methods is not retrieved from RequestContextHolder as before, but from the Authentication object provided by Spring:
val sessionId = ((authentication as OAuth2AuthenticationToken) .details as WebAuthenticationDetails).sessionId
And second, we want the ephemeral keys we generate during the token request to be removed from DPoPUtils when the session they were created for is destroyed. To accomplish this, we create an HttpSessionListener and override its sessionDestroyed method:
@Component class KeyRemovalSessionListener( private val dPoPUtils: DPoPUtils ) : HttpSessionListener { override fun sessionDestroyed(se: HttpSessionEvent) { val securityContext = se.session .getAttribute("SPRING_SECURITY_CONTEXT") as SecurityContextImpl val webAuthDetails = securityContext.authentication.details as WebAuthenticationDetails val sessionId = webAuthDetails.sessionId dPoPUtils.removeSessionKey(sessionId) } }
This method will be invoked on user logout as well as on session timeout.
0 notes
Link
Credit: Adam Sinicki / Android Authority
A Web API is an online “application programming interface” that allows developers to interact with external services. These are the commands that the developer of the service has determined will be used to access certain features of their program. It is referred to as an interface because a good API should have commands that make it intuitive to interact with.
An example of this might be if we want to get information about a user from their social media account. That social media platform would likely have a web API for developers to use in order to request that data. Other commonly used APIs handle things like advertising (AdMob), machine learning (ML Kit), and cloud storage.
It’s easy to see how interacting with these types of services could extend the functionality of an app. In fact, the vast majority of successful apps on the Play Store will use at least one web API!
In this post, we’ll explore how to use a web API from within an Android app.
How a Web API works
Most APIs work using either XML or JSON. These languages allow us to send and retrieve large amounts of useful information in the form of objects.
XML is eXtensible Markup Language. If you are an Android developer, then you’re probably already familiar with XML from building your layouts and saving variables.
XML is easy to understand and generally places keys inside triangle brackets, followed by their values. It looks a bit like HTML:
<client> <name>Jeff</name> <age>32</age> </client>
JSON, on the other hand, stands for “Javascript Object Notation.” It is a short-hand for sending data online. Like XML or a CSV file, it can be used to send “value/attribute pairs.”
Here the syntax looks a little different, though:
[{client: {“name”:”Jeff”, “age”: 32}}]
These are “data objects” in that they are conceptual entities (people in this case) that can be described by key/value pairs. We use these in our Android apps by turning them into objects just as we normally would, with the use of classes.
See also: How to use classes in Java
To see this in action, we need to find a Web API that we can use readily. In this example, we will be using JSON Placeholder. This is a free REST API specifically for testing and prototyping, which is perfect for learning a new skill! REST is a particular architectural “style” that has become standard for communicating across networks. REST-compliant systems are referred to as “RESTful” and share certain characteristics. You don’t need to worry about that right now, however.
Setting up our project for Retrofit 2
For this example, we’ll also be using something called Retrofit 2. Retrofit 2 is an extremely useful HTTP client for Android that allows apps to connect to a Web API safely and with a lot less code on our part. This can then be used, for example, to show Tweets from Twitter, or to check the weather. It significantly reduces the amount of work we need to do to get that working.
See also: Consuming APIs: Getting started with Retrofit on Android
First up, we need to add internet permission to our Android Manifest file to make sure our app is allowed to go online. Here is what you need to include:
<uses-permission android:name="aandroid.permission.INTERNET" />
We also need to add a dependency if we are going to get Retrofit 2 to work in our app. So in your module-level build.gradle file add:
implementation 'com.squareup.retrofit2:retrofit:2.4.0'
We also need something called Gson:
implementation 'com.squareup.retrofit2:converter-gson:2.4.0'
Gson is what is going to convert the JSON data into a Java object for us (a process called deserialization). We could do this manually, but using tools like this makes life much easier!
There are actually later versions of Retrofit that make a few changes. If you want to be up-to-the-moment, check out the official website.
Converting JSON to Java object
A “Route” is a URL that represents an endpoint for the API. If we take a look at JSON Placeholder, you’ll see we have options such as “/posts” and “/comments?postId=1”. Chances are you will have seen URLs like this yourself while browsing the web!
Click on /posts and you’ll see a large amount of data in JSON format. This is a dummy text that mimics the way a page full of posts on social media looks. It is the information we want to get from our app and then display on the screen.
[{ "userId": 1, "id": 1, "title": "sunt aut facere repellat provident occaecati excepturi optio reprehenderit", "body": "quia et suscipit\nsuscipit recusandae consequuntur expedita et cum\nreprehenderit molestiae ut ut quas totam\nnostrum rerum est autem sunt rem eveniet architecto" }, { "userId": 1, "id": 2, "title": "qui est esse", "body": "est rerum tempore vitae\nsequi sint nihil reprehenderit dolor beatae ea dolores neque\nfugiat blanditiis voluptate porro vel nihil molestiae ut reiciendis\nqui aperiam non debitis possimus qui neque nisi nulla" }, { "userId": 1, "id": 3, "title": "ea molestias quasi exercitationem repellat qui ipsa sit aut", "body": "et iusto sed quo iure\nvoluptatem occaecati omnis eligendi aut ad\nvoluptatem doloribus vel accusantium quis pariatur\nmolestiae porro eius odio et labore et velit aut" }
To handle this information, we’re going to need a class that can build objects from the deserialized data. To that end, create a new class in your project and call it “PlaceholderPost”. This will need variables that correspond to the data we’re getting from the /posts page (“body”, “ID” etc.). We’ll be getting that information from the web API, so we need a getter for each of them.
The final class should look like this:
public class PlaceholderPost { private int userID; private int id; private String title; private String body; public int getUserId() { return userID; } public int getId() { return id; } public String getTitle() { return title; } public String getBody() { return body; } }
This could just as easily be users on Twitter, messages on Facebook, or information about the weather!
Interface files
Next, we need a new interface file. You create this the same way you create a class: by clicking on your package name in the project window and choosing “New > Class” but here you’re selecting “Interface” underneath where you enter the name. An interface file contains methods that are later implemented by a class. I’ve called mine “PlaceholderAPI”.
This interface needs just a single method to retrieve all the data from “/Post”. If you take a look at that JSON again, you’ll notice that the curly brackets are inside square brackets. This means that we have an array of objects, which is why we want to build a list for them. The objects are instances of our “PlaceholderPost” that we just made, so that’s what we’re putting in here!
For those that are very new to programming, remember that any red lines probably mean you haven’t imported a class. Just click on the highlighted statement and press alt+return to do this automatically.
(I can’t imagine anyone using this as an early programming lesson but you never know!)
This looks like so:
import java.util.List; import retrofit2.Call; import retrofit2.http.GET; public interface PlaceholderAPI { @GET("posts") Call<List> getPosts(); }
Displaying the content
Now, hop back into your main activity. We could build a fancy layout for displaying all this data, but to keep things nice and simple, I’m just going to stick with the layout as it is.
To use Retrofit, we’re going to need to create a new Retrofit object. We do this with the following lines of code:
Retrofit retrofit = new Retrofit.Builder() .baseUrl("https://jsonplaceholder.typicode.com/") .build();
As you can see, we’re passing in the rest of the URL here. We then want to use our interface:
Call<List> call = placeholderAPI.getPosts();
Now we just need to call the method! Because things have been too easy so far, Android does throw a little spanner in the works by preventing you from doing this on the main thread. The reason, of course, is that if the process takes too long, it will end up freezing the app! This is true when using any Web API. It makes sense, but it’s not terribly convenient when we just want to make a tutorial. Fortunately, we don’t need to create a second thread ourselves as Retrofit actually does all that for us.
We’ll now get an onResponse and onFailure callback. onFailure is, of course, where we need to handle any errors.
onResponse does not mean that everything went smoothly, however. It simply means that there was a response; that the website exists. Should we get a 404 message, this would still be considered a “response.” Thus, we need to check again if the process went smoothly with isSuccessful(), which checks to see that the HTTP code is not an error.
To keep things really simple, I’m going to display just one piece of data from one of the objects we’ve received. To achieve this, I renamed the textView in the layout file to give it the id “text”. You can experiment with this yourself.
The full code looks like this:
call.enqueue(new Callback<List>() { @Override public void onResponse(Call<List> call, Response<List> response) { if (response.isSuccessful()) { List posts = response.body(); Log.d("Success", posts.get(3).getBody().toString()); TextView textView = findViewById(R.id.text); textView.setText(posts.get(3).getBody().toString()); } else { Log.d("Yo", "Boo!"); return; } } @Override public void onFailure(Call<List> call, Throwable t) { Log.d("Yo", "Errror!"); } }); Log.d("Yo","Hello!"); } }
Wrapping up
At this point, you should have a good idea of how a web API works and why you want one. You would have also created your first app that uses a web API to do something potentially useful.
Of course, there are countless other web APIs, and each work in their own ways. Some will require additional SDKs to use or different libraries. Likewise, there are many other actions beyond the “GET” request we demonstrated here. For example, you can use “POST” in order to send data to the server, which is useful if you ever want your users to be able to post to social media from your apps.
The possibilities are endless once you combine the power and flexibility of Android with the huge resources available online.
source https://www.androidauthority.com/use-web-api-android-1152645/
0 notes
Link
Start Learning Java Programming Step By Step with 200+ code examples. 250 Amazing Steps For Absolute Java Beginners!
What you’ll learn
You will Learn Java the MODERN WAY – Step By Step – With 200 HANDS-ON Code Examples
You will Understand the BEST PRACTICES in Writing High Quality Java Code
You will Solve a Wide Range of Hands-on Programming EXERCISES with Java
You will Learn to Write AWESOME Object Oriented Programs with Java
You will Acquire ALL the SKILLS to demonstrate an EXPERTISE with Java Programming in Your Job Interviews
You will learn ADVANCED Object Oriented Programming Concepts – Abstraction, Inheritance, Encapsulation and Polymorphism
You will learn the Basics of Object Oriented Programming – Interfaces, Inheritance, Abstract Class and Constructors
You will learn the Basics of Programming – variables, choosing a data type, conditional execution, loops, writing great methods, breaking down problems into sub problems and implementing great Exception Handling
You will learn Basics of Functional Programming with Java
You will gain Expertise in using Eclipse IDE and JShell
You will learn the basics of MultiThreaded Programming – with Executor Service
You will learn about a wide variety of Java Collections – List, Map, Set and Queue Interfaces
Requirements
You have an attitude to learn while having fun 🙂
You have ZERO Programming Experience and Want to Learn Java
Description
Zero Java Programming Experience? No Problem.
Do you want to take the first steps to Become a Great Java Programmer? Do you want to Learn Java Step By Step in a Fail Safe in28Minutes Way? Do you want to Learn to Write Great Java Programs?
******* Some Amazing Reviews From Our Learners *******
★★★★★ it’s an awesome course , i was a complete beginner and it helped me a lot. One of the best courses i have every taken on Udemy.
★★★★★ This is the best Java course I’ve come across. It’s straight to the point without any missing details. You can get an idea of what you’re getting into working with Java fast with this course. I really like it.
★★★★★ The experienece was extremely amazing. The course was highly detailed and comprehensive and all the topic were covered properly with due examples to their credit. The instructor is passionateabout what he is doing and hence it makes the course much more worth to learn. Kudos to the instructor for such an amazing job.
★★★★★ Never thought taking an online course will be so helpful. The instructor is quite engaging, gives good amount of exercises.
★★★★★ This course is wonderful! I really enjoy it. It really is for beginners, so it’s very helpful for people which don’t know nothing about programming.
★★★★★ Very comprehensive and detail course the instructor takes the patience to explain everything and goes a step forward in thinking what kind of errors could happen to the students really good instructor!
★★★★★ It’s very well thought out. I enjoy the constant exercises and the challenge they present to make things happen.
******* Course Overview *******
Java is one of the most popular programming languages. Java offers both object oriented and functional programming features.
We take an hands-on approach using a combination of JShell and Eclipse as an IDE to illustrate more than 200 Java Coding Exercises, Puzzles and Code Examples. This course assumes no previous ( beginner ) programming or Java experience. If you’ve never programmed a computer before, or if you already have experience with another programming language and want to quickly learn Java, this is a perfect course for you.
In more than 250 Steps, we explore the most important Java Programming Language Features
Basics of Java Programming – Expressions, Variables and Printing Output
Java Operators – Java Assignment Operator, Relational and Logical Operators, Short Circuit Operators
Java Conditionals and If Statement
Methods – Parameters, Arguments and Return Values
Object Oriented Programming – Class, Object, State and Behavior
Basics of OOPS – Encapsulation, Abstraction, Inheritance and Polymorphism
Basics about Java Data Types – Casting, Operators and More
Java Built in Classes – BigDecimal, String, Java Wrapper Classes
Conditionals with Java – If Else Statement, Nested If Else, Java Switch Statement, Java Ternary Operator
Loops – For Loop, While Loop in Java, Do While Loop, Break and Continue
Immutablity of Java Wrapper Classes, String and BigDecimal
Java Dates – Introduction to LocalDate, LocalTime and LocalDateTime
Java Array and ArrayList – Java String Arrays, Arrays of Objects, Primitive Data Types, toString and Exceptions
Introduction to Variable Arguments
Basics of Designing a Class – Class, Object, State and Behavior. Deciding State and Constructors.
Understanding Object Composition and Inheritance
Java Abstract Class and Interfaces. Introduction to Polymorphism.
Java Collections – List Interface(ArrayList, LinkedList and Vector), Set Interface (HashSet, LinkedHashSet and TreeSet), Queue Interface (PriorityQueue) and Map Interface (HashMap, HashTable, LinkedHashMap and TreeMap() – Compare, Contrast and Choose
Generics – Why do we need Generics? Restrictions with extends and Generic Methods, WildCards – Upper Bound and Lower Bound.
Functional Programming – Lambda Expression, Stream and Operations on a Stream (Intermediate Operations – Sort, Distinct, Filter, Map and Terminal Operations – max, min, collect to List), Functional Interfaces – Predicate Interface,Consumer Interface, Function Inteface for Mapping, Method References – static and instance methods
Introduction to Threads and MultiThreading – Need for Threads
Implementing Threads – Extending Thread Class and Implementing Runnable Interface
States of a Thread and Communication between Threads
Introduction to Executor Service – Customizing number of Active Threads. Returning a Future, invokeAll and invokeAny
Introduction to Exception Handling – Your Thought Process during Exception Handling. try, catch and finally. Exception Hierarchy – Checked Exceptions vs Unchecked Exceptions. Throwing an Exception. Creating and Throwing a Custom Exception – CurrenciesDoNotMatchException. Try with Resources – New Feature in Java 7.
List files and folders in Directory with Files list method, File walk method and find methods. Read and write from a File.
******* What You Can Expect from Every in28Minutes Course *******
in28Minutes created 20 Best Selling Courses providing Amazing Learning Experiences to 250,000 Learners across the world.
Each of these courses come with
✔ Amazing Hands-on Step By Step Learning Experiences
✔ Real Project Experiences using the Best Tools and Frameworks
✔ Awesome Troubleshooting Guides with 200+ FAQs Answered
✔ Friendly Support in the Q&A section
✔ Free Udemy Certificate of Completion on Completion of Course
✔ 30 Day “No Questions Asked” Money Back Guarantee!
~~~ Here are a Few Reviews on The in28Minutes Way ~~~
★★★★★ Excellent, fabulous. The way he has prepared the material and the way he teaches is really awesome. What an effort .. Thanks a million
★★★★★ A lot of preparation work has taken place from the teacher and this is visible throughout the course.
★★★★★ This guy is fantastic. Really. Wonderful teaching skills, and goes well out of his way to make sure that everything he is doing is fully understood. This is the kind of tutorial that gets me excited to work with a framework that I may otherwise not be.
★★★★★ The best part of it is the hands-on approach which the author maintained throughout the course as he had promised at the beginning of the lecture. He explains the concepts really well and also makes sure that there is not a single line of code you type without understanding what it really does.
★★★★★ I also appreciate the mind and hands approach of teaching something and then having the student apply it. It makes everything a lot clearer for the student and uncovers issues that we will face in our project early.
★★★★★ Amazing course. Explained super difficult concepts (that I have spent hours on the internet finding a good explanation) in under 5 minutes.
Zero risk. 30 day money-back guarantee with every purchase of the course. You have nothing to lose!
Start Learning Now. Hit the Enroll Button!
******* Step By Step Details *******
Introduction to Java Programming with Jshell using Multiplication Table
Step 00 – Getting Started with Programming
Step 01 – Introduction to Multiplication Table challenge
Step 02 – Launch JShell
Step 03 – Break Down Multiplication Table Challenge
Step 04 – Java Expression – An Introduction
Step 05 – Java Expression – Exercises
Step 06 – Java Expression – Puzzles
Step 07 – Printing output to console with Java
Step 08 – Printing output to console with Java – Exercise Statements
Step 09 – Printing output to console with Java – Exercise Solutions
Step 10 – Printing output to console with Java – Puzzles
Step 11 – Advanced Printing output to console with Java
Step 12 – Advanced Printing output to console with Java – Exercises and Puzzles
Step 13 – Introduction to Variables in Java
Step 14 – Introduction to Variables in Java – Exercises and Puzzles
Step 15 – 4 Important Things to Know about Variables in Java
Step 16 – How are variables stored in memory?
Step 17 – How to name a variable?
Step 18 – Understanding Primitive Variable Types in Java
Step 19 – Understanding Primitive Variable Types in Java – Choosing a Type
Step 20 – Java Assignment Operator
Step 21 – Java Assignment Operator – Puzzles on Increment, Decrement and Compound Assignment
Step 23 – Java Conditionals and If Statement – Introduction
Step 24 – Java Conditionals and If Statement – Exercise Statements
Step 25 – Java Conditionals and If Statement – Exercise Solutions
Step 26 – Java Conditionals and If Statement – Puzzles
Step 27 – Java For Loop to Print Multiplication Table – Introduction
Step 28 – Java For Loop to Print Multiplication Table – Exercise Statements
Step 29 – Java For Loop to Print Multiplication Table – Exercise Solutions
Step 30 – Java For Loop to Print Multiplication Table – Puzzles
Step 31 – Programming Tips : JShell – Shortcuts, Multiple Lines and Variables TODO Move up
Step 32 – Getting Started with Programming – Revise all Terminology
Introduction to Method with Multiplication Table
Step 00 – Section 02 – Methods – An Introduction
Step 01 – Your First Java Method – Hello World Twice and Exercise Statements
Step 02 – Introduction to Java Methods – Exercises and Puzzles
Step 03 – Programming Tip – Editing Methods with JShell
Step 04 – Introduction to Java Methods – Arguments and Parameters
Step 05 – Introduction to Java Method Arguments – Exercises
Step 06 – Introduction to Java Method Arguments – Puzzles and Tips
Step 07 – Getting back to Multiplication Table – Creating a method
Step 08 – Print Multiplication Table with a Parameter and Method Overloading
Step 09 – Passing Multiple Parameters to a Java Method
Step 10 – Returning from a Java Method – An Introduction
Step 11 – Returning from a Java Method – Exercises
Step 99 – Methods – Section Review
Introduction to Java Platform
Step 00 – Section 03 – Overview Of Java Platform – Section Overview
Step 01 – Overview Of Java Platform – An Introduction – java, javac, bytecode and JVM
Step 02 – Java Class and Object – First Look
Step 03 – Create a method in a Java class
Step 04 – Create and Compile Planet.java class
Step 05 – Run Planet calss with Java – Using a main method
Step 06 – Play and Learn with Planet Class
Step 07 – JDK vs JRE vs JVM
Introduction to Eclipse – First Java Project
Step 01 – Creating a New Java Project with Eclipse
Step 02 – Your first Java class with Eclipse
Step 03 – Writing Multiplication Table Java Program with Eclipse
Step 04 – Adding more methods for Multiplication Table Program
Step 05 – Programming Tip 1 : Refactoring with Eclipse
Step 06 – Programming Tip 2 : Debugging with Eclipse
Step 07 – Programming Tip 3 : Eclipse vs JShell – How to choose?
Introduction To Object Oriented Programming
Step 00 – Introduction to Object Oriented Programming – Section Overview
Step 01 – Introduction to Object Oriented Programming – Basics
Step 02 – Introduction to Object Oriented Programming – Terminology – Class, Object, State and Behavior
Step 03 – Introduction to Object Oriented Programming – Exercise – Online Shopping System and Person
Step 04 – Create Motor Bike Java Class and a couple of objects
Step 05 – Exercise Solutions – Book class and Three instances
Step 06 – Introducing State of an object with speed variable
Step 07 – Understanding basics of Encapsulation with Setter methods
Step 08 – Exercises and Tips – Getters and Generating Getters and Setters with Eclipse
Step 09 – Puzzles on this and initialization of member variables
Step 10 – First Advantage of Encapsulation
Step 11 – Introduction to Encapsulation – Level 2
Step 12 – Encapsulation Exercises – Better Validation and Book class
Step 13 – Introdcution to Abstraction
Step 14 – Introduction to Java Constructors
Step 15 – Introduction to Java Constructors – Exercises and Puzzles
Step 16 – Introduction to Object Oriented Programming – Conclusion
Primitive Data Types And Alternatives
Step 00 – Primitive Data Types in Depth – Section Overview
Step 01 – Basics about Java Integer Data Types – Casting, Operators and More
Step 02 – Java Integer Data Types – Puzzles – Octal, Hexadecimal, Post and Pre increment
Step 03 – Java Integer Data Types – Exercises – BiNumber – add, multiply and double
Step 04 – Java Floating Point Data Types – Casting , Conversion and Accuracy
Step 05 – Introduction to BigDecimal Java Class
Step 06 – BigDecimal Puzzles – Adding Integers
Step 07 – BigDecimal Exercises – Simple Interest Calculation
Step 08 – Java Boolean Data Type – Relational and Logical Operators
Step 09 – Java Boolean Data Type – Puzzles – Short Circuit Operators
Step 10 – Java Character Data Type char – Representation and Conversion
Step 11 – Java char Data Type – Exercises 1 – isVowel
Step 12 – Java char Data Type – Exercises 2 – isDigit
Step 13 – Java char Data Type – Exercises 3 – isConsonant, List Upper Case and Lower Case Characters
Step 14 – Primitive Data Types in Depth – Conclusion
Conditionals
Step 00 – Conditionals with Java – Section Overview
Step 01 – Introduction to If Else Statement
Step 02 – Introduction to Nested If Else
Step 03 – If Else Statement – Puzzles
Step 04 – If Else Problem – How to get User Input in Java?
Step 05 – If Else Problem – How to get number 2 and choice from user?
Step 06 – If Else Problem – Implementing with Nested If Else
Step 07 – Java Switch Statement – An introduction
Step 08 – Java Switch Statement – Puzzles – Default, Break and Fall Through
Step 09 – Java Switch Statement – Exercises – isWeekDay, nameOfMonth, nameOfDay
Step 10 – Java Ternary Operation – An Introduction
Step 11 – Conditionals with Java – Conclusion
Loops
Step 00 – Java Loops – Section Introduction
Step 01 – Java For Loop – Syntax and Puzzles
Step 02 – Java For Loop – Exercises Overview and First Exercise Prime Numbers
Step 03 – Java For Loop – Exercise – Sum Upto N Numbers and Sum of Divisors
Step 04 – Java For Loop – Exercise – Print a Number Triangle
Step 05 – While Loop in Java – An Introduction
Step 06 – While Loop – Exericises – Cubes and Squares upto limit
Step 07 – Do While Loop in Java – An Introduction
Step 08 – Do While Loop in Java – An Example – Cube while user enters positive numbers
Step 09 – Introduction to Break and Continue
Step 10 – Selecting Loop in Java – For vs While vs Do While
Reference Types
Step 00 – Java Reference Types – Section Introduction
Step 01 – Reference Types – How are they stored in Memory?
Step 02 – Java Reference Types – Puzzles
Step 03 – String class – Introduction and Exercise – Print each word and char on a new line
Step 04 – String class – Exercise Solution and Some More Important Methods
Step 05 – Understanding String is Immutable and String Concat, Upper Case, Lower Case, Trim methods
Step 06 – String Concatenation and Join, Replace Methods
Step 07 – Java String Alternatives – StringBuffer and StringBuilder
Step 08 – Java Wrapper Classes – An Introduction – Why and What?
Step 09 – Java Wrapper Classes – Creation – Constructor and valueOf
Step 10 – Java Wrapper Classes – Auto Boxing and a Few Wrapper Constants – SIZE, BYTES, MAX_VALUE and MIN_VALUE
Step 11 – Java Dates – Introduction to LocalDate, LocalTime and LocalDateTime
Step 12 – Java Dates – Exploring LocalDate – Creation and Methods to play with Date
Step 13 – Java Dates – Exploring LocalDate – Comparing Dates and Creating Specific Dates
Step 14 – Java Reference Types – Conclusion
Arrays and ArrayLists
Step 00 – Introduction to Array and ArrayList – Section Introduction with a Challenge
Step 01 – Understanding the need and Basics about an Array
Step 02 – Java Arrays – Creating and Accessing Values – Introduction
Step 03 – Java Arrays – Puzzles – Arrays of Objects, Primitive Data Types, toString and Exceptions
Step 04 – Java Arrays – Compare, Sort and Fill
Step 05 – Java Arrays – Exercise – Create Student Class – Part 1 – Total and Average Marks
Step 06 – Java Arrays – Exercise – Create Student Class – Part 2 – Maximum and Minimum Mark
Step 07 – Introduction to Variable Arguments – Need
Step 08 – Introduction to Variable Arguments – Basics
Step 09 – Introduction to Variable Arguments – Enhancing Student Class
Step 10 – Java Arrays – Using Person Objects and String Elements with Exercises
Step 11 – Java String Arrays – Exercise Solutions – Print Day of Week with Most number of letters and more
Step 12 – Adding and Removing Marks – Problem with Arrays
Step 13 – First Look at ArrayList – An Introduction
Step 14 – First Look at ArrayList – Refactoring Student Class to use ArrayList
Step 15 – First Look at ArrayList – Enhancing Student Class with Add and Remove Marks
Step 16 – Introduction to Array and ArrayList – Conclusion
Object Oriented Programming Again
Step 00 – Object Oriented Programming – Level 2 – Section Introduction
Step 01 – Basics of Designing a Class – Class, Object, State and Behavior
Step 02 – OOPS Example – Fan Class – Deciding State and Constructors
Step 03 – OOPS Example – Fan Class – Deciding Behavior with Methods
Step 04 – OOPS Exercise – Rectangle Class
Step 05 – Understanding Object Composition with Customer Address Example
Step 06 – Understanding Object Composition – An Exercise – Books and Reviews
Step 07 – Understanding Inheritance – Why do we need it?
Step 08 – Object is at top of Inheritance Hierarchy
Step 09 – Inheritance and Overriding – with toString() method
Step 10 – Java Inheritance – Exercise – Student and Employee Classes
Step 11 – Java Inheritance – Default Constructors and super() method call
Step 12 – Java Inheritance – Puzzles – Multiple Inheritance, Reference Variables and instanceof
Step 13 – Java Abstract Class – Introductio
Step 14 – Java Abstract Class – First Example – Creating Recipes with Template Method
Step 15 – Java Abstract Class – Puzzles
Step 16 – Java Interface – Example 1 – Gaming Console – How to think about Intefaces?
Step 17 – Java Interface – Example 2 – Complex Algorithm – API defined by external team
Step 18 – Java Interface – Puzzles – Unimplemented methods, Abstract Classes, Variables, Default Methods and more
Step 19 – Java Interface vs Abstract Class – A Comparison
Step 20 – Java Interface Flyable and Abstract Class Animal – An Exercise
Step 21 – Polymorphism – An introduction
Collections
Step 01 – Java Collections – Section Overview with Need For Collections
Step 02 – List Interface – Introduction – Position is King
Step 03 – List Inteface – Immutability and Introduction of Implementations – ArrayList, LinkedList and Vector
Step 04 – List Inteface Implementations – ArrayList vs LinkedList
Step 05 – List Inteface Implementations – ArrayList vs Vector
Step 06 – List Inteface – Methods to add, remove and change elements and lists
Step 07 – List and ArrayList – Iterating around elements
Step 08 – List and ArrayList – Choosing iteration approach for printing and deleting elements
Step 09 – List and ArrayList – Puzzles – Type Safety and Removing Integers
Step 10 – List and ArrayList – Sorting – Introduction to Collections sort static method
Step 11 – List and ArrayList – Sorting – Implementing Comparable Inteface in Student Class
Step 12 – List and ArrayList – Sorting – Providing Flexibility by implementing Comparator interface
Step 13 – List and ArrayList – A Summary
Step 14 – Set Interface – Introduction – No Duplication
Step 15 – Understanding Data Structures – Array, LinkedList and Hashing
Step 16 – Understanding Data Structures – Tree – Sorted Order
Step 17 – Set Interface – Hands on – HashSet, LinkedHashSet and TreeSet
Step 18 – Set Interface – Exercise – Find Unique Characters in a List
Step 19 – TreeSet – Methods from NavigableSet – floor,lower,upper, subSet, head and tailSet
Step 20 – Queue Interface – Process Elements in Order
Step 21 – Introduction to PriorityQueue – Basic Methods and Customized Priority
Step 22 – Map Interface – An Introduction – Key and Value
Step 23 – Map Interface – Implementations – HashMap, HashTable, LinkedHashMap and TreeMap
Step 24 – Map Interface – Basic Operations
Step 25 – Map Interface – Comparison – HashMap vs LinkedHashMap vs TreeMap
Step 26 – Map Interface – Exercise – Count occurances of characters and words in a piece of text
Step 27 – TreeMap – Methods from NavigableMap – floorKey, higherKey, firstEntry, subMap and more
Step 28 – Java Collections – Conclusion with Three Tips
Generics
Step 01 – Introduction to Generics – Why do we need Generics?
Step 02 – Implementing Generics for the Custom List
Step 03 – Extending Custom List with a Generic Return Method
Step 04 – Generics Puzzles – Restrictions with extends and Generic Methods
Step 05 – Generics and WildCards – Upper Bound and Lower Bound
Introduction to Functional Programming
Step 01 – Introduction to Functional Programming – Functions are First Class Citizens
Step 02 – Functional Programming – First Example with Function as Parameter
Step 03 – Functional Programming – Exercise – Loop a List of Numbers
Step 04 – Functional Programming – Filtering – Exercises to print odd and even numbers from List
Step 05 – Functional Programming – Collect – Sum of Numbers in a List
Step 06 – Functional Programming vs Structural Programming – A Quick Comparison
Step 07 – Functional Programming Terminology – Lambda Expression, Stream and Operations on a Stream
Step 08 – Stream Intermediate Operations – Sort, Distinct, Filter and Map
Step 09 – Stream Intermediate Operations – Exercises – Squares of First 10, Map String List to LowerCase and Length of String
Step 10 – Stream Terminal Operations – 1 – max operation with Comparator
Step 11 – Stream Terminal Operations – 2 – min, collect to List,
Step 12 – Optional class in Java – An Introduction
Step 13 – Behind the Screens with Functional Interfaces – Implement Predicate Interface
Step 14 – Behind the Screens with Functional Interfaces – Implement Consumer Interface
Step 15 – Behind the Screens with Functional Interfaces – Implement Function Inteface for Mapping
Step 16 – Simplify Functional Programming code with Method References – static and instance methods
Step 17 – Functions are First Class Citizens
Step 18 – Introduction to Functional Programming – Conclusion
Introduction to Threads And Concurrency
Step 01 – Introduction to Threads and MultiThreading – Need for Threads
Step 02 – Creating a Thread for Task1 – Extending Thread Class
Step 03 – Creating a Thread for Task2 – Implement Runnable Interface
Step 04 – Theory – States of a Thread
Step 05 – Placing Priority Requests for Threads
Step 06 – Communication between Threads – join method
Step 07 – Thread utility methods and synchronized keyword – sleep, yield
Step 08 – Need for Controlling the Execution of Threads
Step 09 – Introduction to Executor Service
Step 10 – Executor Service – Customizing number of Threads
Step 11 – Executor Service – Returning a Future from Thread using Callable
Step 12 – Executor Service – Waiting for completion of multiple tasks using invokeAll
Step 13 – Executor Service – Wait for only the fastest task using invokeAny
Step 14 – Threads and MultiThreading – Conclusion
Introduction to Exception Handling
Step 01 – Introduction to Exception Handling – Your Thought Process during Exception Handling
Step 02 – Basics of Exceptions – NullPointerException and StackTrace
Step 03 – Basics of Handling Exceptions – try and catch
Step 04 – Basics of Handling Exceptions – Exception Hierarchy, Matching and Catching Multiple Exceptions
Step 05 – Basics of Handling Exceptions – Need for finally
Step 06 – Basics of Handling Exceptions – Puzzles
Step 07 – Checked Exceptions vs Unchecked Exceptions – An Example
Step 08 – Hierarchy of Errors and Exceptions – Checked and Runtime
Step 09 – Throwing an Exception – Currencies Do Not Match Runtime Exception
Step 10 – Throwing a Checked Exception – Throws in method signature and handling
Step 11 – Throwing a Custom Exception – CurrenciesDoNotMatchException
Step 12 – Write less code with Try with Resources – New Feature in Java 7
Step 13 – Basics of Handling Exceptions – Puzzles 2
Step 14 – Exception Handling – Conclusion with Best Practices
Files and Directories
Step 01 – List files and folders in Directory with Files list method
Step 02 – Recursively List and Filter all files and folders in Directory with Step Files walk method and Search with find method
Step 03 – Read content from a File – Files readAllLines and lines methods
Step 04 – Writing Content to a File – Files write method
Step 05 – Files – Conclusion
More Concurrency with Concurrent Collections and Atomic Operations
Step 01 – Getting started with Synchronized
Step 02 – Problem with Synchronized – Less Concurrency
Step 03 – Enter Locks with ReEntrantLock
Step 04 – Introduction to Atomic Classes – AtomicInteger
Step 05 – Need for ConcurrentMap
Step 06 – Implementing an example with ConcurrentHashMap
Step 07 – ConcurrentHashMap uses different locks for diferrent regions
Step 08 – CopyOnWrite Concurrent Collections – When reads are more than writes
Step 09 – Conclusion
Java Tips
Java Tip 01 – Imports and Static Imports
Java Tip 02 – Blocks
Java Tip 03 – equals method
Java Tip 04 – hashcode method
Java Tip 05 – Class Access Modifiers – public and default
Java Tip 06 – Method Access Modifiers – public, protected, private and default
Java Tip 07 – Final classes and Final methods
Java Tip 08 – Final Variables and Final Arguments
Java Tip 09 – Why do we need static variables?
Java Tip 09 – Why do we need static methods?
Java Tip 10 – Static methods cannot use instance methods or variables
Java Tip 11 – public static final – Constants
Java Tip 12 – Nested Classes – Inner Class vs Static Nested Class
Java Tip 13 – Anonymous Classes
Java Tip 14 – Why Enum and Enum Basics – ordinal and values
Java Tip 15 – Enum – Constructor, variables and methods
Java Tip 16 – Quick look at inbuild Enums – Month, DayOfWeek
Zero risk. 30 day money-back guarantee with every purchase of the course. You have nothing to lose!
Start Learning Now. Hit the Enroll Button!
Who this course is for:
You have ZERO programming experience and want to learn Java Programming
You are a Beginner at Java Programming and want to Learn to write Great Java Programs
You want to learn the Basics of Object Oriented Programming with Java
You want to learn the Basics of Functional Programming with Java
Created by in28Minutes Official
Last updated 1/2019
English
English [Auto-generated]
Size: 2.80 GB
Download Now
https://ift.tt/2A4bRbM.
The post Java Programming for Complete Beginners – Learn in 250 Steps appeared first on Free Course Lab.
0 notes
Text
Spark Actions
Overview
In our Apache Spark tutorial journey, we have learnt how to create Spark RDD using Java, Spark Transformations. In this article, we are going to explain Spark Actions.
Spark Actions are another type of operations which returns final values to Driver program or writes the data to external system.
You can find all the Java files of this article at our Git repository.
1.1 count()
count is an action which returns number of elements in the RDD, usually it is used to get an idea of RDD size before performing any operation on RDD.
JavaRDD<String> likes = javaSparkContext.parallelize(Arrays.asList("Java")); JavaRDD<String> learn = javaSparkContext.parallelize(Arrays.asList("Spark","Scala")); JavaRDD<String> likeToLearn = likes.union(learn); //Learning::2 System.out.println("Learning::"+learn.count());
1.2 collect()
we can use collect action to retrieve the entire RDD. This can be useful if your program filters RDDs down to a very small size and you’d like to deal with it locally.
Note:
Keep in mind that your entire dataset must fit in memory on a single machine to use collect() on it, so collect() shouldn’t be used on large datasets.
reusing the above example, we can print the likeToLearn RDD elements in system console using collect action like,
List<String> result = likeToLearn.collect(); //Prints I like [Java, Spark, Scala] System.out.println("I like "+result.toString());
Now, moving forward we want continue the example by adding few other skills in our skillset.
We can use below snippet to add new learning skills in our learn RDD.
String[] newlyLearningSkills = {"Elastic Search","Spring Boot"}; JavaRDD<String> learningSkills = learn.union(javaSparkContext.parallelize(Arrays.asList(newlyLearningSkills))); //learningSkills::[Spark, Scala, Elastic Search, Spring Boot] System.out.print("learningSkills::"+learningSkills.collect().toString());
Here, we are using union to add new skills in learn RDD, so as a result we can get new RDD i.e learningSkills RDD.
1.3 take(n)
we can use take spark action to retrieve a small number of elements in the RDD at the driver program. We then iterate over them locally to print out information at the driver.
countinuing our example, now we have added new skills and as a result we do have learningSkills Spark RDD.
Now, If we call take action on learningSkills RDD like,
List<String> learning4Skills = learningSkills.take(4); //Learning 4 Skills::[Spark, Scala, Elastic Search, Spring Boot] System.out.println("Learning 4 Skills::"+learning4Skills.toString());
We will get 4 different skills from learningSkills RDD.
1.4 top(n)
Spark top action returns top(n) elements from RDD. In order to get top 2 learning skills from our learningSkills RDD, we can call top(2) action like,
List<String> learningTop2Skills = learningSkills.top(2); //Learning top 2 Skills::[Spring Boot, Spark] System.out.println("Learning top 2 Skills::"+learningTop2Skills.toString());
So, as a result we will get new RDD i.e learningTop2Skills and we can print the top 2 learning skills as shown in code snippet.
Note: Here, we have not defined any ordering, so it uses default ordering. we can use
public static java.util.List<T> top(int num,java.util.Comparator<T> comp) method for specifying custom Comparator while using top action.
1.5 countByValue()
countByValue Spark action returns occurence of each element in the given RDD.
so, in case, if we call countByValue action on learningSkills RDD, It will return a Map<String,Long>where each element is stored as Key in Map and Value represents its count.
Map<String,Long> skillCountMap= learningSkills.countByValue(); for(Map.Entry<String,Long> entry: skillCountMap.entrySet()){ System.out.println("key::"+entry.getKey()+"\t"+"value:"+entry.getValue()); }
Output
key::Scala value:1 key::Spark value:1 key::Elastic Search value:1 key::Spring Boot value:1
1.6 reduce()
The reduce action takes two elments as input and it returns one element as output. The output element must be of same type as input element. The simple example of such function is an addition function. We can add the elements of RDD, count the number of words. reduce action accepts commutative and associative operations as an argument.
So in our case lets take a list of integers and add them using reduce action as shown below.
The result will be sum of all the integers i.e 21.
JavaRDD<Integer> intRdd = javaSparkContext.parallelize(Arrays.asList(1,2,3,4,5,6)); Integer result = intRdd.reduce((v1, v2) -> v1+v2); System.out.println("result::"+result);
1.7 fold()
Spark fold action is similar to reduce action, apart from that it takes “Zero value” as input, so “Zero Value” is used for the initial call on each partition.
Note: Zero value is that it should be the identity element of that operation i.e 0 for Sum, 1 for Multiplication and division, empty list for concatenation etc.
Key Difference: The key difference between fold() and reduce() is that, reduce() throws an exception for empty collection, but fold() is defined for empty collection.
Return type : The return type of fold() is same as that of the element of RDD we are operating on.
ProTip: You can minimize object creation in fold() by modifying and returning the first of the two parameters in place. However, you should not modify the second parameter.
JavaRDD<Integer> intRdd = javaSparkContext.parallelize(Arrays.asList(1,2,3,4,5,6)); Integer foldResult = intRdd.fold(0,((v1, v2) -> (v1+v2))); System.out.println("Fold result::"+foldResult);
1.8 aggregate()
fold() and reduce() spark actions works well for operations where we are returning the same return type as RDD type, but many times we want to return a different type.
For example, when computing a running average, we need to keep track of both the count so far and the number of elements, which requires us to return a pair. We could work around this
by first using map() where we transform every element into the element and the number 1, which is the type we want to return, so that the reduce() function can work on pairs.
The aggregate() function frees us from the constraint of having the return be the same type as the RDD we are working on.
Input: With aggregate() spark action like fold(), we have to supply,
An initial zero value of the type we want to return.
A function to combine the elements from our RDD with the accumulator.
We need to supply a second function to merge two accumulators, given that each node accumulates its own results locally.
We can use aggregate() to compute the average of an RDD, avoiding a map() before the fold().
For better explaination of aggregate spark action, lets consider an example where we are interested in calculating moving average of integer numbers,
So following code will calculate the moving average of integers from 1 to 10.
You can find the complete example of the Aggregate spark action at our git repository.
JavaRDD<Integer> intRDD = javaSparkContext.parallelize(Arrays.asList(1,2,3,4,5,6,7,8,9,10)); Function2<AverageCount, Integer, AverageCount> addAndCount = new Function2<AverageCount, Integer, AverageCount>() { public AverageCount call(AverageCount a, Integer x) { a.total += x; a.num += 1; return a; } }; Function2<AverageCount, AverageCount, AverageCount> combine = new Function2<AverageCount, AverageCount, AverageCount>() { public AverageCount call(AverageCount a, AverageCount b) { a.total += b.total; a.num += b.num; return a; } }; AverageCount initial = new AverageCount(0, 0); AverageCount currentMovingAverage = intRDD.aggregate(initial, addAndCount, combine); System.out.println("Moving Average:"+currentMovingAverage.avg());
Now, if you run this code, you will get moving average as 5.5, lets add another 3 values, i.e 11,12,13 using following snippet.
JavaRDD<Integer> anotherIntRDD = javaSparkContext.parallelize(Arrays.asList(11,12,13)); JavaRDD<Integer> resultantRDD = intRDD.union(anotherIntRDD); AverageCount newMovingAverage = resultantRDD.aggregate(initial, addAndCount, combine); System.out.println("Changed Moving Average:"+newMovingAverage.avg());
Now if you run the program, you will get the changed moving average i.e 7.
1.9 foreach()
When we have a situation where we want to apply operation on each element of RDD, but it should not return value to the driver. In this case, foreach() function is useful. A good example of this would be
posting JSON to a webserver or inserting records into a database. In either case, the foreach() action lets us perform computations on each element in the RDD without bringing it back locally.
In our case we are simply printing each element of our previously derived RDD i.e learningSkills RDD.
So we can use following line to print all the elements of learningSkills RDD.
learningSkills.foreach(element -> System.out.println(element));
1.10 saveAsTextFile()
Outputting text files is also quite simple. The method saveAsTextFile(), we have already demonstrated in our passing function to spark example,
This spark action takes a path and will output the contents of the RDD to that file.
The path is treated as a directory and Spark will output multiple files underneath that directory. This allows Spark to write the output from multiple nodes.
With this method we don’t get to control which files end up with which segments of our data, but there are other output formats that do allow this.
we have used following code snippet to save the RDDs to textFiles.
adultMinorCountsRDD.saveAsTextFile(args[1]); aggregatedFamilyPairsRDD.saveAsTextFile(args[2]);
2. API & References
We have used Spark API for Java for writing this article, you can find complete John Party problem solution at our Git repository.
3. Conclusion
Apache Spark computes the result when it encounters a Spark Action. Thus, this lazy evaluation decreases the overhead of computation and make the system more efficient.
If you have any query about Spark Actions, feel free to share with us. We will be happy to solve them.
0 notes
Text
SOLVED:P2: Interactive PlayList Analysis Solution
In this assignment, you will develop an application that manages a user's songs in a simplified playlist.
Objectives
Write a class with a main method (PlayList).
Use an existing, custom class (Song).
Use classes from the Java standard library.
Work with numeric data.
Work with standard input and output.
Specification
Existing class that you will use: Song.java
Class that you will create: PlayList.java
Song (provided class)
You do not need to modify this class. You will just use it in your PlayList driver class.
You are given a class named Song that keeps track of the details about a song. Each song instance will keep track of the following data.
Title of the song.
The song title must be specified when the song is created.
Artist of the song.
The song artist must be specified when the song is created.
The play time (in seconds) of the song.
The play time must be specified when the song is created.
The file path of the song.
The file path must be specified when the song is created.
The play count of the song (e.g. how many times has the song been played).
This is set to 0 by default when the song is created.
The Song class has the following methods available for you to use:
public Song(String title, String artist, int playTime, String filePath) -- (The Constructor)
public String getTitle()
public String getArtist()
public int getPlayTime()
public String getFilePath()
public void play()
public void stop()
public String toString()
To find out what each method does, look at the documentation for the Song class: java docs for Song class
PlayList (the driver class)
You will write a class called PlayList. It is the driver class, meaning, it will contain the main method.
In this class, you will gather song information from the user by prompting and reading data from the command line. Then, you will store the song information by creating song objects from the given data. You will use the methods available in the song class to extract data from the song objects, calculate statistics for song play times, and print the information to the user.
Finally, you will use conditional statements to order songs by play time. The ordered "playlist" will be printed to the user.
Your PlayList code should not duplicate any data or functionality that belongs to the Song objects. Make sure that you are accessing data using the Song methods.
Do NOT use a loop or arrays to generate your Songs. We will discuss how to do this later, but please don't over complicate things now. If you want to do something extra, see the extra credit section below.
User input
Console input should be handled with a Scanner object.
Create a Scanner using the standard input as follows:
Scanner in = new Scanner(System.in);
You should never make more than one Scanner from System.in in any program. Creating more than one Scanner from System.in crashes the script used to test the program. There is only one keyboard; there should only be one Scanner.
Your program will prompt the user for the following values and read the user's input from the keyboard.
A String for the song title.
A String for the song artist.
A String for the song play time (converted to an int later).
A String for the song file path.
Here is a sample input session for one song. Your program must read input in the order below. If it doesn't, it will fail our tests when grading.
Enter title: Big Jet Plane
Enter artist: Julia Stone
Enter play time (mm:ss): 3:54
Enter file name: sounds/westernBeat.wav
You can use the nextLine() method of the Scanner class to read each line of input.
Creating Song objects from input
As you read in the values for each song, create a new Song object using the input values.
Use the following process to create each new song.
Read the input values from the user into temporary variables.
You will need to do some manipulation of the playing time data.
The play time will be entered in the format mm:ss, where mm is the number of minutes and ss is the number of seconds. You will need to convert this string value to the total number of seconds before you can store it in your Song object. (Hint: use the String class's indexOf() method to find the index of the ':' character, then use the substring() method to get the minutes and seconds values.)
All other input values are String objects, so you can store them directly in your Song object.
Use the Song constructor to instantiate a new song, passing in the variables containing the title, artist, play time, and file path.
Because a copy of the values will be stored in your song objects, you can re-use the same temporary variables when reading input for the next song.
Before moving to the next step, print your song objects to make sure everything looks correct.
To print a song, you may use the provided toString method. Look at the Song documentation for an example of how to print a song.
NOTE: Each Song instance you create will store its own data, so you will use the methods of the Song class to get that data when you need it. Don't use the temporary variables that you created for reading input from the user. For example, once you create a song, you may retrieve the title using song1.getTitle();
Calculate the average play time.
Use the getPlayTime() method to retrieve the play time of each song and calculate the average play time in seconds.
Print the average play time formatted to two decimal places. Format the output as shown in example below.
Average play time: 260.67
Use the DecimalFormat formatter to print the average. You may use this
Find the song with play time closest to 4 minutes
Determine which song has play time closest to 4 minutes.
Print the title of the song formatted as shown in the output below.
Song with play time closest to 240 secs is: Big Jet Plane
Build a sorted play list
Build a play list of the songs from the shortest to the longest play time and print the songs in order.
To print the formatted song data, use the toString() method in the Song class.
Print the play list as shown in the output below.
==============================================================================
Title Artist File Name Play Time
==============================================================================
Where you end Moby sounds/classical.wav 198
Big Jet Plane Julia Stone sounds/westernBeat.wav 234
Last Tango in Paris Gotan Project sounds/newAgeRhythm.wav 350
==============================================================================
Extra Credit (5 points)
You may notice that you are repeating the same code to read in the song data from the user for each song (Yuck! This would get really messy if we had 10 songs).
Modify your main method to use a loop to read in the songs from the user. As you read and create new songs, you will need to store your songs in an ArrayList.
This can be quite challenging if you have never used ArrayLists before, so we recommend saving a backup of your original implementation before attempting the extra credit.
Getting Started
Create a new Eclipse project for this assignment and import Song.java into your project.
Create a new Java class called PlayList and add a main method.
Read the Song documentation and (if you are feeling adventurous) look through the Song.java file to familiarize yourself with what it contains and how it works before writing any code of your own.
Start implementing your Song class according to the specifications.
Test often! Run your program after each task so you can find and fix problems early. It is really hard for anyone to track down problems if the code was not tested along the way.
Sample Input/Output
Make sure you at least test all of the following inputs.
Last Tango in Paris
Gotan Project
05:50
sounds/newAgeRhythm.wav
Where you end
Moby
3:18
sounds/classical.wav
Big Jet Plane
Julia Stone
3:54
sounds/westernBeat.wav
Where you end
Moby
3:18
sounds/classical.wav
Last Tango in Paris
Gotan Project
05:50
sounds/newAgeRhythm.wav
Big Jet Plane
Julia Stone
3:54
sounds/westernBeat.wav
Big Jet Plane
Julia Stone
3:54
sounds/westernBeat.wav
Last Tango in Paris
Gotan Project
05:50
sounds/newAgeRhythm.wav
Where you end
Moby
3:18
sounds/classical.wav
Submitting Your Project
Testing
Once you have completed your program in Eclipse, copy your Song.java, PlayList.java and README files into a directory on the onyx server, with no other files (if you did the project on your computer). Test that you can compile and run your program from the console in the lab to make sure that it will run properly for the grader.
javac PlayList.java
java PlayList
Documentation
If you haven't already, add a javadoc comment to your program. It should be located immediately before the class header. If you forgot how to do this, go look at the Documenting Your Program section from lab .
Have a class javadoc comment before the class (as you did in the first lab)
Your class comment must include the @author tag at the end of the comment. This will list you as the author of your software when you create your documentation.
Include a plain-text file called README that describes your program and how to use it. Expected formatting and content are described in README_TEMPLATE. See README_EXAMPLE for an example.
Submission
You will follow the same process for submitting each project.
Open a console and navigate to the project directory containing your source files,
Remove all the .class files using the command, rm *.class.
In the same directory, execute the submit command for your section as shown in the following table.
Look for the success message and timestamp. If you don't see a success message and timestamp, make sure the submit command you used is EXACTLY as shown.
Required Source Files
Required files (be sure the names match what is here exactly):
PlayList.java (main class)
Song.java (provided class)
README
Section Instructor Submit Command
1 Luke Hindman (TuTh 1:30 - 2:45) submit lhindman cs121-1 p2
2 Greg Andersen (TuTh 9:00 - 10:15) submit gandersen cs121-2 p2
3 Luke Hindman (TuTh 10:30 - 11:45) submit lhindman cs121-3 p2
4 Marissa Schmidt (TuTh 4:30 - 5:45) submit marissa cs121-4 p2
5 Jerry Fails (TuTh 1:30 - 2:45) submit jfails cs121-5 p2
After submitting, you may check your submission using the "check" command. In the example below, replace
submit -check
Read the full article
0 notes
Last Seen Blogs

fyeahsnapeandlily
Severus Snape & Lily Evans

081288939951
Untitled

ghjim
제목 없음

phamhoadecor
Untitled

healthshabits
Healthy Habits