#those are pieces you'll be able to remove or swap out
Text
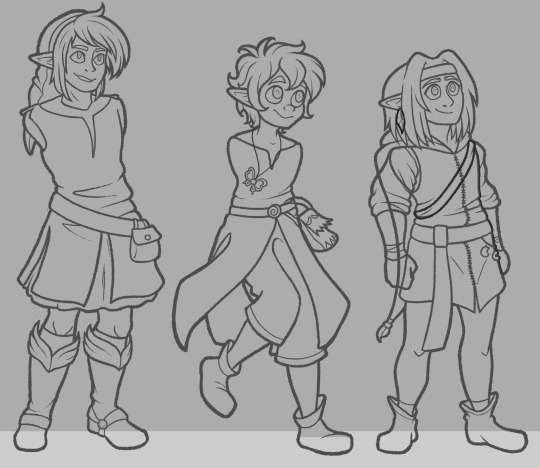
Progress on the sprites. Four now has two buddies. The buddies do not have arms yet.
#linked universe four#lu four#linked universe legend#lu legend#linked universe wind#lu wind#if you see parts with overlapping outlines like four's arms or wind's monster parts bag?#those are pieces you'll be able to remove or swap out#like the expressions#also got started on the base linework for everyone else#but they're kind of uglyyyyy#Lege looked pretty ugly at first too tho so we can probs fix it#Four did turn out really adorable tho?#same w/ Wind#mightier than the sword
57 notes
·
View notes
Note
Hi! Would you mind talking a little about how you made your pants? I'm in the same boat of not being able to find tripp pants in my size. I LOVE what you did and definitely want to try making a pair myself but I don't really know where to start
YES i can talk lots about it!! in fact i can draw some about it as well!
i'll put it all under a cut since it's gonna be a Long Post! and heres the pants we are talking abt btw
so i started with 2 pairs of skinny jeans. generally skinny jeans in plus sizes are easier to find because they think we are scared of looking any bigger (and since they're out of style lately you'll likely be able to thrift them very easily, but really any cut of full length jeans will work). the first pair (jeans 1) should fit how you want at the top, but it wasn't as important if the legs or the second pair (jeans 2) fit because we'll be chopping those up.
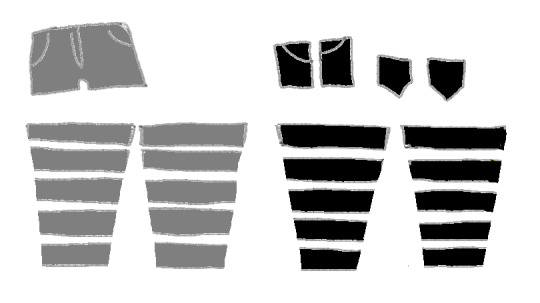
i cut them into segments as shown, though you could do more or fewer:

then i cut each leg 'ring' that i've made open and laid them all out flat. i also took the pockets off of jeans 2, and set aside the rest for scraps. you'll have something like this:
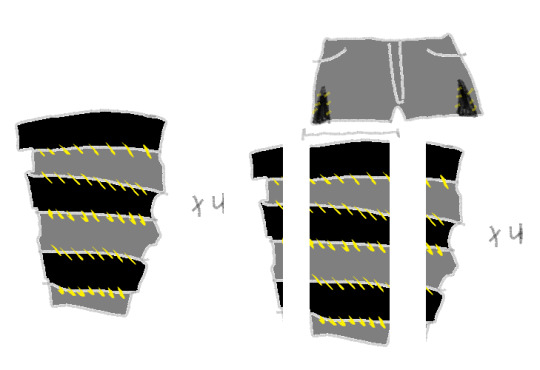
essentially what i'm going to do is attach 2 legs together to increase the circumference - the reason i cut strips is so i can mix and match colours to make it more interesting and look more intentional! i swapped them around like this:

then i sewed the strips back into 4 leg pieces. keep in mind for this whole project i am sewing with exposed seams to minimize bulk/be comfortable on the inside/look more grungy, so not a lot of this is gonna be turning stuff inside out and i'm actually being a little bit messy with my lines on purpose. i did 2 passes of zigzag stitch right next to each other over every seam for stretch and strength. also, unless you have 2 of the exact same pairs of pants they're probably not gonna perfectly match at the edges, this is okay because we'll be trimming the rough edges next - the top of the leg should match 1/2 the circumference of the legholes of jeans 1 (and if you want to make that circumference bigger you can use a scrap to add a triangle shaped dart to the outside seams of the jeans):
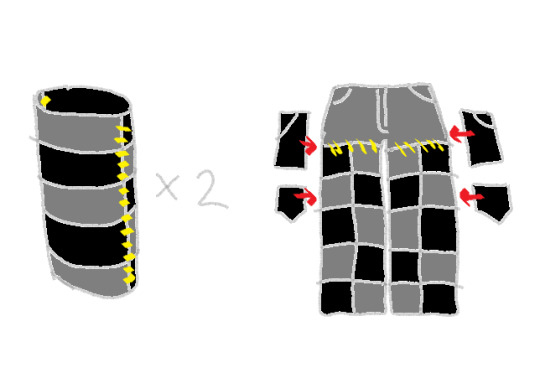
it may feel weird to be removing width when we want them wide, but don't forget we've essentially doubled the width of the entire leg here. i wanted a very straight leg that matched my thigh circumference all the way down, so i pretty much just cut a straight line, but if you have enough material to make it flare out at the bottom and you want to do that, definitely go for it! you could even reattach the leg upside down if the 2 ankles combined happen to be enough to match your thigh, but i liked keeping the original bottom hem on mine so i kept it right side up.
from there i sewed the legs up and attached them back to jeans 1. i did mine so that the checkered seam was in the front but you could rotate them a bit to just have it stripey in the front if you wanted. then I applique'd the extra pockets on. this would probably have been easier to do before sewing the legs fully into a tube, but i wanted to make sure they were placed exactly how i wanted so i had to complete the jeans first to see.
i also sewed 4 tiny loops on the front and backs of the shin area using the belt loops from jeans 2 so i could clip on some lil chains. theres so much more you can do tho!
phew, i think that's everything i did!
if anyone makes a pair of pants with this tut i would LOVE to see!!!!!!!!!!!!
57 notes
·
View notes
Text
A White Mage's Guide; The Armory Chest and Glamor Dresser
Your equipment is one of the most vital tools in your adventure. In FFXIV, this is where you get the majority of your stats and your protection. if you don't have gear that is strong enough, your ability in combat will suffer. But where do you keep it all? Why do you keep it all? Well, let's find out.
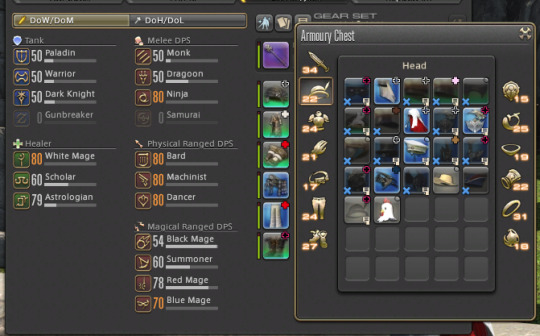
This is your Armory Chest; I've put it next to my current loadout for comparison. Each 'slot' in your armory chest can hold up to 35 of a particular item. (Editor's note; this will be changing with the expansion pack Endwalker, where Belts will be removed as an equipable item and more slots will be added to your main-hand weaponry.) When you 'sort' any particular category, it will start with the highest ilevel and work its way down.
What is iLevel, you ask? Excellent question!
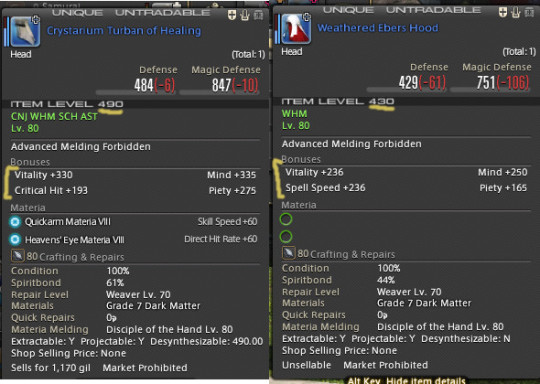
iLevel is the strength of your equipment. I have two different hats here, equipable by the same class at the same level, but they have two different strengths. The Crystarium Turban of Healing has an iLevel of 490 and has slightly higher stats than the Weathered Ebers hood, which has an iLevel of 430. Note that the Materia melded to the turban stacks on top of the original stats. This is usually only noticeable at the end of an expansion pack or when you've hit the level cap, but you may encounter a raid or dungeon that won't let you in until your overall iLevel is high enough.
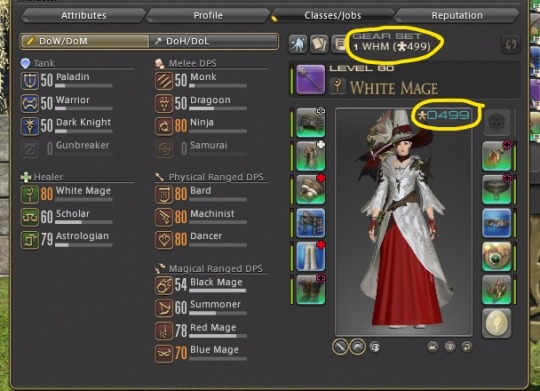
I've Circled it for convenience here. That's the 'mean' of all the iLevels of your equipment. A little trick about the stats of your equipment is that 'rare' items, ones with blue or green (or in the reaaaaly early game pink) have better stats than a crafted or 'grey' background one of the same level. These will hold out a bit longer in terms of leveling, but a rule of thumb is that your equipment should stay within 5 'equipable' levels of your own. So, if you're a level 45 White mage, your equipment should not be equipable at level 27. If you look at the comparison image of the two hats, they both say 'WHM, Lvl 80'. That means a White mage can only equip those at level 80.
This is important because, again, your equipment determines your stats. A Paladin wearing level 30 equipment is not going to be able to soak up as much damage as a Paladin wearing level 50 equipment, even if they are both level 50. Your gear will also stop giving stat buffs when it breaks, as indicated by the red/green bar to the left of each item. make sure to keep your gear in top shape!
As you wear your armor, you'll notice a second, blue bar next to it. This is your 'spiritbond' with your gear. When it hits max, you can right click the piece of armor and select 'extract materia' to get an extra bauble that will boost your stats even more. Again, this isn't as relevant in the early game because you'll be out-leveling your gear faster than you generate spiritbond. but come endgame, it's an easy way to generate materia.
If the idea of manually equipping your loadout every time you change class is daunting (and it should be) you can save your set to a 'gearset'. This will automatically equip whatever is saved to it, and is sorted by your main-hand weapon. (Blue circle) It will show the iLevel of the loadout, and if there is a glamour plate attached to it. (Which I will talk about later.) use the plus sign in the top left corner of the menu to add a new gear set.
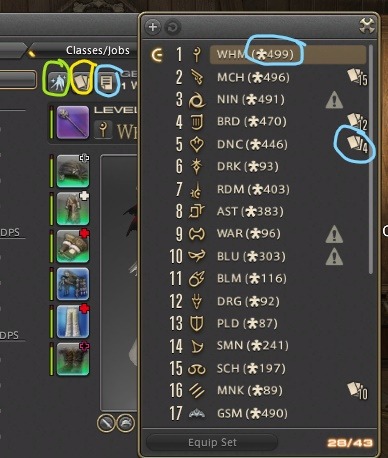
The green circle is your 'recommended gear'. This is the easy button if you just got a whole slew of new equipment. It will automatically equip the best gear for your level, stats wise. (This is actually unhelpful regarding accessories at the early levels, because it will always prioritize your weathered accessories first. ) The yellow circle is your Glamour menu, which I will talk about next.

you've probably received an item like this at some point. it has no stats, and can be equipped at level one. This is a 'glamour' item; it's meant to be glammed on top of something else rather than worn as a piece of armor. to make the best use of these, use your Glamour Dresser.

You can find your glamour dresser and armoire in any inn room in the main cities. Unfortunately you can only put an armoire on private estates, not the glamour dresser. If you have absolutely no idea what I'm talking about, you need to find the lady below, outside the Waking Sands in Eastern Thanalan.

She'll give you an easy pair of quests that teach you the bare basics of glamour prisms and dyes. Once you're ready to reach the True Endgame (Glamour) then grab a few pieces of armor you really like and some glamour prisms (easily attainable from your Grand company or the marketboard) and return to your glamour dresser.

To add items to your glamor dresser, select it from the menu on the right, which is your inventory/armory chest. you can swap between selecting something from your inventory, or from various parts of the Armory. WARNING: It WILL put something in the dresser even if it's attached to a gearset, so for ease of use put anything you want in your glamour dresser in your inventory first. Or risk fighting your mortal enemy in your Skivies.
The stuff of Nightmares, I'm sure.
Anyway, it will use one Glamour prism for every item you store in the dresser. The exception is items that can be stored in the armoire. These are almost exclusively Mogstation, special event or seasonal event items, Achievement rewards, and your level 45 job gear. If you try to put these in the glamour dresser instead, the game will tell you it can be stored in the armoire to save crystals and space; you can have 400 items max (across ALL categories) in your glamour dresser.

Once you're ready to create your look, click 'edit glamour plates' at the bottom of the brown menu to pull up your plates. You have 15 plates to design and trust me, they can go quickly. You can design to your hearts content and even preview dye colors for items that can be dyed; those will have a circle in the upper right hand corner of its icon.
Be aware that a high-level item cannot be glammed over a lower-level one, and armor belonging to one class or job cannot be glammed over armor of a different armor type. That's why the specialty items have an equipable level of one. There's even special items designed to be transparent; these can be bought from a vendor near the Waking Sands.
When you're done, click 'save' to save your plate, then open your character menu and click the glamour plates button to chose one of your new designs to glam over your equipment. Now you can fight your mortal enemy in your Skivies whilst having the protection of a tank.
Remember that gearset menu? If you right-click the gearset, you can change its order in the list, and attatch a glamour plate to it. This is handy when you have three jobs that wear the same armor, but you want different looks for each.
Just like your normal inventory, it's important to go through and clean out your Armory Chest and your Glamour Dresser once in a while. You may have forgotten to discard or sell a bracelet you no longer need, or a chestpiece that you were saving for when you leveled that second healing class, only to have outleveled it by the time you remembered you had it. This goes double for the rings, since you equip two per gearset but only have 35 slots.
That's all for now! Best of luck on your Journey through Eorzea, and remember; Glamour is the True Endgame.
4 notes
·
View notes
Last Seen Blogs

laraforexsignalprovider
Lara Forex Signal Provider

lettersfromafar00000
远方来信


boguvola
everything you need

thicthighsskinnywaist
Thick Thighs, Tiny Waist