#this is like how i learned how to play ocarina by watching YTers
Explore tagged Tumblr posts
Visit Tumblr Blog
Explore Tumblr blogs with no restrictions, modern design and the best experience.
Last Seen Tumblr Blogs


Fun Fact
Celebrities use Tumblr as well.
Note
Hey how did you make your backgrounds and sprites in your game? I'm trying to learn and I wanna know what the best way to start is cause I wanna make my own stuff to put in the game
I only have the rpg MV do I need the other add ons?
oh my god I accidentally refreshed the page and lost my entire progress of my answer to this so bear with me (IT WAS REALLY LONG TOO)
I just draw everything in Paint Tool Sai, though you could get away with ms paint! You don’t even have to draw in pixel art if you don’t want to as long as they fit the right dimensions. But if you want to know specific dimensions and stuff and how to like. actually draw them correctly so they work, I can try to help with that but uhm,, bear with me because I Do Not know how parallax mapping works and I am an amateur.
Disclaimer: I have RPG Maker VX Ace AND MV (no add ons or anything, I don’t think you NEED add-ons unless you can’t draw yourself) but MV is a very recent addition to me. I’ll still try my best (If any RPG maker people are reading this and are like HEY NO THERE ARE EASIER WAYS I’m sorry. i do not know those easier ways)
So sprites? Pretty easy! For RPG Maker MV, I use this 576 x 384 px grid to organize them!

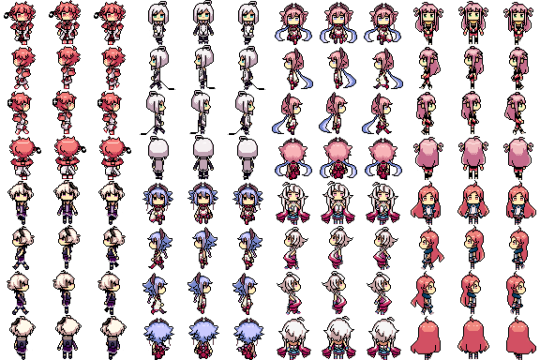
RPG Maker splits sprite sets in a certain way, and if you mess with the dimensions, it might not work correctly anymore, so I generally stick to this size (There IS a way to get bigger sprites, but I do not understand them)
As you can see, each sprite is about one square big. I referenced default RPG Maker MV’s sprites by comparing them to my handy grid and being like, oh! They are one square big! I should also make my sprites one square big each! In general, I recommend taking a look into RPG Maker MV’s files, overlaying the grids over the tilesets and characters, and trying to study how they’re split up. I also recommend making a base sprite!

I didn’t bother making the in between animations of the actual movement, but if you’re having trouble figuring them out, just study the base sprites of rpg maker mv and you’ll figure out how walking works!

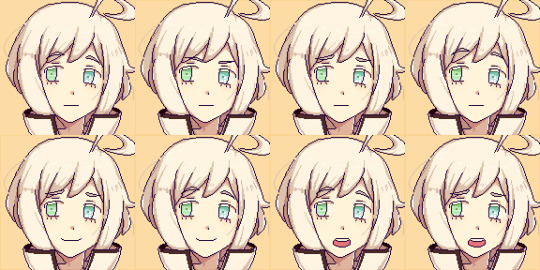
For faces, I use these for RPG Maker MV! Each individual box is 144 x 144 px (the canvas’ total size is 576x288 px)! I make a 144x144 px canvas, draw my faces, and then copy and paste them into each box until there’s a full set of 8! I don’t recommend messing with the sizes, and I don’t think you can get bigger sizes unless you ditch the face icon feature altogether.
My tileset process is way more convoluted because I don’t understand MV yet so I reference RPG Maker MV’s default assets a lot. For example, say I want to make an original floor set, but I’m not sure what dimensions I’ll need to make sure RPG Maker MV will read it and implement it into the program properly. I look into RPG Maker MV’s files and choose a floor tileset to reference. In this case, I open up inside_A5.png and put my grids over it to break it down.

I look at this, and say hm! Each floor pattern is about one square big! My floor pattern should also be one square big.

(Don’t ask me why I started from the bottom) If you put my grid overlay on top of these patterns I made, you will see that indeed, each floor pattern takes up one box!
As for planning maps, I have the most convoluted method so I apologize in advance. I will try to explain it.
So first off, each square in RPG Maker MV is 48x48 px. Cool. But your default size in RPG Maker MV is 17x13 for some reason? Well, multiply each number by 48. All of a sudden, you find out your map is actually 816 x 624 px! Whoa! Let’s say you’d prefer a bigger map, like 20x15. Multiply both by 48 and you’ll get the right canvas size. Anyway, we’re sticking with 17x13/816 x 624 because I recommend against huge maps and 17x13 can be cozy.
To properly plan my map, I need to open up a canvas in my art program that’s 816 x 624 px.
Bam. I also put my grid down, making sure there are no half squares because we’re trying to mimic how RPG Maker MV’s grid works. If there are still half squares but you’re sure you placed the grid right, check your math!

I start planning out my map! I recommend making sure your floors and walls don’t take up any half-squares, but your furniture can be literally whatever. As you can see, my grave takes up one and a half squares. Anyway, say we’re done. Now we transfer them onto tilesets.
We focused on floors already, so I’ll just explain transferring objects. To transfer them onto a tileset, each item’s gotta take up the exact same number of squares it takes up in the planned map. If you don’t, you won’t be able to replicate your map plans into RPG Maker MV as perfectly as you’d like. For example, the rug in my planned map could take up just 2 squares if I shifted it to the left or right, but then it wouldn’t be centered at the entrance like a normal rug would.

(SF_Inside_B.png) I kept the overlays and stuff so you can hopefully better understand my process. I moved the rug (just because), but I made sure it still took up 3 spaces like a man on the train who sleeps across the seats. Don’t put anything else in those half squares either, it’s all belongs to the rug. When you’re ready to place the objects in the program, you should be able to replicate your map no problem.
I’m so sorry if this didn’t help, I really don’t know what I’m doing and it’s a miracle I made two games by myself hsdghd There’s tons of resources out there! If something I said was almost helpful but you’d like me to elaborate more, please let me know too!
#eddie speaks#my methods are so convoluted im sorry#this is like how i learned how to play ocarina by watching YTers#i still cant read music#noeggets
18 notes
·
View notes