#the skillet will be cleaned up in the electrolysis tank
Explore tagged Tumblr posts
Text
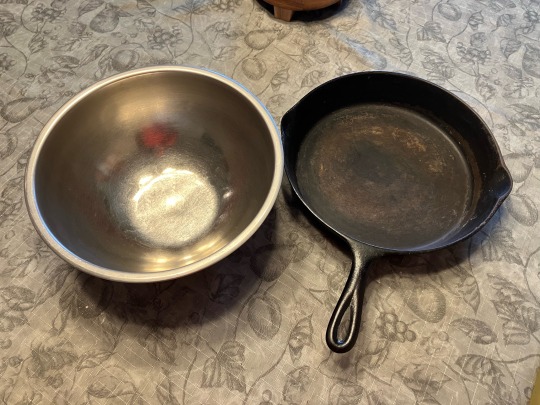
Thrifting for the kitchen, Vollrath mixing bowl and vintage Lodge skillet. These are some of the higher quality cookware that I keep an eye out for.
Vollrath still makes high quality stainless steel cookware in Sheboygan, WI, and will almost always be well marked.
The skillet is a No. 8 Lodge from about the 1940s. These were ‘unmarked’, as in no manufacturer’s label, had a heat ring with three notches, and were ground smooth on the cooking surface.
#the skillet will be cleaned up in the electrolysis tank#I use a vollrath stainless measuring cup just about every day#thrifting#thrifstorefinds#stainless steel#mixing bowl#vollrath#cast iron#cast iron skillet#lodge#vintage#vintage cast iron
2 notes
·
View notes
Photo
An example of a first scrub
I am constantly mentioning that a pan was scrubbed before during or after another cleaning process. The quasi-mysterious scrub that happens numerous times in the process of cleaning and restoring cast iron cookware makes all of the difference in the world.
The first scrub after a long soak in the lye bath reveals much about what to expect for the remainder of the cleaning process. This time the first scrub was especially effective.
materials
The prevailing wisdom at WAGS and elsewhere is to use a stainless steel scrubber and Dawn™ dishwashing detergent. Copper scrubbers can interact with the iron in a way that is not helpful. Plastic scrubbers often have abrasive material embedded in them. Steel wool has its place, but in my process it is better suited to touch-ups.
The stainless steel scrubber shown in the pictures below is pretty much shot. It was thrown away afterwards. As the scrubber becomes shredded it leaves metal in the sink that can easily clog the plumbing, even with a strainer in place.
before cleaning
Pic 1: Skillet ci0305 before cleaning. This thing looks terrible. It suffers from rust, baked on food particles, and old nasty seasoning. Into goes into the drink (lye bath).
Pic 2: The front of the same skillet after about 10 days in the lye bath. It has not been scrubbed, rinsed or otherwise touched except to transport it to a sink.
Pic 3: Back of the skillet before the scrub.
clean the handle, start with the top
The first order of business is to clean the handle.
Pic 4: Without touching anything else, I gently scrubbed the top of the handle with soap and a stainless steel scrubber.
Pic 5: Next rinse. This is a good result. The top surface of the handle is more or less clean to bare iron.
clean the bottom of the handle
Pic 6: Repeat for the back of the handle - gently scrub with the stainless steel scrubber then rinse. At this point touching the handle is not scary.
scrub the back, start with a rinse
Pic 7: A quick rinse first. Some gunk simply rinses off.
Pic 8: Without touching anything else, scrub use soap and scrubber.
Pic 9: Rinse again.
Pic 10. Repeat the scrub. This time around, I used a little more pressure.
Pic 11: Repeat the rinse. The back is done for this cleaning cycle. There are still some dark spots. The skillet goes back into the lye bath after this scrub is complete (front and back). If the rest of the skillet were perfect, It would still go back to the drink because of those spots. The spots look like a thin layer of ‘gunk’ but could be rust. If they persist after a few more days in the lye bath and another two scrubs, the spots are probably rust. After more days in the lye bath and a second or third scrub, the skillet will move to electrolysis tank - provided the rest of the pan is clear of organic material. Electrolysis will turn red rust black and make it easier to remove with a scrub. Electrolysis would remove the old seasoning too. For numerous reasons I prefer to use the lye bath whenever it can be effective and employ the electro for reducing rust.
next clear the stupid drain
Pic 12: The strainer in the drain has clogged from gunk that came of of the back. Before proceeding, the strainer has to be cleaned in a way that keeps the gunk and scrubber shreds from going down the drain.
scrub the other side
Pic 13: This is how the front of the pan looks after the back was cleaned.
Pic 14: Gently use scrubber and soap to lift some of the crud off of the surface.
Pic 15: Rinse with water
Pic 16: After the water was dumped. The front is looking pretty good too.
Pic 17: Repeat the scrub
Pic 18: Repeat the rinse
Pic 19: Here is the result. I dried the pan a bit. It is looking a lot better, but it is not clean yet. It goes back into the lye bath for another multi-day soak before electrolysis. The lye bath does the heavy lifting.
0 notes