#the results section won't take long to write at all either once i have all the results. i just need to do some R stuff
Explore tagged Tumblr posts
Text
status update: 15 days until the final draft of my thesis is due to be submitted to my supervisor.
22 days until my committee is getting it.
How much of my thesis is written you ask? About 1/2 of the methods section, by far the easiest section to write. I haven't even finished analysing my results yet.
And I'm working 3 days this week so can't even really spend the weekend catching up :)))
#honestly it's still fine#like i can get the introduction done in a day or two i've done that before i know what i need to write#the results section won't take long to write at all either once i have all the results. i just need to do some R stuff#there's more stuff i could (should) do but i don't think it's strictly necessary if i'm aiming at barely passing this#i'm jusr like... sigh#so fucking tired of this shit#i dont even want the degree. having it might make it more difficult for me to get the jobs i want if anything#ugh#like i know it's not a major life problem. i live in an okay cheap apartment and have a job that i don't hate that pays well enough and shi#it's just. ugh. i was really looking forward to doing my thesis - my undergrad thesis was so much fun!#but this project is just like... 90% data analysis or something. not a fan at all#can't wait for it to be over but i also have zero motivation to work on it#herr's personal tag
1 note
·
View note
Text
nsfw headcanons; arcane women x fem!reader

still new to writing this kinda stuff yall dont kill me. anyways, here's some general headcanons. again, i'm open for nsfw requests, just please read through the new section in my rules post!
summary; general nsfw headcanons with arcane women and their girlfriend.
characters included; jinx, vi, mel, sevika, caitlyn, lest
tags; nsfw, fluff, everything is done consensually, some aftercare (full aftercare headcanons here), fingering, cunnilingus, strap-on use, strap-on referred to as dick, degradation, rough sex, nipple play, light bdsm (sevika, lest), anal (sevika, lest), public (mel), jinx being a brat, vibrator use (jinx, caitlyn) gun play (jinx), period sex mention (jinx), usage of words like ‘slut’ and ‘whore,’ sloppy shit, p in v (lest), dacryphilia (jinx, caitlyn), wax play (lest), breeding kink (vi), orgasm denial (mel, caitlyn), thigh riding (sevika, caitlyn), blowjob (lest), shimmer (jinx, lest)
men and minors dni.
jinx;
✧.* the way i interpreted it at least, what jinx received after the fight on the bridge was a sort of shimmer infusion. she's got that stuff running in her veins, and jinx is basically 50% shimmer at this point.
✧.* i bring this up because the amount of shimmer in jinx's system gives her certain.. perks. such as her stamina being that of twenty women combined, how fast and hard she can go. she'd have fun increasing the speed, fucking you harder and harder while you're a writhing mess beneath her and can only think of the pleasure she's giving you.
✧.* even while receiving, jinx can go all night if she wanted to. she won't, because you're not as energetic as she is and she needs to let you rest (as much as she wishes you could go all night). the girl would be so damn overstimulated, but still, she'll demand that you make her cum again, and again, and again. she can keep going; she can take it.
✧.* a tit girl. she doesn’t care how big or small your boobs are, as long as she gets them in her hands and mouth! it’s probably a result of how damn sensitive her own are- jinx will be whimpering mess just from you pinching her nipples a few times.
✧.* she’s a switch, and what position she takes at what given time is just dependent on her mood. jinx is always unpredictable, always keeping you on your toes. she isn’t much different in bed.
✧.* so fucking noisy, and the dirty talk is downright filthy. it's bad enough that at times, you worry your girlfriend might lose her voice. jinx is very unfiltered in general, so you'd expect no less from her in the bedroom. she sees no point in holding back. you're making her feel good, why should she hide that?
✧.* "oh, fuck! ngh, just like that, you're fucking my pussy soooo good," she'd babble, taking every inch of your strap with impressive resolve. her lips are parted, swollen and red from just how hard she'd kissed you. obscene squelching noises filling the room while you pound into her, her legs pressed to either side of her body. "y'hear it? do you? that's me, fuckin' dripping for you. need your dick, ineeditineediti need it-"
✧.* SIZE QUEEN. jinx is a petite girl, shorter and thinner than most. yet she'd insist on you fucking her and stretching her with dildos that looked monstrous next to her. she's a whiny, squealing mess as you ease each inch into her aching pussy, but she always takes it so well. there's nothing quite like the feeling of being pried open to jinx.
✧.* along with that, she's pretty flexible so you can get creative with positions. she'll let you press your knees to either side of her body, not wincing once or growing tired.
✧.* jinx does enjoy a variety of positions- doggystyle, reverse cowgirl, the like, her favorite positions are any where she can see your face. not only does it give jinx a rush to see your flushed, fucked-out expressions, but it also gives her that sense of connection to be able to look at you while you pleasure each other. she's the type to hold eye contact with you the entire time she eats you out, and to bore her gaze into yours in missionary.
✧.* she'd be riding you, arms wrapped around your chest as you piston the strap into her. she's whimpering and squealing louder and louder with each thrust, but her eyes never would leave yours. you're fucking her at an unforgiving pace, plastic tip kissing her cervix, but she still feels so at ease and cared for.
✧.* i feel like jinx would say 'i love you' at least once every time.
✧.* a munch. jinx loves it when you sit on her face, and she's the type to be downright offended if you don't put your full body weight on her. she'd tug you down by your hips before plunging her tongue deep into you without warning, earning sharp cries from you. every time she hears those noises, her ego grows bigger, and damn. you'd allow her that.
✧.* also loves to eat you out from under her workbench. seeing you in her chair, under her desk, in her space, so willingly submissive to her- it's thrilling to her and she can't quite explain it.
✧.* "fuck yes, toots," she'd grumble, pulling back from your wet heat for just a split seconds. "you taste so damn good. so fuckin' sweet and needy f'me."
✧.* a damn brat when she wants to be. she loves to rile you up, it's like a game to jinx. not so amusing for you when you're trying to fill out paperwork and jinx is groaning, taking your pen from your hand and holding it out of your reach while she tells you to just fuck her already.
✧.* "come on! that stuff is so boring, and here i am, soaked for you," she'd pout, her knees parting more beside you on the couch. "you always have to be so responsible, and it's irritating. you could be putting those hands to better use, but noooo."
✧.* or something along the lines of, “i can’t feel anything! are you sure you’re fucking me? come on, do something!”
✧.* not so mouthy when your face is buried in her cunt, that's for sure.
✧.* very into marking. placing her claim on you. almost every time, without fail, you’ve got a new array of hickeys splayed across your neck, chest, hips, and inner thighs. also very into writing on you, with permanent marker. she’d write ‘JINX’ right above your pubic bone, draw little hearts around your nipples, draw an arrow on your inner thigh pointing to your cunt that reads ‘JINX WAZ HERE!’
✧.* a crier, especially when you overstimulate her and when she orgasms. she gets embarrassed every time and tries to explain it away, but it’s just her body’s way of processing all of those sensations. poor girl can’t hold it in :(
✧.* being with jinx, it's gonna be either her tongue, a strap, or a vibrator pleasuring you, unless you can convince jinx to cut her nails. not likely, since she takes pride in their length. sorry :(
✧.* jinx isn’t afraid to get messy. she’ll be rubbing her sticky cunt against yours, having already squirted twice- her lips swollen from your kisses, thighs and lower stomach covered in sweat and cum. but she just can’t stop grinding against you, it feels so damn right.
✧.* along with that, jinx is definitely into period sex. the first time was a whirlwind, with jinx insisting she doesn’t mind and eating you out anyways. if anything, you being on your period makes jinx want to please you more so that you forget about those pesky cramps.
✧.* squirter, and her juices are tinged pink from the shimmer running through her body.
✧.* oh, you already know the prosthetic finger vibrates. she wouldn’t tell you the first time she used it, just say something like, “i’ve got somethin’ special for ya toots! what is it? well, i can’t say just yet! but you’ll love it. i know you will.”
✧.* the way you gasp as soon as you feel the vibrations against your clit and buck your hips into the metal gives jinx all that she needs.
✧.* definitely into gun play as well. seeing your pussy stretch to accommodate the barrel of her gun, the way your eyes widen and you gasp when her finger brushes over the trigger… oh, it’s art. jinx could fully get addicted to it.
vi;
✧.* A MUNCH.
✧.* it probably sounds far-fetched, but vi could cum just from eating you out. from tasting your sweet juices, the scent of your heat, the way your face contorts in pleasure, the trembling of your thighs in her hands, the obscene noises that spill from your lips, how it feels when you cum in her mouth- vi gets lost in it every single time.
✧.* it gets to a point some nights where you’ll almost have to pry vi’s face from between your legs.
✧.* likes to switch and doesn’t have a preference when it comes to top or bottom. i take her as the type who would do both during most sessions to balance things out, she gets some and you get some!
✧.* dirty talk is crazy when she’s domming, but when vi is subbing she can barely string together a coherent thought, especially not a full sentence. she tries to talk to you, tries to let you know how good you’re feeling, but it comes out more as a choppy string of moans and ‘please’s.
✧.* “oh, that feels so- haaaah, please, mm-”
✧.* vi is strong, stronger than most. meaning she can pick you up, fuck you while holding you up against a wall, or she could use that strength to slam your wrists into the mattress above your head while her free hand works at your heat. the possibilities are endless!
✧.* not necessarily loud, but she doesn’t hold back when it comes to noises either. always some form of grunting, groaning, heaving. or whimpering, when she’s on bottom.
✧.* her tits are so sensitive. she’ll try to act like it’s nothing when your hands brush over her hardened nipples, but oh gods when your lips form a seal over one and you start to swirl your tongue around it, vi loses her mind. she’s threading calloused fingers into your hair, trying to push you impossibly closer to her.
✧.* loves giving strap- she likes to receive too, but she’s more partial to giving when it comes to strap-on usage. it just gives her a rush, being on top of you, making you take her. it’s a bit of a power trip for vi.
✧.* “yeah, fucking take my cock- ngh… such a good girl for me, such a good slut.” she’s a panting mess, pounding into you from behind. your asscheeks are sore from the swats she’s given them, and you can feel vi filling you to the brim with every thrust. yet it’s intoxicating.
✧.* vi is just so smitten with you, she’ll do almost anything if you ask nicely. any position, any toys, any kink you want to try out. she’s a lover girl at heart, and aims to please above all else. all you have to do is say the word.
✧.* due to her sweet nature, vi would be so attentive during rougher sex with you. even as she’s tossing you around, coaxing what must be your fourth or fifth orgasm out of you, calling you pathetic and needy, she’d be looking out for you. one second she’s degrading you, the next she’s asking if you’re okay and if you need a break. additionally, she does internally wince when she talks down to you, though she tries to hide it. she knows you know she doesn’t actually think of you like that, but she does hold back because she can’t bear the thought of going too far with it.
✧.*despite liking to be rough from time to time, especially if she knows that you like it and you ask for it, vi also does enjoy slow, sweet lovemaking to keep things balanced. she likes being able to pleasure you, to worship you, show you exactly how much you mean to her through her touch.
✧.* “shh, baby,” she’d whisper, kissing down the valley between your breasts, towards your sternum and stomach. “i’ll make you feel good. so good. just lay your pretty self back and take it. can you do that for me, love?”
✧.* her favorite positions are probably doggystyle and 69. doggystyle gives her room to manipulate your body, a prime angle to pound into you, room to pull your hair and force you to look back at her while you’re coming undone on her dick. 69 is ideal for eating you out, but you both get off, so it’s even better. she’d be trying to stifle moans while her tongue is lapping at your clit, sending vibrations through your core when she can’t hold back anymore.
✧.* one orgasm is never enough when it comes to vi. she wants to give you more, and more, and more. her hand would be soaked and her fingers beginning to prune from just how much you’ve already given her, but she still swears you can give her one more (those words are almost always a lie).
✧.* creamer, and there’s SO much of it. the first time you made her cum you didn’t say anything, but you questioned to yourself whether this is a normal amount. but you quickly grew to love it- seeing vi make such a mess, shaking and whining.
✧.* can somebody say BREEDING KINK. no, it’s not scientifically possible for a woman to get another woman pregnant. but vi will be damned if she doesn’t try.
✧.* pistoning her strap into you while she has you folded into a mating press, grunting and panting with her hands on either side of your head. “gonna fill you up just right,” she’d say, breathless. “please, vi-” “shh. i’ll give it to you, you’ll be such a pretty mama, fuck- take it. take it all.”
✧.* while she enjoys getting her tits played with, i definitely see vi as more of an ass girl when it comes to you. she loves eating you out from behind, slapping your ass during sex, even slapping your ass in public when you’re just trying to pay the poor street vendor. she just can’t get enough of the feeling of plush skin in her hands. the shape, the sensation.
✧.* a head pusher. practically shoves your mouth into her pussy while she’s bucking into your face, groaning and panting while your tongue laps up everything she’ll give you. the proximity does something for her, but she also just… can’t help it. it’s reflex at this point. you hit just the right spot, and her strong hand is flying to the back of your head to push you even further.
✧.* RIDE HER ABS. that’s all i’ll say.
mel;
✧.* such a devoted and sweet lover. also a switch, and she truly doesn’t mind what position she takes at what moment. usually mel lets you decide, she trusts you and the pace you set.
✧.* she’s devoted to your pleasure, but she also won’t deny herself any; not by a long shot.
✧.* however, there are times when she’s had a frustrating day at work. the councilors wouldn’t listen to her, her ideas weren’t getting anywhere, she felt a mental block growing stronger with each passing second. every minute she was in that room was like torture, and all she wanted was to get home.
✧.* so the second she does, she’s asking you to lay down so she can lower her pussy onto your face and lose herself.
✧.* “please, love, make me forget- oh, shit! aah!”
✧.* mel doesn’t really curse much, so a good signifier that she’s feeling good is when you hear her swearing. she’s always so poised, so refined in the way she speaks. careful to converse in a manner becoming of a councilor, of a medarda. so when she’s making those pretty sounds, laid back with three fingers deep inside of her and you hear her swear, you know you’ve got her.
✧.* “right there, hah, mm…” she’d moan, grabbing at one of her breasts to anchor herself. “that feels so- fuck! oh, don’t stop, don’t stop!”
✧.* she’s not necessarily loud either, just the right volume to assure you that she’s feeling good.
✧.* mel’s stamina is pretty average. she knows how to pace herself, so it’s really up to you and how long you want to go for.
✧.* she prefers lovemaking and being doted on in the bedroom rather than rough sex and being denied. that’s not to say she’s opposed to trying out something more hardcore, but generally, she prefers to feel cared for in the moment. touch her, love her, worship her.
✧.* however, when she’s topping, she could deny you for hours. it’s something to do with the power she’s holding over you.
✧.* “mpph, please, just let me come, aaah.. i’ll be so good, mel.” you’d whimper, writhing beneath her touch. “shh. you’ve been so good already, but you can hold out a bit longer, can’t you? that’s my strong girl.”
✧.* partial to body worship. take your time with her, slowly removing her clothing to tell her every little thing you love about her body. her soft skin. the swells of her breasts, her lean muscle and smooth thighs. she’ll be gasping, petting your hair and praising you, letting you know what feels right. every touch from you feels like a promise, and you’ll do damn right to keep it.
✧.* TRIBBING. she especially loves being on top when it comes to scissoring, so that she can set the pace and get both of you off just right. it checks off all of mel’s boxes- proximity, close connection, being able to see your pretty face, and the fact that you both get pleasure from it.
✧.* “oh, gods, love,” she’d grunt, grinding her wet cunt into yours. strings of arousal connecting the two of you, rutting into each other. “don’t stop, unngh- that’s so good, so fucking good.. faster. faster.”
✧.* although she’s refined and poised, mel is not above fucking you in public. you’d be at a gala together, champagne glass in hand and trying to converse with others; some of the most important figures and families in piltover. yet all you can focus on is mel, the way the white dress she chose hugs the curves of her hips just right, and the slit that runs up the side. you try to be subtle, but mel is observant. she notices. and this is one of the few times where she’s a bit more rough.
✧.* “just couldn’t wait?” she’d ask, her fingers pounding into you in an empty room just outside of the crowded hall. “almost struck a deal, a good one, before you started undressing me with your eyes. it’s distracting, love.” “i’m sorry, baby,” you’d whimper, so fucking close to your peak. “sorry isn’t going to cut it. but you’re so pretty… so wet, too. i’ll be merciful.”
✧.* mel likes to set the mood. candles, maybe some soft music crackling over a stereo as well. as i keep saying, she’s a romantic! she wants you to see the effort she’s putting in for you, to know just how much she cares. all of this is worth it to her, you’re worth it.
✧.* just one is rarely enough for mel. if you’re more the one-and-done type, she won’t try to coax more orgasms out of you- but for her, she can go several rounds. back to back to back, coming undone on your fingers and mouth and strap and loving every second.
✧.* always holding onto you somehow. her arms wrapped around your shoulders while she rides you, one arm around your waist to steady you while she fingers you against a wall, the like. however, mel’s favorite is holding your hand, interlacing your fingers together. it just feels so intimate, so loving. it’s also grounding in a way, she can squeeze your hands as the sensations grow stronger, or as a silent support while you teeter over the edge of climax.
✧.* aside from times like i mentioned earlier, mel isn’t really a fan of quickies. there are some exceptions, but she prefers to take it slow within the confines of a place she knows is safe. she wants to take her time to truly appreciate you, and she can’t do that if she’s got a time constraint.
✧.* says she loves you every time, probably multiple times. the intimacy of it all overpowers her. some people may think that saying ‘i love you’ over and over makes it lose meaning, but on the contrary, mel means it more each time she says it.
✧.* “oh, oh, gods… mm, i love you, right there…”
sevika;
✧.* have fun trying to move at all after sleeping with sevika.
✧.* she’s a top-leaning switch. she won’t deny pleasure herself, but she won’t ask for it either. she’s more than happy to just fuck you again and again, her pleasure being derived from the sight of your head thrown back in ecstasy and the sound of your pleasured screams.
✧.* sevika loves just about anything, but she’s partial to the strap. it gives her a rush of power, being able to split you open and fuck you so deep, so right. definitely gets one of the biggest dildos she can find to insert into the strap, just so she can make you lay there and take it.
✧.* rough, experienced, and doesn’t hold back when it comes to degradation. she’d pull her cock almost fully out of you, just leaving the tip- before slamming back in, drawing a borderline pornographic moan from your lips. “fuck, doll, you sound filthy. can’t even talk right now, can you? fuckin’ slut, losing her mind already.” she’d drink in all of your noises, your labored breathing and the way your eyes roll to the back of your head. “gods. i’ve never been with someone this fuckin’ desperate. i almost pity you.”
✧.* can and will manhandle you. she’ll be pushing your chest further into the mattress while fucking you from behind, yanking your hips into hers as she thrusts into you. smacking your ass so hard the sound nearly echoes through the room. she’ll flip you on your back, nearly throwing you down on the bed just to continue her relentless rhythm. she wants to absolutely ruin you. so let her.
✧.* she wants to leave you sore and tired for the next day, so that every time you try to even take a step you’re reminded of exactly what, or who put you into this position.
✧.* sevika’s stamina is admirable. exhaustion weighs heavy on her during the day, her work cut out for her. running around handling zaun, tying up loose ends silco left, and making sure jinx doesn’t get herself into too much trouble wears her out quickly. but somehow she still has so much energy when it comes to fucking you. she could go all night if you allowed her, without so much as yawning.
✧.* she’ll grab your chin to force you to look at her, holding direct eye contact while she fucks you. she wants to see every expression of yours, she wants you to see her face while you cum.
✧.* “who’s makin’ this pussy feel good?” she’d demand, grunting as she grabs a fistful of your hair. you’d yelp at the sensation, your voice breathy and bordering on whiny. “aahh! you! you, mmph- sevika, you’re making it feel so good…”
✧.* also lowkey (highkey) really into anal… being able to please your tight asshole and feel you clench around her fingers as she keeps rutting into your cunt. yeah
✧.* it’s not often that she does, but sevika likes to have you tied up. your wrists tied to the headboard of her bed, the wood creaking while she rocks into you and holds your thighs apart. it’s picturesque almost, you look so damn perfect and pliant. and all for her.
✧.* the ropes are rough and frayed, something similar to what would be used on a ship. it’s not much, and they look like they’ve been used before- they’ll definitely leave marks on your wrists once you’re done. not to worry, sevika already has ointments for once you’re done, and she makes sure to space things like this out. she loves the sight of you bound for her, but not enough to over exert your poor skin.
✧.* she loves hearing those gorgeous sounds you make for her, but sevika does have neighbors and she’s not above shoving your discarded shirt or panties into your mouth if she feels that you’re being too loud. “hush. gonna wake the whole neighborhood at this point, doll. or is that what you want?”
✧.* when she does allow you to top, she’s pretty quiet. a stark contrast to how breathy and gruff she is while pleasing you, but she’ll still make noises! just at a low volume. yet her words do still hold some of that domineering edge.
✧.* your tongue would be delicately splitting her wet folds, teasingly licking up her slit before it brushes right over her clit. a shiver runs up her spine and she groans, a breathy noise that only serves to motivate you more.
✧.* “shit, baby, like that…” she’d breathe out, her chest beginning to heave up and down. “faster, baby. more. like you mean it.”
✧.* creamer, but she’ll squirt if you coax enough orgasms out of her. when you first found this out, she was on the edge of her fifth orgasm, panting and grunting before her walls clenched around your tongue. you then felt a wet warmth splash onto your face, and your gaze flickered. something downright predatory awoke in you, making you desperate to see that again and again.
✧.* “come on, sevi, just gimme one more, mm… that was so fucking hot,” you’d murmur, bringing your face close to her glistening cunt yet again. “another? i think- aah, i’ll break,” sevika breathes out. “good.”
✧.* RIDE HER THIGH. she didn’t even know she was into it at first. you’d be kissing her, panting into her mouth as you strip her of her shirt- before pulling away. “i wanna try something,” you’d say, before lowering yourself onto one of her bulky thighs. beginning to rock your hips, your clothed clit bumping against her thigh while a sharp gasp is pulled from you.
✧.* sevika’s eyes are opened to a whole new realm of possibilities. her hands are flying to your waist to help guide you along on her thigh, feeling your arousal leak through the cotton of your panties. “fuck, dove, you really are a whore.” she says, a low chuckle following. “i wouldn’t have thought of this, but you’re just too damn eager… look at you, soaking me. you’re lucky you’re so pretty.”
✧.* before you know it, sevika is asking you to ride her thigh regularly!
✧.* sevika’s neck is her weak spot. kiss up the expanse of it, suck dark marks into her pulse point, and she’s a damn mess. she’s tilting her head back so you have easier access, melting from you just touching her neck. it’s kind of adorable, honestly.
✧.* switches up the second you’re done- is so sweet and loving during aftercare. making sure that you’re okay and taken care of before she even thinks of doing anything for herself, making sure she didn’t go too far and you’re not too wrecked.
caitlyn;
✧.* switch with a slight preference for topping. she’s been in control most of her life, usually having the upper hand and hardly ever not getting what she wants. she doesn’t expect much less in the bedroom- that, and she loves seeing you fall apart beneath her, knowing that she’s the one responsible.
✧.* caitlyn has long and strong fingers, perfect for reaching all the spots that you’ve never been able to reach yourself. the second her middle finger brushes against that spongy spot that makes your vision blank, her eyebrows shoot up and her mouth is open in a ‘ah, gotcha!’ expression.
✧.* “yeah, darling? you like that? should i keep going, hm?” you’d nod frantically, panting and flushed beneath her. “then keep being good for me. you can do that, can’t you?”
✧.* BRAT TAMER. you might be able to get away with being mouthy with others, but never with cait. she’s a patient woman, but you learn after a while of being with her how to push her buttons just right. wearing that very patience thin with every word and sway of your hips. you’re giggling, until caitlyn is pushing you against a wall and clawing at your clothing, ordering you to spread your legs.
✧.* “i thought this was what you wanted? what you were begging for, not even a minute ago?” she’d grunt, slamming her purple strap into you at an alarming pace. ragged gasps and moans are pulled from your parted lips, and hot tears begin to stream down both of your cheeks. caitlyn would let out a low chuckle, tutting. “what, you’re crying now? come on, it’s not that bad. just a little lesson for you.” she’d coo.
✧.* there’s also been several times when you haven’t been able to behave yourself in her workplace, and she’d whisk you to her office to bend you over the hard wood of her desk, fucking you right then and there.
✧.* part of caitlyn delights at the sight of your tears. it’s exhilarating, in a way. seeing you so desperate, so wanton, knowing it was her who took you apart so expertly. seeing you so bared and vulnerable for her is a moment she wishes she could frame every time.
✧.* caitlyn can be such a temptress. she’s beautiful, anyone can see that- and she uses that beauty to her advantage. you’d come home from a long day of working harder than you ought, to be greeted by your girlfriend in white lace lingerie that leaves very little to the imagination. she knows you can’t resist, and she’s internally celebrating the moment you pounce on her.
✧.* “how was work, love?” she’d ask, voice low and smooth. “you look like you’re starving. maybe i can do something about that?” she’d muse, fingers teasing under one of her thigh garters.
✧.* when subbing, caitlyn is loud. she’s not screaming out in pleasure, but she doesn’t hold back any noises. she wants you to know how good you’re making her feel, to hear it on her lips and in her choppy words.
✧.* likes clitoral stimulation best, i think. don’t get me wrong, she thoroughly enjoys the feeling of penetration- but something about having her pretty clit played with until she’s an aching mess is just better.
✧.* also likes to be praised when she’s on bottom. tell her how beautiful she is, tell her that you’re taking her just right and she sounds so pretty right now. not only does it provide an ego boost, but it makes caitlyn feel so loved.
✧.* she’s a bit embarrassed to admit it, but she likes being on the receiving end of orgasm denial. so fucking close, her body strung thin like a bowstring. each nerve ending nearly on fire. but she can’t cum, not until you give her the green light, and it drives her insane.
✧.* “please, i’m losing my mind,” she’d cry out. “i need- mmf- i need to cum, pleasedarlingillbesogood,”
✧.* not opposed to quickies, but doesn’t opt for them. however, there are occasions where she’ll steal you away just before you have to leave for work, her fingers working as quickly as she possibly can to get you off- giving you something to think about the rest of the day.
✧.* something about your hips draws caitlyn in. maybe it’s the plush skin against them, the way they’re perfect for her nails to dig into, the feeling she gets when they rut against her, the rush she gets from gripping them to guide you as you grind against her thigh, or the way they sway when you walk. she can’t quite pinpoint it, but she also doesn’t care to.
✧.* “fuck, darling, keep moving,” she’d breathe out, gripping the tops of your hips as your wetness spreads over her thigh- folds glistening, head tilted back as lewd moans fill the room. “you look beautiful like this. so damn perfect, like you’re made for my viewing…”
✧.* she enjoys pet names a lot, but i think one of caitlyn’s weaknesses would be just addressing her by her name. especially if you usually call her by pet names outside of the bedroom. it feels so intimate, so personal.
✧.* “such a good girl for me, caitlyn,” you’d whisper, holding a bullet vibrator to her wet clit. “look at this pussy, so desperate for me. i can’t get enough.”
✧.* her favorite places to have sex are her bed and her desk. simple, but they work- her bed is a sanctuary, and it’s comfortable. optimal. her work desk serves many purposes, but her favorite is pleasuring each other.
✧.* caitlyn’s eyes are hypnotic, her gaze piercing. she’s big on eye contact during sex, demanding that you look at her the entire time. even as you’re fighting to not let your eyes snap shut or roll to the back of your head, the commanding tone in her voice keeps you grounded. it’s an ego boost, but it’s also a way of connecting to you.
✧.* gets rough when she’s especially stressed, which is often. she’s an enforcer and one of piltover’s most powerful figures; caitlyn is basically a walking manifestation of stress. slapping your tits, grabbing your chin, degrading you, shoving her fingers into your mouth and down your throat to shut you up.
✧.* that’s not to say that she doesn’t enjoy gentle love making from time to time- she absolutely does. she loves those nights where you take your time with her, truly conceptualize your affections for her. just how much you love her. she just gets carried away in the moment more than she’d like to admit.
lest;
✧.* switch with a preference for subbing. she will dom you if you ask her to, but most of the time, lest likes to lay back and bask in the feeling of you touching her. the scent of incense thick in the air, hair freed from her scarf and fanned around her as she lets out soft moans.
✧.* her voice is so smooth, so calming. the kind of voice you could fall asleep to. lest isn’t necessarily loud during sex, but she gets pretty vocal. and her noises, her words sound almost heaven sent.
✧.* “oh, keep doing- aahh!- that, darling…” she’d breathe out, her tone soft and buttery with desperation. “i need it, i’m so close-”
✧.* lest is definitely experienced, so she knows well and good what gets her going. she’ll tell you as well, guiding your hands to exactly where she needs them and describing in vulgar detail what she wants you to do to her.
✧.* “play with my tits with one hand, stroke me with the other,” she’d breathe out, placing your hands over both her perky breast and twitching cock. “pinch my nipple, hard, run your thumb over the tip- oh, fuuuuck…”
✧.* the tip of her dick is easily the most sensitive part of her body. it’s so sensitive, it’s almost comical- but lest can’t help it. you know how to pleasure her exactly the way she needs. as soon as you take it into your mouth, teasing your tongue over the head before taking her full length, she’s already fighting the urge to buck into your mouth. it draws sharp gasps from her throat, her fingers gripping at the bedsheets.
✧.* but her tits aren’t meant to be neglected, either. plump and soft, sitting so pretty on her. her nipples are definitely pierced, usually adorning gold bars with dangling chains. play with them, suck on them, place clamps on them. she’ll eat all of it up, praising you all the while.
✧.* definitely enjoys being tied up during the act, and she’d likely want to try shibari at some point. she has the nice ropes: purple woven silk, soft against her wrists and ankles. the feeling of being bared open before you, completely powerless and at your mercy can’t compare to anything else.
✧.* i think lest is really into wax play, but can’t participate as much as she’d like to because wax is a pain in the ass to get out of fur. she’ll gasp at the feeling of hot, sticky wax on her tits and stomach, a shiver running through her body involuntarily. you like to indulge her from time to time, relishing in her every reaction. again, it just can’t be as often as you’d both like because of the aftermath :(
✧.* lest can’t exactly finger you since she uh… has claws. but she’s so skillful with her mouth, the thought of what you might be missing doesn’t even cross your mind. she’d take your clit between her lips, teasing over the bud with her tongue before sucking. brushing her silky hair over her shoulder and angling her jaw so she has even more access to you, drinking in every sound you make.
✧.* “you taste amazing, darling,” she’d murmur. “stay still, mm.. you want to cum, don’t you?”
✧.* lest could grow addicted to just eating you out. the feeling of your release on her tongue is a high she never wants to come down from. she’ll draw orgasm after orgasm after orgasm from you on just her tongue.
✧.* praise her!! tell lest how good she’s doing, how beautiful she looks between your thighs and how lucky you are to have her. it only makes her more eager to please you.
✧.* “gods, you’re beautiful,” you’d whisper, “that feels amazing, you’re amazing, you’re perfect-” before feeling her tongue slip from your clit to your wet hole, prying you open.
✧.* LOVES to be pegged. she’s also partial to cowgirl, but lests’s absolute favorite is doggystyle. she craves the sensation of you slamming into her hole, gripping her plump asscheek with one hand and yanking on her tail with the other. she’d let out a sharp yowl, her chest almost collapsing into the mattress at the feeling. but it feels so fucking good, even though it’s sending pain up her spine.
✧.* “oh, yes, yesyesyes,” she’d babble, so bravely taking every inch of your strap. “don’t stop, go harder- fuck, ow!” she gasps, her soft tail in your grasp as you pull. “sorry,” you’d wince, slightly loosening your grip. “no. keep holding it, it- aahh! feels damn good.”
✧.* she cums pretty quickly when you strap her down. she’s a bit embarrassed about it, but she just can’t help it. your strap rubs against her g-spot so perfectly, your rhythm is exactly what she needs and you fill her up just right.
✧.* alternatively, lest loves when you ride her. seeing your face while you’re on top of her, claws digging into your hips while she bounces you up and down on her length… oh, it’s gold. and the sight of your tits bouncing is always a welcome bonus.
✧.* sometimes lest will have her pipe with her while you ride her, in which case she’ll allow you to shotgun hits. your breaths mingling with one another and lips almost touching as magenta smoke is passed between the two of you. it only serves to further heighten your senses, bringing you even greater pleasure.
✧.* “you’re divine,” she’d breathe out, hips rocking into you with fervor. “take it. take everything, just like i know you can. you’re a damn work of art.”
#jinx x reader#vi x reader#mel medarda x reader#sevika x reader#caitlyn kiramman x reader#lest x reader#arcane x reader#jinx smut#vi smut#reader insert#arcane x you#sapphic
1K notes
·
View notes
Text

So... you've gotten down the basics for converting objects from Sims 4 to Sims 2 and now you're ready for something just a little more complicated. If that tiny, little complication is called glass, this tutorial is for you.
Full disclosure once more. I am not an expert in... well... anything. I can convert items with glass, however. This is how I do it. There are probably better, more technical ways to do it, but I don't claim to know them. I am all about the best possible result for the least amount of effort. That's what I'll be teaching here. If that's what you're looking for too... Keep reading! Also, bonus end table download at the end!
For the purposes of this tutorial, I'm going to be converting the "Attention-Worthy End Table" from Growing Together. This tutorial is going to assume you have the necessary programs for converting (Sims 4 Studio, Blender, Milkshape, and SimPE), that you have a rough idea how to use them, and that you already know the basics of extracting a mesh and textures from Sims 4 Studio.
Step One - Separate the mesh and the Glass in Blender.
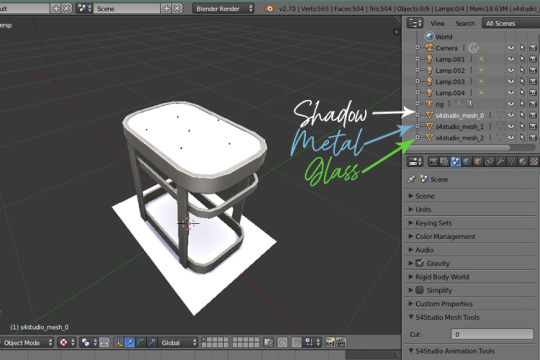
By playing with the eyeball next to each of the s4studio_mesh_#'s, we know what each of the layers is responsible for. I'm going to go ahead and discard the shadow layer so I'm left with the two parts of my mesh.
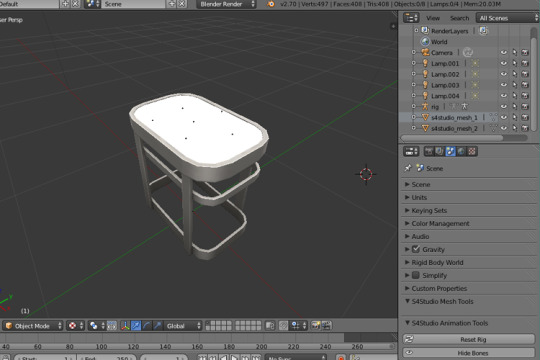
Like so. Now we need to isolate and extract the metal part of the mesh and the glass part of the mesh. To do this, I'm going to start by deleting the metal part of the mesh (s4studio_mesh_1), which leaves me with:
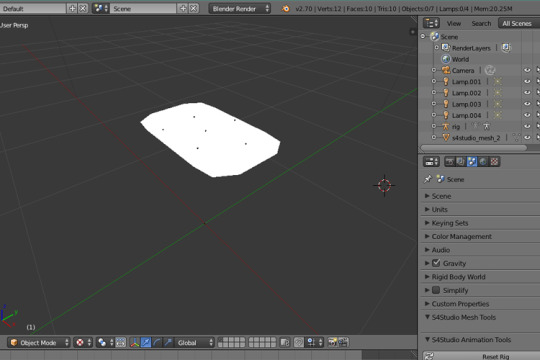
Export the glass portion of the mesh by going to File > Export > Wavefront (.obj).
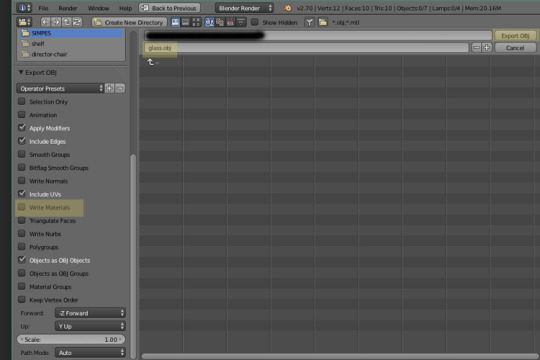
Remember to uncheck "Write Materials" then change the filename to "glass" and hit Export OBJ. Once the object has been exported, it will take you back to the screen with the lonely glass layer.
Press Ctrl-Z. This will undo the deletion of the metal layer. This time, delete the glass layer of the mesh (s4studio_mesh_2). You'll be left with just the metal portion of the mesh.
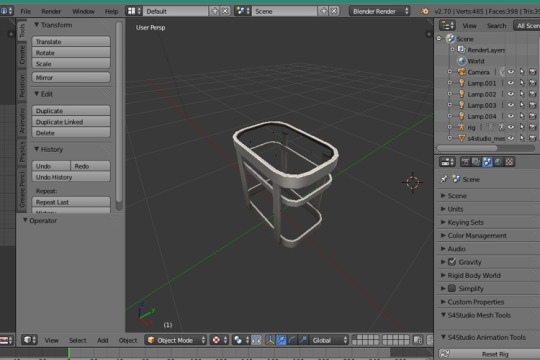
Go to File > Export > Wavefront (.obj).
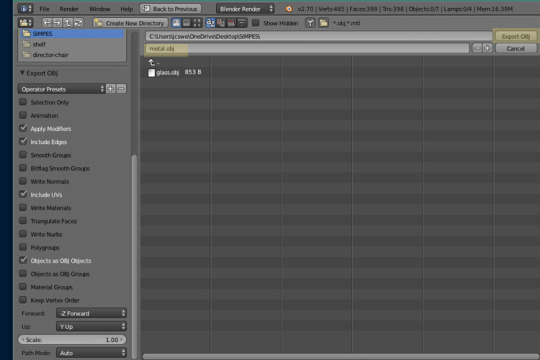
If you unchecked "Write Materials" with the glass, you won't need to uncheck it again. Just adjust the save name to "metal" this time, and hit Export OBJ.
Do not just hide the layers. You must delete them each individually just like this. If you hide a layer and export it, the resulting .obj file will not recognize that a layer is hidden and just treat it as a fused object, with glass and metal all as one. You'd either have to start over in Blender and separate the mesh out like this anyway, or try to separate it in Milkshape, and speaking as someone who has done that before I knew any better, it's a lot of pointless and unnecessary work that goes wrong more often than it goes right. So long as you do it as laid out above, you won't have a problem.
At this point, you can close Blender and delete the blender file that Sims 4 Studio created.
Step Two - Launch SimPE and clone an endtable.
At this point in time, you have two options. You can choose to clone an endtable that already has a glass part to it (like the Gliteri & Co. Trieste End Table from the Base Game, for example) or you can clone an endtable that does not.
Cloning an object with a glass part to it already will mean there's less to adjust in SimPE. There's already going to be a "glass" layer in your GMDC, SHPE, TXMT, and MMAT, so all you're going to have to do is replace the preexisting glass with your new one after you've taken it to through Milkshape.
The downside to this method is not everything you could be converting has a Sims 2 equivalent with a glass section to it. Or it might not have a base game equivalent, if you care about making your conversions base game compatible.
So, for the purposes of this tutorial, I'm not going to clone the Gliteri & Co. Trieste End Table, so I can teach you how to add a glass section when none exists to begin with.
I'm going to clone the "Curvaceous Colonial End Table," because why the heck not? This is a one-subset end table from the base game.
After I've cloned the end table and let it load, I'm going to do all the stuff I'd normally do for any other object. Give it a new, unique GUID. Adjust the category placement if I need to. Quartertile enable if I want to. Then, I'll replace the old texture with my Sims 4 texture. If you have a question about any of this, you can find the detailed instructions in my previous tutorial.
Step Three - Extract the old mesh for Milkshape.
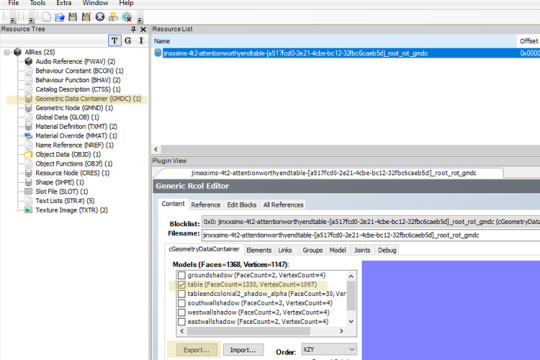
Highlight Geometric Data Container (GMDC) in the Resource Tree, click on the name in the Resource List, and make sure the box next to your mesh is checked. Click export. I don't rename this mesh, but you can give it a name like "old mesh" or something similar if it helps you keep track of what is what.
Do not check the boxes next to any shadows. When loaded in Milkshape, they just come up as a bunch of large, unnecessary squares surrounding your object that are going to get in the way or end up being deleted anyway.
While I'm on it, you can delete shadows from an object permanently by going into the "Groups" tab on this window.
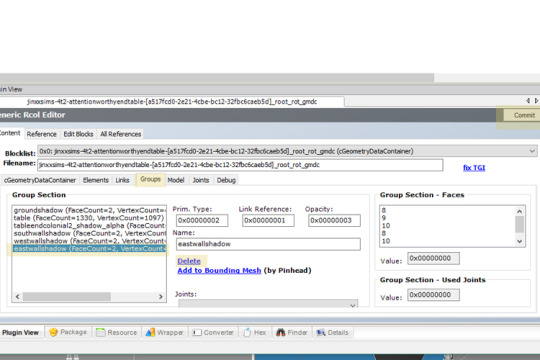
Once on the "Group" tab, highlight the shadow you want to delete, click delete, then click commit. You can also remove them from the SHPE, TXMT, and TXTR (it will reduce file size very, very, very slightly if you do so), but so long as you remove them from the GMDC, there will be no shadow in game.
I don't play with shadows on personally, so I'm never very concerned about keeping them when they don't already match the object I'm converting. My advice on this and any other Sims 2 topic is always going to be: DO WHAT IS BEST FOR YOU AND YOUR GAMEPLAY.
Now, back to our regularly scheduled programming....
Step Four - Import the Meshes into Milkshape.
I always start with the mesh I'm replacing. Go to File > Import > Wavefront OBJ... and select your mesh you just exported in SimPE.
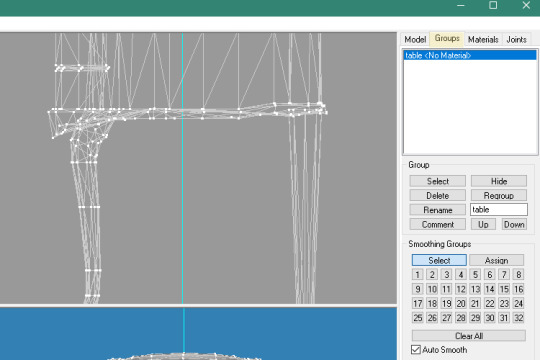
If we click on the "Groups" tab, we see this mesh has a name of "table."
Now, go to File > Import > Wavefront OBJ... and select your "metal" mesh you exported from blender.
In the "Groups" tab, it's going to be given an automatic name of "default." In any two-part mesh like a mesh with a glass part, we need to change the name to anything other than default before loading the next part of mesh. If you don't, when you import the glass, it too will be named "default," and Milkshape will kind of fuse them back together because they both have the same name.
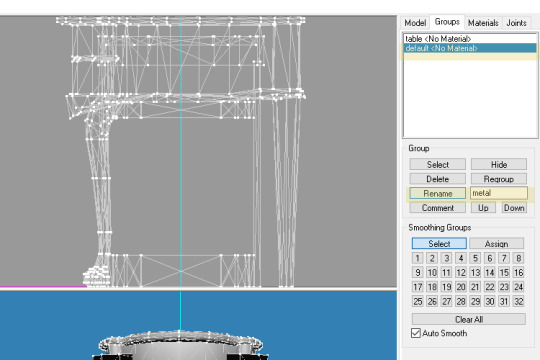
Highlight "default" under the Groups tab. Down under the Group panel, type a new name for "default" next to the button that says "Rename." In this instance, I've named this part of the mesh "metal." Once you've given it a new name, click on Rename. That will officially rename that part of the mesh.
Now we can add the glass part of the mesh. Go to File > Import > Wavefront OBJ... and select the "glass" portion of your mesh.
Just as you did for the metal portion, go ahead and rename the glass portion "glass." It'll make it easier to keep track of all the different parts going on right now.
Once you have the three different meshes all labeled differently, go to Face > Smooth All.
Step Five - Line Up the Meshes
While still in the "Groups" tab, in the list of each layer at the top, highlight "metal" and choose Select.
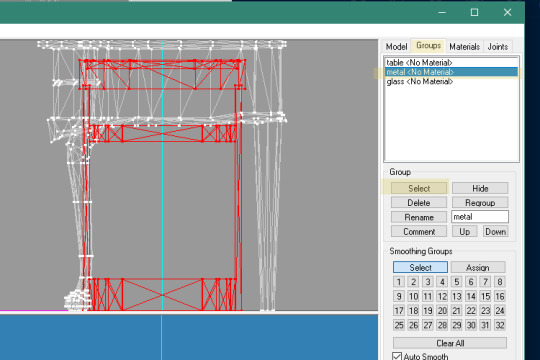
Once you've Selected the metal part, highlight "glass" and choose Select.
As you can now see, the Sims 4 mesh is all-around smaller than the Sims 2 mesh. For objects to be placed properly on the end table and not be floating oddly above it, we need the tops of the tables to be even. We can make this happen by changing the size of the Sims 4 table.
Highlight the "Model" tab and choose "Scale."
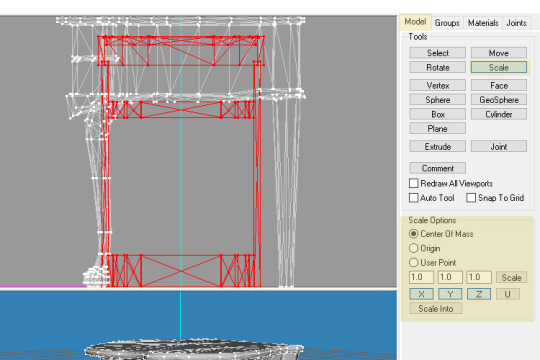
A panel will open at the bottom of the Model window with options for changing the scale of your selection (with the selection being the red parts highlighted). X will impact the mesh's width (side to side), Y will impact the mesh's height (up and down), and Z will impact the mesh's depth (front to back). Whenever possible, it's best to increase or decrease the scale evenly across all three to maintain original proportions, but it's also not strictly necessary. Again, do what looks best to you.
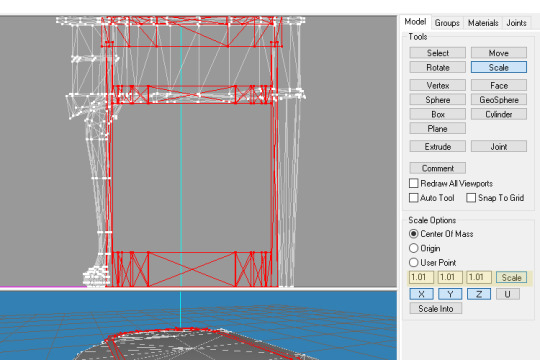
Whether I'm increasing or decreasing the scale, I usually set it to 1.01. It makes for a very gradual increase, but there's less of a chance of overshooting my mark and then having to decrease the size. Once you've entered your numbers for the X, Y, and Z, click the Scale button beside them to watch the mesh get bigger (or smaller, if your values are less than 1) until you have it the size you want.
For me, my 1.01, and this end table, eight clicks of the Scale button was perfect.
Highlight "Move," then click and drag your Sims 4 mesh up so the tops and bottoms of both end table align.
Step Six - Export your mesh parts.
Go back over to the "Groups" tab. Highlight "table" in the list and choose "Delete." Now you should only have "metal" and "glass" in the list. Go to File > Export > Wavefront OBJ... And save a file. I name this combined file "mesh," but you can call it whatever you want or override one of your previous files.
You can now close Milkshape.
Step Seven - Import your mesh to SimPE.
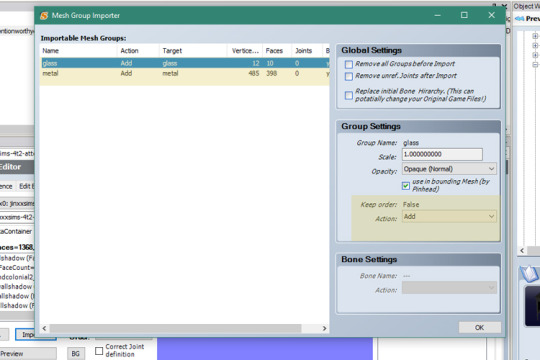
On the Mesh Group Importer window, both the glass and metal parts need to be accounted for. The "glass" layer is going to be a new layer, so we're going to leave the "Action" on "Add." Do not click OK yet.
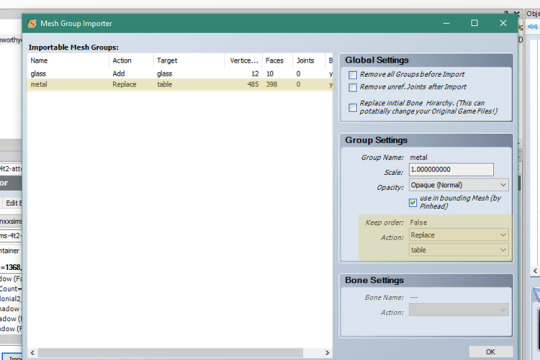
Highlight "metal." Change the Action to "Replace." When the new drop-down menu pops up, choose "table."
Click OK.
When it goes back to the GMDC's Generic Rcol Editor, click "Commit."
Step Eight - Add the new mesh part to the SHPE.
Highlight Shape (SHPE) in the Resource Tree. Highlight the name of your SHPE file under the resource list. Highlight "table" in the window that appears and choose "add."
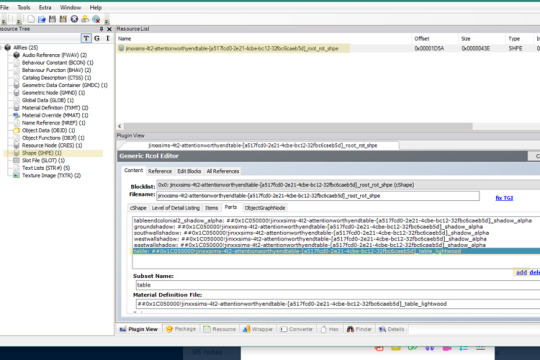
This is going to create a duplicate "table" in the list. Highlight one, and change both the Subset Name and the bit at the end of the Material Definition File following the ]_ to glass. Then click Commit.
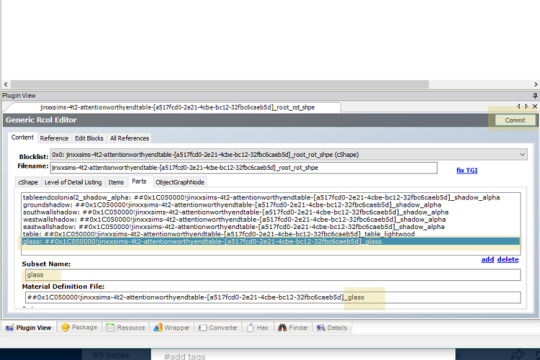
Step Nine - Save your file, then close it.
Step Ten - Find the glass you want for your glass element.
In the Sims 2, glass is seldom actually an image/TXTR file. Instead, it's a series of numbers and commas and settings and just general weirdness in a TXMT file. It's not really something that's recolored (hence why we don't need it to be its own subset most of the time), but there are different "shades" (for lack of a better word) of it out there.
You're probably most familiar with it when it comes to the windows in the game. Some windows have like a blue glass tint. Others are more gray. Some have kind of a shiny effect while others are flat. Chances are there is a glass you especially like and that you have in mind for your project.
If it's a specific Maxis glass, go back to the Object Workshop in SimPE and make a clone of the object that has the glass you want. You don't need to give it a new name or description, nor a genuine save name, you just need the file to load. If you like a glass from a piece of CC, just open that file in SimPE.
For the purposes of this tutorial, I'm going to use my own conversion of the Oh-So-Fine China Hutch from Discover University (it can be found here).
Once I load the file in SimPE, under the Resource Tree, I'm going to choose Material Definition (TXMT). Then I'm going to highlight the "glass" file in the list. Right-click and choose "Extract" and "Save."
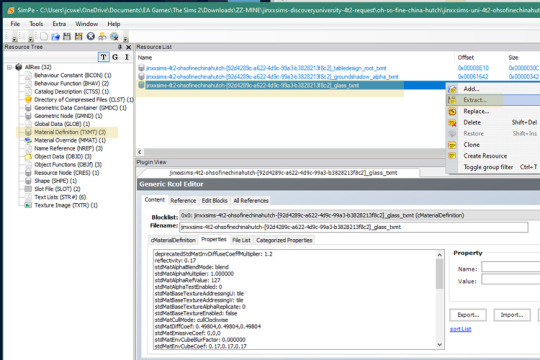
And now you can go ahead and close out of (or delete if you made a Maxis clone) that file.
Step Eleven - Add the TXMT to your file.
Open your conversion file again.
Choose Material Definition (TXMT) under the resource tree, then in the ResourceList panel, right-click on an empty space and choose Add.
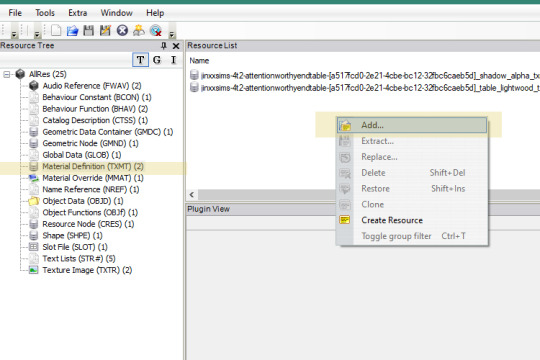
Select the file you just extracted. It will likely have a weird name consisting of a bunch of numbers and a few letters thrown in. Choose open.
Once it's loaded in the panel, click on and highlight any of the other lines of the TXMT. Once they've loaded in the Plugin View, highlight and copy (Ctrl-C) the first part of its filename.
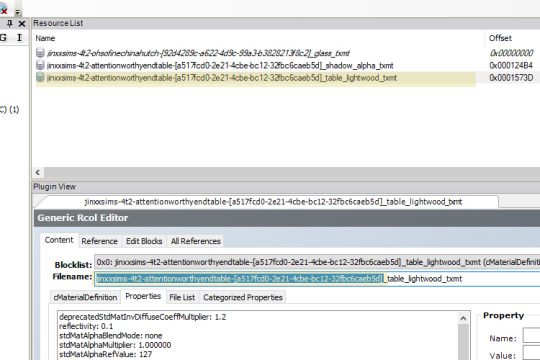
Highlight the "glass" TXMT that you just added. Paste (Ctrl-V) the name you just copied in front of the _glass_txmt.
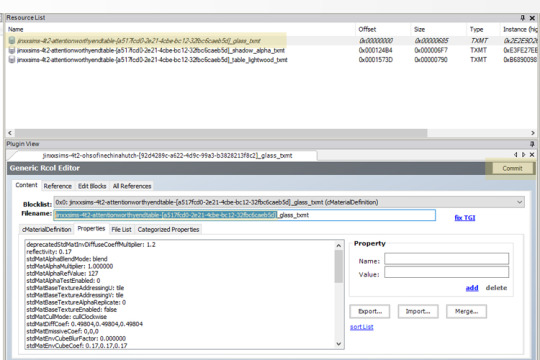
Click Commit.
IMPORTANT NOTE - If the glass TXMT that you extracted does not have an ending of _glass_txmt, change it as well to _glass_txmt. If you don't want to change it to _glass_txmt and would rather leave it as-is, you need to go back to the SHPE file and alter the glass layer to point to whatever you have it named.
STEP TWELVE - Fix Integrity. I cannot emphasize this enough. FIX INTEGRITY. Tools > Object Tools > Fix Integrity.
Save your file. And you're done.
At this point, you can make your recolors or load up your game and check out the finished product.
A Few Notes - If you cloned an item that already has a glass part, basically once you finish the Milkshape part, when importing your mesh to SimPE, Replace both the mesh part and the glass part with the glass portion of the mesh, and you're done. Fix integrity, save, and you're good to go. You don't need to adjust anything in the SHPE or TXMT.
If you're converting an object that has a custom glass with an image (I converted a coffee table from High School Years that had a rainbow-y, actual-image glass), when importing it, use DXT5Format for the best results. Also, make sure the TXMT file has the stdMatAlphaBlendMode set to "blend" instead of "none."
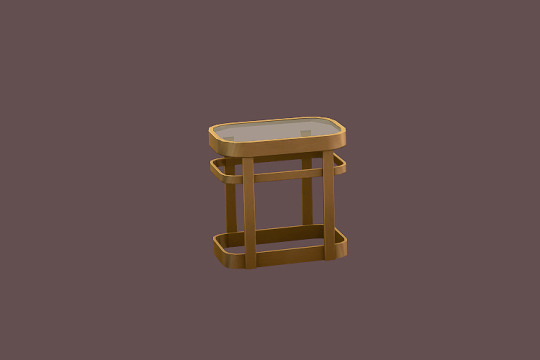
BONUS - Download the Attention-Worthy End Table
88 notes
·
View notes
Text
Hi! I'm Candy (it/its), welcome to my reader-insert and N-S-F-W blog! (Sorry for the dashes, I want to avoid the p0rnbots finding me 😔) Please only follow/interact if you're 18 or older! Not everything I post here will be N-S-F-W but a good chunk will. For a purely SFW and non-reader-insert experience, please check out @cottoncandythetrashpanda. Pretty much everything I post here can also be found on my ao3, AugustQ. This means I will most likely crosspost answered requests there too. I have a Ko-Fi as well- I'm not currently taking commissions, but y'know, if you like what I do and want to throw me a couple dollars, feel free.
My requests are currently CLOSED so I can catch up with my backlog!
DNI if you are any brand of LGBT-phobe or exclusionist or any other type of bigot. This is an inclusive blog. I don't support pro shippers and don't want them interacting either (while I agree fiction is a safer space to explore taboos, the way most proship communities romanticise abuse, often refusing to acknowledge or outright denying that what's depicted would be unhealthy or unsafe IRL, does far more harm than good, and isn't really "exploring" taboos as much as it is pretending taboos don't/shouldn't exist)
Request Rules (please read carefully as breaking these rules may result in you being ignored or blocked):
For Alphabet Requests:
For the sake of keeping what I do sustainable, I no longer write entire alphabets at once on request. Instead, requests for alphabets are limited to up to 4 letters per ask. You can send multiple asks for the same character, but please limit how many you send in - if I get too many (like more than 3) for the same character all at once I might ignore or delay some of them especially if I can tell they're from the same person. Please send in separate asks if you'd like to request for more than one character.
Please include in the ask: which character you're requesting for, which alphabet (SFW or NSFW) you're requesting, and the letters you'd like (up to 4). You can also say "dealer's choice" or "you pick" or something and I'll choose 4 letters myself instead.
Example:
"Could you do A, B, C, and D of the NSFW Alphabet for Senku?" ✅
"Could you do some of the SFW Alphabet for Takeo? You can choose which letters!" ✅
This method does mean that alphabets will be Tumblr exclusive until I've done the whole alphabet, at which point I'll post them to ao3. I apologize for any inconvenience this causes.
I WILL write:
1. NSFW, SFW, and platonic; one-shots, headcanons, alphabets and memes; most fic types basically!
2. The following fandoms: Dr. Stone, DC Comics, Hunter X Hunter (no Hisoka), JoJo's Bizarre Adventure, Undertale, Spy X Family, TMNT, Noblesse, Yu-Gi-Oh (and feel free to ask about other fandoms as long as they aren't in my "won't write" list! No guarantees, but these listed are just my favorites, and I might be willing to write for others, so don't be shy!)
3. Otherwise, if it's not listed in the "won't write" section below, assume I will write it! Very few themes, AUs, kinks, etc. are off limits to me =).
I WON'T write:
1. Any NSFW or reader-insert shipping of characters who are minors. Characters must be canonically 18 or older for me to write NSFW or reader insert content of them. Characters who turn 18 over the course of the story are allowed if they spend the majority of the story as adults (so most Dr Stone characters are okay, but not, say, Suika because even though she's grown by the end, she's a child for most of the manga.) Just use your best judgement, really. I may also deny requests for characters who look very young, even if they're canonically adults, and/or have unclear ages (such as Chelsea from Dr Stone) for my own comfort. Platonic and familial requests for minor characters are okay.
2. NSFW or shipping involving real people or personas/role-play characters closely based thereupon. If you know me, you know I'm in some YouTuber fandoms (Hermitcraft mostly), but I don't write about them here. Even if the creator is comfortable with it, I'm not, sorry. I might consider platonic requests for them? But no promises, I'm not sure yet.
3. No incest or p-dophilia; watersports or scat; omegaverse (I don't understand a/b/o dynamics and I don't want to learn)
4. The following fandoms: Attack on Titan, My Hero Academia, Danganronpa, SCP (these fandoms either make me uncomfortable or I just plain don't like them. No hate to fans, I promise, but I don't want to write about them lol.)
Other Stuff:
Reader will usually be gender neutral unless otherwise specified
2. Requests might take a while (i'm kinda slow sometimes)
3. Finished requests may also be posted on ao3
4. Don't spam! If you send in the same request multiple times I'll ignore it and might block you. If you're worried an ask might have gotten eaten by Tumblr, send a DM or follow up ask to check and I'll let you know.
5. I assume any completely blank & empty accounts are bots and block them. I highly recommend at least changing your icon and adding a title and short bio if you're new to tumblr.
6. I reserve the right to refuse requests for any reason. If they follow all the rules and I just don't want to do it I'll respond letting you know, though.
2 notes
·
View notes