#tamiyatank
Explore tagged Tumblr posts
Text
Chieftain tanks are my happy place
I grew up in Germany in the 1980s, a time of the cold war, Chernobyl and the Chieftain tank. Sadly, only one of these things has turned into something fun to play with at the weekend.
I have loved the Chieftain tank since childhood and had more than one chance to crawl across one, while still an overly excited pre-teen, visiting the Tank Museum in Bovington. Obviously, as soon as I hit my teenage years, I immediately stopped loving something as loud, obnoxious and heavy as a tank and instead got into music, namely Heavy Metal music.
Along with my love of Heavy Metal music, came my delight in the peace movement and even now aged horribly close to fifty, I am still involved in the peace movement, albeit, while wishing that I had the disposable income and large area of unused farmland upon which I could dabble in my interest in Chieftain tanks.
As we all know, the venerable old Chieftain had something of an Achilles heel out back, in the form the Leyland L60 engine. However, when it did work, the nineteen litre, opposing piston, two stroke multi-fuel engine had a glorious howl to it, despite being chronically underpowered for the vehicle it was propelling. Luckily the pack was easy to pull out and replace while in the field... Every cloud etc.
You can now buy your own Chieftain tank, providing that you have £60K to play with. However you also need a thousand pounds to fill the tank, every time you want to go for a drive of more than half a mile. If you want to know more about this kind of thing, why not go and have a look at the Mr Hewes YouTube channel. If you love tanks, you will not be disappointed.
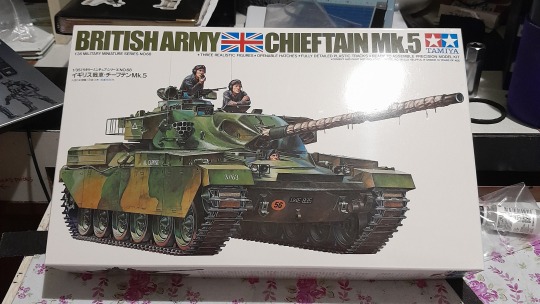
Now of late, I have of course got into my art in a big way and when I say a big way, I now have a room in the house entirely dedicated to my making art. I have some of my art displayed in our home and the wife even likes some of it! However, I have wanted to make a Chieftain Tank Diorama for a while now and always put it off because of the cost of a decent sized set. Now obviously, the kindly folk at Google would never listen in to my conversations through their monitoring devices in my phones and computers, so it was by pure chance that they displayed to me one day, a whole host of cheap model tanks... It would have been rude to ignore it, so I snapped up a Tamiya 1/35 scale model set for a penny short of £17. The bastard Post Office added their own stab in the back for delivery and four days later, it arrived in my disgustingly sweaty paws. Thus, the plan came together and I got my magic bucket out of the shed. I cut the wood for a base and dropped it in the bucket. I also slapped in some ripped up newspaper and a bottle of glue, then tickled the lot with a paintbrush and then dropped in the bits of tank. I put the lid on the bucket, gave it a hearty shake as I said the magic words (do you really think that I am going to tell you my magic words?) and what do you know? A load of spilled paint, sticky glue, broken plastic and ripped up newspaper fell out of the bucket!

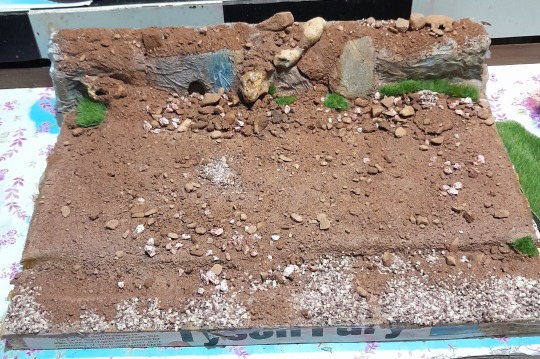
So with a new model set delivered to my desk and the magic bucket on toilet cleaning duty, I set about doing it properly. The base was a piece of off cut chipboard donated by a friend. The newspaper came from my Mother in law, while Wifypoozles supplied the PVA glue. Knowing the dimensions of the tank, I was able to map out the diorama and then start designing the landscape. I knew that I wanted a rocky bank and a drainage ditch either side of the vehicle, with a fence and some grass. Using a cardboard tube and flower arranging foam, I quickly modelled the bank and then using a drill and a Dremel I cut the ditch into the base board.
The base board was then coated with newspaper and a mix of paint and PVA, sealing the tube and foam into place. I also placed a couple of pretty stones and a larger rock into place to give me a rocky bank with an exposed rock face.
With the base dry, it was time to add the soil and substrate, for which I used a mix of builders sand, gravel and pebbles, mixed with PVA. It took a couple of days to dry, but when it did, it was as hard as rock. Using my airbrush, I gave it a quick coat of burnt umber paint, which just deepened the already very brown of the sand and gravel. I used some lichen that had fallen from one of our trees to simulate bushes and shrubs and used some sheet grass from a model railway to make the grassy tufts I wanted at the edge of my gravel road.

I used cocktail sticks and super glue to knock up a fence and then found the measurements for a stile and added one of them too. A quick on line check sourced an army range sign warning about the dangers of picking up used ordnance.
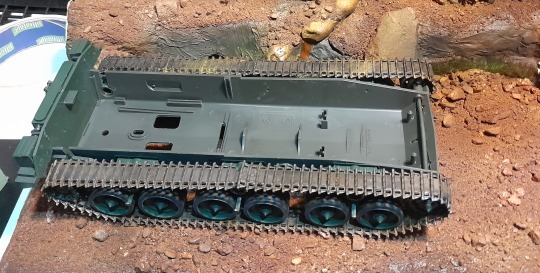
With the base done, I turned to the model tank and began the construction with painting and building of twelve road wheels, two front guide wheels, two rear sprockets and six return rollers. Five hours later, each wheel was assembled, painted and ready for fitting to the bogies. By the end of day one on the tank build, I had assembled the lower hull, with tracks.

Day two saw me make a start on the upper section of the tank, also known as the Glacis Plate and engine deck. This took barely more than an hour and the boxes looked great assembled and fitted. Moving onto the turret was where things got complicated as several tiny parts needed to be located and fitted. The crew doors had to be functional, so that if I decided to use them, I could add the figures for a heads out driving of the vehicle. I also had to fit the barrel lock, which again had to be functional to allow the main gun to be locked into the rearward position. With all of these parts functional, it was fun to add the first coats of paint, a dark green acrylic ink designed for use with an air brush. With the dark green base coat of the plastic, it needed only thin coverage to give the wanted effect, however as the paint dried, it took on the usual glossy finish, totally unsuitable for NATO camouflage. Luckily, when I bought the model set, I also purchased a bottle of clear mat varnish.

Some parts of the set were extremely well made and thus it went together beautifully, not needing anything more than a light sanding to remove moulding marks. Sat on the shelf behind me in my room was two jars of experimental spru-goo and not once did I need it. However some parts were quite poorly made. Actually, that is unfair. The plastic tow cables were brittle and did not lay like real steel cable, so I raided the mountain bike spares and pulled out a stainless steel brake cable, which I unwound to find the wire core. At point eight of a millimetre, this was the exact size to replace the plastic tow cables. However the eyelets that connect the cable to the tank were another story. Using some of the spru-goo, I attempted to model some eyelets. However at the time of writing, the spru-goo has not yet reached full hardness. So with a heavy heart, I cut the eyelets off of the plastic tow cable and with a micro-drill, made a 0.5mm hole and then enlarged it to just under one millimetre. This was just big enough for take a tight fitting steel cable and thus the tow cables were made.

The final pieces to be assembled were the crew and in the instruction guide, all three of the crew are to be painted as white European men. This grated against my more egalitarian heart and so when I started to paint the figures, I painted the tank Commander with a skin tone that matched a photograph of Grand Tour level cyclist, Biniam Girmay, the first Black African cyclist to win a stage in a grand tour. The young man is an extremely talented professional cyclist, who was unfortunately taken out of the 2022 Gyro d'Italia after winning a stage, when the cork from a podium celebration bottle hit him in the eye.

With my crew painted, I fitted them and then decided that they needed a back story, so here it is. The Driver is a Gay man, out and proud. The Gunner is a Trans Man, brave and strong and then the Commander is a young Black man. The sad truth is that during the years of service for this vehicle, it is extremely unlikely that such people would ever get into the army, let alone command of a main battle tank.

Thus my project came to an end, with a large stone holding the tank hull down to the base board as I waited for the glue to dry. So while I wait for the glues, paints and resins to harden, I must find another project to distract me from the unending pain I suffer every day. I know, I will design and scratch build from paper stock an entire model of my motorbike! I am a fucking idiot.
#disability#lgbtq🌈#art#ladyartist#womencreaters#chieftaintank#thetankmuseum#modelmaking#diorama#tamiya#Tamiyamodels#Tamiyatanks
1 note
·
View note
Photo

M551Sheridan @tamiya_inc_jp 1/35 #sheridan #m551 #m551sheridan #tamiya #miniatures #scalemodelkit #plasticmodelkit #modelkit #plastickit #plasticmodel #plasticmodelkit #scalemodeller #35scale #scalemodelling #scalemodel #tank #modelarmor #modeltank #tankmodels #tamiyamodels #tamiyamodel #tamiyatank #tankmodelling #sheridan (w: Ely, Cambridgeshire, United Kingdom) https://www.instagram.com/p/CQDiqhNh1cV/?utm_medium=tumblr
#sheridan#m551#m551sheridan#tamiya#miniatures#scalemodelkit#plasticmodelkit#modelkit#plastickit#plasticmodel#scalemodeller#35scale#scalemodelling#scalemodel#tank#modelarmor#modeltank#tankmodels#tamiyamodels#tamiyamodel#tamiyatank#tankmodelling
1 note
·
View note
Photo

#newarrivals at #bobeshobbyhouse ! #greatgiftideas #gundam #bandaistarwars #modelcars #tamiyatanks and more! https://ift.tt/2YLP5xN
0 notes
Video
instagram
No flying today so out in the snow with the Tamiya Tiger 1 full options tank. Just a quick video as it's cold! #tamiya #tamiyatank #tank #rctank #rctanks #rc #rcmilitia #rcmilitary #rcracer #ww2 https://www.instagram.com/p/BgdrmTUBQq_/?igshid=pqy0451od813
0 notes