#styrene leak
Explore tagged Tumblr posts
Text
was sposed to get my stupid quiz done 2day but my mother was in town friday & instead of actually bringing any of the shit she said she would she decided that going to ikea on a friday night (busy as fuck for some reason) was the go instead & then we simply had to go out to [REDACTED] --once again-- on a friday night to get dinner despite the fact that it is even worse there after i had 2 skip classes that day due to my agonies and in spite of my repetitions that we had food at home. so the horrors are in a resurgence and i have instead achieved jackshit this weekend!!!! yay!!!!!!
#sorry i have been stewing for 2 days and if i don't complain about it somewhere my brain will leak out my ears#'haha wow it's like an hour later than i thought no wonder you're so tired!1' yeah no fuckin shit mate#im going to go listen to germfree adolescents. save me poly styrene
1 note
·
View note
Text
SiliNOT! Testing and Review
Since I run a lot of casting workshops, I've had several people in the costuming/maker community ask me my opinion on SiliNOT!, a relatively new product advertised as a budget- and eco-friendly moldmaking alternative to silicone, urethane, and other single-use materials.
I finally bought a couple of bottles to play with, so I did a test project. My experience and findings are below! (It's not a recipe blog, but if you want to skip the play-by-play and get to the TL;DR, it's under the big "In Summary" header near the bottom.)
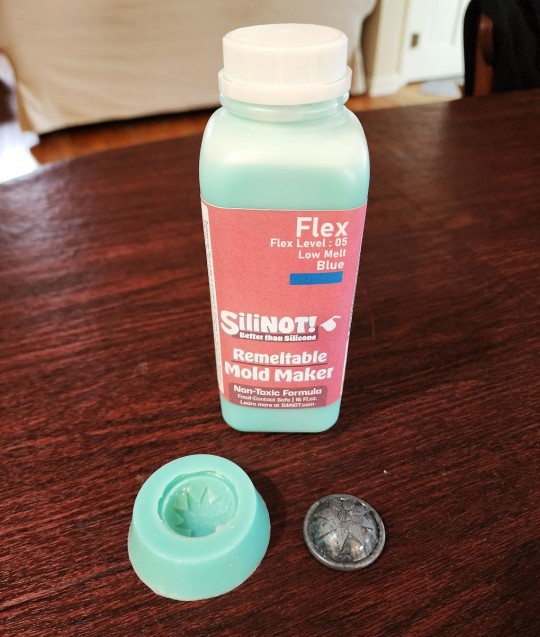
First, if you aren't familiar with this material, SiliNOT! is a remeltable, reusable medium for making molds. Though its exact ingredients are not disclosed, it purports to nontoxic, food-safe, and compostable. It melts in a household microwave or double boiler and solidifies at room temperature (or in a refrigerator/freezer for faster results). The website is https://silinot.com/.
(I am not an affiliate, and have no connection to this company apart from having made one retail purchase from them. I just have a lot of casting experience and like trying out new products.)
The Positive Original
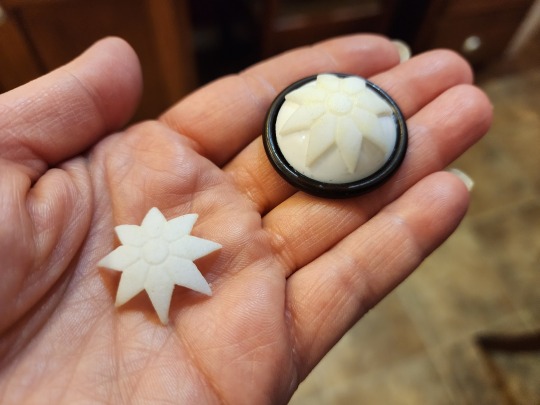
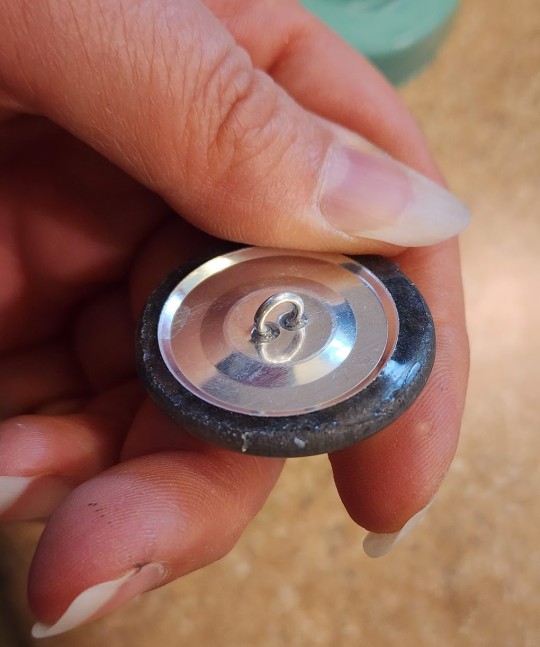
I’m still in the middle of a Vincent Valentine build, so I decided to test the SiliNOT! on his custom buttons. My original is a stack of various nonporous materials: an antique (probably Bakelite) coat button, an epoxy resin dome I cast using a mold I already had in my library, and some engraved Worbla’s Pearly Art for the raised detail. The button shanks won’t be added until the final casting, so the original can be mounted flat for the moldmaking process.
Sample Worbla on the left; completed button stack on the right:
The Mold
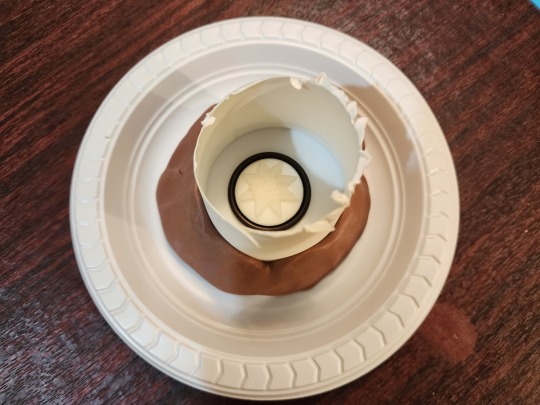
I built the mold container the same way I do for silicone pours, with the flat back of the button fixed to a styrene plate and a cylinder (actually a small paper cup with the bottom cut off) surrounding it for the walls. The lip of the cup is sealed all the way around with Monster Clay to prevent leaks.
Heating and Pouring
The SiliNOT! didn’t take long at all to heat up; I did maybe four or five 20-second bursts before it was completely fluid. The bottle does get rather warm, so hand protection isn’t a bad idea. If you have heat-resistant gloves, you can use those; I was working in my kitchen (yay for nontoxic stuff!), so I just grabbed an oven mitt with a silicone grip.
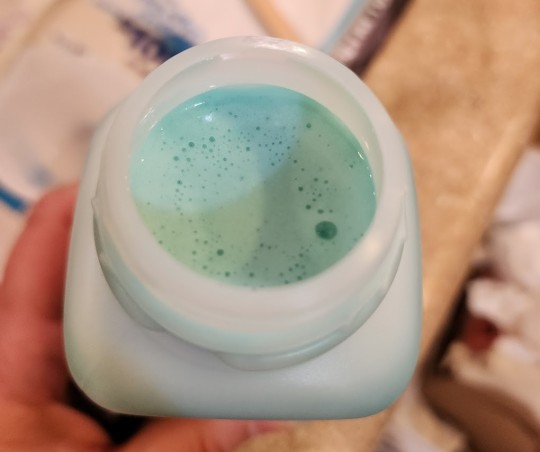
The melted SiliNOT! looks a bit like Luke Skywalker’s blue milk. It’s about the consistency of a yogurt smoothie and likes to pour in a thicker stream compared to silicone. While silicone can be stretched into a thin ribbon for delicate pours or chemically thinned with solvent for really tricky jobs, SiliNOT!'s viscosity is dependent on temperature and never seems to get quite as thin as silicone.
I’d automatically made my mold compact to conserve material (not really a concern with a reusable moldmaking material like SiliNOT!, but after using silicone for more than a decade, I’ve trained myself to be as efficient as possible), so the walls of my mold container were only about half or three quarters of an inch from my object. Because the target was so narrow, I found it difficult to accurately fill from the lowest area of the mold with the SiliNOT! The heavier pour also means more air can get trapped in or under the material.
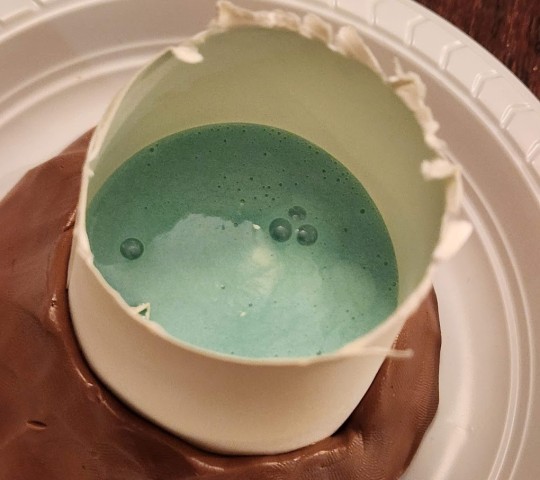
Bubbles are one of the areas in which SiliNOT! is decidedly inferior to silicone. SiliNOT! has higher viscosity, so bubbles don’t want to rise to the surface without vigorous tapping, which can distort the mold edges or affect leveling depending on your mold container. The bubbles that do make their way to the surface are difficult to pop, even when poked with a sharp implement. Heat gun degassing doesn’t have much effect.
Since the bubble surface cools and skins over quickly, I actually had to use a tool and scoop some large bubbles completely out of the mold to allow the surface to level. Critically, the SiliNOT! is opaque, so you can’t spot bubbles clinging to the surface of your original. (This is why my first mold was a reject, and I had to repour. More on that below.)
Hardening
Once the surface had set, I carefully moved the mold into the refrigerator to cool faster. Here’s another area where some types of silicone can have an advantage: I typically use fast-curing Smooth-On products (because I always have random quantities left to use up after our casting workshops), so I rarely have to wait more than half an hour for a silicone mold to cure, regardless of its size or mass.
The SiliNOT! has to chill completely before handling, though, and discharging that amount of heat requires a fair amount of time even in a cool environment. My mold was pretty small, maybe 2 1/2” wide by 1” deep, and it still took around 40 minutes to cool completely. A larger, deeper mold could hold considerably more energy in the center, and might have to be left in the freezer for a couple of hours before use.
Demolding the Original
When the mold was completely chilled, I removed it from the refrigerator and popped it off the plastic plate I’d used for the base of the mold. The texture was very different from what I’d expected: Unlike other meltable materials (Monster Clay, et al.) that have a firm surface when cool, the SiliNOT! remains tacky, which means it promptly collects any debris that crosses its path. In my case, this meant I had to pick dog hair off the surface throughout the casting process (and I don’t want to think about what would happen if glitter had contaminated the work space).
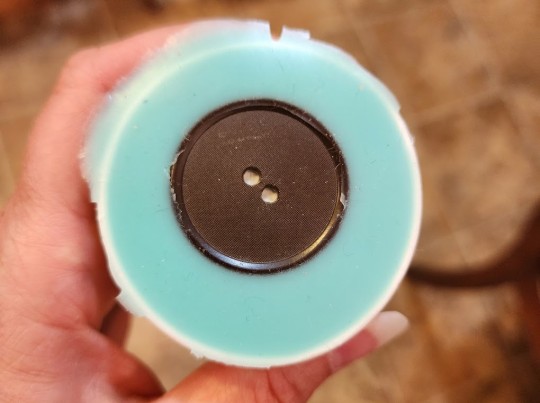
I’d used a paper cup for my mold walls, which usually works fine with fast-curing silicone. But the SiliNOT! must have a high oil content, because the cup absorbed some of it:
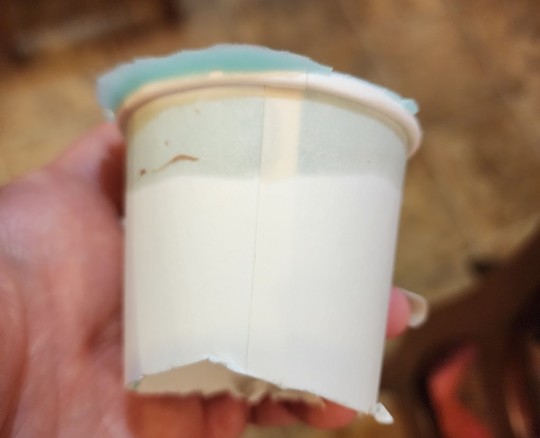
Lesson learned; use only nonporous containers with this stuff.
The SiliNOT!! really wanted to cling to the edges of my original, so I had to go slow at first to avoid tearing the thin flanges of the mold off. However, it did demold nicely from the smooth surfaces, and preserved texture very well. You can see the Worbla pebbling and the engraving channels clearly in the mold (as well as some dust and dog hair, because I made the mistake of setting it down briefly):
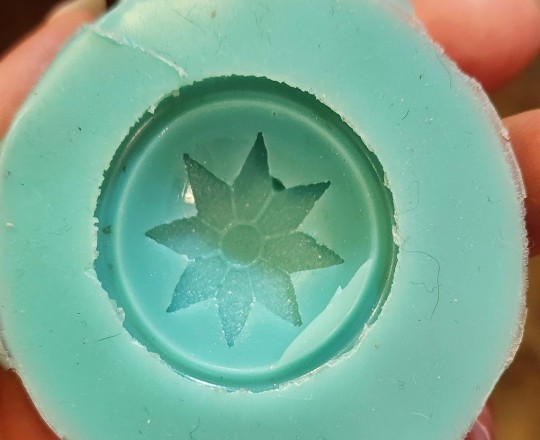
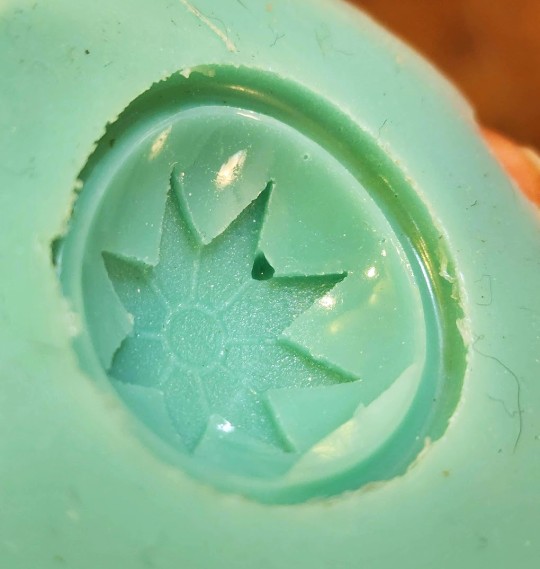
Unfortunately, as you can see, a large bubble had stuck to my original and created a pit in the mold, so I decided to do a second mold pour. I figured I’d tear up the failed mold and put the pieces back in the bottle to remelt… and discovered I couldn’t. The mold would stretch and twist, but not tear. It also seemed to return to its original shape relatively faithfully. Here’s a video of me manhandling the mold:
As you can see, the SiliNOT! has much better stretch and recovery than many silicone products (there are silicones that stretch well -- some of the Dragon Skin products come to mind -- but they’re not typically marketed for moldmaking). This means it’s likely well suited to casting objects with moderate undercuts or oddly-shaped bits that need the mold to stretch during demolding.
You can cut the SiliNOT! easily with scissors, which is the recommended method for getting it back in the bottle when you’re ready to remelt.
Take Two
Using what I’d learned from the first pour, I did the second one inside a hard plastic ramekin. This gave me a bit more room to pour into the floor of the mold, reducing the bubble risk, and also eliminated the porous paper cup that had absorbed oil. I still had the issue with bubbles that didn’t want to pop, but there were fewer of them this time.
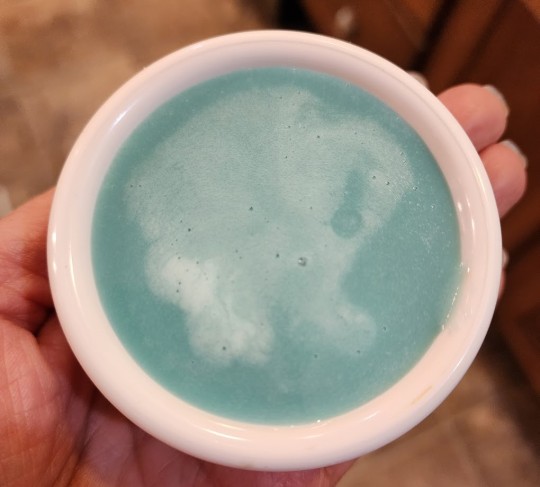
The ramekin made for a much cleaner mold, buuuuut there was ANOTHER BUBBLE right in the middle of the design. >.<
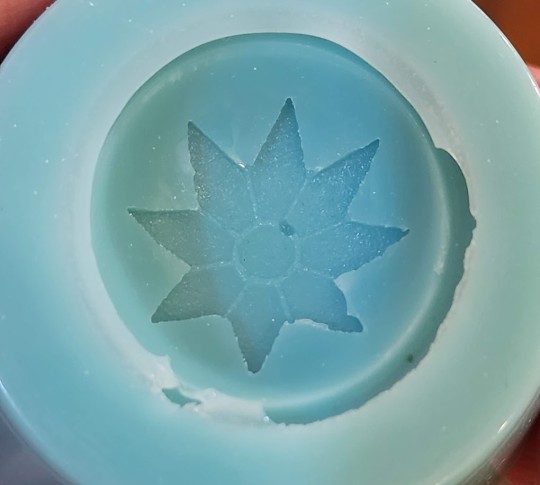
Take Three
Lather, rinse, repeat. Or in this case, melt, pour, chill.
This time I heated the SiliNOT! as much as I dared and did the absolute slowest, narrowest pour I could manage, giving the air extra time to escape as the mold was filled from the bottom. The risk with stringing out the pour like this is that in a thinner stream, the heat escapes faster, leading to uneven viscosity as the liquid fills the mold. I don’t think that’s a major problem for this particular piece, but it’s something to pay attention to as regards leveling and degassing, especially for larger molds that will take longer to fill.
The result of pour three:
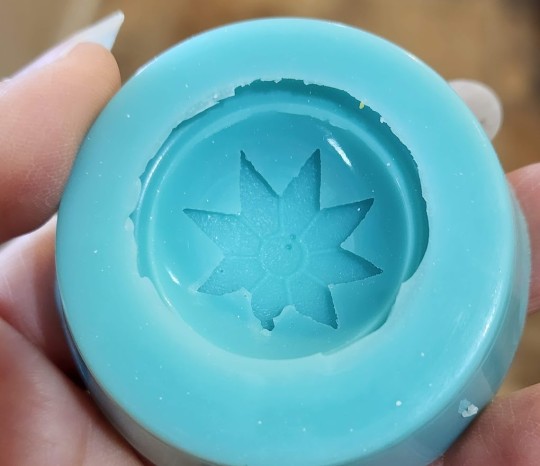
/siiiiigh/ Well, at least the bubbles are smaller, this time. They may not show up enough to matter in the final cast. I’ll give it a try.
Casting
I had leftover workshop resin that was getting on toward the end of its shelf life, so I used Smooth-On Smooth-Cast 300 for my initial resin trial. It’s an opaque white resin with about a 10-minute cure time (the fast turnaround is why we use it for workshops).
Before pouring, I had to do a little mold cleanup where the SiliNOT! had managed to sneak under the edge of the Worbla (I think I’d loosened the corner of the star from prying it out of so many molds), but since the SiliNOT! stretches so well, it was pretty easy to invert it to get little scissors down into the bottom of the depression.
For the first cast, I didn’t use anything but the resin in order to get a baseline. Ideally I’d like to cold cast or dye the resin so I don’t have to worry about paint chipping, but since I’m doing a trial here (and need multiple buttons anyway) I figured some plain white extras wouldn’t hurt.
So, my first cast…
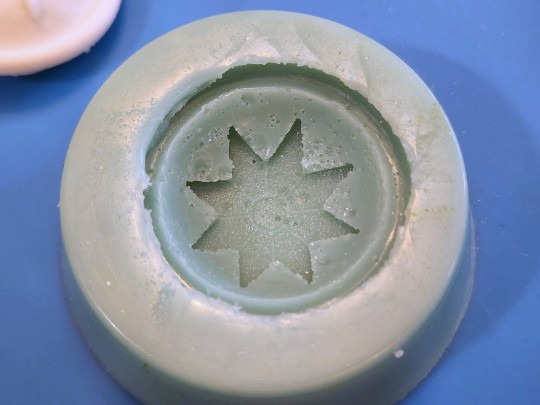
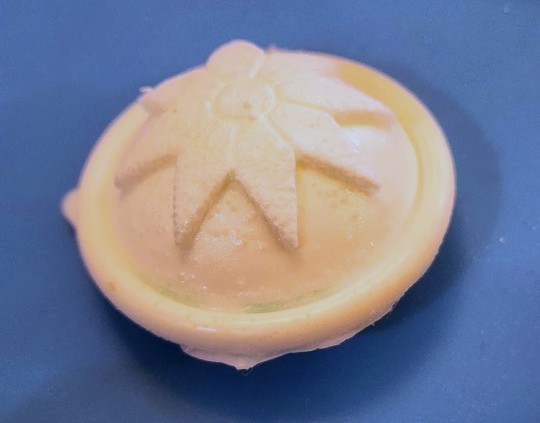
…smacked into a big problem, which I probably should have seen coming: The resin I’m using is a fast cure formula, which means it discharges a fair amount of heat as it's going through that rapid chemical reaction -- enough heat to melt the SiliNOT!, as it turned out. When I tried to demold it (after giving it a few extra minutes beyond label time to be sure it was done), the surface of the mold had melted to the resin and even embedded itself in a few places. It’s difficult to see the resin detail in the photos (my camera went into white balance panic mode with all the shades of white and blue), but you can see how pitted the formerly-smooth mold surface is.
In fairness to the SiliNOT!, the bottle does say that you should put the mold in the freezer for half an hour before casting high-temperature materials. But I assumed high-temperature material was something like candle wax or melted chocolate, rather than ordinary resin. (And the mold had just come out of the refrigerator.)
So, on to pour FOUR of the SiliNOT! mold…
Take Four
NGL, this is getting a little old. >.<
Fourth mold definitely needed some cleanup around the edges, and there are still a couple of tiny bubbles I can’t seem to get rid of, but it’s good enough for a test. (I’m starting to despair of using these for actual production, given how many times I’ve had to redo the molds because of bubbles...)
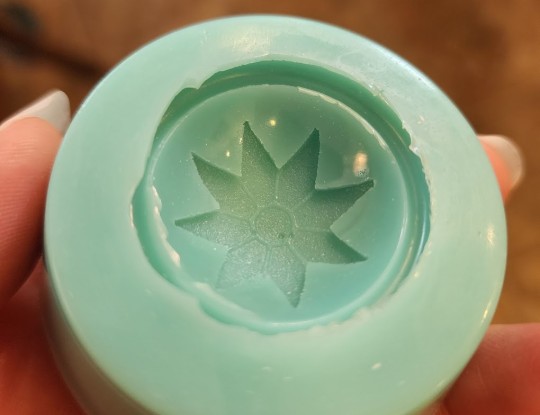
Deep in the recesses of my basement, I found some transparent epoxy resin with a 24-hour cure time -- much slower and lower-temperature than the Smooth-Cast. Since it cures clear, I went ahead and mixed in some metallic powder pigment on the off chance that I get a usable button out of this one. I had excess resin after mixing, so I poured that into my first mold, which has a bubble in the design but is otherwise fine. Two test pieces are better than one, right?
Results
Here are the results of the slow-curing resin out of mold #4:
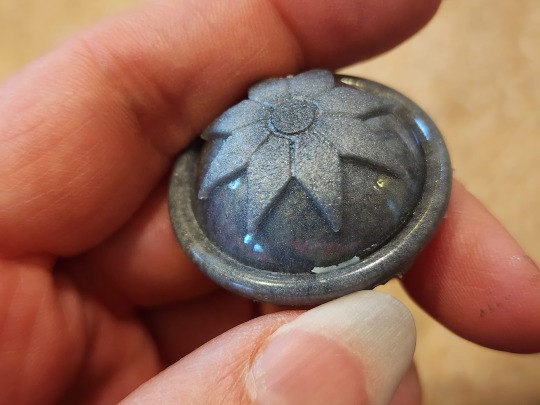
Finally, a (mostly) clean cast!
As you can see, the detail reproduction is excellent -- certainly on par with the pulls from the silicone mold I ended up making while waiting on this set to cure (purely for time reasons; I couldn’t afford five days to cast the buttons using slow-curing resin, and with a silicone mold and fast-curing resin I could get them all done within a couple of hours).
However, you can also see a few spots where bits of the SiliNOT! embedded themselves in the final cast. Part of that may be due to design flaw in the original; I didn’t want to glue anything permanently to the antique button, and that resulted in a tiny gap between the button and the resin hemisphere. Silicone has enough strength to resist tearing out in that kind of area, but apparently the SiliNOT! doesn’t. The bits of mold around the outer edge seem to have stuck just to be difficult, as there was no structural reason for those to have become embedded in the resin. This means the mold could be damaged by successive casts, reducing its usable life and accuracy.
Still, the mold definitely produced decent results for a first cast, and a different shape might not have had as much of a problem with tearing off mold parts. The slow-curing resin is a bit of a limitation, but not a unique one (I use this same epoxy resin for any glass-clear casts I do, and only use the Smooth-Cast 300 for opaque items or things I need very quickly). I don’t personally use UV resin, but I’d be curious to learn how it performs with the SiliNOT!
IN SUMMARY:
Here’s the TL;DR on SiliNOT!
Pros
Cost effectiveness. This is the most obvious advantage of SiliNOT! over silicone; it’s (theoretically) infinitely reusable, and even with natural attrition/inevitable contamination from use, you can likely get over a hundred pours out of a bottle. That's a lot cheaper per use than silicone.
Non-toxicity. SiliNOT! is touted as food contact-safe, so you don’t have to panic if you get it on your skin or kitchen counters. While platinum-cure silicone is also relatively harmless (some varieties are labeled for food or life casting), other common moldmaking materials such as tin-cure silicone or urethane are not. (NOTE: Since the company is very hush-hush about what actually makes up the SiliNOT! secret formula, I do not know if it might release any vapors or fumes that would be irritating or harmful to pet birds. In general, I advise not doing any kind of casting around birds.)
Eco-friendliness. This is the biggest draw for me personally: Given the number of casting workshops I run and all the things I sell commercially, I have constant guilt about the amount of waste I generate for creative projects. In most areas of life I’m an aggressive reduce/reuse/recycler and try to use organic materials instead of synthetics whenever possible, so a mold that’s reusable and compostable is very appealing.
Ease of use. It’s honestly pretty hard to mess this up -- just microwave according to the directions and pour. No measuring, no A/B mixture, no concerns about chemical contamination from latex or sulfur, etc.
Shelf life. Unlike silicones, which have a shelf life of anywhere from six months to three years depending on storage conditions, the SiliNOT! purports to be shelf-stable. It's compostable, so don’t bury it in your yard, but otherwise it appears that it could be kept on hand for years.
Cons
Bubbles. Honestly the most irritating thing about this stuff for me. I’m used to being able to see bubbles forming as I pour, tap them to the surface, and remove them. The fact that I poured four molds of the same object and never once got one without bubbles is super irritating.
Stickiness. I’m not a big fan of the tacky surface texture, and while I haven’t done any cold casting yet, I can imagine that it would be very difficult to clean out any pigment or mica powder that got where you didn’t want it. I probably wouldn’t use this for any kind of cold casting that required isolated colored areas or changing colors between casts.
Set time. The SiliNOT! may take longer to cool than a fast silicone would to cure when dealing with larger molds, so it’s not ideal for projects with a really tight turnaround. (But cosplayers would never be casting something the night before a con, right? We always plan ahead and never, ever procrastinate!)
Library life. The SiliNOT! may or may not structurally degrade over time the way urethane, latex, and tin cure silicones do, but I noticed even in my very limited casts that it was prone to having tiny bits of the mold (particularly at edges) stick and pull off. While I keep most of my platinum silicone molds for years and reuse them, I don’t feel that the SiliNOT! molds would hold up to repeated casting, and they’re far more sensitive to ambient temperature, so they’re probably best used for short term only. (I also wonder about the possibility of oil leaching out in long-term storage.)
Comparative Ranking
Ranking it against other mold-making materials, I’d place SiliNOT! below platinum-cure silicone in terms of performance, but maybe somewhere in the neighborhood of urethane and tin-cure silicone. It's definitely superior to latex. (Though to be honest, I'd rank Play-Doh above latex. I hate working with that stuff.)
Factoring in cost and environmental impact, it beats out urethane and tin-cure silicone. I'm still not sure if I'd rank it above platinum-cure silicone, though... Silicone costs much more and isn't eco-friendly, but the performance and lifespan is significantly better, so it still makes more sense for some projects.
Alginate is another type of material entirely, but in some ways SiliNOT! is comparable to it -- both are more cost-effective than silicone, both are biodegradable, both are skin safe, and both have long shelf lives. But SiliNOT! is easier to use for beginners than alginate, which has to be mixed to the right consistency and has an extremely short lifespan once poured.
Overall, I would recommend SiliNOT! for:
People who want accurate, non-shrinking molds but don’t have the budget for platinum-cure silicone
People who are committed to eliminating waste from single-use materials, and are willing to trade off a little performance for a more eco-friendly material
Projects with smooth surfaces and no indentations/sharp edges/undercuts where bubbles might stick (e.g. cabochons; simple geometric forms)
Projects where you need only one or two casts of something, rather than many casts from the same mold
Casting oddly-shaped pieces around which the mold needs to stretch in order to demold
Use with slow-curing resins that do not generate much heat
I would NOT recommend SiliNOT! for:
Extremely complex or detailed pieces, or pieces with a lot of surface texture that bubbles might stick to
Two-part molds
Projects requiring many identical casts out of the same mold
Molds that you intend to add to your library for future or repeat casting
Use with fast-curing resins, melted wax, melted Monster Clay, or any other material that emits heat
Cold casting with precise color application
My Overall Opinion
It's... okay? I will almost certainly keep SiliNOT! in my toolkit for certain specific applications. It's MUCH cheaper over the long term, I love the idea of recycling mold material, and there are some projects for which it will likely perform very well (those listed in the above bullet points). I will also admit that three days of working with it does not constitute a comprehensive familiarity with the product, and it might be the sort of thing that you get better at working with after more practice. (Just learning how to eliminate bubbles would go a long way toward making me adopt this for more projects!)
However, I don't quite buy the "better than silicone" tagline. It's definitely more difficult to get a perfect result, and there are some projects for which platinum-cure silicone is always going to be more reliable (e.g. high-temperature casting, mass production, large-scale life casting).
For those looking for a recommendation of whether or not to buy, I'd say look at your project budget and the applications for which you're going to be making molds, and let those factors guide which mold material you go with. People doing some kinds of projects are likely going to find this a godsend, while those doing different projects would probably hate working with it.
37 notes
·
View notes
Text

Launched in 1923, the S-44 was one of few “old pigboats” that saw extensive service in WW2 when the US Navy was desperate for Submarines after the onset of Pearl Harbor.
Serving on such boats took extra courage! I find these boats unique in that they were not the more well-known modern Gato or Balao-class boats,
but already had 20 years of service behind them when asked again to serve their country in time of war!.
With the leaks and deficiencies in these older submarines
(e.g., limited depth, speed,
no rear tubes,
and range capability), these boats still nonetheless served with distinction in WW2. S-44 earned two battle stars and has the distinction of being the first US Submarine in WW2 to sink an enemy cruiser -
that of the IJN heavy cruiser Kako in 1942 during the Battle of Savo Island!
But she was also tragically, the only S-Class boat to be lost to enemy action when she was sunk on 7 October 1943, as a result of surface gunfire with the Japanese Destroyer Escort Ishigaki off the Kuril Islands.
She was lost with only 2 survivors out of a complement of 38 crew (Lt.Cdr. Francis Elwood Brown went down with the ship).
Given this unique history, I wanted to build this boat!
I originally wanted to build the resin 1/350 S-Class model by Blue Water Navy but,
found it is very rare (if anyone has one, I am still interested as I collect 1/350 USN WW2 submarines).
With no luck in getting the 1/350 BWN model,
I decided to scratch-build one in 1/72. Given I had more time than usual with Covid19,
I started this project only in June 2020 and expect to finish in a month or so –
a record for my scratch-built projects which can last about a year minimum.
Here are pictures of the model in-progress thus far. It is not yet finished as I STILL have to add the many rivets found on these old boats!!!
The model was based on an old vacuform kit of a generic S-Class boat by the now defunct Combat Models.
However I found the old vacuform kit),
was not accurate in shape nor detailed enough as a start.
So far, the approach was to use the Combat Models as a guide to re vacuform the hull based on new plans I bought.
Methods included thermo forming,
along with styrene,
bass wood,
metal,
photo-etch,
resin casting,
and lots of gizmology parts from the spares box!
There is no major definitive book outlining the details of these old boats!
I relied solely on two grainy photos that exist of her as she exited Philadelphia Naval Shipyard in her last refit in summer 1943.
I also used photos of her near sisters (S-42 to S-46),
to guess at the rest of the details that could not be ascertained in those two old photos...
You will note that the boat had many details that are not symmetrical and aligned such as the flood holes (remember this boat was constructed in 1920!).
This is replicated on the model on purpose based on period photos of her flood hole arrangements.
While I thought a submarine would be relatively easy to scratch build,
I take that back as she has tons of little deck details.
The conning tower alone has about 150 parts itself.
In total, there will be about 400 parts to this “simple” sub.
It is not all scratch…the deck gun is from White Ensign Models
(but with more details added),
and the AA gun is from UM.
The S-44 was the only boat to mount this massive 4”/50 deck gun,
and her near sisters had the smaller 3” guns.
The paint scheme is of utmost challenge as she was simply “all black”.
I do not know how to go about it, but will tackle it one step at a time.
Thus the model represents S-44 after her final refit in June 1943,
and in what she might have looked at the time of her loss near Japan –
an old boat with a more modern conning tower!
This model is a tribute to all the crew on that boat, and those submariners still on “eternal patrol”.


I hope to contribute it and find a home for it one day at some naval museum.
More Pics on FB - Harvey Low
10 notes
·
View notes
Text
Best quality Bitumen Waterproofing Solution in Chennai
Bitumen waterproofing Blog content
damage to the surrounding region, bitumen-based membranes are also used to waterproof swimming pools.
In conclusionBitumen Waterproofing: A Dependable Option for Durable Defense
Any building's maintenance must include waterproofing in order to shield it from the damaging effects of moisture damage and water seepage. Bitumen has long been a well-liked and potent option among the several waterproofing compounds available. Bitumen waterproofing is renowned for its resilience to harsh weather conditions, flexibility, and longevity. Bitumen provides a dependable solution that guarantees long-lasting protection for your property, whether you're waterproofing a foundation, terrace, or flat roof.
Bitumen waterproofing: what is it?
The use of bituminous materials, including bitumen membranes or coatings, to form a barrier against water intrusion is known as bitumen waterproofing. Because of its adhesive, waterproofing, and sealing qualities, bitumen—a viscous, black, and sticky material made from crude oil—is frequently employed in building. Bituminous sheets, liquid bitumen, and bituminous coatings are some of the different types of bitumen-based waterproofing products.
Using bituminous membrane sheets is the most popular method of bitumen waterproofing. To produce a smooth layer of protection that stops water from leaking through, these sheets are put to surfaces including walls, terraces, basements, and roofs.
Why Opt for Waterproofing with Bitumen?
Longevity and Durability: Bitumen is renowned for its remarkable longevity. It creates a robust, long-lasting barrier that is resistant to UV radiation, intense rain, high temperatures, and other environmental challenges. Bitumen waterproofing is a great long-term protection investment because it can last for decades when done correctly.
Water Resistance: Bitumen waterproofing's strong water resistance is one of its key benefits. The foundation, walls, and other vital components of the building are shielded from moisture damage by the impermeable surface created by bituminous materials, which effectively stop water from leaking into the underlying structure.
Expansion and Flexibility: Bitumen's natural flexibility enables it to expand and shrink in response to temperature changes without breaking. This is particularly crucial for spaces like terraces and flat roofs that are subject to harsh weather or temperature fluctuations. Bitumen's adaptability guarantees that the waterproofing layer will hold up even if the building moves a little or settles over time.
Applying bitumen waterproofing is comparatively simple and can be accomplished in a number of ways, including cold application, torching, and hot mopping. Liquid bitumen coatings can be applied with brushes or sprayers, and bitumen membranes are prefabricated sheets that are simple to roll out onto surfaces. This makes it a suitable option for both small-scale and large-scale waterproofing projects.
Cost-Effective: Compared to other high-performance waterproofing materials, bitumen is a cost-effective solution. While the initial cost of installation may vary depending on the type of bitumen product used, bitumen waterproofing provides excellent value for money due to its durability and long lifespan. The need for repairs or replacements is minimal, making it a financially sound option in the long run.
Superior Adhesion: Bitumen's superior adhesive qualities guarantee that it adheres firmly to a range of surfaces, such as masonry, concrete, metal, and wood. Because of this, it is a flexible option for waterproofing a variety of building constructions.
Bitumen Waterproofing Types
Bitumen waterproofing techniques can be broadly divided into two categories:
Styrene-Butadiene-Styrene (SBS) modified bitumen is a kind of bitumen that is combined with synthetic rubber to improve its performance and flexibility in extremely hot or cold conditions. SBS membranes are frequently utilized in roofing systems and are best suited for locations with high traffic volumes or where the roof is subjected to inclement weather.
APP Modified Bitumen: Bitumen that has been improved using plastic polymers is also known as APP (Atactic Polypropylene) modified bitumen. This kind of bitumen is a fantastic option for applications in hot climates or places with a lot of sun exposure because it has a higher resistance to UV radiation and high temperatures.
Bitumen Waterproofing Applications
Many types of construction projects use bitumen waterproofing. Among its frequently used uses are:
Flat Roofs: Because bitumen membranes are so durable and water resistant, they are frequently used to waterproof flat roofs.
Terraces and balconies: Bitumen waterproofing protects the terrace and the floors below by preventing water from leaking into the structure.
Basements: Bitumen is frequently used to waterproof basements because it effectively guards against moisture and water intrusion.
Foundations: Water intrusion and structural damage can be avoided by applying bituminous coatings to the foundation walls.
Swimming Pools: To prevent water leaks and
A very dependable and affordable way to shield your property from water damage is through bitumen waterproofing. It is the best option for a range of waterproofing and construction projects due to its exceptional water resistance, flexibility, durability, and ease of application. Whether you're looking to protect your roof, terrace, basement, or foundation, bitumen waterproofing offers long-lasting protection that will save you time and money in the long run. Investing in bitumen waterproofing ensures your home or building stays dry, safe, and structurally sound for many years to come.
0 notes
Photo


Introducing our Glacier – 16 oz. Double-Wall Recycled Stainless Steel Tumbler – Crafted from 304 recycled stainless steel for both the outer and inner body. The leak-proof flip lid is made of a combination of recycled AS (Acrylonitrile Styrene) and recycled PP. #Tumblers #Drinkware https://thetshirtlady.com/product/glacier-16-oz-double-wall-recycled-stainless-steel-tumbler/
0 notes
Text
"It is not the first such incident in the area. A styrene leak from a railcar occurred in Cincinnati in August 2005 after it was left to heat up for five months, the Cincinnati Enquirerreported.
The incident that was on many residents' minds following Tuesday's accident was more recent. In February 2023, a Norfolk Southern railcar carrying toxic chemicals derailed in East Palestine, Ohio, setting off fires and leading to a controlled chemical burn of vinyl chloride, a carcinogen. Chemicals released that week spread to 16 states, later research showed. East Palestine is some 300 miles from Whitewater Township.
Following Tuesday's accident, local residents worried that they wouldn't get the cleanup help they needed.
"We are Hooven, Ohio," said Greer, a fourth-generation resident. "They will ignore us.""
0 notes
Text
Chemical Leak From Rail Yard Near Cincinnati Prompts Evacuations
A train car in Whitewater Township, Ohio, was discovered to be leaking styrene, which is used to make plastic and fiberglass and is highly flammable. Source: New York Times Chemical Leak From Rail Yard Near Cincinnati Prompts Evacuations
0 notes
Text
What Are the Basics of Plumbing & sanitary Installation
When it comes to constructing or renovating a home, one of the most critical systems to focus on is plumbing and sanitary installation. While these systems often operate behind the scenes, they are essential to the comfort and functionality of any building. Whether you are a homeowner looking to understand the basics or a DIY enthusiast, this guide will walk you through the essential components of plumbing and sanitary installation.
1. Understanding Plumbing and Sanitary Systems
The plumbing system is designed to deliver clean water for use and carry away waste from the home. On the other hand, the sanitary system specifically handles wastewater, ensuring that it is disposed of properly to maintain hygiene and prevent contamination.
Plumbing and sanitary systems can be divided into three main areas:
Water Supply System
Drainage System
Ventilation


2. Water Supply System
The water supply system ensures the flow of clean, potable water to your home. It consists of pipes, fittings, valves, and faucets that deliver water from the main municipal supply or a well to the different outlets in your home. Here’s what you need to know about this essential component:
Piping: Pipes used in water supply systems are typically made from copper, PEX (cross-linked polyethylene), or PVC (polyvinyl chloride). Each has its pros and cons in terms of durability, flexibility, and cost.
Valves: Valves are used to control the flow of water in different sections of your home. A shut-off valve is especially important in case of leaks or repairs.
Water Pressure: It’s crucial to maintain optimal water pressure throughout your home. Low pressure can cause inconvenience, while too much pressure can lead to leaks and damage to fixtures.
3. Drainage System
The drainage system is responsible for removing wastewater from your home. Whether it’s water from your sink, shower, or toilet, the drainage system safely guides it to the sewer or septic tank. Here are the key components:
Pipes: Drainage pipes are typically made of PVC or ABS (acrylonitrile butadiene styrene) because of their durability and resistance to corrosion.
Traps: Every sink, bathtub, or toilet should be equipped with a P-trap, a U-shaped pipe that prevents sewer gases from entering your home.
Sloping: Drainage pipes must be installed at a slight slope to ensure proper flow of waste through the system and avoid blockages.
4. Ventilation System
A proper ventilation system is necessary to allow air to enter the drainage pipes, ensuring smooth water flow. Without proper venting, your drainage system can suffer from negative pressure, which can lead to slow drainage or even siphoning of water from the traps, allowing sewer gases to escape into your home.
Vents: Vent pipes are installed to allow air into the drainage system, preventing blockages and maintaining a smooth flow of water.
Air Admittance Valves (AAV): In homes where installing a traditional vent pipe isn’t feasible, AAVs can be used to regulate air flow and maintain proper drainage.
5. Types of Sanitary Fixtures
Sanitary fixtures are the endpoints of your plumbing system where water is used or drained. Some of the common sanitary fixtures include:
Toilets: Ensure proper installation with correct alignment to the drainage pipe.
Sinks and Basins: Require both a water supply and a drainage system.
Showers and Bathtubs: Involve hot and cold water supplies and a drainage system, often connected to traps to prevent gas leaks.
Bidets: An increasingly popular fixture in modern homes, bidets require both water supply and drainage.
6. Installation Considerations
Whether you’re installing a new plumbing system or upgrading an existing one, there are several important factors to consider:
Pipe Sizing: Proper pipe sizing is crucial to ensure adequate water flow and pressure. The diameter of your pipes must be able to handle the volume of water your household requires.
Sealing and Insulation: Pipes should be sealed properly to prevent leaks and insulated in colder regions to avoid freezing.
Compliance with Local Codes: Plumbing and sanitary installation must comply with local building and plumbing codes to ensure safety and functionality.
Professional Assistance: For complex systems, always consider hiring a licensed plumber to ensure everything is installed correctly.
7. Maintenance Tips for Long-Term Efficiency
After installation, maintaining your plumbing and sanitary installation system is key to ensuring its longevity. Here are a few tips:
Regular Inspections: Look for leaks, corrosion, or any signs of wear and tear in the piping system.
Clear Blockages: Avoid pouring grease or large objects down your drains, and regularly clean your pipes with safe, non-corrosive cleaners.
Monitor Water Pressure: Use a pressure
Innovations in Plumbing and Sanitary Installations
Plumbing and sanitary installations have evolved significantly over the years. Technological advancements have shifted the way homes and businesses manage water supply, waste disposal, and energy efficiency. From smart solutions to environmentally conscious practices, the plumbing industry is embracing a future that promotes sustainability, efficiency, and comfort.
1. Smart Plumbing Systems
The advent of smart technology has revolutionized almost every industry, and plumbing is no exception. Smart plumbing systems integrate IoT (Internet of Things) technology, allowing homeowners to monitor water usage, detect leaks, and even control water temperature through mobile apps. These systems provide real-time data, ensuring preventive maintenance, which reduces water wastage and the risk of major leaks.
Some features of smart plumbing include:
Water usage monitoring: Homeowners can track how much water is being consumed in real time, encouraging better conservation habits.
Leak detection sensors: These systems can detect leaks early, preventing costly repairs by alerting the homeowner to take action.
Smart water heaters: These devices allow users to control water temperature remotely, promoting energy savings.
2. Greywater Recycling Systems
With increasing water scarcity concerns, greywater recycling systems have emerged as a sustainable solution. Greywater refers to gently used water from sinks, showers, and laundry that can be treated and reused for non-potable purposes like irrigation or toilet flushing. These systems drastically reduce water consumption, making them an eco-friendly choice for homes and commercial properties.
Innovations in greywater systems have improved filtration processes, making them more affordable and easier to install. More homeowners and businesses are adopting these systems as they provide a long-term return on investment while reducing environmental impact.
3. Water-Efficient Fixtures
Low-flow and water-efficient fixtures have been at the forefront of plumbing innovation. These fixtures include low-flow toilets, faucets, and showerheads designed to use significantly less water without compromising performance. The latest models incorporate aerators and sensors to adjust water flow based on usage, ensuring minimal waste.
Low-flow toilets: These models use less than 1.6 gallons per flush, compared to traditional toilets that use up to 3.5 gallons.
Sensor faucets: Commonly used in public restrooms, these faucets prevent unnecessary water usage by turning on only when needed.
Water-efficient showerheads: These fixtures reduce water flow while maintaining pressure, making showers more water-efficient without sacrificing comfort.
4. Piping Material Advancements
The materials used in plumbing pipes have undergone significant advancements, moving from traditional metal pipes to more durable and sustainable options. Innovations in piping materials are crucial for ensuring longevity, reducing leaks, and enhancing energy efficiency in plumbing systems.
PEX (Cross-linked Polyethylene) pipes: PEX piping has become a popular choice due to its flexibility, durability, and resistance to corrosion. These pipes are also easier to install, reducing labour costs.
CPVC (Chlorinated Polyvinyl Chloride) pipes: CPVC pipes are corrosion-resistant and designed for both hot and cold water applications, making them ideal for a wide range of plumbing needs.
Recycled materials: The use of recycled and eco-friendly materials in piping systems is growing, offering an alternative for environmentally conscious construction.


5. Touchless Sanitary Installations
Hygiene is a top priority, especially in commercial spaces and public restrooms. The demand for touchless sanitary installations has soared, with motion-sensor faucets, automatic soap dispensers, and self-flushing toilets becoming more commonplace. These innovations promote hygiene and minimize the spread of germs by eliminating the need for physical contact.
In addition, touchless technology has been incorporated into water-saving systems, ensuring that water is only used when absolutely necessary, further reducing water wastage.
6. Rainwater Harvesting Systems
Rainwater harvesting is another growing trend in plumbing and sanitary installations. These systems capture and store rainwater for non-potable uses such as irrigation, toilet flushing, and even laundry. Modern systems are equipped with filters and purifiers, ensuring that the water is free from contaminants before it is used.
Integrating rainwater harvesting into building designs can reduce reliance on municipal water supplies, lowering water bills and conserving a vital resource.
7. Sustainable Drainage Systems
Flooding and waterlogging are increasingly common due to urbanization and climate change. Sustainable Drainage Systems are designed to manage surface water runoff in a way that reduces the risk of flooding while improving water quality. These systems include permeable pavements, green roofs, and rain gardens, which naturally filter water as it seeps into the ground.
plumbing and sanitary installations. installations are becoming a key part of urban planning and plumbing design, particularly in areas prone to heavy rainfall.
How to Maintain Your Plumbing and Sanitary Systems
1. Regular Inspection: Catch Problems Early
Just like with any other system in your home, regular inspection is key. Make it a habit to periodically check the following:
Pipes: Look for leaks, corrosion, or cracks in exposed pipes. Pay attention to damp areas in walls or ceilings, as this could be a sign of hidden pipe issues.
Fixtures: Check faucets, showers, and toilets for any signs of dripping or slow leaks. Even small drips can waste significant amounts of water over time.
Water Heater: Inspect your water heater for signs of rust, leaks, or strange noises. If it's old or malfunctioning, it may need servicing or replacement.
2. Clear Drains Regularly: Prevent Clogs Before They Happen
One of the most common issues in plumbing systems is clogged drains. Over time, soap scum, hair, grease, and debris can build up in your drains. To avoid this, try these maintenance tips:
Use Drain Covers: A simple yet effective tool, drain covers can catch hair, food particles, and other debris before they go down the drain.
Regular Flushing: Pour hot water down your kitchen and bathroom drains every week to clear grease and soap buildup.
Natural Cleaners: Use a mixture of baking soda and vinegar to naturally clean and deodorize your drains. Avoid using chemical drain cleaners as they can damage your pipes over time.
3. Maintain Your Toilet System: Simple Tips for Longevity
Toilets are often taken for granted until they malfunction. Prevent costly repairs with these easy maintenance practices:
Watch What You Flush: Only flush toilet paper and human waste. Avoid flushing items like wipes, sanitary products, or diapers, which can easily clog pipes.
Check for Leaks: Toilet leaks are often silent. Add a few drops of food coloring to your toilet tank; if the color seeps into the bowl without flushing, you have a leak that needs fixing.
Regular Cleaning: Clean the toilet tank and bowl to prevent mineral buildup and stains. This will keep the system running smoothly.
4. Take Care of Faucets and Showers: Avoid Drips and Wastage
Leaky faucets and showers are not just annoying; they can also lead to wasted water and increased utility bills. Here’s how to maintain them:
Replace Washers and O-Rings: Most faucet leaks are caused by worn-out washers or O-rings. These are inexpensive and easy to replace.
Clean Showerheads: Over time, mineral deposits can block showerheads. Clean them by soaking the head in a vinegar solution for a few hours.
Check Water Pressure: If you notice low water pressure, it could indicate a buildup of debris or sediment in your pipes. You might need a plumber to flush your system or install a pressure regulator.
5. Water Heater Maintenance: Extend Its Lifespan
Your water heater works hard every day, so give it the care it needs to last longer:
Flush the Tank: Once a year, flush the water heater tank to remove sediment and mineral buildup. This can improve efficiency and extend the unit's lifespan.
Check the Anode Rod: The anode rod inside your water heater prevents rust. Inspect and replace it every few years to keep the tank rust-free.
6. Know When to Call a Professional: Don’t Ignore Major Issues
While regular maintenance can prevent many plumbing problems, some issues require the expertise of a professional plumber. Here are signs that you should seek professional help:
Persistent Leaks: If you’ve tried fixing a leak, but it keeps coming back, it’s time to call a plumber to assess the underlying issue.
Low Water Pressure: If your entire home has low water pressure, it could indicate a more significant problem like a water line leak or blockage.
Backflow Issues: Water backing up from drains or toilets is a serious problem and requires immediate professional attention.
Unpleasant Smells: Foul odors from drains could indicate sewer line issues or other serious problems that need expert inspection.
7. Prepare for Emergencies: Have a Plan in Place
Even with the best maintenance, emergencies can happen. Be prepared by:
Knowing Your Shut-Off Valves: In case of a major leak, knowing where your water shut-off valves are located can help you stop water flow quickly.
Keeping Emergency Numbers Handy: Have the contact information of a trusted plumber readily available so you can act fast in an emergency.


0 notes
Text
Pick a Straw
As the MAGA types warn that a Harris Administration could be a threat to plastic straws, I’d like to remind readers that the Iowa Republicans have been way ahead when it comes to plasticphelia. They love plastic so much that they brought back Styrofoam cups after the Democrats had replaced them with paper cups at the Statehouse in Des Moines. Styrofoam can leak styrene, a neurotoxin (brain…

View On WordPress
0 notes
Text
Ensuring Efficient Sewer Line Installation in Phoenix: A Comprehensive Guide
Sewer line installation is a critical aspect of any residential or commercial property, ensuring the proper disposal of wastewater and maintaining a clean and healthy environment. In Phoenix, where the climate and soil conditions can present unique challenges, a well-executed sewer line installation is essential for long-term functionality and reliability. This article will explore the key considerations, processes, and benefits of professional sewer line installation in Phoenix.

Understanding the Importance of Proper Sewer Line Installation
A sewer line is a vital component of your property’s plumbing system, responsible for transporting wastewater from your home or business to the municipal sewer system or septic tank. Proper installation is crucial to avoid issues such as leaks, blockages, and sewer backups, which can lead to health hazards, property damage, and costly repairs. In Phoenix, where the desert environment can contribute to shifting soils and extreme temperature fluctuations, a well-designed and expertly installed sewer line is even more important to ensure longevity and efficiency.
Key Considerations for Sewer Line Installation in Phoenix
Soil and Environmental Conditions: The arid climate of Phoenix can result in expansive soils that shift and settle over time, potentially causing sewer lines to crack or break. Understanding the soil composition and environmental conditions is essential for choosing the appropriate materials and installation techniques to minimize these risks.
Material Selection: Choosing the right materials for your sewer line is crucial for durability and performance. Common materials include PVC, cast iron, and ABS (Acrylonitrile Butadiene Styrene). Each material has its advantages and considerations, such as resistance to corrosion, ease of installation, and cost. Professional plumbers in Phoenix can recommend the best material based on your specific needs and the local conditions.
Permits and Regulations: Sewer line installation in Phoenix requires adherence to local building codes and regulations. This includes obtaining the necessary permits and ensuring the installation meets the city's standards. Professional plumbing companies are well-versed in these requirements and can handle the permitting process, ensuring a smooth and compliant installation.
Slope and Alignment: Proper slope and alignment are critical for the efficient flow of wastewater. A sewer line must be installed at the correct gradient to prevent backups and ensure smooth drainage. Professional plumbers use precise leveling techniques and equipment to achieve the optimal slope and alignment for your sewer line.

The Sewer Line Installation Process
Assessment and Planning: The first step in sewer line installation is a thorough assessment of your property, including soil analysis and determining the best route for the sewer line. This stage involves planning the layout, selecting materials, and obtaining necessary permits.
Excavation: Excavation involves digging trenches to lay the sewer pipes. In Phoenix, this process must consider the desert soil conditions, which may require special equipment and techniques to ensure stability and minimize disruption to the surrounding area.
Pipe Installation: Once the trenches are prepared, the sewer pipes are carefully laid and connected. This step includes ensuring proper alignment and slope, as well as securely joining the pipes to prevent leaks.
Inspection and Testing: After installation, the sewer line undergoes thorough inspection and testing to ensure it meets all safety and quality standards. This includes checking for leaks, proper flow, and adherence to local codes.
Backfilling and Restoration: The final step involves backfilling the trenches and restoring the landscape to its original condition. This process may include compacting the soil to prevent future settling and repairing any disrupted surfaces.
Benefits of Professional Sewer Line Installation in Phoenix
Expertise and Experience: Professional plumbers have the knowledge and experience to handle the complexities of sewer line installation in Phoenix, from navigating local regulations to managing challenging soil conditions.
Quality Assurance: Hiring a reputable plumbing company ensures high-quality workmanship, using the best materials and techniques for a reliable and long-lasting sewer line.
Cost-Effectiveness: While professional installation may have a higher upfront cost, it can save money in the long run by preventing costly repairs and extending the lifespan of your sewer line.
Peace of Mind: Knowing that your sewer line has been installed correctly and meets all regulations provides peace of mind, knowing that your property is protected from potential plumbing issues.
Conclusion
Sewer line installation is a crucial investment for any property owner in Phoenix. Given the unique challenges posed by the local environment, it's essential to choose a professional plumbing company with the expertise to ensure a successful installation. From careful planning and material selection to precise installation and inspection, professional plumbers can provide a comprehensive solution that ensures the efficiency and longevity of your sewer line. By prioritizing quality and expertise, you can protect your property and enjoy a reliable plumbing system for years to come.
0 notes
Text
The Different Types of Plumbing Pipes

Today’s plumbing industry is rapidly changing as we learn more and more about the health advantages and dangers of different materials used for the pipes that carry our water. Innovation has met design and the result is many types of plumbing pipes that each carry their own unique benefits depending on their use. Pipes are used to support your home’s water supply, drainage, and sewer requirements. A consultation with a professional plumber can help you narrow down your choices so that you select a plumbing pipe that will work best for your quality of life, budget, and lifestyle. This article will detail the five most popular plumbing pipes that most homeowners will encounter. PVC Pipe PVC pipe is made of plastic. PVC plumbing pipes are used in homes for water supply, drainage, and waste removal. These pipes are cheaper when compared to other types of plumbing pipes. Plastic plumbing pipes are easily available because they are manufactured by many companies in different parts of world. PVC pipes are highly flexible and durable because there is no metal or corrosion inside the plastic piping. PEX Pipe PEX plumbing pipes, also known as cross linked polyethylene plumbing, are manufactured with advanced technology. PEX plumbing systems are used in homes because these plumbing systems require less water pressure to transport liquid over a long distance. This type of plumbing pipe also offers protection against winter freezing issues. It provides a high-water flow rate and does not corrode easily. Unlike metal plumbing pipes, the flexible PEX plumbing system is easily available at a low cost and often comes with a 5-year manufacturer’s warranty. Copper Pipe Coated rigid copper pipe is a great way to improve water flow. The metal provides an excellent surface for natural convection and reduces friction, which means less energy wasted on heating or cooling your home's plumbing system! Copper pipes are one of the most durable materials for plumbing. They have excellent thermal conductivity, high strength, and even low corrosion rates. ABS Pipe The ABS pipe (acrylonitrile butadiene styrene) is a versatile and affordable material for your home, often used as a vent and drain line. Like PVC pipe, ABS is perfect if you're looking to build new plumbing systems or renovate older ones. This product will last longer than traditional materials because it has been designed with longevity in mind! In fact, these pipes can withstand temperatures up as high at 1,800 degrees Fahrenheit without any damage whatsoever! Galvanized Steel Pipe Steel plumbing pipes have been around for many years and are often found in older homes for drainage, water supply, gas supply, and more. Steel pipes are known to last due to their impressive strength but are primarily used for gas supply purposes. Galvanized steel pipes were invented back in 1843 when someone realized he could coat one side with zinc + copper mixture which would protect against rust by forming an electro-galvanic cell between two dissimilar metals during use. However, the high lead content in this coating has since been associated with increased risk for disease so it is no longer incorporated into new builds or remodels. Pipe maintenance keeps your plumbing system operating without disruption and extends the lifespan of your pipes, appliances, and fixtures. Mike Counsil Plumbing and Rooter delivers comprehensive plumbing services to San Jose, CA residents that include leak detection, re-piping, and other pipe maintenance tasks to take care of our customers. As a family-owned company, we are dedicated to premier customer service. Your maximum comfort is our job. When you have a plumbing problem, you can trust your home to our expert technicians--we have you covered! Contact us today to schedule a pipe inspection and let us restore your home’s prior functionality with ease! Read the full article
0 notes
Text
10 Shocking Facts You Didn't Know About Underground Drainage
Underground drainage systems are essential for removing waste and rainwater from the house. They also need to be maintained regularly. The most common cause of drain blockages is tree roots. It is important to avoid planting trees near the drain system.
You can prevent blockages by using a snake or boiling water. If these methods don’t work, you can call a plumber.
1. The Drain Pipes Are Made Of PVC
Most modern drain lines are made of PVC plastic. This is due to its affordability, light weight, and high durability. It also has a smooth interior which speeds up the drainage process and resists blockages.
Older houses often have Orangeburg pipes, which are made of a wood fiber blend. These are still used in some older homes because they are inexpensive and easy to install.
They are also durable, but can rust if they are exposed to acidic wastewater. These pipes direct both sewage and surface water to a sewer system.
2. The Drain Pipes Are Made Of Steel
In older homes, drain pipes are often made of steel. These are sturdy but can get rusty, leading to blockages. Eventually, they will need to be replaced.
When it comes to newer underground drainage systems, plastic is usually the material of choice. It offers a high lifespan, low maintenance requirements, and good chemical resistance.
APL APOLLO underground drainage pipes also have decent surface solidity and tensile strength. They are ideal for conveyance of surface water and potable water. They are also fire retardant. They are a great choice for residential and commercial applications.
3. The Drain Pipes Are Made Of Aluminum
Many older homes have combined drainage systems that transfer both wastewater and rainwater. These pipes rust and can cause pollution to the environment, so it is important to upgrade to plastic underground drainage systems.
Metal drains can crack, break, or even completely collapse when they corrode. The resulting gaps and cracks allow ground water to seep through and pollute the surrounding area. Plastic pipes are a safe alternative that will last for years to come.
Getting the best underground drain system is a big investment, so hiring a professional is a great idea. A professional will make sure that the drains are installed properly and don’t cause any problems in the future.
4. The Drain Pipes Are Made Of Copper
Copper is a durable material that can withstand underground conditions. It does not crack or leak like plastic pipes, and it is also resistant to oxidizing chemicals such as chlorine.
In older homes, you may find drain/waste/vent (DWV) pipes made of cast iron. These can rust, and you’ll need to call in a professional plumber for repair or replacement.
In newer homes, you’ll likely encounter PVC or acrylonitrile butadiene styrene (ABS) pipe. These are inexpensive and easy to install, with a lifespan that exceeds 100 years.
5. The Drain Pipes Are Made Of Iron
In modern homes, most plumbers will use PVC or ABS plastic pipe for new drain line installations. These pipes are cheap, easy to install with liquid glue and have a long lifespan. They also resist root anchorage.
Older homes often have cast iron pipes that can rust over time. These pipes can also develop bellies that cause them to clog more frequently. These clogs can be difficult to clear. The best way to prevent them is to only put pee, poo and toilet paper down the drains.
6. The Drain Pipes Are Made Of Brass
Brass is a great material for drain pipes because it is resistant to corrosion. In addition, it can withstand high water pressure. Plumbing professionals often recommend this type of piping.
Galvanized steel is another good option for drainage pipes. It is durable and has a long lifespan. However, it is prone to rusting and requires regular maintenance by professional plumbers.
It is important to only put pee, poo, and toilet paper down your drains. Otherwise, you risk causing blockages in the sewers. In some cases, these blockages can even be a hazard to your health.
7. The Drain Pipes Are Made Of Glass
A drainage system is a key part of any home or business. It’s designed to move water away from your property and prevent soil erosion and flooding.
Typically, waste is flushed down the toilet into a drain which connects to larger sewer pipes and transports it to sewage treatment plants. However, it’s not uncommon for sewer workers to discover all sorts of odds and ends in their pipes, from the bizarre to the downright creepy. Some of them are even deadly.
8. The Drain Pipes Are Made Of Plastic
Today, most underground drainage pipes are made of PVC. This material is cheaper and easier to install than clay or cast iron pipes, and it doesn’t rust. It also has a smooth interior that allows waste to flow freely.
When the malodorous sewage leaves our homes, it enters a sewer pipe and connects to larger tunnels that transport it to a sewage treatment plant. Occasionally, this waste can cause blockages. Plumbers have found all sorts of strange things in drains, including false teeth. In fact, Thames Water once ran a campaign to reunite false teeth with their owners.
9. The Drain Pipes Are Made Of Wood
Historically, drainage pipes have been made of wood. A wood drainage system was a cost-effective and environmentally friendly way to improve soil health. It also prevented groundwater pollution and reduced the risk of water-borne diseases.
However, modern underground drainage pipes are made of plastic and do not rust or corrosion. These pipes are also easy to clean and maintain.
The most common types of underground drainage pipe are PVC and UPVC. They are lightweight and can withstand high pressure. In addition, they are resistant to cold temperatures.
10. The Drain Pipes Are Made Of Metal
Drain pipes are made of various metals, including galvanized steel, copper, and iron. They are usually used for water supply in homes but can also be found in drainage systems.
Drainage systems are designed to separate stormwater and sewage. The former is typically safe to drain into natural water bodies without treatment, but the latter can contain dangerous bacteria and other pathogens.
The first subsurface drains were probably bundles of brush or gravel and stones, but in the 1800s, mechanically produced clay tiles became popular in England. They were a great improvement over the old brush and stone drains.
0 notes
Photo


The "Ferrari Mad Max" work: Italeri 1/24.A funny thing this time.
What can you do with an old forgotten model? Why not some Sci-Fi stuff! I used an old Ferrari GTO 1/24 kit from Italeri mixed with some spare parts from the dead models box, some styrene supply and absolutely no complex.
It was really funny to build those bizarre, creepy, rusty-looking weapons. The worn look of the paint is imitated with several layers of Tamiya acrylics.
First the aluminum color followed by two thick layers of clear varnish.
Next an orange layer and finally a red one.
And then I sanded the paint with sandpaper of several grains, until I got the worn look.
The final touch is a dusty effect with pigments and some rusty leaks here and there. Cheers.
Diego Quijano.
https://dqscaleworks.blogspot.com/search/label/Italeri
0 notes
Text
Best quality Bitumen Waterproofing Solution in Chennai
damage to the surrounding region, bitumen-based membranes are also used to waterproof swimming pools.
In conclusionBitumen Waterproofing: A Dependable Option for Durable Defense
Any building's maintenance must include waterproofing in order to shield it from the damaging effects of moisture damage and water seepage. Bitumen has long been a well-liked and potent option among the several waterproofing compounds available. Bitumen waterproofing is renowned for its resilience to harsh weather conditions, flexibility, and longevity. Bitumen provides a dependable solution that guarantees long-lasting protection for your property, whether you're waterproofing a foundation, terrace, or flat roof.
Bitumen waterproofing: what is it?
The use of bituminous materials, including bitumen membranes or coatings, to form a barrier against water intrusion is known as bitumen waterproofing. Because of its adhesive, waterproofing, and sealing qualities, bitumen—a viscous, black, and sticky material made from crude oil—is frequently employed in building. Bituminous sheets, liquid bitumen, and bituminous coatings are some of the different types of bitumen-based waterproofing products.
Using bituminous membrane sheets is the most popular method of bitumen waterproofing. To produce a smooth layer of protection that stops water from leaking through, these sheets are put to surfaces including walls, terraces, basements, and roofs.
Why Opt for Waterproofing with Bitumen?
Longevity and Durability: Bitumen is renowned for its remarkable longevity. It creates a robust, long-lasting barrier that is resistant to UV radiation, intense rain, high temperatures, and other environmental challenges. Bitumen waterproofing is a great long-term protection investment because it can last for decades when done correctly.
Water Resistance: Bitumen waterproofing's strong water resistance is one of its key benefits. The foundation, walls, and other vital components of the building are shielded from moisture damage by the impermeable surface created by bituminous materials, which effectively stop water from leaking into the underlying structure.
Expansion and Flexibility: Bitumen's natural flexibility enables it to expand and shrink in response to temperature changes without breaking. This is particularly crucial for spaces like terraces and flat roofs that are subject to harsh weather or temperature fluctuations. Bitumen's adaptability guarantees that the waterproofing layer will hold up even if the building moves a little or settles over time.
Applying bitumen waterproofing is comparatively simple and can be accomplished in a number of ways, including cold application, torching, and hot mopping. Liquid bitumen coatings can be applied with brushes or sprayers, and bitumen membranes are prefabricated sheets that are simple to roll out onto surfaces. This makes it a suitable option for both small-scale and large-scale waterproofing projects.
Cost-Effective: Compared to other high-performance waterproofing materials, bitumen is a cost-effective solution. While the initial cost of installation may vary depending on the type of bitumen product used, bitumen waterproofing provides excellent value for money due to its durability and long lifespan. The need for repairs or replacements is minimal, making it a financially sound option in the long run.
Superior Adhesion: Bitumen's superior adhesive qualities guarantee that it adheres firmly to a range of surfaces, such as masonry, concrete, metal, and wood. Because of this, it is a flexible option for waterproofing a variety of building constructions.
Bitumen Waterproofing Types
Bitumen waterproofing techniques can be broadly divided into two categories:
Styrene-Butadiene-Styrene (SBS) modified bitumen is a kind of bitumen that is combined with synthetic rubber to improve its performance and flexibility in extremely hot or cold conditions. SBS membranes are frequently utilized in roofing systems and are best suited for locations with high traffic volumes or where the roof is subjected to inclement weather.
APP Modified Bitumen: Bitumen that has been improved using plastic polymers is also known as APP (Atactic Polypropylene) modified bitumen. This kind of bitumen is a fantastic option for applications in hot climates or places with a lot of sun exposure because it has a higher resistance to UV radiation and high temperatures.
Bitumen Waterproofing Applications
Many types of construction projects use bitumen waterproofing. Among its frequently used uses are:
Flat Roofs: Because bitumen membranes are so durable and water resistant, they are frequently used to waterproof flat roofs.
Terraces and balconies: Bitumen waterproofing protects the terrace and the floors below by preventing water from leaking into the structure.
Basements: Bitumen is frequently used to waterproof basements because it effectively guards against moisture and water intrusion.
Foundations: Water intrusion and structural damage can be avoided by applying bituminous coatings to the foundation walls.
Swimming Pools: To prevent water leaks and
A very dependable and affordable way to shield your property from water damage is through bitumen waterproofing. It is the best option for a range of waterproofing and construction projects due to its exceptional water resistance, flexibility, durability, and ease of application. Whether you're looking to protect your roof, terrace, basement, or foundation, bitumen waterproofing offers long-lasting protection that will save you time and money in the long run. Investing in bitumen waterproofing ensures your home or building stays dry, safe, and structurally sound for many years to come.
0 notes
Photo


Introducing our Glacier – 16 oz. Double-Wall Recycled Stainless Steel Tumbler – Crafted from 304 recycled stainless steel for both the outer and inner body. The leak-proof flip lid is made of a combination of recycled AS (Acrylonitrile Styrene) and recycled PP. #Tumblers #Drinkware https://thetshirtlady.com/product/glacier-16-oz-double-wall-recycled-stainless-steel-tumbler/
0 notes
Text
Yeah, guys, you don't want to heat styrofoam of any form or brand. The heat can make the styrofoam rupture and possibly leak styrene into your food. Styrene had been show to cause certain types of lymphoma.
Is this Mandela affect? Where you think something is true when it never happened?! I always thought you could microwave them 💀
20 notes
·
View notes