#seriously all i have open is firefox and task manager
Text
How the hell does disk usage of less than one megabyte per second take up 100% of disc capacity. Hell on earth and badwill among men.
#it's been doing this for a few days too#posting this on my phone because my computer won't load#seriously all i have open is firefox and task manager#last reboot was only two days ago#this might convince me to finally switch to linux#okay now it's at 0.5MB/s and still 100%#fucking hell windows#catgirltxt
5 notes
·
View notes
Text
Tab suspender for firefox

#Tab suspender for firefox install#
#Tab suspender for firefox software#
#Tab suspender for firefox Pc#
#Tab suspender for firefox free#
#Tab suspender for firefox windows#
Then, when you want to browse again, either activate the tab you want to use or activate all your tabs.
#Tab suspender for firefox install#
The extension will install and you’ll see a new toolbar icon that gives you the ability to control your tabs.īy choosing “Suspend this tab” you can put the currently active tab to sleep or by selecting “Suspend all tabs”, you can stop Chrome from using all but a bare minimum of your CPU cycles so you can work on a Powerpoint deck, play a game, or work on a cool new infographic in Photoshop. To install this great extension, just go here:Īnd choose “Add to Chrome”. It allows you to put a tab (or all the tabs) to sleep so they don’t bog down your computer while you are working on other things. Chrome doesn’t know that when I’m not looking at a tab, I want it to go to sleep and stop consuming resources. You see, whether you are using those tabs in Chrome, they are still consuming resources. The answer is an extension in the Chrome Store called “The Great Suspender”.
#Tab suspender for firefox windows#
Tips for reducing Chrome’s usage of Windows resources.
Are there ways to speed up Chrome on Windows?.
Why are there multiple Chrome processes running in the Windows Task Manager?.
Ironically, this led me back to Chrome to run some Google searches like: I could ditch Chrome altogether, but I actually like the integration with my phone (a Samsung Galaxy), so I wanted to find a way to keep Chrome, but have it run more efficiently. I opened the same 11 tabs in Firefox and it’s running a single process using significantly fewer resources than Chrome. In fact, take a look at the image above and notice that Firefox is running. But if you run multiple tabs, here are a few tips to keep it from killing your computer's performance. Yes, I had 11 tabs open in Chrome and that was probably a little on the high side, but for there to be 13 different memory hogs and CPU hogs slowing down my computer…that’s just bad architecture. So, the next questions become why is Google Chrome using so much memory? Why Is Chrome causing high CPU usage? Why are multiple Chrome processes slowing down my computer?Īfter thinking about this for a couple of minute and Googling for a couple minutes more, I realized that each of the tabs I have open in Chrome are being treated as a separate process, and are consuming their own allocated resources. Seriously, Chrome? You are running 13 different process that are consuming a TON of resources on my machine? Google Chrome in the task manager shows multiple instances and high CPU and memory usage When I did that, I saw something very, very interesting.Ĭhrome. The best way to see what is using all those CPU cycles is to switch to the Processes tab and then order the CPU column from highest to lowest by clicking the column header twice. As you can see from the image below, my CPU cycles are really high…that’s what I’m trying to figure out. You can see how your CPU(s) are performing by selecting the Performance tab. You can open the Task Manager by choosing Ctrl + Shift + Esc. Since the easy stuff was done, but my CPU was still cycling high, I turned to the Windows Task Manager to see what might be causing the issue. Unfortunately, it didn’t really help speed up my computer, so I had to continue the search. I followed my own advice and used Defragler to clean up my hard drive space. Just to make sure that disk fragmentation wasn’t slowing the computer down. The final step I took was to defragment my hard drive. Took 30 minutes using the CCleaner tool, cleaned up quite a few old registry keys, but no luck in calming down my CPU. Since I didn’t find any offending malware installed, my next step was to clean my registry in case there were old registry keys that were mis-pointed or just out of date that would be hurting the performance.
#Tab suspender for firefox free#
Here are links to a couple of tools that offer free trials that will get you going: If your computer is running slow, the first step is to run a spyware scan.
#Tab suspender for firefox Pc#
BTW, if your PC is running slow and you haven’t run a spyware check recently, now would be a good time to do it.
#Tab suspender for firefox software#
I spent a considerable amount of time looking for spyware to see if some malicious little software spy had been installed, but came up empty. As an Amazon Associate I earn from qualifying purchases when you buy something from those links.Ĭhrome can slow down your computer by using too much memory and causing high CPU cycles I get commissions for purchases made through those links. Please note: Some of the links in my posts are affiliate links.
0 notes
Text
MAKING MONEY ONLINE

hey y’all. i decided suddenly to make this post because i know it could be super helpful to people out there who might be struggling for money, or even those who just want to earn some extra cash on the side. i’ve been doing this for about 6 months and while it’s not full time or even part time work, it’s extra money that you can use for food, hobbies, gas, etc.
a lot of these sites i am about to list pay very little (we’re talking pennies or dollars) but it accumulates over time if you’re willing to keep at it. in combination these are all good sites to just leave in an open browser or tab and just do the tasks passively as they come in or as you feel like it. half the time i’m playing the sims on one monitor and earning money on my other monitor.
anyways here we go! these are in no particular order; just in the order that i think of them. i will include my referral codes but don’t feel obligated to use them!
Prolific - this one is my favorite because i have had the most success with it. there are a lot of survey sites out there that will kick you out mid-survey after you’ve already invested so much time into them because you’re “not qualified” to answer the questions. prolific is the opposite. you sign up, fill out your profile, and the surveys that fit your demographic will come to you. most of them only take a few minutes to complete but the payout is better than most other survey sites out there. the surveys come from academic researchers who use your data anonymously for studies. some days you won’t get any studies, and some days you’ll get several. you can cash out to paypal once you reach $5. keep a prolific open in a tab and it will alert you when a new study is available!
Slicethepie (non-referral link) - i discovered this one recently and it’s one of my favorites. the pay is very little; i’m only making 4c per review right now but i’m told the pay goes up the more you review. all you do is sign up and get paid to write short reviews for clothing, get paid to watch movie clips or commercials, or get paid to listen to new music (whaaaaat). it’s one of the more fun ways to make money. it takes a couple minutes and you earn a few pennies after each one. those quickly add up!
Usertesting - this one is really good if you manage to qualify for the tests, which can be hit or miss (mostly miss in my case). it requires a microphone and being okay with recording your screen and sending the info to a company. basically, people pay you to test our their websites and make comments about it. they’ll ask you to go to their website and look for something specific, and you have to voice your thoughts about the site out loud as you look for what it is they asked for. the pay is $10 per test which is amazing, but you have to take a pre-screener test to qualify for them. overall i’ve made maybe $40 total by working passively (not every day) in the last 6 months but hey - that’s a tank of gas.
more under the cut!
rev - if you’re a fast typer, a good listener, and have some time on your hands, this is a pretty good option. rev is a transcription service, so you listen to some audio and type out what the people are saying, and then get paid for it. some of the audio is garbage which is why they pay people to transcribe it, but if you have the time you can make a few bucks. just make sure you take it seriously because if you somehow appear to be “below average” at this, they will terminate your account. the amount of transcriptions that appear varied so you just have to keep an eye out.
GG2U (non-referral link) - this one is pretty dope. sign up for free trials, install and play video games, take surveys, watch videos, and earn points. 100 points = $1. within 5 minutes of signing up i had $7. just be certain to cancel any trials before the trial period ends so you don’t get charged.
amazon turk - not gonna lie, i have not been able to achieve this one, but i have personally seen people make hundreds and thousands on this platform. if you don’t know already, mturk is where clients post microtasks for humans to do that robots cannot yet achieve. if you are willing to put in more work than me and figure it out, check our /r/mturk or do some googling before pursuing it.
Ibotta (non-referral link) - (get a $20 welcome bonus if you use my referral and scan your first receipt) this is an app that offers cash back for shopping at the stores listed on ibotta. you buy an item from the store listed on ibotta, can your receipt into the app, and boom you get cash back.
qmee - this one makes chump change but it’s worth it. you complete surveys for some change (50c or somewhere around that) and that’s it. there’s also a browser extension; i use this more than the surveys. the extension pops up on the side of your window whenever you search something on the internet - but only if it’s something that qmee is looking for. and occasionally it offers a few pennies if you click on the link. best part is you can cash out no matter how much you’ve made. i cashed out 32c the other day lmao.
inboxdollars (non-referral link) - i don’t know if it’s just me, but this website only works on firefox for me. my chrome hates it. but anyways, this site provides very passive income. i do not recommend the surveys; they’ll have you answer a bunch of questions and you think you’re going to finish it and get the $$$, but then it kicks you out because “you’re not qualified”. the ways to earn that i like are watching videos in the TV/videos tab and playing the games in the games tab. after you watch x amount of videos or play x amount of games, you get a scratch off ticket. i usually get about 15c from them, but it’s something. when i first started i worked my way about to $50. they send you a check in the mail.
redbubble (my shitty store) - y’all know about this one already i’m sure. if you’re creative and think you can make a design for shirts and accessories, go ahead and make an account! you might make zero money, you might make a few bucks every couple months, or you might make a couple hundred. it all depends so this one is really a gamble, but still worth looking at if you’re into that sort of thing!
crowdtap - haven’t used this one in a while but i will be getting back into it. you take surveys and answer questions for brands and receive points in return. you need to accumulate 500 points before you can begin cashing out, which will take a while. after that, you can redeem the points for gift cards to amazon/sephora/walmart/etc, use the points for a subscription service, or use the points to donate money to a charity.
swagbucks (non-referral link) - this site is wild and just like mturk, i have yet to master it, but have seen others do so. it’s another typical survey site very similar to inboxdollars listed above. you can take surveys for swagbucks (points), watch videos, use their cash back feature, etc.
vindale research (non referral link) - similar to prolific. it’s surveys from researchers that pay a few dollars for you to answer some questions. length of survey varies. each survey generally pays aroud $1. there is also a jobs tab that gives a list of jobs in your area.
submittable - this one is a recent discovery. my first article was rejected but i’d like to share this one anyways in case someone would like to pursue it! there’s a large list of writing and art contests mainly. a lot of them don’t seem to be offering pay but the ones that do offer a huge payout if you win the competition.
cambly - if you have any type of skill in teaching other languages, being a life coach, of just have any knowledge you think you can pass along, cambly might be for you. when you sign up there are two options, be tutored or become the tutor. if you want to tutor people, you need a webcam and microphone access. my connection never worked with cambly so i have not been able to personally try it, but i have seen people make a lot of money from teaching english to little kids.
ebates (non referral link) - another cash back option every time you buy something online. or you can link your credit/debit card and use it when you buy stuff in stores. so you get money for spending money. good stuff y’all.
lionbridge & appen - these two sites are basically the same thing just different companies. this is the ONLY two sites on my list that pay hourly. i believe it’s somewhere between $9 - $12? i could be wrong. but once you sign up, apply, and get approved, you could be doing a multitude of things, inducing: translation, transcription, social media evaluation, data collection, and more.
TIPS:
minimum requirements are internet, a computer, and a phone. if you have an extra laptop or computer that still works, set it up and let videos on inboxdollars or swagbucks run in the background. this way you are making money without even thinking about it.
you could even just open the videos in another window and mute them, which is what i’m doing right now. you still get the credit for watching them but you don’t actually have to listen to them.
this is not a get rich quick and easy deal. none of these jobs are simple and you won’t be pulling in hundreds per day. it’s hard, annoying work. so don’t expect to be rolling in the dough.
if you can, create a second email for all those times you get asked to sign up for something or subscribe to a newsletter. this way your actual personal inbox isn’t getting spammed with ridiculous things you don’t care about. just check the second email once in a while to make sure no one has sent you anything important. if you choose to get email notifications for new paid surveys on whichever site, i recommend letting those go to your personal inbox so that you may see them. or use the second email and check it daily. it’s up to you!
even though these sites don’t pay a lot, when you use them all together you can get a decent amount of cash. i’ve seen people work entirely from home, pulling $1000-$2000 per month just by using sites like this. but obviously that doesn’t mean it will be the case for everybody. i do this stuff on the side and am happy with just making a few dollars per day.
if it ever feels pointless because you only earned 30c or $1 just remember this - it’s more money than you had five minutes ago. it’s something. it might not pay the bills but eventually it might buy you a coffee or sit in your savings collecting interest. however you want to use it!
CASH OUT IMMEDIATELY. as soon as you are allowed to transfer your money to paypal or wherever, do it asap. there have been times where sites will shut down or glitch out and you are unable to get back all that money you earned.
be careful with some surveys. if they seem fishy or gimmicky or are constantly offering you to sign up for a bunch of bullshit, exit immediately. it will get you nowhere.
do not use VPNs. this usually results in getting banned.
OTHER RESOURCES:
i cannot possibly list every single way to make money online because there is so much! i listed my favorites but please check out these other websites that provide even more information and opportunities. they’re the reason i know so much and have been able to earn money on the side.
down the rabbit hole you go!
r/beermoney (wiki)
r/workonline
r/flipping
the work at home wife
i hope this helps someone out there. i have a job but i don’t get enough hours so i try to make a little extra on the side utilizing all these sites. and i have bad social anxiety so anything i can do to work from the comfort of my own home is my ideal situation. as i said, you won’t make a lot of money to begin with, or even later down the line, but as i’ve repeated - it’s something. it’s $5 more than you had earlier.
again, hope this helps and please let me know if it does! and if you have any questions i can try to help you!

#work#workonline#this took so long to type lmao my hands hurt#please reblog and share the info because i hope it helps somebody!#i didn't know about any of this until months ago and i've made a good chunk of change since then#im gonna go lie down now lmao
38 notes
·
View notes
Text
How to nicely and smoothly save your DMM stream without a screen capture app but using simply VLC (and Video Download Helper).
AKA when your computer is a potato
EDIT: DMM recently changed their protocol and that trick ISN’T WORKING anymore (especially if your stream’s url starts with http://tc-video3.dmm.com)...
... but you won’t let that stop you ;)
(Of course, this is all theoretical, since, you know, it’s not technically legal and stuff... so obviously, I’m just posting that out of general, scientific, detached interest XD)
So, as I am found of mentioning, my laptop is a potato. It is over 11 years old, has traveled around the world with me and has somehow survived all the tea and coffee I poured on it through the ages. It is truly a warrior and still allows me to stream HD videos on the net without any problem, like the DMM streams for example (cheaper than dvds, even though it’s fun the get them both and compare the editing XD). Where the troubles start however is when screen recording is involved. The graphic card and processor of my good old potato just can’t handle the pressure of streaming HD video *AND* screen recording it at the same time in a decent quality, whatever the different settings I tried to cajole it with. This was just the line it would not cross and kept sulking when I tried to force Active Presenter on it by getting very hot and handing me over very jerky-hicky out-of-sync recordings.
Since screen recording was a big no no, I tried to remove it from the equation and I thought about tinkering around a bit with VLC since it has a stream recording feature. AND IT WORKED VERY WELL! (theoretically, of course XD)
The only tricky bit is how to find the url of the stream (edit: just made that step easier;)) in order to put it into VLC, so that it can manufacture a nice and smooth recording for you. There are however 2 small downsides: the processing of the video by VLC may be a bit quite very long and you will want to leave your potato alone while it’s dealing with the task.
So, if you’re interested on knowing how to achieve that (out of pure curiosity, of course, nothing else XD), there is how you should proceed.
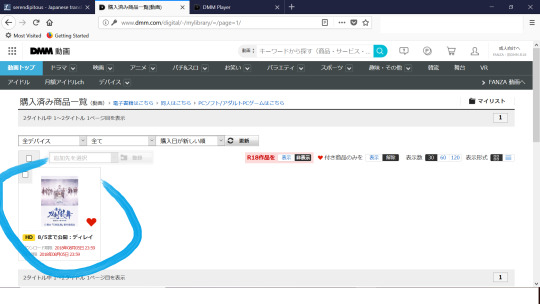
First, to buy a DMM stream, follow the steps from the excellent guide made by Riku, from 1 to 7. And I will explain the alternative 8th step - how to save the video on your disc without using a screen recording app (with pics!) - under the cut.
You can still try the following steps BUT THE TRICK ISN’T WORKING ANYMORE because DMM changed their streaming protocols
SERIOUSLY, It DOESN’T work anymore!
STEP 8 BIS:
Please read this first: you can follow the rest of the tutorial, however you will get stuck at the end of step 8 bis B and VLC will never actually start recording. The progression line will never actually start progressing. I have received a number of messages from people asking me for help - despite the fact that this post was edited 2 years ago to signal that the trick wasn’t working anymore - because they couldn’t record the stream with VLC. Well, again, I’m sorry but it is perfectly normal because the trick doesn’t work anymore. I have tried to find a way around the problem 2 years ago before throwing in the towel quite quickly once I found an easier way to cook up a decent screen capture recording with my good old potato and figured it was maybe more time-consuming but certainly less of a hassle than digging around in DMM’s code with almost zero computer skills. If I ever come back to this quest of finding a new hack and become successfull, I’ll edit this post. In the meantime, please keep in mind that even if you follow the next steps, you won’t be successful in ripping a DMM stream.
STEP 8 bis A
First, you need to find the URL of the stream. I used to do a trick with Firefox and the web developer console, but it turns out there is a much easiest way to find it with Video Download Helper. Note that if your computer is a new sleek thing, you can try to save the video directly via Video Download Helper (I’ll just call it DH now, for clarity sake, because VDH may be confusing): you have a 1 on 3 chance that the addon will succeed in completing the download. But if you have a potato, the chances drop down to about 1 on 100. That’s why using both DH and VLC may be the safest option.
Before anything else, if you’re not already using it, add the Video Download Helper addon to your browser (it works best with Firefox). You can find it there.
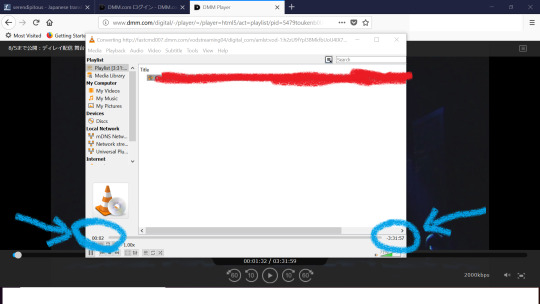
Once you have set up your VPN, bought your stream and gone to your library on DMM.com, open the stream you’re interested in (still hypothetically XD) and start it, just like you would if you were going to simply watch it. Like this one for example
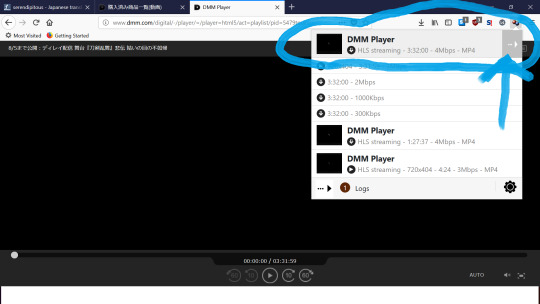
Once you have started the video, look at the top right corner of your browser and you will see the DH icon, 3 little balls, suddenly wearing the colours blue, yellow and red. This means it has detected video(/audio/stuff) flux that it can download.

Then, pause the video and shut down your VPN. (Technically, you can still watch the video and change the quality settings as long as you don’t refresh the page).

Go back to the page where the stream is open and open the menu of DH (the 3 coloured balls) by clicking on it. It will display the list of medias it has detected on the page, like this:

In our present case, those are the different levels of quality you can choose to watch the video in. If you glide over the one you’re interested (but don’t click just right now), you will see a little white arrow appear in a grey box next to it, on the right side. Click on that arrow.
And on the menu that appears, click on the option “Copy the URL”, like this:

Congratulation! You just copied the URL to your video.
Note that if you’re not a potato owner, you may try your chance with downloading directly the file on your disc by choosing one of the 3 first options. Unfortunately, DH doesn’t handle well long heavy videos. But you never know, eh? Might just be lucky this time. If your computer is old and slow, don’t even bother to try...
STEP 8 bis B
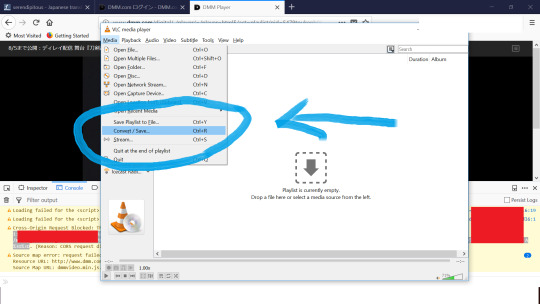
The only part left to do is to record the stream with VLC.
Open VLC and in the menu “Media”, choose “Convert/Save”
Click on “Network”
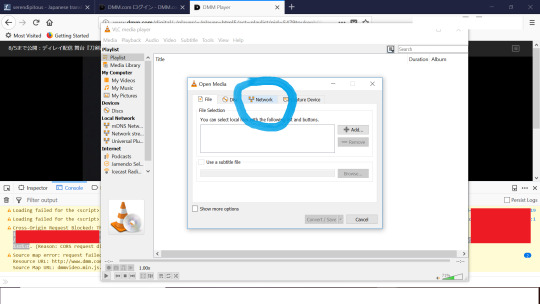
Since VLC is a clever little beast, the URL you just copied should already appear in the url box. If not, simply click right and paste it. Then select “Convert/Save”.
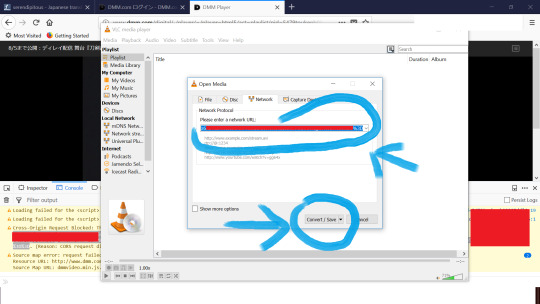
You will get to the following window:

The source is the URL you previously added. If you check “Display the output”, you will get to see the video at the same time VLC is converting it, but I will advise against it if your computer is a potato and if it can’t handle screen capturing, because the process will be dreadfully slow and you will end up with light glitches in the final video if the processor is overwhelmed. And most likely you will only get a glitchy preview anyway.
[Note: At this stage, I also recommend to shut down all the other applications running on your computer, including firefox, to help your little potato to really pour all its strength and power exclusively into the task of getting you that nice video. And before you actually launch the processing of the video, you may elite to do a couple of other optional things to help it further: first, if you have a laptop, make sure to deactivate any energy saving mode and connect your power cable (just don’t trust your battery). Secondly, you may also choose to try and prioritize VLC as a main task (Ctrl+Alt+Delete > Task Manager (Window) > Processes(Windows XP) or Details (Windows 10) > right click on VLC > change the priority > High) the CPU will allocate the most ressources to (and you can switch it back later; the priorities will reset to default anyway when you shut down VLC or when you switch off the computer).]
Then, choose the path for the exit file and create a name for it by clicking on “Browse”. If you know what you’re doing, you can also tinker with the profile, but the default one is really fine too, especially for a trial. When you’re ready, just hit “Start”.
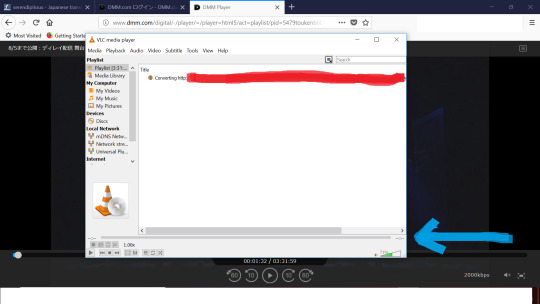
You will arrive at this final window:
The progression line may flicker for a few seconds in yellow, as VLC is establishing the connection to the url of the stream. When it’s ready to start, you will see appear on the bottom right the complete duration time of the video file and on the bottom left the progression of VLC as it processes it from the beginning to the end. Don’ t touch anything, just let it do its thing until the end; at this stage, your role is over and the rest is up to your potato.
The speed of progression will depend on the speed of your internet connection as well as whether you continue to use you computer to do something else in the meantime or if you let it focus exclusively on the task. The manier the tasks you ask it to deal with at the same time VLC is treating the video, the higher the chances to get some minor glitches in the processed video. If your computer is a smart new thing, watching another video or browsing the internet at the same time may not have much impact on the process. However, show some mercy for your little potato and try to help it by being patient. I had to let mine in peace for 4 hours and a half so that it could process 3 hours and a half of high quality video. Also, if you can use an internet cable instead of the wifi, that may speed things up. And if your potato is a laptop, remember to plug in the power cable (it is unlikely that the battery will hold long enough) and deactivate any energy saving mode.
When the conversion is over, it will look like that.
Close VLC, take a big breath and look up the emplacement of the file on your disc. If you chose the default settings, it should appear as a mp4 file (with the audio track already merged in) quite heavy (depending on the quality of the stream that you chose) but with a nice and smooth quality to it.
To give you an example, there is a short clip from the final video (beware of spoilers - but since someone already uploaded the OP song...) from the second highest quality of Tousute Hiden that I may or may not (XD) have gotten after letting my eleven years old potato do his thing for a little over 4 hours (total file size of 4Gb). (Note: Tumblr drastically lowered the video quality, but it’ s still possible to see that the video isn’t jerky)
So, anyone interested in trying out that trick - purely out of scientific curiosity - on, say, Tousute Hiden for example XD, before the end of the delayed stream (in a little over 12 hours), by all means, be curious as hell... theoretically, of course XD
Feel free to ask if you have any questions.
REMINDER: again, please keep in mind that this tutorial doesn’t work anymore because DMM changed their streaming protocols 2 years ago.
148 notes
·
View notes
Text
The Mainlanders are not cattle nor are they children. Most of them have eyes that can see and a brain that can think. They are not hermetically sealed like the North Koreans do and they are exposed to a lot of western ideas and culture. I quit gaming because it unproductive, and because it was ruining my life. Games operate on short positive feedback loops and instant gratification. They give you a sense of achievement even when you aren really achieving anything, and they make difficult tasks seem easy by allowing you to achieve simulated tasks with the click of a few buttons.. I think that this is a broader conversation that needs to be had outside of influencers. I seen plenty of celebrities (or even non traditional personalities la Brad Leone) being obviously sponsored to post something and not say anything about it. This has been going on for years, but since it part of the culture, no one bats an eye.. This might not be the most popular opinion, but honestly, if I were in your situation, I would SERIOUSLY consider this offer if it saves you on expenses. 14 months isn that long, and as long as you don completely hate her family, it could be workable and put you in a better financial position when you do move. It not like there no end date. Stinking cloud. This spell is busted. Let your cleric cast communal delay poison or use a scroll with umd before an encounter, cast 4+ extended with rod stinking clouds on yourself. A Morphe store just opened up in our area, across the Sephora and MAC and if you didn't know better you'd think Morphe was a high end store. The store set up is very nice. I've never bought Morphe and went inside to see what the hype was about. Keep at it, I stopped woodworking for years and years, and always missed it to some degree or another. I much happier now that I create things again, especially when they present me with a challenge or a new skill to learn. At age 50 this still manages to excite me, and that damn cool.. A QoL change is something like adding a progress bar to dig sites. Fundamentally changing the way old archaeology sites works isn a QoL change, it makes archaeology easier to do. Which is annoying to those 안산출장마사지 who actually put in the hours to farm our rewards. What are your undertones? I been looking for a perfect burnt orange for years, and spent around a year trying to dupe Linda because I was convinced it was the answer to all my prayers. I finally got it off MUE, and turns out it pulled a bit pinker/redder/brighter than I was expecting. I have warm olive skin, in the NC20ish range, and muted oranges definitely have a tendency to pull this way on me, particularly on the lips, so I shouldn have been surprised, but I was so bummed.. Exercise, psychologist, therapist, etc.). There are many free drop ins in the city. It her fault she reacted this way. It hard to tell without a video. My first thought is that your hand grip is a bit too loose and you not sufficiently engaging your shoulders. You should imagine pushing the pole into the ground (or pulling the pole out of the ceiling) 안산출장마사지 with your shoulder engage. Eyeshadow palettes used to tempt me but when I did my declutters I parted with so many that barely got used. None of them were panned. Not even one shade. If a less technically inclined friend or relative asks for advice on setting up a new computer, I can tell them, "Install Firefox, then install uBlock Origin" and they can be expected to remember that and carry it out. They might even pass it on to their own friends and do the same on their next computer. That used to be enough.
1 note
·
View note
Link
Today, we’re going to look at what web standards are, why we have them, and what you actually need to do with them as a web designer.
What Are Web Standards?
When we talk about web standards, what we’re referring to are formal specifications that the Internet and everything on it should adhere to. So, this is frequently less about how the frontend of a website appears and more about how the backend of it is structured.
Web standards aren’t just focused on web development either. They touch on browsers, HTTP, design and development software, as well as consumer devices. Essentially, web standards are developed and formalized to bring strength and consistency to the very core of the web. The more we adhere to these standards, the more accessible the web becomes for all.
Even if you’re not involved in the coding of your websites, you’re likely familiar with today’s web standards:
Valid HTML, CSS, and JavaScript
Poorly written code can cause a lot of problems for the performance of a website, not to mention the bugs it can introduce. So, this was one of the first things we needed to get a handle on.
Since HTML, CSS, and JavaScript form the backbone of the web, there are strict standards pertaining to how they’re written and when they’re used. In addition, as variations of these languages enter the web’s lexicon — like HTML5 and CSS3 — standards are created for them as well.
By standardizing coding, we make it possible for all developers and designers to speak the same language, and for every web browser or software to comprehend them.
Graphics
This is an important one for web designers, though it’s not so much as a strict standard as a set of best practices for using graphics on the web. For example, this is what the W3C recommends:
PNG for photos;
SVG for data visualization;
CSS for enhancing basic HTML;
Canvas API for creating gradients, shapes, and other design effects;
WebCGM for vector graphics.
If you want your website to perform as efficiently as possible, it’s important to take recommendations like these seriously.
Mobile Responsiveness
With the proliferation of smart devices and the immense variation in the types of devices available, it’s become critical to have standards for the mobile web.
That said, standards bodies haven’t just standardized responsive design. They’ve also created a set of best practices for the mobile web.
Here’s an example of some of the mobile web standards we have:

Guidelines aren’t just provided for design or tools used either. They also focus on things like processing payments, website security, and performance.
The best practices recommendations are just as in-depth and intense, too:

Expect to see a greater focus on mobile web standards as more users flock to websites on their smart devices.
Web Architecture
This pertains to the way we structure information behind the scenes. So, standards have been drawn up for things like:
URLs and URIs;
XML;
HTTP and HTTPS;
Character sets;
Encoding.
By using standards for the way we label and identify parts of the web, it can become more global-friendly.
Accessibility
The Web Accessibility Initiative (WAI) is part of the larger World Wide Web Consortium (more on that below).

Unlike some of the other web standards mentioned here, standardizing accessibility is a big deal. As you can see in the screenshot above, it’s not just something that affects how web developers code or web designers create. It affects everyone who contributes to a website — writers, testers, project managers, policymakers, and so on.

There’s a lot to unpack when it comes to accessibility standards. Suffice to say, if you’re building a website that aims to actively serve the public, then every one of these standards needs to become part of your workflow.
Where Do Web Standards Come From?
In the very early days of the web, the browser wars between Internet Explorer and Firefox was problematic. As they attempted to compete for greater market share, their technologies diverged wildly. If left to their own devices, those browsers could’ve done real damage to the Internet, causing a fractured experience from browser to browser, and website to website.
Tim Berners-Lee, the person who founded the world wide web, decided something needed to be done and, as a result, formed the World Wide Web Consortium (W3C).

Since the founding of the W3C, it’s been the mission of this standards organization to establish universal standards that would allow the web to grow in a positive direction.
The W3C wasn’t the only standards organization trying to improve the Internet in the early days. The Web Standards Project arose in the ‘90s to provide support to the W3C. Its specific mission was to help make the web less costly and complex to build for and manage. Although it disbanded in 2013, it played a critical role in getting web browsers to support HTML 4 and XHTML.
Today, there are other standards organizations helping to bring order and control to the web. These are some of the bigger ones operating today:
Ecma has been around since the ‘60s. Its aim has been to standardize communication and information systems. It’s also responsible for developing ECMAScript, which standardized JavaScript.
Internet Engineering Task Force (IETF) is dedicated to strengthening the architecture of the Internet while creating a more open environment.
The WHATWG Community has developed a number of standards and non-standards around things like URLs, encoding, APIs, and coding.
These organizations — like the early creators of the web — aren’t in it to make money. Their sole aim is to create a free, open, and efficient Internet for every user.
What Do We Need Web Standards For?
Last but not least, let’s talk about the why.
As far as users are concerned, one of the biggest benefits to them is the predictability of the web.
That’s not to say that web standards will prohibit you from being creative in how you design a website. However, in terms of how it functions and how your visitors can interact with it, those elements should be consistent with the rest of the web. This creates a more inviting environment for users as it removes the struggle and confusion that comes with entering new territory.
As far as web designers are concerned, I think that’s been made clear by now. Not only does it help you work more efficiently, but it allows you to contribute to a better web — one that’s well-built and accessible for all.
0 notes
Text
6 common techniques to waste time at work

Wasting time is in our nature. We can not avoid. Of course, it is not something we want. If this were not so, there would be many articles on how to work more efficiently.
Most of us waste time without being aware of it. The dreaded procrastination is part of our daily life, even for those who have the best intentions.
However, the first step we must take to solve a problem is admitting you have one. Or, if you think you have no problem, you should rethink surely.
Here are six common obstacles that hinder you from day today.
1. Social Networks
This issue is first because you’ve probably already read countless articles that talk about the capabilities of social networks to absorb most of your time. And nobody likes to repeat the same thing over and over again … unless, of course, is really a problem for you
Even if you think you are one of those who manage well their social networks, you should take a look at how you do it. I propose an exercise. Excel creates a file (or just use paper and pencil) and points how long you spend each day on each of your accounts. Each time you enter a social network, write down the time. Do you really connected and came out quickly? Or actually spent more time than you thought?
Just as it is very easy to have the feeling of being really productive because you spent all morning on your desktop, it’s easy to think you’ve just wasted your time on social networks. You know, time flies when you’re having fun.
Try to schedule your updates on social networks in advance, using programs such as Buffer. The real-time updates are perfect to respond or interact with someone, but the less time and disconnecting you miss logging into your account to share links, the better.
2. Navigating the network
Let us not only on social networks. The general use of the Internet is one of the leading causes of downtime. How many hours a day do you spend surfing from site to site?
It is very easy to get caught in an indefinite succession of links or articles. After all, someone took to create the most tempting holder possible. How not going to click on it?
The video on YouTube is especially guilty. Why not take a look at this video of five minutes on productivity by our favorite guru? Oops, wait; there is another video on how to lose 10 lbs. In one week. What five minutes matter? It’s nothing. Wait! There is another video of how it is not a good idea to lose 10 lbs. In one week …
It was just fifteen minutes. Fifteen minutes of your working time that could have been exploited for more.
3. Slow Internet
Okay, I admit it: most freelancers today spend much time on the Web. And sometimes that time passes slowly, even if you have a good connection fail-over.
I often hear people complain that your browser is very slow and unstable. It is very easy to blame developers for using bad programming practices and not managing memory properly, but in my experience, there is a common element: people who insist on having dozens of tabs open simultaneously. It is unproductive and pointless practice, and everyone should quit immediately. Opens enough browser tabs, and no matter what browser you’re using (Chrome, Firefox, IE, Safari, Opera …): Your system will increasingly slow and eventually your browser will crash …
Adjust your browsing habits. Or, if you’re still using the same pack of connection to the modem and Internet Explorer you wore in the 90 …jump into your time machine and join us in the future
4. Endless Answers
A 2012 research study showed that we use approximately 28% of our workweek reading and answering emails. If you work five days a week for a year, you need about 73 days to respond mails.
If you create predefined answers, you learn to delete what you do not need, and abbreviates your answer, you can decrease this time exponentially. We talked about it in-depth in our article “10 ways to reduce the time you spend with email”. If mail is one of the tasks that more time you spend, I recommend checking out.
The tens of SMS or WhatsApp you arrive daily are also a huge black hole that absorbs your time alone. Answers to these messages later, during your next break. Or better yet, unplug your phone (or at least notifications) while you’re working. I assure you that the time will spread more.
5. No plans
Could you plan a road trip without a map or GPS? Of course not. Dedicate a few hours to know where to go.
Same with your career as a freelancer. Even in your everyday life. If you go if you have a plan in mind, it is quite likely to miss much time.
Set goals, both short and long term. From creating connections for your professional development to make a list of personal goals. Almost everything can become a target. Put it in writing and draw a plan (your “map”).
6. Personal Questions
I can sound a bit cynical. but no further loss of time that you spend time doubting yourself. Go ahead and write it on a card put on the wall.
Seriously, many freelancers lose a huge amount of time questioning themselves every second. It is what is known as the impostor syndrome. And no matter what discipline you devote.
You have decided to manage your own business — or be your own business— for a reason. Do not forget why you started or why to keep doing it. Trust yourself and do not waste time wondering if you’re good enough. If you’ve come so far I can assure you that you are.
0 notes
Photo

New Post has been published on http://www.lifehacker.guru/im-aurelia-moser-community-lead-at-mozilla-and-this-is-how-i-work/
I'm Aurelia Moser, Community Lead at Mozilla, and This Is How I Work
Aurelia Moser is a developer, teacher, author, and also a bit of a cartographer. She works at the Mozilla Science Lab with researchers to collaborate on open source projects and is also a mentor at Girls Develop It.
The Mozilla Science Lab is a community of coders and scientists who work together to share their data and collaborate in the same open-source spirit you probably associate with Mozilla. Along with her teaching at SVA-DSI and Parsons, Aurelia is one of those people who seems to have ten gigs at once but somehow stays organized with a system of color-coding, text editors, and IRC. Here’s how she works.
Location: Brooklyn, NYC
Current Gig: Mozilla Science Lab, Community Lead + Developer, Girl Develop It, Chapter Leader + Teacher, SVA-DSI + Parsons, Visiting Professor
One word that best describes how you work: Continuously, cartographically?
Current mobile device: iPhone 6 with a cracked screen
Current computer: MacBook Air (2015) with the camera covered
First of all, tell me a little about your background and how you got to where you are today. How’d you end up at Mozilla?
My background is pretty colorful, academically and professionally. I went to grad school for art and media conservation, including resuscitating born-digital and new media art projects for persistent display and viewing by library and museum patrons. It was a pretty rad introduction to tech forensics, diagnosing code problems and working backwards to develop emulators and solutions for broken applications, defunct data storage formats, and deprecated APIs.
I worked at some creative tech agencies and then applied to be an Open News Fellow with Mozilla and Ushahidi, an East-African tech company working to build software for crisis mapping at global scale powered by both feature and smart phone data. From there I got really geeky about maps and worked for Carto and some geospatial software startups before circling back to science and applying to work at Mozilla Science Lab, a part of the Mozilla Foundation and broader network that works to support scientists who want to open source their research (open data, open access publishing, open science practice). It feels fun and fulfilling and not totally tertiary to my initial education in science conservation; open science and open source provide some avenues to promote and preserve research findings… giving scientists some agency to share ideas and iterate on them faster, informed by feedback from a broader research community on the web.
What apps, software, or tools can’t you live without?
Sublime Text – Text editor of choice, with a custom color theme that I change every few months.
Mou – Side-by-side markdown preview app, where I take notes and store text docs.
Firefox / Chrome / Safari – All the browsers for testing, sometimes for simultaneously running multiple accounts on the same platform.
Colloquy – App for IRC, which we still use internally at Mozilla, though Slack/Gitter/MatterMost/Adium are pretty popular these days.
Shifit – Love this app for setting up keyboard hotkeys for shifting windows and apps around your screen, useful for anyone who has a small screen and serious economy of space.
LICEcap – Animated GIFs are an entire computational language for me and I use them to illustrate bugs, document pull request functionality, demonstrate programmatic concepts, and capture delightful everyday interactions. This app helps you do that for any screen; no accounting for the weird name of the app but the utility is just ace.
Mail – I don’t like a lot of local mail clients but I use Apple’s Mail (and previously Thunderbird) for PGP encrypting communications.
Alarm on iOS- Probably the thing I really can’t live without: my phone alarm. I set multiple alarms, with lots of tones to scare me into stimulation.
Boomerang – A lovely app for scheduling email communications. I’m an inbox zero hero but I don’t like to impose my strange hours of operation on other people.
I also install a “dark theme” on every application I can, so that I relax my eyes a bit. I don’t really like f.lux, or anything that federates coloring on my screen because it skews a lot of color and design considerations, but I do think that taking a visual break from backlight is good.
What’s your workspace setup like? Coffee shop with laptop and headphones? Home office with a standing desk?
At Mozilla we have the blissful privilege of working remotely, so I work from home a lot. My twee apartment with a small desk in the living room is my typical work habitat. Mozilla also has a tiny co-working space in DUMBO, Brooklyn that I can bike to if I want slightly faster Wi-Fi. Headphones all day/always; I’m on a one pair per month diet, which is probably more a sad indictment of the poor quality of most headphone hardware than it is my over-usage of earbuds.
What’s your best time-saving shortcut or life hack?
I tried the Pomodoro planning but sometimes find it adds unnecessary stress to my day. As a modification of that, I usually try to do anything that takes less than two minutes immediately, and I compete with myself in cute ways to try to maximize my productivity during those two-minute sprints. I also keep multiple browsers open, and thematically spread tasks between them, so if I need to focus on a task, I’ll shut down the browser with my email clients loaded to avoid distractions and notifications from email.
What’s your favorite to-do list manager?
I really like Taskwarrior, mostly because I can customize and color code it, and I’m big on color-coding. It’s local to your terminal though, so best for private to-do lists, and the entry is manual so upkeep can be challenging.
GitHub project boards are awesome; I’m neurotic about organizing my issues and tasks in GitHub so I often move my to-do lists to GitHub repos, and have a new repo with a task log for every job I have.
What everyday thing are you better at than everyone else? What’s your secret?
Buying weird domains, laughing at inappropriate times, whistling and humming at the same time, snorting (corollary to laughing at inappropriate times).
But seriously, I’m obsessively over-organized and really good at color-coding. I group and color my phone apps, the clothes in my closet, my book shelves… there’s something eminently pleasant about ROYGBIV distributions, for me at least. It probably sounds fake, but I have a chromatic memory: I can easily recall things by associative color, the location of things in my apartment, their function and utility… like a useless synesthesia or mnemonic.
What do you listen to while you work? Got a favorite playlist? Maybe talk radio? Or do you prefer silence?
I layer music with Coffitivity, often other people’s playlists on Spotify. I like the strange serendipity of finding people across the world who assemble a music collection that intrigues me, more than the algorithmically generated preference playlist that you can get by training Spotify or Pandora through thumb buttons. If I need to focus, it has to be classical or instrumental; but otherwise I typically lean on shoegaze, twee indie, French and Spanish rock music from the 60s/70s/80s.
I loved Songza for their creative and highly specific playlist themes, Radiooooo for its spacetime tracks, Pandora for casual playlist generation. I only have a few playlists on Spotify; this is probably my favorite of those right now. I have a pretty strong emotional attachment to music, so if I listen to a track while doing a specific thing, that activity imprints on the music and it’s hard for me to listen to that same track casually. For example, pretty much anything on my running playlist is a “safe” track that is impossible for me to listen to without triggering a kind of heart jolt or mild panic attack.
What are you currently reading? Or what’s something you’d recommend?
The Story of Your Life and Others, Cosmicomics, Lab Girl, and The Recompiler (online inclusive tech mag).
How do you recharge? What do you do when you want to forget about work?
When I want to unplug I do yoga, or sometimes ballet classes, or I take a bath. I’m a terrible meditator, though I’ve tried many times. My sleep schedule is laughably erratic so I can’t claim that I recharge much that way, though I am a fierce and violent dreamer; I feel strangely energized by the few lucid dreaming experiences I’ve had.
What’s your sleep routine like? Are you a night owl or early-riser?
I would call myself a “low-level sleeper;” in more euphemistic terms, I might qualify as “more evolved.” I operate on about 5 hours of sleep a night though I really do try for more. I have little routines for sleeping; sometimes they include ASMR YouTube videos, hot tea, night yoga, melatonin gummy bears. I really love getting up before 8am, and will privilege that over almost any late-night activity.
Fill in the blank: I’d love to see _________ answer these same questions.
Penny Lane, Ian Webster, Robby Kraft.
Lots of people interested in open science, new media, and visualization … too many to suggest.
What’s the best advice you’ve ever received?
“The time you spend is not your own.”
From Paul Ford’s 10 Timeframes, a really excellent graduation speech where he discusses how, as a creator or developer, you have an obligation to consider the time-suck implied in your applications and designs. You should think about how many hours you waste of another person’s life when they use your creations, because that waste, if sloppily structured, is so toxic to human progress and such a sad debt to build with humanity. The pragmatic programmer is one who respects other people’s time.
I’m really interested in time abstraction and research into how we process and comprehend the passage of time, our most frustrating non-renewable resource. I’ve proposed conference talks on timezones and have lost so many hours to programmatic time-related bugs.
So that line,
about being considerate of time, </slant_rhyme>
has always stuck with me.
Is there anything else you’d like to add that might be interesting to readers and fans?
If you’re an early-career researcher, you should apply to our Mozilla Fellowship Program, open through May 14th.
If you’d like to teach more women how to code, you should reach out and join our non-profit, Girl Develop It. I co-run the NYC chapter with a few friends but there are many local chapters across the US and probably in your local area if you’re US-domestic.
Feel free to tweet at me or reach out with any questions; I love making friends on the internet: @auremoser.
This interview has been lightly edited for clarity.
The How I Work series asks heroes, experts, and flat-out productive people to share their shortcuts, workspaces, routines, and more. Have someone you want to see featured, or questions you think we should ask? Email Andy.
Recommended Stories
I’m Brad Smith, CEO of Intuit, and This Is How I Work
I’m Hallie Jackson, NBC News Correspondent, and This Is How I Work
I’m Max Levchin, CEO of Affirm and Co-Founder of PayPal, and This Is How I Work
©
0 notes
Text
Install and Style From Internet WordPress 2.5
New Post has been published on https://beingmad.org/install-and-style-from-internet-wordpress-2-5/
Install and Style From Internet WordPress 2.5
It’s soon going to be time to redesign my website for the “Web 2.0 Age.” I have seriously looked at two platforms, Drupal and Joomla, with which to accomplish this.
Drupal and Joomla offer comprehensive packages that, in the case of Drupal, includes a blog and forum as core modules. Theming these platforms can be accomplished through both CSS (Cascading Style Sheets) and PHP (Personal Home Page or PHP: Hypertext Preprocessor) code modifications. However, these platforms are complex and learning enough to install, manage, and customize these platforms can be a daunting task.
After studying the two platforms, including using them both on my test bed platform and on the Internet, I decided to take a look at WordPress as a possible solution to my future Web needs. I was surprised to discover that the latest version of WordPress is easy to install, easy to use, and easy to theme. In this article, I will describe how to install and customize WordPress 2.5.
INSTALL WORDPRESS IN FIVE EASY STEPS
(1) Download WordPress
The first installation step is to Download WordPress from the website. I created a directory on my PC called “WordPress” in which to collect the files and images I will use for my WordPress installation and customization. Once the download completed, I saved the .zip file.
(2) Unzip WordPress
After saving the file, I opened it with the zip/unzip program I use and selected all of the files. Since I will be testing and modify WordPress locally, to begin with, I “extracted” the files to the root directory of the Apache server I use for my PC test bed.
If I were going to install WordPress “for real” on a live website, I would have used an FTP client to upload the .zip file to the desired directory at my hosting service and unzipped the file there. Firefox has a terrific and *free* FTP client, FireFTP, that can be used for the upload.
(3) Create the Database
At this point, the WordPress database needs to be created. WordPress requires a database to store the site content and other information. I use MySQL for my database server both on my PC test bed and on my live sites. I use phpMyAdmin as an interface to MySQL.
Creating the database is really simple using phpMyAdmin. I simply start phpMyAdmin, enter the database name, and hit the “Create” button. WordPress will create the tables it needs in the database.
(4) Create wp-config.php
WordPress needs to know how to access the database once it has been created. That’s what the wp-config.php file is for. WordPress includes a file called “wp-config-sample.php.” This file needs to be modified with the database access information and renamed to “wp-config.php.”
Open the config file with any text editor. The critical entries are DB_NAME, DB_USER, DB_PASSWORD, and DB_HOST.
As an enhanced security measure, I obtained a unique SECRET_KEY and pasted this into the file. I then saved the edited file as wp-config.php. The text below shows the code I changed:
// ** MySQL settings ** //
define(‘DB_NAME’, ‘wordpress’); // The name of the database
define(‘DB_USER’, ‘rtivel’); // Your MySQL username
define(‘DB_PASSWORD’, ‘MyPassword’); // …and password
define(‘DB_HOST’, ‘localhost’); // 99% chance you won’t need to change this value
// Change SECRET_KEY to a unique phrase. You won’t have to remember it later,
// so make it long and complicated.
// to get a secret key generated for you, or just make something up.
define(‘SECRET_KEY’, ‘diq`~@|CH6)l@u>x;hA>1ew1maZ/)ToE!y%}}ZYAI!=V^L()eooB!0V+k8LJa!Eh’); // Change this to a unique phrase.
(5) Run the WordPress Installer
After completing the edit of the wp-config.php file, I started the installation script by entering this URL to my Apache server into my browser:
localhost/Wordpress/wp-admin/install.php
For a live site, the URL might be something like this:
yourdomain.com/wordpress/wp-admin/install.php
The first installation screen asks for the blog name and contact email address.
The next screen announces a successful installation and provides a username and password for the administrator. Be sure to save this password!
The installation is now complete. I can now log into WordPress and begin managing the blog, customizing the theme, or adding content.
Or, I can click the link at the top of the log-in screen and go to the blog’s home page.
If you don’t manually create a wp-config.php file, WordPress will prompt for the information it needs and try to complete the installation.
That’s it! WordPress should now be installed.
STYLING WORDPRESS — THE JAKOB DESIGN
The current design for my personal website, SelectDigitals.com, is based on work and philosophy of Jakob Nielsen. Nielsen’s work has been dedicated to making usable websites that deliver content that is easy to find and easy to read.
The design of Nielsen’s site (and my site, by permission) is elegantly simple and has the primary goal of delivering content. WordPress also has the primary goal of delivering content. So, my first WordPress design will endeavor to maintain the look and feel of our sites with the added feature of visitor interactivity. I will refer to this as the Jakob design.
There are six major components that make up the look of the default WordPress blog:
1. Header Graphic,
2. Blog Title,
3. Tagline,
4. Page,
5. Background, to and
6. Footer.
In order to make the Jakob blog load quickly, I decided not to use a header or footer graphic; and since the design will essentially be the default WordPress theme with a new coat, only a little graphic design work needs to be done. In fact, I only needed to create one graphic generate the blog page with its two column effect. The blog page will “float” centered in a dark-blue *body* background that will serve to frame the page.
Creating the Graphic
A look in the image directory for the default WordPress theme shows the default images used for the Kubrick look. For now, there is only one file of particular interest: kubrickbgwide.jpg. For the Jakob design, the other Kubrick images are not needed but will be needed for the “Fancy”, more complex design.
The blog’s page will be created from a “slice” through the center of the new design. The slice is a narrow image the width of the blog page.
I began my design by laying out a basic page (760px X 600px) in Adobe Illustrator. I like using Illustrator for an artwork of this kind, although other programs could be used, too.
I filled the basic page with the page’s background color (not to be confused with the dark blue *body* background). The light background color will-will “show-off” colored text, such as the blog’s title and tagline.
I overlayed the page with two rectangles, or “columns.” The left-hand, 510px-wide column is filled with a pastel yellow color; the right-hand column, 230px wide, is filled with a pastel blue color. The two columns fit within the basic page with a 10px border of page background around them.
In Illustrator, I then placed a 760px X 40px rectangle on the page and used this to make a slice. A slice is nothing more that a representative piece of a larger image, in this case, of the blog design. I saved the slice as kubrickbgwide.jpg. Kubrickbgwide.jpg will be used to generate the blog page background. As new content is added to the blog page, copies of the slice will be stacked vertically to “grow” the two-column background. This is the only image needed by a browser to generate the blog’s home page. The Blog will, therefore, load very quickly.
Pretty easy so far, right? The rest of the design is accomplished through the theme’s CSS file and/or through the WordPress administrative interface.
CSS Changes
The default CSS file is in the wp-content_themes_default directory. The CSS text below shows the code changes to style.css. Before making any changes to the default CSS file, I always make and save a copy of the original. The CSS file can be opened and modified with any text editor. Text to be deleted will be shown within square brackets. New or modified text will be shown without brackets.
/* Begin Typography & Colors */
body
[background: #d5d6d7 url(‘images/kubrickbgcolor.jpg’);]
background: #636f89; /* Set the Body background color to blue */
#page
[background-color: white;]
[border: 1px solid #959596;]
border:none;
[#header
background: #73a0c5 url(‘images/kubrickheader.jpg’) no-repeat bottom center;
#headerimg
margin: 7px 9px 0;
height: 192px;
width: 740px;
]
#footer
[background: #eee url(‘images/kubrickfooter.jpg’) no-repeat top;]
background: #fffef2; /* Very light yellow */
h1, h1 a, h1 a:hover, h1 a:visited, #headerimg [.description]
text-decoration: none;
[color: white;]
color:red; /* Make the title red */
padding-bottom: .5em; /* Put a little space between the title and tagline */
.description
text-decoration: none;
color: blue; /* Make the tagline blue */
text-align: center;
/* End Typography & Colors */
/* Begin Structure */
#page
[background-color: white;]
background-color: fffef2; /* Very light yellow */
[border: 1px solid #959596;]
border: none;
#header
[background-color: #73a0c5;]
background-color: #fffef2; /* Very light yellow */
/* End Structure */
After making and saving these changes to the style.css file, the newly designed blog page is accomplished.
STYLING WORDPRESS — THE FANCY DRESS DESIGN
Although I like the simplicity of the Jakob blog design, it will not appeal to everyone. Lots of people just love “glitz.” The price of a fancy WordPress dress is often a slower loading blog with no increase in usability. However, for those who want to “dress up” the appearance of their blog, here are additional ways this can be accomplished.
First of all, it should be noted that the background of the default WordPress page uses header (kubrickheader.jpg) and footer (kubrickfooter.jpg) graphics. These graphics are not filled with a solid color, as in the Jakob design, but with gradients. There also appears to be a very small drop shadow under the page.
Because of the complexity of the default page, additional graphics are required and, thus, more slices will be needed. Additionally, when a more complex body background is desired in which to “float” the page, a “seed” image for this might also be required (this is what the kubrickbgcolor.jpg image is for).
As before, I created a drawing of the blog page in Illustrator. The page, with rounded corners, floats on the default WordPress background, has a yellow gradient, and has a small drop shadow.
I first created a 760px X 600px rectangle on the Illustrator artboard. I filled this rectangle with the background color (C:8, M:6, Y:6, K:0).
Next, using the Rounded Rectangle Tool, I drew a 736px X 584px rectangle and filled it with the yellow gradient. Essentially, I made the page as large as possible within the background while leaving enough room for the drop shadow.
Finally, I gave the rounded rectangle a small drop shadow.
In order to ensure that the slices will merge perfectly into the *body* background, I created a 60px X 60px square of the same background color (C:8, M:6, Y:6, K:0) and saved it as kubrickbgcolor.jpg. The small image will be used to “paint” the body background. This is an important step as the background used for the body and the background used for the page must match perfectly for the Fancy design.
Creating the Slices
Using the Rectangle Tool, I placed a 760px X 200px rectangle on top of the layout described above. I positioned this rectangle at the top of the layout and used it to make a slice for the header graphic. Before doing this, I disabled stroke and fill.
I saved the slice as kubrickheader.jpg.
I created the footer and page slices in a similar fashion and renamed them as kubrickfooter.jpg and kubrickbgwide.jpg, respectively. Kubrickfooter.jpg is 760px X 63px and kubrickbgwide is 760px X 40px.
There are two other Kubrick images in the images directory: kubrickbg-ltr.jpg and kubrickbg-rtl.jpg (left to right, and a right to left). These images are the same as kubrickbgwide.jpg. So, I made two copies of kubrickbgwide.jpg and renamed them accordingly.
CSS Changes
The default CSS file is in the wp-content_themes_default directory. The CSS text below shows the code changes to style.css. Square brackets show which code to delete and new code is shown without brackets. Before making the change, I copied and saved the original file. For the Fancy design, the CSS changes are minimal.
/* Begin Typography & Colors */
body
[background: #d5d6d7 url(‘images/kubrickbgcolor.jpg’);]
background: #e7e7e7 url(‘images/kubrickbgcolor.jpg’);
#page
[background-color: white;]
[border: 1px solid #959596;]
#header
[background: #73a0c5 url(‘images/kubrickheader.jpg’) no-repeat bottom center;]
background: #e7e7e7 url(‘images/kubrickheader.jpg’) no-repeat bottom center;
#footer
[background: #eee url(‘images/kubrickfooter.jpg’) no-repeat top;]
background: #e7e7e7 url(‘images/kubrickfooter.jpg’) no-repeat top;
h1, h1 a, h1 a:hover, h1 a:visited, #headerimg [description]
[color: white;]
color:red; /* Make the blog title red */
padding-bottom: .5em; /* Put a little space between the title and tagline */
.description
text-decoration: none;
color: blue; /* Make the blog tagline blue */
text-align: center;
/* End Typography & Colors */
/* Begin Structure */
#page
[background-color: white;]
background-color: #e7e7e7;
[border: 1px solid #959596;]
border: none;
#header
[background-color: #73a0c5;]
background-color: #e7e7e7;
/* End Structure */
After the design and CSS work, the WordPress shows it’s new clothes to the whole Internet.
Yours for a more successful blog.
0 notes
Text
How to Install and Style WordPress 2.5 From Internet
New Post has been published on https://giveuselife.org/2618-2/
How to Install and Style WordPress 2.5 From Internet
It’s soon going to be time to redesign my website for the “Web 2.0 Age.” I have seriously looked at two platforms, Drupal and Joomla, with which to accomplish this.
Drupal and Joomla offer comprehensive packages that, in the case of Drupal, includes a blog and forum as core modules. Theming these platforms can be accomplished through both CSS (Cascading Style Sheets) and PHP (Personal Home Page or PHP: Hypertext Preprocessor) code modifications. However, these platforms are complex and learning enough to install, manage, and customize these platforms can be a daunting task.
After studying the two platforms, including using them both on my test bed platform and on the Internet, I decided to take a look at WordPress as a possible solution to my future Web needs. I was surprised to discover that the latest version of WordPress is easy to install, easy to use, and easy to theme. In this article, I will describe how to install and customize WordPress 2.5.
INSTALL WORDPRESS IN FIVE EASY STEPS
(1) Download WordPress
The first installation step is to Download WordPress from the website. I created a directory on my PC called “WordPress” in which to collect the files and images I will use for my WordPress installation and customization. Once the download completed, I saved the .zip file.
(2) Unzip WordPress
After saving the file, I opened it with the zip/unzip program I use and selected all of the files. Since I will be testing and modify WordPress locally, to begin with, I “extracted” the files to the root directory of the Apache server I use for my PC test bed.
If I were going to install WordPress “for real” on a live website, I would have used an FTP client to upload the .zip file to the desired directory at my hosting service and unzipped the file there. Firefox has a terrific and *free* FTP client, FireFTP, that can be used for the upload.
(3) Create the Database
At this point, the WordPress database needs to be created. WordPress requires a database to store the site content and other information. I use MySQL for my database server both on my PC test bed and on my live sites. I use phpMyAdmin as an interface to MySQL.
Creating the database is really simple using phpMyAdmin. I simply start phpMyAdmin, enter the database name, and hit the “Create” button. WordPress will create the tables it needs in the database.
(4) Create wp-config.php
WordPress needs to know how to access the database once it has been created. That’s what the wp-config.php file is for. WordPress includes a file called “wp-config-sample.php.” This file needs to be modified with the database access information and renamed to “wp-config.php.”
Open the config file with any text editor. The critical entries are DB_NAME, DB_USER, DB_PASSWORD, and DB_HOST.
As an enhanced security measure, I obtained a unique SECRET_KEY and pasted this into the file. I then saved the edited file as wp-config.php. The text below shows the code I changed:
// ** MySQL settings ** //
define(‘DB_NAME’, ‘wordpress’); // The name of the database
define(‘DB_USER’, ‘rtivel’); // Your MySQL username
define(‘DB_PASSWORD’, ‘MyPassword’); // …and password
define(‘DB_HOST’, ‘localhost’); // 99% chance you won’t need to change this value
// Change SECRET_KEY to a unique phrase. You won’t have to remember it later,
// so make it long and complicated.
// to get a secret key generated for you, or just make something up.
define(‘SECRET_KEY’, ‘diq`~@|CH6)l@u>x;hA>1ew1maZ/)ToE!y%}}ZYAI!=V^L()eooB!0V+k8LJa!Eh’); // Change this to a unique phrase.
(5) Run the WordPress Installer
After completing the edit of the wp-config.php file, I started the installation script by entering this URL to my Apache server into my browser:
localhost/wordpress/wp-admin/install.php
For a live site, the URL might be something like this:
yourdomain.com/wordpress/wp-admin/install.php
The first installation screen asks for the blog name and contact email address.
The next screen announces a successful installation and provides a username and password for the administrator. Be sure to save this password!
The installation is now complete. I can now log into WordPress and begin managing the blog, customizing the theme, or adding content.
Or, I can click the link at the top of the log-in screen and go to the blog’s home page.
If you don’t manually create a wp-config.php file, WordPress will prompt for the information it needs and try to complete the installation.
That’s it! WordPress should now be installed.
STYLING WORDPRESS — THE JAKOB DESIGN
The current design for my personal website, SelectDigitals.com, is based on work and philosophy of Jakob Nielsen. Nielsen’s work has been dedicated to making usable websites that deliver content that is easy to find and easy to read.
The design of Nielsen’s site (and my site, by permission) is elegantly simple and has the primary goal of delivering content. WordPress also has the primary goal of delivering content. So, my first WordPress design will endeavor to maintain the look and feel of our sites with the added feature of visitor interactivity. I will refer to this as the Jakob design.
There are six major components that make up the look of the default WordPress blog:
1. Header Graphic,
2. Blog Title,
3. Tagline,
4. Page,
5. Background, to and
6. Footer.
In order to make the Jakob blog load quickly, I decided not to use a header or footer graphic; and since the design will essentially be the default WordPress theme with a new coat, only a little graphic design work needs to be done. In fact, I only needed to create one graphic enerate the blog page with it’s two column effect. The blog page will “float” centered in a dark-blue *body* background that will serve to frame the page.
Creating the Graphic
A look in the image directory for the default WordPress theme shows the default images used for the Kubrick look. For now, there is only one file of particular interest : kubrickbgwide.jpg. For the Jakob design, the other Kubrick images are not needed but will be needed for the “Fancy”, more complex design.
The blog’s page will be created from a “slice” through the center of the new design. The slice is a narrow image the width of the blog page.
I began my design by laying out a basic page (760px X 600px) in Adobe Illustrator. I like using Illustrator for artwork of this kind, although other programs could be used, too.
I filled the basic page with the page’s background color (not to be confused with the dark blue *body* background). The light background color will will “show-off” colored text, such as the blog’s title and tagline.
I overlayed the page with two rectangles, or “columns.” The left-hand, 510px-wide column is filled with a pastel yellow color; the right-hand column, 230px wide, is filled with a pastel blue color. The two columns fit within the basic page with a 10px border of page background around them.
In Illustrator, I then placed a 760px X 40px rectangle on the page and used this to make a slice. A slice is nothing more that a representative piece of a larger image, in this case, of the blog design. I saved the slice as kubrickbgwide.jpg. Kubrickbgwide.jpg will be used to generate the blog-page background. As new content is added to the blog page, copies of the slice will be stacked vertically to “grow” the two-column background. This is the only image needed by a browser to generate the blog’s home page. The Blog will, therefore, load very quickly.
Pretty easy so far, right? The rest of the design is accomplished through the theme’s CSS file and/or through the WordPress administrative interface.
CSS Changes
The default CSS file is in the wp-content_themes_default directory. The CSS text below shows the code changes to style.css. Before making any changes to the default CSS file, I always make and save a copy of the original. The CSS file can be opened and modified with any text editor. Text to be deleted will be shown within square brackets. New or modified text will be shown without brackets.
/* Begin Typography & Colors */
body
[background: #d5d6d7 url(‘images/kubrickbgcolor.jpg’);]
background: #636f89; /* Set the Body background color to blue */
#page
[background-color: white;]
[border: 1px solid #959596;]
border:none;
[#header
background: #73a0c5 url(‘images/kubrickheader.jpg’) no-repeat bottom center;
#headerimg
margin: 7px 9px 0;
height: 192px;
width: 740px;
]
#footer
[background: #eee url(‘images/kubrickfooter.jpg’) no-repeat top;]
background: #fffef2; /* Very light yellow */
h1, h1 a, h1 a:hover, h1 a:visited, #headerimg [.description]
text-decoration: none;
[color: white;]
color:red; /* Make the title red */
padding-bottom: .5em; /* Put a little space between the title and tagline */
.description
text-decoration: none;
color: blue; /* Make the tagline blue */
text-align: center;
/* End Typography & Colors */
/* Begin Structure */
#page
[background-color: white;]
background-color: fffef2; /* Very light yellow */
[border: 1px solid #959596;]
border: none;
#header
[background-color: #73a0c5;]
background-color: #fffef2; /* Very light yellow */
/* End Structure */
After making and saving these changes to the style.css file, the newly designed blog page is accomplished.
STYLING WORDPRESS — THE FANCY DRESS DESIGN
Although I like the simplicity of the Jakob blog design, it will not appeal to everyone. Lots of people just love “glitz.” The price of a fancy WordPress dress is often a slower loading blog with no increase in usability. However, for those who want to “dress up” the appearance of their blog, here are additional ways this can be accomplished.
First of all, it should be noted that the background of the default WordPress page uses header (kubrickheader.jpg) and footer (kubrickfooter.jpg) graphics. These graphics are not filled with a solid color, as in the Jakob design, but with gradients. There also appears to be a very small drop shadow under the page.
Because of the complexity of the default page, additional graphics are required and, thus, more slices will be needed. Additionally, when a more complex body background is desired in which to “float” the page, a “seed” image for this might also be required (this is what the kubrickbgcolor.jpg image is for).
As before, I created a drawing of the blog page in Illustrator. The page, with rounded corners, floats on the default WordPress background, has a yellow gradient, and has a small drop shadow.
I first created a 760px X 600px rectangle on the Illustrator artboard. I filled this rectangle with the background color (C:8, M:6, Y:6, K:0).
Next, using the Rounded Rectangle Tool, I drew a 736px X 584px rectangle and filled it with the yellow gradient. Essentially, I made the page as large as possible within the background while leaving enough room for the drop shadow.
Finally, I gave the rounded rectangle a small drop shadow.
In order to insure that the slices will merge perfectly into the *body* background, I created a 60px X 60px square of the same background color (C:8, M:6, Y:6, K:0) and saved it as kubrickbgcolor.jpg. The small image will be used to “paint” the body background. This is an important step as the background used for the body and the background used for the page must match perfectly for the Fancy design.
Creating the Slices
Using the Rectangle Tool, I placed a 760px X 200px rectangle on top of the layout described above. I positioned this rectangle at the top of the layout and used it to make a slice for the header graphic. Before doing this, I disabled stroke and fill.
I saved the slice as kubrickheader.jpg.
I created the footer and page slices in a similar fashion and renamed them as kubrickfooter.jpg and kubrickbgwide.jpg, respectively. Kubrickfooter.jpg is 760px X 63px and kubrickbgwide is 760px X 40px.
There are two other Kubrick images in the images directory: kubrickbg-ltr.jpg and kubrickbg-rtl.jpg (left to right, and right to left). These images are the same as kubrickbgwide.jpg. So, I made two copies of kubrickbgwide.jpg and renamed them accordingly.
CSS Changes
The default CSS file is in the wp-content_themes_default directory. The CSS text below shows the code changes to style.css. Square brackets show which code to delete and new code is shown without brackets. Before making the change, I copied and saved the original file. For the Fancy design, the CSS changes are minimal.
/* Begin Typography & Colors */
body
[background: #d5d6d7 url(‘images/kubrickbgcolor.jpg’);]
background: #e7e7e7 url(‘images/kubrickbgcolor.jpg’);
#page
[background-color: white;]
[border: 1px solid #959596;]
#header
[background: #73a0c5 url(‘images/kubrickheader.jpg’) no-repeat bottom center;]
background: #e7e7e7 url(‘images/kubrickheader.jpg’) no-repeat bottom center;
#footer
[background: #eee url(‘images/kubrickfooter.jpg’) no-repeat top;]
background: #e7e7e7 url(‘images/kubrickfooter.jpg’) no-repeat top;
h1, h1 a, h1 a:hover, h1 a:visited, #headerimg [description]
[color: white;]
color:red; /* Make the blog title red */
padding-bottom: .5em; /* Put a little space between the title and tagline */
.description
text-decoration: none;
color: blue; /* Make the blog tagline blue */
text-align: center;
/* End Typography & Colors */
/* Begin Structure */
#page
[background-color: white;]
background-color: #e7e7e7;
[border: 1px solid #959596;]
border: none;
#header
[background-color: #73a0c5;]
background-color: #e7e7e7;
/* End Structure */
After the design and CSS work, the WordPress shows it’s new clothes to the whole Internet.
Yours for a more successful blog,
0 notes
Text
How to Install and Style WordPress 2.5
New Post has been published on https://netmaddy.com/how-to-install-and-style-wordpress-2-5/
How to Install and Style WordPress 2.5
It’s soon going to be time to redesign my website for the “Web 2.0 Age.” I have seriously looked at two platforms, Drupal and Joomla, with which to accomplish this.
Drupal and Joomla offer comprehensive packages that, in the case of Drupal, includes a blog and forum as core modules. Theming these platforms can be accomplished through both CSS (Cascading Style Sheets) and PHP (Personal Home Page or PHP: Hypertext Preprocessor) code modifications. However, these platforms are complex and learning enough to install, manage, and customize these platforms can be a daunting task.
After studying the two platforms, including using them both on my test bed platform and on the Internet, I decided to take a look at WordPress as a possible solution to my future Web needs. I was surprised to discover that the latest version of WordPress is easy to install, easy to use, and easy to theme. In this article, I will describe how to install and customize WordPress 2.5.
INSTALL WORDPRESS IN FIVE EASY STEPS
(1) Download WordPress
The first installation step is to Download WordPress from http://wordpress.org/download/. I created a directory on my PC called “WordPress” in which to collect the files and images I will use for my WordPress installation and customization. Once the download completed, I saved the .zip file.
(2) Unzip WordPress
After saving the file, I opened it with the zip/unzip program I use and selected all of the files. Since I will be testing and modify WordPress locally, to begin with, I “extracted” the files to the root directory of the Apache server I use for my PC test bed.
If I were going to install WordPress “for real” on a live website, I would have used an FTP client to upload the .zip file to the desired directory at my hosting service and unzipped the file there. Firefox has a terrific and *free* FTP client, FireFTP, that can be used for the upload.
(3) Create the Database
At this point, the WordPress database needs to be created. WordPress requires a database to store the site content and other information. I use MySQL for my database server both on my PC test bed and on my live sites. I use phpMyAdmin as an interface to MySQL.
Creating the database is really simple using phpMyAdmin. I simply start phpMyAdmin, enter the database name, and hit the “Create” button. WordPress will create the tables it needs in the database.
(4) Create wp-config.php
WordPress needs to know how to access the database once it has been created. That’s what the wp-config.php file is for. WordPress includes a file called “wp-config-sample.php.” This file needs to be modified with the database access information and renamed to “wp-config.php.”
Open the config file with any text editor. The critical entries are DB_NAME, DB_USER, DB_PASSWORD, and DB_HOST.
As an enhanced security measure, I obtained a unique SECRET_KEY and pasted this into the file. I then saved the edited file as wp-config.php. The text below shows the code I changed:
// ** MySQL settings ** //
define(‘DB_NAME’, ‘wordpress’); // The name of the database
define(‘DB_USER’, ‘rtivel’); // Your MySQL username
define(‘DB_PASSWORD’, ‘MyPassword’); // …and password
define(‘DB_HOST’, ‘localhost’); // 99% chance you won’t need to change this value
// Change SECRET_KEY to a unique phrase. You won’t have to remember it later,
// so make it long and complicated. You can visit http://api.wordpress.org/secret-key/1.0/
// to get a secret key generated for you, or just make something up.
define(‘SECRET_KEY’, ‘diq’~@|CH6)l@u>x;hA>1ew1maZ/)ToE!y%}}ZYAI!=V^L()eooB!0V+k8LJa!Eh’); // Change this to a unique phrase.
(5) Run the WordPress Installer
After completing the edit of the wp-config.php file, I started the installation script by entering this URL to my Apache server into my browser:
localhost/wordpress/wp-admin/install.php
For a live site, the URL might be something like this:
yourdomain.com/wordpress/wp-admin/install.php
The first installation screen asks for the blog name and contact email address.
The next screen announces a successful installation and provides a username and password for the administrator. Be sure to save this password!
The installation is now complete. I can now log into WordPress and begin managing the blog, customizing the theme, or adding content.
Or, I can click the link at the top of the log-in screen and go to the blog’s home page.
If you don’t manually create a wp-config.php file, WordPress will prompt for the information it needs and try to complete the installation.
That’s it! WordPress should now be installed.
STYLING WORDPRESS — THE JAKOB DESIGN
The current design for my personal website, SelectDigitals.com, is based on work and philosophy of Jakob Nielsen, http://www.useit.com/. Nielsen’s work has been dedicated to making usable websites that deliver content that is easy to find and easy to read.
The design of Nielsen’s site (and my site, by permission) is elegantly simple and has the primary goal of delivering content. WordPress also has the primary goal of delivering content. So, my first WordPress design will endeavor to maintain the look and feel of our sites with the added feature of visitor interactivity. I will refer to this as the Jakob design.
There are six major components that make up the look of the default WordPress blog:
1. Header Graphic,
2. Blog Title,
3. Tagline,
4. Page,
5. Background, to and
6. Footer.
In order to make the Jakob blog load quickly, I decided not to use a header or footer graphic; and since the design will essentially be the default WordPress theme with a new coat, only a little graphic design work needs to be done. In fact, I only needed to create one graphic enerate the blog page with it’s two column effect. The blog page will “float” centered in a dark-blue *body* background that will serve to frame the page.
Creating the Graphic
A look in the image directory for the default WordPress theme shows the default images used for the Kubrick look. For now, there is only one file of particular interest : kubrickbgwide.jpg. For the Jakob design, the other Kubrick images are not needed but will be needed for the “Fancy”, more complex design.
The blog’s page will be created from a “slice” through the center of the new design. The slice is a narrow image the width of the blog page.
I began my design by laying out a basic page (760px X 600px) in Adobe Illustrator. I like using Illustrator for artwork of this kind, although other programs could be used, too.
I filled the basic page with the page’s background color (not to be confused with the dark blue *body* background). The light background color will will “show-off” colored text, such as the blog’s title and tagline.
I overlayed the page with two rectangles, or “columns.” The left-hand, 510px-wide column is filled with a pastel yellow color; the right-hand column, 230px wide, is filled with a pastel blue color. The two columns fit within the basic page with a 10px border of page background around them.
In Illustrator, I then placed a 760px X 40px rectangle on the page and used this to make a slice. A slice is nothing more that a representative piece of a larger image, in this case, of the blog design. I saved the slice as kubrickbgwide.jpg. Kubrickbgwide.jpg will be used to generate the blog-page background. As new content is added to the blog page, copies of the slice will be stacked vertically to “grow” the two-column background. This is the only image needed by a browser to generate the blog’s home page. The Blog will, therefore, load very quickly.
Pretty easy so far, right? The rest of the design is accomplished through the theme’s CSS file and/or through the WordPress administrative interface.
CSS Changes
The default CSS file is in the wp-content_themes_default directory. The CSS text below shows the code changes to style.css. Before making any changes to the default CSS file, I always make and save a copy of the original. The CSS file can be opened and modified with any text editor. Text to be deleted will be shown within square brackets. New or modified text will be shown without brackets.
/* Begin Typography & Colors */
body
[background: #d5d6d7 url(‘images/kubrickbgcolor.jpg’);]
background: #636f89; /* Set the Body background color to blue */
#page
[background-color: white;]
[border: 1px solid #959596;]
border:none;
[#header
background: #73a0c5 url(‘images/kubrickheader.jpg’) no-repeat bottom center;
#headerimg
margin: 7px 9px 0;
height: 192px;
width: 740px;
]
#footer
[background: #eee url(‘images/kubrickfooter.jpg’) no-repeat top;]
background: #fffef2; /* Very light yellow */
h1, h1 a, h1 a:hover, h1 a:visited, #headerimg [.description]
text-decoration: none;
[color: white;]
color:red; /* Make the title red */
padding-bottom: .5em; /* Put a little space between the title and tagline */
.description
text-decoration: none;
color: blue; /* Make the tagline blue */
text-align: center;
/* End Typography & Colors */
/* Begin Structure */
#page
[background-color: white;]
background-color: fffef2; /* Very light yellow */
[border: 1px solid #959596;]
border: none;
#header
[background-color: #73a0c5;]
background-color: #fffef2; /* Very light yellow */
/* End Structure */
After making and saving these changes to the style.css file, the newly designed blog page is accomplished.
STYLING WORDPRESS — THE FANCY DRESS DESIGN
Although I like the simplicity of the Jakob blog design, it will not appeal to everyone. Lots of people just love “glitz.” The price of a fancy WordPress dress is often a slower loading blog with no increase in usability. However, for those who want to “dress up” the appearance of their blog, here are additional ways this can be accomplished.
First of all, it should be noted that the background of the default WordPress page uses header (kubrickheader.jpg) and footer (kubrickfooter.jpg) graphics. These graphics are not filled with a solid color, as in the Jakob design, but with gradients. There also appears to be a very small drop shadow under the page.
Because of the complexity of the default page, additional graphics are required and, thus, more slices will be needed. Additionally, when a more complex body background is desired in which to “float” the page, a “seed” image for this might also be required (this is what the kubrickbgcolor.jpg image is for).
As before, I created a drawing of the blog page in Illustrator. The page, with rounded corners, floats on the default WordPress background, has a yellow gradient, and has a small drop shadow.
I first created a 760px X 600px rectangle on the Illustrator artboard. I filled this rectangle with the background color (C:8, M:6, Y:6, K:0).
Next, using the Rounded Rectangle Tool, I drew a 736px X 584px rectangle and filled it with the yellow gradient. Essentially, I made the page as large as possible within the background while leaving enough room for the drop shadow.
Finally, I gave the rounded rectangle a small drop shadow.
In order to insure that the slices will merge perfectly into the *body* background, I created a 60px X 60px square of the same background color (C:8, M:6, Y:6, K:0) and saved it as kubrickbgcolor.jpg. The small image will be used to “paint” the body background. This is an important step as the background used for the body and the background used for the page must match perfectly for the Fancy design.
Creating the Slices
Using the Rectangle Tool, I placed a 760px X 200px rectangle on top of the layout described above. I positioned this rectangle at the top of the layout and used it to make a slice for the header graphic. Before doing this, I disabled stroke and fill.
I saved the slice as kubrickheader.jpg.
I created the footer and page slices in a similar fashion and renamed them as kubrickfooter.jpg and kubrickbgwide.jpg, respectively. Kubrickfooter.jpg is 760px X 63px and kubrickbgwide is 760px X 40px.
There are two other Kubrick images in the images directory: kubrickbg-ltr.jpg and kubrickbg-rtl.jpg (left to right, and right to left). These images are the same as kubrickbgwide.jpg. So, I made two copies of kubrickbgwide.jpg and renamed them accordingly.
CSS Changes
The default CSS file is in the wp-content_themes_default directory. The CSS text below shows the code changes to style.css. Square brackets show which code to delete and new code is shown without brackets. Before making the change, I copied and saved the original file. For the Fancy design, the CSS changes are minimal.
/* Begin Typography & Colors */
body
[background: #d5d6d7 url(‘images/kubrickbgcolor.jpg’);]
background: #e7e7e7 url(‘images/kubrickbgcolor.jpg’);
#page
[background-color: white;]
[border: 1px solid #959596;]
#header
[background: #73a0c5 url(‘images/kubrickheader.jpg’) no-repeat bottom center;]
background: #e7e7e7 url(‘images/kubrickheader.jpg’) no-repeat bottom center;
#footer
[background: #eee url(‘images/kubrickfooter.jpg’) no-repeat top;]
background: #e7e7e7 url(‘images/kubrickfooter.jpg’) no-repeat top;
h1, h1 a, h1 a:hover, h1 a:visited, #headerimg [description]
[color: white;]
color:red; /* Make the blog title red */
padding-bottom: .5em; /* Put a little space between the title and tagline */
.description
text-decoration: none;
color: blue; /* Make the blog tagline blue */
text-align: center;
/* End Typography & Colors */
/* Begin Structure */
#page
[background-color: white;]
background-color: #e7e7e7;
[border: 1px solid #959596;]
border: none;
#header
[background-color: #73a0c5;]
background-color: #e7e7e7;
/* End Structure */
After the design and CSS work, the WordPress shows it’s new clothes to the whole Internet.
Yours for a more successful blog.
0 notes
Text
New Post has been published on Pagedesignweb
New Post has been published on http://pagedesignweb.com/how-to-install-and-style-wordpress-2-5/
How to Install and Style WordPress 2.5
It’s soon going to be time to redesign my web site for the “Web 2.0 Age.” I have seriously looked at two platforms, Drupal and Joomla, with which to accomplish this.
Drupal and Joomla offer comprehensive packages that, in the case of Drupal, includes a blog and forum as core modules. Theming these platforms can be accomplished through both CSS (Cascading Style Sheets) and PHP (Personal Home Page or PHP: Hypertext Preprocessor) code modifications. However, these platforms are complex and learning enough to install, manage, and customize these platforms can be a daunting task.
After studying the two platforms, including using them both on my test bed platform and on the Internet, I decided to take a look at WordPress as a possible solution to my future Web needs. I was surprised to discover that the latest version of WordPress is easy to install, easy to use, and easy to theme. In this article, I will describe how to install and customize WordPress 2.5.
(1) Download WordPress
The first installation step is to Download WordPress from http://wordpress.org/download/. I created a directory on my PC called “wordpress” in which to collect the files and images I will use for my WordPress installation and customization. Once the download competed, I saved the .zip file.
(2) Unzip WordPress
After saving the file, I opened it with the zip/unzip program I use, and selected all of the files. Since I will be testing and modifying WordPress locally to begin with, I “extracted” the files to the root directory of the Apache server I use for my PC test bed.
If I were going to install WordPress “for real” on a live web site, I would have used an FTP client to upload the .zip file to the desired directory at my hosting service and unziped the file there. Firefox has a terrific and *free* FTP client, FireFTP, that can be used for the upload.
(3) Create the Database
At this point, the WordPress database needs to be created. WordPress requires a database to store the site content and other information. I use MySQL for my database server both on my PC test bed and on my live sites. I use phpMyAdmin as an interface to MySQL.
Creating the database is really simple using phpMyAdmin. I simply start phpMyAdmin, enter the database name, and hit the “Create” button. WordPress will create the tables it needs in the database.
(4) Create wp-config.php
WordPress needs to know how to access the database once it has been created. That’s what the wp-config.php file is for. WordPress includes a file called “wp-config-sample.php.” This file needs to be modified with the database access information and renamed to “wp-config.php.”
Open the config file with any text editor. The critical entries are DB_NAME, DB_USER, DB_PASSWORD, and DB_HOST.
As an enhanced security measure, I obtained a unique SECRET_KEY and pasted this into the file. I then saved the edited file as wp-config.php. The text below shows the code I changed:
// ** MySQL settings ** //
define(‘DB_NAME’, ‘wordpress’); // The name of the database
define(‘DB_USER’, ‘rtivel’); // Your MySQL username
define(‘DB_PASSWORD’, ‘MyPassword’); // …and password
define(‘DB_HOST’, ‘localhost’); // 99% chance you won’t need to change this value
// Change SECRET_KEY to a unique phrase. You won’t have to remember it later,
// so make it long and complicated. You can visit http://api.wordpress.org/secret-key/1.0/
// to get a secret key generated for you, or just make something up.
define(‘SECRET_KEY’, ‘diq’~@|CH6)l@u>x;hA>1ew1maZ/)ToE!y%}}ZYAI!=V^L()eooB!0V+k8LJa!Eh’); // Change this to a unique phrase.
(5) Run the WordPress Installer
After completing the edit of the wp-config.php file, I started the installation script by entering this URL to my Apache server into my browser:
localhost/wordpress/wp-admin/install.php
For a live site, the URL might be something like this:
yourdomain.com/wordpress/wp-admin/install.php
The first installation screen asks for the blog name and contact email address.
The next screen announces a successful installation and provides a username and password for the administrator. Be sure to save this password!
The installation is now complete. I can now log into WordPress and begin managing the blog, customizing the theme, or adding content.
Or, I can click the link at the top of the log-in screen and go to the blog’s home page.
If you don’t manually create a wp-config.php file, WordPress will prompt for the information it needs and try to complete the installation.
That’s it! WordPress should now be installed.
STYLING WORDPRESS — THE JAKOB DESIGN
The current design for my personal web site, SelectDigitals.com, is based on work and philosophy of Jakob Nielsen , http://www.useit.com/. Nielsen’s work has been dedicated to making usable web sites that deliver content that is easy to find and easy to read.
The design of Nielsen’s site (and my site, by permission) is elegantly simple and has the primary goal of delivering content. WordPress also has the primary goal of delivering content. So, my first WordPress design will endeavor to maintain the look and feel of our sites with the added feature of visitor interactivity. I will refer to this as the Jakob design.
There are six major components that make up the look of the default WordPress blog:
1. Header Graphic,
2. Blog Title,
3. Tagline,
4. Page,
5. Background,and
6. Footer.
In order to make the Jakob blog load quickly, I decided not to use a header or footer graphic; and since the design will essentially be the default WordPress theme with a new coat, only a little graphic design work needs to be done. In fact, I only needed to create one graphic to to generate the blog page with it’s two column effect. The blog page will “float” centered in a dark-blue *body* background that will serve to frame the page.
Creating the Graphic
A look in the image directory for the default WordPress theme shows the default images used for the Kubrick look. For now, there is only one file of particular interest : kubrickbgwide.jpg. For the Jakob design, the other Kubrick images are not needed but will be needed for the “Fancy”, more complex design.
The blog’s page will be created from a “slice” through the center of the new design. The slice is a narrow image the width of the blog page.
I began my design by laying out a basic page (760px X 600px) in Adobe Illustrator. I like using Illustrator for artwork of this kind, although other programs could be used, too.
I filled the basic page with the page’s background color (not to be confused with the dark blue *body* background). The light background color will will “show-off” colored text, such as the blog’s title and tagline.
I overlayed the page with two rectangles, or “columns.” The left-hand, 510px-wide column is filled with a pastel yellow color; the right-hand column, 230px wide, is filled with a pastel blue color. The two columns fit within the basic page with a 10px border of page background around them.
In Illustrator, I then placed a 760px X 40px rectangle on the page and used this to make a slice. A slice is nothing more that a representative piece of a larger image, in this case, of the blog design. I saved the slice as kubrickbgwide.jpg. Kubrickbgwide.jpg will be used to generate the blog-page background. As new content is added to the blog page, copies of the slice will be stacked vertically to “grow” the two-column background. This is the only image needed by a browser to generate the blog’s home page. The Blog will, therefore, load very quickly.
Pretty easy so far, right? The rest of the design is accomplished through the theme’s CSS file and/or through the WordPress administrative interface.
CSS Changes
The default CSS file is in the wp-content_themes_default directory. The CSS text below shows the code changes to style.css. Before making any changes to the default CSS file, I always make and save a copy of the original. The CSS file can be opened and modified with any text editor. Text to be deleted will be shown within square brackets. New or modified text will be shown without brackets.
0 notes
Last Seen Blogs

amardeepriyat
Amardeep Riyat

bandyaroze
remade

crispyrebelcoffee
제목 없음

blog-article-usa
Blog Article

hiroomi3
茶請け: