#s13build
Explore tagged Tumblr posts
Text
September 2019
First look.
Your first glimpse of the new side project. And first thing is first lets get some fitment and style.
Next onto some work, re routed and made tidy some wiring then started on intercooler pipes. Decided to run the intercooler inside the engine bay with no viscous fan. Trying some different things with this project.
R33 GTR wheels looking real nice
2 notes
·
View notes
Text
September 2019
Sweet jesus
With the wiring 95% complete i can now put the dashboard back. Wow this looks good.
Triple gauges in the cockpit dash vent. Water temperature, oil temperature and oil pressure finish with a carbon surround.
Carbon centre console looks so, so good especially with this homemade Bride gear gator. finished with a Nismo shifter.
Pioneer touchscreen radio with apple car play fits perfect. The radio also allows two usb cables which i ran into the Ash tray.
1 note
·
View note
Text
Febuary 2019
//Engine removal
The s13 is going to be painted. Most likely the whole shell will be one colour, including engine bay. Removing the engine is also going to give me a chance to clean up the metal work and also relocate a few engine accessories.
6 notes
·
View notes
Text
March 2019
//Best combo
Could not resist red interior in a hatch, carbon details make this even better. Red and carbon are the best combo
4 notes
·
View notes
Text
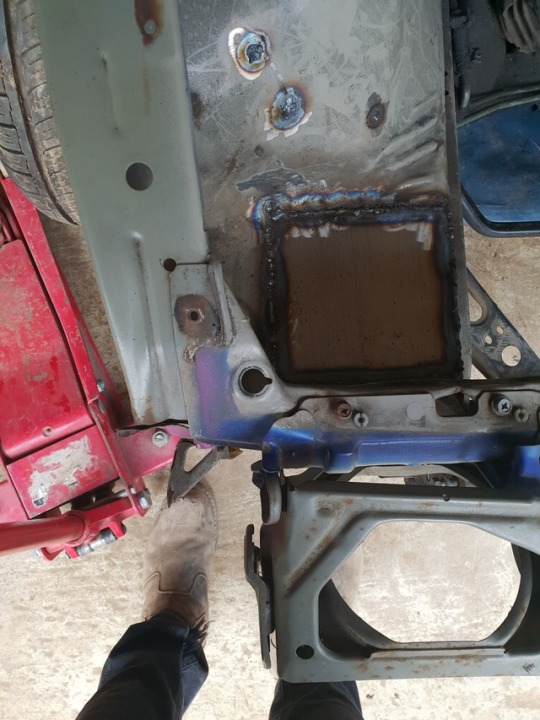
March 2019
// a good base
S13s really are made of wafer thin crappy metal.
Due to the last owner making a mess, which i can only assume he dropped and angle grinder in the bay and cut everything to bits.
It was awful. So i cut out the existing holes into squares then welded new plates in. Next i will cut new holes for the intercooler pipework using a hole saw making everything look much neater. Then finish by smoothing the engine bay.
#s13#sr20det#uklowstyle#s13build#180sx#rps13#clubbuilt#nissan#originlabo#s chassis#ukbuild#streetstyle#240sx#fabrication
1 note
·
View note
Photo
February 2018 // accessories strip Began stripping all the engine bay accessories including loom, radiator, intercooler, air con, fan shroud and fuse boxes. Car is starting to look bare.
2 notes
·
View notes
Photo
February 2018
// getting on
Started with a new battery tray as the battery was just loose in the engine bay. Made up a template out of cardboard for accurate measurements allowing the battery to fit tightly without no movement at all. Next i set about making it. I used 18 gauge sheet metal along with 4mm steel angle, then i welded them to form the tray.
Coilovers and brakes upgrade. Was not happy with the coilovers that were on the car due to not being high quality or able to lower the car very much. i swapped them out for HSD Dualshock which are a fully adjustable, gas pressured, shock. With a better range of height adjustment, camber and also shock travel preload. along with a 8k rated spring
Brake pads were upgraded from standard pads to Stop tech race pads
1 note
·
View note
Photo
January 2018
// details
New speedo bulbs.
Finished installing the new radio which comes with apple car play via a usb lead, which i routed under the centre console and into the ash tray for ease of access
0 notes
Photo
A G G R E S S I V E
0 notes
Photo
March 2017 //
test fit Tuesday
car is fully prepped for paint and just waiting for a slot in the paint booth. so what better to do then test the new wheels. Only ever using a tape measure to configure wheel sizes this was the first time to see if they actually fit or i messed up with specs, but seems they are perfect.
0 notes
Photo
21st November 2016 // Winter Intercooler pipes made up and fitted. Need to add an intake filter for the turbo then should be ready to fire up.
0 notes
Photo
May 2016
// Engine in.
Installed a new twin plate competition clutch and flywheel. Added the gearbox and starter motor. Then reinstalled the intake manifold and components. Also new solid vibra-techniq engine mounts.
With the new space frame it has forced me to make some changes to the original layout of the components in the engine bay. I am planning to relocate the battery and fuse box inside the car. Moreover this will mean the wiring loom will also have to be modified to accommodate the change, this will give the engine bay a revitalised look as i will be able to condense and hide a lot of the wiring to clear space and further emphasise the engine when bonnet it open.
-MMT
0 notes
Photo
23 April 2016
// Origin labo
Chose an origin kit for the 13 this was down to it being the newest kit on the market with BN sports now becoming overdone (but never out of fashion) thought it would be good to do something fresh and new. Also i was looking for a small kit compared to the typical, D-max, bn sports or blister kits. This Idea came from me always being fond of lowered cars with perfect fitment. Having a smaller kit would allow me to run the car lower without worrying about dragging the kit along the floor, yet giving the car a ‘fitment’ look to it. The origin kit is going to suit my original idea well as it is a mixture of smooth and aggressive in one with a super aggressive front along side a vented bonnet and rear cut out for a diffuser type look then smooth sides to finish the simple look.
-MMT
1 note
·
View note
Photo
22 April 2016
// Engine rebuild.
After taking the engine apart a while back in December i had the lower block and head sent off to a machine shop to be skimmed, bored and polished. This gets rid of any of the original head gasket and cleans the surface thoroughly and allows the blocks to meet true in order to seal the engine better. More over polishing the insides and surfaces allows water and oil to flow around the internals a lot smoother. The boring process ensures the blocks is perfectly aligned and hasn’t warped, been scratched or indented from any damage caused by internals. This allows the motion of the pistons to move efficiently with no restriction of movement from any imperfections.
With all parts in very good condition i did not have to replace anything, just wanted to update and freshen up parts that had probably never been changed since factory. This included new water pump, oil pump, timing chain, ARP head studs, tomei gaskets, acl race bearings, baffled sump, uprated rocker arm stoppers and stem valves.
-MMT
0 notes
Photo
20th January 2016
// Start of the new year.
Fabrication work all complete by Wand Wizard fabrications over the winter months. Start of the year means time to get on and build it.
-MMT
0 notes
Photo
30th October 2015
Strip down and part out.
Strip down: Started to strip down the front end and dismantle the engine bay. Even though I brought the car in very good condition with low mileage, I still wanted reassuring everything was as it should be, with no internal damage. A big downside to importing cars is you do not get to talk directly or see the car first hand before buying. Yet you’re going on limited information and a few pictures.
Part out: The thing about having a project is even if you’re unsure on what you want the final picture to look like and you’re making it up as you go along. One thing is for certain, there are generally a few parts that you know for definite you want. Selling parts to replace in order to balance cost.
-MMT
0 notes