#restrictiondigestion
Explore tagged Tumblr posts
Photo

Staying late to do a restriction digestion only to find out that the restriction enzymes did not cut the DNA because of high salt concentration . . . . . . . . . #restrixtionenzymes #dnadigestion #polymerasechainreaction #cloning #pcr #rnaprep #science #sciart #dna #restrictiondigest #restrictiondigestion #phdproblems #scientistproblems #molecularbiology #laboratory #science #scientist #phd #phdstudent #lablife #phdlife #viralphd #biology #phdstudentlife #viralphd
#rnaprep#restrictiondigestion#restrixtionenzymes#biology#sciart#lablife#phdstudent#phdstudentlife#scientistproblems#dnadigestion#polymerasechainreaction#viralphd#phdproblems#phdlife#cloning#science#pcr#restrictiondigest#molecularbiology#laboratory#dna#phd#scientist
0 notes
Text
restrictionDigest Lab
Introduction
The purpose of this lab is to cut lambda into fragments using restriction enzymes. A restriction enzyme is a protein that recognizes a specific nucleotide sequence and cuts the DNA at that specific site. In this lab, I will observe how certain restriction enzymes cut DNA in different manners. I will be using an electrophoresis machine to make the cuts of DNA visible to the human eye. A control group without a restriction enzyme added will be used as a baseline for this experiment.
Materials
· Uncut lambda DNA
· Pstl restriction digest
· EcoRl restriction digest
· HindlIl restriction digest
· Sample loading dye
· Micropipette
· Bed of ice
· Water
· Electrophoresis machine
· Agarose gel with a line of cavities

Procedure
1. Obtain micro test tubes that contain each enzyme stock solution, lambda DNA, and restriction buffer. Keep all the stock solutions on ice.
2. Obtain one of each colored micro test tubes and label them as follows: yellow tube: L (lambda DNA) violet tube: P (PstI lambda digest) green tube: E (EcoRI lambda digest) orange tube: H (HindIII lambda digest)
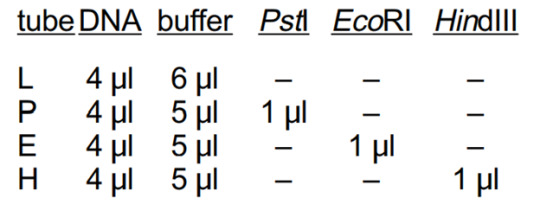
3. Using a fresh tip for each sample, pipet the reagents into each tube according to the table below:

4. Mix the components by gently flicking the tube with your finger and tapping gently on the table to collect liquid to the tube bottom. Pulse-spin the tubes in a centrifuge to collect all the liquid to the bottom, or tap them gently on the benchtop.
5. Place the samples in the ice tray.
6. Remove the digested DNA samples from the ice tray.
7. Add 2 µl of sample loading dye into each tube. Mix the contents by flicking the tube with your finger. Collect the sample at the bottom of the tube by tapping it gently on the table or by pulse-spinning in a centrifuge.
8. Fill the electrophoresis chamber on the agarose gel and cover the gel with 1x TAE buffer (about 275 ml of buffer).
9. Check that the wells of the agarose gels are near the black (–) electrode and the bottom edge of the gel is near the red (+) electrode.
10. Load 10 µl of each sample into separate wells in the gel chamber in the following order: Lane Sample 1 M, marker (clear tube) 2 L, uncut lambda DNA (yellow tube) 3 P, PstI lambda digest (violet tube) 4 E, EcoRI lambda digest (green tube) 5 H, HindIII lambda digest (orange tube) 8. Carefully place the lid on the electrophoresis chamber. Connect the electrical leads into the power supply, red to red and black to black.
11. Turn on the power and run the gel at 100 V for 30 minutes. Tap + – + –
12. When the electrophoresis run is complete, turn off the power and remove the top of the chamber. Carefully remove the gel and tray from the gel box. Slide the gel into the staining tray.
13. Add 120 ml of 1x Fast Blast DNA stain to the staining tray (2 gels per tray). Let the gels stain overnight, with gentle shaking for best results.
14. Pour off the water out.
15. Record results.

Results


Conclusion
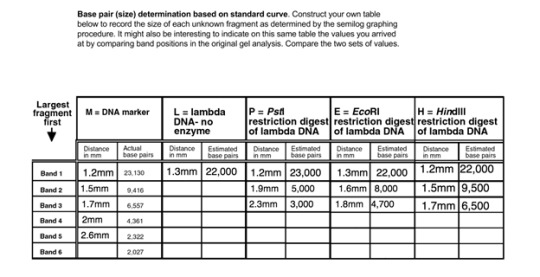
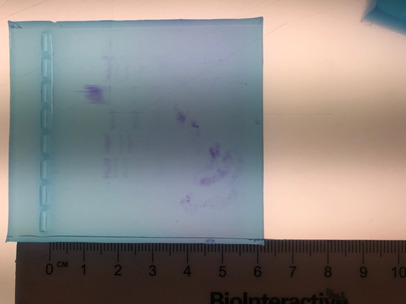
From this experiment, we were able to determine the base pairs that each restriction enzyme presented to us from the distance that each of the lambdas moved from the well with different restriction digests. As the distances of the DNA bands increase, the number of base pairs present in that specified fragment decreases. The results prove that as the strand of DNA gets longer, it travels through the gel slower, therefore it will be closer to the original starting point. All of the added restriction enzymes created similar amounts of base pairs, however, PstI created the most amount of base pairs at 23,000 base pairs. HindIII, EcoRI, and the lambda without enzymes were equal at 22000 base pairs.
0 notes
Text
Restriction Digestion Lab
Introduction:
DNA splicing lets people take working DNA fragments from chromosomes of certain organisms and combines them to the DNA from other organisms to help study how those genes work. In this lab, our group received some lambda DNA. And with the lambda DNA, we needed to cut this into several fragments using some restriction enzymes and separate and measure the size of the fragments using electrophoresis. Restriction enzymes almost act as the DNA’s defense system. Once viruses inject its DNA into bacteria, the bacteria use restriction enzymes to cut off and kill the invading DNA. This means that our group can use restriction enzymes in the experiment to create DNA fragments. In this lab, our group utilized three different types of enzymes: EcoRI, HindIII, and Pstl.
Procedure:
For Part 1, the first step was to obtain micro test tubes that contained the lambda DNA and the restriction buffer and keep these solutions on ice. Once that was done, our group obtained 4 micro test tubes and labeled them as L (lambda DNA), P (Pstl lambda digest), E (EcoRI lambda digest), and H (HindIII lambda digest). Using a fresh pipet for each reagent, we had to add 4 microliters of DNA and 6 microliters of the buffer into tube L, 4 microliters of DNA, 5 microliters of buffer, and 1 microliter of Pstl into tube P, 4 microliters of DNA, 5 microliters of buffer, and 1 microliter of EcoRI into tube E, and 4 microliters of DNA, 5 microliters of buffer, and 1 microliter of HindIII into tube H. We then had to mix the components by flicking the tube with our fingers and tapping gently on the table to collect any liquid to the tube bottom. After that, we placed the tubes in floating racks and incubated them for 30 minutes at 37 degrees Celsius. After incubation, our teacher, Mr. Wong, placed them in a refrigerator until our next class meeting.
For Part 2, Mr. Wong removed our samples from the refrigerator and then we added 2 microliters of sample loading dye into each of the tubes. Once we did that, we mixed the contents by flicking the tubes with our fingers. Afterwards, we obtained the DNA marker from Mr. Wong. We then filled the electrophoresis chamber and covered the agarose gel with TAE buffer. For the final steps, our group added 10 microliters of each sample into different wells in the gel chamber. We carefully placed the lid on the electrophoresis chamber and connected the electrical leads into the power supply (red to red and black to black). Finally, Mr. Wong turned on the power and ran the gel at 100V for 30 minutes.
Results:

Discussion/Conclusion:
This lab demonstrated that different restriction enzymes are able to cut apart DNA at different restriction sites, which result in DNA fragments of different base pair sizes. Restriction enzymes also vary in the number of DNA fragments, bands in this case, that they create since it usually depends on the number of times the palindromic sequence appears within the DNA. If our group were able to do this lab again, we would make sure we carefully inject the samples into the gel. At one point, we accidentally put too much into one well. I think that the second time around, our results would have been much better since we already know exactly what to do and how to do it.
(below is the pdf of all the questions)
file:///C:/Users/Vincent.Jimenez18/Desktop/restrictiondigest-stu.pdf
0 notes