#projectdcadoll
Explore tagged Tumblr posts
Text
Project DCA Doll update, #2!
Oh yeah Moon has a 3D face now!

And hands & feet(tho obvi not finished yet, i need to do a second pass on the hands to bulk them up slightly, Sun's hand is there for scale).


I'm finally on the clay stage despite my schedule consistently fighting me. Woo.
I also have aluminum foil this time around to help sculpt the bases of pieces so the pieces stay lightweight and avoid it being solid clay. Yaaaay.
#projectdcadoll#fnaf security breach#fnaf moon#dca fandom#fnaf daycare attendant#luka rambles#hi yes im aware of how little these updates will actually help someone make their own#im having to save up money for a camera#because this craft is the first consistant craft ive held in a while and the fact that im on my way to completing 2 tells me that-#-ill be more than happy to make more. Eclipse is probably next. i could take the SAMS route and make Lunar or Earth?#or maybe even jack-o-moon bc hes babey
25 notes
·
View notes
Text
✨️Moondrop progress update #1✨️

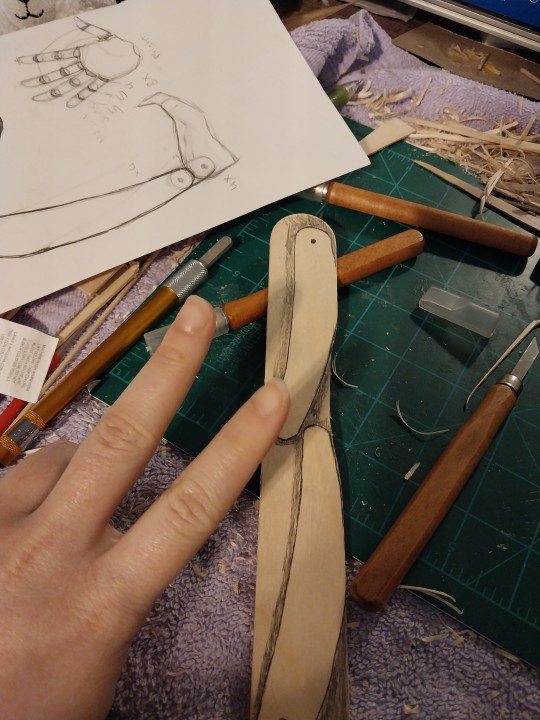
Picture 1 desc/info: knowing that I'd want to make Moondrop once I finished Sundrop, I made sure that(when I remembered to, as I'm learning that i wasn't quite as 100% consistent as I hoped I was) to make traced out references of each finished carved piece so that I wouldn't waste time struggling matching both of their proportions, considering nearly every piece required a duplicate piece to help achieve the eventual 'hollow skeleton' method that I use. Also, this is what I mean when I state that theyre carved from popsicle sticks. If it works, it works. lol

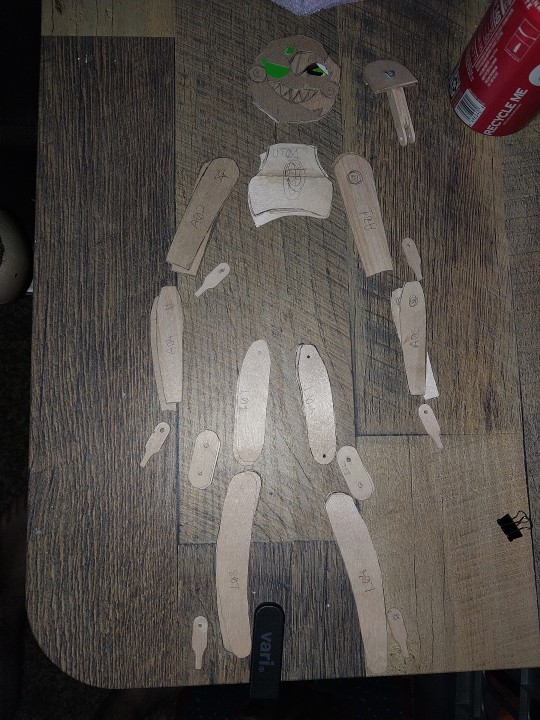
Picture 2 desc/info: here's the full lineup of every carved piece I have ready for Moondrop so far, and roughly how it will fit together. Every arm piece, leg piece, and even knee joint and the head piece have a duplicate(sans for the detail on the head's piece, obviously, though the headpiece is more complex than that as well). To further expand on why I did this, instead of just having one piece each, I need to point out the arm, hand, and ankle joint pieces. They will not be connected in two places, only one, to achieve full range of movement for the limb that they are attached to.
To achieve this, whilst still trying to keep this project's weight light, I'll create a hollowed skeleton. Essentially where the insides of the limbs(and body) are made hollow via smaller pieces of wood/popsickle stick scraps glued in-between the base pieces, but leaving enough empty space on either side to add two things. One side will have a rolled cylinder of a reinforced cardboard/paper mache combo, to provide a hollowed slot for the long joint piece side to slot into, and the other side, two hollowed holes to slot a dowel through with the joint piece inbetween. (If this doesn't make sense, dw, I plan on taking pictures when I get to that stage to show how I do it)
I also just end up stuffing the remaining 'dead-space' between the carved pieces with paper before i add clay, to further sheer off any unnecessary internal weight. Now, what you couldn't see with my Sundrop, is that by the time I finished adding clay and test stringing him together and started looking at reference photos again for color references, I hadn't realized up until that point that I'd entirely forgotten to add the dca standard wire-hook on his back. Not even superficially. So this will be where project Moondrop(whom at least uses the wire far more than sundrop, lol) will deviate from my original Sundrop design. I might use paper and cardboard to flesh out his limb shapes further before adding clay to make his body even lighter than suns, I've reinforced his torso pieces to account for the hole I'll carve into the back for my goal of a Functional wire-hook, I've made adjustments to his thigh shape for better ease of movement/posability(which might coincidentally make him just a smidgen shorter than Sun by design, shhh) because sundrops leg slots and the actual part of the leg that's supposed to slot in ended up quite a bit out of alignment due to the leg shape lacking a taper at the top to allow for a rounder end. Sundrop's legs are just a little janky bc of it.

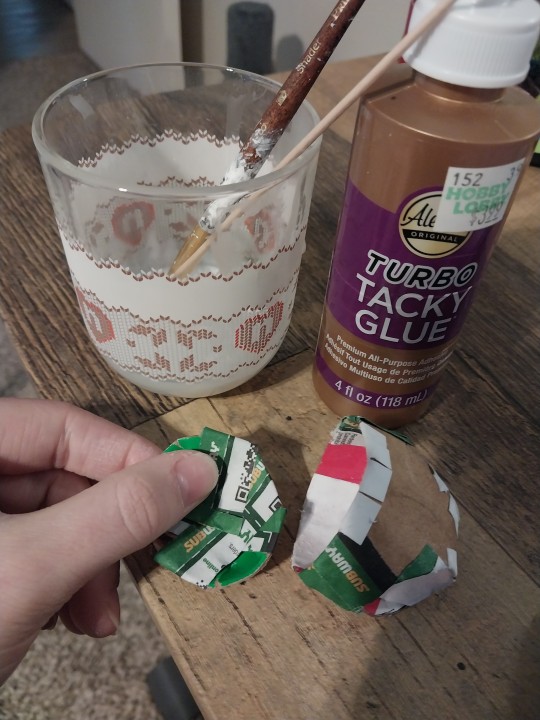
Picture 3 desc/info: this is a look at the inbetween stage that the hip piece goes through, and you'll find that it's not reinforced with wood anywhere simply because of the completely curved surface. There were attempts made with sundrop to do this but they proved to be way too hard to bother with and less than affective with just popsickle sticks. Hense I use cardboard from a soda can box(aka cardboard that's compact and can carry a heavy capacity if the design is balanced and re-attachment points are reinforced properly) and then have so far gone over certain points with paper and glue(using the papermache method) to base reinforce places and also provide more adhesable texture internally. Because, that round piece(also cardboard) is going to sit in the main juncture of the top of the hips. A hole will be cut into it to maintain the ability to string the limbs and body together, and it will be further reinforced further with paper and glue, and later covered in clay- along with the rest of the hips inside and out, thus entirely made smaller than intended to account for the eventual bulk up of the piece. This cover provides a supportive divot in the hips that the middle torso piece can sit in that will give it the range of movement intended but also aid it in allowing the body to sit up straight otherwise(something that was discovered to be needed when working on finetuning sundrop whilst test-stringing, adding yet more weight due to the fix having been made solidly out of clay. Probably provides more support to Sundrop this way, but Moon needs to be as light as possible to prevent stress cracks/damage/balance issues/ect. If I want him to be able to have a functional hook to be used to be displayed with.
On a less technical note, there isn't much to show in the skeleton stage for the middle torso piece bc it's just a hollow cylinder of cardboard, thin enough to escape the bulk, but wide enough to still be strung through. It's just a lil tube for Sundrops frame anyway lol. Though, tbf, I might bulk Moondrops middle with paper/cardboard/whatever I decide, for the, once again, lightweight intention. I use air dry clay but even still it do be solid af when dry and sealed lol
Off camera just inches out of shot of each picture is sundrop, whom has slowly become disrobed and carefully disassembled in places to give me size references for things, but also one of these updates I'll show you how I made his head/face/ ray settup- why? Because it broke. Cuz my dumbass should've used wire and not a wooden dowel to support it all. (Further more, I'm using it as an opportunity to eventually redo Suns rays, because when I did the first set, I went for accuracy in the ray count, but still wanted them to spin freely. But I realized I HATE the gap that's left anywhere if his rays arent perfectly positioned and honestly this mechanism breaking is my sign and chance to fix it now that the rays aren't locked in anymore lol.)
I've decided to give this progress update log the tag '#projectdcadoll' from now on, so any posts I make abt this in the future will have that tag!
And if anyone has any questions about any specifics of the project, I'll also answer them/respond to them under this tag, so please feel free to ask away! I'm excited to share this process with ya'll!
#projectdcadoll#dca fandom#fnaf security breach#dca fnaf#fnaf moon#no but fr when i realized i forgot Suns hook i just about flatlined in heartbreak. im still considering giving him an artificial looking-#-one to match moon but i wont be able to until moon's is done so i can actually make em match.#tbh sun is probably light enough for a real hook but not structurably stable enough where its needed to account for the stress of movement#my boggest challenge is gonna be finding a carabiner small enough for moons hook lol
26 notes
·
View notes