#photo organizer software for Windows
Explore tagged Tumblr posts
Visit Tumblr Blog
Explore Tumblr blogs with no restrictions, modern design and the best experience.
Last Seen Tumblr Blogs


Fun Fact
69% of Tumblr users are millennials.
Text
Stand-alone, 8 of 8 chapters posted; 20,000 words. Rating kick-up to E has happened as of second chapter. Dubai era, Armand-as-Rashid clusterfuck. Daniel reaches a conclusion without understanding its significance. Consequences = hilarious or awful, whichever comes first. It's done, hilarity and awfulness alike.
Comfortingly Unhinged (2024-10-16)
Unreliable Narrators (2024-10-16)
Companionship Business (2024-10-17)
Narrative Framework (2024-10-18)
Everything Dangerous (2024-10-20)
Redeeming Features (2024-10-21)
Course Corrections (2024-10-21)
Blank Cassettes (NEW, 2024-10-22)
TEASER:
None of the Divisadero shots are in this folder. The first ones show, unsurprisingly, Armand following Daniel around for weeks like a fucking creeper. He’s not doing anything except lurk at the edges of grainy black and white frames while Daniel and various interview subjects, and even sometimes people he’s chatting up for drugs, occupy center stage. But like an off-kilter filmstrip, Armand moves closer and closer until there’s one shot, about two months on from the clusterfuck, when Daniel and Armand are chatting over coffee in Caffè Trieste—and even through the dirty window glass, even though this Talamasca pervert is a shitty photographer, it’s plain as day. Armand is laughing.
Daniel closes the photo, pressing his knuckles into his forehead. He hasn’t thought about North Beach in so long, hasn’t thought about San Francisco in so long, and here he is wallowing in it. He clicks on the very next photo expecting to see himself and Armand having their first real tryst in the stacks City Lights Bookstore during an open mic or something equally, pathetically nerdy, but at first he doesn’t understand what he’s looking at. The shot is so dark that Daniel thinks the photographer must surely have gotten sacked after this one, except…hang on. He opens the laptop’s out of date image editing software, fucks with the contrast, and just like that his breath is gone.
The shot has been taken at considerable distance with a telescoping lens. The point of focus lies through a wide, shutterless window with a stone casement. There’s a point of light in the foreground, on the floor inside the room beyond the window; is the photographer at a higher vantage point? Don’t get distracted. Focus. Work outward from the point of light, the candle flame. Mosaic tiles on the floor. Look up; figures on the wall, ghostly. Don’t get distracted. Focus. The shot’s in black and white and there, there in the middle now—
#devil's minion#armand x daniel#armandaniel#devils minion#armand#daniel molloy#iwtv fanfiction#iwtv fanfic#iwtv fic#iwtv#iwtv s2#interview with the vampire
21 notes
·
View notes
Text

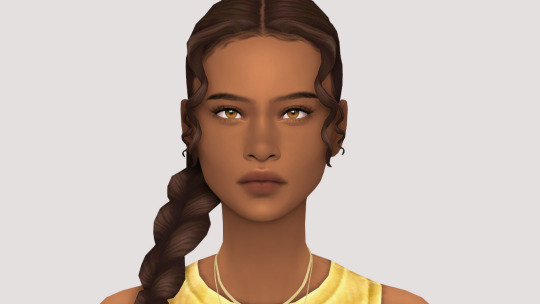
i didn't have a tutorial yet... so i made one lol. its longer than i wanted it to be, but i wanted to make sure it's easy to follow for people who've never made cc or have no experience with photo editing software, and fully explain my process. it's by no means hard at all though lol, i guarantee you making skin details is the easiest thing aside from recolors and if you want to learn this is a good place to start :-)
for people who are more experienced than that, and want to know specific things-- i've sectioned everything so it should be easy to skim through until you find what you need!
requirements.
this tutorial will only require sims 4 studio (free) and photoshop (not free) or gimp (free). i pirated photoshop 2022 myself. any version will do but i think 2022 just has nice new features for making content! if you don't want to buy or pirate, gimp is a similar alternative.

1.1 how to find skins to use as a base.
in case you don't have (a) skin(s) in mind to use for your skinblend, my tip is to download as much random ones as you can find. this way you have a lot to choose from and it's easier to get an idea of what you want.
go-to creators for maxis match skins: heihu, madmono, pyxiidis, faaeish, miikocc, emmibouquet and stretchskeleton.
creators for maxis mix/alpha skins: sims3melancholic, obscurus, ddarkstonee and pralinesims.
creators for maxis mix/alpha skins that only allow editing for private use: northernsiberiawinds, remussirrion and thisisthem.
go into cas and try them all out. if you like a part of a skin, write down which skin it is and what part(s) you want to use of it from which swatch if it has multiple.
for example, i almost always use one or two skins for just the nose shape, one for the eyebags, one to three for the lips and one for the basic shading of the face. don't be afraid to use the opposite style skins of what you're going for, you can always add or erase details.
1.2 exporting the skins.
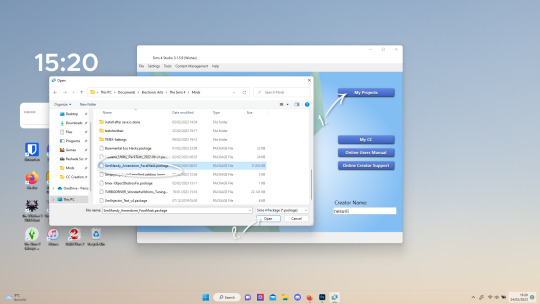
now we're gonna export the skins with sims 4 studio. click on "my projects" (1) and navigate to whereever you have the skins you want to use, and select one and click "open" (2).
the colored little boxes in the top right are the swatches. click whichever swatch you wanted to use something from (1), then click the "export" button (2). you'll get a window to save the exported skin now.
tip: i highly recommend making an organized folder for your skinblend, to have all your files together and easy to find. if you haven't made it already you can easily do so within this window. i put mine in a folder called "resources" in a folder named "unnamed skin" for example.
name the exported skin file (3) and make sure the "save as type" is set to .png (4).
after saving the file, you can just click "cancel" on the bottom right to go back to sims4studio's starting screen. if you have multiple skins you want to use, repeat the above process for all the other skins to export them too.
2.1 opening the exported files in photoshop/gimp.
open your program of choice and click on "file" from the top bar (1) and then "open..." and navigate to the skin files. you can left click and hold down your CTRL key to select multiple at once to open.
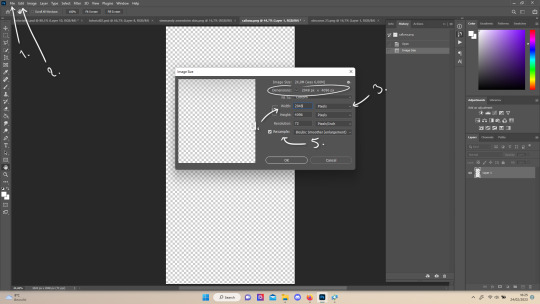
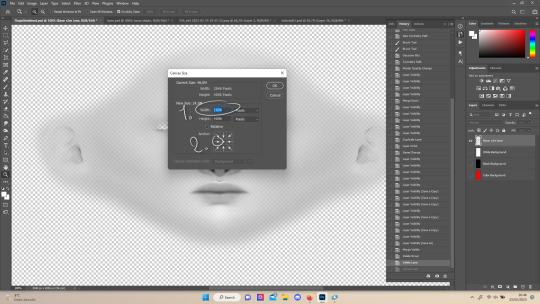
we have to layer them all in one file, but before we do that we have to check if they're all the same size.
note: some skindetails might be 2048x4096, others may be 1024x2048. unless you want your skin to be compatible with the HQ mod, you should just opt for 1024x2048, as without the mod both resolutions look identical. the bigger one will just make your fize unnecessarily large.
click "image" at the top bar (2), then "image size". it'll say the size at dimensions. if it's at the size you want it to be at, just exit the window. if you need to edit it, select "pixels" from the dropdown menu (3), and put in 1024 for width and 2048 for height OR 2048 for width and 4096 for height. if you're sizing up select "bicubic smoother (enlargement)" under resample (5).
repeat this for every skin you opened.
2.2 layering the skins together.

copy and paste all the skins individually onto one by selecting them with CTRL + A and CTRL + C on your keyboard, and pasting them into one of the other opened skins with CTRL + SHIFT + V. you can then close all the other tabs.
the file now has multiple layers. you can rename them by double clicking the layer name. this makes it easier to keep track of whats what. you can reorder them as well by dragging them with your mouse. put the skin you want to use as base (for the general facial shading, highlighting) at the bottom.
tip: i recommend making all white and all black background layers to see the skins better. you can do so by pressing D, then CTRL + SHIFT + N. for the white layer then press CTRL + BACKSPACE and for the black layer repeat the first two steps and then press ALT + BACKSPACE. now there should be two new layers in black and white. drag them to the bottom of the list. i prefer using white so i put black last.
2.3 changing the opacity in parts of the base skin layer.
to make ea's preset details (cheek/nose bridge sharpness, dimples) come through your skinblend, you need to change the opacity of the base skin sometimes. alpha skins tend to be fully opaque but maxis match skins are usually already transparant enough.
hide all the layers aside from this base layer by clicking the eye icon next to the layer names. you can see the transparancy with the visibility of the grey-white blocks or if you find it easier you can also unhide the black background to see it instead.
to change the opacity, you can either edit the entire layer's opacity (1) or use the eraser tool (E key) to add transparancy at specific parts.
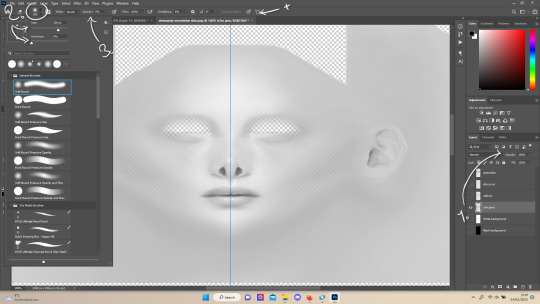
if you have photoshop 2022, turn on vertical symmetry (+). if you don't have it, you can choose to edit only one side of the skin and mirror it later or do both sides and embrace some asymmetry.
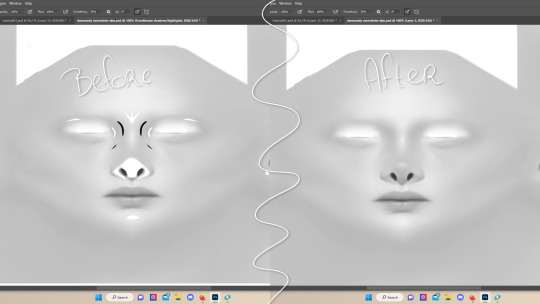
i selected the eraser (2) and set the brush size to about 200px and 0% hardness. the opacity of the brush i set to about 10% (3). i used the eraser on the lower cheeks, the nose bridge and tip and the bottom of the chin. i also erase the upper eyelid 100%, cause i prefer to have eyelid freedom :p. it then looks like the above! this will very subtly let through details, if you want more you should make it more transparant.
2.4 optionally: editing out freckles, pores and/or eyelashes.
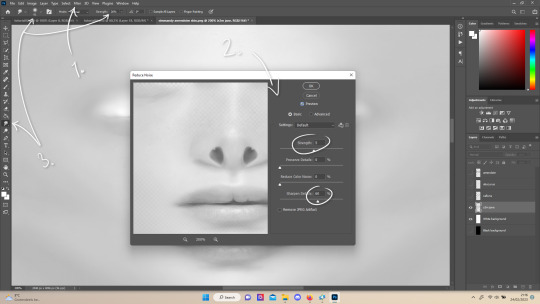
your base may have pores, freckles or moles you want to get rid of. to smoothen everything at once, click "filter" at the top bar (1), "noise" and then "reduce noise". i only edit the strength and sharpen details setting (2), this setting erased the pores and most of the freckles for me while keeping the details looking sharp, but you likely have to adjust it a little cause it depends on how large/fine the details are.
the remaining freckles, pores and eyelashes i remove by using the smudge tool, with 0% brush hardness and at 25% strength. (3) brush size depends on the size of the details. i just go over it in circular motions until the freckle or whatever it is has been blended away without pixelation.

for this part i'm going to only show how i do the nose as an example, however it works the same for editing in eyebags, lips, jaw lines or whatever you want to add in too.

unhide the layer of the skin you want to use a part of, and hide the base layer. if you are going to use multiple parts of that skin (for example, you want both the nose and the lips of that skin), duplicate the layer by right clicking the layer name and choosing "duplicate layer...". then hide the duplicated layer. it's easier to edit one part at a time.
use the selection tool (M) to select the part. press CTRL + SHIFT + I and then DELETE. press CTRL + D to unselect. should look something like the above.
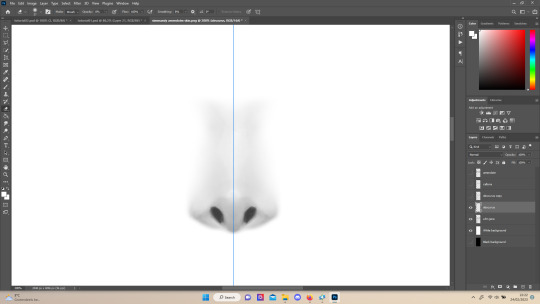
use the eraser tool (E) at a moderately small size like 30px~ with about 30% hardness and 100% opacity to erase around "hard lines", like the nostrils in this case and the bottom of the nose. the nose bridge has "soft lines", so if you were to use a hard brush for that, the shading of the nose bridge would look far too harsh and unblended. for the soft lines, set the eraser tool at a bigger size like 100px~ with 0% hardness and a lowered opacity between 15-45%. erase soft lines "gradually", so the shadows blend in with the layers underneath it. should look something like the picture above.
always look at the newly added part with both a black and white background to see if there's anything you need to erase more. then look if it blends in properly with the layers underneath. if it's too dark or light, you can click on "image" on the top bar, then "adjustments" and "brightness/contrast", and lower or raise the brightness until it blends in better.
i'm using two separate skins to make the nose, so i've repeated the process above for the second nose skin, then used the method of step 2.3 to erase certain parts and make other parts more transparant / blended in. as you can see above, it's now the perfect offspring between the two noses i used.
note: for a maxis match nose, you'll want to avoid a completely opaque nose, mainly at the nose bridge it should be more transparant. i always make sure the lips and eyebags are fully opaque though, unless you're going for a vanilla type of skin it doesn't look good transparant.

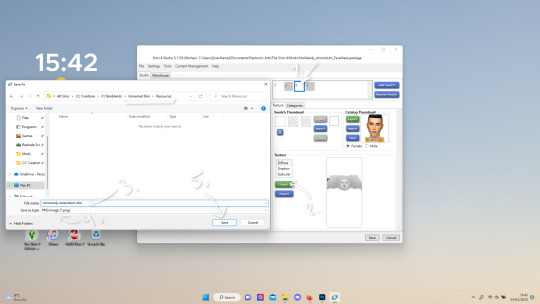
at this point, i like to save the file with the white background layer on and see what it looks like in sims 4 studio. this gives you a better idea of what it looks like on sims and what you may want to change or add. press CTRL + SHIFT + S and name your file, and set the file type to .png.
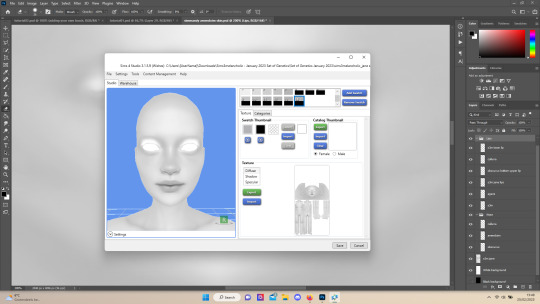
open any skin or skin detail cc file just like in step 1.2, and instead of exporting anything, click "import". now navigate to the file you just saved, and open it. the sim model now displays what your skin looks like. should look something like the above! you can click cancel after you've looked enough, so you don't have to worry about ruining the original cc file.

maybe you're happy with the skins current state... but in case you want to add or change some things, here's a step by step how i do it.
5.1 drawing shadows & highlights.
as you probably have noticed, everything needs to be done in greyscale, so select black (for shadows) or white (for highlights) in the top right colored box. make a new layer (CTRL + SHIFT + N). select the brush tool (B) and set the brush at about 0px with 100% opacity. draw the shape of the shadow or highlight where you want it. make sure to make a new layer for every shadow and highlight!
now you can either use the smudge tool to blend it out, but i prefer using "filter" from the top bar, "blur" > "gaussian blur". i just play around with the radius until it's blended out but still has some shape to it. it depends on how small or wide and blended you want it to be.
then i use the eraser to shape the shadow/highlight further. for example, i want the shadow in this case more blended out towards the eye, but harder towards the forehead and nose, so i use the eraser on that side. lastly i change the layer opacity to make the shadow/highlight less dark/light. my preference lays with subtle details, but of course you can make it as contrasted as you like!
5.2 drawing small details.
to draw your own details, use the brush in 1-3px brush size, 100% opacity in black. i can't help you here cause it's just drawing where you want and then blending it out with the smudging or blurring tool where needed, and using the eraser at lower opacity to blend it in.
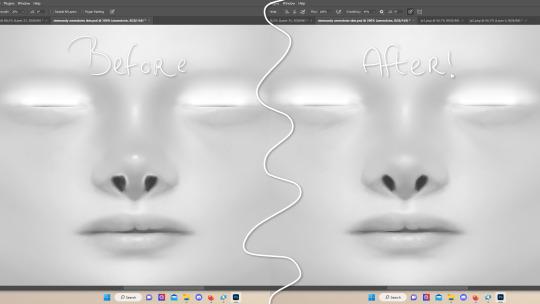
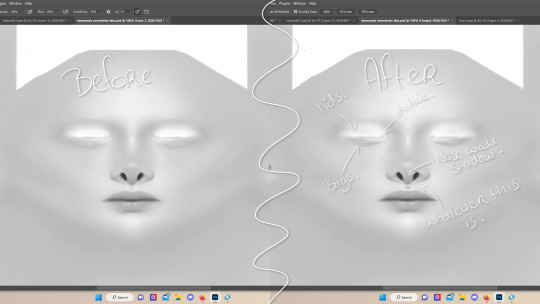
to give you some ideas, i usually draw some details on the nose like sharper nostrils or a nose wall, some texture on the lips and the eyebags. i like using reference pictures of real peoples skins to see where and how to draw things. before and after pictured above! (i'm so proud of these eyebags yall T-T)
5.3 adding other creators cc skin details.
if you don't like drawing things yourself or know just the right cc skin detail your skin needs, you can also use other creators' skin details on yours.
maxis match + mix details: pyxidis about face, miikocc face kits, okruee face details, sammi-xox face details, lamingtonsims face details.
maxis mix + alpha details: detail overlays by obscurus-sims, ddarkstonee & sims3melancholic
like in step 1.2, just open the file in s4s and export whatever swatches you want to use. remember to make sure the resolution of the file is the same as your skin's before copy and pasting it on your skinblend! and remember you can lower the opacity layer for these too.
5.4 mirroring your skin.
if your skin isn't mirrored/symmetrical yet, save your file as a .psd and then right click the layers, click "merge visible", press CTRL + ALT + C, and set the canvas width to half what it is now (either 1024 or 512). (1) click the arrow in the left middle if you want to mirror the left side, or the arrow on the right middle for the right side. (2) press "ok".
press CTRL + A, then CTRL + X, then CTRL + SHIFT + V. delete the layer beneath the active one (it's empty). then press CTRL + ALT + C again, and put the canvas width back to the original (2048 or 1024). select the same arrow you selected before, and click "ok".
press CTRL + A again, then CTRL + C. now click "image" from the top bar, "image rotation" and then "flip canvas horizontal". now press CTRL + SHIFT + V .... and voila, your skin should now be mirrored.
note: ik there's a ridiculous amount of steps for such a simple thing so i feel like there's probably a much faster way to do this, but i hate following tutorials and guides (the irony) so this is just the way i taught myself lmao
5.5 last test & optional last touches.
at this point, i'm done with the skin. i erase everything aside from the face if the skin still has a full body texture cause i prefer face-only skinoverlays. i always save as .psd and .png, .psd is to edit it later on if need be. once again import your skin into s4s like in step 4, and see if you're happy with the skin. if not, just keep editing whatever you need!
i also like to add alternate versions of the skin lastly here. some examples: a soft nose or hard nose bridge (justice for flat soft noses, simblr loves to erase them lol), different eyebags, lighter or darker lip option, version with eyelid overlay or without.

6.1 creating the package file.

to make the package file for your skinblend, open s4s and select "create cas standalone" and then click "cas". (2) now select "skin detail forehead" from part type (3), click the most left forehead wrinkle and click "next" (4). name the skin file whatever you want, you can always change it later!
click "import" and open your skin file. and voila! you're pretty much done!
6.2 editing the age, gender & occult flags and category.
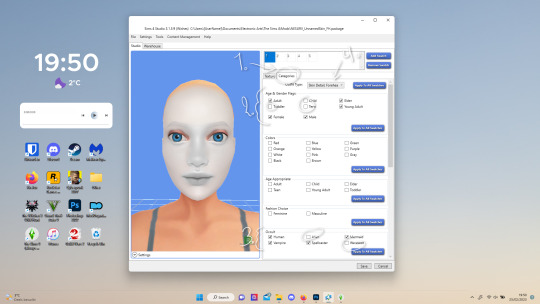
right now your skinblend is only available for young adult to elder sims, and not for aliens and werewolves, so you probably want to change this. go to "categories" (1) and check the boxes you want under "age & gender flags" and "occult" (2). you don't need to change any of the other things.
if you wish to change the skin detail slot it's in, you can change it at "outfit type". most people use either forehead or mouth crease, but you can use any of the ones that start with 'skindetail'.
6.3 adding swatch colors, thumbnails or additional swatches.
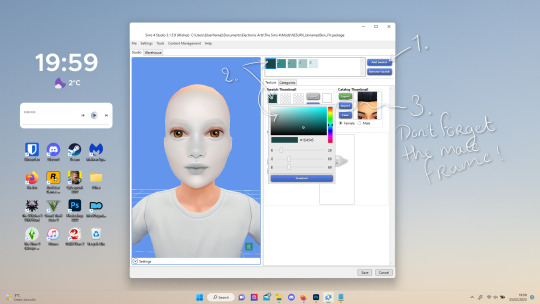
if you want, you can add multiple swatches (1). you can also edit the color of the swatches (2) and upload a custom thumbail with 104x148px resolution (3), make sure to upload for both male and female frames.
6.4 editing the sorting layer.
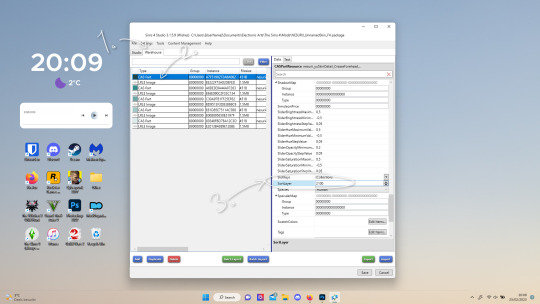
it's not the end of the world if you don't do this, but you may run into some skin details or freckles/moles that won't display on top of your skinblend if you don't edit it :).
click on the "warehouse" tab (1), select the first "cas part" (2). scroll down on the right to find "sort layer" (3) and put in 2100. you're gonna want to change this for each cas part individually.
now just save your file... and try it out in game!
if you need any help or have any questions please comment below <3 feel free to tag me in the end result if you want too.
(my end result)
293 notes
·
View notes
Text
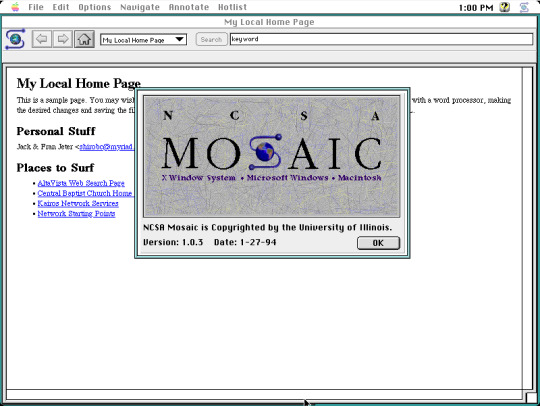

I stumbled upon some long forgotten disk images stored on my computer, the actual disk images themselves date back from around 2008 when I was only a teenager. One of the disk images contains an installation of Macintosh System Software 7 which first debuted in 1991, but the version I have installed is 7.6.1, released in 1997. Here are just a few applications I have installed. Screenshots taken on Basilisk II, a Classic Mac emulator available on Windows, Mac, and Linux.
Hopefully these photos are in order.
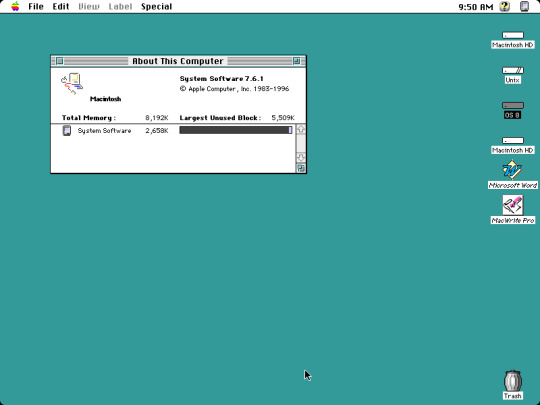
First screenshot at the top left is just a blank desktop with no running applications, except a window that says "About this Macintosh" which shows you how much memory individual applications are currently using. It even tells you how much memory the operating system is using, which is just a little over 2.5 MB. I decided to allocate 8 MB of RAM for the emulator but you can allocate more if needed.
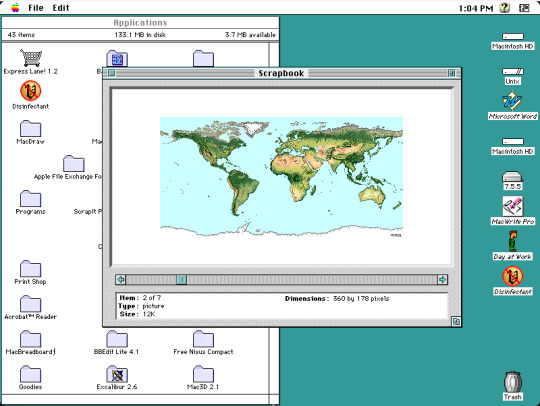
Second screenshot located in the top center is from an application called Scrapbook, showcasing a graphic of the world's continents. A simple application to keep some of your favorite images or sound clips in. However, there was no true organization in Scrapbook so in order to find media in this program, you had to click the back and next buttons to view and find content, you couldn't categorize your media. Not all media and sound formats were supported, for instance dragging a JPEG wouldn't do anything. In the background is a Finder window showing various folder and application icons.
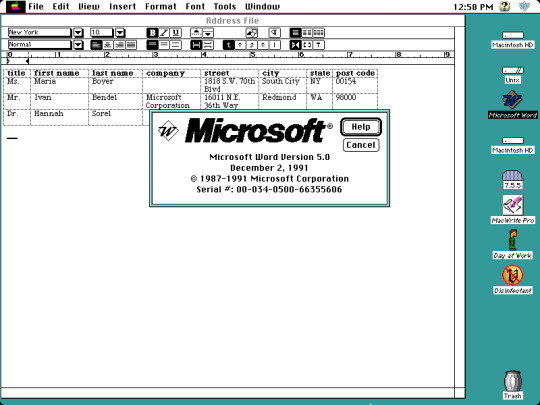
Third screenshot at the top right is Microsoft Word 5.0. No bloat, no nagging about subscribing to Microsoft 365, just productivity. This version dates back to 1991, making this version of Word older than I am!
Center-most screenshot is from one of the earliest web browsers available in the early 90s called NCSA Mosaic, showing a sample website that came bundled with the browser. Although it was not the first browser in existence at the time, Mosaic was instrumental in popularizing the internet to the masses. This version dates back to 1994, I was only two years old at the time and was unaware of the impact the internet would have in the world over the years. The browser eventually lost marketshare to Netscape, and Mosaic was discontinued in 1997.
Bottom photo is a screenshot from a simple dirt bike game called... Dirt Bike. Looks like this was developed by an independent developer. What else is there to say about it? You ride a dirt bike around and you can even create custom paths if you want to make the game even more exciting.
If this post gets decent traction, I'll get around to posting more screencaps of what I have in this disk image, even some of the schoolwork I did in it!
#macintosh#System 7#1990s#1990s aesthetic#90s aesthetic#90s nostalgia#old computers#technology#computing#vintage#vintage electronics#retro aesthetic#retro computing#vintage computing#apple#apple computers#abandonware#vaporwave#software#old software#vintage mac#BasiliskII#classic mac#microsoft word#old web#old internet#nostalgiacore#old games#old programs
23 notes
·
View notes
Text
(Tumblr Post from July 15, 2024)
Affinity suite is 50% off in sale until August 15, 2024 and has extended free trial to be 6 months (previously 1 month).
Free trial includes Affinity Designer 2, Affinity Photo 2, and Affinity Publisher 2.
The "all software license" bundle (including iPad versions) can be purchased for $82.99usd on sale.
During the sale the PC/Mac apps individually cost $34.99, and iPad apps individually cost $9.29 (Affinity Pricing Page)
Each main version of Affinity software is so far just a 1-time purchase. Affinity suite is a competitor of Adobe suite, and was acquired by Canva.
Compatible with MacOS, Windows, and IpadOS. (Though some have Affinity apps working Unofficially on GNU/Linux using "Wine" and "Bottles").
For context:
The sale and extended free trial for Affinity 2 Suite is happening at same time of Adobe's recent controversies. So this is likely taking advantage of the influx of former Adobe Suite users quitting Adobe products.
Adobe controversies include: (1) exorbitant hidden subscription cancellation fees, and difficulty in cancelling. (2) previous Terms of Service scrutinized for implying Adobe planned to collect and sell Adobe cloud suite users’ files and user data; as well as use their users' content (including NDA content) for image generation training with no opt-out option, creating further legal scrutiny.
The U.S. government and different organizations are suing Adobe for anti-consumer practices.
4 notes
·
View notes
Text
For my American Friends
I feel now is a good time to spread this news. Much like how the internet came together to help share information with the Ukrainians for resisting Russia, I’m here delivering help of a similar nature to those that could be impacted by this latest election in the US. There are ways to communicate relatively securely, outside of Big Brother's social media. I bring this up so that we can minimize the amount of gatherable information that could be used to hurt you, or others you know, in the coming years as changes are made. I'm not going to tell you how or why to use them, I'm just going to provide you with the information.
WhatsApp – While not my personal favorite, since Facebook/Meta is the parent company, WhatsApp is free, globally popular, and widely-used, featuring the ability to lock chats with passwords, disappearing messages, photos and videos that are deleted after being opened, profile photo privacy, the ability to lock the app itself so that only your biometrics can unlock it, encrypted backups, the ability to set custom permissions for who can see you online or when you last used the app, and of course End-to-End Encryption for all conversations EXCEPT those with business accounts. WhatsApp is a good option for those who are not really technically savvy, but still value privacy – if one trusts Facebook/Meta to adequately protect their privacy. It does require a phone number to sign up, however.
Signal - Signal is an end-to-end encrypted messaging software. meaning that the contents of your conversation is secure. The protocol they use (which they created) is seen as the best known protocol for asynchronous messaging by cybersecurity researchers. It's so good that it has been implemented in WhatsApp and in Messenger's secret chats. This app has even been mentioned in the Right-wing author Jack Carr's Political Thriller about a Navy SEAL named James Reece, as being a preferred method of secure communication on the civilian side for operators. (Jack Carr is a former US Navy SEAL.) It's run by a Non-Profit organization called Signal Foundation, and it's mission is to "protect free expression and enable secure global communication through open source privacy technology." It allows secure messaging, voice calls, and video calls. The only downside is that app links to your phone number, so while your conversations and content are secure, who you are talking to is not. Signal is available on Windows, Mac, Andriod, Linus, and iOS.
Session - Session is an end-to-end encrypted messenger that minimises sensitive metadata, designed and built for people who want absolute privacy and freedom from any form of surveillance. Session is an open-source, public-key-based secure messaging application which uses a set of decentralized storage servers and an onion routing protocol to send end-to-end encrypted messages with minimal exposure of user metadata. This means no phone numbers, no metadata for digital footprints, and censorship resistance. It features group chats, the ability to send documents, files, and images securely, and has added voice messages, though these can be spotty. It’s slow, but effective, and be downloaded on Android, F-Droid, iPhone, Mac, Windows, and Linux.
Briar - If you have an Android phone, Briar is another option you have. It features a decentralized network (it’s peer-to-peer encrypted, rather than relying on a central server), meaning messages are synced directly between user devices. It also means that even if the internet is down, it can sync via Bluetooth, Wi-Fi, or even memory cards, meaning information can continue to flow even during a crisis. In the event the internet is functioning, it can sync via the Tor network, protecting users and their relationships from surveillance. Other features: - Screenshots and screen recording are disabled by default - Each user’s contact list is encrypted and stored on her own device. - Briar’s end-to-end encryption prevents keyword filtering, and because of its decentralized design there are no servers to block. - Every user who subscribes to a forum keeps a copy of its content, so there’s no single point where a post can be deleted. - Briar’s forums have no central server to attack, and every subscriber has access to the content even if they’re offline. - Doesn’t require any user data like name and phone number. The downside is that it is text-only and limited to Android Devices, but they do offer Briar Mailbox to deliver messages securely to those who are online at different times. Briar’s goal is “to enable people in any country to create safe spaces where they can debate any topic, plan events, and organize social movements”
Protonmail - A free end-to-end encrypted AND zero-access encryption email service based out of Switzerland, you can safely email with peace of mind that your content is secure. Unlike Google, Outlook, Yahoo, and others, Proton's zero-access encryption means they can't even view the contents of your emails or attachments. As a Swiss-owned company they are not allowed to share information with foreign law enforcement under criminal penalty and they are politically neutral, meaning they won't be pressured by foreign governments. Furthermore, Switzerland has a constitutional right to privacy and strict data protection laws. Unlike companies in other countries, Proton cannot be compelled by foreign or Swiss authorities to engage in bulk surveillance.
Additional Information, from Proton’s Website: Switzerland has strong legal protections for individual rights, and in fact the Swiss Federal Constitution(new window) explicitly establishes a constitutional right to privacy. (In the US, this right is merely implied.) Specifically, Article 13 safeguards privacy in personal or family life and within one’s home, and the Swiss Civil Code(new window) translates this right into statutory law in Article 28.
In the US and EU, authorities can issue gag orders to prevent an individual from knowing they are being investigated or under surveillance. While this type of order also exists in Switzerland, the prosecutors have an obligation to notify the target of surveillance, and the target has an opportunity to appeal in court. In Switzerland, there are no such things as national security letters(new window), and all surveillance requests must go through the courts. Warrantless surveillance, like that practiced in the US where the FBI conducts 3.4 million searches per year(new window) with little oversight, is illegal and not permitted in Switzerland.
Switzerland also benefits from a unique legal provision with Article 271 of the Swiss Criminal Code(new window), which forbids any Swiss company from assisting foreign law enforcement, under threat of criminal penalty. While Switzerland is party to certain international legal assistance agreements, all requests under such agreements must hold up under Swiss law, which has much stricter privacy provisions. All foreign requests are assessed by the Swiss government, which generally does not assist requests from countries with poor rule of law or lack an independent judiciary.
Swiss law has several more unique points. First, it preserves end-to-end encryption, and unlike in the US, UK, or EU, there is no legislation that has been introduced or considered to limit the right to encryption. Second, Swiss law protects no-logs VPN(new window) meaning that Proton VPN does not have logging obligations. While numerous VPNs claim no-logs, these claims generally do not stand up legally because in most jurisdictions, governments can request that the VPN in question starts logging. So the VPN is only no-logs until the government asks. However, in Switzerland, the law does not allow the government to compel Proton VPN to start logging.
We’ve also fought to ensure that Switzerland remains a legal jurisdiction that respects and protects privacy.
Nearly every country in the world has laws governing lawful interception of electronic communications for law enforcement purposes. In Switzerland, these regulations are set out in the Swiss Federal Act on the Surveillance of Post and Telecommunications (SPTA), which was last revised on March 18, 2018. In May 2020, we challenged a decision of the Swiss government over what we believed was an improper attempt to use telecommunications laws to undermine privacy.
In October 2021, The Swiss Federal Administrative Court ultimately agreed with us and ruled that email companies cannot be considered telecommunication providers. This means Proton isn’t required to follow any of the SPTA’s mandatory data retention rules, nor are we bound by a full obligation to identify Proton Mail users. Moreover, as a Swiss company, Proton Mail cannot be compelled to engage in bulk surveillance on behalf of US or Swiss intelligence agencies. (Links can be found at: proton.me/blog/switzerland)
#american politics#kamala harris#transgender#lgbtqia#lgbtq community#antifascist#anti trump#freedom#information#resistance
6 notes
·
View notes
Text
Demystifying Digital Images and Video: Formats, Tools, Copyright, and More.
Introduction
In today's digital age, images and videos have become an integral part of our daily lives. From personal photographs shared on social media to professional content uploaded on platforms like YouTube and Twitch, understanding the intricacies of image and video file formats, codecs, and manipulation tools is essential. This blog post aims to provide a comprehensive overview of these digital elements, focusing on the definitions of common file types, export settings for popular broadcasting platforms, image manipulation tools, and the critical aspects of image copyright.
Definitions of Commonly Used Image and Web Video Formats, Wrappers, and Codecs
Image Formats:
JPEG (Joint Photographic Experts Group): JPEG is the most widely used image format for photographs and digital images. It uses lossy compression, which reduces file size while maintaining reasonable image quality.
PNG (Portable Network Graphics): PNG is preferred for images with transparent backgrounds or crisp, high-quality graphics. Unlike JPEG, it uses lossless compression.
GIF (Graphics Interchange Format): GIFs are a popular choice for short, looping animations and simple graphics. They use lossless compression and support transparency.
TIFF (Tagged Image File Format): TIFF is a versatile format commonly used in professional photography and graphic design. It supports lossless compression and maintains high image quality.
BMP (Bitmap): BMP is a Windows-native format known for its lack of compression. It results in large file sizes but retains image quality.
Video Formats and Codecs:
MP4 (MPEG-4): MP4 is a widely supported video format that uses the H.264 codec. It offers a balance between quality and file size, making it ideal for streaming and sharing on the web.
AVI (Audio Video Interleave): AVI is an older format that supports various codecs. It is not as efficient as MP4 in terms of compression and is used less frequently nowadays.
MOV (QuickTime Movie): MOV is a format developed by Apple and is popular among Mac users. It can use various codecs, such as H.264 and ProRes, for high-quality video.
MKV (Matroska): MKV is an open-source container format that can contain videos with a variety of codecs, making it highly customizable.
Export Settings for Popular Broadcast Platforms
When it comes to sharing images and videos on popular broadcasting platforms like YouTube, Twitch, and Facebook, selecting the right export settings is crucial for optimal quality and compatibility.
YouTube: For video content on YouTube, the recommended format is MP4 with H.264 video codec and AAC audio codec. The ideal resolution is 1080p (1920x1080) or 4K (3840x2160) for higher quality. These settings balance quality and compatibility across devices.
Twitch: Twitch also prefers the MP4 format with H.264 video and AAC audio codecs. A resolution of 720p (1280x720) or 1080p is recommended, depending on the viewer's internet speed and quality preferences.
Facebook: Facebook accepts a wide range of video formats, including MP4 and MOV. However, MP4 with H.264 video and AAC audio codecs is a reliable choice. The resolution should be adapted to the target audience and device capabilities.
Commonly Used Image Manipulation Tools and Techniques
Image manipulation tools are essential for enhancing and editing images. Here are some commonly used tools and techniques, along with their purposes:
Adobe Photoshop: Photoshop is a versatile image editing software that can be used for tasks like retouching, color correction, and compositing.
Adobe Lightroom: Lightroom is perfect for photo organization and enhancement, with features like exposure adjustment, color grading, and batch processing.
GIMP (GNU Image Manipulation Program): GIMP is a free alternative to Photoshop, offering similar features for image editing and manipulation.
Canva: Canva is a user-friendly online tool for creating graphics and social media content. It simplifies design tasks for non-designers.
Cropping and Resizing: These techniques are fundamental for adjusting image dimensions and removing unwanted parts of an image.
Image Copyright Essentials
Artists and content creators must be aware of copyright laws to protect their intellectual property. Key copyright essentials include:
Ownership: Creators automatically own the copyright to their work upon creation, but registration provides additional legal protection.
Fair Use: Fair use allows limited use of copyrighted material without permission for purposes like criticism, commentary, news reporting, and education.
Licensing: Creators can license their work under specific terms, such as Creative Commons licenses, allowing others to use their work while respecting their rights.
Public Domain: Works in the public domain are not protected by copyright and can be used freely.
DMCA Takedowns: The Digital Millennium Copyright Act (DMCA) enables copyright owners to request the removal of infringing content from online platforms.
Attribution: When using copyrighted material, proper attribution is often required to credit the creator.
Conclusion
Understanding digital image and video formats, codecs, export settings, image manipulation tools, and copyright essentials is essential for content creators, whether amateur or professional. By adhering to best practices and legal guidelines, creators can ensure their work is of high quality, reaches the right audience, and is protected from unauthorized use. Whether you're a budding photographer, a vlogger, or a graphic designer, the knowledge presented in this blog post can serve as a valuable resource to navigate the digital content landscape successfully.
References
Reference list
Arts Law Centre of Australia 2010, Copyright - Arts Law Centre of Australia, Arts Law Centre of Australia.
Attorney-General's Department 2022, Copyright basics, Attorney-General’s Department.
Image Manipulation: The What, How, and Why 2021, Clipping Path Campus.
Image Processing: Techniques, Types, & Applications [2022] n.d., www.v7labs.com.
Video File Formats, Codecs, and Containers Explained | TechSmith 2018, Welcome to the TechSmith Blog.
By: Juan Gutierrez.
4 notes
·
View notes
Text
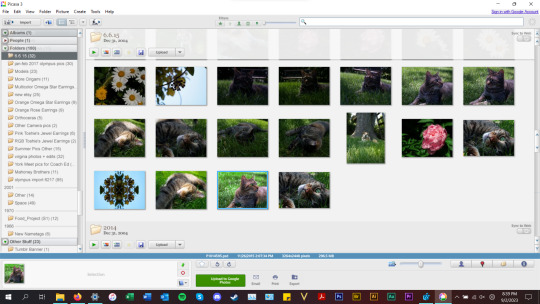
Ok so for all my windows using friends. We all know that new windows photos is dreadful and extra slow and bloaty on slower computers. There is a better solution for photo viewing on your PC, and as an added bonus this comes with a photo managing app that does many of the same things as adobe bridge. Oh and it's free.
What is this stunning software you ask?
Great question! Back in 2002, Google created a nifty piece of software known as Picasa Photos. They eventually killed this software in 2016 to focus on the infinitely more spying Google Photos (I'm not kidding about Google photos having privacy issues. They literally got sued over this in my home state of IL for violating our biometric privacy laws. I got paid $500 from Google for this btw). Moving on, Picasa slapped and that's why they killed it. Fortunately I am not the only Picasa Photo Viewer 3 enthusiast on the internet and there are others who saved the installation exe files. That said, I have helpfully found one that works which you can now download from my google drive here. Note that you cannot use the Google Photos/Google Account related options in the software anymore as Google has discontinued support for it.
Picasa has it all for the person who needs a good photo organizer:
finds ALL photos in your documents, downloads, and pictures folders for you.
ability to open and edit camera raw files
ability to add tags to photos, sort into folders, locate in the system etc.
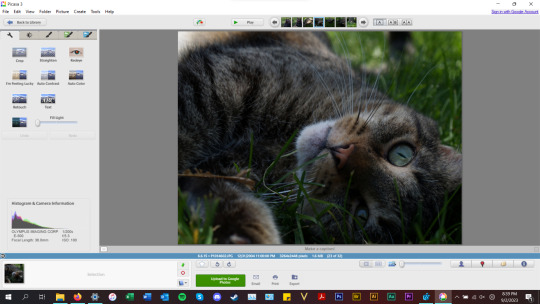
basic photo editing tools with a good histogram. one of the best editing tools they have, which I would argue is almost on par with a tool from the adobe camera raw editor is the "neutral color picker" tool, where you can select an area in the picture to set a custom white balance in the image (easiest, best color correction). Also contains a primitive healing brush tool.
very good at red eye removal. I used that feature a lot back in 2005.
good printing options (easy to print multiple copies of the same photo on the same page in a variety of standard sizes.
ability to create a photo collage with multiple photos or a photo slideshow video
sort by person tool
lots of fun filters to apply to images if that's your thing.
add custom geotags to photos using another dated google product, google earth.
create a gift cd of photos or create poster sized versions of your photos that print over multiple sheets somewhat like the rastrabator.
the image viewer part is slick, lightweight and fast unlike windows photos. It allows you to quickly arrow key through your photos in a very nice way.
Allow me to show you some screenshots of this glorious piece of abandonware.


anyways, tldr; this piece of abandonware is the best, most glorious free photo viewer for windows, and as a person who's been using it for the last 18 years I highly recommend it to everyone who does not have adobe PS & Bridge and also anyone with windows who wants a quick way to preview photos in their folders.
2 notes
·
View notes
Text
Radmin password-cracking-vulnerability warning-the black bar safety net
⭐ ⏩⏩⏩️ DOWNLOAD LINK 🔥🔥🔥 Radmin Crack full version of the world's most popular and trusted PC remote Radmin License Keygen is a powerful, photo library images. Radmin Crack is the best tool that is for the remote access tool for the mac and windows. While this tool can get the delivered and communicate. Radmin Crack It is software that has unique features for those who work remotely or want to build a remote support system for their employees. Radmin Crack is the best remote PC accessing tool with the functionality to delivers the fast communication among many computers. Radmin Crack is software that offers exceptional features for those who work remotely or need to configure a remote support system within their organization. Radmin Crack is software that provides remote access to remote workers or those who want to build an organization's remote support system for. RADMIN Crack is a photograph of library pictures. This application is a world trending secure controller tool that empowers you to take a shot. Radmin Crack is an application that brings excellent features for people who work remotely or wish to prepare a remote service system. Radmin Crack is software that provides advanced capabilities for those who work remotely or for their employees who need to establish a standard of. Using warez version, crack, warez passwords, patches, serial numbers, registration codes, key generator, pirate key, keymaker or keygen for Radmin Using warez version, crack, warez passwords, patches, serial numbers, registration codes, key generator, pirate key, keymaker or keygen for Radmin Radmin Crack is a short and protected application utility. It is a faraway attain software program, which permits you to paint on a faraway. How to Apply Radmin Crack? · Follow the download to get full setup. You may have to skip a few ads. · Extract the downloaded file and turn off the. Radmin Latest Version Free Download Radmin Crack is the remote control technology PC / laptop access Powerful program comes with the full. Radmin Crack Serial Key (Torrent) Download Radmin helps troubleshoot PCs, switch computers off remotely, access files, scan IP addresses. a few months or even years to crack that password Oh I was recently in a friend which get a information Is how to not need to hack Radmin password. Radmin Crack is an application that you can use to get remote access to other computers you can use your office computer at home or home. Radmin Crack + Full Torrent [] Free Download Radmin Crack is the world's most trusted PC remote control application. So many times you see that. Radmin Crack + Serial Key Free Download Radmin Crack is software that provides exceptional features for those who work remotely or need to.
Radmin Crack Full Version Torrent Free Download
Radmin Crack + License Key Latest Version Downoad
Radmin Crack With License Key Full Torrent Free Download
Radmin Crack With License Key Free Download
Radmin Crack Free Download + License Key
Download Radmin free
Radmin crack Archives - Up4Crack
Radmin Crack With License Key Full Torrent Free Download
download radmin full crack Archives - softwareshax
Radmin password-cracking-vulnerability warning-the black bar safety net
Radmin Crack Full Setup Torrent Latest [Win+Mac] Download
Download Radmin free
2 notes
·
View notes
Text

not calling out anyone here - these are sentiments I have seen before. And I get it. I'm a power user of Windows, and Microsoft is awful and Windows gets worse every year (damn I miss WinXP's search functions so much...) but for a lot of us - Linux is not better.
Less invasive, sure. Less loaded with bloatware. More customizable.
But those features are only useful if the computer also does what you expect your computer to do, and "customizable" is only useful if you understand the options and how to set them.
Virtual box is weird and complicated and does not integrate well with the rest of the computer. (And a daughter who plays Genshin, which I gather is difficult, although maybe not impossible, to do in a virtual box.)
I would definitely need a virtual box; I'm a power-user of programs that have no Linux versions, including Adobe Acrobat Pro. (If you want to convince me there's a good Linux alternative, talk to me about its bookmark and form field editing features.)
Damn I hate having to download & install an update for Discord every couple of days. (I know there's an interface or wrapper or something that will let it auto-update. It takes more space on the disc, which my Linux laptop doesn't have to spare.)
Cannot find my files in Linux. I'm sure they're organized in some much-more-logical way - but the point is, I don't know that way, and don't want to spend a few months being frustrated with the system trying to get used to it.
My job is Windows-based. Cannot stop using Windows; could only shift to "and ALSO use some different system when not at work."
Linux often has tech-support issues - there are very few purchase-new Linux laptops, and the rest often have issues like "must manually install these drivers from a flash drive before your laptop will recognize the internet."
A large portion of the Linux community is hostile to Windows users. Answers to tech questions on forums often include comments like "if you don't have the technical details of the software and OS you're using, you're doing it wrong. Go away and come back when your question is coherent." ...Which does not help a person searching their phone trying to find answers to "why does my new-Linux install not connect to the internet?"
There is no Switch From Windows To Linux website, forum, or support community. There are several Linux options (...several hundred, but we'll limit it to the half-dozen often recommended to newbies), and there's no coherent pros & cons lists, because the people recommending them don't understand what people get out of Windows well enough to make those lists. Microsoft comes with free tech support for new purchases. If your laptop or desktop isn't working correctly when you start it, or there's issues like "sound keeps shutting off," you can contact them, and they will walk you through the problems. (Or, will troubleshoot and say "you have a hardware issue; sorry; I can't help.") There is no equivalent for Linux... there's "visit some forums, in which you can find advice for your problem dating back to 1993; try to find something recent because the old advice probably involves software pieces that no longer exist."
I gather that Linux is terrific for coders, for programmers. Maybe for sysadmins. However, for office workers & students, it's not better, just not full of adware.
That is a good feature! That is a GREAT feature!
...that is not enough of a feature to give up the software that doesn't have Linux support, nor to have to learn a new OS that isn't what most jobs & schools use.
(Want to fix that? Set up a How And Why To Switch website and be welcoming and friendly to clueless newbies who will ask things like "does Linux work for Facebook?" and "how do I get to my photos on Linux?" Because until that exists, Windows is going to dominate the office spaces; schools are slowly being ceded to Google's Chromebooks.)
(For actual would-be Linux newbies: My #1 bit of advice is choose a password that you don't mind typing. A lot. There are people who claim you can Linux without the terminal - without command-line instructions. I assume they are not lying, but they are not talking about the Linux most of us are stuck working with. #2 advice is, when you search for answers online, limit the results to the past year.)
A boy can dream, can't he?
154K notes
·
View notes
Text
Price: [price_with_discount] (as of [price_update_date] - Details) [ad_1] From the manufacturer Features MASSIVE CAPACITY Up to 5TB of expansive space inside a travel-ready drive. REFINED DESIGN Complements today's devices with a chic polished aluminum enclosure. EASY-TO-USE BACKUP SOFTWARE Seagate Toolkit enables on-demand backup along with automatic hourly, daily, weekly, or monthly backups. INCREDIBLY COMPATIBLE Its USB 3.2 Gen 1 (USB 3.0) interface works with both Windows and Mac out of the box- no reformatting necessary. Extras You'll Love RESCUE DATA RECOVERY SERVICES Most Seagate drives now include Rescue Data Recovery Services—helping you defend against power outages, natural disasters, user error, viruses, and more. With an industry-leading 90% success rate against unexpected data loss and access to world-class data recovery experts, you can focus on what’s important and rest easy knowing your files are safer. MYLIO CREATE Enjoy six-months complimentary subscription to Mylio Create- an intuitive yet powerful app that helps organize photos into a life calendar and offers easy protection, editing, sharing, and syncing across multiple devices DROPBOX BACKUP PLAN Automatically back up one computer and one external drive with a 6-month free trial of the Dropbox Backup plan. Keep a copy of your files in the cloud and quickly restore any accidentally deleted data. (Not available in all areas, including China. For new customers and existing Dropbox Basic users only.) Add to Cart
Customer Reviews 4.3 out of 5 stars 246 4.4 out of 5 stars 6,420 Price ₹12,799.00₹12,799.00 — Max Capacity 5TB 2TB Auto Backup Software ✓ ✓ Data Security - Password + AES-256 Encryption Interface USB 3.0/2.0 USB-C, USB 3.0/2.0 Works with Mac/Windows Mac/Windows Max Speed 120 MB/s 120 MB/s Enclosure Aluminum Woven Fabric Safely and easily manage 2 TB of photos, videos, movies, and more with hardware encrypted password-protection. Get an extra layer of protection for your data with the included 3 year Rescue Data Recovery Services. The perfect external hard drive for Windows or Mac, simply back up files with a single click or schedule automatic daily, weekly or monthly backups. Reformatting may be required for use with Time Machine. The perfect compliment to personal aesthetic, this portable external hard drive features a minimalist brushed metal enclosure. [ad_2]
0 notes
Text
Laptop Data Recovery in San Antonio: What You Need to Know
Let’s be honest: be it some essential files, documents, or family photographs, losing such kinds of data from your laptop is unpleasant. Luckily, professional laptop data recovery in San Antonio is here to assist you with recovering lost data and saving what makes the biggest difference.
Data recovery is the process of recovering your lost data or documents from PCs, SSDs, hard drives, or any other storage device. While some endeavor to use Do-It-Yourself recovery strategies, these can frequently worsen what is happening, making professional assistance fundamental for effective data recovery.
Why Choose Professional Laptop Data Recovery in San Antonio?

Professionals use specialized tools and techniques to recover data safely. DIY attempts often lead to further damage, especially if the laptop is already compromised. Professional laptop data recovery experts employ cleanroom environments and advanced equipment to handle damaged or malfunctioning storage devices, increasing the chances of successful data recovery.
Laptop Data Recovery in San Antonio
Laptop data recovery in San Antonio caters to both individuals and businesses facing data loss. Whether it’s a personal laptop failure or critical business data lost from a server, professional services can handle various types of data recovery situations. For laptop owners, these services can recover data from malfunctioning hard drives, operating system crashes, and even physical damage, providing reassurance that lost files can be restored.
Types of Data Recovery Services
Hard Drive Recovery
Whether it's a customary HDD or a newer SSD, experts can recover data from both kinds of drives. Whether or not the failure is mechanical or electrical,laptop data recovery in San Antoniospecialists can frequently restore your documents.
RAID Data Recovery
RAID arrays are regularly utilized in organizations for their redundancy; however, data can in any case be lost because of controller failure, drive damage, or human error. RAID recovery services can recover basic data from these systems.
External Hard Drive Recovery
With regards to external hard drives, which are utilized for backups, these can be damaged because of spontaneous spills or drops. Data recovery experts can recover data from memory drives, USB flash drives, as well as external devices.
Laptop and Mac Recovery
Whether using a Windows laptop or a MacBook, data recovery professionals can handle various operating systems, restoring data that seems lost due to software issues or hardware failure.
Mobile Device Recovery
Smartphones and tablets store personal data like photos, contacts, and messages. When these devices fail, recovery services can retrieve your important data.
Why Trust Professional Recovery Services?
Opting for expert laptop data recovery in San Antonio services significantly increases the chances of successful retrieval. Professionals utilize industry-standard tools and have the experience necessary to recover data from damaged devices. They also ensure that recovered data is transferred to new, secure drives, safeguarding your data.
Conclusion
Laptop data recovery in San Antonio provides a crucial service for anyone facing data loss. By choosing professional recovery services like Jet Data Recovery, you maximize the chances of retrieving your files safely. Whether dealing with a personal laptop, business server, or external hard drive, professional technicians are ready to help recover what matters most.
0 notes
Text

BloodArt : AFairyTaleMuseum

= = = = = = = = = = = = =
📃 𝕃𝕀𝕋𝔼ℝ𝔸𝕋𝕌ℝ𝔼
= = = = = = = = = = = = =
WDS.DarkBrain® Production
BloodArt logo used to identify, submit, and publish art and literature. As well as the base reference that illustrate other logos.
BloodArt-Gallery available in the framed presentation content. to visit and comment on Gallery's initial involvement with the logo.
BloodArt.Magazine detailed description available in the projects and productions, developing delivered to collection information in the magazine.
BloodArt(literature) providing descriptive and literature in texts, comments, and project organization.
BloodArt_Photos highlighting and capturing realities in the proceedings of the virtual world.
DarkSystemCD® used to identify, meet, work and publish logics and programming design, software, games and music on interfaces and electronic, digital and virtual media.
DarkSystemCD®GAMES is a collection of fun and games for playback on digital computer, enabling interaction that can be forefathers to entertainment and education.
WDHellS A virtual personal person trademark and nickname, created for display my creations enabling it’s available worldwide.
= = = = = = = = = = = = =
🛠️ Tools and Process
Microsoft Windows operating system and Mouse Device; GIMP drawing created with PathsTool directly on the computer; and branding layouts; Firealpaca coloring and organization of image sets; = = = = = = = = = = = = =
🔗 also available [at] Google Photos | OneDrive | Yandex.Disk | MEGA | imgur | Behance |
= = = = = = = = = = = = =
🎵 Suggested Song [ Iron Maiden : Stranger On A Strange Land ]
= = = = = = = = = = = = =
🔎 Related Content [ ]
= = = = = = = = = = = = =
Attribution-NonCommercial-NoDerivatives 4.0 International
= = = = = = = = = = = = =

thanks for choosing BloodArt
0 notes
Text
What is aka.ms/linkphoneqr?
www.aka.ms/linkphoneqr is a powerful tool created by Microsoft to enable users to sync their smartphones with a Windows PC. Designed with ease of use in mind, the software allows users to access the features and functionalities of their mobile devices directly from their Windows computers. Whether you’re working on your laptop, desktop, or tablet, syncing your Surface Duo with your PC opens up new dimensions of connectivity, multitasking, and integration between mobile and desktop platforms.
Key Features of aka.ms/linkphoneqr
The versatility and ease of use offered by www.aka.ms/linkphoneqr make it a must-have tool for modern professionals, tech enthusiasts, and anyone looking to streamline their workflow. The software’s key features include:
1. Seamless Sync Between Surface Duo and Windows PC
With aka.ms/linkphoneqr, you can easily sync your Surface Duo with your Windows computer. The integration between Android and Windows has never been more seamless, thanks to the intuitive sync features provided by Microsoft’s tool. By connecting your device to your computer, you instantly gain access to your phone’s core functionalities directly on your Windows desktop.
This synchronization is not limited to just basic file transfers. The tool facilitates a deeper integration, allowing users to interact with mobile apps, notifications, messages, and even files without having to constantly switch between devices. Whether you’re working on an important document on your PC or checking your Surface Duo’s notifications, this synchronization brings everything to one unified platform.
2. Easy Setup with QR Code
One of the standout features of www.aka.ms/linkphoneqr is its simplicity. The setup process is straightforward, requiring only a few steps to establish a connection between your Surface Duo and your Windows PC.
To sync your device, you’ll need to scan a QR code displayed on your computer screen using the camera on your Surface Duo. The entire process takes just a few minutes and requires no complex configurations. Once the QR code is scanned, the connection is instantly established, and you can begin using your phone’s features on your Windows PC.
3. Access Phone Features on Your PC
Once connected, aka.ms/linkphoneqr allows you to interact with your phone’s features directly from your Windows desktop. You can:
View and reply to text messages on your computer
Manage notifications from your phone, such as missed calls, new messages, or app alerts
Access photos and files stored on your phone, making it easy to transfer or edit documents without needing to transfer them manually
Run mobile apps on your PC, allowing you to continue tasks on a larger screen without interrupting your flow
This feature is incredibly useful for those who prefer working from a desktop or laptop but still want quick access to their smartphone’s apps and functions.
4. Mirror Your Mobile Screen on Your PC
One of the most compelling features of aka.ms/linkphoneqr is its ability to mirror your Surface Duo’s screen onto your PC. This allows you to control your smartphone directly from your desktop, making it easier to perform tasks such as managing apps, replying to messages, or even making calls—all from your Windows PC.
Whether you are on a video call or using a mobile app, this screen mirroring function brings the power of your Surface Duo to your computer, offering enhanced productivity and a more flexible user experience.
5. Enhanced Multi-Tasking
In today’s work environment, multitasking is crucial. aka.ms/linkphoneqr makes it easy to switch between tasks on your Surface Duo and Windows PC, increasing productivity. Whether you need to answer a text while working on a report or quickly check a social media notification without leaving your desktop, syncing your phone to your PC keeps you connected and organized.
With the ability to view and manage both mobile and desktop tasks simultaneously, you can enhance your workflow and avoid interruptions that typically occur when switching devices.
6. Transfer Files Between Devices
www.aka.ms/linkphoneqr allows you to transfer files between your Surface Duo and Windows PC without needing cables or complex software. Simply drag and drop photos, documents, or other files from your mobile device to your PC, or vice versa, for quick and easy file management.
This file transfer feature is incredibly useful when you need to move photos, videos, or documents between devices without having to rely on cloud services or third-party apps. The process is fast and convenient, giving you more control over your files.
7. Stay Focused with Cross-Device Notifications
With aka.ms/linkphoneqr, staying up-to-date with notifications from your Surface Duo while working on your PC has never been easier. You’ll receive real-time notifications for calls, messages, and other apps directly on your desktop screen. You can then act on these notifications without needing to pick up your phone.
This cross-device notification syncing ensures that you’re always in the loop, no matter what device you're using. It’s particularly beneficial for professionals who need to maintain focus on their work without constantly checking their smartphones.
How to Get Started with aka.ms/linkphoneqr
Getting started with www.aka.ms/linkphoneqr is quick and easy. Follow these steps to sync your Surface Duo with your Windows PC:
Step 1: Install the Link to Windows App on Your Surface Duo
To begin, ensure that the Link to Windows app is installed on your Surface Duo. This app is available on the Google Play Store and can be downloaded and installed on your device with a single click.
Step 2: Scan the QR Code on Your Windows PC
Next, navigate to www.aka.ms/linkphoneqr on your Windows PC. The website will display a unique QR code that you will scan using the Link to Windows app on your Surface Duo. After scanning, the devices will be paired, and you’ll be able to access your phone’s features directly from your computer.
Step 3: Start Using Your Surface Duo on Your PC
Once the setup is complete, you can begin using your Surface Duo as if it were a native extension of your Windows PC. Start accessing your mobile notifications, text messages, apps, and files directly on your computer screen, enhancing your overall experience.
Why Use aka.ms/linkphoneqr with Your Surface Duo?
The integration of the Surface Duo with www.aka.ms/linkphoneqr is an ideal solution for users who want to maximize the potential of their devices. Here’s why:
Enhanced Productivity: Syncing your Surface Duo with your Windows PC allows you to work more efficiently by seamlessly integrating mobile and desktop features.
Effortless File Transfers: The ability to transfer files between your mobile device and PC without cables or cloud storage solutions streamlines your workflow.
Cross-Device Functionality: Managing notifications and running mobile apps on your PC allows you to maintain focus and work without constantly switching devices.
Whether you're a professional looking to streamline your workflow, a student managing multiple tasks, or simply someone looking for an easier way to interact with both your mobile device and computer, www.aka.ms/linkphoneqr is the tool you need.
Conclusion
aka.ms/linkphoneqr is a game-changing tool for anyone looking to sync their Surface Duo or other compatible smartphones with their Windows PC. By offering seamless integration, enhanced multitasking, and easy access to mobile features directly from a PC, it revolutionizes the way we use and interact with both mobile and desktop technologies.
To start syncing your Surface Duo with your Windows PC today, visit www.aka.ms/linkphoneqr and follow the simple setup instructions. Embrace the future of device synchronization, and unlock the limitless possibilities that come with having your mobile phone and desktop computer connected like never before.
1 note
·
View note
Text
Convert Images into PDF Files: A Simple Guide to Organizing Your Visual Content
In today’s digital age, images play a crucial role in conveying information, whether they’re screenshots, scanned documents, or photos. However, managing multiple images can become overwhelming. This is where converting images into PDF files comes in handy. Converting images to PDF not only helps organize your files but also makes sharing and printing easier.
Why Convert Images into PDF Files?
File Organization: PDFs allow you to combine multiple images into one file, making it easier to manage and share.
Uniformity: With PDFs, you maintain consistent formatting and quality across different devices and platforms.
Easier Sharing: Sharing a single PDF is more efficient than sending multiple image files.
Secure and Compact: PDFs can be password-protected and compressed to reduce file size, making them easy to store or email.
How to Convert Images into PDF Files
Converting images to PDFs is easier than ever, thanks to various tools available online and offline. Here’s how you can do it:
Option 1: Using Online Tools
Choose an Online Converter: Websites like SmallPDF, ILovePDF, and PDF Converter allow you to convert images to PDFs with just a few clicks.
Upload Your Images: Select the images you want to convert. You can often upload multiple images at once.
Adjust Settings: Customize the layout, orientation, and margins, depending on your preferences.
Download the PDF: After the conversion, download your PDF file and save it to your device.
Option 2: Using Software Tools
Adobe Acrobat: Open the software and select the “Create PDF” option. Upload your images, adjust settings if needed, and save as a PDF.
Windows Built-in Tools: In Windows, you can use the “Print” option to select “Microsoft Print to PDF” and save your images as a PDF.
Mac Preview: On Mac, open the images in Preview, select “File > Print,” and choose the “Save as PDF” option.
Option 3: Using Mobile Apps There are various apps available for iOS and Android devices that let you convert images to PDF directly from your phone. Apps like CamScanner, Adobe Scan, and Tiny Scanner are excellent choices.
Tips for Converting Images to PDF
Image Quality: Ensure that the images are of high quality to maintain the resolution when converting to PDF.
Order Your Images: Arrange the images in the correct order before conversion to avoid confusion.
Merge Images: If you're working with several images, try merging them into one PDF to avoid clutter.
Compression: If you need to reduce the file size, use PDF compression tools without compromising too much on quality.
Benefits of Converting Images to PDF
Compact Storage: PDFs often have a smaller file size than individual image files, making them easier to store.
Professional Appearance: PDFs have a clean, professional format, ideal for business presentations, portfolios, and academic purposes.
Universal Compatibility: PDFs can be opened on nearly all devices, ensuring your content is accessible to everyone, regardless of their device.
Conclusion
Converting images into PDF files is a quick and effective way to organize and share your visual content. Whether you're preparing documents for work, school, or personal use, the ability to combine multiple images into a single, easy-to-manage PDF is a valuable tool. With a wide range of free and paid tools available, converting images into PDF has never been easier.
0 notes