#pagemaps
Explore tagged Tumblr posts
Photo

Disney's Echo Lake - Hollywood studios. My take on the @acherryontop_crafts Sketch with a Twist. My three different embellishment are. Chipboard, nuvo dots, stickers. #eaglecraftz #papercrafts #acherryontopcrafts #sketchwithatwist #pagemaps #echolake #scrapbook #scrapbooking #Disneyalbum #layout #rubberstamps #disneyshollywoodstudios #disneyscrappers #disneyscrapbook #disney #hollywoodstudios #disneyworld #echolake #distressoxide #oxideinks #octoberafternoon #paper https://www.instagram.com/p/B3VippzApV6/?igshid=8kaq79wh8hpr
#eaglecraftz#papercrafts#acherryontopcrafts#sketchwithatwist#pagemaps#echolake#scrapbook#scrapbooking#disneyalbum#layout#rubberstamps#disneyshollywoodstudios#disneyscrappers#disneyscrapbook#disney#hollywoodstudios#disneyworld#distressoxide#oxideinks#octoberafternoon#paper
0 notes
Text
How do y’all even handle me. God. I just forget everything. Always. I’m like a trash compacter that compacts memories. You better retrieve it fast or that baby’s goin’ into deep space and you have no chance in hell of retrieving it.
Anyways.
I updated pages, nothing too drastic but you should be able to notice changes. Specifically, a few things on the detailed stats and the addition of some links on the ic about. God, I feel like a changelog whenever I post.
Also! I forgot to mention that I do have Skype and Discord, and anyone who wants to know my handles just hit me up! I try to come across as an open and friendly person but I’m not sure it works! I love to talk to people!
Anyways! I tried to fit this all into one post because I hate to make a lot of ooc posts. This is Avi’s blog after all. I’m probably forgetting something, blame it on the ADHD, but if I did I’ll just hold off. Thank you for your time!
#From your host; Pepper.#I almost made an AWOLNATION reference but does anyone even listen to them anymore.#God.#I hope none of y'all ever have to talk to me in real life because the ADHD is r e a l.#It's like looking at a pagemap and getting really distracted clicking on different links and then backtracking and then getting distracted#again and then backtracking until you forget what you were doing in the first place and give up.#Anyways I love y'all!#I hope you all have a good winter break.#ooc
5 notes
·
View notes
Photo

pagemap: A 'Mini Map' for Your Pages - https://t.co/WnU42LnI5u
1 note
·
View note
Photo

pagemap: A 'Mini Map' for Your Pages - https://t.co/WnU42LnI5u
1 note
·
View note
Text
plugin-programmable-search-engine (a README Experience)

A plugin for Micro.blog for adding a site search interface using Google’s programmable search engine API. It’s code lives here
Creating your Google Programmable Search Engine
You will need a Google account. If you don't have one, go ahead and create one. Once you're logged in, follow these steps to configure yourself a search engine.
Navigate to the landing page and click the Get Started button.

Click the Add button to create a new instance.
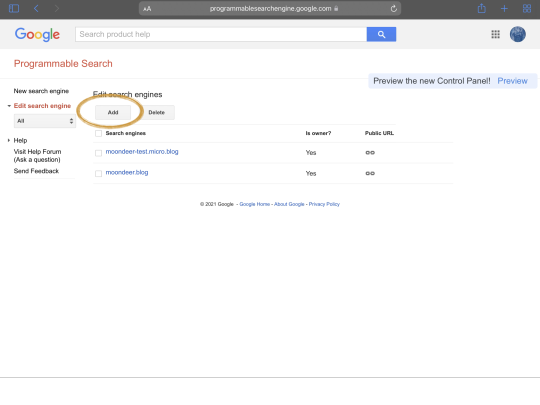
Enter your site address (I believe I went with *.moondeer.blog/*) and click CREATE.

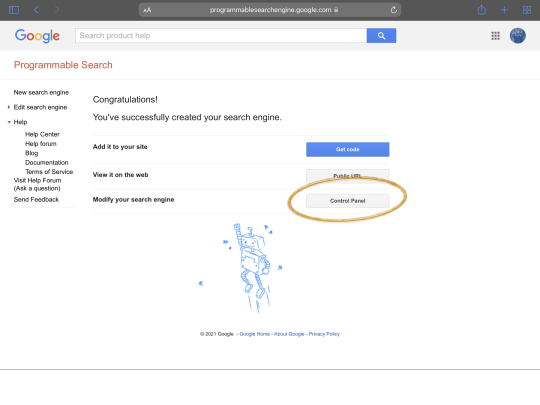
Click on Control Panel to get to the configuration.
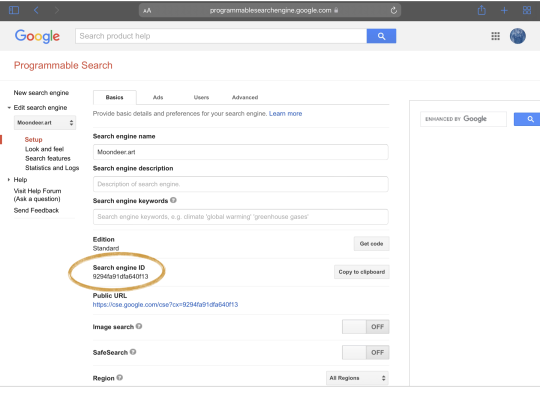
Here’s the first value we need, the Search engine ID, this is the value referred to every else as cx.
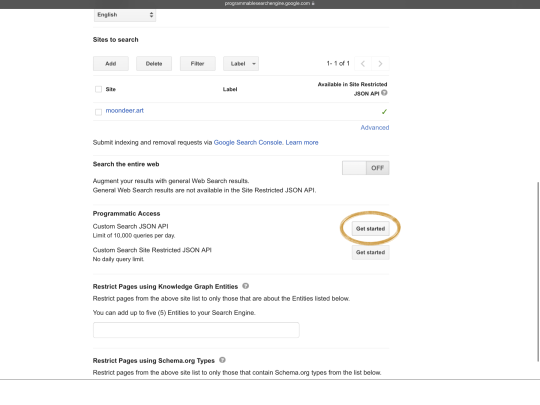
Now, scroll down a bit and find the Programmatic Access section. Click the Get Started button to the right of Custom JSON Search API.
Find and click the Get a Key button.

Select the + Create a new project option.
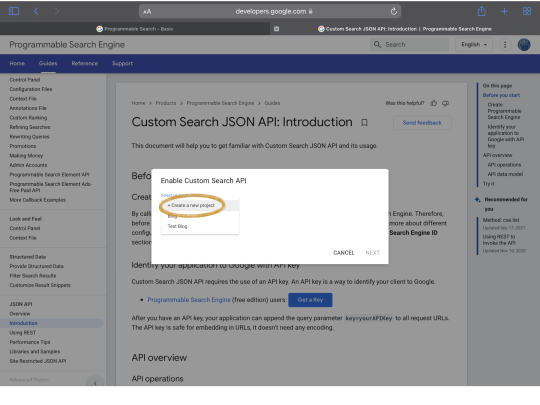
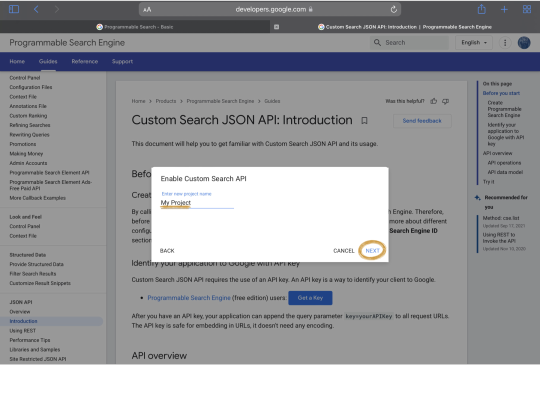
Pick a project name and click NEXT.
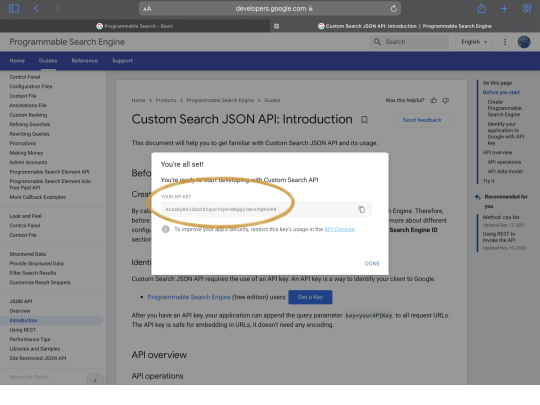
And here’s value number two, the API key.
Test Driving your Engine
If you follow those ten steps, you’ll end up with a working search engine constrained to your site content (or what Google has crawled of it). You can navigate to that Public URL Google kept mentioning as you were getting things setup. If you do, you’ll find an unimpressive page looking something like this:

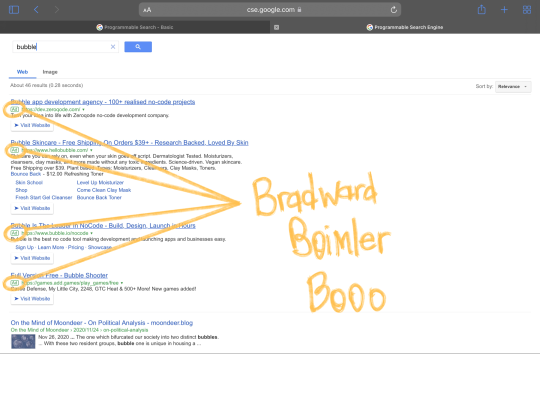
Go ahead and perform a search. These are the same results the plugin will have access to using that Custom Search JSON API. The image below explains why I took one look at the Google-supplied interface options and said, “F$&k that noise … how do we get a hold of this data to display for ourselves”:
Data, What Data?
So that Custom Search JSON API page we visited to get our API key kept pushing you to Try this API, am I right? Here is how can. Locate that Search engine ID value that I warned you we’d start calling cx and plop that little f$&ker in the cx field kinda like:

Then scroll until you find the q field (because query is such a long f$&king word) and plop in some search terms kinds like:
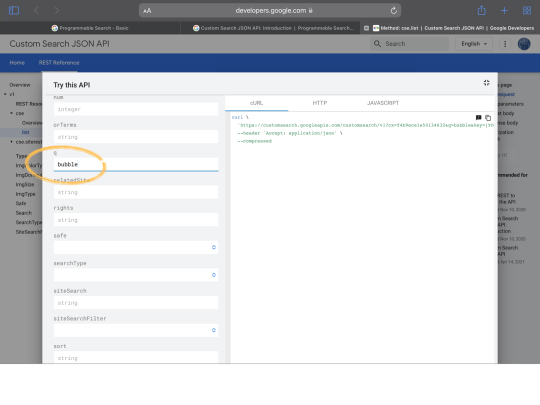
Now, the first time I did this (right after creating my API key) I got an error. No idea why. If you get one, holler. If you don’t, it means you have access to the exact same data the plugin (and that Public URL page) pulls down.
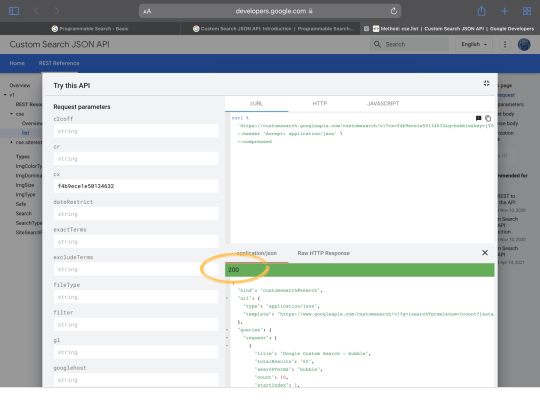
The response to a custom search request is detailed here. Let’s go over the bits I found to be relevant.
The Relevant Response Bits
queries
queries contains 1 - 3 collections of metadata that amount to a glorified page index. There will always be an entry for request, this amounts to the current page. Each collection contains a startIndex value. I did a whole thing where I generated numbered navigation links for the pages at the bottom (you know, as you do); but, it turns out that the f$&king totalResults value is dynamic for some f$&king reason and displaying indices as estimates is horsesh$te (when I checked the Public URL page to see if Google, itself, could manufacture accurate indices, I found they could not. Run through your result pages, if you like swing-and-a-miss-indices, I will put them back). Anyway, all we really care about (seeing as we know the search terms), is that startIndex and the abscence or presence of previousPage and nextPage entries (and their startIndex values). If I’ve missed something you find to be relevant, feel free to share.
"queries": { "previousPage": [{ … "startIndex": integer, … }], "request": [{ … "startIndex": integer, … }], "nextPage": [{ … "startIndex": integer, … }] }
items
The items array holds the search result items corresponding to queries.request. The bits the plugin currently utilizes are these:
{ … "title": string, … "link": string, "displayLink": string, … "htmlSnippet": string, … "pagemap": { f$&kin-random }, … }
It’s the top four properties that compose the bulk of the displayed item. For result items without an image, they compose it entirely.

None of my result items have ever had an image entry at the top level as depicted in the API (If y’all end up with an entry, holler, and I’ll add checks for image property). The thumbnail images are pulled out of that pagemap entry. This collection of page metadata will be influenced by Micro.blog theme and Micro.blog plugin installations. The result items I have received consistently contain an entry at pagemap.cse_thumbnail[0] (yeah, they wrap everything in a f$&kin’ array, no idea why). The plugin looks for this entry and when it finds it you get a thumbnail image to go along with the other stuffs.

So What the F$&k is the PageMap?
Well, it turns out that a PageMap is yet another f$&kin’ form of structured data used by Google. It consists of a butt-ugly chunk of XML injected into the page <head> inside an HTML comment.
<html> <head> ... <!-- <PageMap> <DataObject type="document"> <Attribute name="title">The Biomechanics of a Badminton Smash</Attribute> <Attribute name="author">Avelino T. Lim</Attribute> <Attribute name="description">The smash is the most explosive and aggressive stroke in Badminton. Elite athletes can generate shuttlecock velocities of up to 370 km/h. To perform the stroke, one must understand the biomechanics involved, from the body positioning to the wrist flexion. </Attribute> <Attribute name="page_count">25</Attribute> <Attribute name="rating">4.5</Attribute> <Attribute name="last_update">05/05/2009</Attribute> </DataObject> <DataObject type="thumbnail"> <Attribute name="src" value="http://www.example.com/papers/sic.png" /> <Attribute name="width" value="627" /> <Attribute name="height" value="167" /> </DataObject> </PageMap> --> </head> ... </html>
Can we utilize PageMaps to inject precisely that data which every Micro.blogger using this plugin would want to have availble for display when viewing their search results? Jury is still out. I did construct a partial that injects such an eye sore. For a post with all the fixings it generates something kinda like:
<!-- <PageMap> <DataObject type="post"> <Attribute name="title">On the American Upside Down</Attribute> <Attribute name="summary">While the beltway press, the pundits, the influencers, the organizers, and the cogs that compose the political machinery at large desperately cling to those norms and precedents with which order has so long been coaxed from chaos, the unprecedented leaves breadcrumbs for the fresh-eyed to trace towards the trailhead, near the clearing within which it has planted itself openly as invitation for observation.</Attribute> <Attribute name="reading_time">8</Attribute> <Attribute name="category">Perspectives</Attribute> <Attribute name="publish_date">2021-09-28T15:24:00-08:00</Attribute> <Attribute name="modified_date">2021-09-28T15:24:00-08:00</Attribute> </DataObject> <DataObject type="image"> <Attribute name="src" value="https://moondeer.blog/uploads/2021/cbeaf7bb2f.jpg" /> </DataObject> … <DataObject type="image"> <Attribute name="src" value="https://moondeer.blog/uploads/2021/de854e7aa6.jpg" /> </DataObject> </PageMap> -->
Did it work? Time will tell. I assume we have to wait for Google to re-crawl the site’s pages, at which point the entries will show up in pagemap or they won’t.
Configuration
As with all my plugins, this plugin is configured by the documented data templates under the data directory (Check out the other READMEs or holler at me for more on this). This particular plugin has four configuration files located under the plugin_programmable_search_engine subdirectory (here's a hint, recreate these files in a custom theme, changing the subdirectory to plugin-programmable-search-engine and your data will persist between plugin updates). Let's look at each file and then call it a day.
Config.toml
This is the only file that the plugin requires you to edit in order to function properly. It looks like this:
# Debug and build related parameters #################################### # Theme version, printed to HTML comment when the plugin loads. # Version = '2.0.3' # Whether to print HTML comments for debugging purposes. # DebugPrint = false # Whether to provide subresource integrity by generating a # base64-encoded cryptographic hash and attaching a .Data.Integrity # property containing an integrity string, which is made up of the # name of the hash function, one hyphen and the base64-encoded hash sum. # Fingerprint = true # Output style for the generated stylesheet. # Valid options are nested, expanded, compact and compressed # SassOutput = 'compact' # Whether to minify the generated Javascript file. # MinifyScript = false # Whether to inject a page map structure into the page <head> # in the hopes that Google will eventually parse and provide it. # InjectPageMap = true # Search engine configuration ############################# # The search engine identifier # CX = "" # The search engine API key # APIKey = ""
It's the CX and APIKey values that you must fill in. You can prevent the injection of that experimental page map XML by setting InjectPageMap to false. Version is utilized by an HTML comment that gets injected into the page <head>. DebugPrint allows you to dump the parameter values as parsed by the plugin into an HTML comment injected into the page <head>. The other three parameters control the script and stylesheet builds.
The remaining three files each control the style of one of the plugin's visual components: the search bar, the results container, and the individual result items. Let's briefly look at each of those and then I'll show y'all how the stylesheet gets generated.
SearchBar.toml
The file used to configure the search bar looks like this:
# Parameters controlling the search bar injection and style ########################################################### # The ID of the element that will serve as the parent of the # search bar injected via Javascript # ContainerID = 'pse-container' # The ID assigned to the search bar. # ID = 'pse-search-bar' # Styling the input field ######################### # The ID assigned to the input field. # Input.ID = 'pse-search-bar-input' # Whether the input field of the search bar is collapsible. # Input.Collapsible = true # Whether the input field is initially expanded or collapsed # Input.InitialState = 'collapsed' # The height to set for the input field # Input.Height = 'auto' # The width to set for the input field # Input.Width = '300px' # The color of text within the input field # Input.Color = 'black' # The placeholder text displayed when the input field is empty # Input.Placeholder.Text = 'site search' # The color of the placeholder text # Input.Placeholder.Color = 'darkgray' # The duration to use when collapsing and expanding the search field # Input.Transition.Duration = '.35s' # The time function to use when collapsing and expanding the search field # Input.Transition.TimingFunction = 'ease' # The vertical padding to set on the input field # Input.Padding.Y = '0' # The horizontal padding to set on the input field # Input.Padding.X = '.5em' # The border radius value to set on the input field # Input.Border.Radius = '1em' # The border style to set on the input field # Input.Border.Style = 'solid' # The border color to set on the input field # Input.Border.Color = 'rgba(black,.125)' # The border width to set on the input field # Input.Border.Width = '1px' # Styling the search bar button ############################### # The ID assigned to the button. # Button.ID = 'pse-search-bar-button' # The color to set for the button when the input is collapsed # Button.Color = 'lightgray' # The horizontal padding to set on the button # Button.Padding.X = '.25em' # The vertical padding to set on the button # Button.Padding.Y = '0'
While you can modify the ID values, these are here primarily to ensure consistency between the Javascript and the Sass / CSS. You can control whether the search bar collapses and expands, as well as its initial state. The parameter comments oughta be enough to get your head wrapped around the remaining parameters.
ResultsOverlay.toml
This file is very much like the previous one accept that it is all style (no behavior modification). It looks like this:
# Styling the results overlay ############################# # The ID assigned to the results overlay. # ID = 'pse-results-overlay' # The ID assigned to the <article> element with the search results. # Article.ID = 'pse-results-article' # The text color to set on the <article> element. # Article.Color = 'inherit' # The font size to set on the <article> element. # Article.Font.Size = '1rem' # The base background color # Article.BG.Color = 'white' #Styling the <header> element of the results overlay ################################################## # The ID assigned to the <header> element. # Header.ID = 'pse-results-header' # The color for header text # Header.Color = 'currentcolor' # The ID assigned to the title. # Header.Title.ID = 'pse-results-title' # The font size to set for the title. # Header.Title.Font.Size = 'inherit' # The font weight to set for the title. # Header.Title.Font.Weight = 'inherit' # The font style to set for the title. # Header.Title.Font.Style = 'inherit' # The ID assigned to the search terms. # Header.Terms.ID = 'pse-results-search-terms' # The text color for the search terms # Header.Terms.Color = 'inherit' # The font size to set for the search terms # Header.Terms.Font.Size = 'inherit' # The font weight to set for the search terms # Header.Terms.Font.Weight = 'inherit' # The font style to set for the search terms # Header.Terms.Font.Style = 'italic' # Styling the previous / next links in the results overlay footer ################################################################# # The ID assigned to the footer. # Footer.ID = 'pse-results-footer' # The ID assigned to the previous page link. # Footer.PreviousPageLink.ID = 'pse-results-previous-page' # The ID assigned to the next page link. # Footer.NextPageLink.ID = 'pse-results-next-page' # The text color for the previous / next links # Footer.Link.Color = 'inherit' # The text decoration for the previous / next links # Footer.Link.TextDecoration = 'none' # The text color for the previous / next links when hovering # Footer.Link.Hover.Color = "inherit" # The text decoration for the previous / next links when hovering # Footer.Link.Hover.TextDecoration = 'underline'
ResultItems.toml
Ditto for this file except that you'll see ClassName values popping up. Same deal as with those ID values I mentioned earlier. The file looks like this:
# Styling the result items section ################################## # The ID assigned to the <section> element holding the results. # ID = 'pse-results-items' # The ID assigned to the <ul> element. # List.ID = 'pse-results-list' # Class assigned to item title links. # Item.ClassName = 'pse-result-item' # Class assigned to an item's article element. # Item.Article.ClassName = 'pse-result-item-article' # Styling the result item header ################################ # Class assigned to the header element within the article. # Item.Header.ClassName = 'pse-result-item-header' # Class assigned to the item's title link. # Item.Title.ClassName = 'pse-result-item-title' # The text color for item title links # Item.Title.Color = "inherit" # The text decoration for the item title links # Item.Title.TextDecoration = 'inherit' # the text color for item title links when hovering # Item.Title.Hover.Color = "inherit" # The text decoration for the item title links when hovering # Item.Title.Hover.TextDecoration = 'inherit' # The font size to set for item title links # Item.Title.Font.Size = 'inherit' # The font weight to set for item title links # Item.Title.Font.Weight = 'inherit' # The font style to set for item title links # Item.Title.Font.Style = 'inherit' # Styling the result item body ################################# # Class assigned to the <section> element with the result item body. # Item.Body.ClassName = 'pse-result-item-body' # Class assigned to the item snippet. # Item.Snippet.ClassName = 'pse-result-item-snippet' # The text color for result item snippets # Item.Snippet.Color = 'inherit' # The font size for result item snippets # Item.Snippet.Font.Size = 'inherit' # The font weight for result item snippets # Item.Snippet.Font.Weight = 'inherit' # The font style for result item snippets # Item.Snippet.Font.Style = 'inherit' # Class assigned to an item's thumbnail link. # Item.Thumbnail.ClassName = 'pse-result-item-thumbnail'
Alrighty, let's see how the stylesheet gets generated and hang 'em up for the day.
Style Compilation
Here's how all those parameter values populate the Sass file used to generate the CSS stylesheet (you can see why I quickly switched to block-based parameters in most of the other plugins):
div#{{ .SearchBar.ID }} { position: relative; min-width: 1em; // The input input#{{ .SearchBar.Input.ID }} { height: {{ .SearchBar.Input.Height }}; transition: width {{ .SearchBar.Input.Transition.Duration }} {{ .SearchBar.Input.Transition.TimingFunction }}; width: {{ .SearchBar.Input.Width }}; color: {{ .SearchBar.Input.Color }}; border-style: {{ .SearchBar.Input.Border.Style }}; border-radius: {{ .SearchBar.Input.Border.Radius }}; border-color: {{ .SearchBar.Input.Border.Color }}; border-width: {{ .SearchBar.Input.Border.Width }}; padding: {{ .SearchBar.Input.Padding.Y }} {{ .SearchBar.Input.Padding.X }}; outline-offset: -2px; -webkit-appearance: textfield; &::-webkit-search-cancel-button, &::-webkit-search-decoration { -webkit-appearance: none; } &::placeholder { color: {{ .SearchBar.Input.Placeholder.Color }}; } } // The button that toggles collapse state button#{{ .SearchBar.Button.ID }} { background: transparent; border: none; color: {{ .SearchBar.Button.Color }}; @include padding({{ .SearchBar.Button.Padding.Y }} {{ .SearchBar.Button.Padding.X }}); margin: 0; z-index: 2; &[aria-expanded=true] { position: absolute; right: 0.25em; top: 0.125em; color: black; } } } // Search result wrapper div#{{ .ResultsOverlay.ID }} { position: fixed; display: none; width: 100vw; height: 100vh; top: 0; left: 0; right: 0; bottom: 0; background: rgba(black, .5); z-index: 3; cursor: pointer; // Page results wrapper article#{{ .ResultsOverlay.Article.ID }} { position: relative; overflow: auto; @include font-size({{ .ResultsOverlay.Article.Font.Size }}); color: {{ .ResultsOverlay.Article.Color }}; background-color: {{ .ResultsOverlay.Article.BG.Color }}; display: flex; flex-direction: column; justify-content: stretch; align-items: stretch; width: 90vw; height: 90vh; left: 5vw; top: 5vh; @media (min-width: 769px) { width: 60vw; left: 20vw; } & > * { padding: 0; margin: 0; } // Page results header header#{{ .ResultsOverlay.Header.ID }} { display: flex; justify-content: center; padding: 0; @include margin(1rem); color: {{ .ResultsOverlay.Header.Color }}; #{{ .ResultsOverlay.Header.Title.ID }} { padding: 0; margin: 0; @include font-size({{ .ResultsOverlay.Header.Title.Font.Size }}); font-weight: {{ .ResultsOverlay.Header.Title.Font.Weight }}; font-style: {{ .ResultsOverlay.Header.Title.Font.Style }}; #{{ .ResultsOverlay.Header.Terms.ID }} { color: {{ .ResultsOverlay.Header.Terms.Color }}; @include font-size({{ .ResultsOverlay.Header.Terms.Font.Size }}); font-weight: {{ .ResultsOverlay.Header.Terms.Font.Weight }}; font-style: {{ .ResultsOverlay.Header.Terms.Font.Style }}; } } } // Page results item section section#{{ .ResultItems.ID }} { padding: 0; margin: 0; flex-grow: 2; // Page results list ul#{{ .ResultItems.List.ID }} { list-style: none; display: flex; flex-direction: column; align-items: stretch; gap: 1rem; padding: 0; @include margin(0 1rem); // Page results list item li.{{ .ResultItems.Item.ClassName }} { padding: 0; margin: 0; position: relative; //Result content wrapper article.{{ .ResultItems.Item.Article.ClassName }} { width: 100%; display: flex; flex-direction: column; align-items: stretch; gap: 0.5rem; padding: 0; margin: 0; // Result header header.{{ .ResultItems.Item.Header.ClassName }} { padding: 0; margin: 0; // Result title a.{{ .ResultItems.Item.Title.ClassName }} { color: {{ .ResultItems.Item.Title.Color }}; text-decoration: {{ .ResultItems.Item.Title.TextDecoration }}; @include font-size({{ .ResultItems.Item.Title.Font.Size }}); font-weight: {{ .ResultItems.Item.Title.Font.Weight }}; font-style: {{ .ResultItems.Item.Title.Font.Style }}; &:hover { color: {{ .ResultItems.Item.Title.Hover.Color }}; text-decoration: {{ .ResultItems.Item.Title.Hover.TextDecoration }}; } &::after { position: absolute; top: 0; right: 0; bottom: 0; left: 0; z-index: 1; content: ""; } } } // Result body section.{{ .ResultItems.Item.Body.ClassName }} { display: flex; flex-direction: column; align-items: flex-start; align-content: flex-start; gap: 1rem; @media (min-width: 576px) { flex-direction: row; } p.{{ .ResultItems.Item.Snippet.ClassName }} { flex-grow: 1; color: {{ .ResultItems.Item.Snippet.Color }}; @include font-size({{ .ResultItems.Item.Snippet.Font.Size }}); font-weight: {{ .ResultItems.Item.Snippet.Font.Weight }}; font-style: {{ .ResultItems.Item.Snippet.Font.Style }}; } a.{{ .ResultItems.Item.Thumbnail.ClassName }} { } } } } } } footer#{{ .ResultsOverlay.Footer.ID }} { margin: 1rem; display: grid; grid-template-columns: 1fr auto 1fr; grid-template-areas: "previous . next"; place-items: center; a { background: transparent; color: {{ .ResultsOverlay.Footer.Link.Color }}; text-decoration: {{ .ResultsOverlay.Footer.Link.TextDecoration }}; &:hover { color: {{ .ResultsOverlay.Footer.Link.Hover.Color }}; text-decoration: {{ .ResultsOverlay.Footer.Link.Hover.TextDecoration }}; } &#{{ .ResultsOverlay.Footer.PreviousPageLink.ID }} { grid-area: previous; align-self: start; } &#{{ .ResultsOverlay.Footer.NextPageLink.ID }} { grid-area: next; align-self: end; } } } } }
Alright. Y'all good? I'm good. If y'all aren't good, just holler.
0 notes
Link
Welcome to our guide to the must-have web development tools of 2020 so far. If you regularly write front-end code for web applications, then you probably have your go-to set of tools. A boilerplate that serves as a skeleton, a UI library that helps you make things dynamic and interactive, a build process that might include one or more tools to scaffold out the files and directories you'll need. You might even have a set of CSS and JavaScript utilities that you go back to time and again. Or maybe your tooling is a couple of blank files, your code editor and nothing more (which is absolutely fine, especially if you’re new to the scene). Whatever your toolset looks like, it's always beneficial to take a peek at what's out there and what’s new in front-end tooling. To that end, let's roll out 50 of the most interesting and practical web development tools that you should know about. Most of these are fairly new, having been released at some over the past year, while a few have been around for a little longer and have only started to gain traction during the last 12 months. Whatever the case, you'll most definitely find something in this list you can use in a project soon. We've organised the list into sections, to make it easier to navigate. You can use the links to jump straight to the section you're interested in, or just browse the whole list. Want even more? Here's another list of amazing web design tools, and be sure to check out our list of user testing software tools, too.
01. autoComplete.js
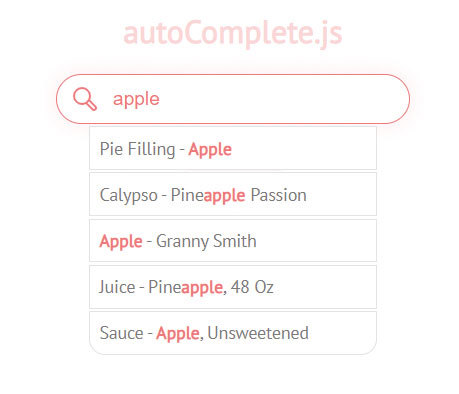
Get it here
A small library to add auto-complete functionality to a form field. Offers loose and strict search modes, customisable minimum number of characters before offering suggestions, optional callback functions and more.
02. indigo-player
Get it here
A modular, easy-to- customise JavaScript video player with advertisement support out-of-the-box so you can enable pre-roll, mid-roll or post-roll sponsors for embedded videos.
03. Simple-keyboard
Get it here
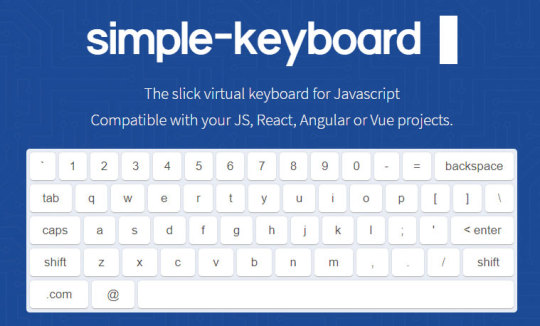
An elegant, responsive virtual keyboard component that offers ready-to-use demos of both mobile- and desktop-style keyboards. The demo keyboards are gorgeous but you can also style one easily to suit your brand.
04. fslightbox.js
Get it here
A vanilla JavaScript lightbox plugin that can display images, HTML5 video and YouTube embeds in an attractive and usable overlay. Offers React and Vue versions and the ability to upgrade from the free version if you want to get your hands on more features.
05. Rallax.js
Get it here
Parallax shouldn’t be used heavily but a simple dependency-free solution like this one is a good option. This has good performance and an easy-to-use API for starting effects, stopping, speeding up and the ability to chain .when() methods for queuing actions.
06. FrenchKiss.js
Get it here
A super-fast internationalisation library with an extensive API. One example customisation it offers is the ability to deal with a language that has multiple pluralisation rules.
07. Moveable

Get it here
Make any element on the page draggable, resizable, scalable rotatable or even warpable (like the perspective tool in a graphics editor). You can also enable grouping and snap-to-guides functionality.
08. Hotkey
Get it here
Trigger an action on a specified element by means of a shortcut key, combination of keys or sequence of keys pressed by the user. The documentation has suggestions to ensure good accessibility.
09. Freezeframe.js
Get it here
Add play/pause functionality to animated GIFs on a page. Trigger play/pause via hover, click, touch event or by an external element that serves as a play/pause button.
10. pagemap
Get it here
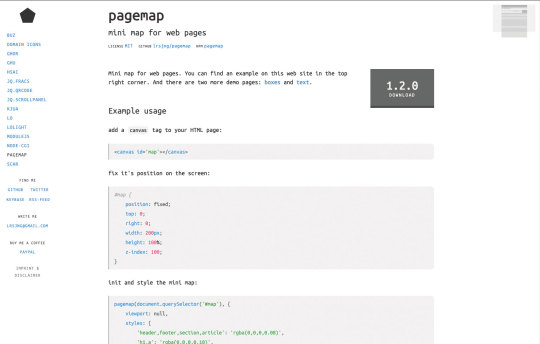
Add a scrollable 'mini map' to long web pages, similar to what you find in the Sublime Text code editor. It’s arguable whether this is more usable than a scrollbar but you could implement this with the scrollbar disabled for a native feel.
11. lax.js
Get it here
Vanilla JavaScript plugin to add responsive and mobile-friendly. Add play/pause functionality to animated GIFs on a page. Trigger animations, transitions and parallax effects to pages while the user scrolls. Get started with the presets or create custom effects.
12. Project Wallace
Get it here
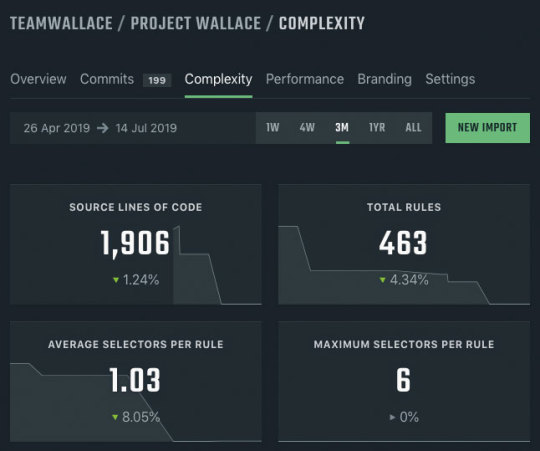
This is a CSS analysis tool with a dashboard that lets you track the complexity of your code, including the number of lines of code, amount of selectors, quantity of declarations, specificity, use of !important, performance bottlenecks and more.
13. DebuCSSer
Get it here
An unobtrusive CSS debugging tool that works as an option for manually adding an outline to one or more elements. Include the script, then hold the CTRL key to outline an element or CTRL-SHIFT to outline all.
14. Animated CSS Burgers
Get it here
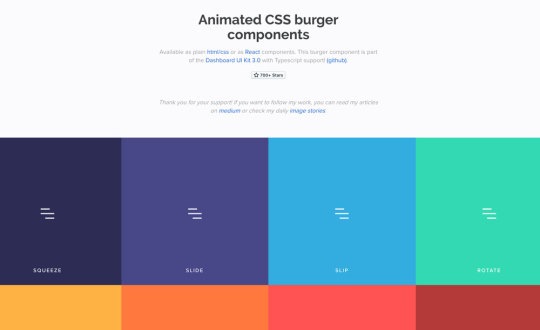
A small library of animated mobile hamburger menus that should satisfy your needs should you require a slightly different menu style in each project.
15. DropCSS
Get it here
A fast JavaScript module that compares a page's HTML to the CSS, then returns the latter with unused code removed, saving valuable bytes in page load time. For more on unused CSS, see the accompanying box.
16. CSSFX
Get it here
Yet another useful and unique set of plug-and- play CSS animations and effects. This one includes a wide variety of effects – some require more than a single HTML element but they’re easy to add to a project.
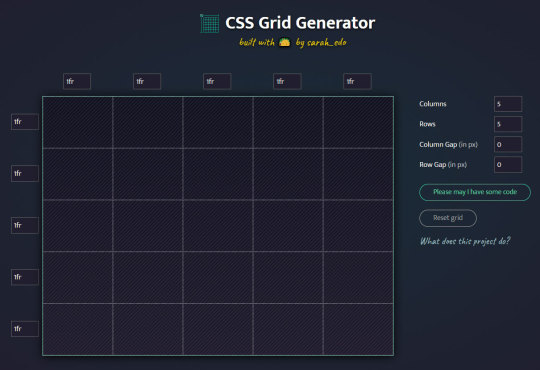
17. CSS Grid Generator
Get it here
For anyone first getting into the CSS Grid standard, having a visual helper will be a huge boost. This generator is a great way to learn the features and create practical grid code for all your layouts.
18. Darkmode.js
Get it here
There seems to be a dark mode craze lately. This project lets you add a dark mode toggle to pages, utilising CSS’s mix-blend-mode property to handle the dark/light modes.
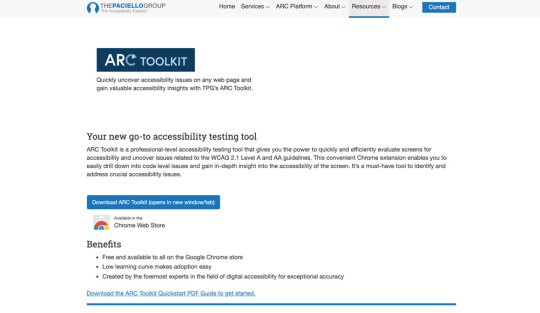
19. ARC Toolkit
Get it here
Chrome extension by the Paciello Group that integrates with DevTools to provide extensive accessibility testing as part of your development and testing workflow.
20. Clarity Dashboard
Get it here
A user-testing platform from Microsoft. Add a script to your page then replay user sessions to see how users interact with your site or app.
21. GraphQL Editor
Get it here
This is a useful online editor that enables you to speed up the creation of GraphQL schemas. GraphQL is a popular new technology that serves as a more efficient alternative to using REST.
22. jsonbox.io
Get it here
Free JSON storage that 22 offers users the ability to store, read and modify JSON data over HTTP APIs using various commands such as GET, POST, PUT and DELETE.
23. Accessibility Insights
Get it here
A Chrome extension, 23 Edge add-on or native Windows app to run accessibility testing. You can do a quick test for the most common problems or show visual overlays on a page to examine colour contrast, ARIA landmarks and more.
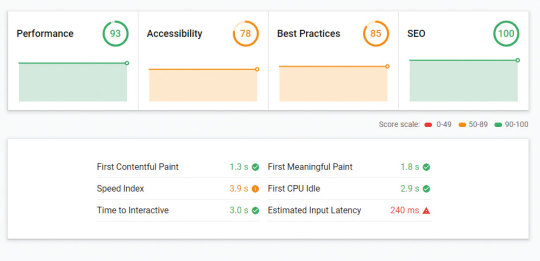
24. Measure
Get it here
This one is part of Google's new developer hub, providing a one-stop online tool to test your content for vital concerns such as performance, accessibility, best practices and SEO.
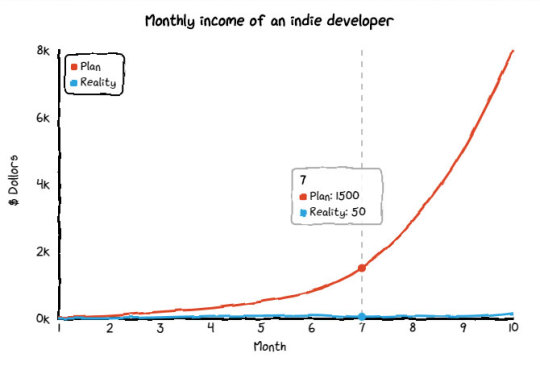
25. Chart.xkcd
Get it here
A quirky JavaScript charting library that generates charts in sketchy or hand-drawn manner in the style of xkcd, the popular web comic. Might be a great option as part of an informal app design.
26. useAnimations
Get it here
A collection of simple, customisable animated icons that you can plug into projects on mobile or web, offering a React version and the ability to edit the pre-made animations either in Lottie or Adobe After Effects.
27. Strikefree Music
Get it here
A growing library of audio clips you can use in things like videos and podcasts without fear of being penalised for copyright violations. You can optionally create your own custom beats or randomly select one that's already been created.
28. ZapChart
Get it here
A neat online tool to build shareable data in chart format. Just plug in the numbers for the x and y axes and this app will generate a bar chart downloadable as PNG or shareable via URL.
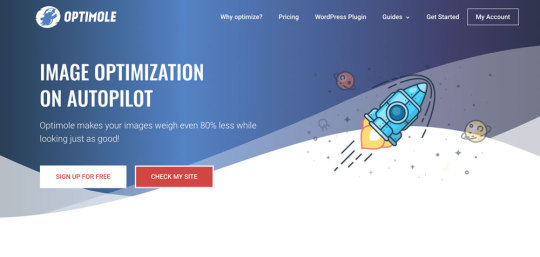
29. Optimole
Get it here
An image optimisation service and CDN for WordPress. Includes features for serving device-appropriate images with lossy or lossless compression, optional lazy loading and lots more.
30. Mixkit
Get it here
A collection of HD videos and illustrations, filterable by categories and free to use anywhere in commercial and non-commercial projects, without attribution.
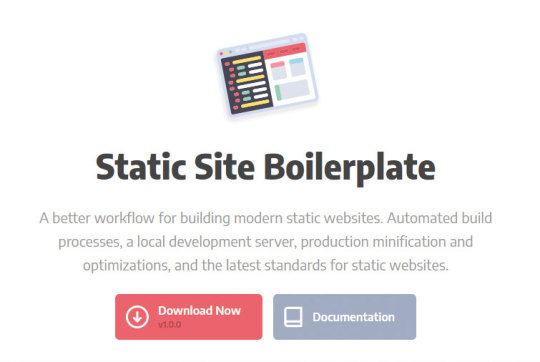
31. Static Site Boilerplate
Get it here
A non-opinionated and feature-rich toolkit for building static sites. Offers automated builds, a local dev server, production-level optimisations (such as code minification and image processing) and has support for a number of modern front-end technologies (Sass, ES6, etc).
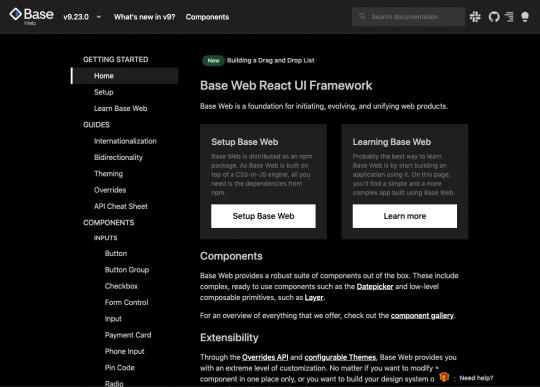
32. Base Web
Get it here
A React-based UI framework with a vast suite of components that range from complex functionality like a payment card component (ie input mask for different credit card types) to low-level features such as FlexGrid and Layer for composing your layouts.
33. Materialize

Get it here
A responsive front-end framework with a slew of CSS and JavaScript components. Includes components for form features, layouts, mobile-specific and more – all based on Google's Material Design.
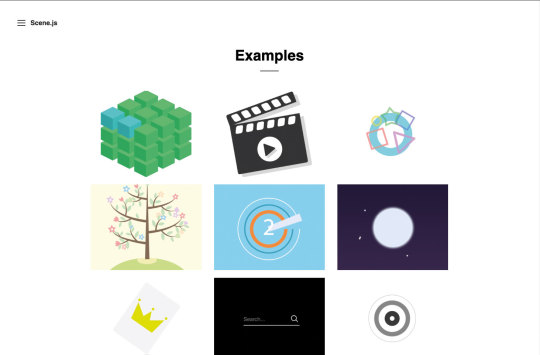
34. Scene.js
Get it here
An extensive API for controlling things like animation timing, transitions and effects. Want some more?
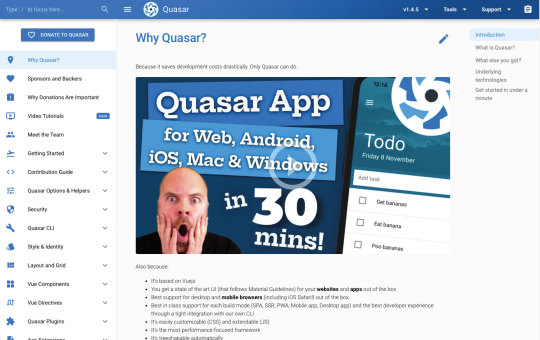
35. Quasar
Get it here
A Vue-based UI library with components to help build single-page applications, progressive web apps, hybrid mobile apps and desktop apps with no unnecessary bloat.
36. React Simple Img
Get it here
A lazy-loading image solution for React projects that uses the IntersectionObserver API and the new Priority Hints standard for an elegant image-loading solution.
37. React Animation
Get it here
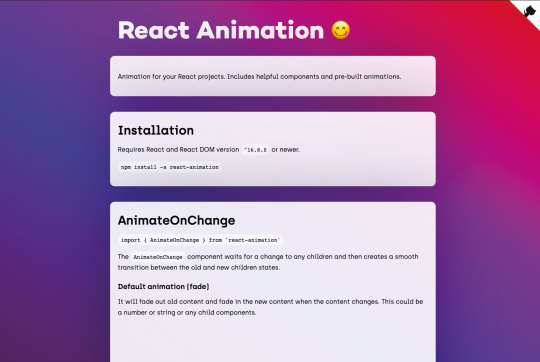
An easy-to-use animation library for React that lets you easily add unique pre-built animated effects to page elements based on content changes and loading or enables you to build your own.
38. React Redux Loading Bar
Get it here
A progressive animated loading indicator bar for React projects, with the ability to add multiple loading bars on a single page that indicate different items loading independently of each other.
39. react-image-magnifiers

Get it here
A set of responsive React components to magnify and zoom in to high-res images on mobile or desktop, similar to the zoom feature available on shopping sites like Amazon, which enables you to drag while zooming to examine specific parts of an image.
40. RIFM
Get it here
React component to convert any HTML form input into formatted input. For example, if a user types something in all lower case, you can force upper case (or just about any preferred format) as they type.
41. Remote Development
Get it here
An extension pack for Visual Studio Code that enables you to use VSCode's full set of features remotely by SSHing into any folder in a container, remote machine or Windows Subsystem for Linux (WSL for short).
42. Fabulous
Get it here
This lets you edit CSS Properties in a sidebar in VSCode. Will display CSS from different sources including CSS-in-JS libraries, .scss files, <style> blocks in the HTML and styles tied to library components (Angular, Svelte, Vue).
43. packtracker.io
Get it here
A tool that tracks and analyses your webpack bundle on every commit. Helps to avoid oversized assets, npm package overuse and redundant content to ensure better overall app performance.
44. Flutter
Get it here
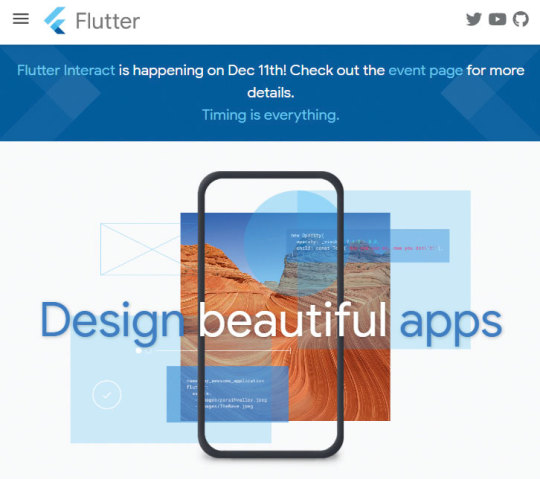
Google's UI development toolkit for creating natively compiled apps for web, desktop and mobile. Produces an app for all platforms from a single codebase, offering flexibly UI to boot.
45. Packem
Get it here
A JavaScript module bundler that purports to be twice as fast as its main competitor, Parcel. Still in alpha at the time of writing but a promising tool that could be your go-to bundler in the coming months.
46. Pika
Get it here
A multi-featured toolset that includes npm stats, package search, a CDN and Pika Web. The latter lets you add dependencies to a project directly in the browser without webpack, Browserify, etc.
47. Commento
Get it here
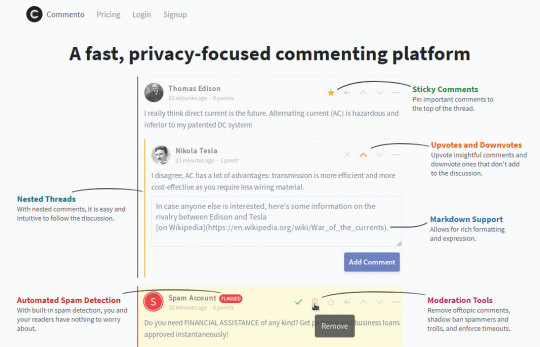
A lightweight, ad-free, privacy-focused commenting system you can embed in your web pages, usable via their cloud service or self-hosted. Includes Akismet spam detection, sticky comments, voting, Markdown support and more.
48. Just
Get it here
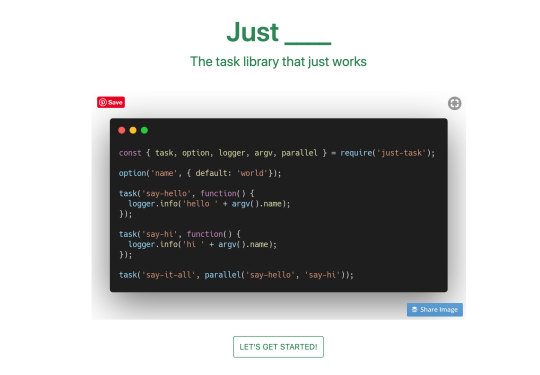
A build task library with an easy-to-use API to compose chained, parallel or nested tasks during your build process.
49. Git History
Get it here
Easily browse any file's history on GitHub, GitLab or Bitbucket. Just select a file URL then replace github.com with github.githistory.xyz and an animated, visual history of the file will display.
50. Sublime Merge
Get it here
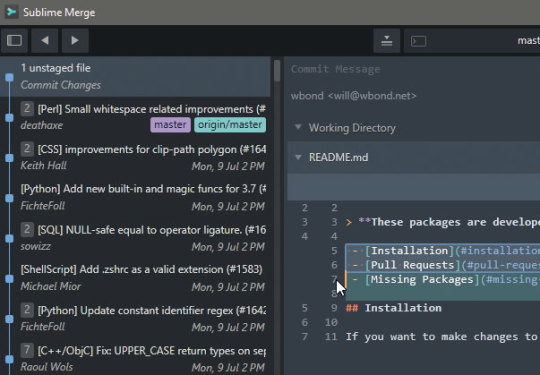
A fast, search-friendly Git client (Mac, Windows, Linux) from the makers of Sublime Text. Offers syntax highlighting, integrated merge tool, side-by-side diffs and more.
0 notes
Photo

pagemap: A 'Mini Map' for Your Pages - https://t.co/WnU42LnI5u
0 notes
Photo

Will PageMap add image thumbnail to my pages in search results? https://www.reddit.com/r/SEO/comments/dk2z8x/will_pagemap_add_image_thumbnail_to_my_pages_in/
I’m trying to add image thumbnails to some pages on my website when people search mobile.
Is this something I can add through a PageMap? Or is this something only google adds to say, the home page. And they control it, not us?
Tried doing some researching online couldn’t come up with an exact answer. Essentially I’ve done alt text and all other SEO practices for optimization but I’d like to know how to add images as thumbnails on search results.
Any information is appreciated! I use Wordpress. Thank you
submitted by /u/We_Dont_Like_You [link] [comments] October 19, 2019 at 05:44PM
0 notes
Text
pagemap - Webページにミニマップを追加
from http://www.moongift.jp/2019/09/pagemap-web%e3%83%9a%e3%83%bc%e3%82%b8%e3%81%ab%e3%83%9f%e3%83%8b%e3%83%9e%e3%83%83%e3%83%97%e3%82%92%e8%bf%bd%e5%8a%a0/
長大なコンテンツがある時、自分が今どの位置にあるのか知りたくなります。書籍であればページ数が書かれており、Webサイトであればページネーションを分けたりします。自分の現在位置が分かることで、後どれくらいのコンテンツが残されているか把握できるようになります。
そんなミニマップをWebサイトに追加してくれるのがpagemapです。
pagemapの使い方
右上に表示されているのがpagemapです。

https://images.moongift.jp/2019/08/open-source-pagemap-3_thumb.5d4bc969564c4463d9a00402ac5b336c.jpg
0 notes
Photo

便利そうなのでメモ。「pagemapはページ全体の構成を取得し、全体を把握できるマップを自動生成するスクリプトです。MITライセンスで、商用プロジェクトでも無料で利用できます」。◆ Webページの構成を取得し、ページ全体を把握できるマップを自動生成するスクリプト -pagemap | コリス https://pyn.jp/2MMvCKw
0 notes
Text
Webページの構成を取得し、ページ全体を把握できるマップを自動生成するスクリプト -pagemap

Webページ内のコンテンツの構成を取得し、ページ全体を把握できるマップを自動生成するスクリプトを紹介します。マップはページ内リンクにも対応しています。
pagemap pagemap -GitHub
pagemapの特徴
pagemapはページ全体の構成を取得し、全体を把握できるマップを自動生成するスクリプトです。MITライセンスで、商用プロジェクトでも無料で利用できます。
全体マップは、デフォルトでは右上に表示されます。
pagemap
マップを操作することも可能で、クリックするとそこに移動し、ドラッグするとスクロールしなが��移動できます。
pagemap(マップを拡大表示)
pagemapのデモ
デモは2種類用意されており、テキストのみ、ボックスのみ、でページ全体のマップが表示されます。
デモページ: Text
デモページ: Box
pagemapの使い方
Step 1: 外部ファイル
当スクリプトを</body>の上に外部ファイルとして記述します。
<body>
...
コンテンツ
...
<script src="pagemap.min.js"></script>
</body>
Step 2: HTML
マップを生成するためのcanvas要素をコンテンツの最後に記述します。
<body>
...
コンテンツ
...
<canvas id="map"></canvas>
<script src="pagemap.min.js"></script>
</body>
Step 3: JavaScript
あとはスクリプトを実行するだけで、マップが表示されます。
<body>
...
コンテンツ
...
<canvas id="map"></canvas>
<script src="pagemap.min.js"></script>
<script>
pagemap(document.querySelector('#map'));
</script>
</body>
オプション
マップの表示位置を変更するには、CSSを調整します。
#map {
position: fixed;
top: 0;
right: 0;
width: 200px;
height: 100%;
z-index: 100;
}
マップのデザインもカスタマイズできます。
pagemap(document.querySelector('#map'), {
viewport: null,
styles: {
'header,footer,section,article': rgba(0,0,0,0.08),
'h1,a': rgba(0,0,0,0.10),
'h2,h3,h4': rgba(0,0,0,0.08)
},
back: rgba(0,0,0,0.02),
view: rgba(0,0,0,0.05),
drag: rgba(0,0,0,0.10),
interval: null
});
0 notes
Photo

Pagemap : Mini map for web pages
Pagemap is a sort of navigation system which uses mini map for single page website or any other lengthy web page with javascript and html5 canvas.
The post Pagemap : Mini map for web pages appeared first on Best jQuery.
by Admin via Best jQuery https://ift.tt/2ztzC9P
0 notes
Text
Pagemap: A mini map for your website
https://larsjung.de/pagemap/ Comments
0 notes
Text
plugin-programmable-search-engine (A README Experience)

A plugin for Micro.blog for adding a site search interface using Google’s programmable search engiine API. It’s code lives here
Creating your Google Programmable Search Engine
Assuming you already have or are willing to go ahead and create an account with Google (which I assume is a necessary component to creating the programmable search engine), follow these steps to configure yourself a search engine.
Navigate to the landing page and click the Get Started button.

Click the Add button to create a new instance.

Enter your site address (I believe I went with *.moondeer.blog/*) and click CREATE.
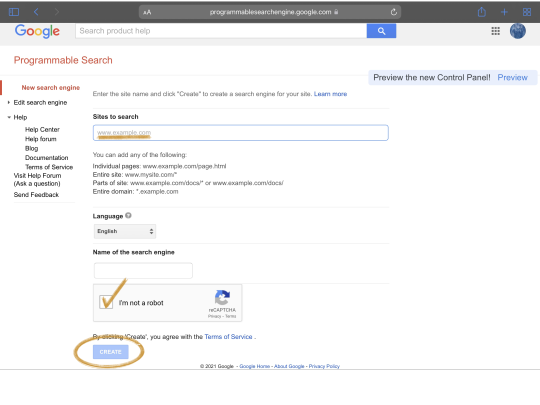
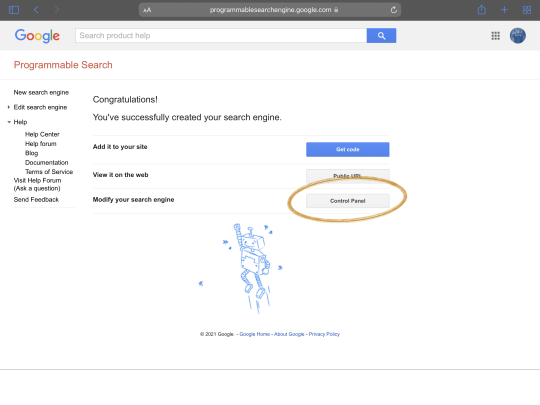
Click on Control Panel to get to the configuration.
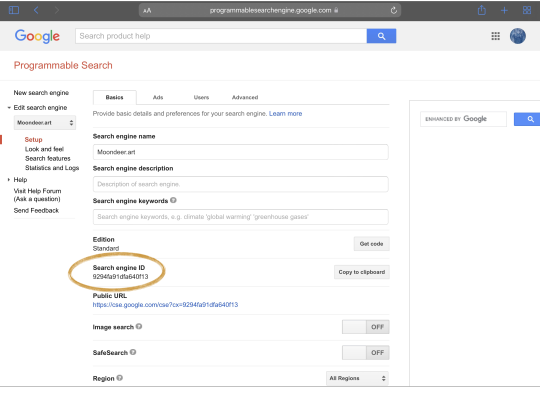
Here’s the first value we need, the Search engine ID, this is the value referred to every else as cx.
Now, scroll down a bit and find the Programmatic Access section. Click the Get Started button to the right of Custom JSON Search API.

Find and click the Get a Key button.

Select the + Create a new project option.
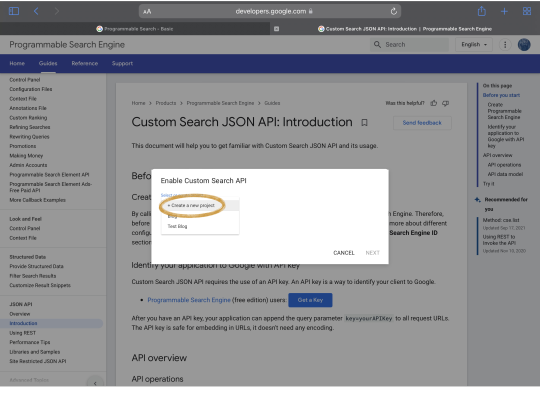
Pick a project name and click NEXT.

And here’s value number two, the API key.

Test Driving your Engine
If you follow those ten steps, you’ll end up with a working search engine constrained to your site content (or what Google has crawled of it). You can navigate to that Public URL Google kept mentioning as you were getting things setup. If you do, you’ll find an unimpressive page looking something like this:

Go ahead and perform a search. These are the same results the plugin will have access to using that Custom Search JSON API. The image below explains why I took one look at the Google-supplied interface options and said, “F$&k that noise … how do we get a hold of this data to display for ourselves”:

Data, What Data?
So that Custom Search JSON API page we visited to get our API key kept pushing you to Try this API, am I right? Here is how can. Locate that Search engine ID value that I warned you we’d start calling cx and plop that little f$&ker in the cx field kinda like:
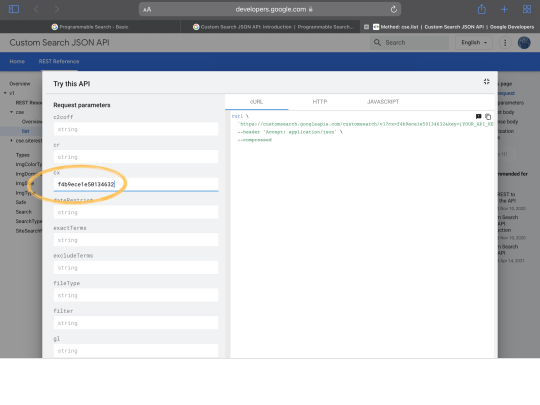
Then scroll until you find the q field (because query is such a long f$&king word) and plop in some search terms kinds like:
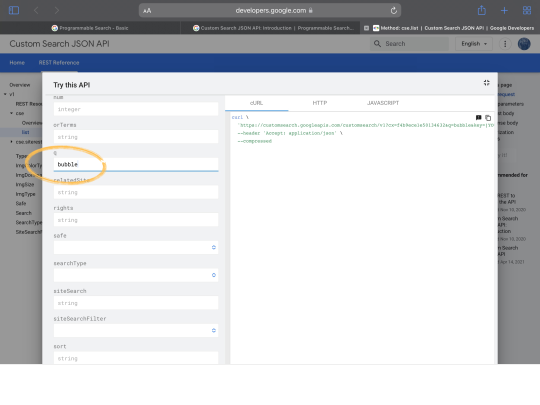
Now, the first time I did this (right after creating my API key) I got an error. No idea why. If you get one, holler. If you don’t, it means you have access to the exact same data the plugin (and that Public URL page) pulls down.

The response to a custom search request is detailed here. Let’s go over the bits I found to be relevant.
Relevant Response Bits
queries
queries contains 1 - 3 collections of metadata that amount to a glorified page index. There will always be an entry for request, this amounts to the current page. Each collection contains a startIndex value. I did a whole thing where I generated numbered navigation links for the pages at the bottom (you know, as you do); but, it turns out that the f$&king totalResults value is dynamic for some f$&king reason and displaying indices as estimates is horsesh$te (when I checked the Public URL page to see if Google, itself, could manufacture accurate indices, I found they could not. Run through your result pages, if you like swing-and-a-miss-indices, I will put them back). Anyway, all we really care about (seeing as we know the search terms), is that startIndex and the abscence or presence of previousPage and nextPage entries (and their startIndex values). If I’ve missed something you find to be relevant, feel free to share.
"queries": { "previousPage": [{ … "startIndex": integer, … }], "request": [{ … "startIndex": integer, … }], "nextPage": [{ … "startIndex": integer, … }] }
items
The items array holds the search result items corresponding to queries.request. The bits the plugin currently utilizes are these:
{ … "title": string, … "link": string, "displayLink": string, … "htmlSnippet": string, … "pagemap": { f$&kin-random }, … }
It’s the top four properties that compose the bulk of the displayed item. For result items without an image, they compose it entirely.

None of my result items have ever had an image entry at the top level as depicted in the API (If y’all end up with an entry, holler, and I’ll add checks for image property). The thumbnail images are pulled out of that pagemap entry. This collection of page metadata will be influenced by Micro.blog theme and Micro.blog plugin installations. The result items I have received consistently contain an entry at pagemap.cse_thumbnail[0] (yeah, they wrap everything in a f$&kin’ array, no idea why). The plugin looks for this entry and when it finds it you get a thumbnail image to along with the other stuffs.

So What the F$&k is the PageMap?
Well, it turns out that a PageMap is yet another f$&kin’ form of structured data used by Google. It consists of a butt-ugly chunk of XML injected into the page <head> inside an HTML comment.
<html> <head> ... <!-- <PageMap> <DataObject type="document"> <Attribute name="title">The Biomechanics of a Badminton Smash <Attribute name="author">Avelino T. Lim <Attribute name="description">The smash is the most explosive and aggressive stroke in Badminton. Elite athletes can generate shuttlecock velocities of up to 370 km/h. To perform the stroke, one must understand the biomechanics involved, from the body positioning to the wrist flexion. <Attribute name="page_count">25 <Attribute name="rating">4.5 <Attribute name="last_update">05/05/2009 <DataObject type="thumbnail"> <Attribute name="src" value="http://www.example.com/papers/sic.png" /> <Attribute name="width" value="627" /> <Attribute name="height" value="167" /> --> ...
0 notes
Text
Using the Little-Known CSS element() Function to Create a Minimap Navigator
W3C’s CSS Working Group often gives us brilliant CSS features to experiment with. Sometimes we come across something so cool that sticks a grin on our face, but it vanishes right away because we think, “that’s great, but what do I do with it?” The element() function was like that for me. It’s a CSS function that takes an element on the page and presents it as an image to be displayed on screen. Impressive, but quixotic.
Below is a simple example of how it works. It’s currently only supported in Firefox, which I know is a bummer. But stick with me and see how useful it can be.
<div id="ele"> <p>Hello World! how're you?<br>I'm not doing that<br>great. Got a cold 😷</p> </div> <div id="eleImg"></div>
#eleImg { background: -moz-element(#ele) no-repeat center / contain; /* vendor prefixed */ }
The element() function (with browser prefix) takes the id value of the element it’ll translate into an image. The output looks identical to the appearance of the given element on screen.

When I think of element()’s output, I think of the word preview. I think that’s the type of use case that gets the most out of it: where we can preview an element before it’s shown on the page. For example, the next slide in a slideshow, the hidden tab, or the next photo in a gallery. Or... a minimap!
A minimap is a mini-sized preview of a long document or page, usually shown at on one side of the screen or another and used to navigate to a corresponding point on that document.
You might have seen it in code editors like Sublime Text.
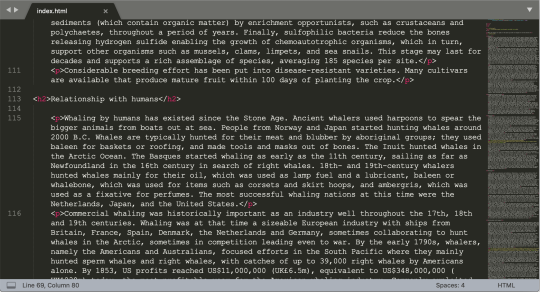
The minimap is there on the right.
CSS element() is useful in making the “preview” part of the minimap.
Down below is the demo for the minimap, and we will walk through its code after that. However, I recommend you see the full-page demo because minimaps are really useful for long documents on large screens.
If you’re using a smartphone, remember that, according to the theory of relativity, minimaps will get super mini in mini screens; and no, that’s not really what the theory of relativity actually says, but you get my point.
See the Pen Minimap with CSS element() & HTML input range by Preethi Sam (@rpsthecoder) on CodePen.
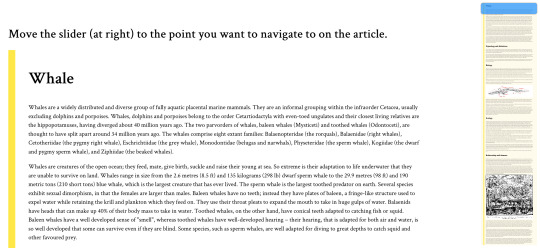
If you’re designing the minimap for the whole page, like for a single page website, you can use the document body element for the image. Otherwise, targeting the main content element, like the article in my demo, also works.
<div id="minimap"></div> <div id="article"> <!-- content --> </div>
#minimap { background: rgba(254,213,70,.1) -moz-element(#article) no-repeat center / contain; position: fixed; right: 10px; top: 10px; /* more style */ }
For the minimap’s background image, we feed the id of the article as the parameter of element() and, like with most background images, it’s styled to not repeat (no-repeat) and fit inside (contain) and at center of the box (center) where it’s displayed.
The minimap is also fixed to the screen at top right of the viewport.
Once the background is ready, we can add a slider on top of it and it will serve to operate the minimap scrolling. For the slider, I went with input: range, the original, uncomplicated, and plain HTML slider.
<div id="minimap"> <input id="minimap-range" type="range" max="100" value="0"> </div>
#minimap-range { /* Rotating the default horizontal slider to vertical */ transform: translateY(-100%) rotate(90deg); transform-origin: bottom left; background-color: transparent; /* more style */ } #minimap-range::-moz-range-thumb { background-color: dodgerblue; cursor: pointer; /* more style */ } #minimap-range::-moz-range-track{ background-color: transparent; }
Not entirely uncomplicated because it did need some tweaking. I turned the slider upright, to match the minimap, and applied some style to its pseudo elements (specifically, the thumb and track) to replace their default styles. Again, we’re only concerned about Firefox at the moment since we’re dealing with limited support.
All that’s left is to couple the slider’s value to a corresponding scroll point on the page when the value is changed by the user. That takes a sprinkle of JavaScript, which looks like this:
onload = () => { const minimapRange = document.querySelector("#minimap-range"); const minimap = document.querySelector("#minimap"); const article = document.querySelector("#article"); const $ = getComputedStyle.bind(); // Get the minimap range width multiplied by the article height, then divide by the article width, all in pixels. minimapRange.style.width = minimap.style.height = parseInt($(minimapRange).width) * parseInt($(article).height) / parseInt($(article).width) + "px"; // When the range changes, scroll to the relative percentage of the article height minimapRange.onchange = evt => scrollTo(0, parseInt($(article).height) * (evt.target.value / 100)); };
The dollar sign ($) is merely an alias for getComputedStyle(), which is the method to get the CSS values of an element.
It’s worth noting that the width of the minimap is already set in the CSS, so we really only need to calculate its height. So, we‘re dealing with the height of the minimap and the width of the slider because, remember, the slider is actually rotated up.
Here’s how the equation in the script was determined, starting with the variables:
x1 = height of minimap (as well as the width of the slider inside it)
y1 = width of minimap
x2 = height of article
y2 = width of article
x1/y1 = x2/y2 x1 = y1 * x2/y2 height of minimap = width of minimap * height of article / width of article
And, when the value of the slider changes (minimapRange.onchange), that’s when the ScrollTo() method is called to scroll the page to its corresponding value on the article. 💥
Fallbacks! We need fallbacks!
Obviously, there are going to be plenty of times when element() is not supported if we were to use this at the moment, so we might want to hide the minimap in those cases.
We check for feature support in CSS:
@supports (background: element(#article)) or (background: -moz-element(#article)){ /* fallback style */ }
...or in JavaScript:
if(!CSS.supports('(background: element(#article)) or (background: -moz-element(#article))')){ /* fallback code */ }
If you don’t mind the background image being absent, then you can still keep the slider and apply a different style on it.
There are other slick ways to make minimaps that are floating out in the wild (and have more browser support). Here’s a great Pen by Shaw:
See the Pen Mini-map Progress Tracker & Scroll Control by Shaw (@shshaw) on CodePen.
There are also tools like pagemap and xivimap that can help. The element() function is currently specced in W3C’s CSS Image Values and Replaced Content Module Level 4. Defintely worth a read to fully grasp the intention and thought behind it.
This browser support data is from Caniuse, which has more detail. A number indicates that browser supports the feature at that version and up.
Desktop
ChromeOperaFirefoxIEEdgeSafariNoNo4*NoNoNo
Mobile / Tablet
iOS SafariOpera MobileOpera MiniAndroidAndroid ChromeAndroid FirefoxNoNoNoNoNo64*
Psst! Did you try selecting the article text in the demo? See what happens on the minimap. 😉
The post Using the Little-Known CSS element() Function to Create a Minimap Navigator appeared first on CSS-Tricks.
😉SiliconWebX | 🌐CSS-Tricks
0 notes
