#one bowl. melt the shit. add shit. pour into lined baking dish. done!
Explore tagged Tumblr posts
Text
this just in - I still have not made the peppermint bark I'm supposed to make. It's not lookin good for today either. Perhaps..... tomorrow 🤔🤔🤔
#look. it's a LOT of melting chocolate. like. a lot. and that makes. such a mess. so many bowls I'll have to use cause#you gotta do it in layers of milk & white chocolate#so it's like so much mess#and I wanna just be able to shove 90% of it in the dish washer#but the dishwasher is already like.... almost at capacity rn so#it's not happening today#and this is the problem lol I just keep going 'oh tomorrow!'#and then NOT DOING IT#UGHHHH#it's that it has like three layers you gotta do and it's just. ugh. the fudge is just#one bowl. melt the shit. add shit. pour into lined baking dish. done!#this is like. way more. involved. in the laziest sense of the word lol#I should have just baked the fckn almond cake again but nooooooo#'omg I'm already making one for Christmas dessert I don't want to make 2 again this year!'#what an idiot#cakes & bundt cakes are literally a piece of cake for me lol I should have just done the cake ughhhhh#erin explains it all
0 notes
Note
do you have any new recipes that you've learned recently? i remember you wrote something a while ago about carbonara and i tried it out for myself it was really fun!!
i love this 😭 im gonna write way too much idec! something that has changed since that post: my kitchen is worse. i have a horrible combi oven which has resulted in me accidentally eating raw chicken, because it had been in there for more than 2 hours at supposedly 230 °C and i was really hungry and thought it HAD to be done by then. also i have less time and less money lol. it has made me a bit sad, and less motivated to cook nice things but i also love food! which means these tips/recipes are gonna reflect that and might seem a bit dull but probably also relatable for a lot of people. i’ve definitely made spaghetti carbonara a bit too much because it’s simple and require few ingredients! will still vouch for that one tip about substituting the bacon with roasted veggies and other types of meat.
last week i made risotto for the very first time, i think? which means i might be assuming a bit too much, but i think it’s a great dish that you can almost make with whatever you have in your fridge. i made it with roasted beetroot(needs A LOT of time to soften, lesson learned), carrots and parsley root or parsnip(idk the difference), dried rosemary and thyme, garlic and onion. i had some leftover sushi rice, which is great for risotto apparently(love versatile ingredients), roasted them in some oil and then added white wine and chicken stock and actually added a leftover parmesan rind i had in the fridge to give the ‘stock’ some flavour, a bit of nutmeg and then in the end some shredded gouda lol… it was surprisingly delicious and i didn’t even really care to cook the rice perfectly. it also tasted delicious 3 days later, which was a nice surprise. i bet there are tons of risotto recipes online, but as long as you have rice, some kind of flavoured water, i guess you could kind of add whatever you want of veggies and top with whatever herb you have around.
another type of porridge i consume a lot these days is hot oat porridge, which i’ve eaten since i was little and it was the first ‘dish’ i learnt to make myself and it’s cheap. some people really dislike the consistency and look but i don’t. it’s also very easy to customise. i put in whatever nuts and seeds(which are often cheaper than nuts) i have around: flaxseed, sesame seeds, pumpkin seeds, sunflower seeds, chopped almonds and sometimes a dollop of peanut butter. i let them simmer along with the oats. i like adding those elements because it gives it some texture and it keeps me more full throughout the day. it’s very important to me because i hate spending money i don’t have on fast-food when i’m not home and i hate being hungry. dried raisins, cranberries for a bit of sweetness and if i’m treating myself i’ll add some fresh apples cut into small pieces or some homemade berry compote(i use frozen) or brown sugar. if i had more money i’d use maple syrup but i don’t at the moment. i also add a bit of cinnamon and cardamom, dried ginger etc, whatever you feel like. some people also add milk afterwards but i’d rather spend my milk on my coffee.
a small tip: making chili flake / garlic oil. it’s really delicious, you could put it straight on pasta with some parmesan and pepper and it would be a filling meal. either chop the garlic really fine, grate it, microplane it, smash it to pieces. heat some olive oil until it’s quite hot, then remove from heat and add the chili flakes and garlic. if the oil isn’t hot enough you can just put the pan or pot back on the heat but be careful you don’t burn the chili flakes or garlic, as it will make it bitter. the longer it will toast, the less pronounced the raw garlic flavour will be, so when it smells toasted enough for your taste, take it off. i store it in a tiny glass jar and add it in stews, sauces, toasts, pizza, sandwiches etc. the flavour is very strong imo and everything it touches will smell like it. something to drink: i like strong foods and i like sour foods, which is why i like lemon/ginger based drinks. to make it even more winter friendly and easy to make, i like to grate unpeeled ginger(i hate slices of ginger, they do nothing for me and seems like a waste of ginger), lemon zest, lemon juice and mix it or blend it with some water/apple juice and honey and strain it afterwards. if you have a really nice blender you can just add all of it together with some ice. i’m basically making a large amount of ginger shot mixture. then when i feel like it, i can take some of the mixture and either drink it as it is, add more apple juice if i need a refreshing beverage or add hot water and more honey for when im cold. you could also add turmeric, chili, use less sweetener and other sorts of healthy stuff but i honestly do it for the taste so i don’t care about that that much.
something sweet: i posted earlier about cakes and someone mentioned swedish kladdkaka, which is a super delicious, cheap, brownie-like chocolate cake that is easily customized and hard to fuck up which is why i’ve made it since i was very young and is a go-to and i didn’t even know it was a swedish thing. if you like airy, light cakes this is not for your. this is sticky, sweet and almost like confection. you can add nuts, swirls of peanutbutter, tahini, actual pieces of chocolate, replace the white sugar with brown sugar, the butter with oil(you can be fancy and use a bit of olive oil) or use a mixture, brown the butter, you name it. the recipe i use is this: melt 100 g butter and let cool. mix 2 eggs + 3 dl sugar in a bowl until fluffy in one bowl. mix 1.5 dl flour, 4 tbs cocoa, 1 pinch of salt in another. mix the dry with the wet mixture and add the cooled, melted butter. this is the point where you’d add chopped nuts, chocolate etc. pour the batter into a cake tin lined with parchment (i use one that is 16 cm in diameters i think). bake the cake for around 30 mins at 150°C - 175°C degrees. check on the cake using a cake tester or a a knife. if the knife is clean after … stabbing it, it’s done! the cake will change it’s texture after cooling. this is a cheap cake, and if you like cake dough you might want to give it less time in the oven for a more fudgey texture. make it your own! there are no rules. last time i made this, i left it in for too long in my opinion but it was still delicious. also i literally have a shit oven with a round oven rack that goes in circles no matter what due to the microwave function, and the only ‘mixing’ equipment i have is a whisk and a spatula. no need for kitchen aids or even electrical hand mixers.
something else i’ve been eating a lot for lunch is simple open faced sandwiches, and something that can really elevate those is: making your own mayonnaise(and toasting the bread). it can be challenging, but it’s really worth it imo and i can’t remember the last time i bought it in a store. i have a small plastic bowl, whisk and 1 egg yolk. something i can really recommend is buying pour snouts for bottles. i transfer my oils from their plastic bottles to smaller, old soda bottles because im cheesy like that and it’s really handy especially when making mayo. constantly whisking the egg yolk by hand and then adding the NEUTRAL oil ever so slowly. don’t be fancy and use cold pressed stuff or extra virgin olive oil because it will taste weird. i only ever fail when i try to use immersion blenders for some weird reason but i find it rewarding to do by hand anyways and i think it might be easier to make smaller portions that way. mayo needs acid and you can get it by adding regular vinegar, apple cider vinegar, balsamic vinegar, lemon juice, lime juice, pickle juice, citric acid dissolved in water etc. it’s really easy to customise! when im making banh mi, i add some sesame oil, soy sauce for saltiness and use lime as the acidic element. for more regular use i add a bit of mustard(also helps with the emulsion), for fries, i like adding some fresh garlic. something as simple as mayo, tomatoes, flaky salt and pepper topped with chives is really nice. i also really like using slices of boiled potatoes or boiled eggs(idk if that’s only a thing where i’m from), mayo and the chili garlic oil. it’s also great for making tuna salad. yesterday i made a really simple sandwich with a very simple tuna salad(tuna, mayo, yoghurt, lemon and pepper), arugula, basil, the garlic/chili oil, cream cheese, pickled jalapeños and onions, green peber, cucumber and tomatoes. you could leave out everything but the tuna salad and it would still be a great little meal.
another nice condiment that beats the supermarket stuff by far is homemade ‘pesto’. when i buy parsley from my local grocery store, it��s a gigantic amount that i in no way can consume in a week. first of all when buying fresh herbs i really recommend washing them, wrapping them in a damp towel and keeping them in a closed container. it will prolong their lifetime from lasting a day to a week(change the towel if it seems too wet). i once had some cilantro in my fridge for several weeks and still be fresh. anyways, when i buy that much parsley, i like to remove the tougher parts of the stem(which i use in stews/sauces! chop it up and sautee it along with garlic and onion), add literally just olive oil, water, pepper, garlic, and a bit of acid and then blend away! it keeps for a long time in the fridge and is also delicious beneath tomatoes/potatoes/cheese on open-faced sandwiches. if you want to be fancy you can of course add some type of hard cheese, nuts, seeds, dried tomatoes, whatever.
i know this is the longest text post ever, but as a last reminder, i really recommend watching pasta grannies on youtube. really simple recipes with focus on few, good ingredients that just takes some time and love.
#sorry about the spelling mistakes and everything#it's not my first language but it probably wouldn't be much better if it were#food
78 notes
·
View notes
Photo
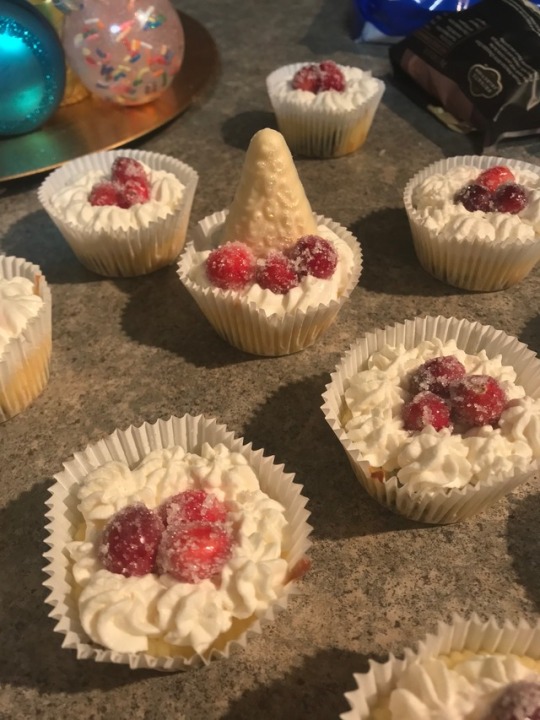
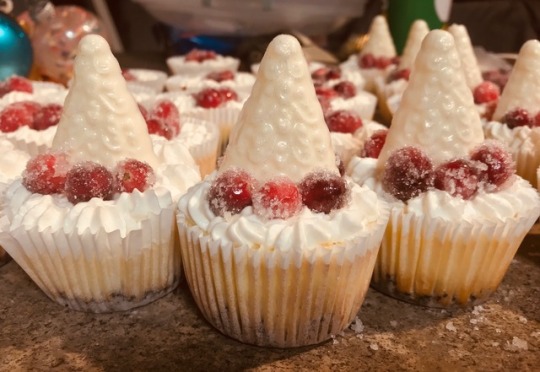
The Great Cookie Exchange 2k17: White Chocolate Cheesecake Cupcakes!
(lightly sweet with a delightful burst of tart, surprisingly easy to make! feat. Oreo cookie crust, stabilized whipped cream frosting, sugared cranberries, and white chocolate Christmas trees covered in edible glitter!)
Thanks to @chocolatequeennk for coming up with the cookie exchange idea, and thanks to @goingtothetardis for convincing me I could try my hand at cheesecake and it wouldn’t be a horrible disaster! :D To be fair, though, one of my favorite things about this dessert is that, while it is time-consuming and dirties a fair number of dishes, the steps themselves are actually pretty darn easy! I cobbled the dessert together out of several recipes I found online (sources below) for the sake of bringing something a lil different to my office holiday party yesterday; they were super effing popular and I received a truckload of nice comments. So if you a) are picky about sweets b) like cheesecake c) are interested in making seasonal/holiday treats that are pleasantly nondenominational (not into Christmas? Then those are wintery holiday trees!) and d) want for people to heap compliments on you, make this recipe, my buddies, my guys. <3 <3 <3
I would highly recommend making them with a friend, mostly because baking is so much fun when you do it with company. :D
The Recipes (AKA What is, How do???)
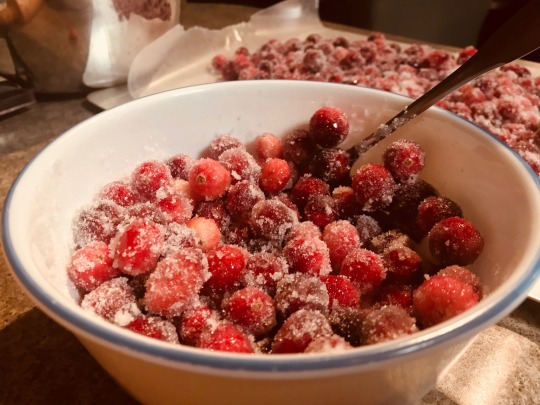
I would recommend starting with the sugared cranberries (source recipe here), and I would recommend making them a day in advance. Here’s my altered version of the aforementioned recipe:
4.5 cups sugar (3 for simple syrup, 1.5 for coating (or more if needed)) 1.5 cups water 2 cups fresh cranberries
First, make a simple syrup by stirring together your water and 4 c. of sugar in a medium saucepan over medium-low heat until the sugar dissolves and the water comes to a boil. Keep stirring and boiling until the mixture goes from opaque to transparent and has a slightly thicker texture when you lift your spoon out--like a thin syrup.

Remove the syrup from heat and let cool for a few minutes, then pour over cranberries in a bowl. The cranberries need to sit in the simple syrup for a minimum of 4 hours, but I would recommend letting them sit overnight, stirring occasionally.
4 hours later/the next day, drain the cranberries from the simple syrup, pour your remaining 1.5 c of sugar into a bowl, and coat the berries in handful-sized batches, rolling them around in the sugar-bowl with a fork until they’re evenly coated all over. (You might end up needing more sugar, since it starts to stick together and refuses to get coat-y after a while.) Place sugared cranberries on a baking sheet lined with parchment paper or wax paper and let dry for at least two more hours, and, voila! You’ve got lovely sugared cranberries!
Next up--or perhaps more accurately, simultaneously up--is the white chocolate Christmas trees, if such a thing interests you! The cupcakes are just as good with or without, tbh. I would recommend using Ghirardelli’s white chocolate melting wafers--they melt more evenly than white chocolate chips (significantly less risk of scalding), they hold their shape better than the chips, and they’re just so much effing tastier than any other candymaking chocolate I’ve had. The total amount you need depends on how many trees you want to make, but I can tell you off the bat that a 10 oz pkg of the Ghirardelli will make about 20-24 of the trees I made. (Srsly the Ghir’s are just so yummy, especially tasty while melted--dip some pretzels in the leftover melty goo, nom nom nom such a good treat!!!)
You can use pretty much any Christmas tree candymaking mold of your choice; I used this one. I also recommend using disco dust if you’re in an edible glitter mood. (I would ONLY buy either the original Disco Dust or the Sunflower Sugar Art variety--others will claim to be the same but many of them are actually regular craft glitter repackaged as “technically nontoxic glitter” for cake-PROP-decorating purposes. Boo!!!)
While your simple syrup for the cranberries is cooling, sprinkle a little bit of your edible glitter in the cavities of your candymaking molds by dipping a (clean, dry) index fingertip in the glitter and rubbing your thumb and forefinger together over the cavities so the glitter falls in. (You’re gonna get glitter everywhere no matter what; I’m sorry in advance.) Melt a handful or two of your white chocolate wafers in a microwave-safe bowl, in intervals of 30 seconds at 50% power, stirring between each session. When the white chocolate is smooth and liquidy enough to pour (no more chunks!!!), pour it into the molds, doing your best not to overflow. When each cavity is filled, gently tap and wriggle the mold--this distributes the chocolate more smoothly and also helps to eliminate pesky air bubbles. Stick the mold in the freezer for 15-20 minutes. When removing, check to make sure the chocolate is pulling away from the edges of the mold--that means it’s ready to come out. Turn the mold over on a plate or piece of wax paper and gently shake and tap the mold until the chocolate falls out.
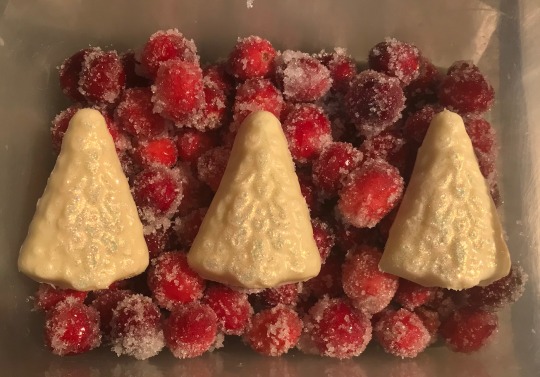
If your chocolate overflowed out of the mold, it might be a little more difficult to get out, and you might have to trim it with a sharp knife afterward. Just use extreme caution, puhleeeeze
And now it’s time for the big to-do: the cheesecake cupcakes! You can also make these a day or two in advance, if you like--they refrigerate quite well! The recipe makes about 16 regular-size cupcakes, or at least that’s how it turned out for me.
The original recipe is here (just disregard the section on the raspberry stuff); my personal tips follow:
- DON’T OVERBEAT THE CUSTARD. Only beat it until it is just blended. Aka, use a hand- or stand-mixer, but with extreme prejudice. Over-beating makes the custard more likely to crack in the oven. Not that that happened to me, or anything... 0:) (Don’t worry tho, even if they do crack, you can just hide it with delicious toppings! They’re still tasty!)
- I would almost always recommend buying store brand cream cheese over Philadelphia. The flavor is richer and they’re easier to soften.
- A quick and fairly easy way to soften the cream cheese? Stick the still-wrapped blocks in your bra/cami/back pants pockets while you’re working on the other stuff. #noshame
- When crushing the Oreos, definitely remove the filling, like the recipe suggests. You might be tempted not to, for the sake of saving time, but since I tried it both ways, I now know that the filling makes the Oreos more difficult to crush, since it makes the cookie bits stick together more. Additionally, if you don’t have a food processor and need to crush the cookies the manual way (it meeeeee), put the cookies in a baggie (be sure to squish out all the air before sealing!!!), lay them down on an old towel, place another towel over the baggie, and go to town with a rolling pin. The towels protect your surfaces from getting bashed and make the sounds a lot easier on the ear!
- If you’re making regular-sized cupcakes (as opposed to minis, like the recipe indicates), you’ll want to scoop a tablespoon of cookie crust into each cup and pack it down; on top of that, spoon custard into each cup until it’s about 3/4 full. (The cakes will puff up while baking and then sink after, or at least, that’s my experience.) I had the best luck baking the cupcakes on a lower shelf in the oven, at 325 degrees, for 15-20 minutes. They’re done when the outsides are set and the middle is still a little jiggly, or when you touch them and the batter no longer sticks to your fingers (they’ll be just a lil springy to the touch).
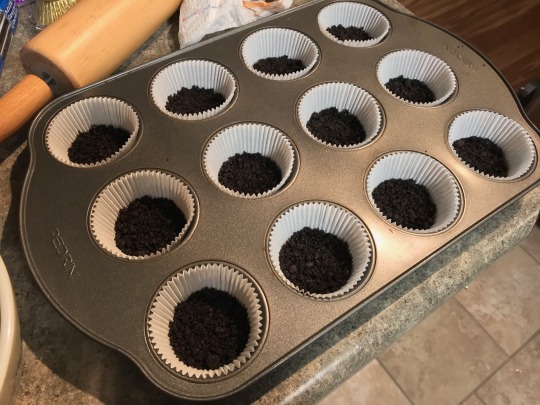
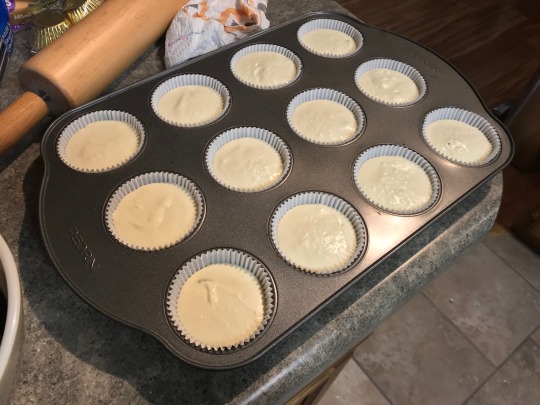
I don’t have pictures of the baked cupcakes, for reasons...? But hey this is what the batter looks like! :’D
While the cupcakes are cooling, you can make the stabilized whipped cream!
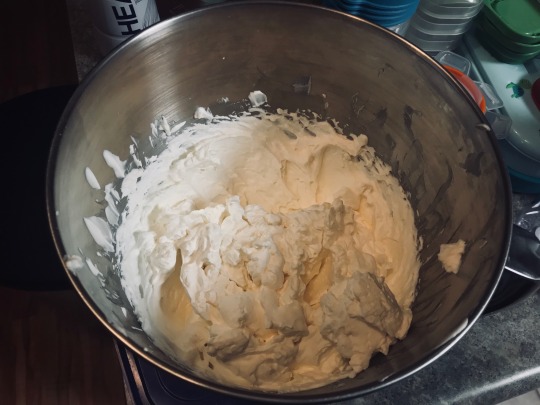
It so tastyyyyyyyyyyy, sigh. And unlike regular whipped cream, which collapses on itself like a delicious but dying star after a couple hours, this shit holds the fuck up! Like seriously I made it days ago and it’s still truckin’. Find the recipe here!
Once everything is set/cooled/etc. (i.e., the candy is out of the molds, the cranberries have formed a semihard sugar shell, and the cupcakes are cool to the touch), it’s time to start pipin’ and decoratin’! I used a small open-star frosting tip to pipe the whipped cream onto my cupcakes, making a small swirly circle in the middle and then little dollop stars around the outside.
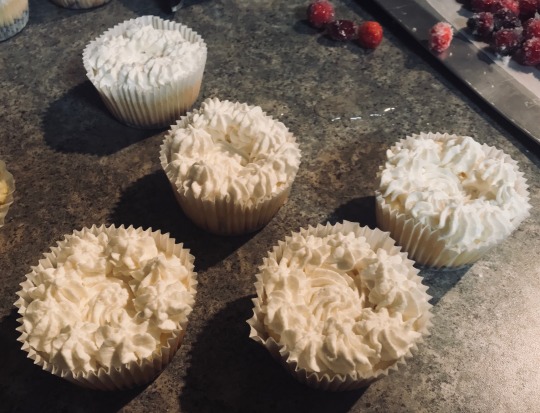
Then I dropped several sugared cranberries on some of the cupcakes (in the center, atop the nice lower swirly bit), and for others, I nestled a tree right smack dab in the middle, using cranberries in the front and back to prop it up (and add that delightful little burst of color/flavor!).
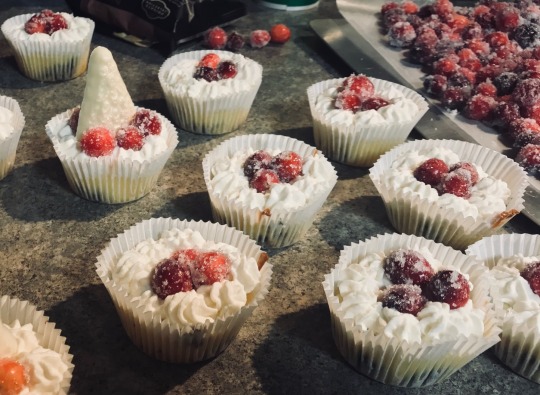
Anyway, that’s about it! Just make sure you have a tall enough container to store the tree-cupcakes in, keep them all refrigerated while you’re not eating, and voila! Delicious fancy fairly-easy-if-a-bit-time-consuming cheesecake cupcakes are yours to share as you please! Or don’t. They are shockingly easy to eat.
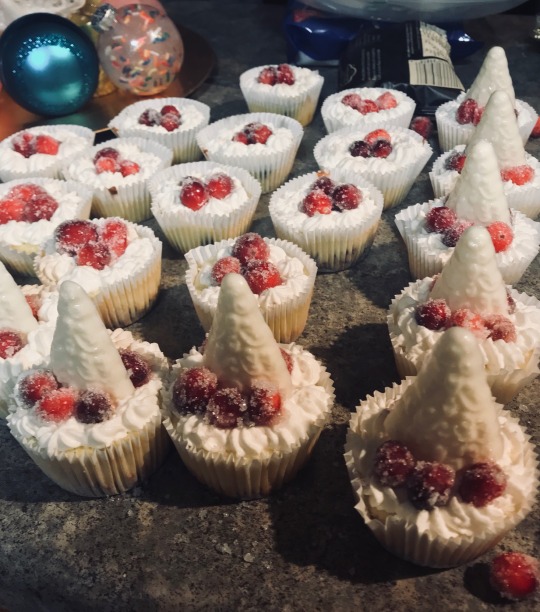
Thanks and have a happy holiday!!! <3 <3 <3
#great cookie exchange#with cupcakes!!!#cheesecake cupcakes#white chocolate cupcakes#christmas cupcakes#mbb bakes#cuppitycakes#kitchen witchery
25 notes
·
View notes
Text
So I made this cake...
Someone asked me to make them a cake for their mom’s bday that also happens to be her sister’s bday (they’re twins). We went to lunch to discuss ideas.
I asked a million questions to try and figure out what they like and what we could do that’d be fun as a twin thing. He didn’t give me much to go on. He did say they liked wine though. So I thought, wine + cake? I’m not a big fan of wine but I pitched it to him anyway - he was all for it. We talked a bit and decided a white and red wine cake, one for each of them. After some research I decided on a white wine cake with strawberry filling and white wine frosting for his mom who likes making a white strawberry cake, and a red wine and chocolate cake with cherry filling and dark chocolate frosting because it just sounds divine. Next step = samples.
I’d never made wine cake before so I wanted to make samples to ensure they would taste good. Easily found some recipes for the cakes. I’d never done anything with cherries, so that was new and surprisingly tasty. I brought in small cakes for him to try and waited for his thoughts. Thankfully, he’s honest. He loved pretty much everything about them except that they were dry... hmm... either from being refrigerated, or just a bad recipe. We discussed presentation and decided simple and elegant, two 6 inch cakes. He mentioned maybe doing something intertwined but dropped it. We’d both been busy and overwhelmed and were bummed this wouldn’t be a collaborative decorating effort. I thought about it for the next day or so and got an idea... next = actual cake.
I couldn’t prep the cake ahead of time for fear of dry cakes. Not to mention, he didn’t bring me the one he wanted me to use until the day of - no worries. Thankfully the fillings could be made beforehand. I did some research day of while on a break at work and found some recipe, put together a list to go shopping for after work, to then rush home and get to work. I went hung out with a friend the night before and had too much to drink so I was very tired and low energy. Also woke up way too early the day before that for work, so I was REALLY tired. Fuck it. Had a monster at work. Added red bull to the shopping list...
Finally, time to get to it. Leave work, go to the store, get my shit, come home. Get into my pjs and my good shoes so I don’t fuck up my back, grab a quick snack and then get to work.
First things first, I pulled out my ingredients and organized them. In my research I read that not having room temp eggs or milk can cause separation - that happened with the first white wine cake I made, I wasn’t going to let that happen again. I started with the red wine cake. He said it was a bit dry so I found a different recipe that had oil and sour cream - meaning guaranteed to be moist and dense like he asked for. I followed the order of the steps of the recipe and started by prepping pans. Cut out the parchment paper (enough for both cakes so I wouldn’t have to do it again later. Crisco and flour on three pans. Then to the batter. Get it all ready. Thin batter so easy to poor and divide. Tempted to put all three in at once but the recipe said to use the same shelf. That means baking it in two batches at 30 min each. Fuck. Ok.
Those are the only pans I have so I wait for the first two to be done, stick the last one in. Wait 15 min and take out the cakes onto cooling racks. They look great! I wash the pans and prep them once more. I make the white wine cake batter.
I couldn’t find a recipe that didn’t use a box mix. No way I’m doing that. So I make my yellow cake batter and use wine instead of milk. I follow the recipe to the letter, even beating in between each egg addition, instead of all at once like I normally do. I don't want that separation. This batter is butter based and is much thicker. I divide into the two pans and use an angled spatula to spread evenly- my boss calls. I continue to even out while I talk to him even thought I should stop because I’m tired and don’t want to mess up. But I do it and it works. In the oven.
At this point, the first two cakes are cool. I use my leveler to slice the tops off. I cut one in half using a ruler for precision. I stack the two and trim them to match. I use one half to cut the second cake in half after leveling as well. I have my layers for the red wine cake. I realize I can’t use typical cake boards, I have to cut my own. I trace one of the layers on a cake board and cut out the proper size cake board. Once again, cutting two at once so I don’t have to do this again later. I remember a trick I saw on youtube where they used a cake board on top of the cake to run the bench scraper against to ensure smooth sides. So I cut out cake boards a bit bigger than the ones I just made for the bottoms.
Okay, white cake is out of the oven and cooling. I can start assembly of the red cake, I just need to make the frosting. Find the recipe - shit. I need to melt and cool chocolate. I had forgotten about that. More waiting. I pull out the dark chocolate I bought. They didn’t have 70% so I just got 100% - it didn’t seem like a good idea. I look at the recipe again and not e that I didn’t get enough chocolate. Okay. That’s okay. I can add semisweet chocolate chips and even out some of the bitterness from the 100%. I put it in a pan and melt it over low heat. Poor it into a glass bowl to encourage quick cooling. Look back at the recipe to realize I forgot to combine the chocolate with the butter. Great. Ok, chocolate back in the pan, add the practically melted butter, melt real quick, back in the glass bowl to cool. Why does it look so runny? Look back at the recipe - I’m dumb. I was looking at the other frosting recipe and used way too much butter. I’m out of chocolate now too....Okay. B! Please run and get me some chocolate. 60% and enough this time. Cool. If I can’t work on this, then I’ll have to work on the white wine frosting. Cool.
Let’s do this . Recipe says slow, steady stream when adding the wine into a slow mixer. I do just that. Mixer was too slow, wine added too fast. and it all starts to separate. An ugly mess of separated butter. Fuck. Okay, in a bowl, in the fridge just in case I need to use it. Remake the frosting. Measure precisely the amount of wine, speed the mixer up just a touch, and poor in extra slow. Boom. Let’s assemble this thing.
I pull out my turn table and pre cut cake boards. Put some frosting on the board, find my sturdiest layer of white wine cake and lay it down, making sure it’s straight on the board. I push down on it to ensure it sticks to the frosting and is flat. I put some frosting in a piping bag with a tip and draw a flat, thick border. I get my strawberry filling and mix it in a bowl to recombine everything then I pour some onto the cake, making sure it’s to the edges, but not so high that it’ll squeeze out with the next layer. Done. Next layer. I push down a bit to make sure it’s flat and straight on there, using the flat side on top. I repeat all these steps with the next 3 layers, making sure everything is nice and flat along the way - no slanted tops this time!
Once I’m done I realize that in smashing down the cake they came out slanted on the side - I straighten that out, looking from all angles to make sure it’s as straight as possible so that it can join the other cake. Then the crumb coat. Then the freezer - timer for 10min. I take this time to melt the butter and chocolate for the other frosting. I pour into a flat serving dish this time to ensure it cools quickly. The texture is gorgeous.
Next frosting layer. I throw some on there, throw the second and bigger board on top and use my bench scraper to smooth out the edges. I repeat many times, adding more frosting and trying to make sure there are no holes and that the sides are straight down and not sinking in towards the top or bottom... it turns out okay. Back in the freezer for 10 min.
Now the top. The hardest part! I use a knife to remove the top board. I add more frosting and try to smooth it out. What I haven’t figured out is how to smooth the top without leaving any lines and then how to deal with the edges...I do my best, again just okay. I look at the whole thing. There are still some lines and it’s not perfectly smooth. I can see some cake on the sides through the frosting. I let it be for now. All this time I had been putting the cake in the freezer with the turn table... now to take it off. I use a big spatula and put it on to a cooling rack. I ruin the bottom, but it’s okay, I plan to put a bottom border on the finished cake.
Onto the red wine cake. I start with the frosting. It’s a cream cheese base so I mix the melted chocolate mixture with the softened cream cheese... the cream cheese has been sitting out for the entire process... it’s WAY too soft. I mix it up and add the powdered sugar and all but it’s too soft for decorating. So I shove it in the freezer. At this point I’m exhausted. I’ve been baking for 5 hours. And I’m hungry. So break time. I consider going to the store to get even more chocolate in case the frosting doesn’t firm up... instead I decide to go with a different frosting should that happen. I know that cream cheese frosting is hard to decorate with because it melts, so a different frosting would probably be best. I grab B and we grab a quick bite. As I’m getting in the car, I feel my back spasm and pain shooting across my lower back. Fucking great. This is going to be so much harder now. As soon as we get back, I pop open my red bull, I take an alive, some cbd oil, and I sit on the couch to eat. I planned to make the break short but I needed to rest my back until the meds kicked in. I’ve baked with a bad back before, I just have to be careful in my movements and take things slow.
45min later, I start on the second cake. Following the same steps as above. All is going the same until I put the second layer on... I realize that the red cakes are much thicker than the white... but they have to be the same height in the end so that I can connect them... so I smash down even more! Gently, though. I don’t want the edges to flare out. I compare to the white cake after every layer to see how much taller it is. After all the layers are assembled, it’s still slightly taller than the white but I can’t squish down anymore... I’ll figure it out later!
I start on the crumb coat. This frosting is amazing. It spreads on incredibly smooth. Is it the cream cheese or the chocolate? Maybe I’ll add cream cheese to all my frostings... This is going to be easy. I choose to forego the top board this time to see if the smoothness of the frosting is enough. I crumb coat and freeze for 10 min.
I spread on more frosting and use my bench scraper to smooth the edges. All the video sI’ve seen they are very specific in how they hold the bench scraper to ensure the frosting is not removed completely, I haven’t been able to do that. My white cake removed enough frosting to see the cake through it.. hm... okay lets think about this a bit more. I line the bench scraper with the edge of the cake and make sure it’s straight. I scrape while turning the table. Wow! That worked. I do it again, this time just turning the table in one full motion - even better! I fill in the holes with more frosting and scrape again. It looks great. Freeze for 10 min before moving on to the top.
At this point the white cake is warm and the frosting is crazy soft. When I pull out the red, I put the white back in the freezer. I start on the top. It’s a bit easier with this frosting but still running into the problem with the edges... I do my best. Okay. Now to combine the two. I pull out a bigger cake board and line up the red cake. I pull out the white cake and lay it next to the red. It’s not nearly as pretty. I decide to rework it. I throw on more frosting and smooth out with the new technique I’ve learned. It looks much better. The top flares in a bit so I need to add more frosting and make sure it’s all smooth. I work on the top, still not the best, but it’ll do. Back in the freezer.
I pull it out and lay it next to the red.They’re not perfectly straight, so they don’t line up easily. Fuck it. I push them together from the sides, ruining all of the frosting. It kind of works. I put it back in the freezer.
At this point I make the chocolate syrup. Very easy recipe. But I want to make sure it will be cool enough to pour fairly soon. While that’s cooling, I pull out the cake and fill piping bags with both frostings. I use one to fill one of the side cracks and the other to fill the other. I scrape to smooth out. It looks pretty great. As I mentioned before, the white is not a tall as the red. So I add more frosting on top and smooth it out until it looks the same height. This going to work!
I poor the chocolate syrup into a piping bag with a rounded tip. I’ve never done a chocolate drizzle before and I don’t want it to look terrible. I grab a mason jar and flip it upside down and practice pouring it. I see the viscosity of the syrup and take a mental note. Okay, lets do it. I start with the side. I drizzle around the red side only. I pour extra down the cracks there the two cakes meet to cover them up. Looks good! Now the top. I draw the line across the middle. it didn’t come out all the straight.. what if I use a ruler? I try that, it doesn’t help and now I have a deep line in my cake. What a dumb move! And so close to the end...
It’s okay, I fill in the line with the white and smooth it out again. I poor more drizzle to straighten the line. I smooth it all out best as I can and I throw it in the freezer to set the drizzle. I look at my frosting, not sure that I will have eough to pipe with. I put them both in the fridge for now as they’re starting to melt down. I clean while I wait.
I prep my piping bags and realize I only have one of the tip that I want to use... okay. I’ll have to pipe one at a time. I pull out my cake and think I should practice the swirl before going straight to the cake, so I do. It takes a couple of times to et it right, now I’m ready. I look at the cake and envision where the swirls should go. I decide to do 5 swirls on each half. I go for it with the white. Easy enough. I wash the tip and start the chocolate. Practice again before swirling. I pipe 5 swirls again but the frosting is still pretty runny so I immediately stick it in the freezer. At this point I remember I wanted to put a bottom border on it. But which border? I want it to look elegant and simple...I pull out the tip I like and a mason jar to practice on with the white frosting - the chocolate back in the fridge to set up some more. Also need to see if I’ll have enough. I have plenty of chocolate frosting so I’ll use that one all around if I don’t have enough. I decide on doing mini swirls to sort of match the top. They look very cute and elegant with the white frosting and it looks like I’ll have enough!
So I pull out the cake and do the border with the white. It looks good. Once again, I only have one tip. So I wash it and prep the chocolate. It’s still pretty soft, but I need to do it, so I do. The swirls are not as defined but they still look nice. I finish up and take a look. it looks pretty good! I stick it in the freezer one last time to set up the bottom border.
I finish cleaning and pull out my cake. it’s a pretty good representation of what I was envisioning - how cool! That never happens! It is not as polished as I had hoped, but it still looks pretty fucking good. I take a bunch of pics to have different angles and lighting. then I box it up and put it in the fridge.
10 hours later, I’m finally off to bed.
0 notes