#off the grid quilt pattern
Explore tagged Tumblr posts
Text
working in an art gallery and talking to a lot of full time artists has given me CRAZY imposter syndrome btw lmao
#i went to a local gallery today (not the one i work in)#and i was looking at this one artists work#and she used a lot of patterns but didnt go up to her#she came up to me as i was looking at her work like ' hi i see youre looking at my work which one do u like most' like okay#i had my headphones on at the time so it did scare me#anyway im really stuck thinking about her work#like shes got this lovely cluttered and messy and chaotic style with still life in one dimension#and she uses pattern and quilt-like grids and so much colour#and the chaos of her work is by far the best part#how nothing stays in their boxes andeverythings falling#its homely and DRAMATIC. which is a mix that doesnt always go together but is held together by the chaos of her work#AND THEN SHE PUTS COLLAGE QUOTES ON IT 'fly high in the sky like a butterfly'#AUUUGGGHHH it pisses me off so much. REALLY? THATS THE BEST QUOTE? no song lyrics no deepp meaning nothing to express the narrative? bitch#love her style but its KITCH shes KITCH her quotes are KITCH her subjects are KITCH <- lives in kitch central of the uk but WHATEVER#by the way im not exagerrating with fly high like a butterfly she really thought that was the quote to describe this chaotic scene like she#eight years old like what the hell. there ere others too the pissed me off#and then i talked to her and she was like. WEIRDLY insistant tht even though she used stencils and that her dughter and husbnd drew anythin#mildly complicated that she had still done a lot of work I HADNT SAID ANYTHING#but she was just BRUSHING OVER whenever i mentioned her patterns and stencils like she was ASHAMED#like what the hell im all for having fun with what you draw but youre three times my age and i can draw a bird better than our adult daught#also i spoke to her turns out she knows my stepdad so that was an odd link but whatever#anyway artists that give me imostersyndrome are my boss who does realism in WATERCOLOUR#oh the woman in the gallery also gave me a printed card whcih was cool since i was going to buy one just to be mad at
7 notes
·
View notes
Text


my first ever line of hand quilting. a lot of trial and error and i actually have to undo some of the end because i tied it off incorrectly. for the pattern i’m just going to do a grid through the middle of all the squares, i wont measure or draw lines though, i want it to be imperfect. (which is good bc it will be)
this 8” row took me almost 2 hours last night with checking my reference book and watching/pausing youtube videos but it was rly fun and i had friends over who were drawing and playing video games so we were all doing “parallel play” it was a good environment to learn in.
i’m really glad i decided to hand stitch this instead of machine even though it will take me so many hours to do
9 notes
·
View notes
Text
More Print Designs
I wanted to continue experimenting with some patterns and designs to consider using them as prints, either on my garment or my illustrated collection. For one of my designs I drew out a vine and leaves design inspired by the embroidery sample I completed, I then expanded this by drawing it out again and then adding the print design inspired by Chatsworth, dotted in-between. I thought this was a more detailed design, and dint look as plain as the vines by themselves. The vines also make the Chatsworth print look more floral.
I then had an idea to recreate a design using the floral patterns I drew on the Chatsworth mood board page, copied from a design on some pottery at Chatsworth. I added to a twist to the existing design, by instead of having the curving semi-circle shape, incorporating the diamond shape into it instead. I drew out a diamond shaped grid lightly in pencil, and began adding green watercolour dots along every line. Then added watercolour roses and leaves into random diamonds. I thought that this designs was quite cute, and felt like it would be something you would see on a dress from the 1770s. Although I have only changed one thing with this design, I think it is quite effective, plus, the design is continuous, so I would definitely consider to use it in my designs.
I also thought about expanding the first stained glass design by making in a repetitive pattern. I started off by drawing out the design, but only a simple version, and then traced over it with tracing paper, and traced in back down next to it. I redrew some lines to make it join, look smooth and continuous. I then traced over the design again and traced it on the other side, and repeated until I had a long pattern of the design. I think that this design would be quite effective as a quilted pattern.

0 notes
Text
Step-By-Step Tricks To Finish A Quilt - Handcrafted Quilts
When stitching stylish and handcrafted quilts, you have to create different patterns and bind them together to make a quilt design. These designs may complement your quilt by following its shapes and lines, or they may transform into another design and give a different dimension to the quilt. While making quilts, many textures are applied that would be properly aligned. A small mistake can ruin the overall look of the quilt. Furthermore, there are some crucial steps to follow to give the perfect finishing to a quilt.

What Are The Essential Steps To Properly Finish A Quilt?
While stitching a quilt, you have to be very careful when combining pieces of designs to complete a quilt and give a perfect finish to your handmade quilt. All the steps are mentioned below that you may apply to have a properly finished quilt.
Craft A Quilt Sandwich
The first step is to create the quilt sandwich for handcrafted quilts. You may join some pieces to form a grid of three blocks by four blocks and add a border to craft the quilt front. Then, make the back side of the quilt, add batting, and lay the quilt on the front wide on top. The right part must be upside down to create a quilt sandwich. You may use fusible batting to avoid the use of pins to hold the quilt sandwich together.
Sew The Layers Altogether
The next step is to sew all the layers together, and you may use different ways for it; the three most popular methods are-
Use a needle and thread to sew the layer with your hands by simply stitching them together.
You may use a sewing machine to sew straight lines and join all the layers.
Next is using a sewing machine with a free arm, which enables you to sew designs as you join all the layers.
You may choose any method according to your convenience, which will let you give a perfect finish to the quilt. If your need is an embroidery company logo, you may contact PSQuilting.
Cut The Basted Quilt
After sewing all the layers together, you will need to trim the basted quilt, and you can choose a soft grip to cut the edges of the quilt neatly. Make sure all the edges are straight and corners at right angles. While cutting the basted quilt, make sure all are in equal parts.
Bind Off The Quilt
The final step is to bind off the quilt. Now select your binding fabric, cut it into long strips, and then you will have to iron and fold it in half widthwise. You can also use a machine to first stitch the folded binding fabric onto the quilt edge. Then, fold it into place. This step is followed when making embroidery jackets with different patterns and textures.
Get The Nicely Designed Quilts At PSQuilting!
For handcrafted quilts, you have to be very careful to give a neat finish. You have to follow the required steps to have the best-designed quilts. Also, if you want to buy a cool-looking quilt, you may contact PSQuilting. They also provide customized embroidery logos on uniforms, embroidered napkins, aprons, tote bags, onesies, and more. For more detailed information, you may contact them through their website.
1 note
·
View note
Text
We're the reason we're here
a Book of Nile fic by @sindirimba Nile-centric and Nile POV Explicit 26 chapters, posting weekly on Saturdays
Nile successfully argues for the benefits of apology and, eventually, grants a little mercy to herself, too.
When @sindirimba asked me to beta what was at the time intended to be her Big Bang fic I jumped at the chance screamed and begged to be allowed to beta what I was already sure would be a masterpiece. It's been an overwhelming (affectionate) and life-affirming delight to follow along as she crafted this story, and when she decided to pull out of the Big Bang and start posting it weekly this spring, I knew what I had to do.

Image description: Nine square images laid out in a 3 by 3 grid, described left to right, top to bottom. Each described in loving detail under the read more:
1. A museum interior, a sculpture display room. In the foreground we see a sculpture of two nude figures in marble. One is seated on a tall plinth, hands at their sides, legs parted slightly, breasts and long hair hanging loose and relaxed. The other figure is kneeling, abs bunched up as they lean in to caress the seated figure's calf and kiss their shin.
2. A green and white checkered picnic blanket spread out in the grass on a very sunny day that makes the grass look yellow as well as green. There's a small picnic basket tipped onto its side, spilling red and green grapes onto the blanket, and a larger basket with a lid flipped up to show baguettes and a bottle of wine inside. A straw fedora hat rests on the closed side of the larger basket.
3. A shot from ground level up to the under-construction spires of a cathedral. The bright blue sky is almost entirely concealed by darkening clouds and cranes tower over the unfinished church. Whether due to incomplete construction or by design, the aesthetic is eerie, the cathedral's brick work textured more like a drip sandcastle or a termites' palace. The building is massive, and as beautiful as it is unsettling.
4. The entryway area of a home. A medium-brown wood credenza is the focal point and atop it are a simple metal and white lamp, two leafy house plants, a small art piece of twisted metal resting atop a book, and an art piece that looks like maybe fossilized tree root.
5. Kiki Layne posing on a big white couch in the bright afternoon sun, looking past the camera, a quiet beach scene stretching out behind her. She's wearing a white black and yellow striped sundress, high-heeled yellow sandals, big gold or yellow hoop earrings, oversized cat-eye sunglasses, and a coordinating striped headband, her hair in a sophisticated updo. From Kiki's instagram.
6. Matthias Schoenaerts looking off to the left (giving the illusion of Booker looking at Nile in the previous image) in a shot taken on the coastline at dusk. His longish hair is windswept and we see him from the chest up wearing only a simple dark t-shirt and a thick but well-trimmed beard. The coastline is more rocks than sand stretching from where he stands to the pink horizon in the distance. From Matthias's instagram.
7. Matthias Schoenaerts looking off into the distance, this time to the right (and again giving the illusion of Booker looking at Nile) in another coastline shot at dusk but seemingly a different beach. The background is indistinct beyond a calm ocean stretching toward the bright yellows and reds of the sun hovering just above the horizon. He's wearing a white tank top and his beard is thick and a little scruffy, his longish hair fanning out from under a straw fedora similar to the one seen in the picnic scene above. From Matthias's instagram.
8. A detail shot of a quilt in greens and blues with yellow and black accents. The patchwork pieces and seam lines form intricate geometric patterns. Many different motifs can be found as you look more closely, including flower petals, diamonds, Jewish stars, ocean waves, and the radiation hazard symbol.
9. Kiki Layne on an industrial-looking balcony overlooking what seems to be a European city, a plaza below her and densely-packed multi-story buildings stretching out into the distance, the sky covered in thick clouds. She's standing on a concrete floor with several puddles of water and there are nautical-looking metal architectural details all around. She's leaning on the balcony railing, face turned from the city view to look at the camera. She's wearing light-wash jeans and a bright multicolored shirt with a busy pattern of Suzie from the Rugrats. The shirt shows an inch or two of her midriff. Her hair is in a protective style gathered up in a large knot above her forehead. From Kiki's instagram.
#READ THIS IMMEDIATELY#book of nile#fic recs#nile freeman#sebastien le livre#tog#fandom friends#mine
50 notes
·
View notes
Text
World AIDS Day
This World AIDS Day remember -
There is a whole queer generation missing because of inaction. People were dying in such high rates that it was a militant but commonplace thing to say - Don't bury me, throw my body on the steps of the FDA.
In my lifetime, the AIDS quilt was created, crafted, and displayed not just in Washington DC but around the country and at least somewhat around the world (if memory serves).
Originally, AIDS was called GRID and was seen as God's 'judgement' against gay people, which, along with then Pres Ronnie Reagan and his ghoul of a wife Nancy, was the reason it took so long to get a handle on it and come up with things like AZT found in Rent.
It's also the reason the Reagan's closeted gay friend and famous actor Rock Hudson died, because they refused to help him get into trial testing for something that could've saved his life.
Before AIDS, queerness wasn't normalized by any stretch but we were moving towards it.
The Golden Girls episode about AIDS was one that was a pattern of sitcom tv like the Golden Girls teaching people how to respond to queer people and 'our issues' back in the day. The same goes for the Designing Women episode "Killing All The Right People" which - I will remind you as an old queen - was a slogan being disseminated against gay men especially at the time (it was thought lesbians couldn't get AIDS and they were practically invisible to the media anyways) - and was one of the first times a show had addressed that it was okay to even touch people with HIV. In the episode, a queer man orphaned by his family asks the Designing Women to literally design his New Orleans styled funeral WHILE HE WAS STILL ALIVE BECAUSE NOBODY ELSE WAS GONNA DO IT. SIMPLY BECAUSE HE WAS GAY. Princess Diana was hated by the royal family for her outreach work period but specifically she was one of the few celebrities that would even touch HIV positive people. Her quote about "giving them a hug, God knows they need it" was in response to an educational push she made to teach people to have kindness or at least tolerance. World AIDS Day might seem like a thing of the past but when our bars are fire bombed, our online actions are silenced by algorithms, sex work is shunned or simplified, and the simple act of being gay could get you cut off from your partner in a Catholic run hospital or get you fired/kicked out of your apartment in some American states still (and beyond that, there are still states where having HIV makes you inhirable for work- it's a thing called transmission something or other - I can't remember the exact title) - World AIDS Day is not some holiday of the past.
It's very present. I'm nearly of the generation now removed from the generation we lost to AIDS. If you need more pop culture context, Angels in America is important. Rent. Pedro from the Real World. And the Band Played On the book. Normal Heart the play. Ellen Greene's interview for the Little Shop revival where she talks about attending funerals DAILY while working on Broadway. Friends would just disappear. Even Pose, as much as I hate Ryan Murphy, is an important tool in remembering the ballroom scene and AIDS. When were you last tested? When were your partners last tested? When did you last confront that reality that the AIDS scare is the reason gay men can't donate blood in America? What are you doing to honor those in your life today that should be honored, remembered, and fought for?
Also, I'm pretty emotional about the day, so excuse any facts I may have gotten a little wrong or not expounded on more. This post is getting longer than I intended with each rewrite.
3 notes
·
View notes
Text
[RoD] Pixel Person MPC Tutorial - Part 1 - Supplies
I intended to just share the patterns for the Pixel People version of the RoD characters for @rodappreciationweek but a few folks expressed interest in more detailed instructions, so I spent entirely too much time writing up a How To guide because I'm a nerd. and a craft nerd. and then realized it was way too much information for one video, so I split it into 3 parts.
Part 1 will go over supplies, and includes the patterns, with a color chart. Part 2 will show you how I stitch one of the pixel people, and Part 3 will go over how to finish your project to display and/or wear.

First off, here's the shopping list to start things off - feel free to save this to your phone so you can refer to it when looking for stuff online/in person at your local craft store. JoAnn's will have 99% of the list, Michael's will have maybe 80%, and anything you can't find in person you can order online - while Amazon carries nearly all of these things, I highly recommend 123stitch.com as a specialized store. They carry an insane amount of inventory and they ship orders fast.

FABRIC
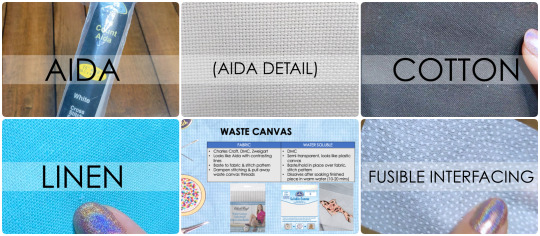
Aida (pronounced "eye-duh," "eye-ee-duh," or "ay-duh") is the fabric most commonly associated with cross stitching, especially for beginners. It's a stiff, gridded fabric with evenly spaced holes to pass the needle through. It's easiest to find in white, but it comes in other colors, and it's sold in a variety of "counts," which refers to the number of stitches in an inch. 11 or 14 count is good for beginners, 16 count or higher is good to include a lot of detail in a smaller workspace. DMC, Charles Craft, and Sensations are good brands.
Cotton is another option if you don't like the appearance of Aida. This can be any solid or patterned design you like, but aim for a quilting weight if this is your first time stitching. Something like cotton jersey would have too much stretch. Kona Cotton has a nice weave, but nearly anything in the quilting cotton section will work.
Linen is a third option, and the material I personally like to use for hand embroidery. It can have a very open weave or a tighter weave closer to cotton, and often includes "imperfections" where some of the threads are thick in spots, adding a textured feel to the material.
If you decide to stitch on cotton, linen, or a finished product like a sweatshirt or cloth napkin, you'll want to add Waste Canvas to your list. It looks similar to Aida cloth with the grid pattern, but you lay it over your fabric and use it as a template to create the same even stitching as you'd get with Aida. You can then remove it by dampening the work area and pulling the waste canvas threads out one by one; if it's a soluble version, you can submerge the finished piece in warm water to 10-20 minutes and the canvas will dissolve into the water. DMC and Charles Craft are good brands.
Additionally, for any cross stitch done on something that will be worn/washed with regular use (clothing, towels, napkins, etc.) you'll want to get Fusible Interfacing that will protect that backside of the material and aid in locking the stitches in place. It's sold on bolts in JoAnn's, typically near the cutting station in most of their stores. It looks like tissue paper, where one side is smooth and the other side is bumpy/textured. The bumps are glue that gets activated with a combination of heat and water (you will need an iron for this). You won't need much; a 1/4 yard strip would be more than enough. You just need enough to cover the stitched area of your finished piece. Pellon brand in P44 is something I use for all kinds of sewing projects. Do yourself a favor and find the discount/scrap bin near the cutting station or search the pre-cut fat quarters in the quilting aisle and pick something white/light colored to use as a pressing cloth.
EMBROIDERY HOOP/FRAME FOR STITCHING

Aida is generally pretty stiff on its own not to need a frame, but a hoop/frame is nice to use to keep the oils on your fingers from getting into the fabric (and it's nice to be able to hold something for a large pattern). Cotton and linen are too soft/flexible to stitch on their own, especially if you want tight and even stitches, so you'll definitely want a hoop in that case.
Hoops can either be wood, plastic, or sometimes metal. I prefer using wood, but feel free to get whatever you like. Anything larger than an 8" hoop will be cumbersome to hold in your hand, but aim for a hoop that gives you extra space outside of the dimensions of your pattern. For example, one pixel person on 14-count Aida will measure about 3/4 inch x 2.25 inches; one person on 8-count will measure 1 inch x 4 inches. If you're stitching the whole crew, an 8" hoop should be fine.
If you plan to display your finished piece in a hoop, pick up more than one - one to display, the other to use for stitching.
If you really get into cross stitch, something like a Q-snap frame will be kinder to your fabric while you work. Q-snaps are plastic tubes that form either a square or rectangular frame, and come with clamps to hold fabric in place. You can then roll the clamp to tighten the fabric if it loses tension while you stitch, versus pulling the fabric in a hoop to readjust tension, which can sometimes warp the stitches. Q-snaps are more expensive than hoops though. In the photo I have pieces of felt that I layer over the fabric, to give the clamps more of a grip and to protect the fabric.
SCISSORS

Pretty self-explanatory - you want a large-ish pair to cut and trim your fabric, waste canvas, and/or interfacing to size. They can be fancy dressmaker shears or utility scissors; just make sure they're nice and sharp.
You'll also want a smaller pair of embroidery/needlework snips to trim thread. Nail scissors would also work. PS - decorative snips are very cute and if you're like me you'll want to collect them just for fun, lol
EMBROIDERY FLOSS AND NEEDLES
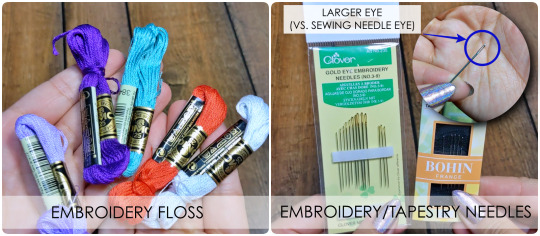
Embroidery Floss - DMC and Anchor are the brands easiest to find in stores. I prefer DMC due to the wide variety of colors, and colorfastness even after years of use. You'll want the standard 6-strand skeins from either brand for cross stitch; don't mess with the corded perle cotton (I know they're pretty, but we want the smoother skeins so we can pull the threads apart later). I suggest going with DMC since not all the colors I used in my patterns have an equivalent shade in Anchor's inventory.
Embroidery and/or Tapestry needles are different from the standard sewing needles you might already have at home in a sewing kit (though sewing needles will come in handy for part of the process too). The eyes on embroidery/tapestry needles are larger to accommodate for multiple threads at once, or even silk ribbons for fancy embroidery work. There are tons of articles online that go into detail about the difference between needle sizes and when to use them, but the main difference is embroidery needles are usually longer and have sharper points to literally stab a hole through fabric; tapestry needles are shorter/thinner and have blunt (but still sharp if you poke your finger) points to go through open weaves. Pick up a pack to have multiple colors of floss threaded while you work; Clover, Bohin, and DMC are all good brands.
(not pictured) Bobbins - Little paper or plastic pieces used to wrap and store excess floss. They're good if you want to organize your floss in a floss box, and for labeling floss if you're working on something with a lot of colors.
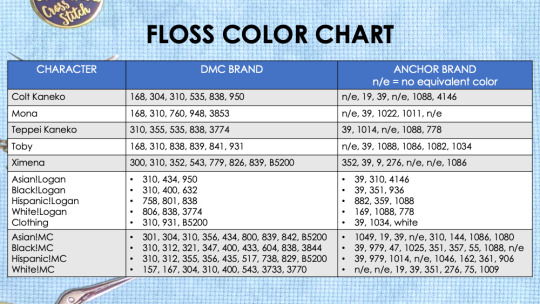
[click to enlarge] Above is the chart that tells you all the different colors you'll need to get for each character. If you plan to do multiple characters that use some of the same numbers, it's fine to just pick up one skein of that color; you're only using a small portion of the floss so it will last you a VERY long time 😅

(I know the image quality sucks, but tumblr maxes out at 10 images per post. This breaks down where each floss color is used, depending on the character/outfit. You can view/download the patterns from my Google drive here to save to your phone or tablet, and use as a reference when stitching.
EXTRAS (FOR FINISHING YOUR STITCHING)
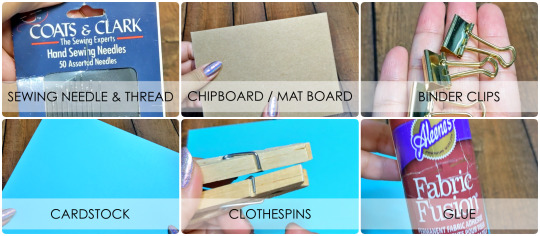
If you're a crafter of many things like me, you might already have some of this stuff in your home. I'll go into more detail on how/when to use these items in Part 3, but add what you need to your supply list to get everything in one go...
Sewing thread and sewing needles - nothing super fancy, just pick a thread in a contrasting color from whatever color your fabric is (e.g. stitching on white Aida? use green or navy thread.)
Chipboard or Mat board - pick up a sheet only if you're going to frame your finished piece in a picture frame where you pull the back out to open it. It's a thick fiber board that looks like cardboard. If you can't find any, the back material of a sketchpad will work, or you can use 2 layers from a cereal box for a less expensive DIY option.
Binder clips - you'll use these to hold fabric in place against the chipboard if you're framing your project in a picture frame.
Cardstock - optional if you plan to display your project in an embroidery hoop or front loading picture frame. You'd glue this to the backside of the hoop and/or layer over the stitched fabric to hide the raw edges.
Clothespins - if you plan to display your project in a hoop, clothespins will help press the fabric to the inner hoop while the glue dries.
Glue - only if you plan to display your project in a hoop. Fabric, tacky, craft, or hot glue; whatever your personal preference is.
PREP THE RED FLOSS
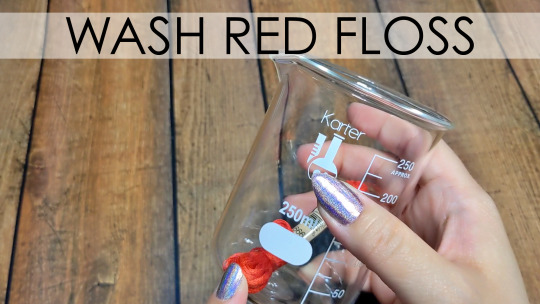
I can't speak for Anchor brand floss, but the red floss colors for DMC brand have a tendency to bleed onto fabric if the threads get wet. It's an annoying and painstaking effort to remove the stain from the fabric without removing color from nearby floss once a piece is already stitched, so I proactively wash my red floss if I plan to stitch on anything other than black fabric.
If you're stitching on Aida, you can probably skip this step since you won't need to wet the fabric. If you're stitching on something that uses waste canvas and the pixel person you're stitching has red in their pattern (Colt's red pants, MC's plaid flannel, MC's tube top, MC's red leather jacket) keep reading.
In a clean cup, add some warm water with a couple drops of dishwashing soap. Remove the paper bands from the floss skein and drop the floss in, soaking all the threads. Gently swirl the water in the cup to work it into the fibers, or carefully use your finger/a chopstick/end of a paintbrush to agitate the water without messing up the floss too much. After a minute or so, dump the water and rinse the floss until you no longer see soap bubbles when you give it a little squeeze. Lay it down on a clean cloth or towel somewhere to air dry.
Get ready for Part 2, where I'll show you how to stitch a mini MPC!
#rodaw#rod appreciation week#rodaw day six: wildcard#cross stitch info#zaffrenotes makes things#i am also a wordy bitch#so this is a long post with lots of details#and if you read all the way through I appreciate and love you for letting me ramble on and on#...for fifTEEN pages. FRONT AND BACK 😉#not really 15 pages#google docs says my notes for all three parts is 9 pages
28 notes
·
View notes
Note
What are your favorite accessories or props you have made for your dolls?
Ooh, good question!
Mostly, Ive made outfits/clothing pieces, not as much the accessories or props, but i think the big one that comes to mind is the sampler i made for Kirsten based off of her quilting square design form her fourth book:


(Made as a cross-stitch sampler because quilting is not yet a skill in my repertoire, though adapting a circular pattern to a square-based grid was...challenging)
Similarly, though I no longer have them, I think of the map samplers I made for @merriestgirls a few years a go, based off the prototype designs for Caroline's map:

They were both fun and challenging to make, and cross stitch is something i really enjoy! Honorable mentions to the four crocheted superhero dolls currently featured in my modern/oc dolls' book series, who weren't initially imagined as doll props, but just happen to be the perfect size!


5 notes
·
View notes
Text
Basic Leather Bracers Tutorial
This is my tutorial for how to create a set of leather bracers. I also cover how to add simple detail in this tutorial. You can also use this tutorial if you are using Pleather or Foam for your bracers. See the notes in each section pertaining to the different materials.
What you will need
Sometime to draft a pattern with (Muslin, Wrapping Paper, Quilt backing, etc)
Leather (Pleather or foam can also work)
Leather Punch
Eyelits
Eyelit Punch (Needle noise pliers will work in a pinch)
Leather Cording (or Suede cording)
Leather Dye (Optional)

________________________________________________________________
Step One
The first thing you want to do is draft your basic pattern piece. Muslin works nicely for this since it's cheap and easy to write on and you can get it at any fabric store or Walmart.
Another neat option is wrapping paper since this can be bought in abundance during after Christmas sales for next to nothing. My favorite is the wrapping paper that has the grid on the underside as it's great for drafting things that need to be symmetrical or with exact measurements.
In this case I ended up using some quilt backing since I got a large bolt of it that's been sitting in my closet forever unused.
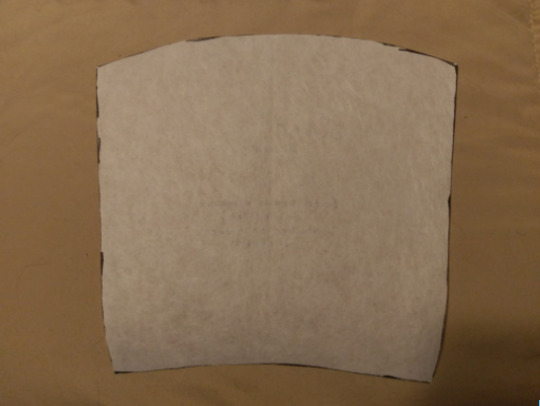
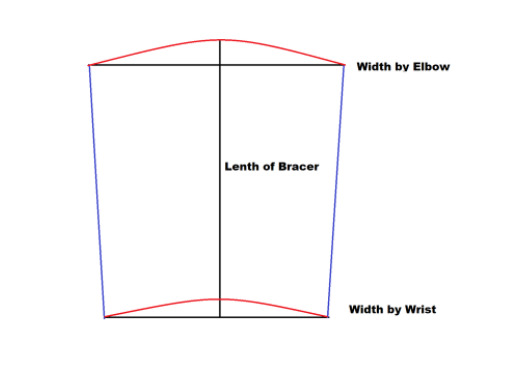
After you have your pattern material, the first thing you want to do is take some measurements. The length of your bracer should be length of your lower arm from the wrist to just before your elbow. You will take 2 width measurements, one at the wrist and one up near the elbow. Don't forget to write down your measurements so you have them saved for later. Start by drawing a line for the length measurement (Black), then add the width measurements as seen (Black). Once you have the base lines, connect the two width measurements on the sides using a ruler to make a straight line (Blue). Finally add the curves as seen (red).
Once you have your pattern piece completed to your liking, put it off to the side and grab the material you want to use for the bracers themselves. In this case I used some leather from a leather scraps bag I bought at the store (many fabric stores have these available for a decent price). If you do not access to leather then you can use pleather as a good substitute (see notes below regarding it). If you not have either, I would suggest the thin crafting foam that you can get at most crafting stores. It will be a bit stiffer, but should still work just fine.
________________________________________________________________
Step Two
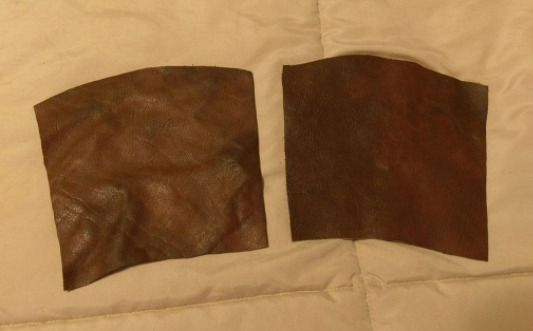
Take your pattern you just created and lay it over your material. Trace and cut 2 pieces out of the fabric. In my case the leather I was using was off in color by quite a bit so I dyed the leather to what you see on the left.
Leather Note:
Make sure you get clean edges on the outside. You can take a V shaped edge tool to clean this up if need be.
Pleather Note:
If you are using pleather you want to add a seam allowance on each side of the pattern piece. Cut the fabric with the seam allowance and then fold and stitch the hem on. This will prevent the fabric from fraying and will give it a more finished look.
________________________________________________________________
Step Three
Time to add the line detail to the bracers (Below). This is where it will differ depending on your material. Regardless of your material choice, I would recommend using a card to help align everything to make sure your lines are perpendicular. (see image below left)
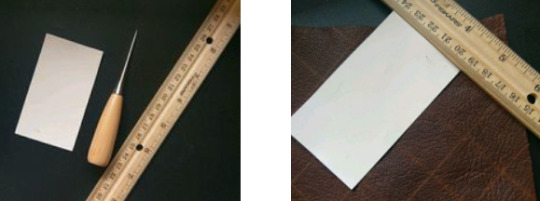
Leather: Wet the leather some before working with it. Take a ruler and a leather stamp or tooling piece to follow along the edge of the ruler to get the lines on. See photos on right. Pleather: Use a fabric pencil and a ruler to mark where you want your lines. Then go to your sewing machine and stitch them into the fabric. Foam: You can either draw/paint the lines on or you can use a tool to indent into the foam creating depressions on it.
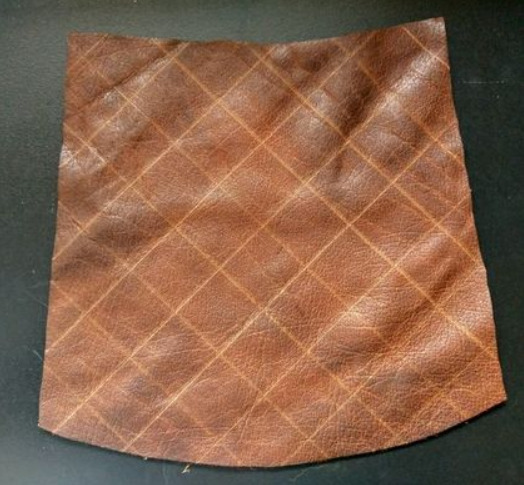
________________________________________________________________
Step Four
This is where you punch the holes for the eyelets in order to string the bracers. Mark on the bracer sides where you want to place the holes. Make sure each side is symmetrical or as close as possible. If you are using leather or pleather, I would suggest using a leather punch. These can be bought at most crafting stores. If you are using foam you can use a regular hole punch.
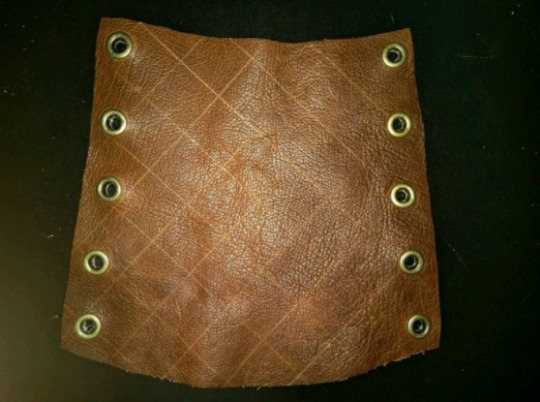
________________________________________________________________
Step Five
You're almost there. Now you just have to string them using your preference of cording. On the right is possible lacing patterns you can use. I opted for C as that is my favorite and seems to hold the best, however, you can use whichever one you like the best. Start your lacing at the wrist and work towards the elbow. This way you can adjust the tightness yourself and you can tuck the cord ends into the larger part of the bracer.

________________________________________________________________
Ta-Dah! Congratulations!
Now you have a set of working bracers for a variety of different costumes. Have fun and enjoy!
#cosplaytutorial#leather#pleather#tutorials#cosplaying#corsetbracers#bracers#leatherbracers#leatherworking#leathercrafting#cosplaytutorials#basictutorial#leathertutorial#sewingtutorial#costumemaking#costumer#cosplayer#sewing
14 notes
·
View notes
Text
Barnyard Episode - Episode 585- The Knitmore Girls
This week's episode is sponsored by:
Carry your creativity with Erin Lane Bags! Whether you show your fiber fandom with the woolly wonder
Sheepleverse, or dive into history with the Curiosities collection, our project bags, totes, and hook and needle
organizers are at the ready to keep your hobby happy.
When was the last time your knitting yarn was a work of art?
Infinite Twist produces one-of-a-kind semi-solid gradients featuring speckles, high-lights, low-lights, and gorgeous color transitions. From 700 y Giant Gradients to 200 y matching sock sets, Infinite Twist Gradients will hold your interest from cast on to bind off.
See the currently available gradients at infinitetwist.com, or be the first to know when new colors are posted by signing up for our newsletter at infinitetwist.com/newsletter-signup
Have you ever had to frog because you forgot a step several rows back? Or lost your spot because you dropped your magnet board or lost track with your highlighter tape? Instead of wrestling with paper, use the knitCompanion app. It keeps you on track so you can knit more and frog less. knitCompanion works with ALL your patterns and is available for apple, android and kindle fire devices.
LoLo Body Care, formally Bar-Maids, creates exceptional moisturizers hand-poured by staff who add a good dose of heartfelt love to each one. Most all their supplies are made in the US, and their beeswax sourced from a local farm. Besides quality, the value of their product lies in that they last a very long time and are loved to the very last bit. They built their brand on being eco-friendly and their new packaging rocks. Their customers and customer service are rare and treasured jewels.
One minute family update
On the Needles:(1:11)
After a month of concerns about users who have been harmed by NuRav being ignored, we are shifting to adding more content to our shownotes pages in order to make them as accessible as possible to our listeners.
From here forward, we will be putting our projects here on our blog as well as in Ravelry.
Gigi is swatching for a Ridgeline cowl out of Backyard Fiberworks
Gigi is working on Knitmore cowls. She is working on a Fade cowl out of an Onyx Fiber Arts mini skein bundle.
and one out of primary colors from Black Trillium Fibers
Gigi is working on the Ochre cardigan
Jasmin picked up her 2014 SPAKAL Harvest Cardigan. She has finished the sleeves, and is nearly done
with the bottom edging.
Jasmin is making good progress on her Match and Move shawl (by Martina Behm #behmalong); she's
knitting it in Black Cat Fibers Nomad Sock.
Gigi is working on Opus the Octopus. She sewed eyelids, and is working on tentacles Gigi finished the
washcloth blanket out of acrylic yarn
Gigi knitted a washcloth blanket out of acrylic yarn
Gigi had set up a preemie hat kit: she is making more baby bear hats (RAVELRY LINK) out of Jamieson yarn and some
yellow yarn, and is knitting plain hats to embroider later.
In Stitches (14:51)
Gigi is sleeping under a Stack and Whack quilt.
She is wearing her A line skirt, using a burrito pillow case, and also the yellow Cal King quilt
Events(20:29)
The Operation Sock Drawer book will be published in October. Call Hicklebees for a SIGNED preorder
copy of Operation Sock Drawer
We talk about Drinking French
knitty.comhttps://knitty.com/sos.php has a comprehensive list of events that have been canceled
Stash Dash 2020. Dates 5/22 to 8/22/20 #teamcuteknitter #beatbostonjen
Fiberworld 2020
Tour de Fleece has started! #Team Sasquatch
Mother Knows Best:(29:00)
Just keep swimming.
We reference Dr Gemma
When Knitting Attacks: (32:44)
Gigi : cast on again for the primary color cowl. Making it pool is hard
Gigi: Ochre cardigan. She ripped out the sleeve, and picked up more sleeve stitches at the underarm
Jamin dropped a stitch on her 2014 SPAKAL Harvest Cardigan.
Review:(41:48)
Cable Knits from Nordic Lands by Ivar Asplund
Jasmin mentions Elsebelth Lavold
Viking Knits
Viking Patterns
Straw into Gold:(48:51)
Tour de Fleece! Jasmin is finished spinning and plying the Targhee/Romney/Angelina from Morro Fleece
for a sweater.
Jasmin finished spinning her Elsa blue Abby batts
Jasmin is half finished with spinning the cashmere/silk roving from Abstract Fiber
She is using the Schacht Double Ended Electric Bobbin Winder, blue shop towels and oil applicator
Gigi is spinning on the Jenkins Turkish drop spindle
Knits in Space:(54:48)
Jasmin took Gigi on a virtual fabric store visit
And Sew On:(58:20)
Gigi dug out UFOs. Working on the background of a whole cloth quilt piece. There are feathers with a
grid background. Genevieve is practicing sewing straight lines. Gigi cut fashion fabric and lining for
Grinch bags. They are black light reactive .She is hand basting the zipper from her Carli sweater
Check out this episode!
3 notes
·
View notes
Photo


Starting in the fog and finishing in the tropics
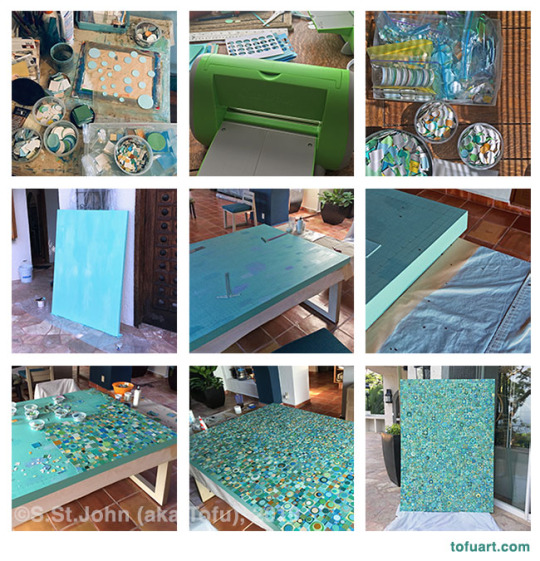
During the last few months I have worked on a new piece in my Post-Folk Art Series. The finished piece is a large (48”x67) site specific work for my friends’ home in Puerto Vallarta, Mexico. To avoid the complexities involved with shipping large artwork to Mexico, the piece needed to be finished on site. I have just spent about three weeks in a luxurious villa, making art, gazing at the Pacific and being fed incredible food. Sometimes an artist needs to make sacrifices.
The project began in San Francisco. First, I estimated the quantity for each different size of squares and circles of painted paper that would be required. I always over-estimate to give me added flexibility. The scale of this piece required a spreadsheet to track all the quantities needed.
With a set of numbers, I was ready to begin painting paper. The palette reflects the setting. In Puerto Vallarta, hills shrouded in tropical jungle come right down to the edge of the city. That jungle was my inspiration.
After all the paper was painted, it was time to start cutting squares in sizes from an half inch to 3 inches. To cut perfect circles, I use a series of punches. I needed nearly 2,400 three-quarter inch circles, as well as quantities of circles that were 1.5, 2 and 2.5 inches, plus thousands of small dots made with hole punches. I am greatly indebted to the artist Dorothy Yuki. Dorothy came over one afternoon with her Provo Craft cutters and helped me punch out most of the circles.
When I was packing up art supplies for my trip, I realized the paper circles and squares would need to stay with me in my carry-on luggage. Those thousands of pieces represented more than 100 hours’ worth of effort. I could not allow them to be lost in transit.
Arriving in Mexico I found the large the board waiting for me. The next step was to find a paint store and then get a few coats of color on the edges and surface. I always use a basic, interior latex house paint. There is no need for expensive acrylics.
With the board now prepped, it was time to set up my workspace. A large table was protected with plastic and drop cloths and the big board was laid out. It was time to draw a grid for a guide and get to work.
Over the next ten days I spent many hours gluing and fitting the squares, and then adding the layers of the circles. Fans kept me cool with temperatures in the 90s. The humidity is intense, but it slowed the drying down just enough to give me a bit more flexibility. The climate does make a difference. In San Francisco, I typically need to wash caked glue off my hands about every 15 minutes, where in Puerto Vallarta I could go for half-an-hour. It really is that humid.
As I was working, an Important holiday was approaching. Día de los Muertos was on my mind. In the evenings I would go down in to town to see the ofrendas that were being installed as the day drew near. Even Puerto Vallarta’s Halloween celebration has most kids in Day of the Dead-themed costumes, and if not that, a costume with a scary theme. Imagine two year old little girls dressed as vampires instead of princesses. The night of November 2nd included a parade and dance performance by youth groups in folk costumes with a Día de los Muertos twist.
Back home in San Francisco, I always set up my own more elaborate ofrenda. In Mexico, I stuck to some simple candles and some rather pungent marigolds in the tropical heat. As I sat at the table with the big piece of art spread out in front of me, I began to recall memories of my great-grandmother and her sisters around a similar big piece of art. For them it was one of the many quilts they worked on. Patterns from quilts and other textiles have influenced my work for more than 20 years. Assembling a large, colorful, patterned piece felt like I was coming full circle — all the more appropriate at a time we remember our ancestors.
As I got towards the end of the project, I realized that I had underestimated the amount of glue I would need. My preferred choice, GAC 100, was not available. I found one small shop in Puerto Vallarta with art supplies. Their best option is a glue called Resistol 850. Fortunately, it worked well for my purposes. I liked it so much, I returned to buy an additional bottle to bring home to California.
There was one other complication. A harsh Mexican art critic forced me to cover up the piece each night with a drop cloth. It was one of the resident geckos who had a tendency to climb up in the rafters and aim gecko poo at my art. Tempting as it might be to make a nod to Chris Ofili and include a bit of gecko poo, none ended up in the final artwork. But the tropics being the tropics, there are a few small insects embedded for all time in the acrylic varnish that coats the artwork. The insects can only add authenticity to a piece titled La Selva (The Jungle).
#art#mixed media#painting#collage#artistic process#california#san francisco#jungle#mexico#jalisco#puerto vallarta#tofuart#artists on tumblr
25 notes
·
View notes
Text
8 ways to renovate the house

The decoration of a house is an unfinished work, it rarely has a beginning, middle and end. As trends come and go and personal styles change, it is common to experience some boredom with some choices made years ago. As it is not always possible to buy everything new, the solution is to make occasional changes from time to time to eliminate that feeling of stagnation. Here are some easy and economical ideas.
1. Thousand cushions
Changing furniture periodically is not exactly practical and economical to renew the look. To create a new look on the same environment, bet on many pillows of different patterns, colors and fabrics. Take advantage of the ones you already have and include new prints to further improve the cost-benefit ratio.
2. Patterned
walls Tired of walls with solid color? One way to end boredom is to bet on patterned wallpaper - there are a multitude of patterns. If you are still unsure about this, consider covering a single wall instead of the entire environment. If you feel sick, just remove it and apply another one or go back to conventional painting.
3. Refrigerator to show off
It is common to use the home refrigerator for reminders, invitations, recipes, children's drawings and photos. In order for this exhibition to be more organized and have a positive aesthetic impact, one option is to print your favorite photos and nail them in a grid shape - or as creativity demands - with washi tape, the one made of rice paper and widely used scrapbook staff. Or even stick the appliance with fun prints that can receive messages.
4. New bedding
A quick and economical way to change the look of a room is to renew the bedding . If the current duvet cover is no longer part of your dreams, replace it with a quilt and vice versa. And have both - or more - up your sleeve to change periodically. Another option is to compose a layer of different pillows at the head of the bed. In this case, it is also possible to change as you feel bored.
5. A bath of towels Bath towels
can go beyond the strictly utilitarian function. They are everyday in your life, but they are easily overlooked. How about valuing them when thinking about moving the house? Update your towels with different colors, prints and embroidery that catch your eye. And, of course, in addition to being beautiful they must be soft, have good absorption and fast drying.
7. Own art

Try to decorate a wall with your own or the family's creation. You don't need to be an expert on the subject or have special talents. A selection of framed travel photos, old family dishes, remnants of paint to create a mural with Jackson Pollok brushstrokes, drawings or photos of the children trapped with clothespins on a clothesline or blinker. Here, originality speaks louder.
8. Rearranging is essential
Finding a place for home thing. It may take a little work, but the organization transforms the environments and makes life easier. Existing items can get new accessories, such as organizing boxes, a tray for drinks, a charming basket to store toys or a magazine holder to organize reading.
2 notes
·
View notes
Photo


Let’s talk about Expert Judgment on Markers to Deter Inadvertent Human Intrusion into the Waste Isolation Pilot Plant. Written in 1993 by Sandia Labs for the US DOE. The most famous part of it is this series of messages:
This place is a message... and part of a system of messages... pay attention to it!
Sending this message was important to us. We considered ourselves to be a powerful culture.
This place is not a place of honor... no highly esteemed deed is commemorated here... nothing valued is here.
What is here was dangerous and repulsive to us. This message is a warning about danger.
The danger is in a particular location... it increases towards a center... the center of danger is here... of a particular size and shape, and below us.
The danger is still present, in your time, as it was in ours.
The danger is to the body, and it can kill.
The form of the danger is an emanation of energy.
The danger is unleashed only if you substantially disturb this place physically. This place is best shunned and left uninhabited.
But what I find the most interesting is that none of these messages were intended to be verbalized. The section where they appear, Appendix F, is about place design. I want to share my favorite passages from it, transcribed for your reading pleasure.
Use a system of markings that utilizes the whole site as an enormous mark, and that includes: smaller markers; high points to climb to from which to view the entire site; walls and places to be in that co-locate viewers with messages... an organized environment. Consider the possible retention of a currently existing structure for symbolic purposes only, as a decaying massiveness.
Build something specifically so it will fall apart and look forlorn and magnificent.
The place should not suggest shelter, protection or nurture... it should suggest that it is not a place for dwelling, nor for farming or husbandry. This would be most strongly communicated if the place obviously tries to deny inhabitation and utilization. It might best be designed as a place difficult to be in, and to work in... both actually and symbolically. Given this, the center of the place should reject rather than embrace. Any attractive focus on/near the center would suggest welcome, and by extension, occupancy and utilization.
Make it actively hostile to life so nobody will think any good thing has ever happened there.
As to the meaning of “center”: physically to mark the WIPP site in any way makes it a different place from the surrounding desert, and creates a “figure” against a “ground.” It makes a center in the desert.
I am so full of the phrase it makes a center in the desert.
Design of the entire site and its subelements should avoid those forms that humans regularly tend to use to represent the “ideal,” “perfection,” or “aspiration.” Aspiring forms are sky-reaching verticals, the obelisk, for example. Ideal and perfect ones are the perfect forms of symmetrical geometry (spheres, pyramids, hexagons) and of regular crystalline structures or polyhedrons. If such forms are used, we suggest their perfection be undermined through substantial and obviously meant “irregularity,” as if its builders knew about the ideal and perfection, but asserted that this place is not about them. More appropriate types of forms to use are amorphic or jagged and horizontal, a deliberate shunning of the values of “perfection” or “aspiration.”
If you make something beautiful, someone might some day think it was good, and this must be avoided at all costs.
Wherever, possible, use design principles in which the intended performance of something is not diminished as it degrades or fails. So the design of the place, and its construction, materials and configurations should gain, rather than lose, communicative capacity as parts erode over time, or as pieces are removed. Erosion or dismantling should expose new messages or reinforce them.
One of my favorite parts. A place that becomes more meaningful as it is destroyed.
And then we have some explanatory figures. I suggest you go to the original document if you want to see all of them, but a few are above. Some of my favorite parts, though, were actually the descriptions:
Shunned land.. poisoned, destroyed, unusable:
“Black Hole”: A masonry slab, either of black Basalt rock, or black-dyed concrete, is an image of an enormous black hole; an immense nothing; a void; land removed from use with nothing left behind; a useless place. It both looks uninhabitable and unfarmable, and it is, for it is exceedingly hot part of the year. Its blackness absorbs the desert’s high sun-heat load and radiates it back. It is a massive effort to make a place that is fearful, ugly, and uncomfortable.
The heat of this black slab will generate substantial thermal movement. It should have thick expansion joints in a pattern that is irregular, like a crazy-quilt, like the cracks in parched land. And the surface of the slab should undulate, so as to shed sand in patterns in the direction of the wind.
“Forbidding Blocks”: Stone from the outer rim of an enormous square is dynamited and then cast into large concrete/stone blocks, dyed black, and each about 25 feet on a side. They are deliberately irregular and distorted cubes. The cubic blocks are set in a grid, defining a square, with 5-foot wide’’streets” running both ways. You can get “in” it, but the streets lead nowhere, and they are too narrow to live in, farm in, or even meet in. It is a massive effort to deny use.
I suspect this document was written by sci-fi fans.
There’s also a discussion of other famously durable structures that have lasted many thousands of years, and a collection of photographs of a camel skeleton being excavated with no explanation of any kind that interrupts the text for two pages.
Construction of the Waste Isolation Pilot Plant started 1979 and continued for over 20 years, plagued by astronomical costs and environmental concerns. The year after this document was published, 1994, Sandia Labs was hired to assess the facility, and the first waste arrived in 1999. In 2014 there was a major leak due to... a cat litter mishap... The plant reopened in 2017. Everything about the warning messages is still written in the future tense, which I take to mean that construction will be pushed off indefinitely and the decayed remains of the plant itself will become the message.
102 notes
·
View notes
Text
HANDI QUILTER BLOCK OF THE MONTH

Hi, I’m Christina Whitney, a studio educator with Handi quilter. I would like to share with you the Paisley template today. So let’s take a look at it. So the Paisley template is pretty self-explanatory, it’s the shape of a Paisley. The part that might be a little bit confusing at the beginning are the marks that are on the Paisley ruler, but they’re really exciting to use. So you’ll notice we have lines coming through
Intersecting through this center point, and that’s where your needle goes. When it’s in this little edge of the Paisley, if you wanted to use the center point of the actual top of the Paisley, we’ve also got grid lines coming through here for that center point. So if you look here, I had an X drawn through my quilt and I started with the center point. And again, we talked about these markings here. I lined up those markings so that they lined up with the mark. I drawn on my quilt going horizontally and vertically, and then stitched all the way around there, rotated around stitched the other side. And I’m going to show you how to stitch the next one. Before we do that though, I want to make sure that we have our ruler base on our machine. So you can feel that ruler base see how much extra table space you have on there. And I also have a Surefoot on here. Now, the shirt’s important because it has that higher profile, which helps protect you from damaging your machine with the ruler, hopping over. Okay. This template has a notch in it to be able to get to the inside of the ruler, make sure your needle is in the up position. And then you’re just going to slide it over the top. Okay, I’m going to go ahead and bring my machine to my center point,
Pull up my bobbin. And I also made sure that I put handy grip on my ruler ahead of time. That will keep the ruler from shifting around. Okay. Now I’m lining up this line. That’s going through the middle of the ruler with the line that I had drawn. It’s pretty faint right now. And then same thing going down. So I’ve got my ruler in position and we’re going to start stitching around
You want to make sure you hug the side of that ruler and change your hand position as necessary.
Now, as we’re coming back up into that point, this part of the ruler isn’t connected to each other. So one side might try to flop up. So it’s important that you hold both sides of the ruler as you come back to that point.
Again, make sure the needle is up to take the ruler off and there you can see our Paisley in a windmill shape.
Okay? We’re going to do a similar pattern that looks completely different, but it’s the same concept. We’re going to have our crosshair here, our horizontal and vertical. And this time when we put the ruler down, we’re going to have that center point be the center point of the top of this Paisley. So I’m going to use these lines going across line those up with the line. I have drawn on my quilt going up and down. We’re going to have it lined up and then I start stitching around and I actually overstretched a little bit. And then that way I could rotate the ruler to the next position without having to snip my threads, get it lined up, ditch the next section, travel it around again and just keep rotating around and look what a different design you get kind of a ninja star compared to more of this whimsical windmill.
Okay, over here, this doesn’t even look like a Paisley if you’re looking at it straight on. So let me show you how we got that design. We’re going to do some creative use of the ruler today. So I put the ruler down. I had a line drawn straight down the middle, stitched out one Paisley, and then watch what I did. I’m actually going to flip the ruler upside down, which we don’t normally do, but I wanted to get that opposite shape. And then I stitched the other one. Then I’m going to flip it back over, shifted over to this next section, stitch out one more Paisley, flip it over one more time and get that last Paisley. And it gives you these different sections and you can go back in and do any kind of fill work in there that you want to. So that’s a fun one. This next design, arguing and yang. I wanted to make sure that it was flowing in the proper direction, which meant that I had to it with the ruler upside down. So my handy grip is actually on the top of my ruler and the words are facing down. So I did one side and then flipped it around, And did the other side.
Okay, let’s look at this design here. It’s a variation of a clam shell. You’ll notice I don’t have half circles. I kind of have this part of a Paisley shape. So what I did was I used the markings on the ruler that goes through the center of the top point, put that on my line that I have on my quilt. And I just stitched along just a portion of the ruler. So that’s a fun thing with doing rulers is that you don’t have to use the entire ruler. You can pick parts out of that ruler to get different designs.
Okay, let’s move on to our last design for this ruler. And there’s been some disagreement as to the name of this ruler, somewhat Batman, somewhat mustache. We’ve heard Viking helmet. So if you’re doing a masculine quilt, this is always going to be a fun border. But this one, I drew some markings on my quilt top drew one Paisley shape, and again, flipping the ruler upside down to get the other side. And it just makes kind of the circular shape where they connect in. And I did the same thing here, but just upside down, so alternating back and forth. So the Paisley template is a great template to use lots of fun. Come up with many, many, many different designs and have fun with it. more info .https://youtu.be/_eyPl86qRG0
https://whitlocks.com/product-category/handi-quilter-longarm-quilting-systems/hq-complete-systems/
Location: Salem, OR, USA
0 notes
Text
Eighty Strategies Of Dreamcloud Mattress Domination

Top rated Information of DreamCloud Mattress Assessment
If you aren't equipped or ready to shell out the complete amount of money for your mattress all at just one time, both equally firms deliver simple financing decisions. When transport straight to The customer is definitely effective, In addition, it usually means you do not have the potential to examine the mattress out before you get it. From the brief time it has been on the marketplace, it has speedily developed into Among the most perfectly-identified options.
Up in Arms About DreamCloud Mattress Evaluate?
Consider more under and find out if the deluxe DreamCloud is a wonderful in good shape for your snooze style. More it meets with all marketplace requirements along with leading certifications. Its mattresses are relatively additional expensive than other on-line models, however , you're getting a thicker hybrid mattress together with every one of the bells and whistles.
It really is Similarly extremely slender, letting for larger breathability for your mattress, mainly because it wicks heat far from the human entire body and disperses it through the remainder from the mattress. It is actually among the finest mattresses readily available for facet sleepers. Not only does this aid the sleeper, but Moreover it supports the remainder of the mattress and lets it to take care of its condition.
The Casper mattress is comprised of 4 personal layers, and every layer is made from another sort of material. The quilt can also be very durable, so we're assured that it'll effectively safeguard the mattress and allow it to retain its form. This layer is intended to source the mattress with nearly all its comfort.
The Do's and Don'ts of DreamCloud Mattress Evaluation
You don't have just about anything to remove no concerns asked. To be a consequence, it is hard to establish the way that it feels and when It will be as supportive and comfy as you happen to be hoping it will be. Pursuing that, it's only a issue of expecting the mattress to accept its ultimate form.
On top of that, the polyfoam is extremely breathable, which prevents the buildup of warmth and permits the mattress to remain cool and comfy all through the evening. Also benefit from the Leesa mattress, the Tuft and Needles mattress is amazingly supportive, lessens the buildup of stress in the system, which prevents the maturation of discomfort even though sleeping. Because of the layer of latex, this mattress does have an awesome amount of bounce, which means you shouldn't should be worried about exerting an abnormal quantity of energy if you're aiming to delight in People personal pursuits.
All About DreamCloud Mattress Evaluate
DreamCloud is just not rated for heavy sleepers, consequently it is not likely to be a remarkable different if you aren't normal measurement. You have to be house to have the mattress, even so the shipping and delivery particular person may help you established every little thing up and will even haul off your earlier mattress. Because of the grid design, It is also really breathable, which means the mattress continues to be interesting throughout the evening.
The One Thing to perform for DreamCloud Mattress Assessment
Consequently, it could be tricky to determine if It can be the proper option for your requirements. Consequently, it can be tricky to notify if it is going to match your requirements. There are several one of a kind alternatives available, which can enable it for being tough to select the very best mattress to fit your demands.
The Fight In excess of DreamCloud Mattress Evaluation and the way to Get It
You must assume to wish to commit a little added effort and hard work in regards to savoring intimacy on this mattress. A different issue which will impact the comfort and ease a mattress delivers is movement transfer, which is really problematic for partners. The products utilised and wherever they're set inside the mattress has a right away effect on the ease and comfort and guidance it provides.
Aspect Sleepers The majority of facet sleepers should really locate the Zotto mattress comfy and supportive, due to neutral degree of firmness it provides. Each individual bed mattress is personalised on the convenience of your private home, at any moment throughout the daily life span of your mattress, so you might produce your excellent comfort and ease amount.
The DreamCloud Mattress Evaluate Stories
You still get the ease and comfort of memory foam so It's a get-get. As being a consequence, foam mattresses could have a scent when they're new. Together with the Zotto mattress, there's a terrific level of bounce, due to the Energex foam.
What You do not know About DreamCloud Mattress Overview
Tuft and Needles is Amongst the several mattresses that been released to the internet mattress pattern.
Here is a peek at unique levels which the mattress delivers And exactly how They are laid out as soon as the mattress is shipped to you. The components utilised in the mattress plus the correct development with the mattress have a direct influence on how comfy It's going to be. Remember the fact that beds are much As with every other bit of home furniture will have to be cleaned often the extremely best option for when you ought to have your mattress cleaned, when every year or two, should be to take it for an expert mattress thoroughly clean or to approach it on your own with a force steam cleaner.
dream cloud mattress reviews
Each and every layer of the DreamCloud Mattress is intended to manage temperature so this mattress was amongst The good sleeping mattresses we've reviewed. The DreamCloud Memory Foam Mattress is among the latter.
What to Expect From DreamCloud Mattress Evaluate?
The Specific style on the Purple mattress provides a variety of benefits. The Backbone Align base layer is specifically produced with increased density, resilient foam for a corporation base which is ensured to past for lots of decades. The Luxi mattress is produced from the United states which is delivered straight from the company's facility to The buyer.
https://www.smore.com/mwhzy-dreamcloud-mattress-reviews-wow
1 note
·
View note
Photo

Mega Man II stitched and designed by azurekoi.
“Mega Man II Cross stitch block for a St Jude charity quilt. There wasn't really a pattern. I used some screen shots from the game and moved the elements closer together since the block needed to be 96 x96. Then I just kinda gridded it and winged it. Was used as a block on a charity quilt for St. Jude Children's Hospital which was put together and auctioned off by Quiltoni over on twitch. The robot's name is Hotdog. =D”
0 notes