#obd notes
Explore tagged Tumblr posts
Text
@earlgreytea68 was that for me..and for TWO fandoms nonetheless!
(other people who've found such heavens.. please mention some.. there're not much in the comments..)
Imagine you're opening AO3 and search for a fic. Imagine you're finding one that fits all your criterias. Imagine it has the perfect length. Imagine getting lost in the story and feeling almost high when it's over. Imagine looking up the author and they have written. so. many. more. fics. exactly. like. that. Imagine.
26K notes
·
View notes
Text
Machine girl with an OBD interface but no documentation so you're helping her out by brute forcing all command values and noting down what happens
#robotposting#I've spoken with that guy who has the 'car in a suitcase' who did exactly this. cool guy.
196 notes
·
View notes
Text
Engine Repair Instruction Full Guide
Engines are the heart of any vehicle, powering everything from your daily commute to long road trips. Knowing how to repair an engine can be a game-changer, whether you're an enthusiast who loves getting your hands dirty or someone looking to save money on mechanic bills. This guide will walk you through the entire process of engine repair, from diagnosing problems to reassembling your engine and ensuring it runs smoothly.

Understanding the Basics of an Engine
Before diving into the repair process, it’s crucial to understand how an engine works. Most vehicles use an internal combustion engine, which combines fuel and air, ignites it, and transforms that explosion into mechanical energy.
Components of an Internal Combustion Engine
The main components include:
Cylinder Block: The engine's core where combustion occurs.
Cylinder Head: Houses the valves and spark plugs.
Pistons: Move up and down to create the force needed to turn the crankshaft.
Crankshaft: Converts the pistons' up-and-down movement into rotational motion.
Camshaft: Controls the opening and closing of the valves.
Valves: Regulate the flow of fuel and air into the engine and exhaust gases out.
How an Engine Works: A Simple Explanation
An engine works by pulling in a mixture of air and fuel, compressing it, igniting it with a spark (in gasoline engines), and then expelling the exhaust gases. This cycle—intake, compression, power, and exhaust—happens in each cylinder and repeats hundreds of times per minute.
Tools and Equipment Needed for Engine Repair

Whether you're performing a basic repair or diving into more complex work, having the right tools is essential.
Essential Tools for Basic Repairs
Socket Set: For removing and tightening bolts.
Wrenches: Different sizes for various engine parts.
Screwdrivers: Flathead and Phillips for screws and clips.
Pliers: For handling wires and small parts.
Torque Wrench: Ensures bolts are tightened to the correct specifications.
Specialized Equipment for Advanced Engine Work
Engine Hoist: For removing the engine from the vehicle.
Cylinder Hone: Prepares cylinders for new piston rings.
Compression Tester: Checks the health of each cylinder.
OBD-II Scanner: Diagnoses engine codes and issues.
Safety Gear and Precautions
Gloves: Protect your hands from cuts and chemicals.
Safety Glasses: Shield your eyes from debris.
Work Boots: Offer protection against heavy parts or tools.
Diagnosing Engine Problems
Accurately diagnosing engine problems is the first step in any repair process. Understanding the symptoms can save time and prevent unnecessary work.
Common Symptoms of Engine Issues

Check Engine Light: Indicates a problem detected by the car's computer.
Strange Noises: Knocking, tapping, or grinding sounds can signal internal damage.
Excessive Smoke: Blue smoke might mean burning oil, while white could suggest a coolant leak.
Loss of Power: Often linked to fuel or air delivery issues.
Step-by-Step Diagnostic Process
Listen and Observe: Note any unusual sounds, smells, or behaviors.
Check Engine Light Codes: Use an OBD-II scanner to retrieve error codes.
Perform Compression Test: Assesses the health of your engine’s cylinders.
Inspect Fluids: Look for contamination or leaks in oil, coolant, and other fluids.
Step-by-Step Guide to Reassembly
Prepare Your Workspace: Ensure that your workspace is clean, organized, and well-lit. Lay out all the parts and tools you'll need in the order of reassembly. Keep the engine manual handy for specific torque specs and sequences.
Install the Crankshaft: Place the crankshaft back into the engine block, ensuring it is seated correctly. Use assembly lube on the main bearings to prevent damage during the initial startup. Torque the main caps to the manufacturer's specifications.
Insert the Pistons: Install the pistons and connecting rods. Be sure to align the piston rings correctly and use a ring compressor to insert the pistons into the cylinder bore. Attach the connecting rods to the crankshaft and torque the rod bolts to spec.
Install the Camshaft and Timing Components: If your engine uses a timing chain or belt, install it according to the timing marks on the camshaft and crankshaft gears. This step is crucial for ensuring the engine's valves open and close at the correct times.
Attach the Cylinder Head: Place the cylinder head gasket on the engine block, followed by the cylinder head. Torque the head bolts in the correct sequence and to the proper specifications. This ensures a good seal and prevents head gasket failure.
Install Valves, Lifters, and Pushrods: If applicable, install the engine's valves, lifters, and pushrods. Make sure they are properly aligned and that the lifters are seated correctly in their bores.
Reassemble the Valve Train: Install the rocker arms and adjust the valve lash according to the engine manual. Proper valve lash is critical for engine performance and longevity.
Reattach External Components: Begin reattaching external components like the water pump, oil pump, timing cover, oil pan, and intake manifold. Replace any gaskets and seals during this process to prevent leaks.
Reconnect the Fuel and Ignition Systems: Reinstall the fuel injectors, spark plugs, and ignition wires. Ensure all electrical connections are secure and properly routed to avoid short circuits or malfunctions.
Final Checks: Before moving on, double-check all connections, bolts, and components. Make sure nothing is left loose or unconnected.
Applying Proper Torques and Specifications
Every engine has specific torque settings for each bolt. Over-tightening can strip threads or warp components, while under-tightening can lead to leaks or parts coming loose. Use a torque wrench and follow the manufacturer's specifications closely.
Double-Checking Work for Mistakes

It's easy to miss a step or make a mistake during reassembly. Double-check your work:
Ensure all components are installed in the correct order.
Verify all bolts are torqued to spec.
Check for any leftover parts or tools in the engine bay.
Testing the Repaired Engine
With the engine reassembled, the next step is testing it to ensure everything is functioning properly.
Preparing for Initial Startup
Before starting the engine, perform a few preparatory checks:
Prime the oil system: This can be done by cranking the engine with the fuel system disabled until oil pressure is achieved.
Fill the engine with fresh oil and coolant.
Double-check all electrical connections and fuel lines.
Checking for Leaks and Unusual Noises

Once you start the engine, pay close attention to any unusual noises or leaks:
Oil Leaks: Check around the oil pan, valve covers, and front and rear seals.
Coolant Leaks: Inspect the radiator, hoses, and water pump area.
Unusual Noises: Listen for knocking, tapping, or whining sounds, which could indicate an issue with the timing components or internal parts.
Fine-Tuning and Adjusting the Engine
After the initial startup, the engine may require some adjustments:
Timing Adjustments: Use a timing light to set the ignition timing.
Idle Speed: Adjust the idle speed according to the manufacturer’s specifications.
Fuel Mixture: On carbureted engines, you may need to adjust the air-fuel mixture for optimal performance.
Common Engine Repair Mistakes to Avoid
Engine repair is complex, and mistakes can be costly. Here are some common errors to watch out for:
Misalignments and Incorrect Torques
Misaligned timing components can lead to poor engine performance or damage.
Incorrectly torqued bolts can cause leaks, parts failure, or engine damage.
Overlooking Small Parts and Connections
Small parts like washers, clips, or gaskets are easy to overlook but crucial for preventing leaks and ensuring proper function.
Electrical connections: Double-check that all sensors and connectors are properly seated.
Skipping Diagnostic Steps
Skipping steps in the diagnostic process can lead to unnecessary repairs or missed issues. Always perform thorough diagnostics before and after repairs.
Maintaining Your Engine After Repair
Proper maintenance is key to ensuring the longevity of your newly repaired engine.
Importance of Regular Maintenance
Regular maintenance, such as oil changes, air filter replacements, and coolant checks, is essential to keep your engine running smoothly and prevent future problems.

Tips for Extending Engine Life
Use high-quality oil and filters.
Avoid hard driving until the engine is fully warmed up.
Regularly check and maintain fluid levels.
When to Seek Professional Help
While DIY repairs can save money, some issues are best left to professionals, especially if you encounter complex problems or lack the necessary tools and expertise.
Dealing with Advanced Engine Repairs
Some engine repairs are too complex for the average DIYer. Here's when to consider professional help:
Understanding When It’s Beyond DIY
Extensive internal damage: Cracked blocks or severely worn bearings usually require professional expertise.
Advanced electrical issues: Problems with engine management systems often need specialized diagnostic tools and knowledge.
Overview of Complex Repairs: Timing Belt, Engine Rebuilds
Timing Belt Replacement: Involves precise alignment of engine components and is critical for preventing engine damage.
Engine Rebuilds: This is a time-consuming and complex task that often requires professional machining and specialized tools.
Working with a Professional Mechanic
When the repair is beyond your capabilities, working with a professional mechanic ensures that the job is done correctly and safely. They have the tools, experience, and resources to handle complex engine repairs.
Cost Considerations in Engine Repair
Engine repair costs can vary widely depending on the scope of work, parts required, and whether you do it yourself or hire a professional.
Estimating Costs for DIY vs Professional Repair
DIY Repairs: Typically cost less but require an investment in tools and time.
Professional Repairs: Can be expensive but come with the assurance of experience and often a warranty.
Budgeting for Tools, Parts, and Time
Consider the cost of any special tools or equipment you might need, as well as the cost of replacement parts. Factor in the time required, especially if the vehicle is your daily driver.
Understanding the Cost of Mistakes
Mistakes can be costly. Stripping a bolt, breaking a part, or incorrect assembly can lead to additional expenses. Always weigh the risks before starting a major repair.
Conclusion
Recap of Key Points
Engine repair is a rewarding but challenging task that requires careful planning, the right tools, and attention to detail. Whether you’re fixing a minor issue or performing a complete rebuild, following the correct procedures is crucial for success.
Encouragement for DIY Enthusiasts
For those who love working on their vehicles, engine repair can be a satisfying and cost-effective way to maintain your car. With patience and persistence, even complex repairs can be tackled with confidence.
Final Thoughts on Engine Repair
Always approach engine repair with a clear plan and the right resources. Don’t hesitate to seek professional help when needed, and remember that regular maintenance is the best way to avoid major repairs.
FAQs
How do I know if my engine needs repair?
Common signs include unusual noises, excessive smoke, loss of power, and a check engine light. Regular diagnostics can help catch issues early.
Can I repair my engine without professional help?
Basic repairs like replacing gaskets or sensors can often be done at home with the right tools. However, more complex tasks like engine rebuilds may require professional expertise.
What are the signs of a failing engine?
Signs include knocking noises, excessive oil consumption, smoke from the exhaust, and persistent overheating.
How long does it take to repair an engine?
The time required varies greatly depending on the complexity of the repair. Simple repairs might take a few hours, while a full rebuild could take several days or longer.
2 notes
·
View notes
Text
From Engine to Electronics: Proper Diagnostic Techniques for Resolving Maserati Problems

Maserati, the epitome of Italian luxury and performance, is renowned for its stylish design and high-performance capabilities. However, like any high-end vehicle, Maserati can encounter a range of issues, from engine troubles to electronic malfunctions. Proper diagnostics is crucial in maintaining the health and performance of these sophisticated machines. This article will guide you through the common problems Maserati face and the proper diagnostic techniques to resolve them.
Common Maserati Problems
1. Engine Issues
Maserati engines are marvels of engineering, but they can develop problems over time. Common engine issues include:
Misfires and Rough Idling: This can be caused by faulty spark plugs, ignition coils, or fuel injectors.
Overheating: Often due to a malfunctioning cooling system, such as a failed water pump or a clogged radiator.
Oil Leaks: These can originate from various seals and gaskets, leading to low oil levels and potential engine damage.
2. Transmission Problems
Maserati transmissions are designed for performance but can experience:
Slipping Gears: This could indicate worn-out clutch plates or issues with the transmission fluid.
Delayed Shifts: Often due to problems with the transmission control module or low fluid levels.
3. Electrical and Electronic Failures
Modern Maseratis are equipped with advanced electronics that can sometimes fail, including:
Dashboard Warning Lights: These can indicate issues ranging from simple sensor failures to serious engine problems.
Infotainment System Glitches: Problems with the touch screen, navigation, or audio system are not uncommon.
Diagnostic Techniques
1. OBD-II Scanner
The On-Board Diagnostics II (OBD-II) scanner is an essential tool for diagnosing Maserati problems. It can read error codes from the car's computer, providing insight into various issues.
How to Use: Connect the OBD-II scanner to the port located under the dashboard. Turn on the ignition and follow the scanner’s instructions to retrieve the error codes.
Interpreting Codes: Each code corresponds to a specific problem. For example, P0300 indicates a random/multiple cylinder misfire, while P0128 points to a coolant thermostat issue.
2. Visual Inspection
A thorough visual inspection can reveal obvious issues such as leaks, damaged components, or worn-out parts.
Engine Bay: Check for oil leaks, loose connections, and the condition of belts and hoses.
Undercarriage: Inspect for fluid leaks and damage to the exhaust system.
Electrical Connections: Look for corroded or loose battery terminals and wiring issues.
3. Multimeter Testing
A multimeter is useful for diagnosing electrical issues in a Maserati.
Battery Voltage: Measure the voltage across the battery terminals. A healthy battery should read around 12.6 volts when the car is off and around 14 volts when running.
Sensor Checks: Test various sensors, such as the oxygen sensor or mass airflow sensor, to ensure they are functioning correctly.
4. Compression Test
A compression test helps diagnose internal engine problems such as worn piston rings or valves.
Procedure: Remove the spark plugs and insert a compression gauge into each cylinder. Crank the engine and note the pressure readings. Low or uneven readings indicate internal engine issues.
5. Professional Diagnostic Tools
Maserati dealerships and specialized repair shops use advanced diagnostic tools that can access proprietary systems and provide more detailed information.
SD2/SD3 Diagnostic Systems: These are specialized tools used by Maserati technicians to diagnose and program vehicle systems accurately.
Diagnostic Software: Tools like Xentry or PIWIS can interface with Maserati's electronic systems for comprehensive diagnostics.
Addressing Common Issues
1. Engine Repairs
Misfires and Rough Idling: Replace faulty spark plugs, ignition coils, or fuel injectors. Regular maintenance and using high-quality fuel can prevent these issues.
Overheating: Ensure the cooling system is functioning correctly by checking the water pump, radiator, and thermostat. Flushing the coolant system periodically is also recommended.
Oil Leaks: Identify the source of the leak and replace the necessary seals or gaskets. Regularly check oil levels and change the oil according to the manufacturer's recommendations.
2. Transmission Solutions
Slipping Gears: Inspect and replace worn clutch plates and ensure the transmission fluid is at the correct level. Consider a fluid change if necessary.
Delayed Shifts: Diagnose and repair issues with the transmission control module or solenoids. Regular transmission servicing can prevent many of these problems.
3. Electrical Fixes
Dashboard Warning Lights: Use an OBD-II scanner to identify and address the underlying issue. Reset the warning lights after repairs are completed.
Infotainment System Glitches: Perform software updates and check for any loose connections or faulty components. In some cases, a complete system reset may be required.
Conclusion
Proper diagnostics are essential for maintaining the performance and reliability of your Maserati. By using the right tools and techniques, you can identify and resolve issues promptly, ensuring your luxury car continues to deliver the driving experience it was designed for. Regular maintenance and timely repairs are key to keeping your Maserati in top condition, from the engine to the sophisticated electronics.
#maserati car#maserati car diagnosis#maserati service center#maserati car maintenance#maserati car mechanic
2 notes
·
View notes
Text
i NEED to know more about this!! OP can you please please elaborate? or maybe a link to read more? thanks in advance!
Colin Morgan in the foreword for Designing Terry Pratchett’s Discworld

foreword written and narrated by colin morgan
488 notes
·
View notes
Text
Autel IM608 Program Key for BMW CAS4 CAS4+ via OBD
Autel MaxiIM IM608 II can program BMW CAS4 and CAS4+ keys using OBD, without needing to open the ECU box. Remember, a network connection is essential during the whole process.
For instance, let’s consider BMW F30 key programming:
Important Notes:
For CAS4, the procedure for adding a key in case of all keys lost remains the same; ISN retrieval is unnecessary.
For CAS4+ all key lost scenarios, attempt to read the Engine ISN code under ISN code management. If this is not supported, explore alternative methods to acquire the ISN code.
The subsequent steps are identical to adding a key. To determine the CAS system type, access “ECU information.”
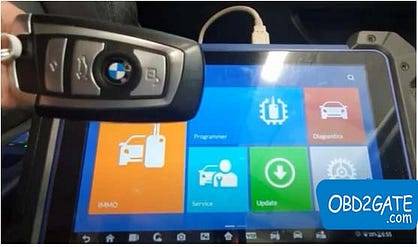
Programming Procedure:
Connect IM608 II to the OBD2 port of your BMW.
Navigate to “BMW” in the device.
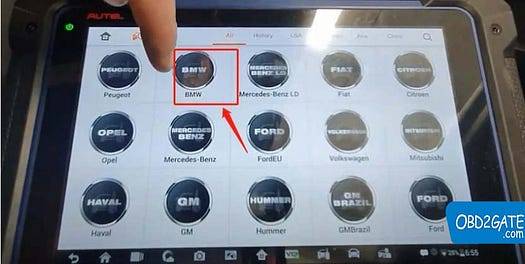
Opt for “Smart Selection.”
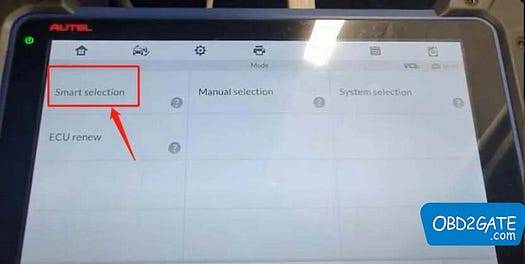
Choose “Mini (Europe) > Smart Mode.”
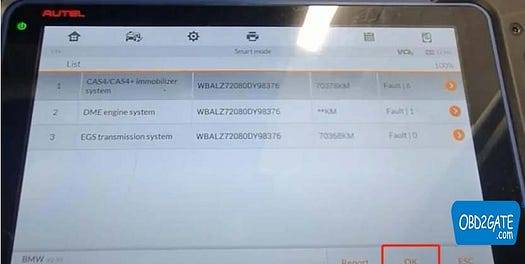
Select “Key Learning” followed by confirming vehicle information with “OK.”
Proceed to “OBD Learning” >read the provided instructions, click ‘OK’
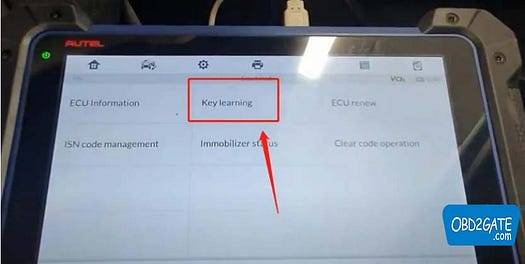
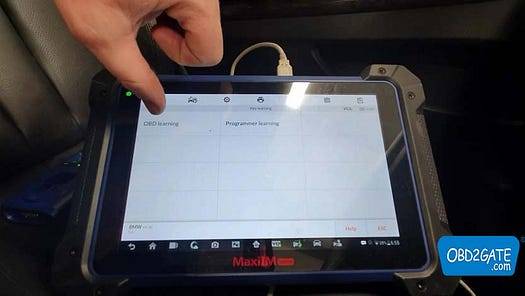
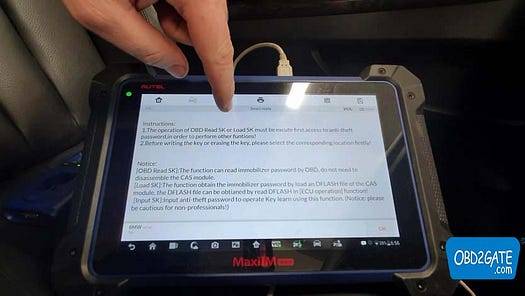
Click “OBD Read SK” on MaxiIM IM608> read notes.
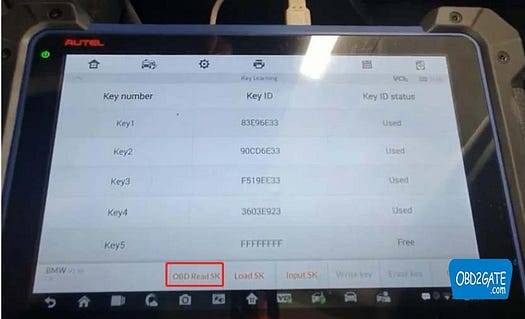
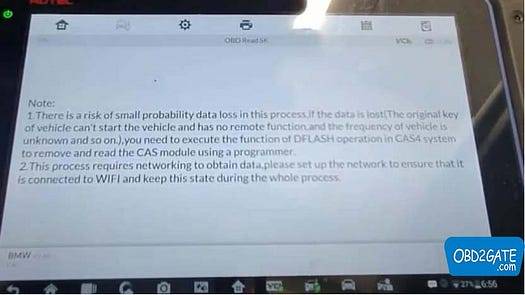
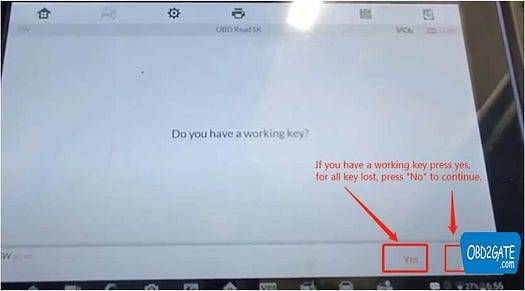
Respond to the question about having a working key with “Yes” or “No.”
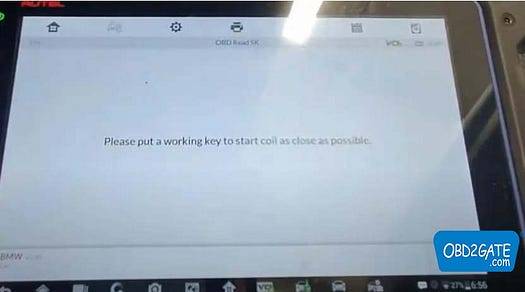
Position a working key as close to the start coil as possible.
Successful reading of the password.
Pick an empty key position for key writing.
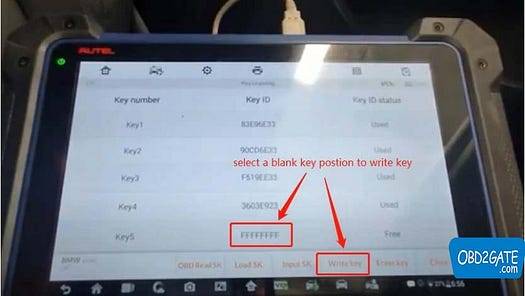
Place the new key near the starting coil. Key frequency: 868MHZ.
The key learning process consists of two steps.
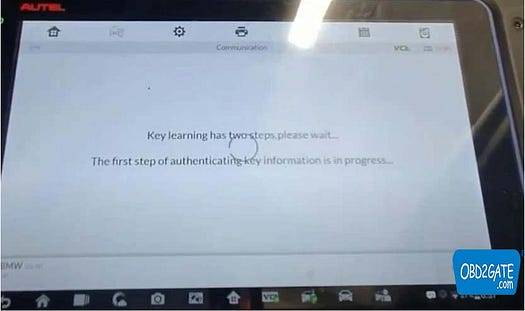
Key writing is completed successfully.
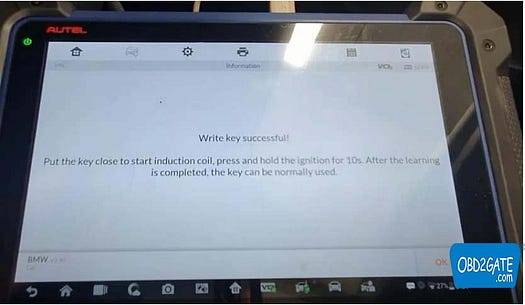
By adhering to the instructions on Autel MaxiIM IM608 II, the entire process will be effortlessly accomplished!
Check Autel im608 pro II price on OBD2GATE.com:
2 notes
·
View notes
Text
Lonsdor K518 Pro Program 2014 BMW X1 CAS3 Smart Key via OBD Guide
Lonsdor K518 Pro programmed a new smart key to 2014 BMW X1 CAS3 via OBD successfully.
The CAS3 needs to be updated to CAS3++. Before doing this, manually back up the original car EEPROM data. After upgrade, you can add a new key.
Operation guide:
Step 1: Back up original car EEPROM data
Connect K518 Pro key programmer and the BMW car via OBDII cable

Select Immo & remote>> BMW>> Select from type>> CAS1/CAS2/CAS3>> Backup & recover (only key data)

This function allows to restore and backup CAS key data:
1.Please carry out this before key programming
2.Whe key programming causes CAS to lock, you can use the previously saved key data to reset CAS.
Press “OK” to continue

Press start button once
Identify the CAS part number and CAS type is CAS3++ (ISTAP).

This CAS version requires update operation to continue. Return to previous menu and update CAS.
Step 2: Update CAS3
Select “Update CAS3” on the main menu

Starting to update CAS:
1.This function will update CAS3++.
2.Before doing this, please manually back up the original car EEPROM.
We have backed up the data, click “OK” to continue
Press start button once
Confirm the CAS part number and CAS type
The CAS update has been completed.


Step 3: Program key
Select “Program/delete key” on the main menu
Press start button once
Identify the CAS part number and CAS type.
For encrypted CAS, please use a working key to switch ignition on.

Confirm the vehicle info

Reading RAM, about a minute…
Remove key from ignition switch
For smart key, take it outside the car
Select “Backup key data”
Input a new file name to save the data (i.e. BMWCAS3)


Operation complete!
Start to make dealer key…
Use a working key to switch ignition on
The ignition is 6 now
Remove key from ignition switch. For smart key, take it outside the car
Reading key info…
Select one key position to delete
Delete key successfully


Select one key position to add
Select “Via this device’s card slot”

Note:
1.If it’s genuine /OEM key, please pre-process it first.
2.If the key was programmed to this vehicle but programming failed, please unlock the key and restore CAS key data first.
Select “Remote key”

Pull the card slot’s baffle to the right and insert the key to be programmed (to identify if key is valid and to pre-process key)
The current key is legal, continue to generate

Insert the key needed to be programmed into car slot
Writing key info…
If for remote or smart key, please complete the following steps:
1.Take away the key from ignition switch
2.Re-insert the key into ignition switch
3.Press Start button
Finally, use the key programmed to start the car and test remote, all work fine!

Done!
2014 BMW X1 CAS3 smart key was programmed by Lonsdor K518 Pro Key programmer perfectly.
0 notes
Text
2023 Yamaha R15 v4, MT 15, FZX Launch Highlights Prices, Features, Specifications & Images
Three of Yamaha Motor India’s most well-known motorcycles in India now have updated OBD-2-compliant engines. The 2023 Yamaha MT-15 V2, 2023 Yamaha R15 V4, and 2023 Yamaha FZ-X are those models. The redesigned Yamaha motorcycles come with a tonne of useful improvements. It’s interesting to note that the OBD-2-compliant Yamaha MT-15 V2 has already received homologation from the Japanese motorbike maker. In addition to the hardware, these motorcycles have a number of extra features such as a TFT dashboard and LED indicators.
The revised R15’s new price range has a base price of just Rs 1,80,900. The upgraded model now has standard traction control, LED turn indicators, a colour TFT display, and a standard fast shifter. Moreover, there are three colour choices available: Metallic Red, Racing Blue, and Dark Knight (new). A new paint colour choice called “Dark Knight” offers a matte black exterior and golden alloy wheels.
Its mechanical parameters have not changed in the interim. The 155cc single-cylinder engine is hence unaltered. As a result, the performance of the most recent model is just as thrilling as that of the previous model. The R15 M model has also received the same changes in addition to this. The cost is Rs 1,93,900.
New features and colours have also been added to the roadster FZS V4 motorcycle. It now has traction control, LED turn indicators, and LED flashers. The new model is now available for Rs 1,27,400 ex-showroom in Delhi. It comes in three new colours: Majesty Red, Metallic Black, and Metallic Grey. It also receives a brand-new LED headlight with LED DRLs. Moreover, the taillight is now LED and the alloy wheels have colours. Also, the new bike comes standard with golden alloy wheels.
The touring-focused FZ-X bike now comes in new colours and with additional features. A moveable holder stand has been added to the modified bike’s handlebars. A traction control system has also been added for added safety. Meanwhile, the new colour possibilities for it are Matte Copper, Matte Black, and Dark Matte Blue. Dark Matte Blue is available for Rs 1,36,900. The other two colour choices, however, are reasonably priced at Rs 1,35,900.
Speaking of the R15’s naked cousin, a small upgrade has also been made to the 2023 Yamaha MT-15. The dual-channel ABS and the arrangement of the pillion grip rails have been changed for the new MT-15 model. It also has LED turn indicators and flashers, just like the upgraded R15. Yamaha has also introduced a new gloss black and red colour hue. With red-coloured alloy wheels and golden USD forks, this colour looks great. The revised MT-15 is available for Rs 1,68,400.
Yamaha India hopes to maintain its sales pitch strong with the latest upgrade. Yamaha, however, has said nothing regarding its preparations despite the RDE requirements being just around the horizon. Yamaha has, however, stated that by the end of 2023, it will have upgraded its whole range in India to comply with E-20 fuel regulations.

#yamahamt15v2#yamahar15v4#yamahafzx#perfectriders#yamahashowroombangalore#yamahaservicecenterinbangalore#authorisedyamahadealersinbangalore
0 notes
Text
Is it worth saving money to let a car insurance company track your every move?
New Post has been published on https://sa7ab.info/2024/08/12/is-it-worth-saving-money-to-let-a-car-insurance-company-track-your-every-move/
Is it worth saving money to let a car insurance company track your every move?


As insurance premiums seem to increase frequently, it isn’t a wonder why consumers are looking for ways to lower their rates. Most auto insurance companies offer some sort of discount for safer driving that’s tracked by the insurance company. This is why we were interested in exploring the question posed by Mary regarding the pros and cons of allowing your insurance company to track your driving in exchange for potentially lower premiums.”State Farm … provided me with a ‘tracker’ so they can provide safe driver discounts. Am I providing too much information? I started to fill [out] info on the app but stopped. They will give me driving tips/suggestions based on the tracker. What is your opinion on this type of tracker?” — Mary, St. Louis, MOWhile most auto insurance companies offer some form of vehicle tracking in exchange for rewarding safe driving, the question most drivers have is whether the benefits outweigh the potential privacy concerns.GET SECURITY ALERTS, EXPERT TIPS – SIGN UP FOR KURT’S NEWSLETTER – THE CYBERGUY REPORT HEREThough Progressive was the first to introduce a drive and save program, Snapshot, in 1998, many insurance companies followed suit. Instead of plugging in a telematics device to collect driving data, insurance companies are using OnStar and apps on drivers’ mobile devices. For State Farm, specifically, you have the option of a Bluetooth beacon in tandem with the mobile app or Drive Safe & Save Connected Cars. State Farm is phasing out OnStar for new enrollees. It’s important to note that there isn’t one set of metrics that all insurance companies collect or use to determine what they consider safe driving. So, if you are considering what information is collected and how your driving will be assessed, it is important to learn the specifics of your particular insurance company.WHAT YOUR CAR KNOWS ABOUT YOU AND COULD BE TELLING THE WORLDThough each auto insurance company collects different data points, the common types of data collected include but are not limited to:HOW TO REMOVE YOUR PRIVATE DATA FROM THE INTERNET Usage-based insurance (UBI) programs, also known as telematics or “pay-as-you-drive” insurance, have gained popularity among major insurers as a way to offer personalized premiums based on individual driving behavior. These programs typically work as follows:Enrollment: Drivers opt into the program, usually in exchange for an initial discount.Data collection: The insurance company provides either a plug-in device for your car’s OBD-II port or a smartphone app to track your driving.Monitoring period: Your driving is monitored for a set period, often 3-6 months.Data analysis: The insurer analyzes the collected data to assess your driving habits.Premium adjustment: Based on the analysis, your premium may be adjusted. Safe drivers often see a reduction in their rates. State Farm’s Drive Safe & Save: Uses a mobile app with a Bluetooth beacon or built-in telematics in select vehicles.Progressive’s Snapshot: One of the pioneers in UBI, offering both a plug-in device and mobile app option.Allstate’s Drivewise: Uses a mobile app to track driving behavior and offer rewards.Geico’s DriveEasy: A mobile app-based program that monitors driving habits.Liberty Mutual’s RightTrack: Offers a choice between a plug-in device or mobile app.It’s important to note that while these programs can lead to significant savings for safe drivers, they may result in higher premiums for those deemed higher risk. Additionally, availability and specific features can vary by state due to differing insurance regulations.Before enrolling in any UBI program, carefully review the terms and conditions, paying special attention to what data is collected, how it’s used and how it might affect your premiums in both the short and long term.HOW TO OUTSMART CAR THIEVES WITH THESE SMART AIRTAG TACTICSIt isn’t just the type of collected information that is a privacy concern. Many insurance companies have privacy policies that allow them to share your data with third parties. While State Farm says that it will not sell your Drive Safe & Save data, it does share some information with third parties.Data sharing associated with Accident Assistance for Drive Safe & Save is with the driver’s consent and intended to enhance the customer experience. For example, if needed, State Farm may share the vehicle location with a tow company and law enforcement if you are in a disabled vehicle. Additionally, if you are in a car accident, your insurance company may use your tracking data to assist with a claim.Your idea of safe driving may differ from your insurance company’s. Some drivers have even seen their rates rise after using drive-tracking programs. It’s not just the insurance company that may have access to your driving information. With State Farm, named policyholders can see all trips recorded on all devices for the last 30 days.CLICK HERE FOR MORE U.S. NEWSHOW YOUR CAR MIGHT BE SELLING YOU OUT TO INSURERSWhile the specific amount of discount depends on the insurance company and driver, State Farm, for example, claims that those enrolled in its Drive Safe & Save program can initially save 10% by enrolling in the program with up to a 30% discount possible.It is important to note that the percentage you can save may be capped in certain states, such as New York, where the discount is capped at 30%. This program is unavailable in states such as California, Massachusetts and Rhode Island. If you don’t drive much and drive safely, it can be a way to reduce your payments with your auto insurance company. With data being logged about your driving safety, it can be a great learning tool to accurately assess your driving habits.GET FOX BUSINESS ON THE GO BY CLICKING HEREMary was spot on in pausing to contemplate the benefits and potential problems of allowing driving to be tracked by an insurance company. It’s important to weigh the potential benefits, such as possible discounts, against these privacy concerns. If you feel any discomfort or concern about the data they are collecting and how it is being used, this program offered by your insurance company might not be right for you. If you are already using a tracker and are uncomfortable, you should contact your insurance provider for guidance on removing the feature or app and your associated data.Remember, it’s always crucial to read and understand the terms and conditions before using any app, especially those that collect personal data. It’s your data, and you have the right to know how it’s being used.Are you part of any insurance tracking program? Do you feel the benefits outweigh the privacy concerns? ContactFor more of my tech tips and security alerts, Follow Kurt on his social channels. .
0 notes
Text
Spark Plug Replacement Step-by-Step: A Comprehensive Guide for Optimal Engine Performance

Replacing spark plugs is crucial for maintaining your vehicle's engine efficiency and performance. Here’s a detailed guide to help you through the process, whether you're a DIY enthusiast or planning to use a mobile auto repair service.
Why Spark Plug Replacement is Essential
Enhanced Engine Performance: New spark plugs ensure that your engine runs smoothly by providing a consistent spark for combustion.
Improved Fuel Efficiency: Properly functioning spark plugs help in efficient fuel combustion, boosting your vehicle’s fuel economy.
Lower Emissions: Fresh spark plugs contribute to cleaner combustion, reducing harmful emissions and aiding in passing emissions tests.
Tools and Materials Needed
Spark Plug Socket: Designed to fit and remove spark plugs.
Ratchet Wrench: Used to turn the spark plug socket.
Extension Bar: Helps reach spark plugs that are deep in the engine bay.
New Spark Plugs: Ensure they are compatible with your vehicle's make and model.
Anti-Seize Lubricant: Optional, for easier future removal.
Spark Plug Gap Gauge: To check and adjust the gap if necessary.
Step-by-Step Replacement Process
Prepare Your Vehicle
Ensure Safety: Park the vehicle on a level surface and set the parking brake. Allow the engine to cool completely to prevent burns.
Open the Hood: Locate the engine compartment and secure the hood.
Locate and Access the Spark Plugs
Find the Spark Plugs: They are typically found on the top or side of the engine. Consult your vehicle’s manual if unsure.
Remove Engine Covers: If necessary, take off any engine covers or components obstructing access to the spark plugs.
Remove the Old Spark Plugs
Disconnect Wires or Coils: Gently remove the ignition wires or coils connected to the spark plugs. Note their arrangement to ensure correct reinstallation.
Unfasten Spark Plugs: Use the spark plug socket and ratchet wrench to carefully unscrew and remove the old spark plugs.
Install the New Spark Plugs
Check the Gap: Verify the gap of the new spark plugs using a spark plug gap gauge. Adjust as needed to match your vehicle’s specifications.
Apply Anti-Seize (Optional): If recommended, apply a thin layer of anti-seize lubricant to the threads of the new spark plugs.
Install New Spark Plugs: Hand-tighten the new spark plugs into their respective sockets, then use the spark plug socket and ratchet wrench to secure them. Avoid overtightening.
Reconnect Ignition Wires or Coils
Reattach Wires/Coils: Firmly reconnect the ignition wires or coils to the new spark plugs, ensuring they are properly seated.
Test the Engine
Start the Engine: Turn on the engine and listen for smooth operation. Look for any unusual noises or misfires.
Check for Error Codes: Use an OBD-II scanner if available, to detect any issues that might need addressing.
Final Tips
Regular Checks: Periodically inspect your spark plugs as part of routine maintenance to avoid performance issues.
Consult a Professional: If you’re unsure about any part of the process, consider consulting a mobile auto repair service for expert assistance.
Conclusion
Spark plug replacement is a vital maintenance task that ensures your vehicle runs efficiently and reliably. By following this comprehensive step-by-step guide, you can perform the replacement yourself or confidently rely on a professional mobile auto repair service. Keeping your spark plugs in top condition will enhance your engine’s performance and longevity.
0 notes
Text
like seriously really really..please please check it out..i'm so mad at myself that i just now watched it after so many years.. whatever you say about the show (which i liked quite a lot) but Olivia Dunham is maybe the finest female character i've ever seen!
"we need more complex & emotional female characters" you guys don't even know who olivia dunham is
455 notes
·
View notes
Text
How do you reset a mass air flow sensor?
Resetting a mass air flow sensor generally involves clearing the error codes from the vehicle’s computer system, which can be done in several ways. Here’s how you can do it:
Using an OBD-II Scanner
Turn Off the Engine: Make sure the vehicle is turned off.
Connect the Scanner: Locate the OBD-II port under the dashboard and connect your OBD-II scanner.
Turn On the Ignition: Turn the key to the “On” position without starting the engine.
Access the Scanner: Follow the instructions on the scanner to read the error codes.
Clear the Codes: Select the option to clear or erase the codes.
Turn Off the Ignition: Turn off the ignition and disconnect the scanner.
Disconnecting the Battery
Turn Off the Engine: Ensure the vehicle is turned off.
Disconnect the Battery: Using a wrench, disconnect the negative battery cable (black).
Wait: Leave the battery disconnected for about 10–15 minutes to ensure the vehicle’s computer resets.
Reconnect the Battery: Reconnect the negative battery cable and tighten it.
Start the Vehicle: Start the vehicle and check if the error codes have cleared and if the issue is resolved.
Cleaning the MAF Sensor
Sometimes, the MAF sensor may just be dirty and not necessarily malfunctioning. Cleaning it can also help.
Remove the Sensor: Locate the MAF sensor and carefully remove it from the intake.
Clean the Sensor: Use a MAF sensor cleaner spray to clean the sensor. Avoid touching the delicate wires inside.
Reinstall the Sensor: After the sensor is completely dry, reinstall it in the intake.
Reset the Codes: Use either an OBD-II scanner or disconnect the battery as described above to reset the codes.
Important Notes
Safety: Always follow safety precautions when working on your vehicle. Disconnect the battery before handling electrical components.
Consult the Manual: Refer to your vehicle’s owner manual for specific instructions related to your vehicle model.
Professional Help: If you are not comfortable performing these steps yourself, it is advisable to seek help from a professional mechanic.
0 notes
Photo

New Post has been published on https://www.vividracing.com/blog/top-5-best-sounding-exhausts-for-the-honda-civic-type-r-fl5/
Top 5 Best Sounding Exhausts for the Honda Civic Type-R FL5
youtube
Today, we are diving into the best-sounding exhaust systems for the Honda Civic Type-R FL5! The FL5 generation was introduced with a 2023 production model. All the exhausts featured in this writing fit on the CTR FL5 2023+
When it comes to enhancing the performance and sound of your Honda Civic Type-R FL5, a high-quality exhaust system can make all the difference. Here, we explore some of the top exhaust systems that provide the best sound and performance for the FL5, each offering unique benefits to elevate your driving experience.
1.) ARMYTRIX Stainless Steel Valvetronic Exhaust System
The ARMYTRIX Valvetronic Stainless Steel Exhaust System is designed to increase power, reduce weight, and improve sound. This precision-made system delivers more power, especially in the low and mid-rev range, while adding a deep, resonant sporty sound. The unique Throttle Pedal Sensor and Engine RPM Signal Auto Functions allow for better launch-starts and performance at high speeds. The ARMYTRIX system also includes triple carbon tips and integrates seamlessly with the OE valvetronic control.
youtube
2.) APEXi N1 Evo Extreme Catback
The APEXi N1 Evo Extreme Catback exhaust emphasizes optimum exhaust efficiency with a straight-thru layout design. It features a hybrid silencer that balances power and sound resonance, constructed with lightweight titanium for a sporty appearance. This system ensures high-power performance gains and a swirling exhaust gas flow effect for excellent torque and throttle response.
youtube
3.) HKS Legamax Sports Revolutionary Exhaust System
The HKS Legamax Sports exhaust system offers a sleek design and a valveless structure for a crystal-clear sporty sound. It reduces exhaust pressure by 30% compared to the stock system, enhancing output when combined with the Power Editor. The included actuator prevents error codes, ensuring smooth operation and compliance with future OBD inspections.
youtube
4.) Milltek Non-Resonated Catback
Milltek’s Non-Resonated Catback exhaust is known for its loud and aggressive sound. Founded in 1983, Milltek has a long history of exhaust development, and this system reflects their expertise. The non-resonated design provides a raw sound and significant performance improvements, crafted with high-quality materials and advanced technology.
youtube
5.) AWE Track Edition Exhaust
For those who prefer a raw and rowdy sound, the AWE Track Edition exhaust is ideal. It sheds 15 lbs off the stock system and features a straight-through design for maximum performance. The Track Edition includes triple 4.5″ double-walled, slash-cut tips and is handcrafted from T304L stainless steel, ensuring durability and a perfect fit.
5.1.) AWE Touring Edition Exhaust
The AWE Touring Edition exhaust offers a deep, sophisticated note with zero drone at highway speeds, thanks to AWE’s patented drone-canceling 180 Technology. This system provides a balance of performance and comfort, making it perfect for everyday driving. It includes triple 4.5″ tips and is proudly designed and manufactured in the USA.
youtube
youtube
Each of these exhaust systems brings unique advantages to the Honda Civic Type-R FL5, from enhanced power and sound to innovative designs that prevent error codes and ensure compliance with future regulations. Choose the one that best fits your driving style and performance needs to transform your FL5 into a true performance machine.
Let us help!
As always, if you have any questions regarding upgrades for your vehicle these exhaust kits specifically, we are enthusiasts who truly believe in supplying fellow enthusiasts with the best mods to meet your driving goals! We have almost 12,000 reviews and a 4.6/5 review on Google to prove it 😏 You can chat with us – HERE (Live Chat). We’ll get back to you like, spooky fast. Reach out to us at [email protected] or give us a call at (480) 966-3040 📞 and we’ll be happy to help with your questions or be a shoulder to cry on.
0 notes
Text
The Ultimate Guide On How To Reset Coolant Temp Sensor: Step-by-Step Solutions
Understanding the Coolant Temperature Sensor
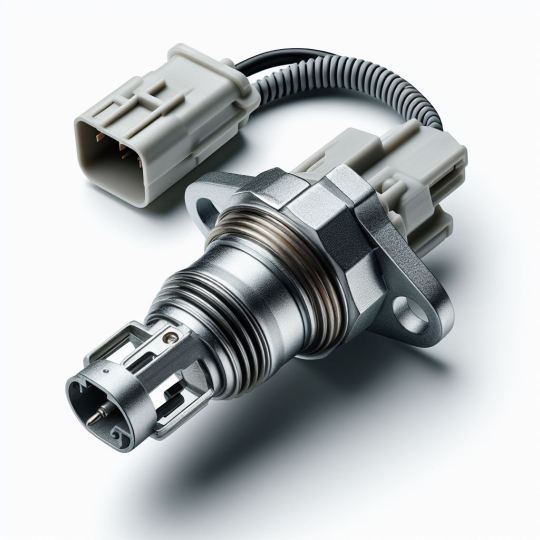
The coolant temperature sensor (CTS), also known as the engine coolant temperature sensor, plays a crucial role in a vehicle's engine operating system. It is typically a thermistor, with resistance that varies based on temperature. The sensor's probe is immersed in the engine coolant, allowing it to measure temperature fluctuations and convert them into voltage signals for the engine control module (ECM).
Location and Function The CTS is commonly located near the thermostat, on the engine block, cylinder head, or intake manifold. Its primary function is to measure the temperature of the engine coolant and relay this data to the ECM. Armed with this information, the ECM can optimize various operations like activating cooling fans, adjusting fuel injection and ignition timing, and managing variable valve timing – all to ensure peak performance, efficiency, and prevent overheating.
Types of Coolant Temperature Sensors - Thermistors: Most common type that changes resistance based on temperature for precise ECM readings. - Resistance Temperature Detectors (RTDs): More accurate but costlier, uses materials like platinum. - Thermocouples: Ideal for extreme temperatures, generates voltage based on temperature differences. - Bi-metallic strips: Less accurate, uses differing metal expansion rates but rarely used in modern vehicles.
Symptoms of a Bad Coolant Temperature Sensor - Overheating engine - Poor fuel economy - Check engine light illumination - Black smoke from exhaust - Engine misfires - Erratic temperature gauge readings - Rough engine running - Engine stalling or hesitation
Diagnosing CTS Issues Testing with a Multimeter: 1. Locate and disconnect the CTS electrical connector 2. Set multimeter to ohms to measure resistance 3. Check resistance value against specifications in the service manual for that temperature range 4. Results outside the specified range indicate a faulty sensor
Visual Inspection Without Multimeter: - Check for physical damage or cracks - Inspect electrical connections for corrosion/dirt - Look for coolant leaks around the sensor - Monitor temperature gauge behavior during warmup - Note any performance issues like poor fuel economy or stalling
Causes of Coolant Temperature Sensor Failure - Electrical problems or damaged wiring - Physical damage from impact or vibrations - Contamination buildup - General wear and tear over time - Excessive overheating - Improper installation - Exposure to corrosive coolant additives - Rare manufacturing defects
How To Reset Coolant Temp Sensor Method 1: Clearing Fault Codes with an OBD-II Scanner 1. Locate the OBD-II diagnostic port (under dash) 2. Connect scanner with ignition on, engine off 3. Scan for any fault codes related to the CTS 4. Follow prompts to clear codes from the computer 5. Disconnect scanner
Method 2: Temporarily Disconnecting the Sensor 1. Ensure engine is off and cooled down 2. Locate and disconnect the CTS electrical connector 3. Wait a few minutes to clear residual data 4. Reconnect the CTS 5. Start engine and monitor temperature gauge
Selecting the proper reset method depends on the vehicle's make/model and whether fault code clearing is required.
Repairing vs. Replacing the Sensor In most cases, a failed coolant temperature sensor cannot be repaired due to its delicate internal components. Repair attempts risk further damage, so replacement is the recommended solution when the sensor fails. Professional diagnosis is advisable to pinpoint the problem accurately.
When to Replace There is no set replacement interval, but most coolant temperature sensors last around 100,000 miles. However, this can vary by vehicle, driving conditions, etc. Replace if experiencing symptoms of sensor failure like check engine lights, overheating, or rough running.
Replacement Process 1. Locate the coolant temperature sensor 2. Disconnect the electrical connector 3. Remove the old sensor 4. Install the new, compatible replacement sensor 5. Reconnect electrical connector 6. Refill cooling system with fresh coolant 7. Start engine and check for leaks
In summary, the coolant temperature sensor is vital for managing engine temperature and enabling proper ECM operation for peak performance and efficiency. Recognizing the signs of failure, performing basic diagnosis, and knowing when replacement is required can prevent costlier repairs down the line. Following the proper resetting and replacement procedures is key to restoring optimal cooling system function.
0 notes
Text
OBDSTAR X300 Classic G3 Unlock Alfa Romeo ECU via OBD
OBDSTAR X300 Classic G3 Key Programmer has the ability to unlock ECU function for Alfa Romeo, Fiat, Chrysler, Dodge, Jeep and others.
Background:
Nowadays, in order to meet the various needs, there are various ECU modules on the car. These modules control almost every aspect of the vehicle. They communicate through the bus. These modules contain vehicle-specific info, usually the VIN code, but not all modules are VIN code. If the ECU module is damaged, we replace it with a new one. We have to use a dealer tool to program the ECU module through the bus so that the other modules in the vehicle will accept it. If this is not done, the new module cannot work properly.
In daily maintenance, in order to save costs, we usually use second-hand modules, but the FCA official in order to let the maintenance technicians use the original brand new module, they add a recognition of the judgement function, once the scanning recognition of the current module exists, other vehicle VIN or other specific information, it will determine the current ECU module for the second-hand control module default for the lock state and will not be programmed. After using the ECU advanced function by OBDSTAR, it can solve the above problems and then can program the second-hand ECU module. This ECU unlock function can operate directly through the OBD diagnostic port on the car, and you can also operate by bench.
How to unlock ECU by OBDSTAR X300 G3?
i.e. Alfa Romeo
Note: the device we used is Key Master G3 (green), it has the same function as OBDSTAR G3 (yellow) we sell.
Connect X300 Classic G3 and the vehicle via OBD cable
Select [ECU Advanced] function on the main menu

Select FIAT/ ALFAROMEO

Select FIAT/ ALFAROMEO latest software (i.e. V30.08)

Select ALFAROMEO

Select IPC

Check the ECU info, and the ECU is locked

Select [ECU Unlock] function and wait a while, the ECU will be unlocked fast.

FYI…
OBDSTAR X300 Classic G3ECU Advanced Support List for ALFAROMEO/FIAT (V30.08)
(Note: For reference only, subject to the device.)

0 notes
Text
Thinkware F70 PRO Dashcam - Product Review

The world-leading dash cam brand Thinkware has launched its latest product, the F70 PRO. This is a great performing dashcam with a super compact size, 1080p Full HD front camera, parking surveillance, and anti-file corruption software, plus many other features. One thing that sets this apart from many other dashcams on the market is that when you order this dashcam via the Thinkware website or other vendors such as Amazon you have the option of either plug and play or hardwire, at no extra cost ! No need to buy extra cables, just choose the option that is right for you. Plus you also get a 32GB MicroSD included, so you have everything you need to start using this dashcam. The F70 Pro accepts up to a 128GB MicroSD card. At around 100MBps per minute with 30fps/1080p captures, that will store approximately 21 hours of video footage. As with most products you don't get a big thick manual in the box, there is a small booklet which has QR code links to manuals that you can view in PDF format online. One thing to note about the manuals is that they are well written and very easy to understand, there is detailed instructions on how to install the dashcam and how to download the app and connect it to your phone. The manual also covers all the relevant features and explains how each option works. If you go for the hardwired installation option (or OBD2 Connector) you get an additional feature called "Parking mode". This allows the dashcam to continue recording while your car is parked and turned off. The manual states that all Thinkware dashcams continuously monitor the health of the vehicle’s battery and will shut down if it detects any issues. It has a time lapse parking mode which is designed to catch any potential bumps, scrapes and other incidents by recording footage from your vehicle when you are not nearby. Time-lapse mode records at 2 frame per second (FPS) to reduce the size of the video file. This allows the dash cam to record longer than other dashcams whilst in parking mode. This dashcam is quite small in size (3.23-inches wide, by around 1.35 inches thick) one of the reasons for this is that it does not have a screen. All the options and settings can be controlled by the app when you link it to your phone. This is a good idea, as a dashcam user for many years I find that other than the initial setup you never need to touch any of the settings. You just link the dashcam to your phone using the Thinkware dashcam link app and when required you can download any saved video footage. It has advanced Video Clear technology, a 140° wide angle lens, and 2.1MP CMOS sensor which is able to capture footage at 30 frames per second (fps), the F70 PRO ensures that every second of your journey is covered. Don't know who Thinkware are ? - They are a well established manufacturer who was founded in Korea in 1997, they are one of the market leaders in various sectors such as dashcams, electronic maps, navigation, mobile applications, and tablet PCs. Key Features Optional Extras You can buy an optional GPS antenna which adds date, time, position & optional speed stamp to the video. Activates safety camera alerts & ADAS features. You can also get an option of an OBD power cable which connects to your vehicles OBDII socket, this cable allows the activation of the Thinkware dash cam parking mode. Daily use and operation As with most dashcams once installed you just leave it running, there is nothing to do. There is only two buttons on the dashcam on one end there is a Wi-Fi-enable/Bluetooth-connect button this is next to the GPS port and just in front of the status LED. The other end has the the Rec button, which saves your current recording so it isn’t overwritten, this is the button you need to press if you have an accident or spot something that you wish to save. There is a number of ways you can get the video files from the dashcam. You can use the Thinkware dashcam link app to view any saved recordings and download them to your phone. There is also PC viewer software which is available for both Windows and MAC (download link here) using this option requires you to remove the MicroSD card from the dashcam and connect it to your PC via a suitable memory card reader. Video Review In this video review we take a look at what you get in the box, a quick overview of the Thinkware dashcam link app and most important of all we will take a look at some recorded video footage from day and night. https://youtu.be/Jw90_N8p7hE In the box - Thinkware F70 PRO Dashcam - 12V Power Cable or Hardwiring Cable - 32GB MicroSD Card - Trim tool - Windshield Mount - Spare 3M Mounting Tape - Adhesive Cable Clips - Quick Start Guide - GPS Antenna (If selected) Specification - Resolution: Front – Full HD (1920 x 1080) - Camera: Front – CMOS Image Sensor - Frame Rate: 30 fps - Viewing Angle: 140° (Diagonal) - Dimensions(WxDxH): 82 X 33.8 X 34.6 mm (3.22 x 1.33 X 1.36 inch) - Weight: 42.4g (0.096 lb) - Storage Temperature: -20°~ 70°C (-4°~ 158°F) - Operating Temperature: -10°~ 60°C (14°~ 140°F) - Capacity: MicroSD card 8/16/32/64/128 GB (UHS-I) (32GB MicroSD card included) - Input Power: DC 12/24V, Built-in Super Capacitor - GPS: GPS Antenna Full detailed specification can be found here Read the full article
0 notes