#movingplatform
Explore tagged Tumblr posts
Text

Whether you're moving locally or cross-country, imoving.com helps you find reliable movers who handle your belongings with care. Start planning today!
#movers#movingassistance#imovinghelp#movingplatform#imovingusa#local mover#imovingexperience#movingservices#usamovers#imovingsolution
0 notes
Text
Day Three (Part One)
Even more Unreal today.
Today, I'm doing Timelines, Keys and Doors. Do I know what that means yet? No, but I'm sure by the end of today I'll have an idea.
We need a want a way for doors and stuff to have animations and actually move so we'll need to utilise something called a 'Lerp'. A lerp (or linearly interpolate) is a graph calculation which maps out the trajectory between two points. This is utilised so that you, the developer, don't need to meticulously draw out a path for the object to follow and you can instead just tell it to go from point A to point B.
First, I am going to be using a lerp to make a moving platform.
I make a Blueprint Actor and call it something (I chose MovingPlatform) and open it up. First, I add a Cube mesh to it and rescale it to my preferred size.

Now I add a sphere and shrink it but still big enough so I can see it peaking out of the top of the platform. In your components tab on the left of the screen, you'll want to drag the Sphere component up to DefaultSceneRoot and select Attach.
Then, I move the sphere over on either the X or Y axis as this will be the end point of the platform. You'd utilise the Z axis if the platform is to go vertical.

Then, you want to put it ingame. Make sure the platform isn't inside of any ground or else it won't work properly. Additionally, the platform will end when the middle of it meets the middle of the sphere, so place those accordingly, and move the sphere where necessary.

Now we go into the Event Graph. First, make a Vector Variable for the starting location of your platform (I named it PlatformStartLocation) and drag it into the Event Graph and when it prompts you to, select 'Set PlatformStartLocation'. Next, we'll want to drag the cube into the Event Graph and select 'Get Cube'. Then, connecting off of that node, we want 'Get World Location'. You'll see that it has a yellow node connector, so you will want that to connect to your 'Set PlatformStartLocation'. And finally, for now, connect the 'Event BeginPlay' node (that should be there by default) to your 'Set PlatformStartLocation'.

After this, you want to add a 'Set World Location' node to the 'Set PlatformStartLocation' node, via the arrow. When typing it, it should give you a lot of options, and we want to select the one that has '(Cube)' in brackets

After this, the next logical thing to do is to add in an end point.
Drag your sphere into the Event Graph, then off of it, add the 'Get World Location' node. From that, we want a 'Lerp (Vector)' node and to connect the 'Get World Location' node to the B node connector of the Lerp node. Drag in another 'PlatformStartLocation' variable and connect it to A on the Lerp node. And finally connect the Return Value node connector to the New Location node connector of the 'Set World Location' node.

Now we want a way for it to move. Add a Timeline by right clicking on the Event Graph and searching for it.

Once that's placed down, you want to double click on the timeline to open it up. Click the '+ Track' button and select 'Add Float Track' Now shift click on the start of the Timeline, and it should make a small blue dot. You can leave them as is but you can also manually edit it by clicking the dot so that both the Time and Value is set to 0. Then you'll want another dot a little further down. Again, you can leave it as is, but I set both the Time and Value to 1. (Edit: Later on, I realised this was too fast, so I changed the Time value to 2.5. the same will happen for the later blue dot, so if you're copying this directly, add an additional 1.5 to the time of the final dot, making it 4.5.)

Now, you'll want it to go back to the start, so make a third dot down on the horizontal 0 line, though again I manually editted it.

Now if you go back to your Event Graph, you should notice that your Timeline node will have a node connector named after your Timeline. (If you didn't rename it to anything, it should be called New Track) We want to connect this node connector to the Alpha on the 'Lerp (Vector)' node.
After this (simply because I forgot to do it earlier), break the node connection between the 'Set Platform Start Location' and the 'Set World Location', and have them connect to the Timeline node. So the 'Set Platform Start Location' connects into the Play node connector on the Timeline node, which then connects its Update node connector to the 'Set World Location' node.

After this, you want to check if it works, and it does for me, so that's good!
Now, I want to try see if I can get it to activate on Player Overlap only.
Go to the MovingPlatform viewport, select the Cube and add a Box Collision. Like always, resize the Box Collision to however you'd like.

This is how I have it.
Now, back in the Event Graph, we want to select the Box component, and scroll down in the details panel on the right side of the screen until we see 'On Component Begin Overlap', and click the + button.
Off of the arrow, we want a 'Cast To BP_FirstPersonCharacter' then connect the Object node connector backwards to connect to the Other Actor node connector. And then finally connect the 'Cast To BP_FirstPersonCharacter' node to the 'Set Platform Start Location' node. We probably want to give the player some time to get off of the platform before it starts moving back. So in the Timeline, we'll add another dot in the middle with a Value of 1.

There's a chance this might be too long for the default length of the Timeline, so set the 'Length' value to however long it is.
Additionally, we will want to turn off the Loop now, as otherwise, it will keep going forever.
Interestingly, it always seems to get stuck at the exact same position every time, so I may have to try something new for when the platform goes back.
Alright, this may not be the most efficient method but this is what I've come up with. I have basically one to one copied every node and pasted them underneath the originals, but with a few differences. One, the start is now 'On Component End Overlap (Box)'. And two, I have made a second timeline. I changed the original timeline so that it only goes from a Value of 0 to a Value of 1, while with the new timeline doing the inverse of it starting at a Value of 1 and ending with a Value of 0. When doing this, make sure to reconnect the node of the first Timeline as there's a chance it may not work properly if not. This will no doubt cause a buggy mess if you leave the platform too early, but if not then it should all be good to go.

Moment of truth (I do not have very high hopes.)
Yeah, I don't know what I did but it now just immediately teleports to the end for no real reason.
It's fine, I'll revert it to how it was before.
Anyways, now we're making a door.
Make a new Actor Blueprint and open it up. You want to add a Scene Component, then connected to that (and not the DefaultSceneRoot), add a cube. I renamed mine to 'Hinge' so it's easier to spot but you can rename it to anything. Resize the cube to get a door like structure. (I set mine to have a value of X 1.5, Y 0.1, Z 3.0).
You want the door to have the bottom left hand corner to be exactly on 0,0,0 so click the Perspective button in the viewport and select left in order to see this accurately. (If you need help, I moved my door to the location of X 75, Y 0 and Z 150).
Now add a Box Collision to the door, and it can be whatever size you want (as long as it's not too giant) but make sure it sticks out of the door the same amount on both sides. Make sure to attach the Box Collision to the DefaultSceneRoot and not the Scene Component we made earlier.

Now, we should be good to get coding.
But first, go the the BP_FirstPersonCharacter blueprint. Make sure that 'BP_FirstPersonCharacter' is highlighted, then in the details panel, search for tag. Under the Actor drop down, you click the + next to the Tags drop down and add a new Tag. Call it 'Player'.

In the Event Graph, make an 'On Component Begin Overlap (Box). Off of the Other Actor node connector, add the 'Actor Has Tag' node and type in 'Player'. Off of the Arrow, make a 'Branch' node, and connect the Condition node connector to the Return Value on the 'Actor Has Tag' node.
Now, not connected to anything, add a 'Get Relative Rotation' node and then select the one that has (Hinge) on it. Right click the node connector and select 'Split Struct Pin'
Timeline. Open it and make your first dot have a Value and Time of 0, with your second dot having a Value and Time of 1.
It should look like this.

Edit: I was going to finish this section, but before finishing this part of the blog post off, and due to reasons I am not sure of, the program just did not work. No clue why it didn't work, I checked everything, but apparently the program kept saying that 0 was greater than 0 (which, I'm pretty sure it isnt.)
So for now, I just get rid of the Compare Float node, and the two things connected to its Input node connector.
Anyways, add a 'Lerp' and then connect the Alpha node connector to the Door Opening node connector off of the 'Timeline' node and connect the Return Value of the 'Lerp' to the New Rotation Z (Yaw) on the Set Relative Rotation.
So now, your Event Graph should look like this.

In order to make it shut when leaving the door, it shouldn't be too difficult. Select your box collision again and add an 'On Component End Overlap (Box)' node. From the Other Actor node connector, add in the 'Actor Has Tag' node and from the arrow, add a Branch node. Connect the Return Value of the 'Actor Has Tag' to the 'Branch' condition value, and connect the True node connector to the Reverse node connector on the Timeline.

Now, as of right now, the door only opens one way, so if you go into it from the wrong direction, it will open into you. This may be a side effect of the Compare Float node just not working, but it's fine for now.
0 notes
Text
Moving World Game
This game features a jumping character which can move around anywhere on screen and jump on different platforms but there’s a catch. The World moves to the right and it can’t be stopped and once its consumed the terrain it can’t be accessed as there is a death wall quickly moving towards the player and if the player gets caught the game is over.
This game aims to achieve a simple visual theme with a fiery wall moving towards the player with the camera locked on it. It will have simple gameplay mechanics so the player can choose their own path whether it be right or wrong as there are consequences for going the wrong way.
0 notes
Photo

LONGEST MINUTE EVER - Composition Sunday #PhotoOfTheDay #MovingPlatform #GreenLine #6Train #straphangers #SubwayStation #transportation #train #commute #trainstation #subway #MTA #NYCSubway #NYCTransit #14Street #UnionSquare #newyorkcity #Manhattan #NewYork #NYC #iPhonePhotography#2017 #ErikMcGregor
© Erik McGregor - [email protected] - 917-225-8963
0 notes
Text
Week 10 - Jump Puzzle Enhancement - (04/10/2017)
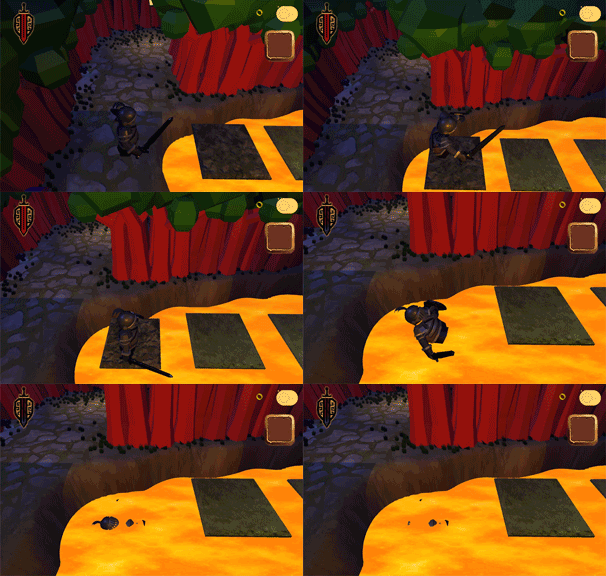
I made the jump puzzle look beautiful. This week was focused around making the jump puzzle look fantastic with particles and a better shake system.
TOTAL TIME: 30 Hours
Team dev day;
I’ll mention in passing, Bryn has more details.
Time Taken: (1000 - 1800) 8 Hours
Particle effects:


TIME TAKEN: 6 Hours
Jump Puzzle OverHaul:
OLD:

NEW:

OLD:

NEW:
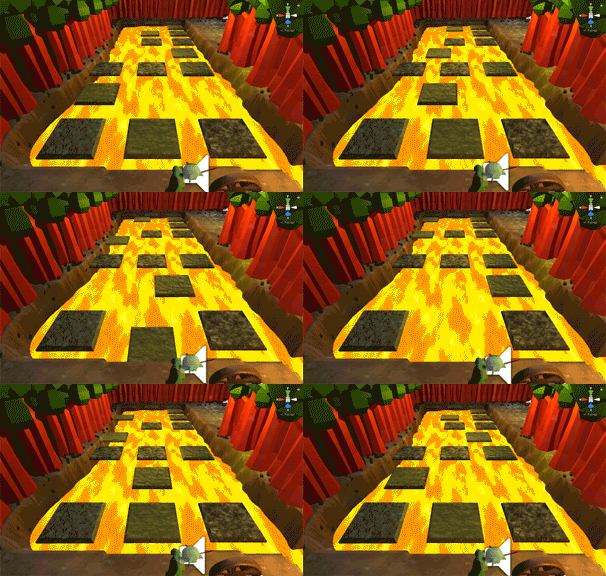
OLD:
NEW:

OLD:
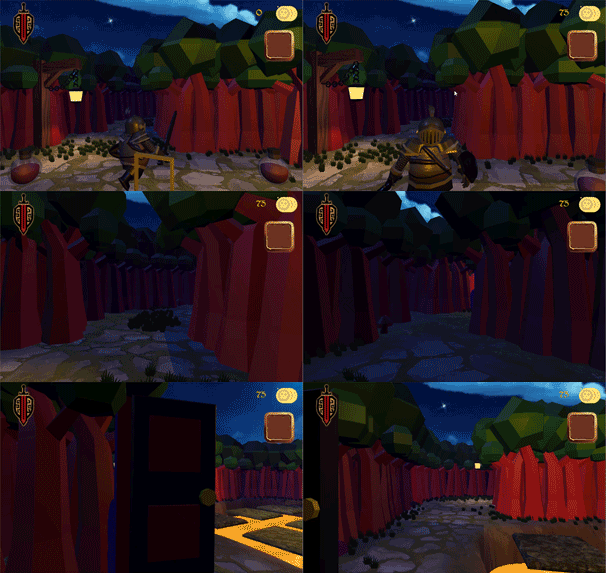
NEW:
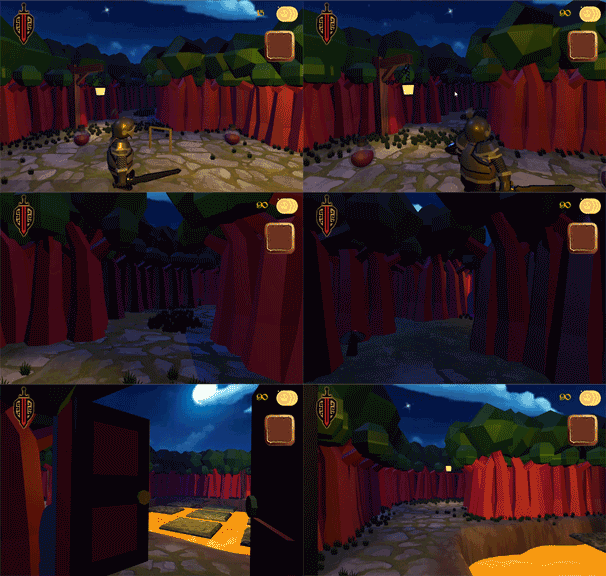
CODE:
PlatformShake class:
Controlling the platform jitters, with bonus original code at the bottom.

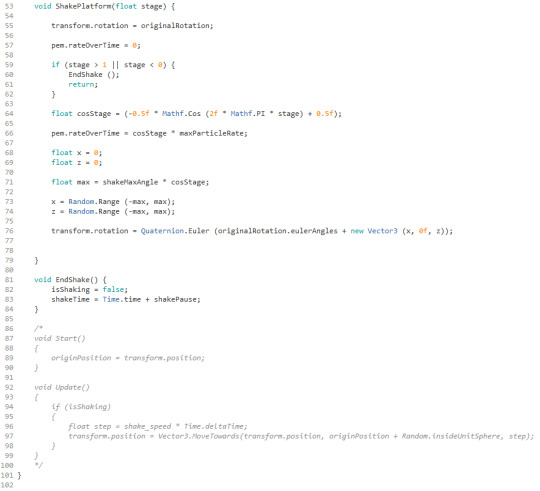
Changes in the FallingPlatform class:
These changes allow the platform to shake vigorously before falling.
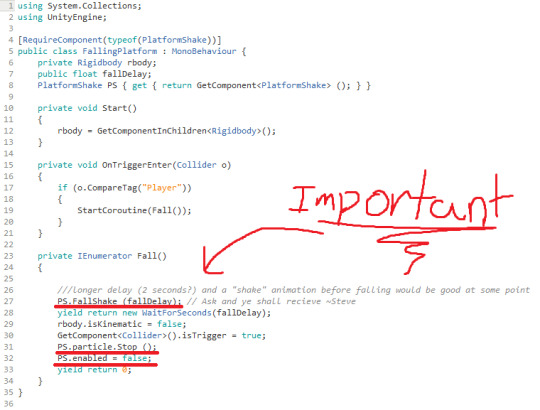
MovingPlatform Class:
This class controls the platforms that move in the Advanced Section

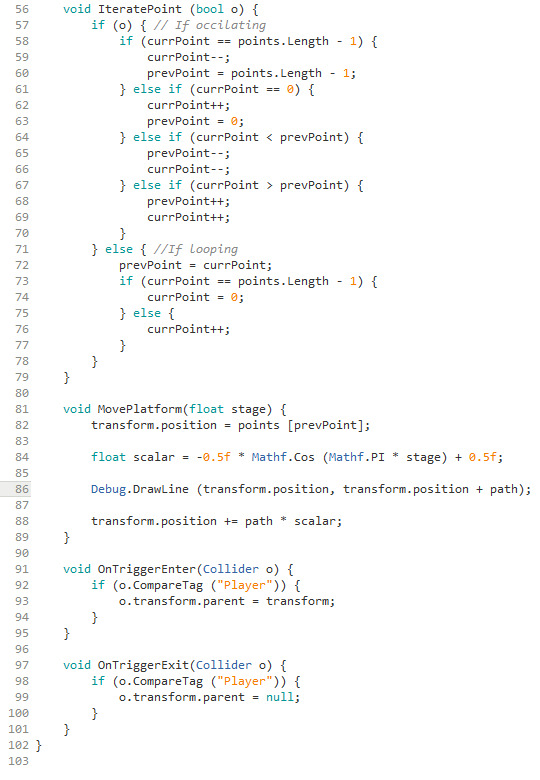
TIME TAKEN: 16 Hours
TOTAL TIME: 30 Hours
0 notes
Video
instagram
I fell in love with the potential of you. The you I thought you could be. Got lost in stories of the potential of us. The us I fought to be. We were built on unsteady ground. Yet it was here that I was found. It was in falling out of love with you, That I fell in love, with me. -------------------------------------- #unsteadyground #yogalife #yachtlife #chelonthesea #observationdeck #onservations #love #potential #movingplatform #steadyasShegoes #iloveyouGoodbye #ilovemeHello #dance #slowdown #simplify #yogaeverydamnday
#love#yogaeverydamnday#dance#movingplatform#yachtlife#observationdeck#ilovemehello#simplify#chelonthesea#unsteadyground#yogalife#steadyasshegoes#iloveyougoodbye#onservations#slowdown#potential
0 notes
Video
instagram
#bestdayever #musicvideo #livingthemoment #behindthescenes #bubbles #wind #movingplatform awesome film crew.....✔️
1 note
·
View note
Photo

Use this command to add a movingPlatform that moves between two points.
0 notes
Text

Did you know? Some of the shortest moves involve relocating just a few blocks away. Even these require careful planning to avoid losing or damaging items! #DidYouKnow #MovingFacts #FunMovingTips #MovingStatistics #HomeRelocation #MovingDayTips #PackingSmart #MovingInsights #MovingMadeEasy
#movingassistance#imovingexperience#imovinghelp#movers#imovingusa#local mover#imovingsolution#usamovers#movingplatform#movingservices
0 notes
Text

Moving is now easier than ever with imoving.com! Discover a platform that connects you to trusted movers across the USA for a seamless transition. #moving #USA #relocation #imoving
#movingassistance#imovingexperience#imovinghelp#imovingusa#local mover#movingplatform#imovingsolution#usamovers#movingservices#movers
0 notes
Text
Moving doesn’t have to be a headache! With iMoving, you can compare movers, see prices upfront, and read real reviews—all in one place. Plus, check out what people are saying about us on Moving Feedback! Ready for a stress-free move? Visit iMoving.com today!
#movingassistance#imovingexperience#imovinghelp#imovingusa#movingplatform#local mover#imovingsolution#movers#movingservices#usamovers
0 notes
Text

Did you know? Last-minute moves often cost significantly more than those booked in advance. Planning ahead can save money and reduce stress.
#imovingexperience#imovinghelp#movingassistance#movers#imovingusa#local mover#movingplatform#movingservices#usamovers#imovingsolution
0 notes
Text

Moving day approaching? imoving.com is here to connect you with the best USA movers for a smooth transition to your new home.
#movingassistance#imovingexperience#imovinghelp#movingplatform#imovingusa#local mover#movers#movingservices#usamovers#imovingsolution
0 notes
Text

Relocation made easy with imoving.com! Find and book reliable movers across the USA for a stress-free experience.
#movingassistance#imovingexperience#imovinghelp#movingplatform#imovingusa#local mover#movers#movingservices#imovingsolution#usamovers
0 notes
Text

Did you know? Placing heavier items at the bottom of boxes and lighter items on top reduces the risk of damage. It’s also helpful to keep an “open first” box with essential items.
#imovingexperience#movingassistance#imovinghelp#movingplatform#imovingusa#local mover#imovingsolution#usamovers#movingservices#movers
0 notes
Text

Make your move smooth with imoving.com. Find top USA moving companies to help you start your next adventure.
#imovingexperience#movingassistance#imovinghelp#movingplatform#imovingusa#local mover#imovingsolution#usamovers#movers#movingservices
0 notes