#mixer-in-monochrome
Explore tagged Tumblr posts
Text
I get shocked about my skill at eyeballing colors now because its insanely accurate. this one i just did had the exact value of I was aiming for. (im doing monochrome though) but I'l never be like the paint mixer tiktoks
4 notes
·
View notes
Text
Sound Mixer
Someone manning a sound desk for a theatre show. #photography #people #monochrome #audio #avpeeps #sound #theatre
Here’s a backstage photo of someone mixing the audio for a theatre show. Found In: Fame
0 notes
Text
Black & White Refinements With The Color Mixer
When you convert monochrome LUTs to camera profiles or when you import other black & white camera profiles into Lightroom or Camera Raw, there’s something extra-interesting that happens. When you apply these profiles, the B&W panel DOES NOT show up in the editing adjustments. Instead, the Color Mixer is still there. And you can use it!
The Classic Monochrome Conversion In Lightroom
The classic workflow in Lightroom to convert to black & white and refine tonality is to first apply a camera profile in the Basic panel. The Adobe Monochrome profile is a standard and Lightroom includes several other profiles in the BW group.
Once converted, attention is turned to the B&W panel to adjust the black and white mix. The luminance of various color channels are adjusted to refine contrast. It’s a coarse color-range-based dodge and burn. And it’s 100% fine for a lot of photos.
But… what happens when you switch to black and white and the B&W panel isn’t there? Can this even happen?
Converting To Black & White With Imported Camera Profiles
If you have imported camera profiles, or have converted LUTs into camera profiles, Lightroom may not know if the profile is color or monochrome. While a monochromatic profile itself is mapping all the colors to a grayscale tone, the B&W panel doesn’t appear if Lightroom doesn’t know it’s a black & white profile. Lightroom still thinks it’s a color image and the Color Mixer remains available.
And this is a good thing!
In the HSL panel, the Luminance sliders give you the fundamental equivalent to the B&W panel. You can brighten or darken areas of the photo based on color ranges. What’s even better is you have more precise control using the Point Color tool in the Color Mixer.
The Point Color tool offers the same luminance adjustment for a color range and you can adjust the breadth of colors affected with the Range slider. It is fantastic for black and whites!
Conclusion
If you’ve been shy about using monochrome camera profiles because the Lightroom B&W panel was missing, now you don’t have to be. Instead, embrace those black and white profiles and use the Color Mixer to refine the tonality of your black and whites. Also, gather your favorite monochrome LUTs and convert your favorite LUTs to camera profiles.
0 notes
Text
youtube
Pixel Mixers just released its newest game cover album: Monochrome Dreams! A 38 tracks tribute to the work of Akira Yamaoka on the Silent Hill Series OST by artists from all over the world!
Two Games Joined is proud to be featured on the album with the track Half Day, mixed by PocketCrow and mastered by Erika Richards.
It is now live on all major platforms, so please share the album link with all your SH-loving friends!
THE ALBUM: https://fanlink.tv/SilentHillAlbum
#two games joined#instrumental#video game cover#vg cover#vg mix#vgm#silent hill#akira yamaoka#industrial#pocketcrow#erika richards#industrial music#polish industrial#video game#video game music#Youtube
1 note
·
View note
Text
Still Life: Glassware
I created a still life shoot with a vintage-style Coca Cola bottle and liquids in the studio. I shot using the recycling painting with light method method, with the the rim lighting effect for the lighting. I collaged all the selected images together via Photoshop
I created a small DIY set-up in the studio and worked with that.
I shot with my own camera and my own trustee 24-105mm lens to capture these images.
Contact Sheet:


Behind the Scenes:


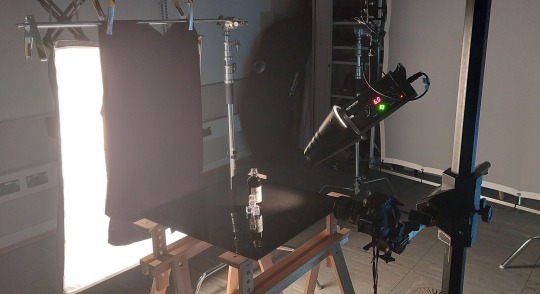
Final Image:
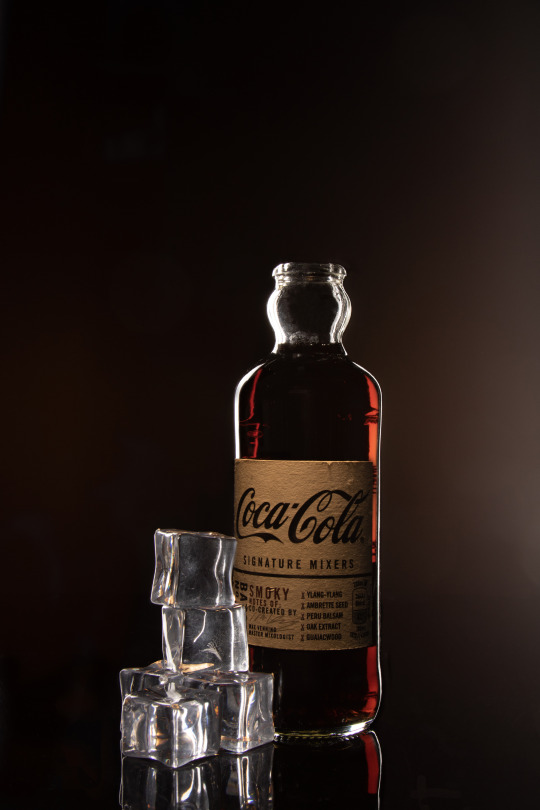
Experimentational colour retouching images:
Brightness & Contrast

Channel Mixer (Monochrome)
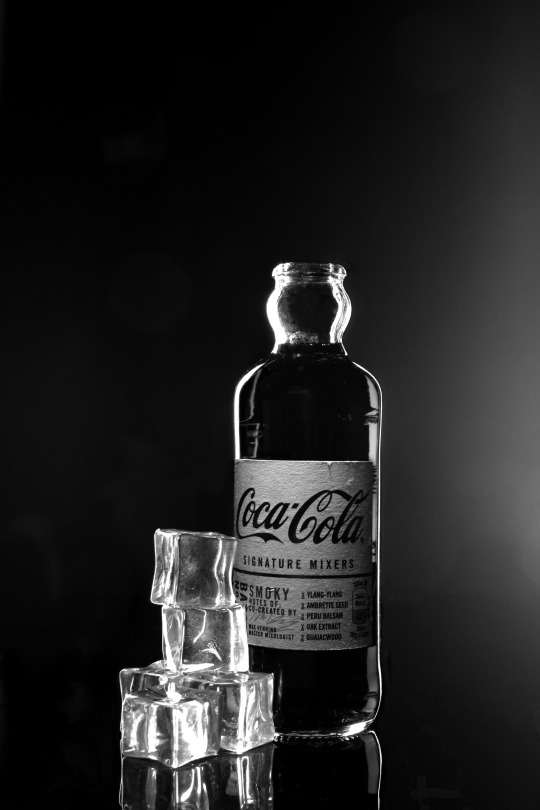
Colour Balance

0 notes
Note
Moment's Silence for the Hozier asks?
Moment's Silence- What do you find beautiful about the situation you're in now?
right now i can hear hozier playing from the dining room which is nice but most importantly, i'm done studying after tuesday bc the trimester is over so i can relax again. also 8 days til su movie is Pretty Beautiful
2 notes
·
View notes
Text
Alphabet Tag Game
In which I was kindly tagged by moonlightmew6 to take part in this challenge! Thank you so much! ✿ I’ll answer these as honestly as possible.
Rules: Copy this post into a new text post, remove my answers, put in yours, and when you are done tag up to ten people and also tag the person who tagged you… And most importantly, have fun!
A - Age: 15 B - Biggest Fear: Abandonment and being used C - Current: 12:34 PM D - Drink you last had: Water E - Every day starts with: Checking my phone F - Favorite song: How can I possibly only pick one? Overall, my favorite song is probably “Little Talks” by Of Monsters and Men. G - Ghosts, are they real?: Not in the horror movie type sense. I like to believe that there are spirits though. H - Hometown: Nysa, Poland I - In love with: My sweet girlfriend ♥ J - Jealous of: People who do not feel like they do not have to meet any types of standards. K - Killed someone: Absolutely not! L - Last time you cried: Two nights ago, I believe? Or maybe last night, I can’t remember. I cry often, pft. M - Middle name: Hanna(h) [spelling varies, apparently] N - Number of siblings: One O - One wish: For everything to be peaceful. P - Person you last called/texted: A friend from school who needed help with homework. Q - Questions you’re always asked: “Is your hair naturally curly?” and, “Are you a sophomore or a junior?” R - Reasons to smile: My family, my friends, my girlfriend, my dog, good deeds that are going on in the world, music, great food, nature, stories, art, and hope. S - Song last sang: "Sugar, We’re Goin Down” by Fall Out Boy T - Time you woke up: 9:05 AM U - Underwear color: Blue V - Vacation destination: Stone Harbor W - Worst habit: I feel like I have to do everything at once, otherwise I will have no time to myself later so I am always keeping myself busy. X - X-rays you’ve had: None, I don’t believe? Y - Your favorite food: Mashed potatoes Z - Zodiac sign: Leo
Again, big thanks to moonlightmew6 for tagging me! Here are the ten people that I would like to tag for this challenge:
norththegem zazombie asziirose stan-the-fic-man mixer-in-monochrome yellawzircon lori-the-vampire-queen mytotaluniverse ichigirl355 kanekikami
☆ If you guys decide to do this then I hope you all have fun!
#maja hush#maja plays games#alphabet tag game#ask games#moonlightmew6#norththegem#zazombie#asziirose#stan-the-fic-man#mixer-in-monochrome#yellawzircon#lori-the-vampire-queen#mytotaluniverse#ichigirl355#kanekikami
5 notes
·
View notes
Note
Star fruit and lemon?
!!! THANK
Starfruit: favorite sea creature
omg that is clearly a very important question that I have not thought much about. Maybe a cuttlefish because they are very cute imo and change colors!! Also, their communication is v rad and I love like...linguistics in animals omg.
Lemon: do you have any pets? what are their names?
unfortunately I don’t have any rn :c I had anoles, fish, and also two finches when I was a kid (my mom was allergic to almost everything else) but it’s been a long time!! I would love a cat though when I’m able to get my own place, hopefully soon enough.
2 notes
·
View notes
Photo

< Una Musica Può Fare > Stay strong, Italy💪🇮🇹 Live from #Decollatura (rigorosamente in quarantena!) @gigideg86 #mixer #music #flashmob #coronavírus #calabriameravigliosa #ig_italia #ig_calabria #igerscalabria #calabriadaamare #detail #stilllife #monochrome #blackandwhite #35_millimetri_lamezia #piccoloclubfoto #hopeandfaith #heartphotos #harusphotos (presso Decollatura) https://www.instagram.com/p/B9wygmIoUbfRg9F3Gv6cdRtKZYTPv-mgIgzQr80/?igshid=af0gyktj5hsa
#decollatura#mixer#music#flashmob#coronavírus#calabriameravigliosa#ig_italia#ig_calabria#igerscalabria#calabriadaamare#detail#stilllife#monochrome#blackandwhite#35_millimetri_lamezia#piccoloclubfoto#hopeandfaith#heartphotos#harusphotos
1 note
·
View note
Text
@mixer-in-monochrome replied to your post “@mixer-in-monochrome replied to your post “@mixer-in-monochrome ...”
Welp, :I I'm out of ideas, then. The serial code is elusive and probably doing this on purpose
im gonna put something there n put in the notes that we searched for it for 3 hours and that im willing to send photos of both the box and battery
4 notes
·
View notes
Photo

#monochrome #monochromephotography #photography #photooftheday #blackandwhite #blackandwhitephotography #truck #cementtruck #mixer #sky #clouds #cloudscape #workingclass (at London, Ontario) https://www.instagram.com/p/CmVQVq9M029/?igshid=NGJjMDIxMWI=
#monochrome#monochromephotography#photography#photooftheday#blackandwhite#blackandwhitephotography#truck#cementtruck#mixer#sky#clouds#cloudscape#workingclass
0 notes
Photo

My guess is crust (pizza)
11 notes
·
View notes
Text
Color Corrections & Color Fixes - In Post #548
Many of the photos I captured in Bryce Canyon needed a level of color correction or color adjustments. The warm earth tones of the hoodoos needed a little extra boost. Also, the shadowed areas of snow had a blue color cast that needed correction. I tried out Lightroom’s new Color Mixer tool to see how it handles these types of corrections … and I like this new tool very much. This is finally the HSL tool Lightroom users have long waited for.
The workflow using the Color Mixer is simple: use the eyedropper to pick a color in your photo, then use the sliders or color spectrums to adjust the hue, saturation, or luminance of the color. You can also control the range of the color selection, so the sliders affect more colors or fewer colors.
A very nice feature of the Color Mixer is the Visualize Range option. Turn this option on everything outside the specified color range switches to monochrome. You can work visually to see what elements in your photo are affected by the adjustment. Using Visualize Range is also an excellent method to fine tune your selected color and color range.
And … did you notice that you can work with multiple, different color ranges in the Color Mixer? Selecting a color from your photo adds a new swatch to the Color Mixer. You can move between swatches to adjust the results, too.
The Color Mixer also works with Lightroom’s masking tools. I didn’t need masking for the bulk of my Bryce photos - the color separation across the photos were distinct. Yet it is great that the Color Mixer is integrated into the masking tools. Finally Lightroom users have a proper, selective tool for adjusting hue, saturation, and luminance.
0 notes
Note
commodorez, will you show off that home setup you mentioned in that reblog
Gladly! Buckle up!

Here's the breakdown:
The main rack of equipment contains the following (from the top):
Knox RS16x16 composite video/audio router
Blackmagic Design Smart Videohub 20x20 3G-SDI video router (3G -SDI is equivalent to 1080p60)
Kramer VP-501XL UXGA (VGA at 1600x1200) to composite converter
CQ-900 Real Time Color Quad (allows 4 video composite video signals to be combined into one, spaced into 4 quadrants)
Extron AVT-100 tuner (for demodulating RF on old game systems)
Extron DVS-304 Scan Converter/Scaler (DVI version with SDI input option)
Videotek VSG-201D 601 Digital Sync Generator (barely used)
Digital Processing Systems Inc. DPS-220 TBC/Frame Synchronizer
Ubiquity Unifi 24 port gigabit switch (unrelated to video stuff)
Hidden behind the rack are a pair of Blackmagic Design signal converters: one SDI to Analog, and one Analog to SDI.
The RS16x16 takes center stage, since most standard definition signals and all of the audio routes through it. Here's the current router chart:

Video and audio on this router can be sent as a pair, or separately as I so choose. I control it via the front panel keypad and watch the status on the LED matrix, but I can also run it via RS232 in a terminal. I've been thinking of making my own control panel for it modeled after the NV9601.
Many of these sources are audio from my various computers, video and audio from vintage computers, connections for a game system or two, and some other oddities. The destinations are a few vintage computer monitors and some video encoder devices on my various desktops, which I control mostly from OBS.
The last 4 destinations are the CQ-900 Quad's inputs for video, and 4 faders on my AM500 Stereo Mixer for audio. This means I can pick 4 things and give each one a fader on the mixer:
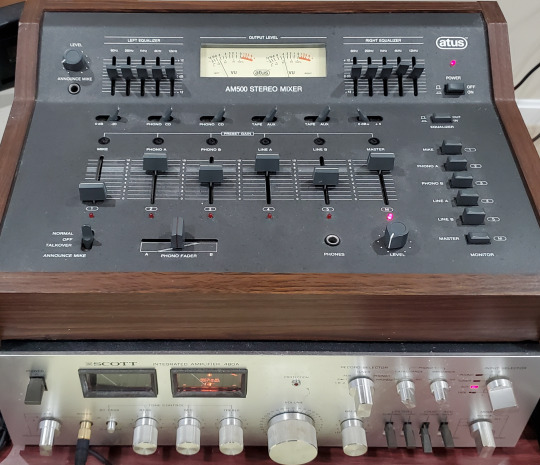
This is my Atus AM500 stereo mixer. The output of which runs to the Scott Integrated Amplifier 480A below, which runs to two sets of speakers in my workshop. I can have a video game running on one fader, audio from a voice chat on another, and music on a third. Works great for co-op games or streaming stuff.
Source/Destination #10 is labeled Bench, which is my workbench across the room:

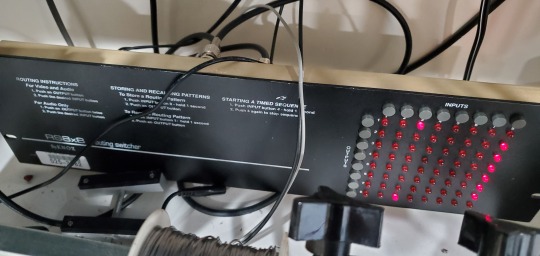
On the workbench I have a Knox RS8x8 composite video router hooked to a bidirectional tie line to the main RX16x16 router. This means I can send a signal over to the test equipment, or send something being tested on the bench over to the main router, and then to an encoder device. There's also an SDI line to carry the HD feed from one of my bench cameras over to the SDI router, but I don't always use that.
The workbench router doesn't have too much wired to it, so I haven't written up a chart. I've got two bench cameras, a small monochrome monitor, and a TV, plus the ability to run video cables directly to an oscilloscope.
Here's what it looks like behind the main rack:

Yeah. It's a mess, but it's always in flux, so I don't bother arranging the cables too neatly. I try to use BNC terminated cables whenever possible, but occasionally I have to use RCA adapters. Right now the TBC and the Sync Generator aren't wired up because I don't need them. I unplug the SDI router when I'm not using it because it's loud and obnoxious.
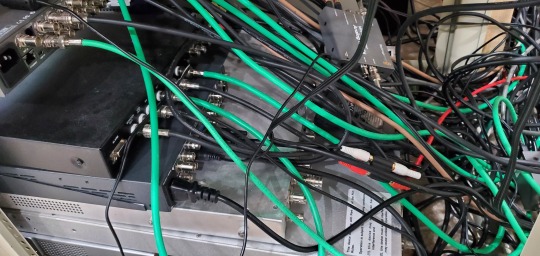
Most of this is surplus gear I got for cheap, mixed in with inexpensive new bits and pieces of things I scored online. I've got other equipment scattered about that I connect as needed. There are also video adapters you don't see here, and this doesn't even cover all of the various encoding hardware I have installed in my desktop computers.
So, that's my setup (as of right now). It will be different in a month, I'm sure.
39 notes
·
View notes
Text


she flap
#srb#btw thanks to mixer-in-monochrome for answering the questions i had about stimming#i didnt even know it was a common stim
506 notes
·
View notes
Text
EBS’s Neon Lights Tutorial
Hello! Here’s the tutorial for how I do my edits with lights. It’s relatively simple and should be possible on other photo editing programs (if not, let me know!).
I’m assuming people who don’t know much about photoshop might want to try, too, so it’s super detailed and long!

Lights Used: Here & Here
It’s possible to do this edit with different lights, but if the lights are more white, it will look different and may require more editing!
Video I got some of the technique from here
1. First, I usually edit the picture with an action, but for the tutorial we’ll just adjust the color. Sometimes the light bleeds too much on the sims, so I just adjust lightly until their skin tones look more natural.

2. Make a new layer, color select the lights, and paint over the area you want the light coming out of.
Here, I did all the lights on one layer since they are all about the same size and I want them to be the same brightness. Sometimes it’ll be better to do them one at a time. Here is an example with the screenshot hidden:

3. With the painted layer selected, go to Filter → Blur → Gaussian Blur. Adjust until it looks right.

4. Next, color select one of the lights, and then create a gradient fill layer.

5. Click OK on the first popup (the one where you can name the gradient), and then adjust on the Gradient Fill popup. Move the gradient around and mess with the style, angle, and scale until your happy.
It helps the lights affect the “environment”, so try to place the gradient where the light would be shining at/on. It might look too bright at first, but just make sure it’s in the right position.

6. Once you like it, click OK, and then change the blend mode to “Soft light” and Adjust the opacity.

7. Right-click on the gradient layer, and select “Duplicate”. On the new gradient layer, change the blend mode to “Lighten”. Adjust the opacity until you like it.
8. Repeat steps 4-7 with another light color (if you have one!). Here’s what we have so far:

9. Create a Color Mixer layer. Right click on the Color Mixer layer and click “Release Clipping Mask”.


10. On the layer, check the box that says “Monochrome”. Change the blend mode to “Soft light” and adjust the opacity. It should look similar to the image below.
After placing the Color Mixer, some of your lights may be wash out. If they are, create more of the gradient layers in steps 4-7 on top until its right.

12. Create another Color Balance layer, and adjust the levels of the shadows, midtones, and highlights to make everything pop 🤩

11. You’re pretty much done! I add a little shadows and highlighting to the sims. Here’s the full pictures for comparison:


All done!! Let me know if you have any questions 🥰
30 notes
·
View notes