#making them from scratch probably involves a lot of work and a laser cutter or smth
Explore tagged Tumblr posts
Visit Tumblr Blog
Explore Tumblr blogs with no restrictions, modern design and the best experience.
Last Seen Tumblr Blogs


Fun Fact
70% of Tumblr users say the Dashboard is their favorite place to spend time online.
Note
Hey Beth! Love the Constantine keychains! Do you think you can make like a tutorial on how to make keychains? I’ve been thinking on doing that with my art but idk how to do that? Love your art and keep doing it! You’re amazing!
Aw thank you, anon!! I worked with a manufacturer to make my keychains so I can't exactly give a beginning to end process of how they're made, but I can tell you I used the company vograce to produce my keychains! I believe a majority of acrylic keychains you can find online are made thru these guys. They're very good!
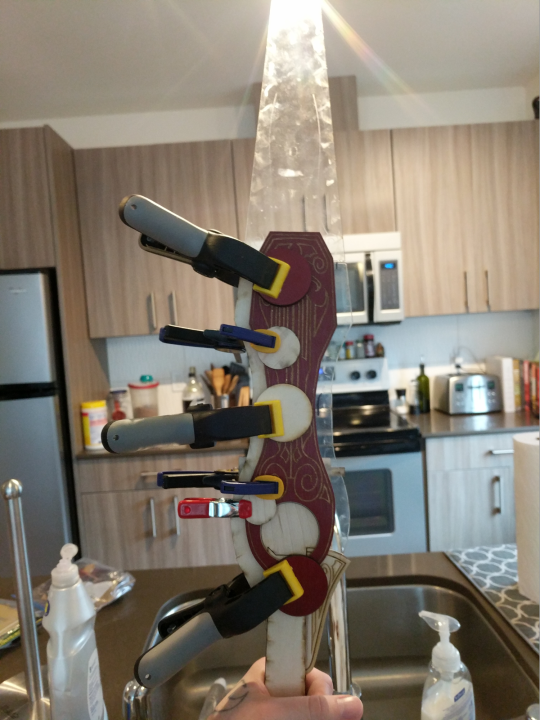
I had a prototype sample made first, which helped give me an idea of how the product looked and what to do to make it better.
Sample on the left vs final on the right

It's really just a matter of making the artwork and formatting it correctly for print then sending it off to be made!
#shut up beth#making them from scratch probably involves a lot of work and a laser cutter or smth#would be awesome to be able to do that but for a small scale thing like this going thru a 3rd party is just the most cost effective way
11 notes
·
View notes
Text
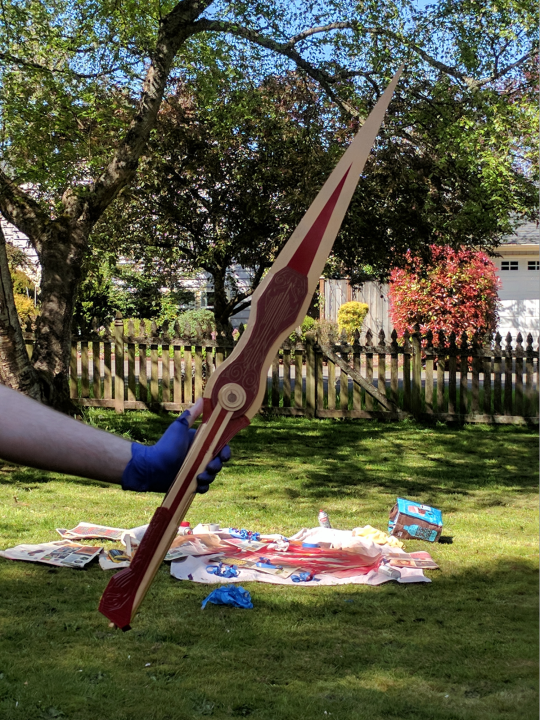
Building Pyrrha’s sword: Miló
so when i first started planning out this costume at the beginning of the year, i jokingly told my friend she could make me a sword to go with it...........& then she actually did it. yay for friends who encourage each other to take on ambitious builds! you can find thea at her website & on twitter
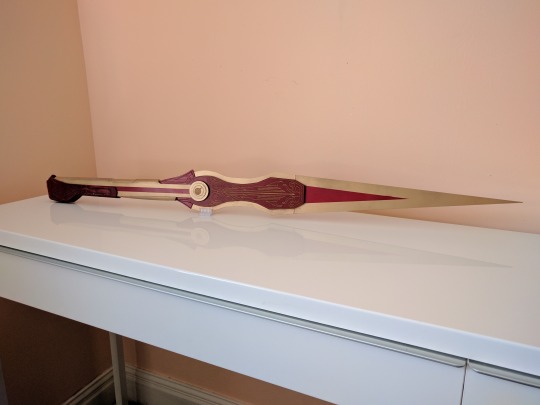
Creating a replica of Pyrrha’s sword was quite a challenge. As this is the first real prop that I’ve designed and built from scratch, I had to learn a lot of techniques and skills to pull off something convincing. This post attempts to document the build process, tools, and techniques used to create this prop.
Part one: research & references
My first step was to figure out what this sword looks like and how I wanted to bring it to life. I had to get a sense of the size, shape, and colors used and how I would map those into the real world. This requires research and collecting references. It’s important to gather references that show multiple angles so you get a sense for all three dimensions. It’s also useful to get references from multiple sources because it might show the item in a different style which sometimes makes it easier to decide how the item should look in real life.
The easiest and most obvious set of references are just using screenshots from the show, like these:
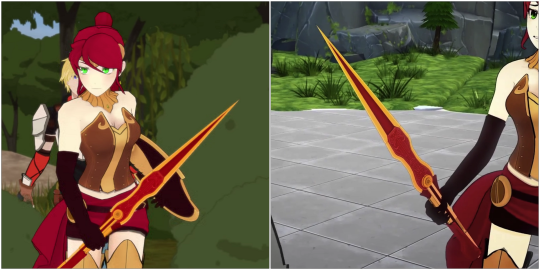
(Source: Rooster Teeth)
RWBY in particular is a great resource for references. The show is 3D animated, so the items generally have plausible construction and proportions.
While researching I also found that the late Monty Oum provided clean references for all the RWBY characters on his Facebook:
(Source: Monty Oum)
The references so far are probably enough to start building, but I didn’t think that the colors used in the show would translate well into real life. After all, RWBY intentionally uses a simplified art style with bold color and sharp lines. So this is where I started looking for “non-canonical” references - fan art and other cosplays.
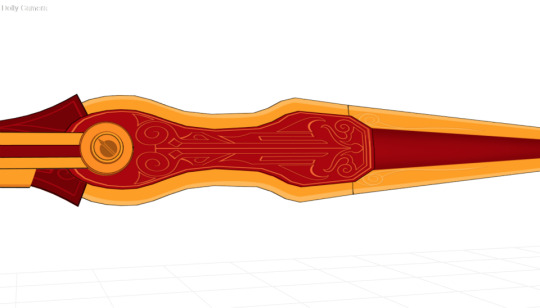
In some fan art, Pyrrha is rendered more in gold than yellow and the crimson is lightened up a bit:

(Source: Infinote on DeviantArt)
Sheena Duquette did an excellent 3D-printed version of Milo that used a significant amount of gold:
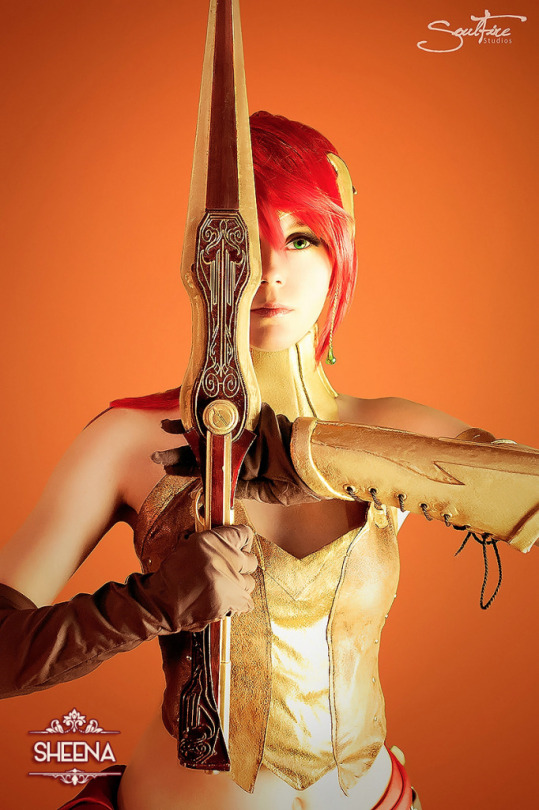
(Source: Soulfire Photography)
With these references in mind I could start designing and prototyping.
Part two: designing & prototyping
Now that I have some idea of what I want it to look like, I needed to design it and figure out how I want to build it. My design is very influenced by the tools available to me. I live in an apartment, I don’t have access to significant woodworking equipment, but I do have access to a small makerspace at work with a laser cutter and 3D printer. How you design and build a prop is so incredibly dependent on what tools and skills you have access to. If I had access to proper woodworking equipment like a CNC router, this would have been a significantly different build.
I designed this prop to build constructed out of layers of laser cut wood with a few 3D-printed embellishments.
Since I’m designing this for laser cutting, I designed everything in vector layers using Affinity Designer (I’ve seen other people use Illustrator or even InkScape). The first thing I did was use the references to create a rough outline of the sword and laser-cut a prototype to test the size:
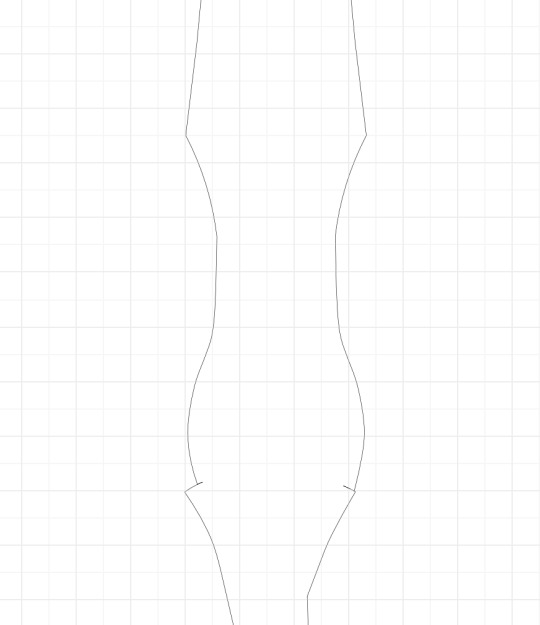
(Rough outline in Affinity)
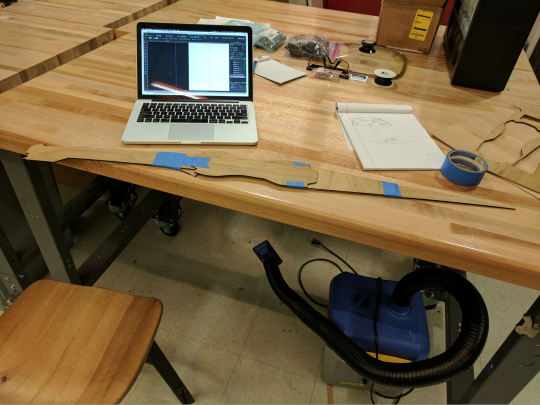
(Laser-cut size test out of cheap plywood)
I could have actually just used paper for the size test, but I was still learning the ins and outs of using the laser cutter and this was a good way for me to get used to the materials and processes involved. I decided after this that the sword was too big so I scaled everything down by 15% and cut a new size test - it seemed perfect to me at that point.
The next step was to start designing all of the layers and embellishments on those layers. I designed most of the layers initially with the material that was readily available to me at the makerspace: cheap 2.8mm plywood. You can see the layer vectors as different colors here:
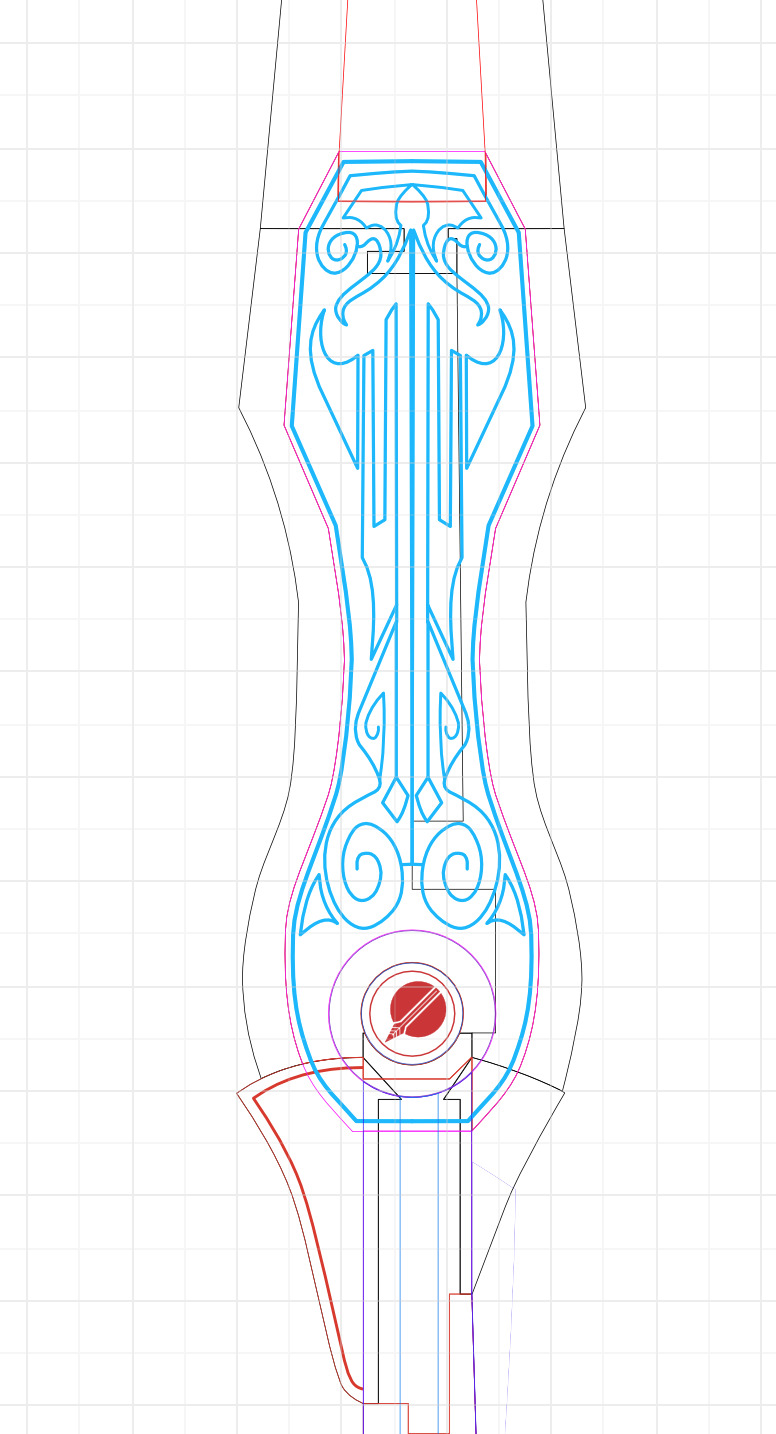
(Layers in Affinity)
Due to the size limitations of the laser cutter and material size, I actually designed some of the layers to be cut in separate pieces. These pieces fit together like puzzle pieces:
(One layer with multiple parts in Affinity)
While designing the layers I printed several prototypes and dry fit them and improved the design. I went through about eight or so iterations before I felt comfortable with the design enough to do the final build.
(Dry fit of a prototype)
During this time I also designed a way for the sword’s blade to be removable to help with transportation. I didn’t get any pictures of this during the prototype, but there’s an explanation of it in the build section.
Once I felt comfortable with the prototype, I glued it all together to get a feel for what the final build would look and feel like.
(The final prototype assembled)
Note that I didn’t design or prototype any of the 3D parts at this stage. Since they’re all part of the “back” of the sword they could be just attached on later. I also wanted to get the final assembled laser cut parts so that I could accurately measure the dimensions of the real object to better design the 3D part.
Step three: building
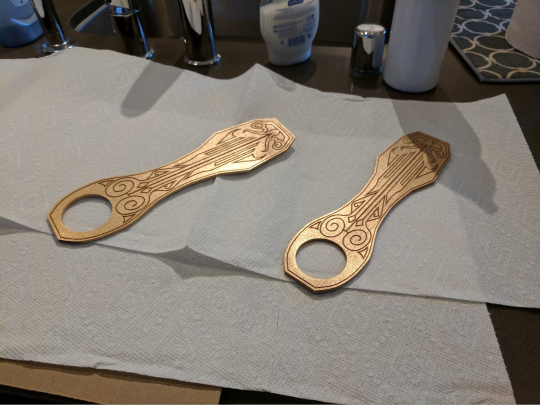
Now it’s time to build this thing. During the prototypes, I decided that the cheap plywood wasn’t going to be acceptable for the final product. I decided to use 1/8" and 1/16” maple stock (from Inventables) for the final build. I used the 30W Epilog Zing 16 laser in the makerspace to cut and engrave all of the pieces out of the stock.
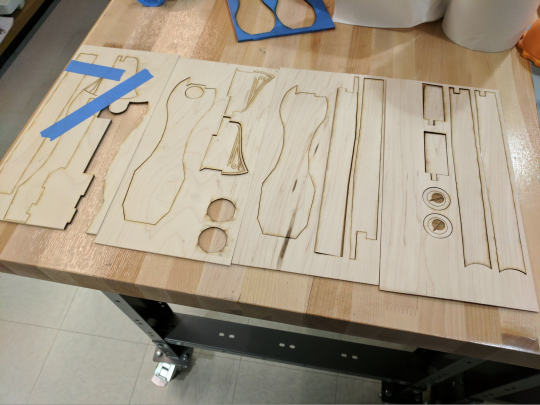
(Laser-cut and engraved parts)
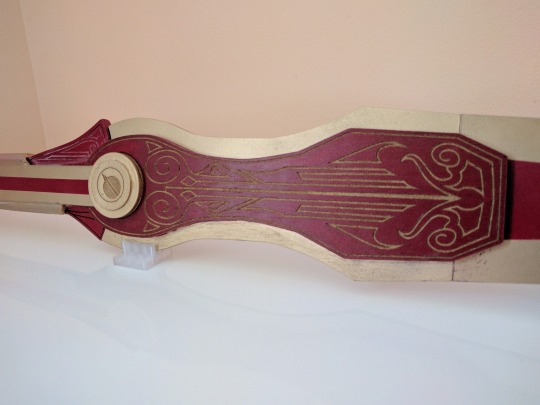
During this time I also had to figure out how to do the gold design in the middle of the sword. I wasn’t content with just stenciling in a flat design, so I decided I wanted to engrave and color fill it. It took me ages to figure out an incredibly simple and low-tech solution to this. First, I painted some stock red and covered it in masking tape:
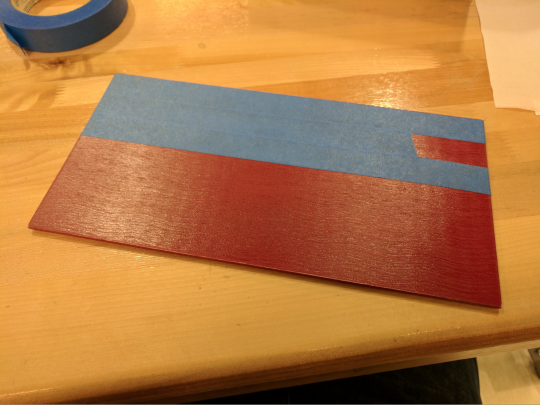
(Red-painted maple stock)
Then, I engraved through the masking tape, paint, and stock. I did this in multiple passes with low power to avoid burning the wood and tape:
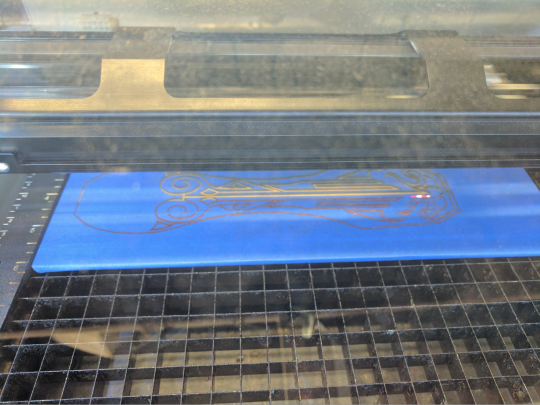
(laser cutter engraving the design on the stock)
(The engraved and masked pieces)
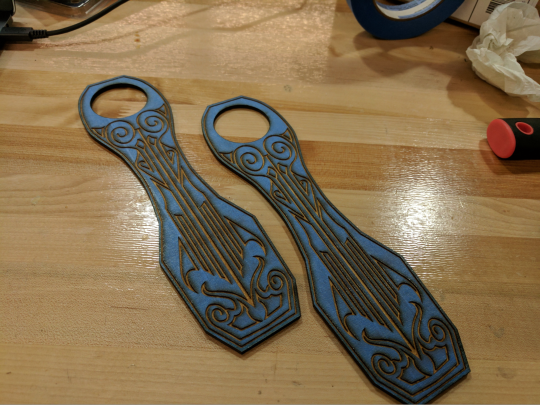
Now that I essentially engraved a paint mask, I used gold spray paint to do the color fill:
(gold-painted parts)
Then, I carefully peeled off the masking tape:
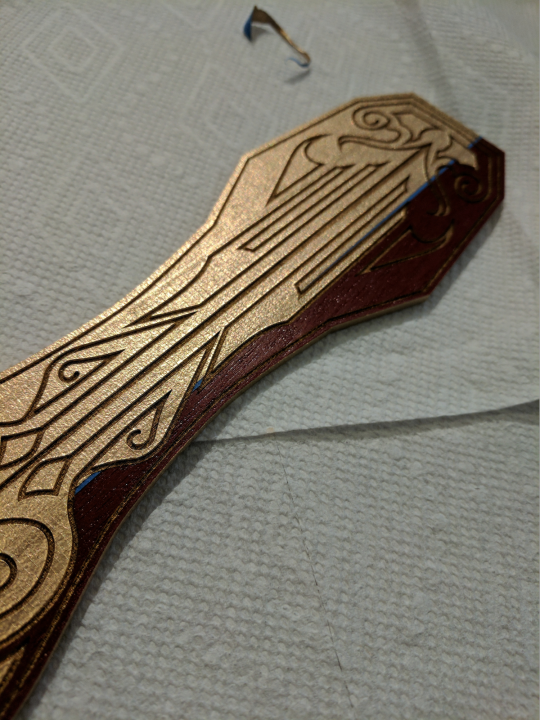
(Masking tape in process of being removed)
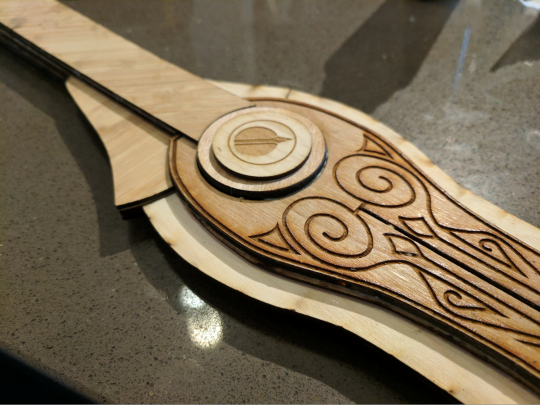
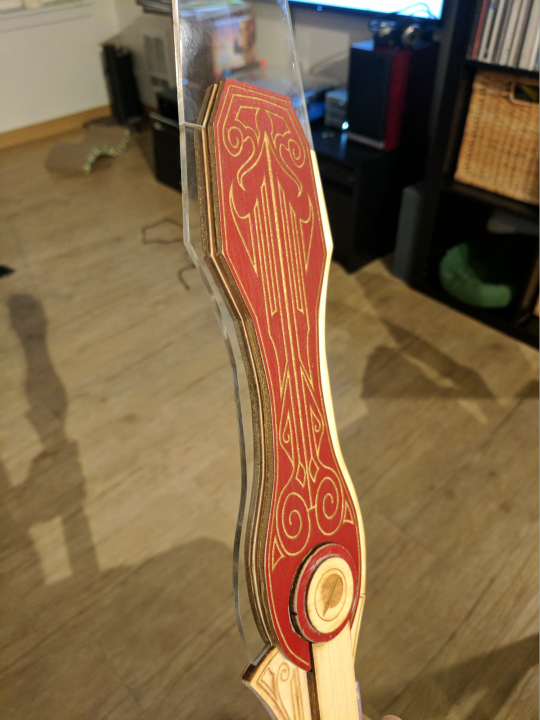
And then I had two beautiful color-filled parts:
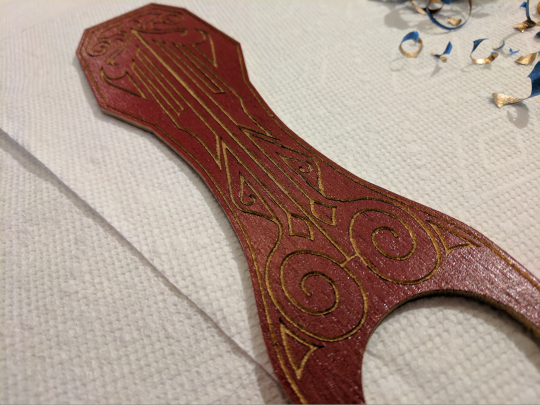
(The finished part, finally!)
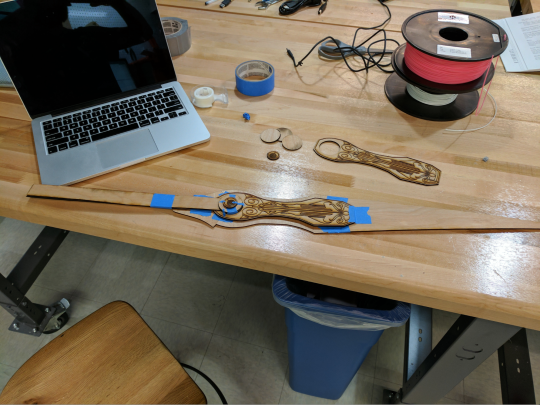
With all the laser-cut parts ready, I did a dry-fit of everything to make sure it all worked:
(Dry-fit: looking good!)
Now the fun part: wood-gluing everything together:
(Making good use of the hundreds of clamps I bought for this)
It felt really great to hold this in my hands once it was completely glued:
(Assembled!)
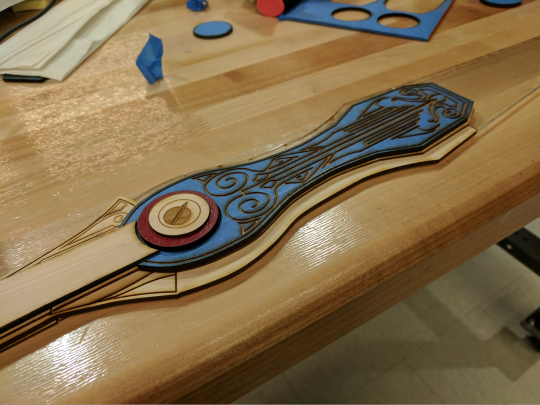
The last part of this step of the build was to finish the blade removal mechanism.

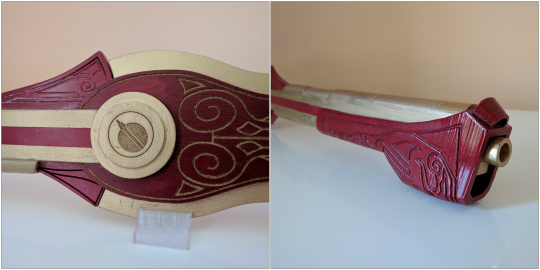
(Blade locking mechanism and cover)
There’s a circle in the center under one of the emblems that works as a lock that's screwed into place. This locks the central blade, and the central blade in turn locks the main blade. The emblem is removable and is held in place using a couple of magnets (which I did number incorrectly, whoops). Fun story, when I first placed in the magnets I had the acrylic middle blade in place as you see here. I accidentally drilled into the acrylic and partially glued the magnets to the acrylic. That was a huge pain to fix- it involved a putty knife and lots of swearing.
Step four: 3D printing
Now that I had the finalized laser-cut parts all assembled and ready to go, it was time to create the 3d-printed embellishments.
The first thing I printed was the parts that comprised the barrel. I designed these using OpenSCAD and some simple formulas.
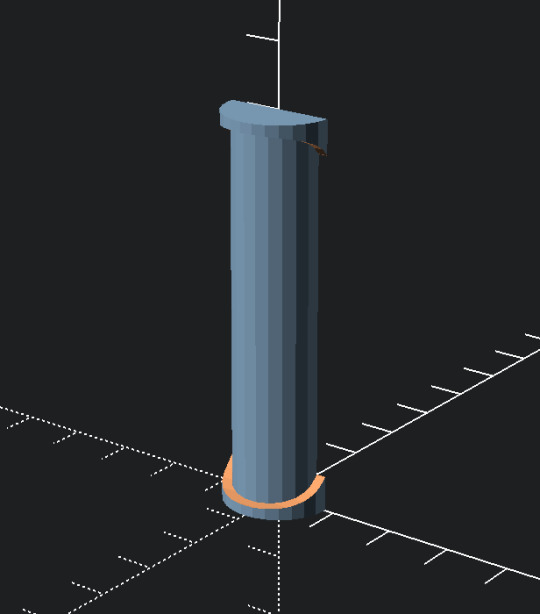
(Middle barrel part in OpenSCAD)
I printed them in PLA on my adorable but powerful Lulzbot Mini. I then glued to the main prop using tacky glue and then blended them in with wood filler and some super-glue.
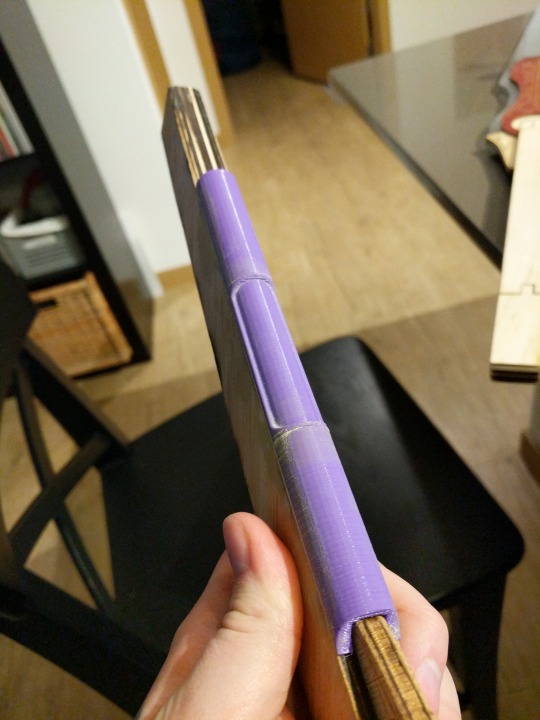
(Barrel piece glued onto the prop)
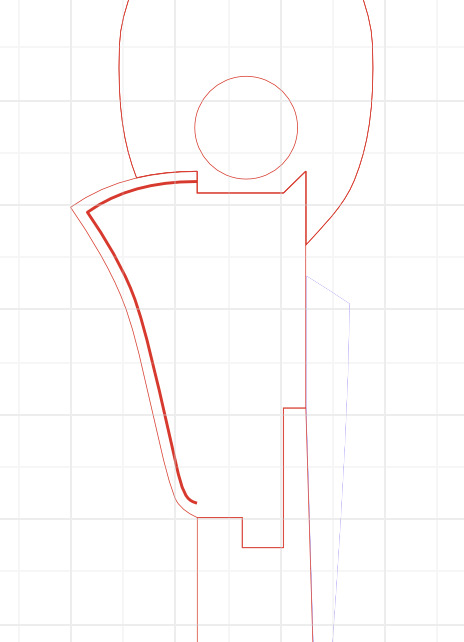
Now for the most difficult part: the barrel cover. I am by no means a 3D artist - I barely know how to use 3D software at all. However, I did use some CAD software in high school, so I’m practically an expert, right? I used Affinity to draw the outline of the barrel cover then used Fusion 360 to model it into the part. I used measurements directly from the real prop to make sure this was designed to fit exactly.
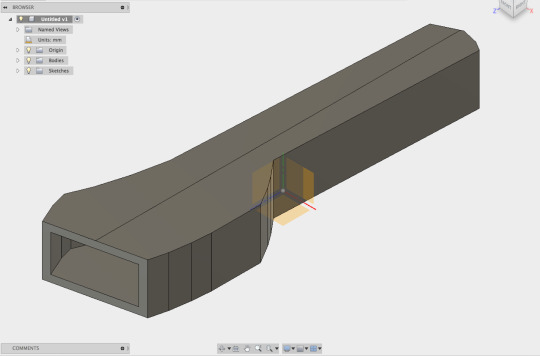
(The basic barrel cover shape in Fusion 360)
I printed this basic shape to make sure it fit and then started to figure out how to do the engravings on this part. This was actually the most frustrating part for me. Fusion 360 kept freezing and crashing which was extremely frustrating. I’m not sure if my Macbook is just too wimpy to handle serious CAD work, but it was baffling to me that such a seemingly simple part was causing Fusion 360 so much trouble. Eventually, I found a hint online about disabling build history which allowed me to actually finish the part and all of the engravings without ripping my hair out and throwing my computer across the room.
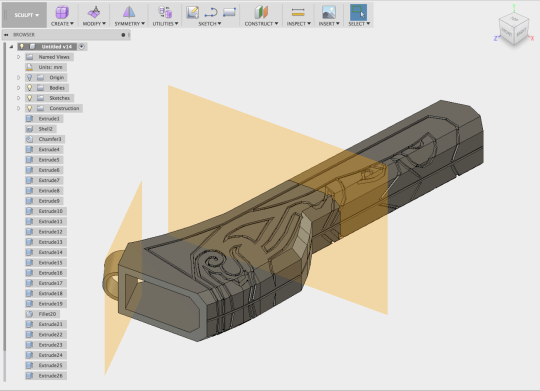
(The final design in Fusion 360, sliced up into three parts so it’ll fit on my Lulzbot Mini)
With the design complete, I printed it. My Lulzbot churned out the three parts over two days and it came out fantastic:
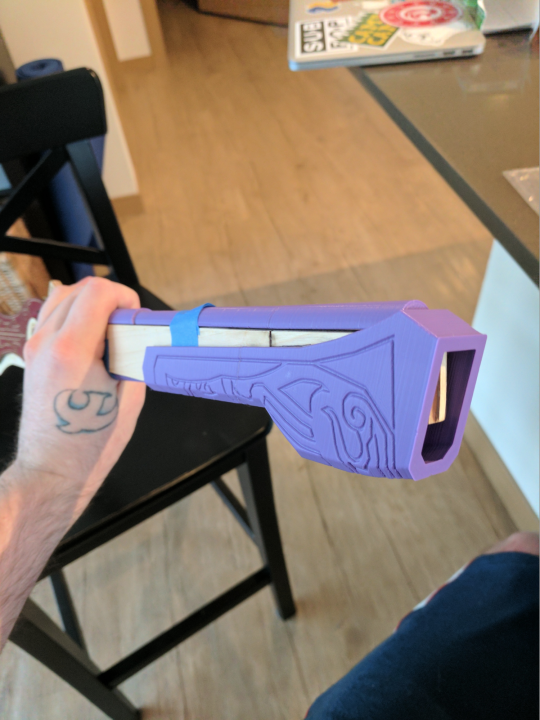
(It’s BEAUTIFUL)
With all that done, all I needed was the little barrel poking out at the end. I whipped that up in OpenSCAD.
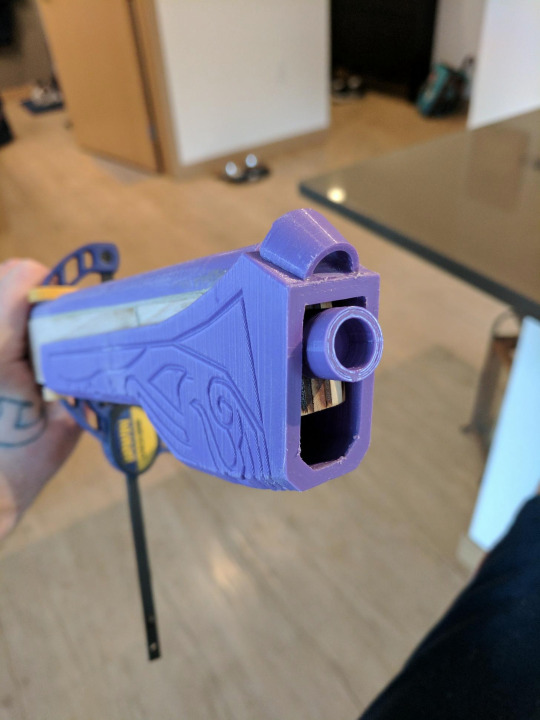
(Barrel and trigger glued in place)
Step five: painting
With the prop assembled, I spent a few days sanding and filling various parts to prepare it for painting. Because of limited space, I choose to use spray paint for this and paint at a friend’s house. I used Krylon ColorMaster spray paints. I painted the whole thing with a gray primer, then painted the gold sections, then masked and painted in the red sections. I finished the whole thing with a pass of clear coat.
(It’s painted!)
While the 3D design was the most frustrating, the outcome of the painting was the most disappointing to me. While I think the paint job is okay, I think I can do much much better. I felt rushed because I was borrowing another person’s space (despite them being wonderful and accommodating) and it was hot outside (I had a nasty sunburn from doing this). I was also really disappointed in how little control I felt I had over the spray paint. In the future I want to use an airbrush, but I don’t presently have the space for it.
Final thoughts
This was an incredibly ambitious item to try to build as my first prop. I’m honestly really proud of the outcome and I can’t wait to build my next prop. I learned so much about laser cutting and a little bit about 3D printing. I learned that I suck at painting. I learned that it’s critical to understand your tools and skills while designing your prop. I learned that I really wanna get access to proper woodworking and painting equipment. Hopefully someone else finds this build log useful- good luck!
2 notes
·
View notes
Text
I just got trash talked and I had to share.
I got someone talking shit about my chainmail in a personal note over on Etsy, and I ended up writing way too involved a response. I probably should’ve just responded with “How about you go order a steaming plate of Go Fuck Yourself to go.” But I was in A Mood, so I wrote like a whole essay about my standards and priorities as a craftsperson. And I kind of like to share those sorts of things publicly from time to time, so here you go. If anyone else would like to send some trash talk at me, feel free to try your luck.
[Redacted]:
www.etsy.com/listing/78305616/european-6-in-1-bracelet-stainless-steel
with all your talk about precision lasers and whatnot, what explains the presence of pinch-cut rings on your pieces, the ugliest and least precise way of producing jump rings (never mind the gaps and bad closure i see)?
Hi [Redacted].
You seem angry about this. I'll try to address the different points you brought up:
• I'm not drawn to laser cutters because of some fetishization of precision. I'm drawn to them because they allow me to make things that would not be possible otherwise. But laser cutters and chainmail have basically nothing to do with each other, so that's a whole different conversation.
• When crafting items to sell, there is a balance one must find between the time put in and the price a customer will pay for it. With chainmail, a customer may notice sloppy work if the rings are not closed in-plane and they scratch a bit. But once you're at an acceptable solid level of quality, there's no reason to put in extra anguish if it doesn't improve the customer's experience of the product. Put simply, it's not about absolute perfection, it's about efficiency and managing your standards.
• I don't consider the shear-cut rings I use to be ugly. People on chainmail forums may deride them and extol on the virtues of saw-cut rings, but honestly I don't mind them. As a matter of principle, I'm totally fine seeing evidence of how an item was made, and that's how I think of the pinching at the shear points of these rings.
• Back when I started chainmail I was hand-wrapping and cutting rings with wire cutters. Sometimes I would slip up and get some variations in ring sizes, but I was pretty accurate at cutting straight along the coil to produce pretty consistently-sized rings. But as soon as I started selling stuff, I switched to buying pre-cut rings from The Ring Lord, and I've never detected any variation in size between rings. Their manufacturing tolerances are good.
• Also, saw-cut rings are more expensive than shear-cut rings, and I don't think they're worth it.
• The vast majority of the chainmail I make is larger costume pieces, usually with scales, where the rings aren't even visible. There's no reason to use saw-cut for those. I sell a decent number of the small scale bracelets, but I sell very few ring-mail jewelry pieces. Even if I did want saw-cut rings for jewelry, for the amount that I'd use them, it's really not worth stocking them.
• A couple times I did get some saw-cut rings. What I found was that they were more prone to being scratchy. The metal at the cut point on the shear-cut rings is bent inwards a bit, so the joint is rounded over. But the edge of the saw cut is sharp, so a minuscule error in closure is immediately evident because it scratches. And even if your closures are perfect, sometimes the rings have little burs poking out parallel with the cut, which will scratch no matter how long you spend exquisitely closing your rings. That sucked, and I didn't order saw-cut rings again after that.
• My closures are fine. I hold myself to a pretty high standard when I close rings. If the ring isn't springing closed, pushing itself to close harder than flush, I worry that a scale will eventually force its way in and open it up. I've never had that happen, but that's why I'm careful.
• When I see other chainmail people at craft fairs, I silently judge their closures. I'm frequently disappointed. The worst disappointment was a guy who sells lots of ring mail at a fantasy convention that's in Boston every year. He uses like 12 gauge 1/2" diameter aluminum rings. Really big. And he will boast about working out a fast method of opening and closing rings with only one pair of pliers. But his closures are shit. None of the rings touch themselves, some of them there's up to like 1/16 inch of a gap. But you know what? He sells big armor pieces. Nobody is looking at them that closely. They're closed well enough that there isn't a danger of rings slipping loose. It's not affecting the function or appearance of his product. It doesn't matter.
I'm assuming you're learning chainmail yourself. A layperson wouldn't have the vocabulary, and someone who had been doing it for a long time would have more tact. My advice to you is to keep looking at other people's work and thinking of how you could do better. That's how you improve. Think of what matters to you, what you want to optimize, what you want to explore. Myself, I care about making an impact with unique designs, especially with larger costume pieces. Some people really love working really small, making micro mail with tweezers. Some people are drawn to ornament, mixing weaves together with lots of draping chains. If you're drawn towards perfection of technique, maybe you'd want to make high price-point pieces in precious metals, maybe even exploring soldering each ring closed. When you have a goal or direction in mind, you can fit your own methods to that goal. And you realize that other people have different priorities, different optimizations.
Oh, and it may please you to know that in the full decade that I've been making chainmail, I truly cannot think of another person before you who has trash talked my work. Congratulations on being the first.
Feel free to let me know if you have any other questions!
-Jesse
19 notes
·
View notes